> ## Documentation Index
> Fetch the complete documentation index at: https://koreai.mintlify.site/llms.txt
> Use this file to discover all available pages before exploring further.
# External Models
Connect and manage models hosted outside AI for Process, including provider-hosted models from OpenAI, Anthropic, Google, Cohere, and Amazon Bedrock, as well as custom models via API integration.
The **External Models** tab in the Models section lets you connect models hosted outside AI for Process. Once connected, these models are available in Prompt Studio, Workflows, Model Traces & Analytics, Audit Logs, and Billing.
You can connect external models in two ways:
* **Easy Integration** - Guided setup for OpenAI, Anthropic, Google, Cohere, or Amazon Bedrock.
* **API Integration** - Custom model connection using an API endpoint, authentication, and request configuration.
## View External Models
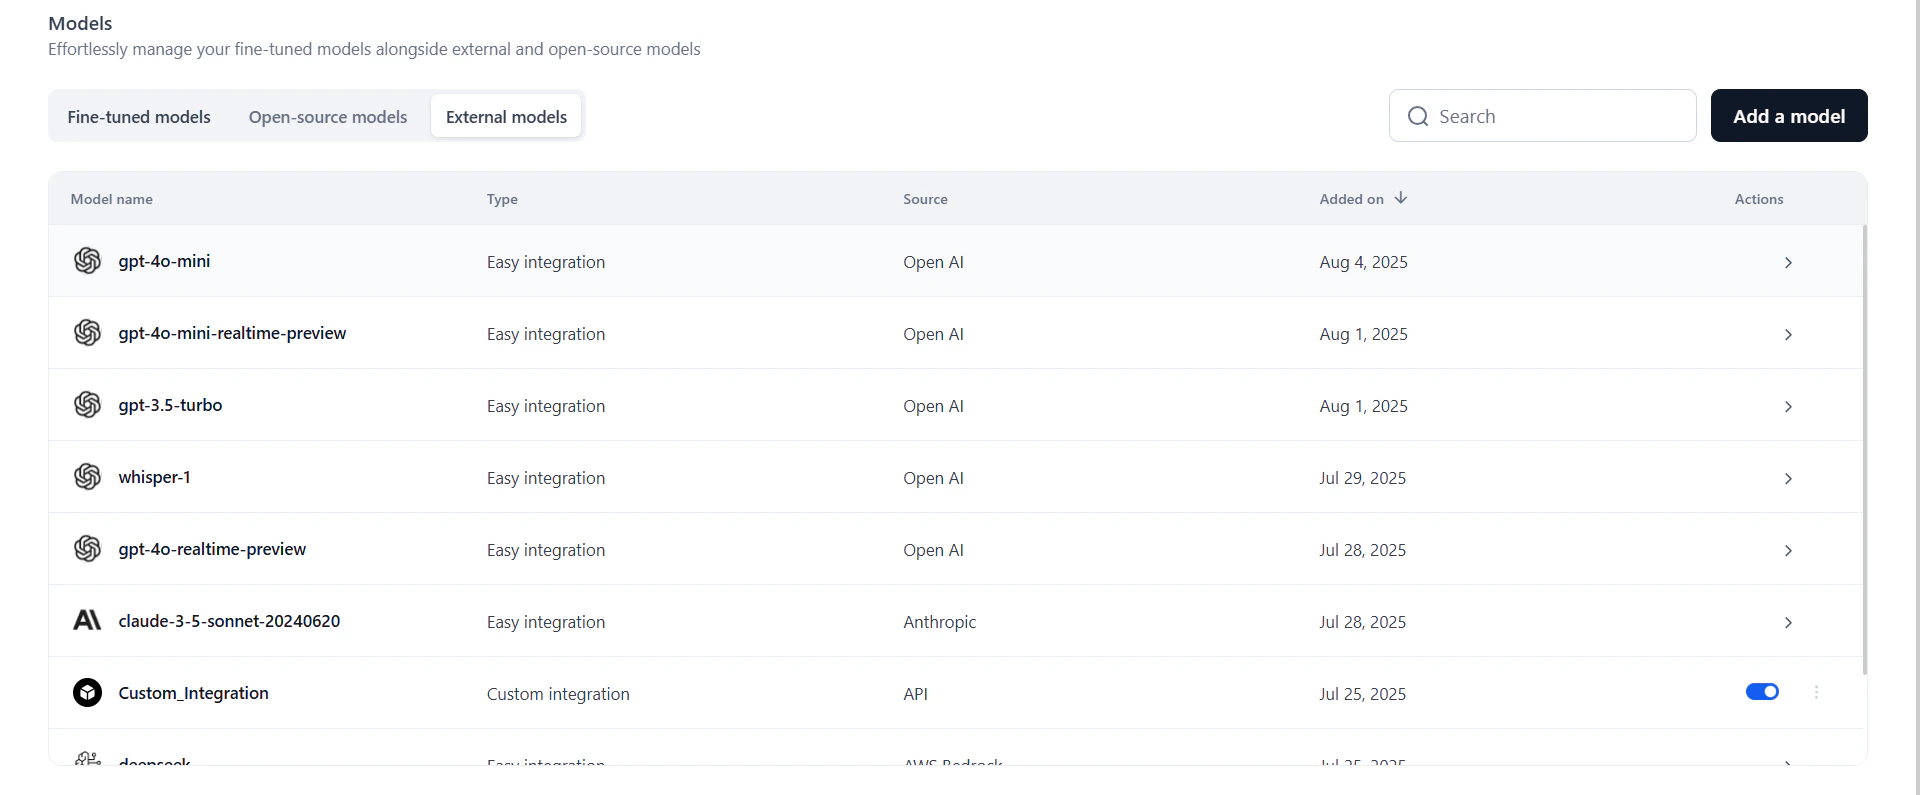
The **External Models** tab lists all models connected to your workspace via Easy Integration or API Integration.
| Field | Description |
| ---------- | -------------------------------------------------------------------- |
| Model Name | Name assigned during integration. |
| Type | Whether the model was added via Easy Integration or API Integration. |
| Source | The provider or origin (for example, OpenAI, Hugging Face, Custom). |
| Added On | Date the model was last added or updated. |
Click a model to view or manage its connections.
 ## Add an External Model
### Easy Integration
Use Easy Integration to connect models from OpenAI, Anthropic, Google, Cohere, or Amazon Bedrock via a guided setup.
#### Integrate with OpenAI, Anthropic, Google, or Cohere
1. Click **Models** in the top navigation bar.
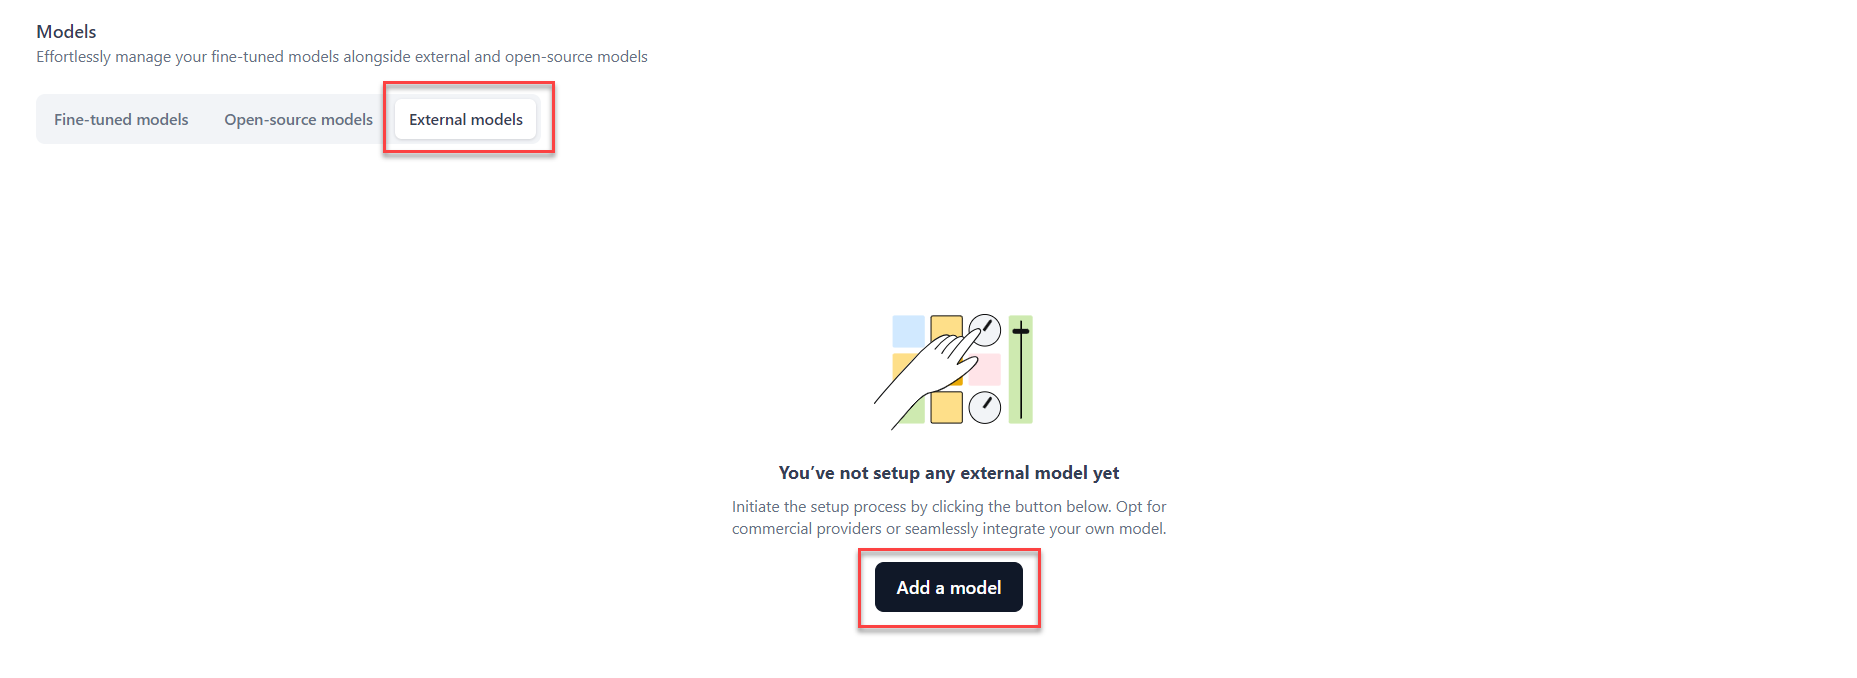
2. Go to the **External Models** tab and click **Add a model**. The **Add an external model** dialog opens.
## Add an External Model
### Easy Integration
Use Easy Integration to connect models from OpenAI, Anthropic, Google, Cohere, or Amazon Bedrock via a guided setup.
#### Integrate with OpenAI, Anthropic, Google, or Cohere
1. Click **Models** in the top navigation bar.
2. Go to the **External Models** tab and click **Add a model**. The **Add an external model** dialog opens.
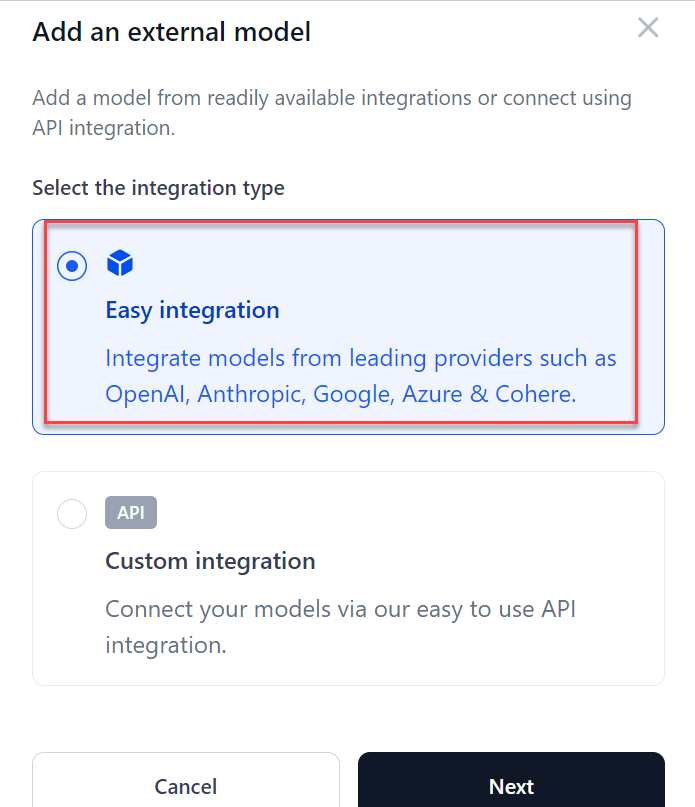
 3. Select **Easy integration** and click **Next**.
 4. Select a provider and click **Next**. See the full [list of supported models](/ai-for-process/models/supported-models).
5. Select a model and click **Next**.
6. Enter the API key from your provider and click **Confirm**.
The model is added and appears in the External Models list.
* To edit or delete a model, click the three-dot icon next to its name.
* Use the **Inferencing** toggle to enable or disable the model across AI for Process. If the toggle is off, selecting the model in the playground returns an error that the model is not active.
#### Configure Amazon Bedrock Access
Before integrating Amazon Bedrock models, set up IAM credentials in your AWS account. This enables secure cross-account access using AWS STS.
**Create the IAM Role and Trust Policy**
Create an IAM role in your AWS account with permission to invoke Bedrock models. For guidance, see the [AWS IAM role creation guide](https://docs.aws.amazon.com/IAM/latest/UserGuide/id_roles_create.html) and [AWS IAM policy examples for Bedrock](https://docs.aws.amazon.com/bedrock/latest/userguide/security_iam_id-based-policy-examples.html).
Assign the following permissions to the role:
```json theme={null}
{
"Version": "2012-10-17",
"Statement": [
{
"Effect": "Allow",
"Action": [
"bedrock:InvokeModel",
"bedrock:ListFoundationModels"
],
"Resource": "*"
}
]
}
```
Set the trust policy to allow AI for Process to assume the role. Replace `` with the AWS account ID provided by the platform:
```json theme={null}
{
"Version": "2012-10-17",
"Statement": [
{
"Effect": "Allow",
"Principal": {
"AWS": ""
},
"Action": "sts:AssumeRole"
}
]
}
```
For private or on-premises deployments, point the trust policy to your internal AWS IAM role.
Use the STS endpoint for the region where your IAM role resides. For the full list, see [AWS STS endpoints](https://docs.aws.amazon.com/general/latest/gr/sts.html). For example: `https://sts.us-east-1.amazonaws.com/`. The STS region must match the IAM role's region, not necessarily the model's region.
**Register Your IAM Role**
After creating the IAM role, raise a support ticket to register it with AI for Process:
1. Submit a support ticket with your IAM Role ARN, requesting that it be added to the trust policy.
2. Wait for confirmation from Support that the role has been registered.
Without this step, the platform cannot assume your IAM role. Both your AWS account and the Kore.ai environment must explicitly trust each other for secure cross-account access.
**Find the Model ID and Region**
The Model ID format depends on how the Bedrock model is deployed:
* **Base foundation models**: Use the standard model IDs from the [AWS supported models list](https://docs.aws.amazon.com/bedrock/latest/userguide/models-supported.html).
* **Marketplace-deployed models**: Go to **Bedrock Console → Model Access → Subscriptions** and locate the Model ARN. Enter only the model name after `foundation-model/`. For example, from `arn:aws:bedrock:us-east-1::foundation-model/your-model-id`, enter `your-model-id`.
* **Models with inference profiles (provisioned throughput)**: Go to **Bedrock Console > Provisioned Throughput**, copy the Inference ARN or ID (for example, `bedrock:provisioned-model-inference/my-throughput-id`), and enter `my-throughput-id` in the **Model ID** field.
#### Integrate with Amazon Bedrock
Complete [Configure Amazon Bedrock Access](#configure-amazon-bedrock-access) before these steps.
1. Click **Models** in the top navigation bar.
2. Go to the **External Models** tab and click **Add a model**.
3. Select **Easy integration** > **AWS Bedrock** and click **Next**.
4. Select a provider and click **Next**. See the full [list of supported models](/ai-for-process/models/supported-models).
5. Select a model and click **Next**.
6. Enter the API key from your provider and click **Confirm**.
The model is added and appears in the External Models list.
* To edit or delete a model, click the three-dot icon next to its name.
* Use the **Inferencing** toggle to enable or disable the model across AI for Process. If the toggle is off, selecting the model in the playground returns an error that the model is not active.
#### Configure Amazon Bedrock Access
Before integrating Amazon Bedrock models, set up IAM credentials in your AWS account. This enables secure cross-account access using AWS STS.
**Create the IAM Role and Trust Policy**
Create an IAM role in your AWS account with permission to invoke Bedrock models. For guidance, see the [AWS IAM role creation guide](https://docs.aws.amazon.com/IAM/latest/UserGuide/id_roles_create.html) and [AWS IAM policy examples for Bedrock](https://docs.aws.amazon.com/bedrock/latest/userguide/security_iam_id-based-policy-examples.html).
Assign the following permissions to the role:
```json theme={null}
{
"Version": "2012-10-17",
"Statement": [
{
"Effect": "Allow",
"Action": [
"bedrock:InvokeModel",
"bedrock:ListFoundationModels"
],
"Resource": "*"
}
]
}
```
Set the trust policy to allow AI for Process to assume the role. Replace `` with the AWS account ID provided by the platform:
```json theme={null}
{
"Version": "2012-10-17",
"Statement": [
{
"Effect": "Allow",
"Principal": {
"AWS": ""
},
"Action": "sts:AssumeRole"
}
]
}
```
For private or on-premises deployments, point the trust policy to your internal AWS IAM role.
Use the STS endpoint for the region where your IAM role resides. For the full list, see [AWS STS endpoints](https://docs.aws.amazon.com/general/latest/gr/sts.html). For example: `https://sts.us-east-1.amazonaws.com/`. The STS region must match the IAM role's region, not necessarily the model's region.
**Register Your IAM Role**
After creating the IAM role, raise a support ticket to register it with AI for Process:
1. Submit a support ticket with your IAM Role ARN, requesting that it be added to the trust policy.
2. Wait for confirmation from Support that the role has been registered.
Without this step, the platform cannot assume your IAM role. Both your AWS account and the Kore.ai environment must explicitly trust each other for secure cross-account access.
**Find the Model ID and Region**
The Model ID format depends on how the Bedrock model is deployed:
* **Base foundation models**: Use the standard model IDs from the [AWS supported models list](https://docs.aws.amazon.com/bedrock/latest/userguide/models-supported.html).
* **Marketplace-deployed models**: Go to **Bedrock Console → Model Access → Subscriptions** and locate the Model ARN. Enter only the model name after `foundation-model/`. For example, from `arn:aws:bedrock:us-east-1::foundation-model/your-model-id`, enter `your-model-id`.
* **Models with inference profiles (provisioned throughput)**: Go to **Bedrock Console > Provisioned Throughput**, copy the Inference ARN or ID (for example, `bedrock:provisioned-model-inference/my-throughput-id`), and enter `my-throughput-id` in the **Model ID** field.
#### Integrate with Amazon Bedrock
Complete [Configure Amazon Bedrock Access](#configure-amazon-bedrock-access) before these steps.
1. Click **Models** in the top navigation bar.
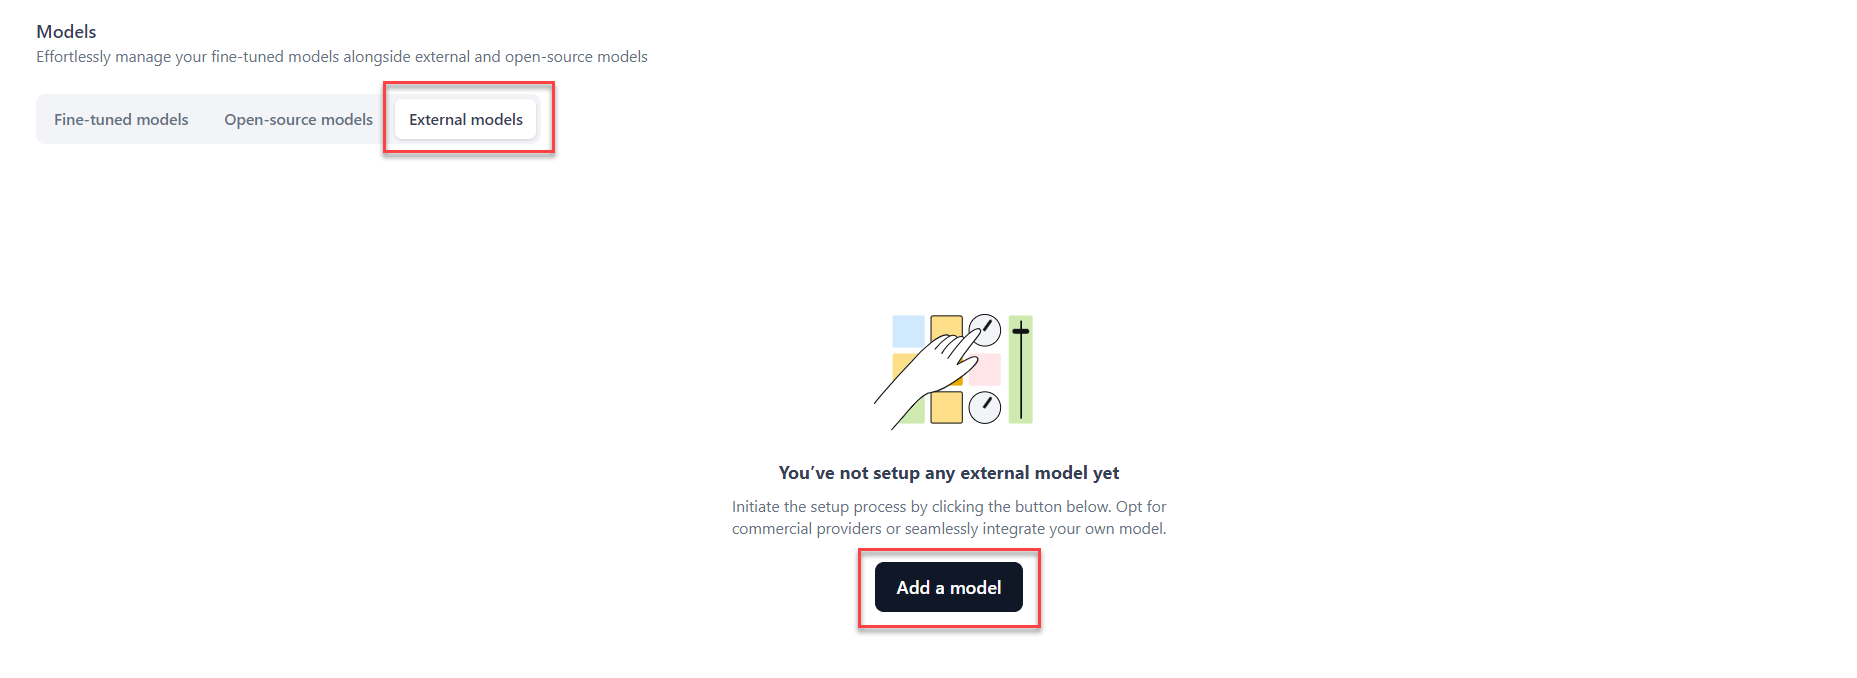
2. Go to the **External Models** tab and click **Add a model**.
3. Select **Easy integration** > **AWS Bedrock** and click **Next**.
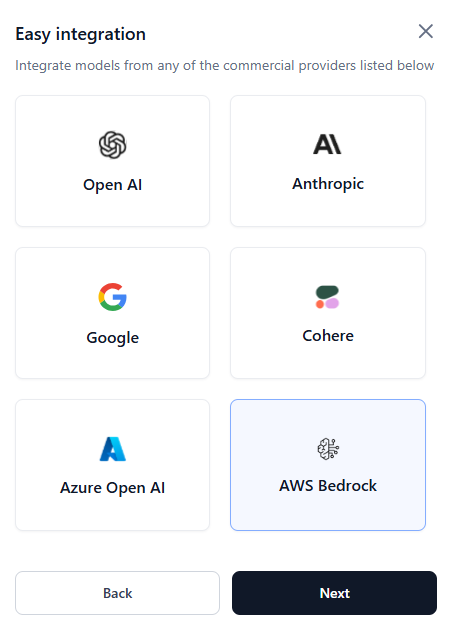 4. In the AWS Bedrock dialog, configure the following:
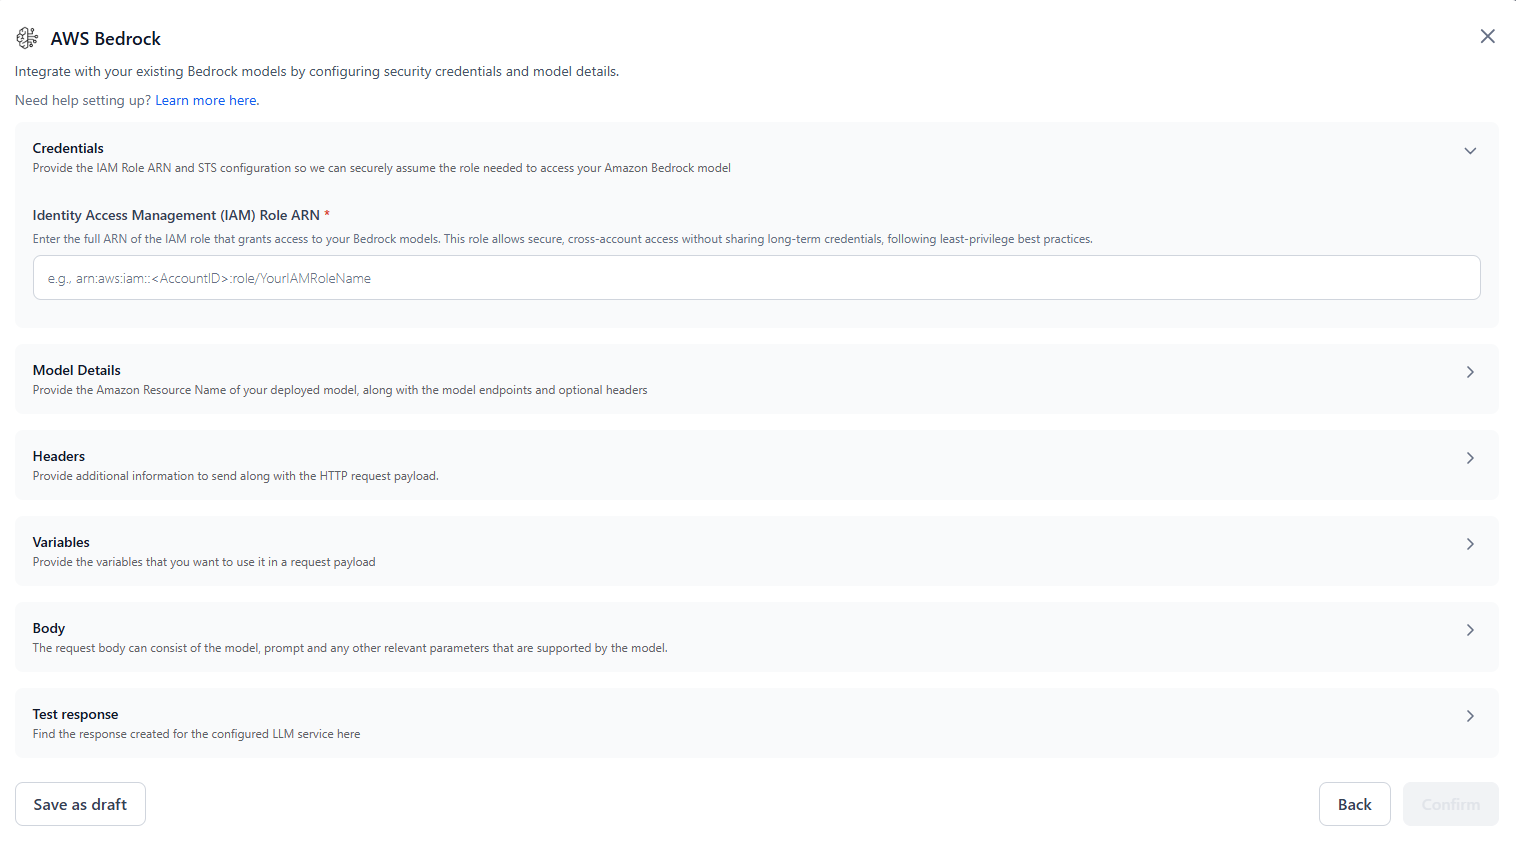 **Credentials**:
* **Identity Access Management (IAM) Role ARN**: Enter the full ARN of the IAM role with Bedrock permissions.
* **Trusted Principal ARN**: Pre-populated and read-only. This is the AI for Process IAM principal used to assume your role.
**Model Details**:
* **Model name**: Enter a display name to identify this model within your workflows.
* **Model ID**: Enter the Model ID or Endpoint ID. See [Find the Model ID and Region](#find-the-model-id-and-region) above.
* **Region**: Specify the AWS region where the model is deployed.
**Headers** (optional): Add custom HTTP headers if required. For example: `"Content-Type": "application/json"`.
**Variables**: Define input variables for your request payload. For example: `{{prompt}}`, `{{system.prompt}}`.
**Body**: Enter a sample JSON request body. Use `{{variableName}}` to bind input fields dynamically. The structure must follow the model-specific API schema.
```json theme={null}
{
"prompt": "{{prompt}}",
"max_tokens": 200,
"temperature": 0.7
}
```
5. Under **Test Response**, enter sample values for your variables and click **Test** to invoke the model and preview the response.
6. Under **Configure JSON Path**, define JSON paths to extract the output text and token counts from the response.
7. Click **Save as draft** to store the configuration without activating it, or click **Confirm** to add the model.
The model appears in the **External Models** tab and is available in Prompts and Workflows.
### API Integration
Use API Integration to connect a custom model by configuring the endpoint, authentication, and request-response structure.
1. Click **Models** in the top navigation bar.
2. Go to the **External Models** tab and click **Add a model**.
**Credentials**:
* **Identity Access Management (IAM) Role ARN**: Enter the full ARN of the IAM role with Bedrock permissions.
* **Trusted Principal ARN**: Pre-populated and read-only. This is the AI for Process IAM principal used to assume your role.
**Model Details**:
* **Model name**: Enter a display name to identify this model within your workflows.
* **Model ID**: Enter the Model ID or Endpoint ID. See [Find the Model ID and Region](#find-the-model-id-and-region) above.
* **Region**: Specify the AWS region where the model is deployed.
**Headers** (optional): Add custom HTTP headers if required. For example: `"Content-Type": "application/json"`.
**Variables**: Define input variables for your request payload. For example: `{{prompt}}`, `{{system.prompt}}`.
**Body**: Enter a sample JSON request body. Use `{{variableName}}` to bind input fields dynamically. The structure must follow the model-specific API schema.
```json theme={null}
{
"prompt": "{{prompt}}",
"max_tokens": 200,
"temperature": 0.7
}
```
5. Under **Test Response**, enter sample values for your variables and click **Test** to invoke the model and preview the response.
6. Under **Configure JSON Path**, define JSON paths to extract the output text and token counts from the response.
7. Click **Save as draft** to store the configuration without activating it, or click **Confirm** to add the model.
The model appears in the **External Models** tab and is available in Prompts and Workflows.
### API Integration
Use API Integration to connect a custom model by configuring the endpoint, authentication, and request-response structure.
1. Click **Models** in the top navigation bar.
2. Go to the **External Models** tab and click **Add a model**.
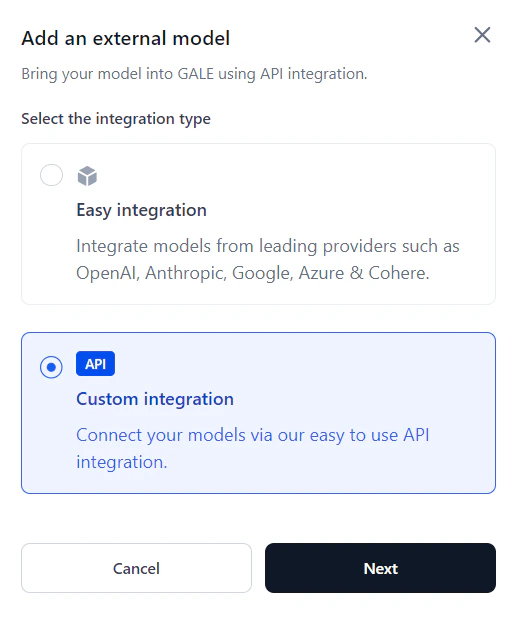
 3. Select **Custom integration** and click **Next**. The **Custom API integration** dialog opens.
 4. Enter a **Model name** and **Model endpoint URL**.
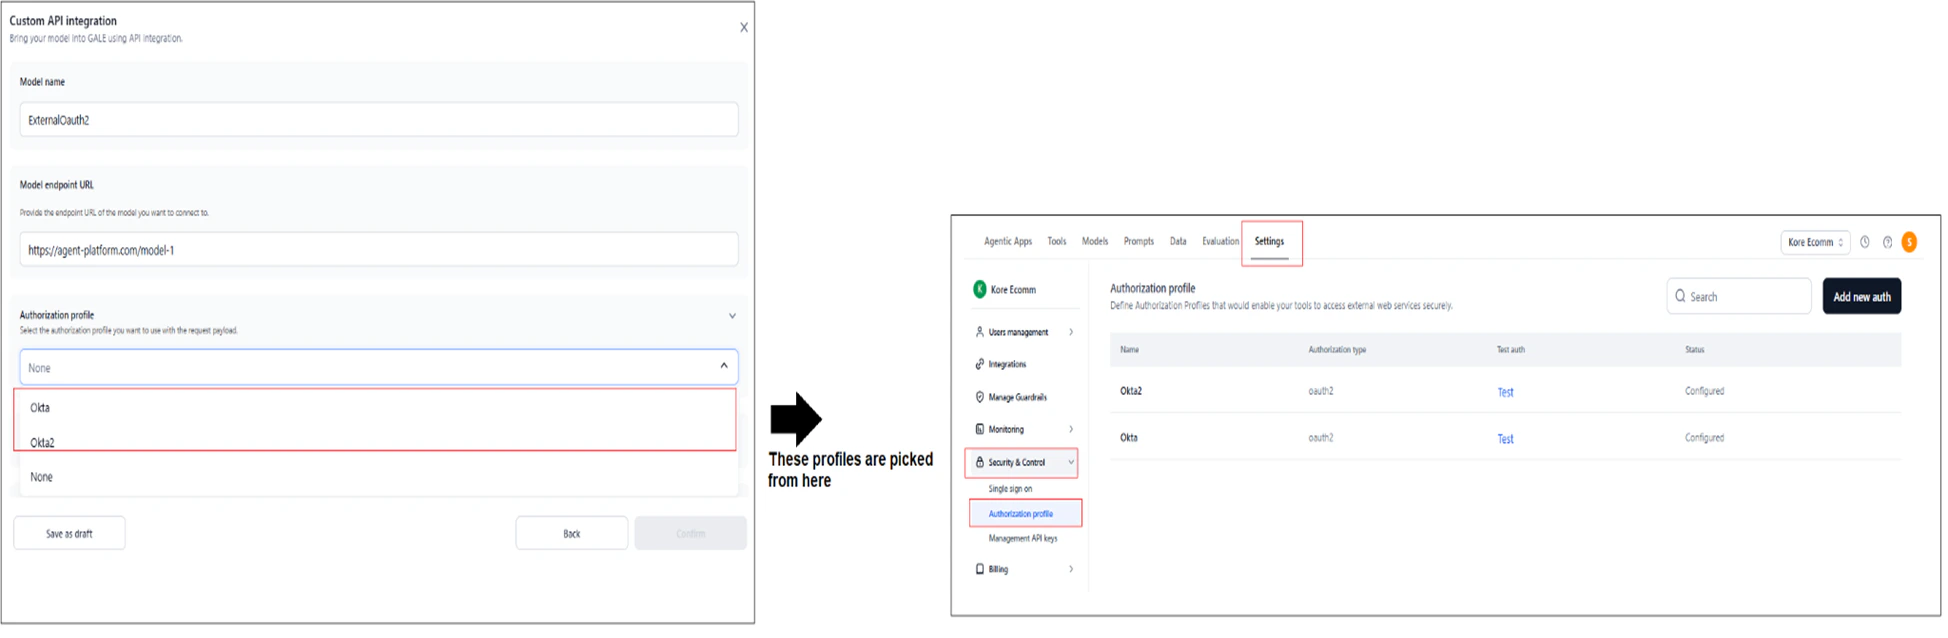
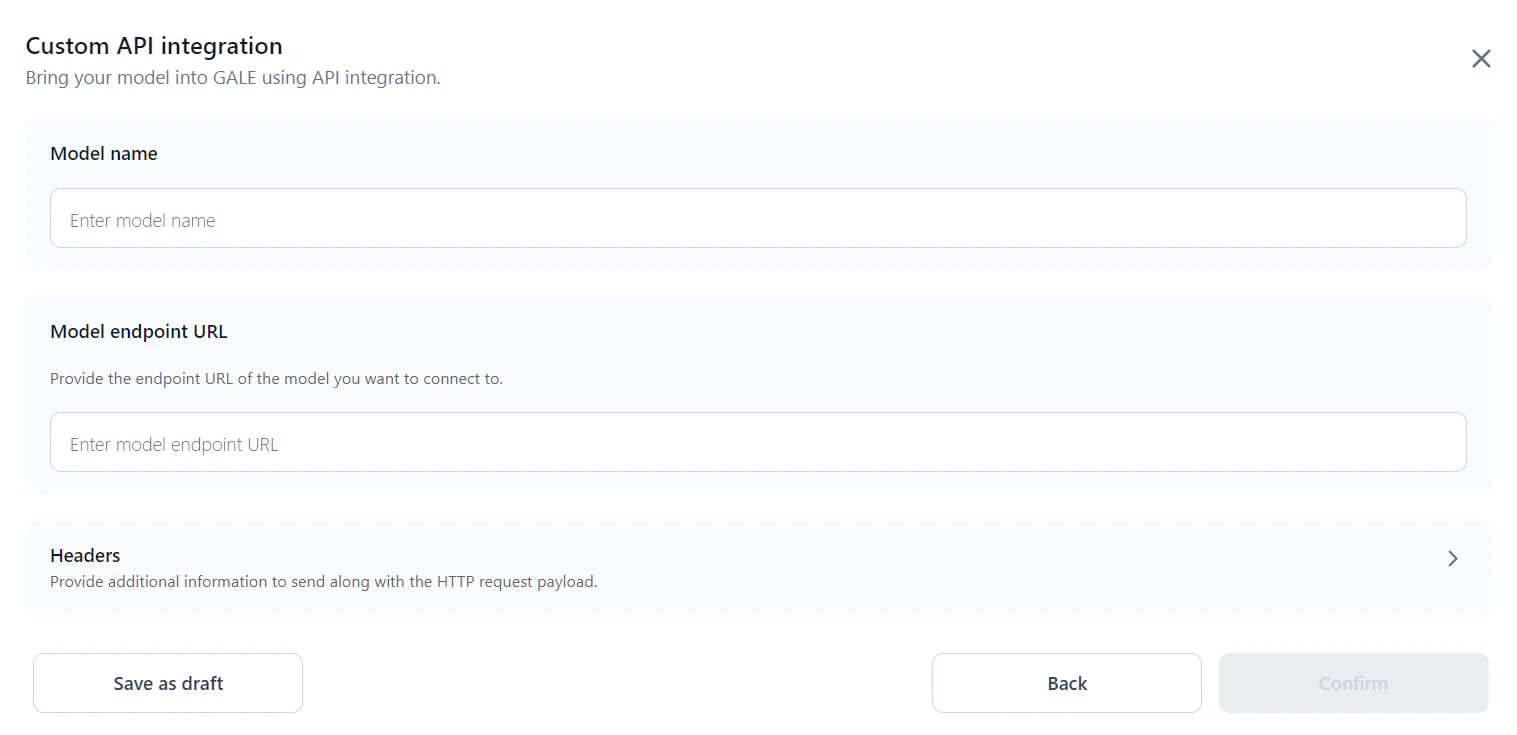 5. Select an **Authorization profile** for the request, or select **None** to proceed without authentication. See [Authorization Profiles](/ai-for-process/settings/security-control#authorization-profile-summary) for details.
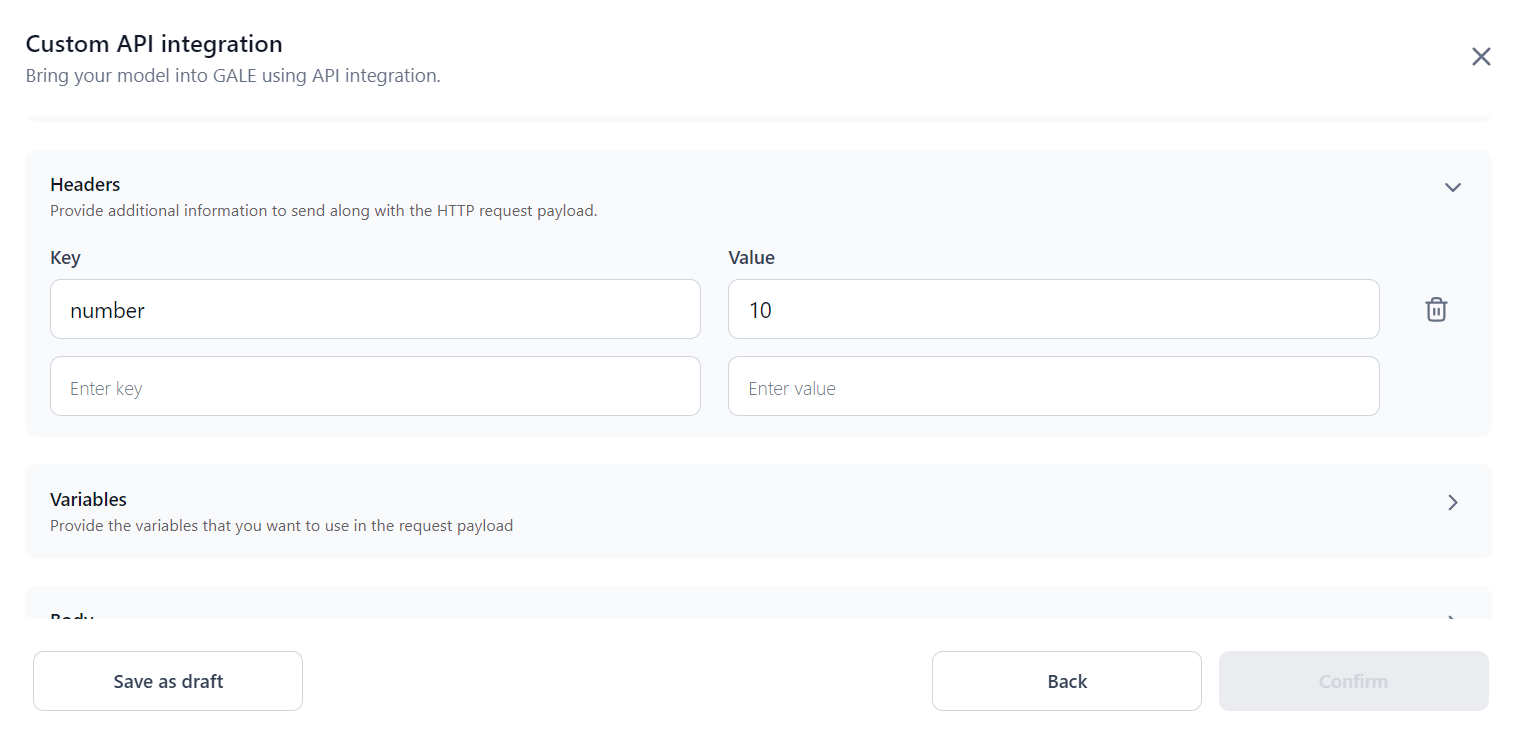
 6. In the **Headers** section, enter the **Key** and **Value** for each header to send with the request.
 7. In **Model configurations**, select one of the following options:
**Option A: Default**
Manually define variables, the request body, and test the model response.
7. In **Model configurations**, select one of the following options:
**Option A: Default**
Manually define variables, the request body, and test the model response.
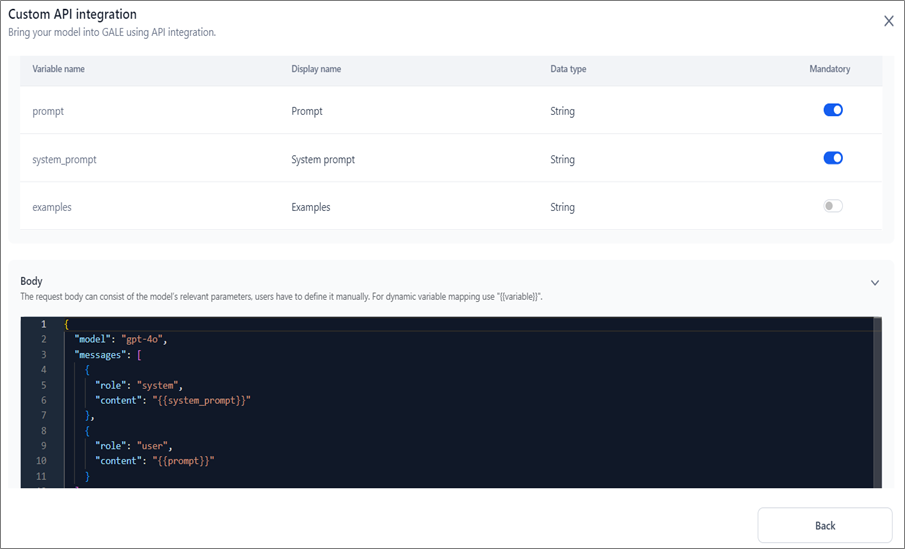
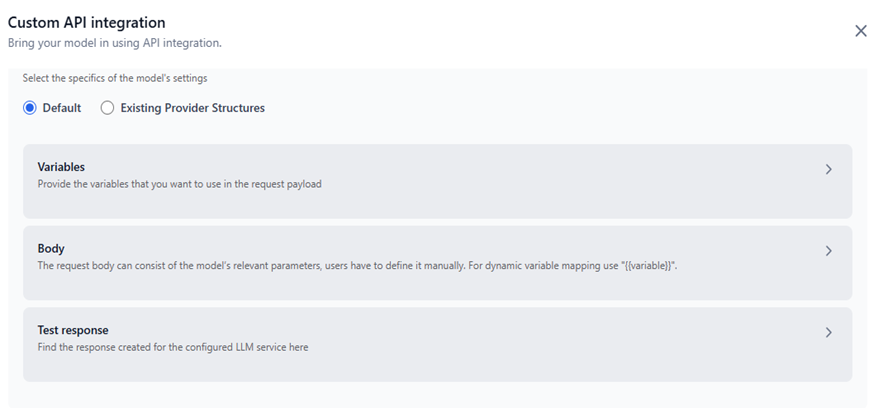 * **Variables**: Define the variables for the request payload.
* **Prompt variables**: The Prompt variable is mandatory by default. Enable the System prompt and Examples toggles if needed.
* **Variables**: Define the variables for the request payload.
* **Prompt variables**: The Prompt variable is mandatory by default. Enable the System prompt and Examples toggles if needed.
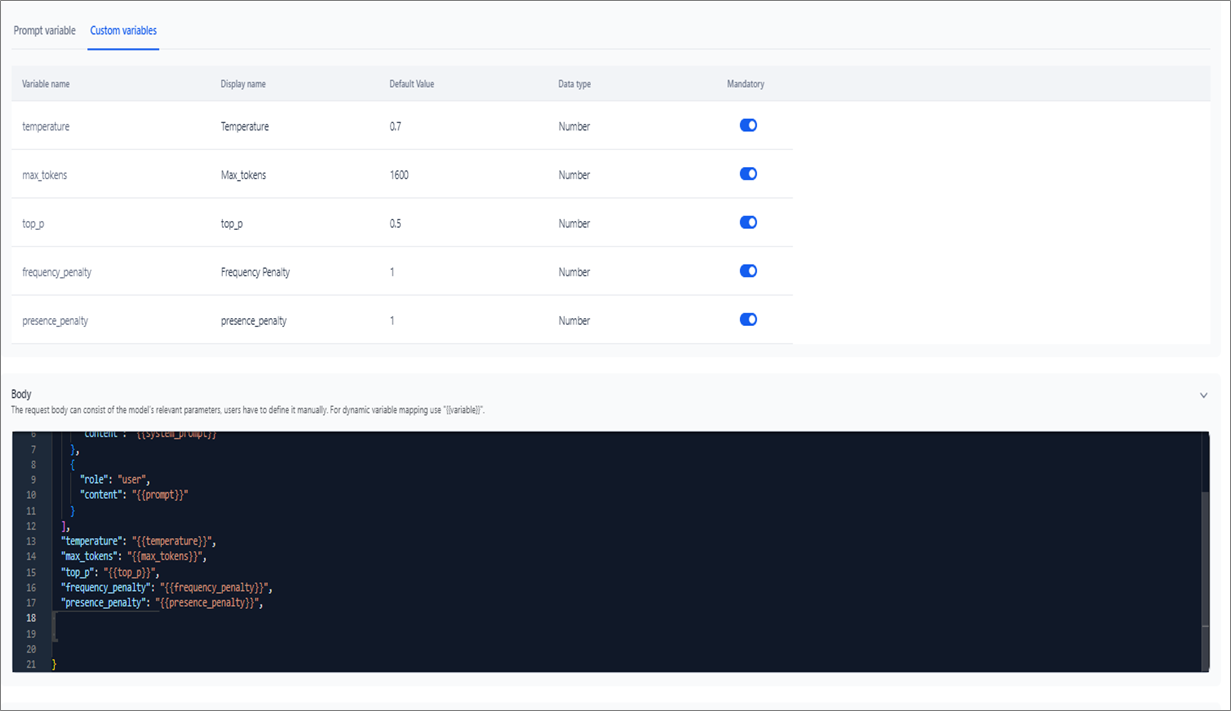
 * **Custom variables** (optional): Click the **Custom variables** tab and then **+Custom variables**. In the dialog, enter the **Variable name**, **Display name**, and **Data type**.
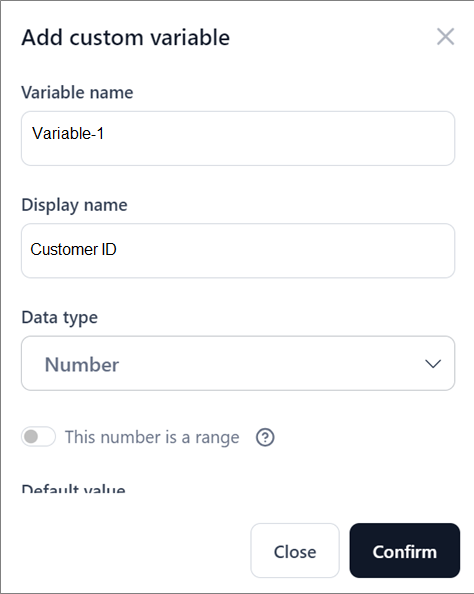 * **Body**: Define the request body with the model's parameters. Use `{{variable}}` for dynamic mapping. Ensure the format is correct — incorrect formatting causes API testing to fail.
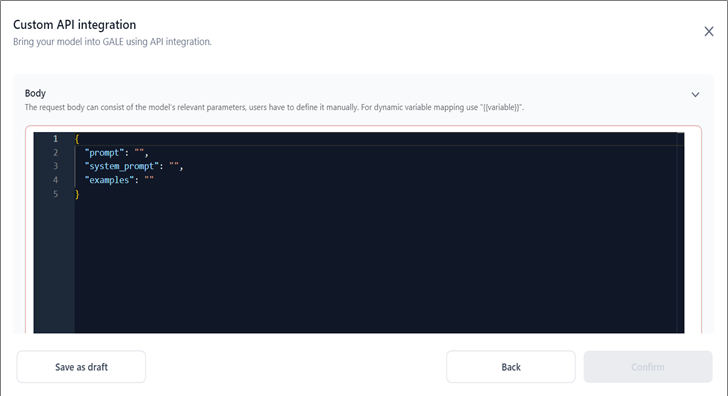 * **Test Response**: Click **Test** to invoke the model.
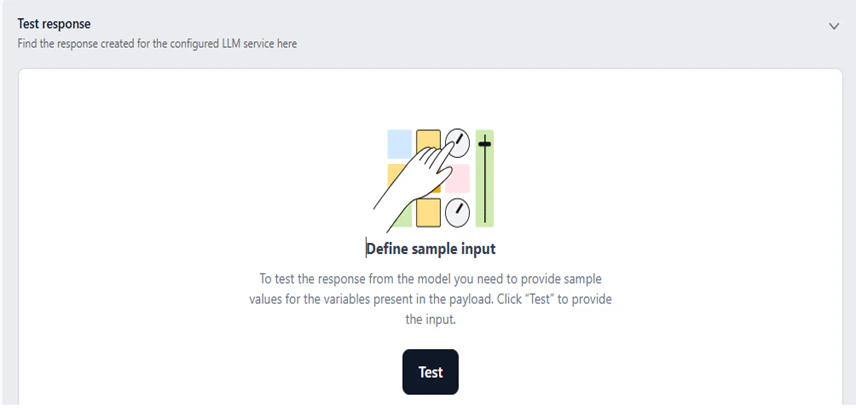 In the **Sample Input** dialog, enter the **Prompt**, **System prompt**, and **Examples**, then click **Confirm**.
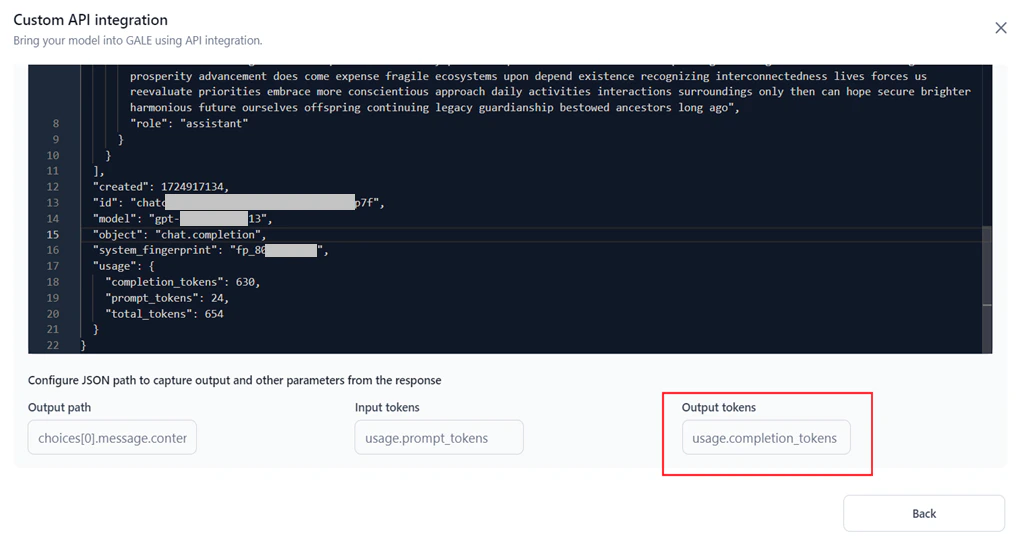
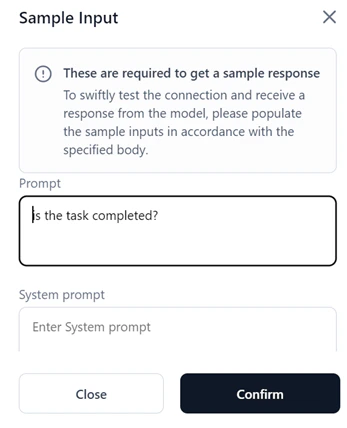 After the response is generated, configure the **JSON path** for the following fields:
* **Output Path**: The JSON key containing the model's output. This determines which key maps to the response in Prompt Studio. For example: `choices[0].message.content`.
After the response is generated, configure the **JSON path** for the following fields:
* **Output Path**: The JSON key containing the model's output. This determines which key maps to the response in Prompt Studio. For example: `choices[0].message.content`.
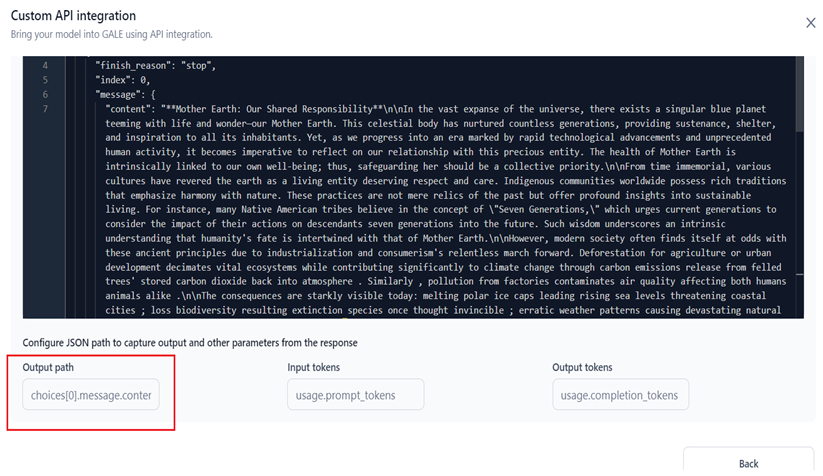 * **Input Tokens**: The JSON key for input token count. For example: `usage.prompt_tokens`.
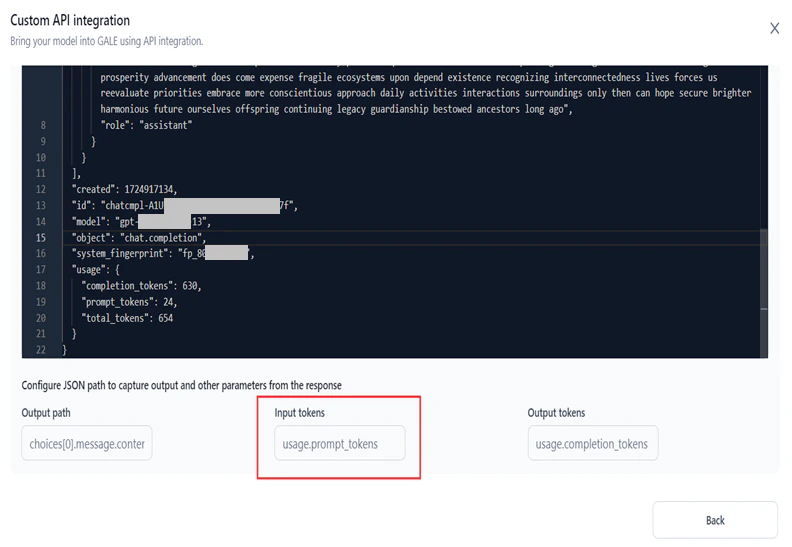 * **Output Tokens**: The JSON key for output token count. For example: `usage.completion_tokens`.
 **Option B: Existing Model Provider Structures**
Use this option to automatically map the request and response schemas using a known provider format. Unlike the Default option, this enables advanced features such as structured outputs and multimodal support.
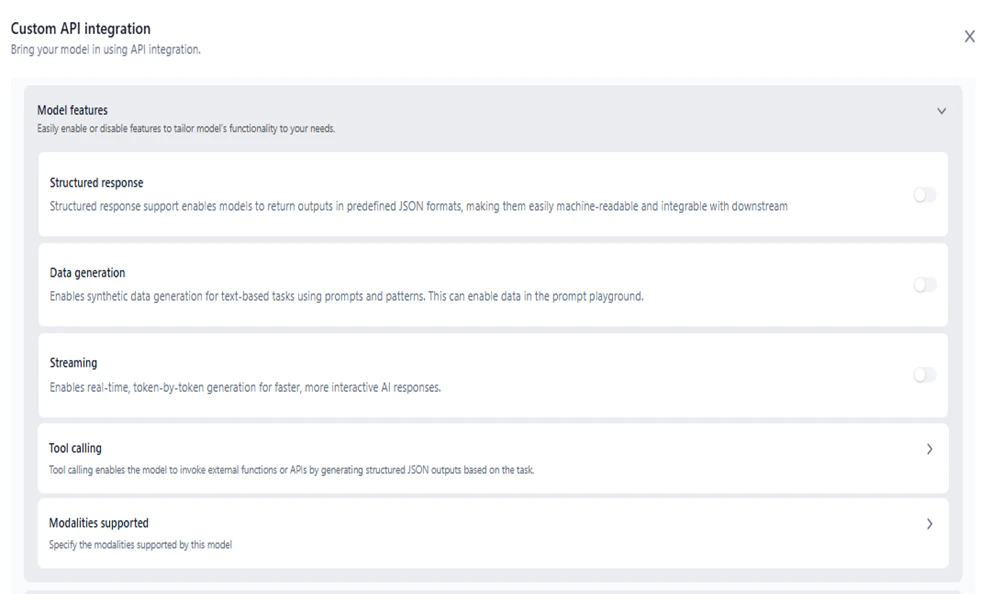
* **Model Features**: Enable one or more features. At least one must be enabled.
Enable only those features that the model supports. Enabling unsupported features may cause unexpected behavior.
| Feature | Description |
| ------------------- | ---------------------------------------------------------------------------------------------------------------------------------------- |
| Structured response | Enables structured output in [Prompts](/ai-for-process/prompts#add-prompts) and [Workflows](/ai-for-process/workflows/workflow-builder). |
| Data generation | Enables synthetic data generation for text tasks in [Prompt Studio](/ai-for-process/prompts#add-prompts). |
| Streaming | Enables real-time token-by-token generation for Agentic Apps. (Coming soon) |
| Modalities Support | Enables Text-to-Text, Text-to-Image, Image-to-Text, and Audio-to-Text in [Workflows](/ai-for-process/workflows/workflow-builder). |
**Option B: Existing Model Provider Structures**
Use this option to automatically map the request and response schemas using a known provider format. Unlike the Default option, this enables advanced features such as structured outputs and multimodal support.
* **Model Features**: Enable one or more features. At least one must be enabled.
Enable only those features that the model supports. Enabling unsupported features may cause unexpected behavior.
| Feature | Description |
| ------------------- | ---------------------------------------------------------------------------------------------------------------------------------------- |
| Structured response | Enables structured output in [Prompts](/ai-for-process/prompts#add-prompts) and [Workflows](/ai-for-process/workflows/workflow-builder). |
| Data generation | Enables synthetic data generation for text tasks in [Prompt Studio](/ai-for-process/prompts#add-prompts). |
| Streaming | Enables real-time token-by-token generation for Agentic Apps. (Coming soon) |
| Modalities Support | Enables Text-to-Text, Text-to-Image, Image-to-Text, and Audio-to-Text in [Workflows](/ai-for-process/workflows/workflow-builder). |
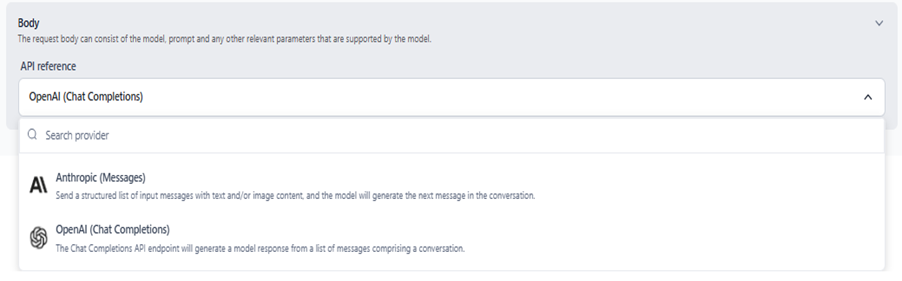
 * **Body**: Select a provider schema to map the request-response structure.
* **Anthropic (Messages)**: Uses the [Anthropic Messages API](https://docs.anthropic.com/en/api/messages) schema.
* **OpenAI (Chat Completions)**: Uses the [OpenAI Chat Completions API](https://platform.openai.com/docs/api-reference/chat) schema.
* **Body**: Select a provider schema to map the request-response structure.
* **Anthropic (Messages)**: Uses the [Anthropic Messages API](https://docs.anthropic.com/en/api/messages) schema.
* **OpenAI (Chat Completions)**: Uses the [OpenAI Chat Completions API](https://platform.openai.com/docs/api-reference/chat) schema.
 Click **Save as Draft** to save the model with a *Draft* status.
8. Click **Confirm** to add the model to the External Models list.
## Manage Connections
Each external model can have multiple connections, each with its own credentials or API key. You can track usage, billing, and analytics per connection independently.
For example, you can add multiple API keys for the same commercial model (such as multiple GPT-4 keys for OpenAI), with each key managed as a separate connection.
When adding connections:
* Each connection name must be unique.
* Each API key must be unique for the model.
Click a model in the External Models list to open its Connections page. From here, you can add new connections or edit and delete existing ones.
| Field | Description |
| --------------- | ------------------------------------------------------------------------------------------------------------------------------------------------------------- |
| Connection Name | Name given during model integration. Not editable after saving. |
| Added By | User who created the connection. |
| Added On | Date the connection was created. |
| Actions | **Toggle for Inference** - Enable or disable inference for this connection. **Edit** - Update the API key or credentials. **Delete** - Remove the connection. |
Once added, the model and connection names appear across AI for Process. Where you select a model, you can also choose a specific connection if multiple are configured.
## Manage API Integrations
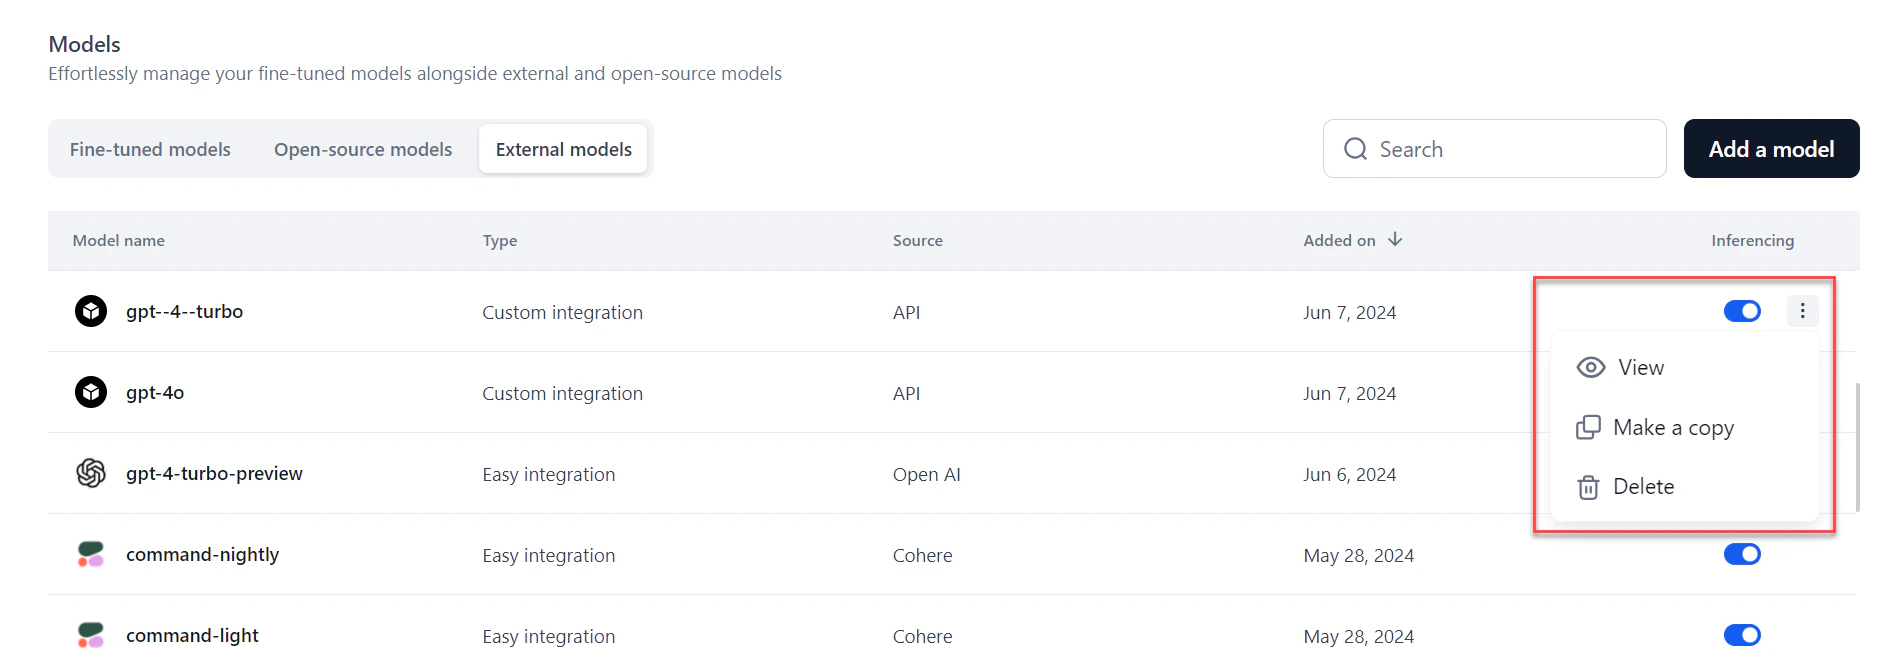
Once a custom API integration is active and the **Inferencing** toggle is on, the model is available across AI for Process. You can disable inferencing at any time.
To manage an integration, click the three-dot icon next to its name and select one of the following:
* **View**: View integration details.
* **Copy**: Create an editable copy of the integration.
* **Delete**: Remove the integration.
Click **Save as Draft** to save the model with a *Draft* status.
8. Click **Confirm** to add the model to the External Models list.
## Manage Connections
Each external model can have multiple connections, each with its own credentials or API key. You can track usage, billing, and analytics per connection independently.
For example, you can add multiple API keys for the same commercial model (such as multiple GPT-4 keys for OpenAI), with each key managed as a separate connection.
When adding connections:
* Each connection name must be unique.
* Each API key must be unique for the model.
Click a model in the External Models list to open its Connections page. From here, you can add new connections or edit and delete existing ones.
| Field | Description |
| --------------- | ------------------------------------------------------------------------------------------------------------------------------------------------------------- |
| Connection Name | Name given during model integration. Not editable after saving. |
| Added By | User who created the connection. |
| Added On | Date the connection was created. |
| Actions | **Toggle for Inference** - Enable or disable inference for this connection. **Edit** - Update the API key or credentials. **Delete** - Remove the connection. |
Once added, the model and connection names appear across AI for Process. Where you select a model, you can also choose a specific connection if multiple are configured.
## Manage API Integrations
Once a custom API integration is active and the **Inferencing** toggle is on, the model is available across AI for Process. You can disable inferencing at any time.
To manage an integration, click the three-dot icon next to its name and select one of the following:
* **View**: View integration details.
* **Copy**: Create an editable copy of the integration.
* **Delete**: Remove the integration.