> ## Documentation Index
> Fetch the complete documentation index at: https://koreai.mintlify.site/llms.txt
> Use this file to discover all available pages before exploring further.
# Fine-Tuned Models
Create, deploy, manage, and configure fine-tuned models in AI for Process. Covers the full lifecycle from training setup to API access and deployment management.
The Fine-Tuned Models section in Model Hub lets you create, customize, and manage models fine-tuned to your specific use cases. Fine-tune a platform-hosted model or import one from Hugging Face, then deploy it within AI for Process or externally via a generated API endpoint.
## Model List
The Fine-Tuned Models page lists all available models with the following details:
| Field | Description |
| ---------------------- | ------------------------------------------- |
| **Model Name** | Name of the fine-tuned model. |
| **Base model** | The model used as the base for fine-tuning. |
| **Active Deployments** | Number of deployments currently active. |
| **Deployment Failed** | Number of deployments that failed. |
| **Ready to Deploy** | Number of deployments ready to be deployed. |
| **Tags** | Labels associated with the model. |
| **Added by** | User who created or imported the model. |
| **Updated on** | Date of the last update. |
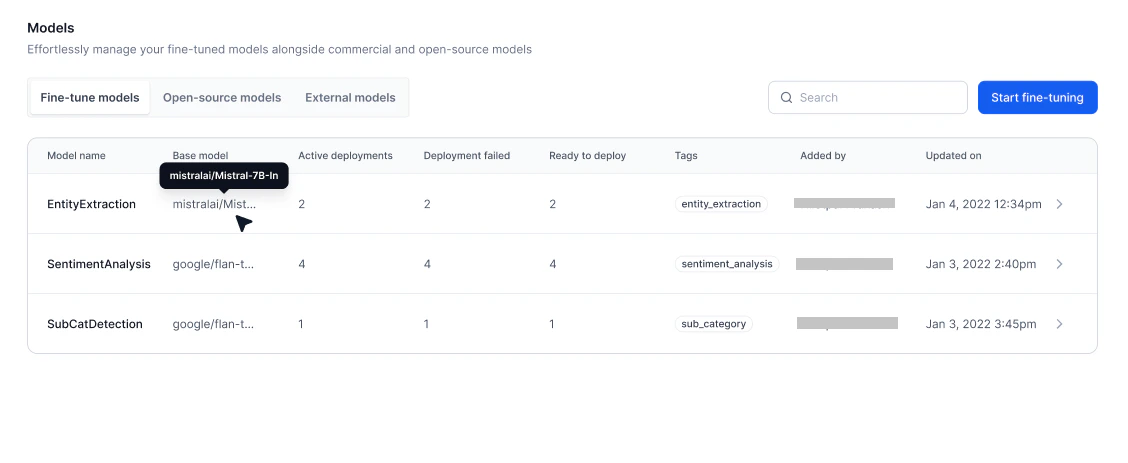 Select a model to open its detail view. The left navigation includes:
* [Overview](#monitor-fine-tuning-progress) — View general information, training progress, and test results.
* [Deployments](#manage-deployments) — Manage all deployments for the selected model.
* [Configurations](#configure-a-fine-tuned-model) — Edit model details, adjust endpoint timeout, or delete the model.
***
## Create a Fine-Tuned Model
You can fine-tune a platform-hosted model or import one from Hugging Face. The process involves the following steps:
1. General details
2. Selecting a base model
3. Fine-tuning configuration
4. Adding the training and evaluation datasets
5. Adding the test dataset (optional)
6. Selecting hardware
7. Integrating with Weights & Biases (optional)
**To create a fine-tuned model:**
1. Log in and click **Model Hub** under AI for Process.
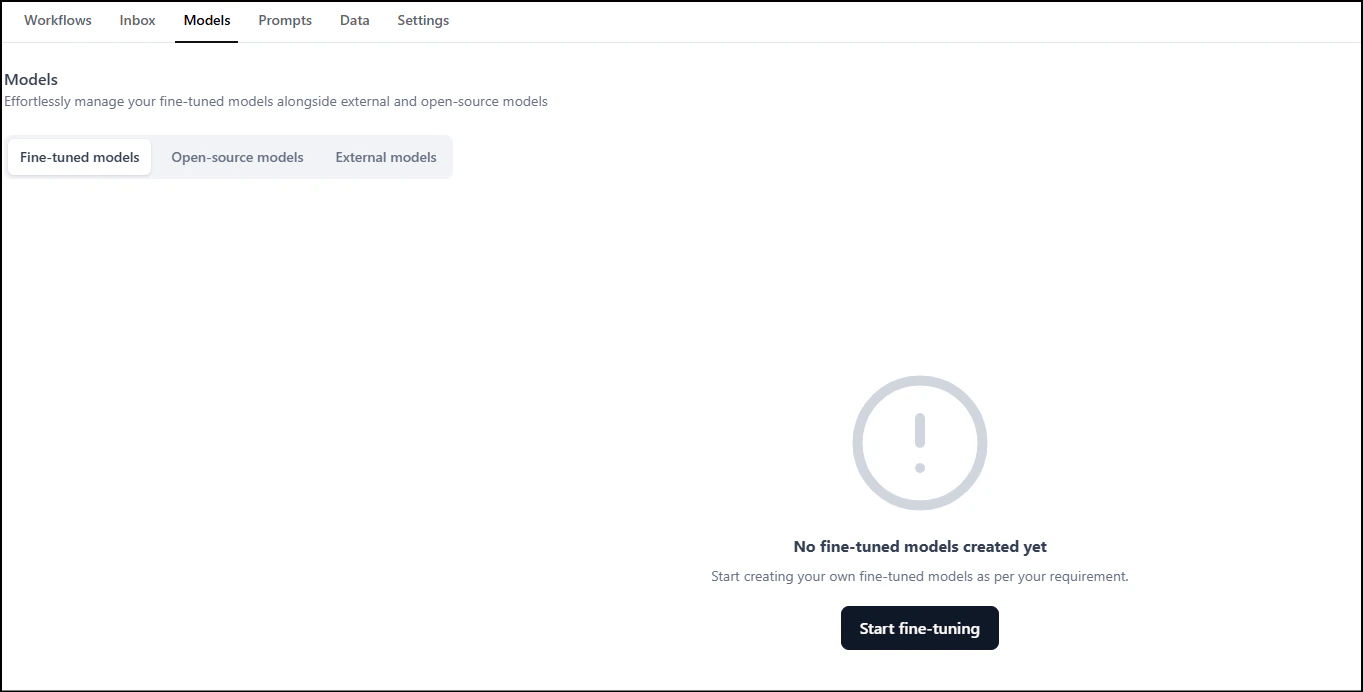
2. On the **Fine-tuned models** tab, click **Start fine-tuning**.
Select a model to open its detail view. The left navigation includes:
* [Overview](#monitor-fine-tuning-progress) — View general information, training progress, and test results.
* [Deployments](#manage-deployments) — Manage all deployments for the selected model.
* [Configurations](#configure-a-fine-tuned-model) — Edit model details, adjust endpoint timeout, or delete the model.
***
## Create a Fine-Tuned Model
You can fine-tune a platform-hosted model or import one from Hugging Face. The process involves the following steps:
1. General details
2. Selecting a base model
3. Fine-tuning configuration
4. Adding the training and evaluation datasets
5. Adding the test dataset (optional)
6. Selecting hardware
7. Integrating with Weights & Biases (optional)
**To create a fine-tuned model:**
1. Log in and click **Model Hub** under AI for Process.
2. On the **Fine-tuned models** tab, click **Start fine-tuning**.
 3. In the **General details** section:
* Enter a **Model name** and **Description**.
3. In the **General details** section:
* Enter a **Model name** and **Description**.
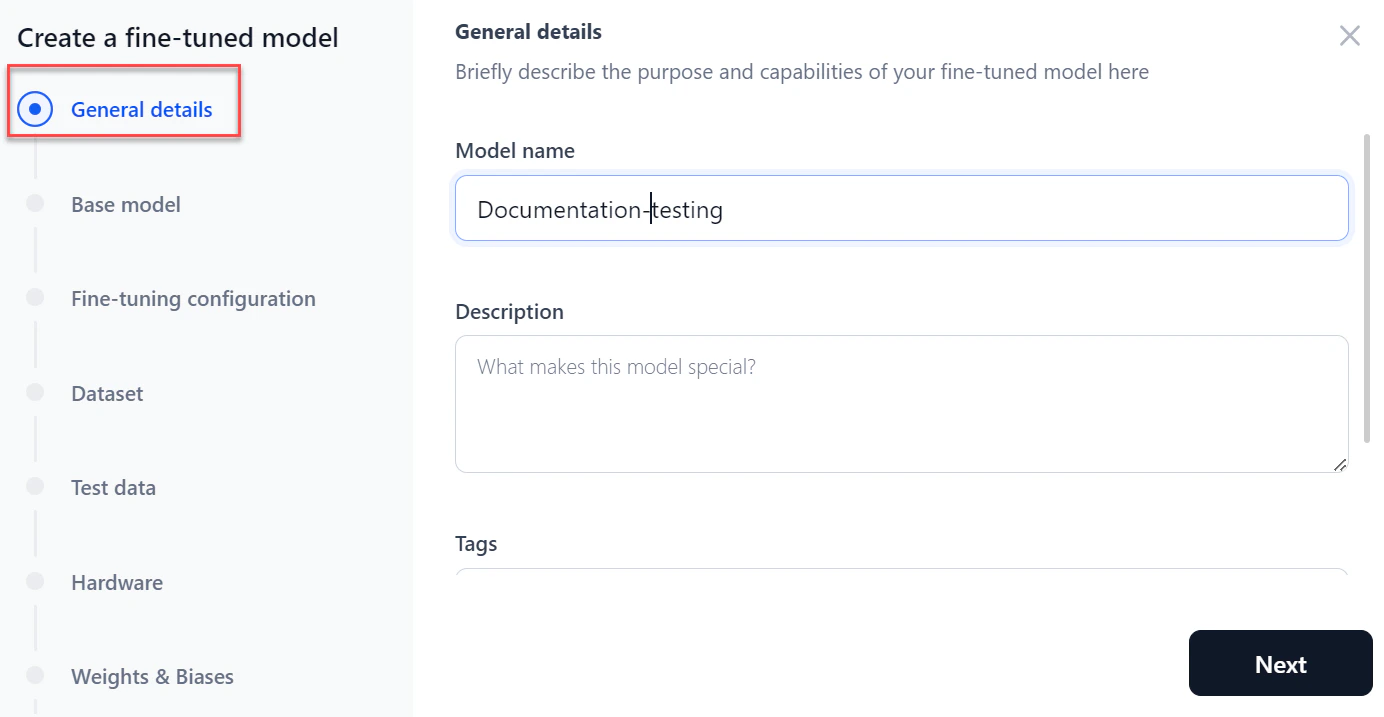 * Add tags to help search for the model and click **Next**.
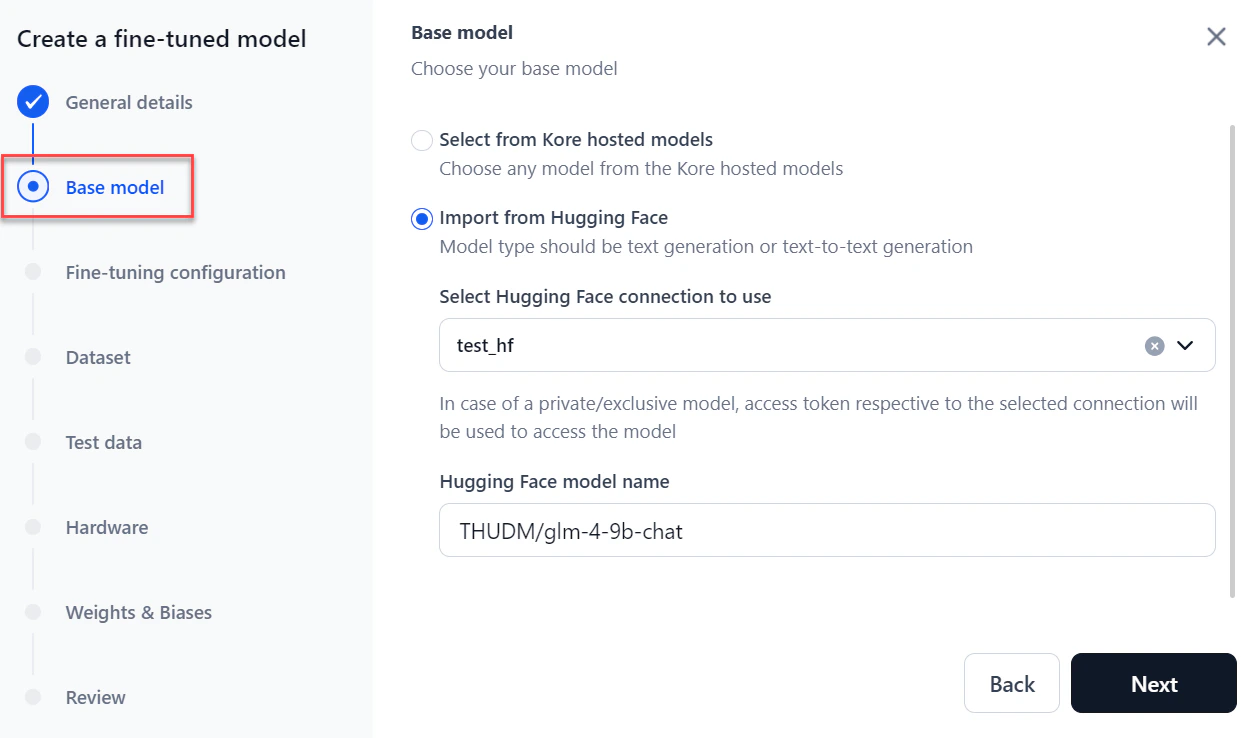
4. In the **Base model** section, choose the model to fine-tune:
* **Hosted models**: Select the model from the dropdown and click **Next**.
Imported models are also included in the list.
!\[Platform hosted models]\(/ai-for-process/models/images/base-model-kore hosted.png)
* **Import from Hugging Face**: Select the Hugging Face connection type, paste the model name, and click **Next**. For more information, see [How to Connect to your Hugging Face Account](/ai-for-process/models/open-source-models#deploy-a-model-from-hugging-face).
* Add tags to help search for the model and click **Next**.
4. In the **Base model** section, choose the model to fine-tune:
* **Hosted models**: Select the model from the dropdown and click **Next**.
Imported models are also included in the list.
!\[Platform hosted models]\(/ai-for-process/models/images/base-model-kore hosted.png)
* **Import from Hugging Face**: Select the Hugging Face connection type, paste the model name, and click **Next**. For more information, see [How to Connect to your Hugging Face Account](/ai-for-process/models/open-source-models#deploy-a-model-from-hugging-face).
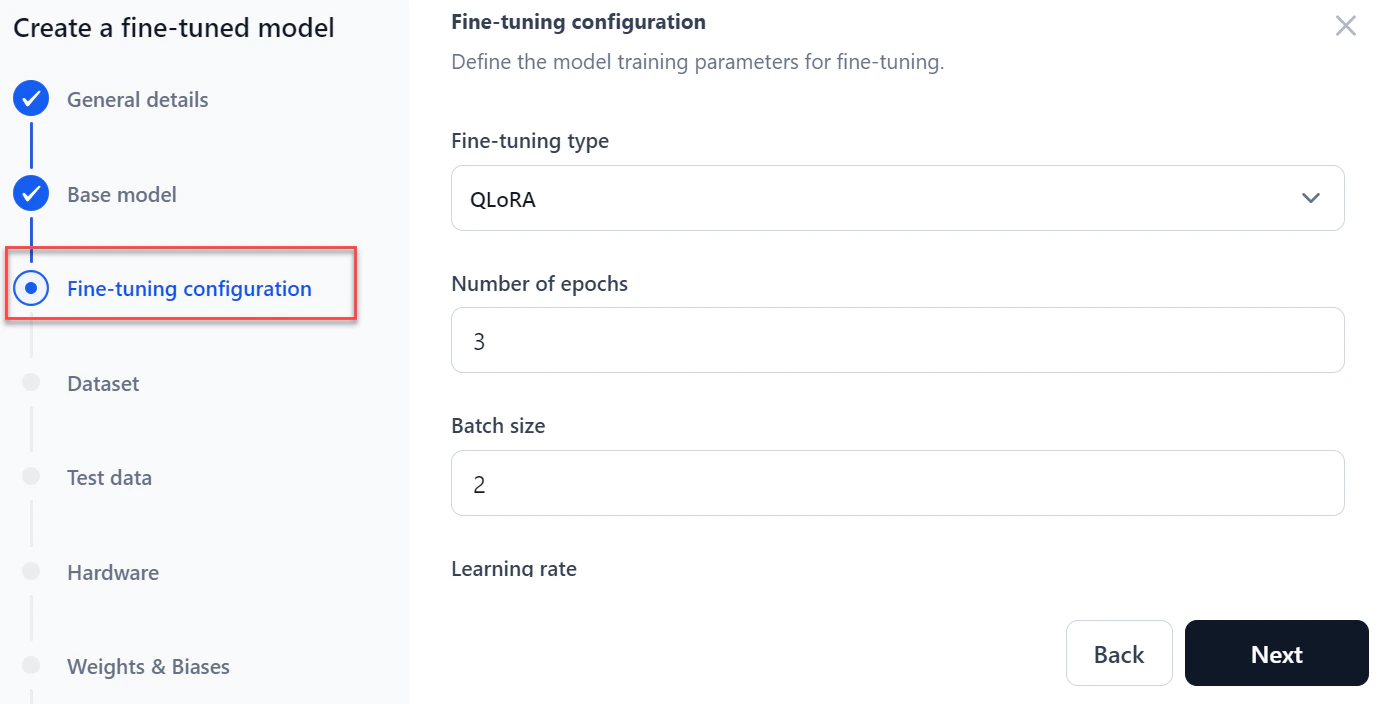
 5. In the **Fine-tuning configuration** section:
* Select a **Fine-tuning type**: Full fine-tune, LoRA (Low-Rank Adaptation), or QLoRA (Quantized LoRA).
Supported fine-tuning types vary by base model size:
| Base model parameters | Supported fine-tuning types |
| --------------------- | --------------------------- |
| **\< 1B** | Full fine-tune, LoRA, QLoRA |
| **≥ 1B and \< 5B** | LoRA, QLoRA |
| **≥ 5B and ≤ 8B** | QLoRA |
* Enter the **Number of Epochs** — how many times the model processes the full dataset during training.
* Enter a **Batch size** — the number of training examples used per training iteration.
* Enter a **Learning rate** — the step size used during model optimization.
* Click **Next**.
5. In the **Fine-tuning configuration** section:
* Select a **Fine-tuning type**: Full fine-tune, LoRA (Low-Rank Adaptation), or QLoRA (Quantized LoRA).
Supported fine-tuning types vary by base model size:
| Base model parameters | Supported fine-tuning types |
| --------------------- | --------------------------- |
| **\< 1B** | Full fine-tune, LoRA, QLoRA |
| **≥ 1B and \< 5B** | LoRA, QLoRA |
| **≥ 5B and ≤ 8B** | QLoRA |
* Enter the **Number of Epochs** — how many times the model processes the full dataset during training.
* Enter a **Batch size** — the number of training examples used per training iteration.
* Enter a **Learning rate** — the step size used during model optimization.
* Click **Next**.
 6. In the **Dataset** section:
* Select or upload the **Training dataset** from the dropdown.
The system accepts JSONL, CSV, and JSON files. Files must have at least two columns: one for the prompt and one for the completion. You can download a sample file.
6. In the **Dataset** section:
* Select or upload the **Training dataset** from the dropdown.
The system accepts JSONL, CSV, and JSON files. Files must have at least two columns: one for the prompt and one for the completion. You can download a sample file.
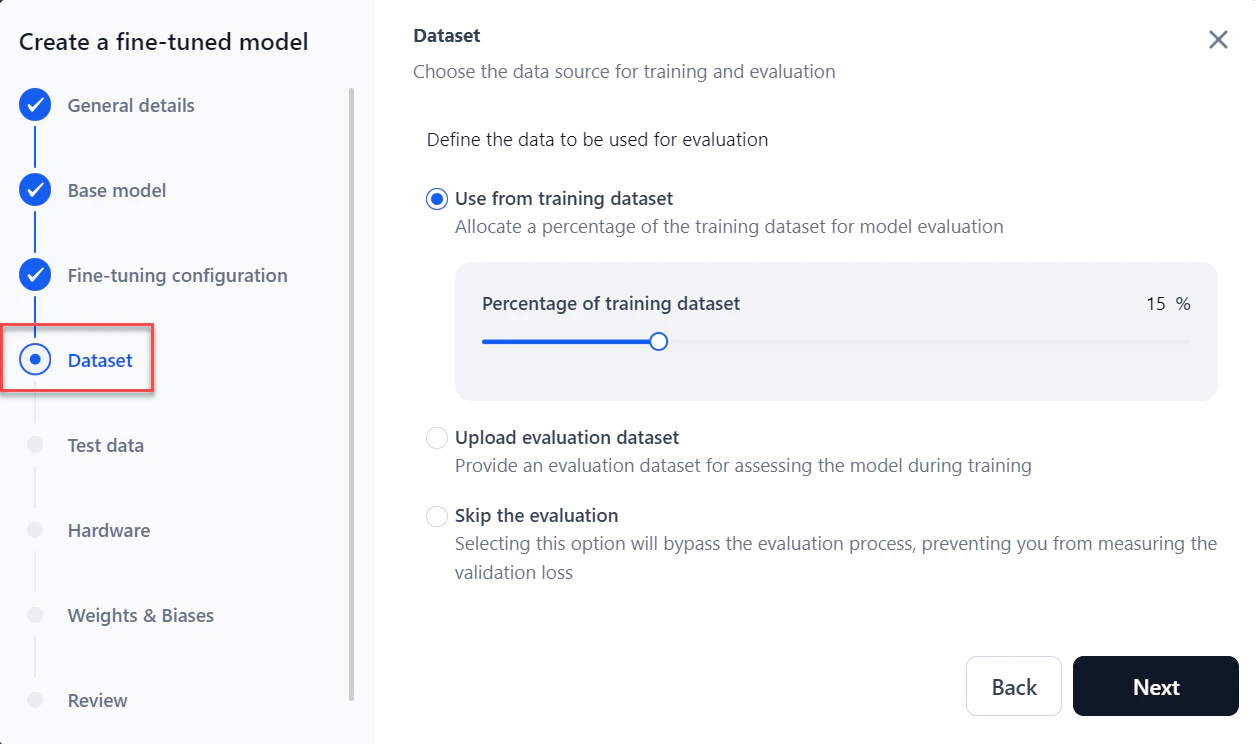
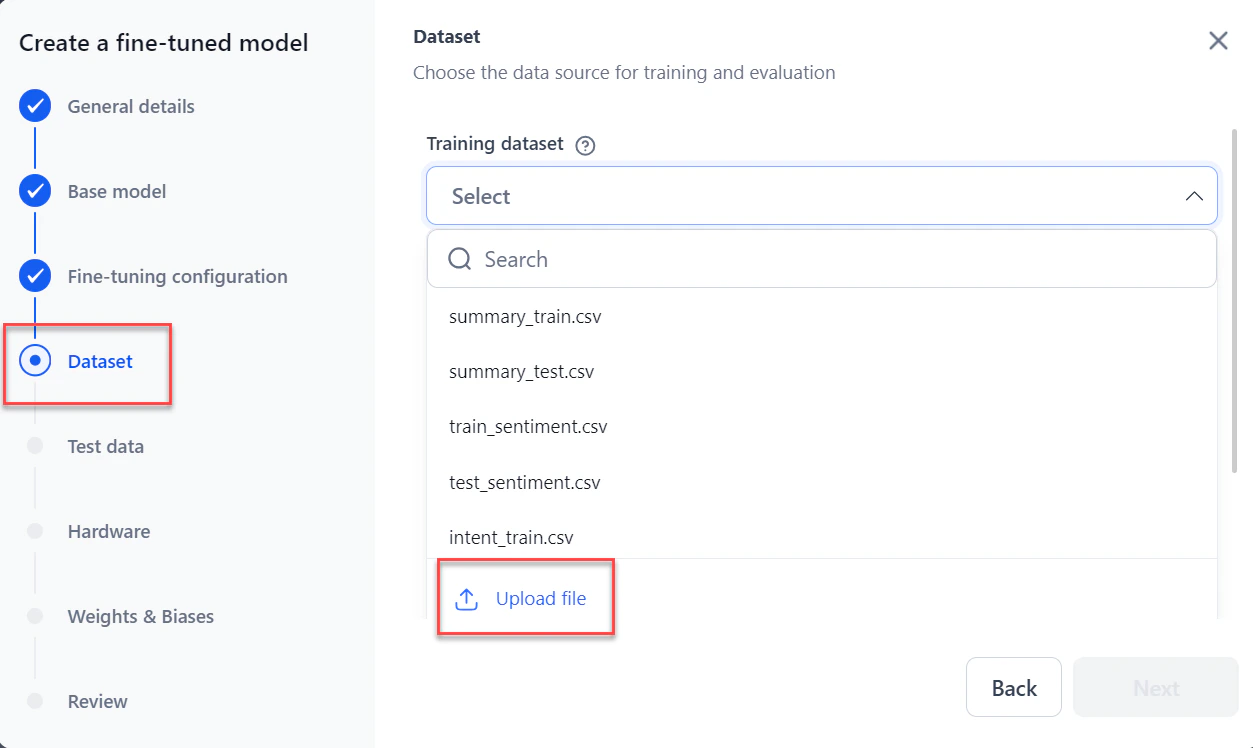 * For **Evaluation dataset**, choose one of:
* **Use from training dataset (default)**: Allocates a percentage of the training dataset for evaluation. Default is 15%.
* **Upload evaluation dataset**: Select or upload a separate dataset.
* **Skip the evaluation**: Skips model evaluation entirely.
Click **Next**.
* For **Evaluation dataset**, choose one of:
* **Use from training dataset (default)**: Allocates a percentage of the training dataset for evaluation. Default is 15%.
* **Upload evaluation dataset**: Select or upload a separate dataset.
* **Skip the evaluation**: Skips model evaluation entirely.
Click **Next**.
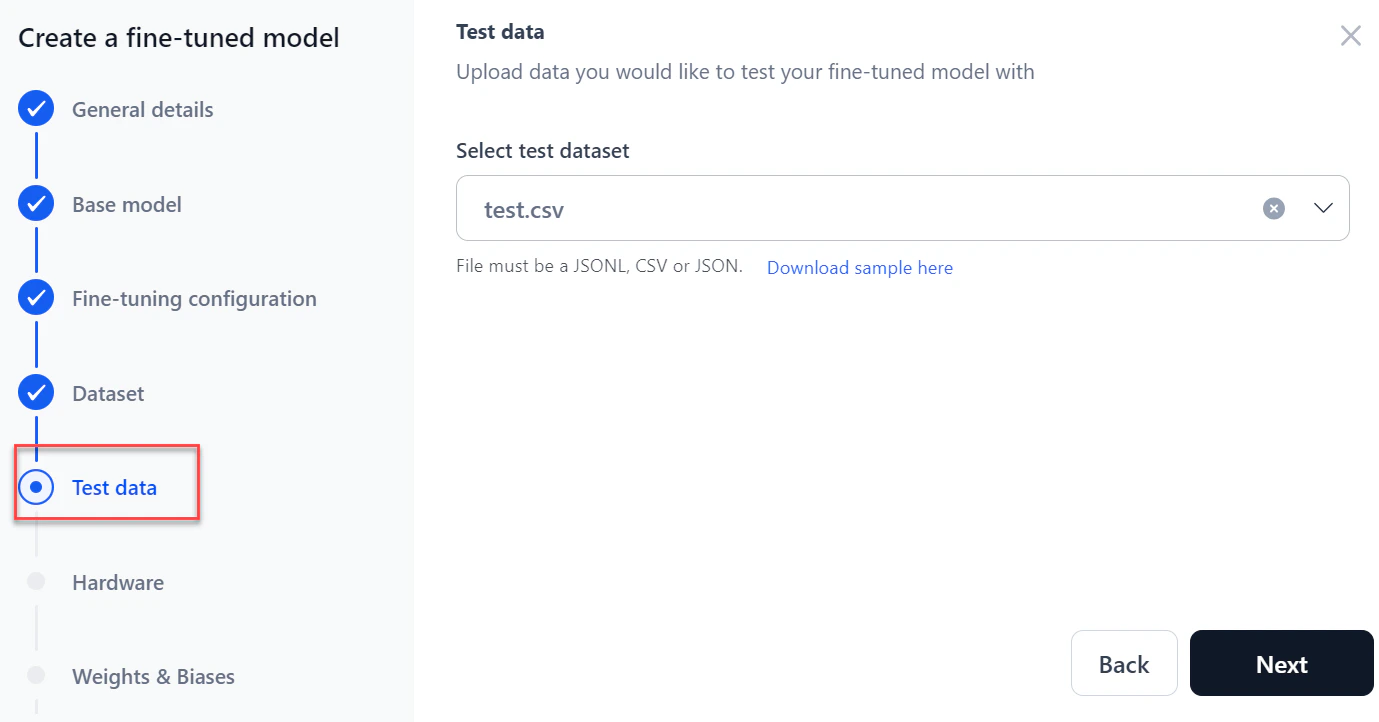
 7. Select or upload a **test dataset** to test the fine-tuned model, then click **Next**.
The system accepts JSONL, CSV, and JSON files.
7. Select or upload a **test dataset** to test the fine-tuned model, then click **Next**.
The system accepts JSONL, CSV, and JSON files.
 8. Select the required **hardware** from the dropdown and click **Next**.
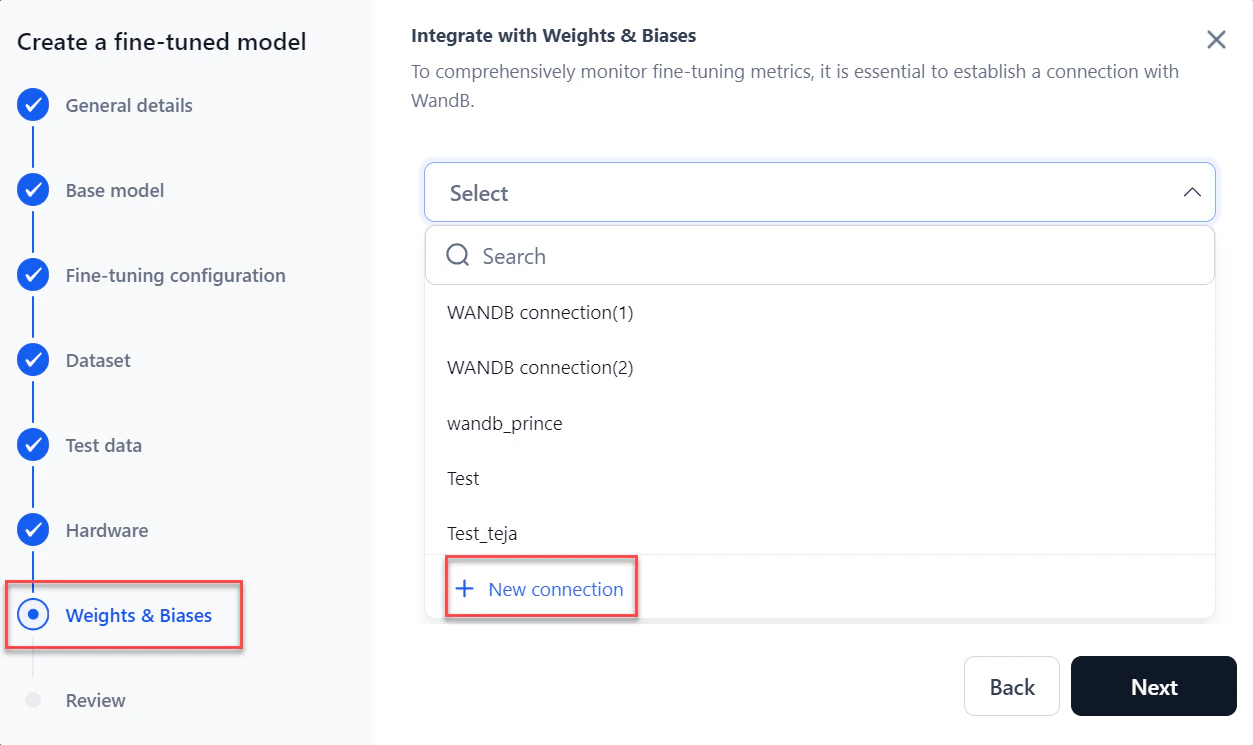
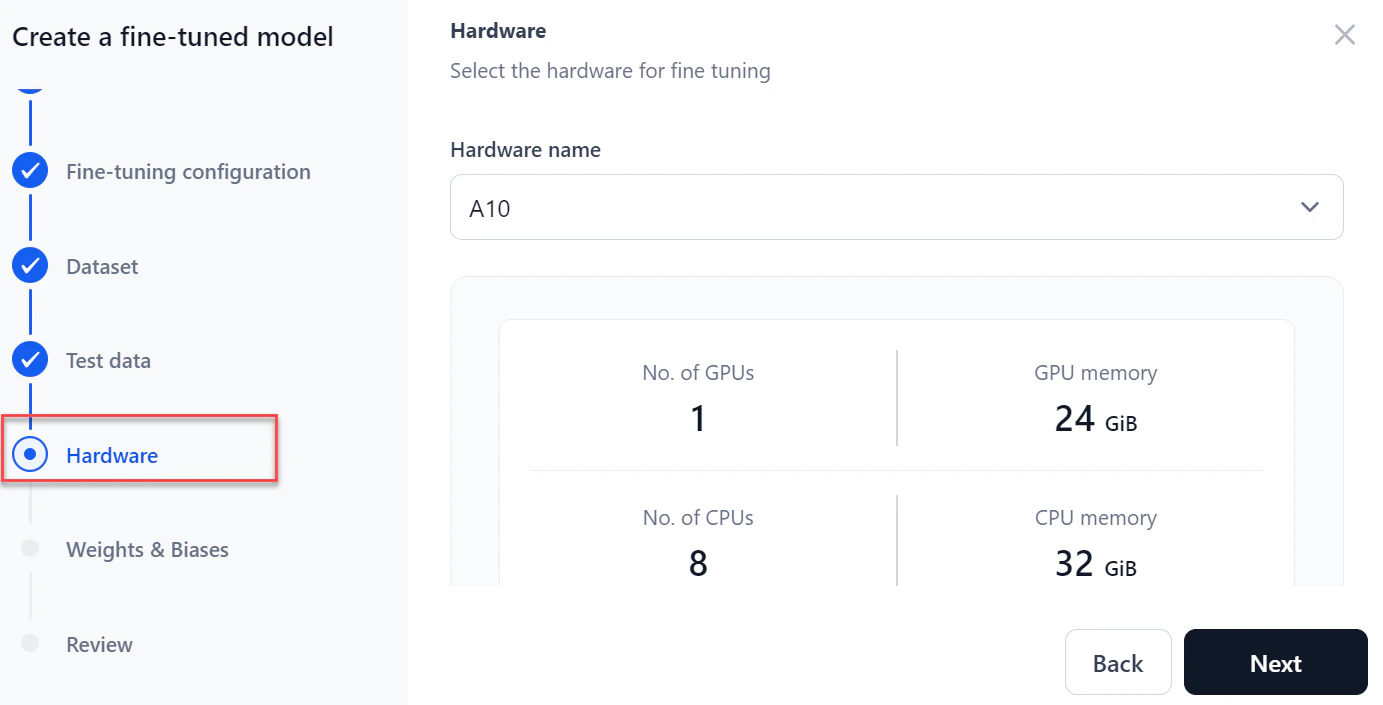 9. In the **Weights & Biases** section, select your **WandB connection** from the dropdown and click **Next**. To create a connection, click **+ New connection**. For more information, see [How to Integrate with WandB](/ai-for-process/settings/integrations#integrate-with-weights-and-biases).
A Weights & Biases account is required. Enabling the integration shares real-time fine-tuning status with the platform for comprehensive monitoring of fine-tuning metrics. Use your API token to send fine-tuning data to the associated account.
9. In the **Weights & Biases** section, select your **WandB connection** from the dropdown and click **Next**. To create a connection, click **+ New connection**. For more information, see [How to Integrate with WandB](/ai-for-process/settings/integrations#integrate-with-weights-and-biases).
A Weights & Biases account is required. Enabling the integration shares real-time fine-tuning status with the platform for comprehensive monitoring of fine-tuning metrics. Use your API token to send fine-tuning data to the associated account.
 10. In the **Review** step, verify all details. Click **Back** to make changes.
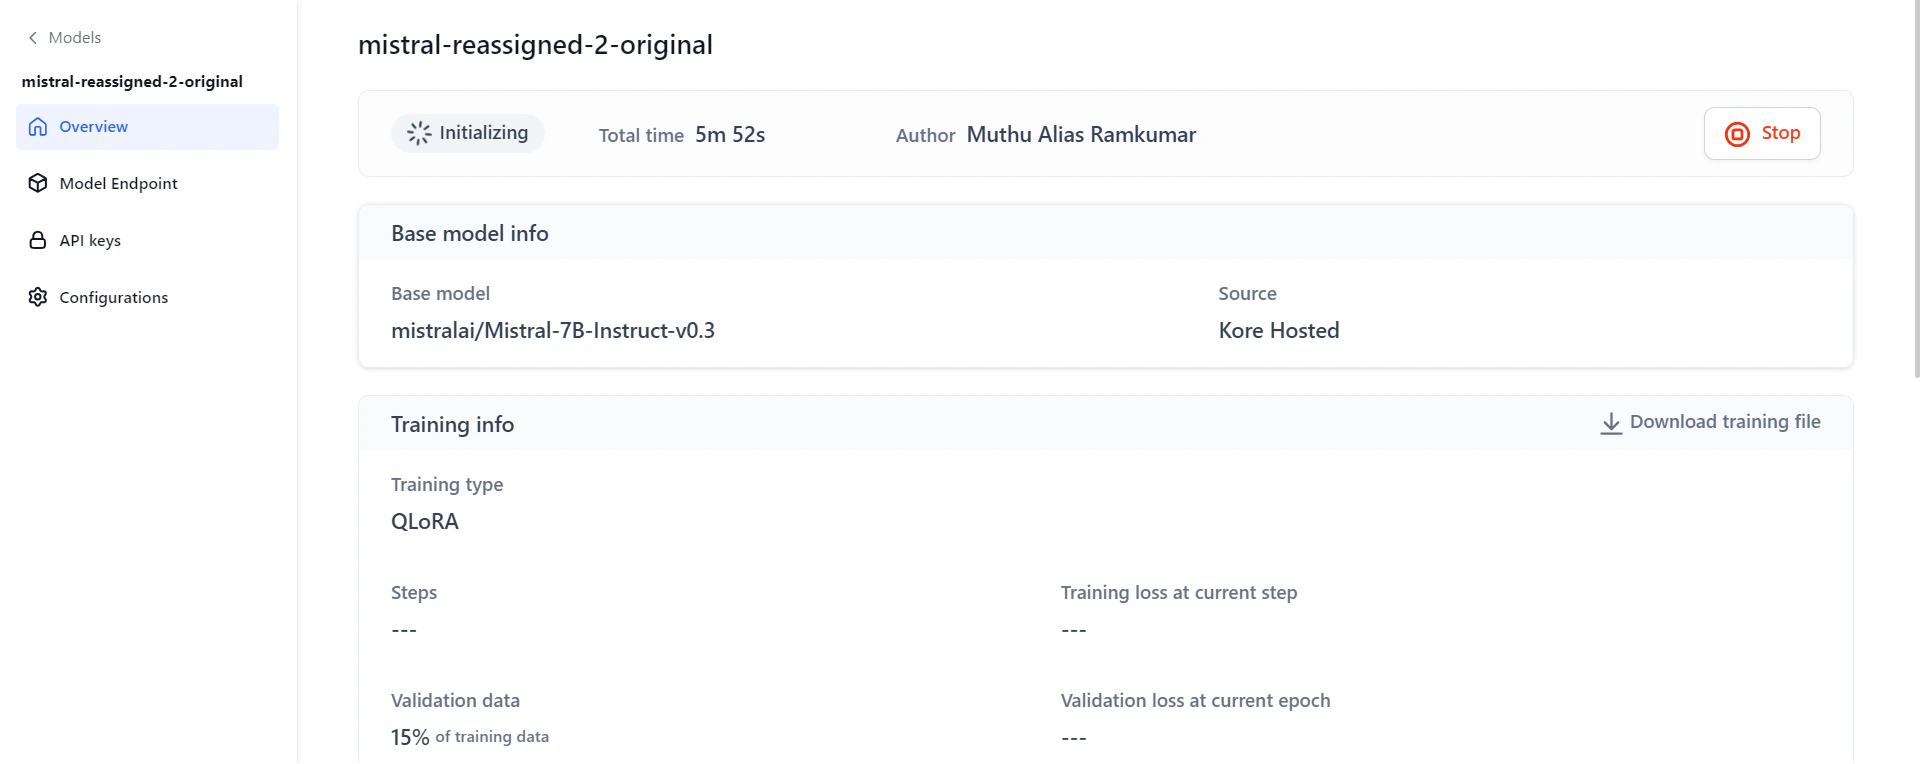
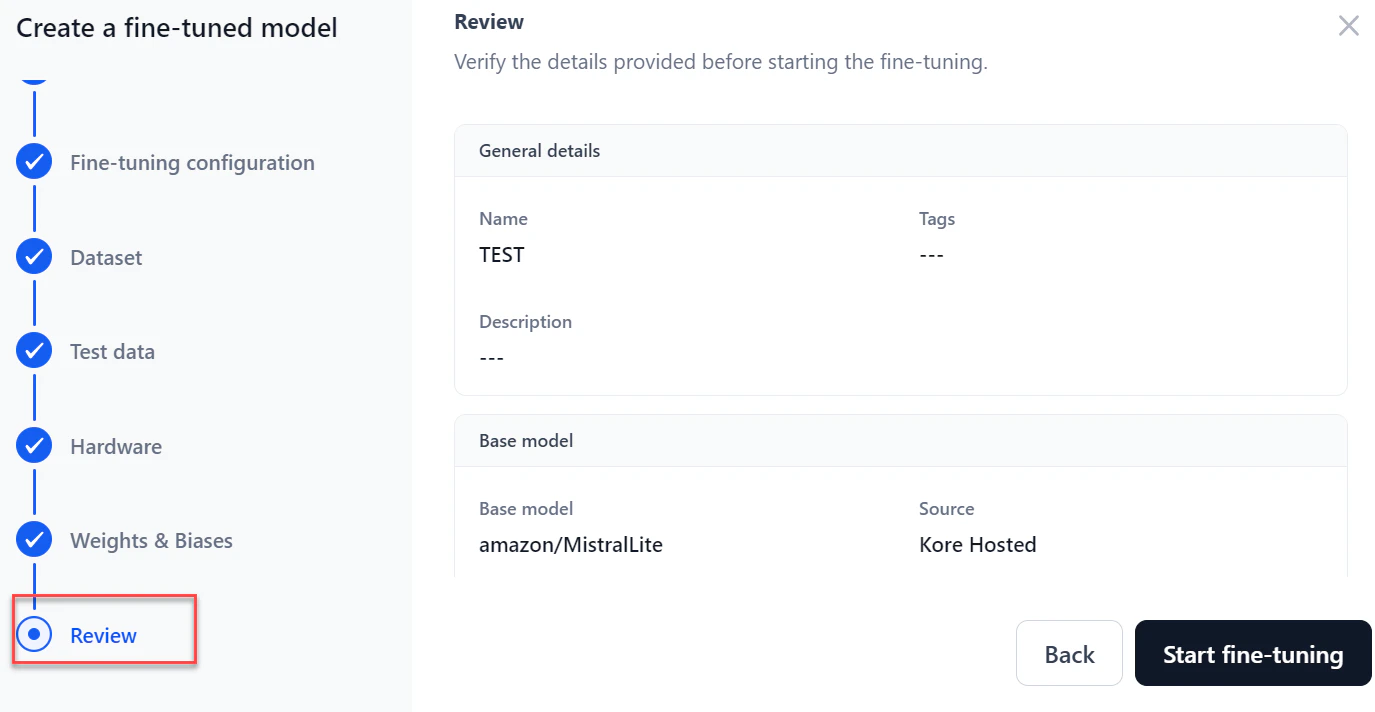 11. Click **Start fine-tuning**. The model Overview page displays real-time progress. After testing completes, you can download the training file, test results, and test data.
 After fine-tuning, deploy the model in AI for Process or externally using the generated API endpoint. You can also create another fine-tuned model on top of this one.
***
## Monitor Fine-Tuning Progress
The model **Overview** page shows real-time progress during fine-tuning. Access it by clicking the model on the Fine-tuned models page.
After fine-tuning, deploy the model in AI for Process or externally using the generated API endpoint. You can also create another fine-tuned model on top of this one.
***
## Monitor Fine-Tuning Progress
The model **Overview** page shows real-time progress during fine-tuning. Access it by clicking the model on the Fine-tuned models page.
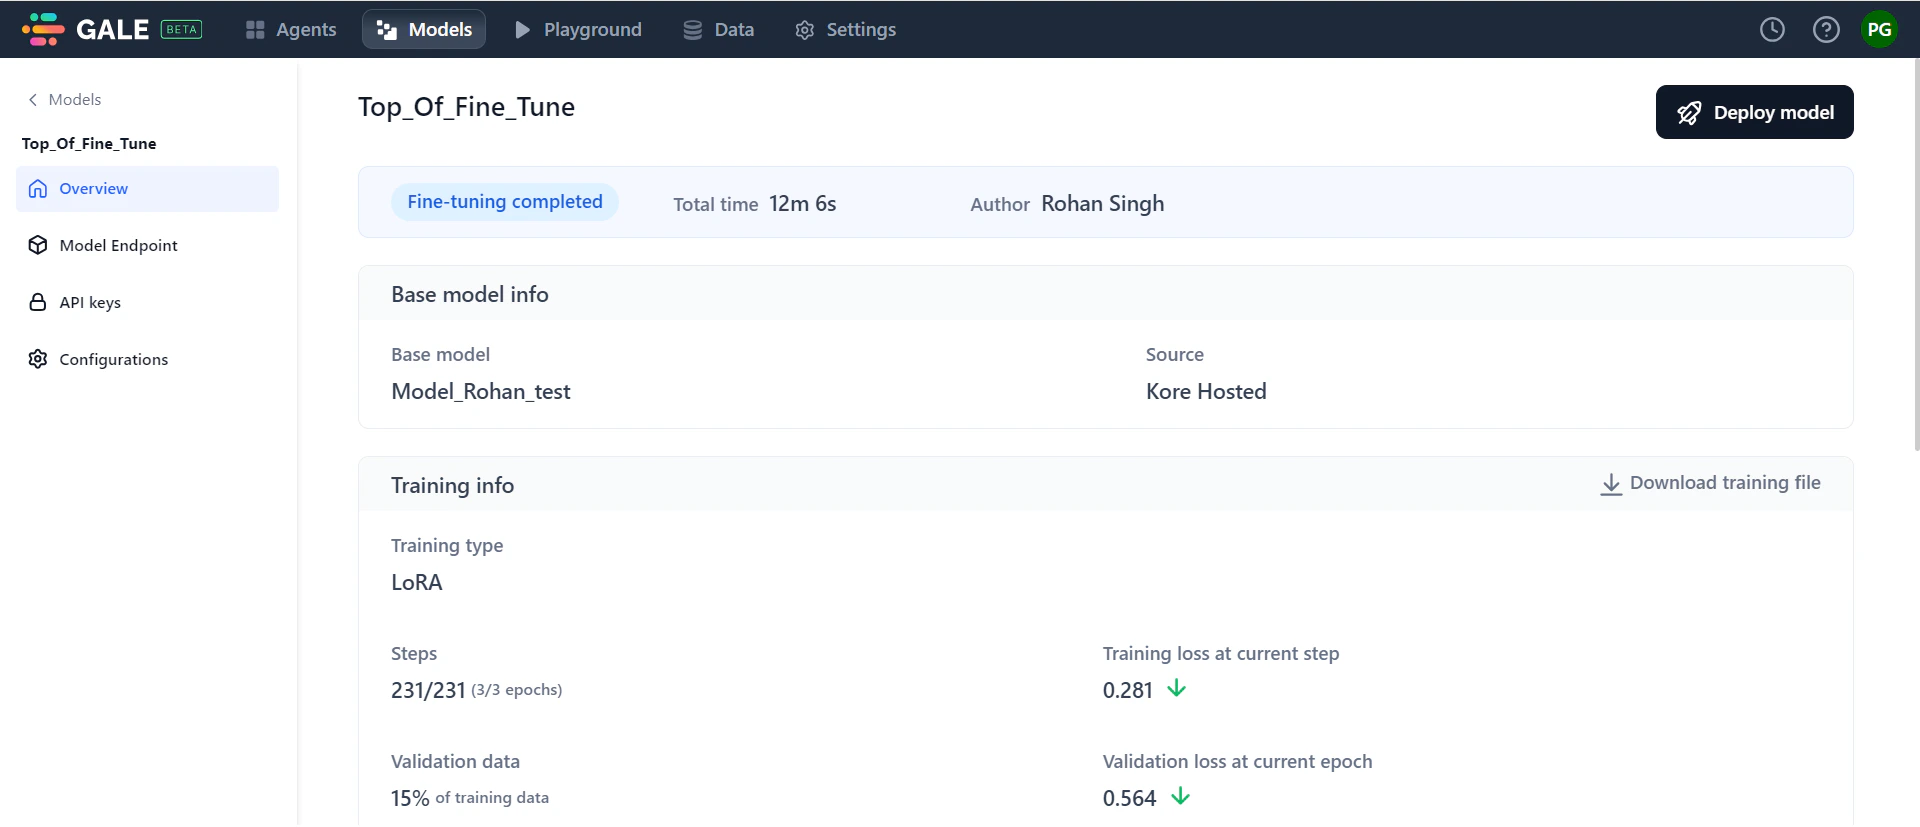 The overview includes the following sections:
* **General Information**: Shows progress status, total time, and author details. Progress statuses include: Initializing, Training in progress, Testing in progress, Fine-tuning completed, Stopped, and Failed.
If fine-tuning fails, the status changes to "Failed." View the reason, make necessary changes, and click **Re-trigger** to restart. If you stop the process mid-way, click **Re-trigger** to restart from the beginning.
* **Base model information**: Shows the base model used and its source.
* **Training information**: Displays training type, number of training steps, training loss, percentage of validation data, validation loss, and training duration. Click the downward arrows next to training loss and validation loss to see their graphical trends.
* **Test data information**: Shows model performance on the test dataset using the BLEU score.
* **Hardware information**: Displays CPU and GPU utilization during fine-tuning.
* **Training parameters**: Summary of the parameters you configured.
***
## Deploy a Fine-Tuned Model
After fine-tuning completes, deploy the model for use in AI for Process or externally.
1. Open the model in one of these ways:
* Go to **Models** > **Fine-tuned models**, click the required model, then click **Deploy model** at the top-right of the Overview page.
The overview includes the following sections:
* **General Information**: Shows progress status, total time, and author details. Progress statuses include: Initializing, Training in progress, Testing in progress, Fine-tuning completed, Stopped, and Failed.
If fine-tuning fails, the status changes to "Failed." View the reason, make necessary changes, and click **Re-trigger** to restart. If you stop the process mid-way, click **Re-trigger** to restart from the beginning.
* **Base model information**: Shows the base model used and its source.
* **Training information**: Displays training type, number of training steps, training loss, percentage of validation data, validation loss, and training duration. Click the downward arrows next to training loss and validation loss to see their graphical trends.
* **Test data information**: Shows model performance on the test dataset using the BLEU score.
* **Hardware information**: Displays CPU and GPU utilization during fine-tuning.
* **Training parameters**: Summary of the parameters you configured.
***
## Deploy a Fine-Tuned Model
After fine-tuning completes, deploy the model for use in AI for Process or externally.
1. Open the model in one of these ways:
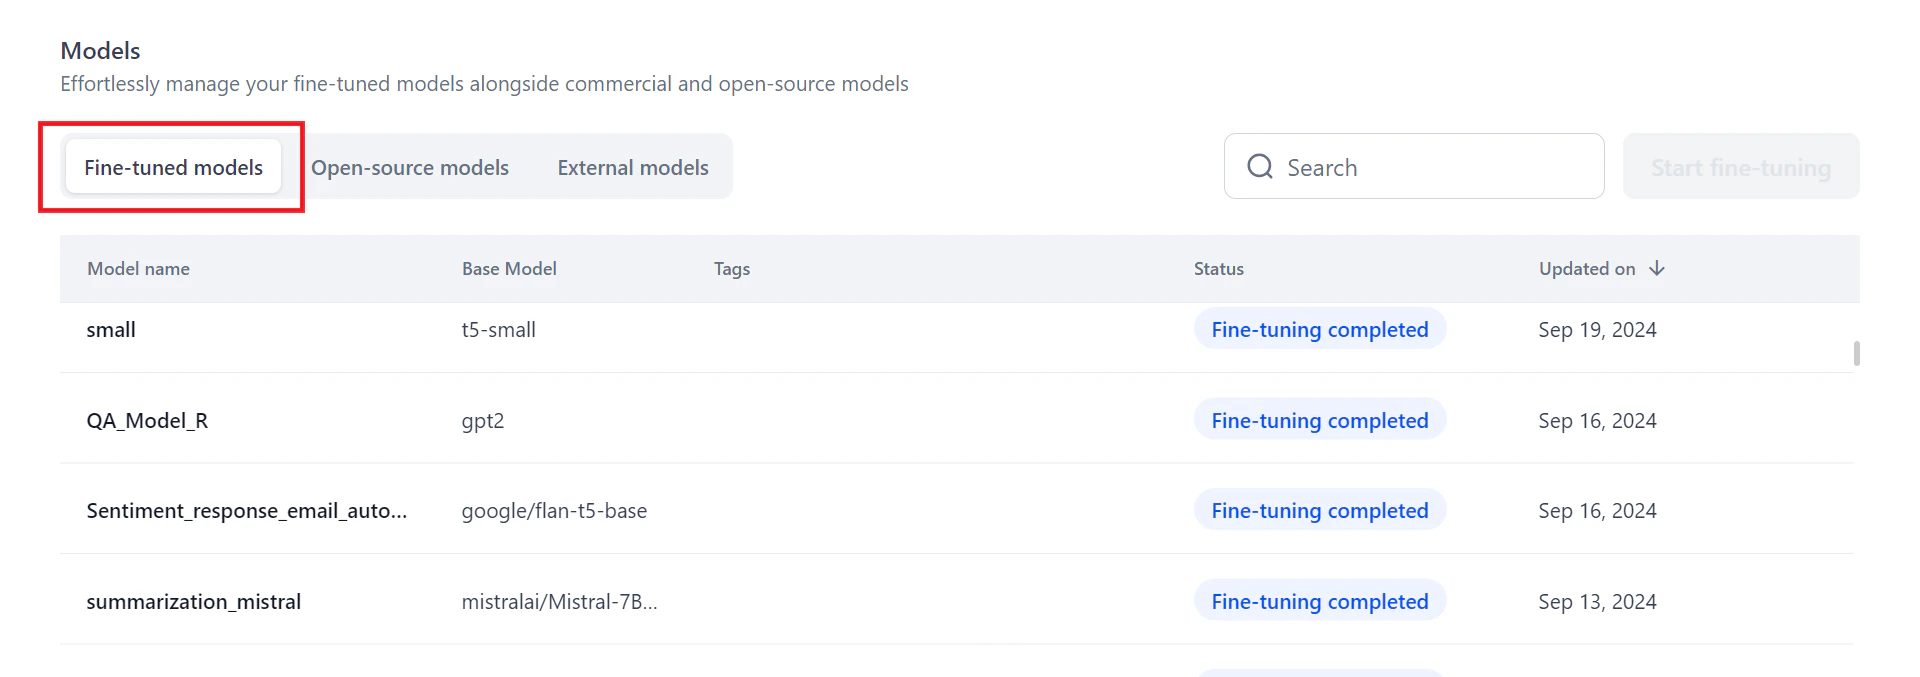
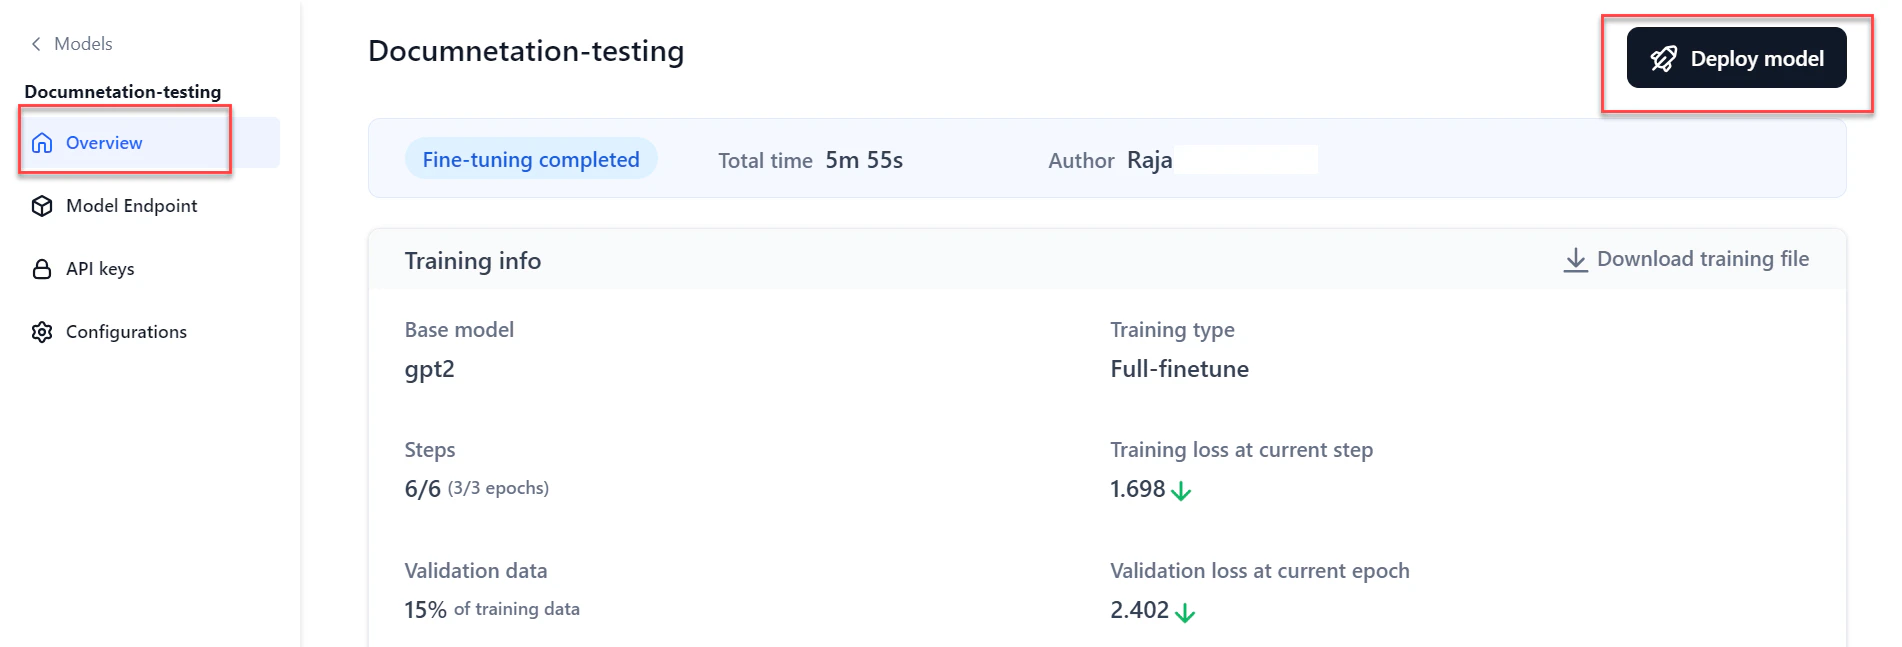
* Go to **Models** > **Fine-tuned models**, click the required model, then click **Deploy model** at the top-right of the Overview page.
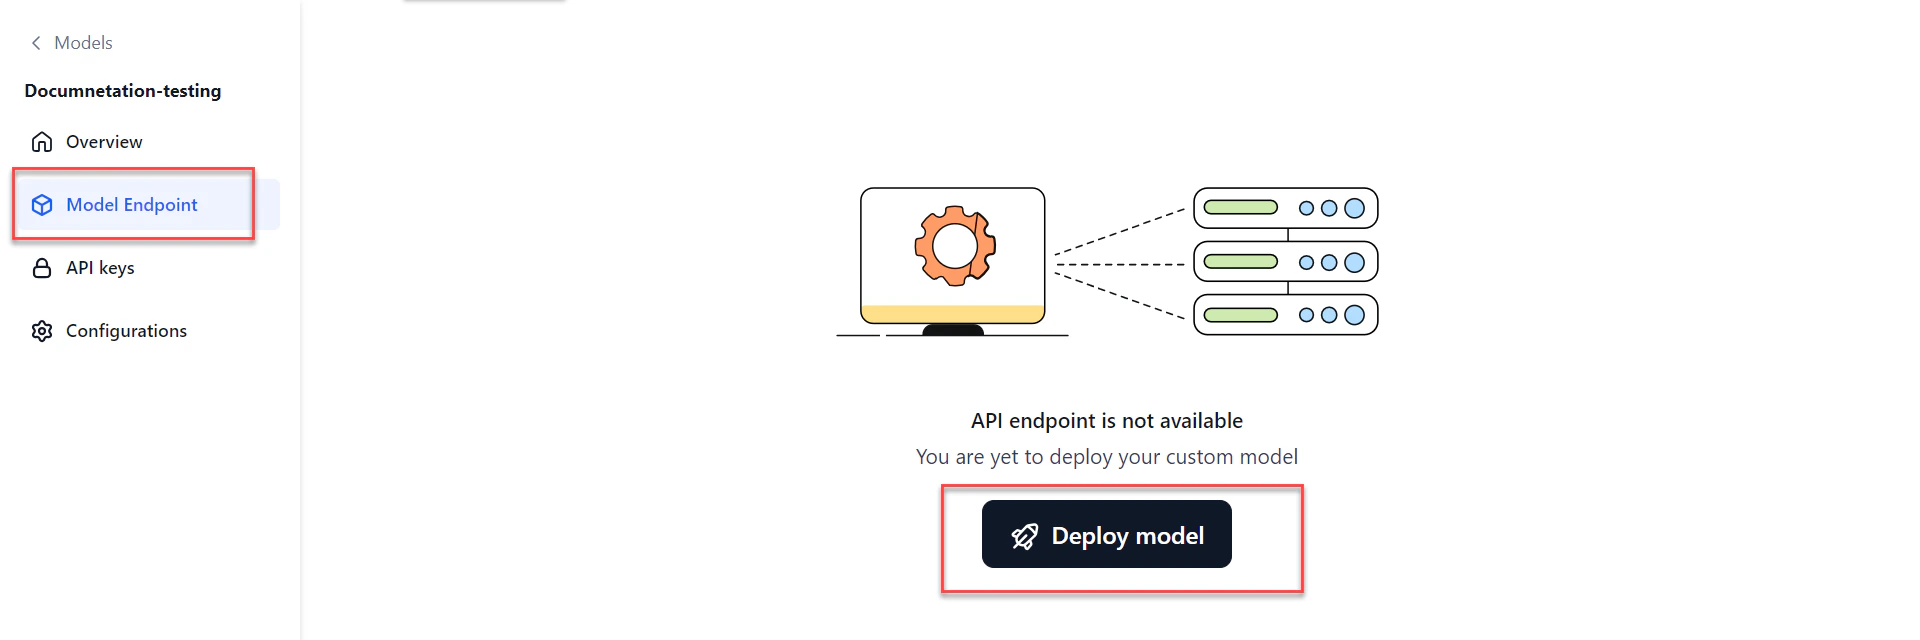
 * Or click **Model Endpoint** in the left navigation, then click **Deploy model**.
 2. In the **General details** section of the Deploy dialog:
* Enter a **Deployment name** and **Description**.
2. In the **General details** section of the Deploy dialog:
* Enter a **Deployment name** and **Description**.
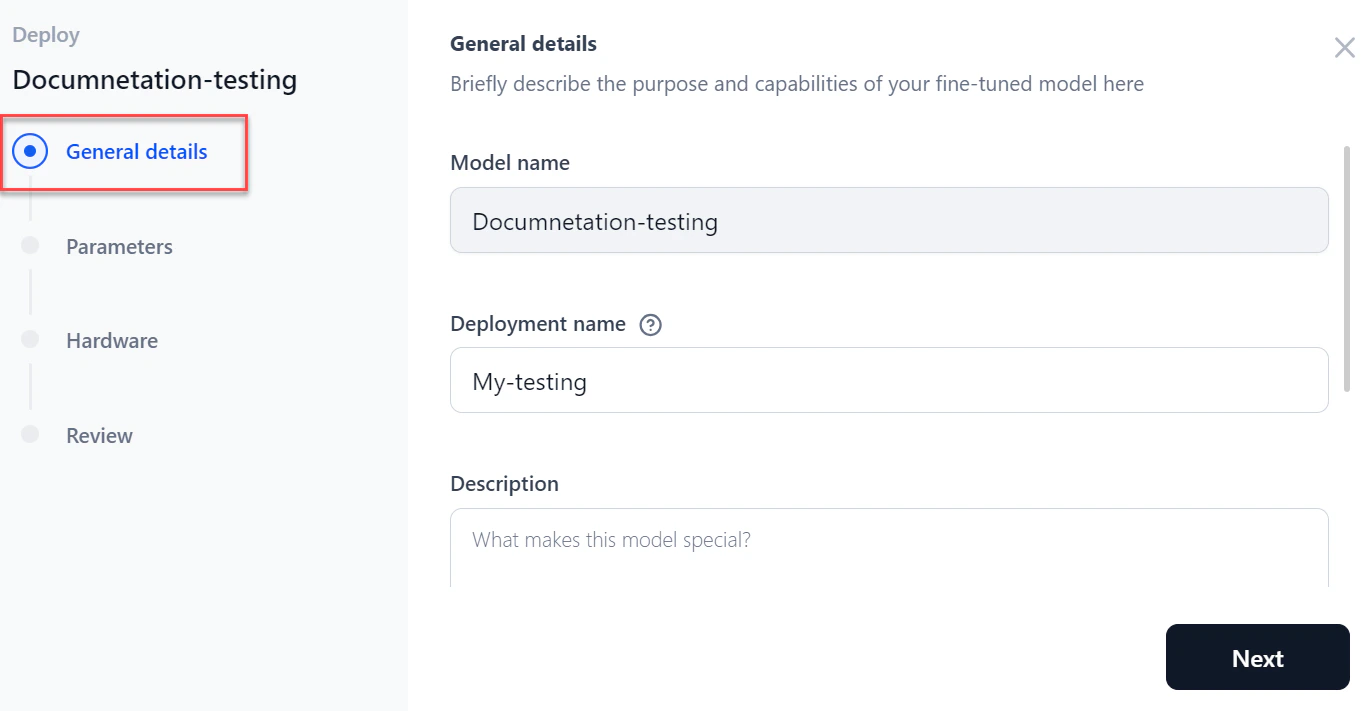 * Add tags and click **Next**.
3. In the **Parameters** section, configure the following:
| Parameter | Description |
| ------------------------------ | ------------------------------------------------------------------------------ |
| **Temperature** | Sampling temperature for generation. |
| **Maximum length** | Maximum number of tokens to generate. |
| **Top p** | Sampling with top\_p probability mass; an alternative to temperature sampling. |
| **Top k** | Number of highest-probability tokens to keep for top-k filtering. |
| **Stop sequences** | Sequences where the model stops generating further tokens. |
| **Inference batch size** | Batch size for concurrent requests during inferencing. |
| **Min replicas** | Minimum number of model replicas to deploy. |
| **Max replicas** | Maximum number of replicas to auto-scale. |
| **Scale up delay (seconds)** | How long to wait before scaling up replicas. |
| **Scale down delay (seconds)** | How long to wait before scaling down replicas. |
* Add tags and click **Next**.
3. In the **Parameters** section, configure the following:
| Parameter | Description |
| ------------------------------ | ------------------------------------------------------------------------------ |
| **Temperature** | Sampling temperature for generation. |
| **Maximum length** | Maximum number of tokens to generate. |
| **Top p** | Sampling with top\_p probability mass; an alternative to temperature sampling. |
| **Top k** | Number of highest-probability tokens to keep for top-k filtering. |
| **Stop sequences** | Sequences where the model stops generating further tokens. |
| **Inference batch size** | Batch size for concurrent requests during inferencing. |
| **Min replicas** | Minimum number of model replicas to deploy. |
| **Max replicas** | Maximum number of replicas to auto-scale. |
| **Scale up delay (seconds)** | How long to wait before scaling up replicas. |
| **Scale down delay (seconds)** | How long to wait before scaling down replicas. |
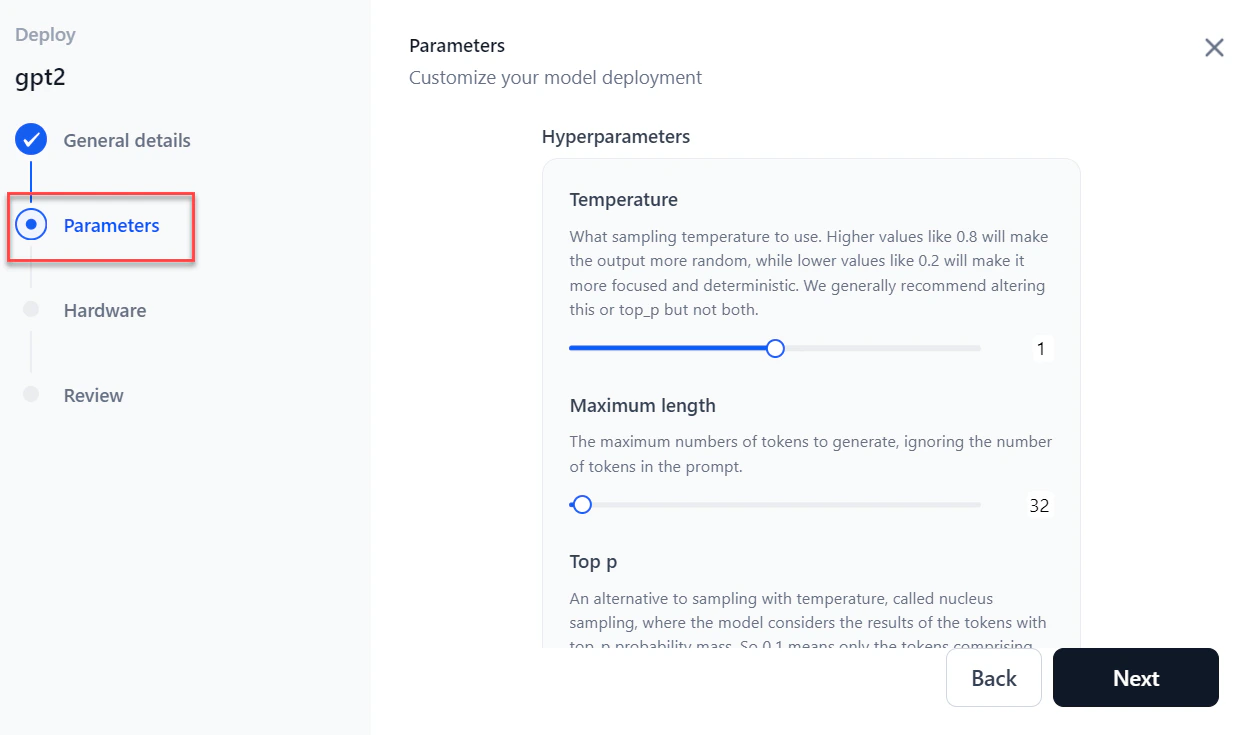 4. Click **Next**.
5. Select the required **Hardware** from the dropdown and click **Next**.
4. Click **Next**.
5. Select the required **Hardware** from the dropdown and click **Next**.
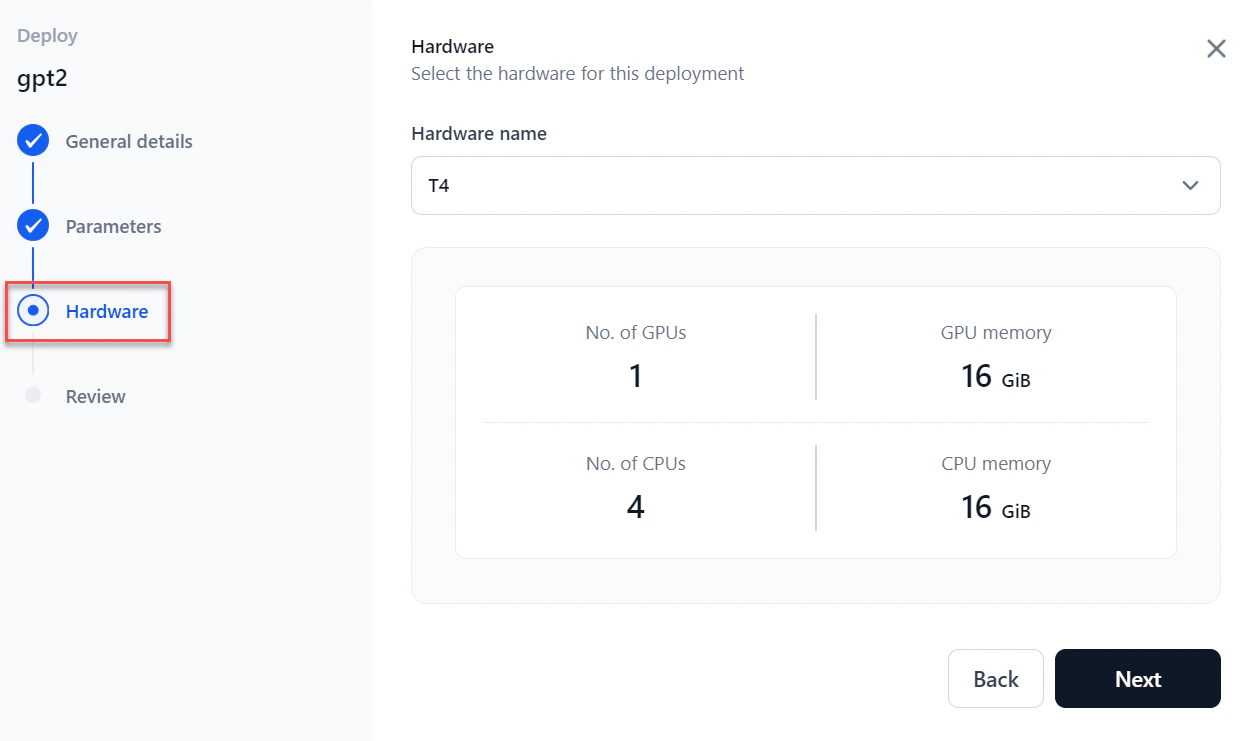 6. In the **Review** step, verify all details and select **I accept all the terms and conditions**.
 To make changes, click **Back** or select a specific step in the left panel.
7. Click **Deploy**. Once complete, the status changes to Deployed and an API endpoint is generated for the model.
***
## View the API Endpoint
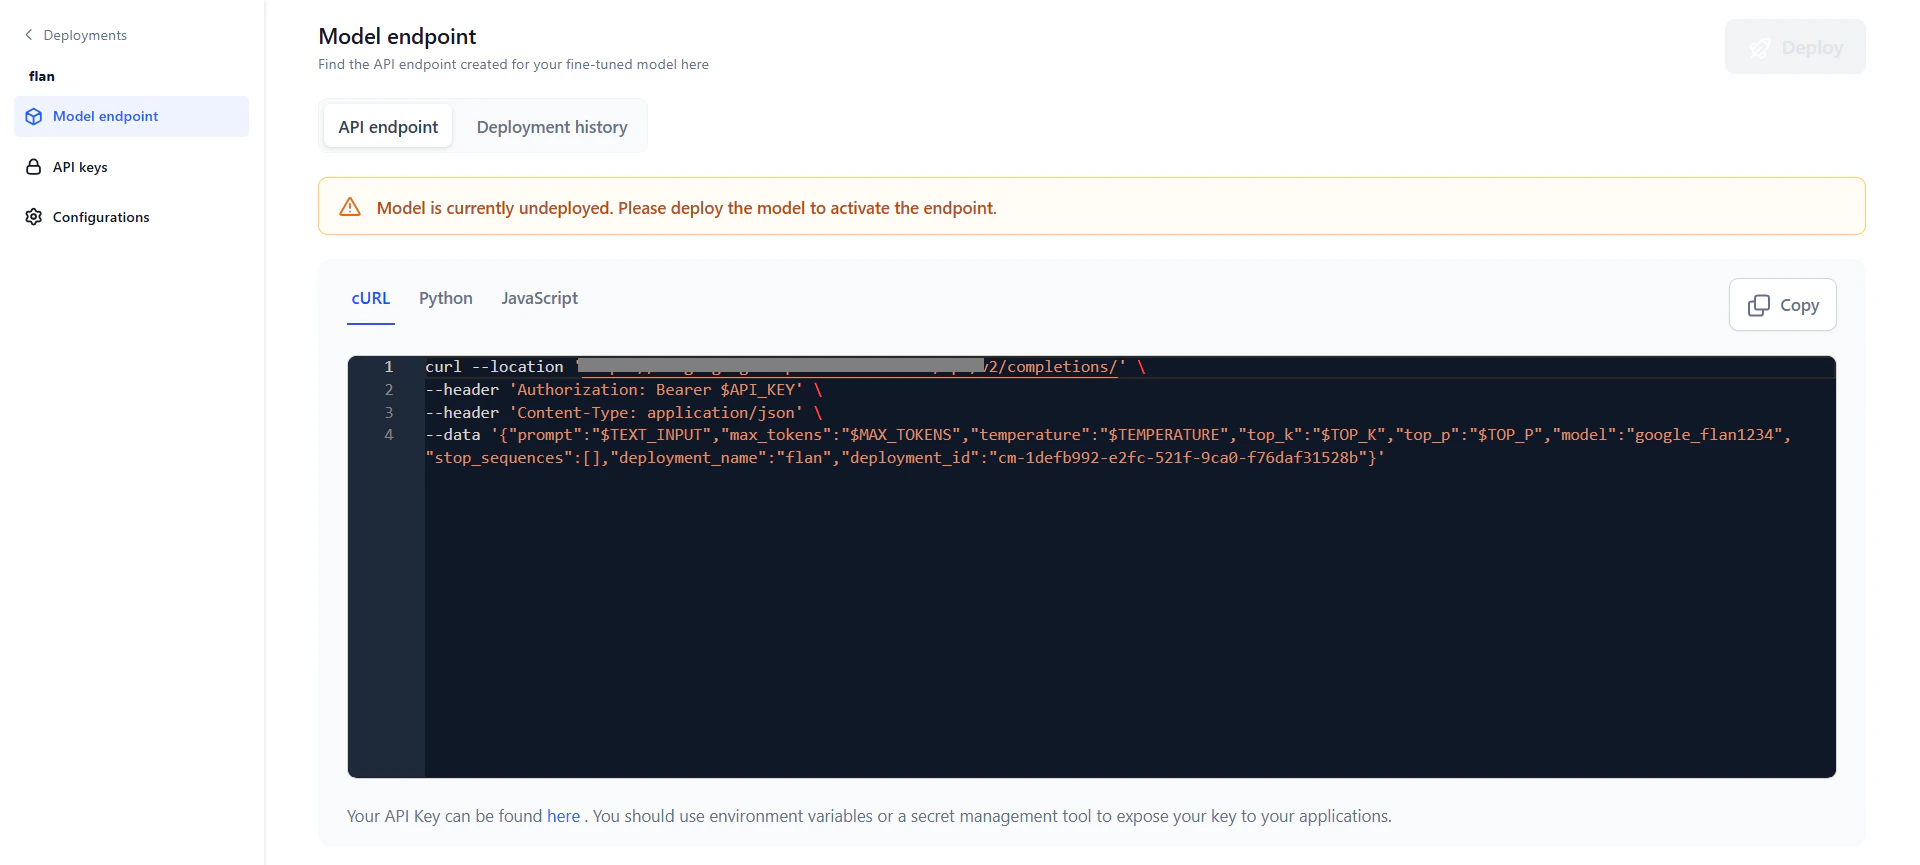
After deployment, an API endpoint is generated for external inferencing and for use across AI for Process.
You receive an email notification when deployment completes and the API endpoint is ready.
1. Go to **Models** > **Fine-tuned models** and click the required model. Click **Model Endpoint** in the left navigation.
2. Click the **Copy** icon to copy the API endpoint.
To make changes, click **Back** or select a specific step in the left panel.
7. Click **Deploy**. Once complete, the status changes to Deployed and an API endpoint is generated for the model.
***
## View the API Endpoint
After deployment, an API endpoint is generated for external inferencing and for use across AI for Process.
You receive an email notification when deployment completes and the API endpoint is ready.
1. Go to **Models** > **Fine-tuned models** and click the required model. Click **Model Endpoint** in the left navigation.
2. Click the **Copy** icon to copy the API endpoint.
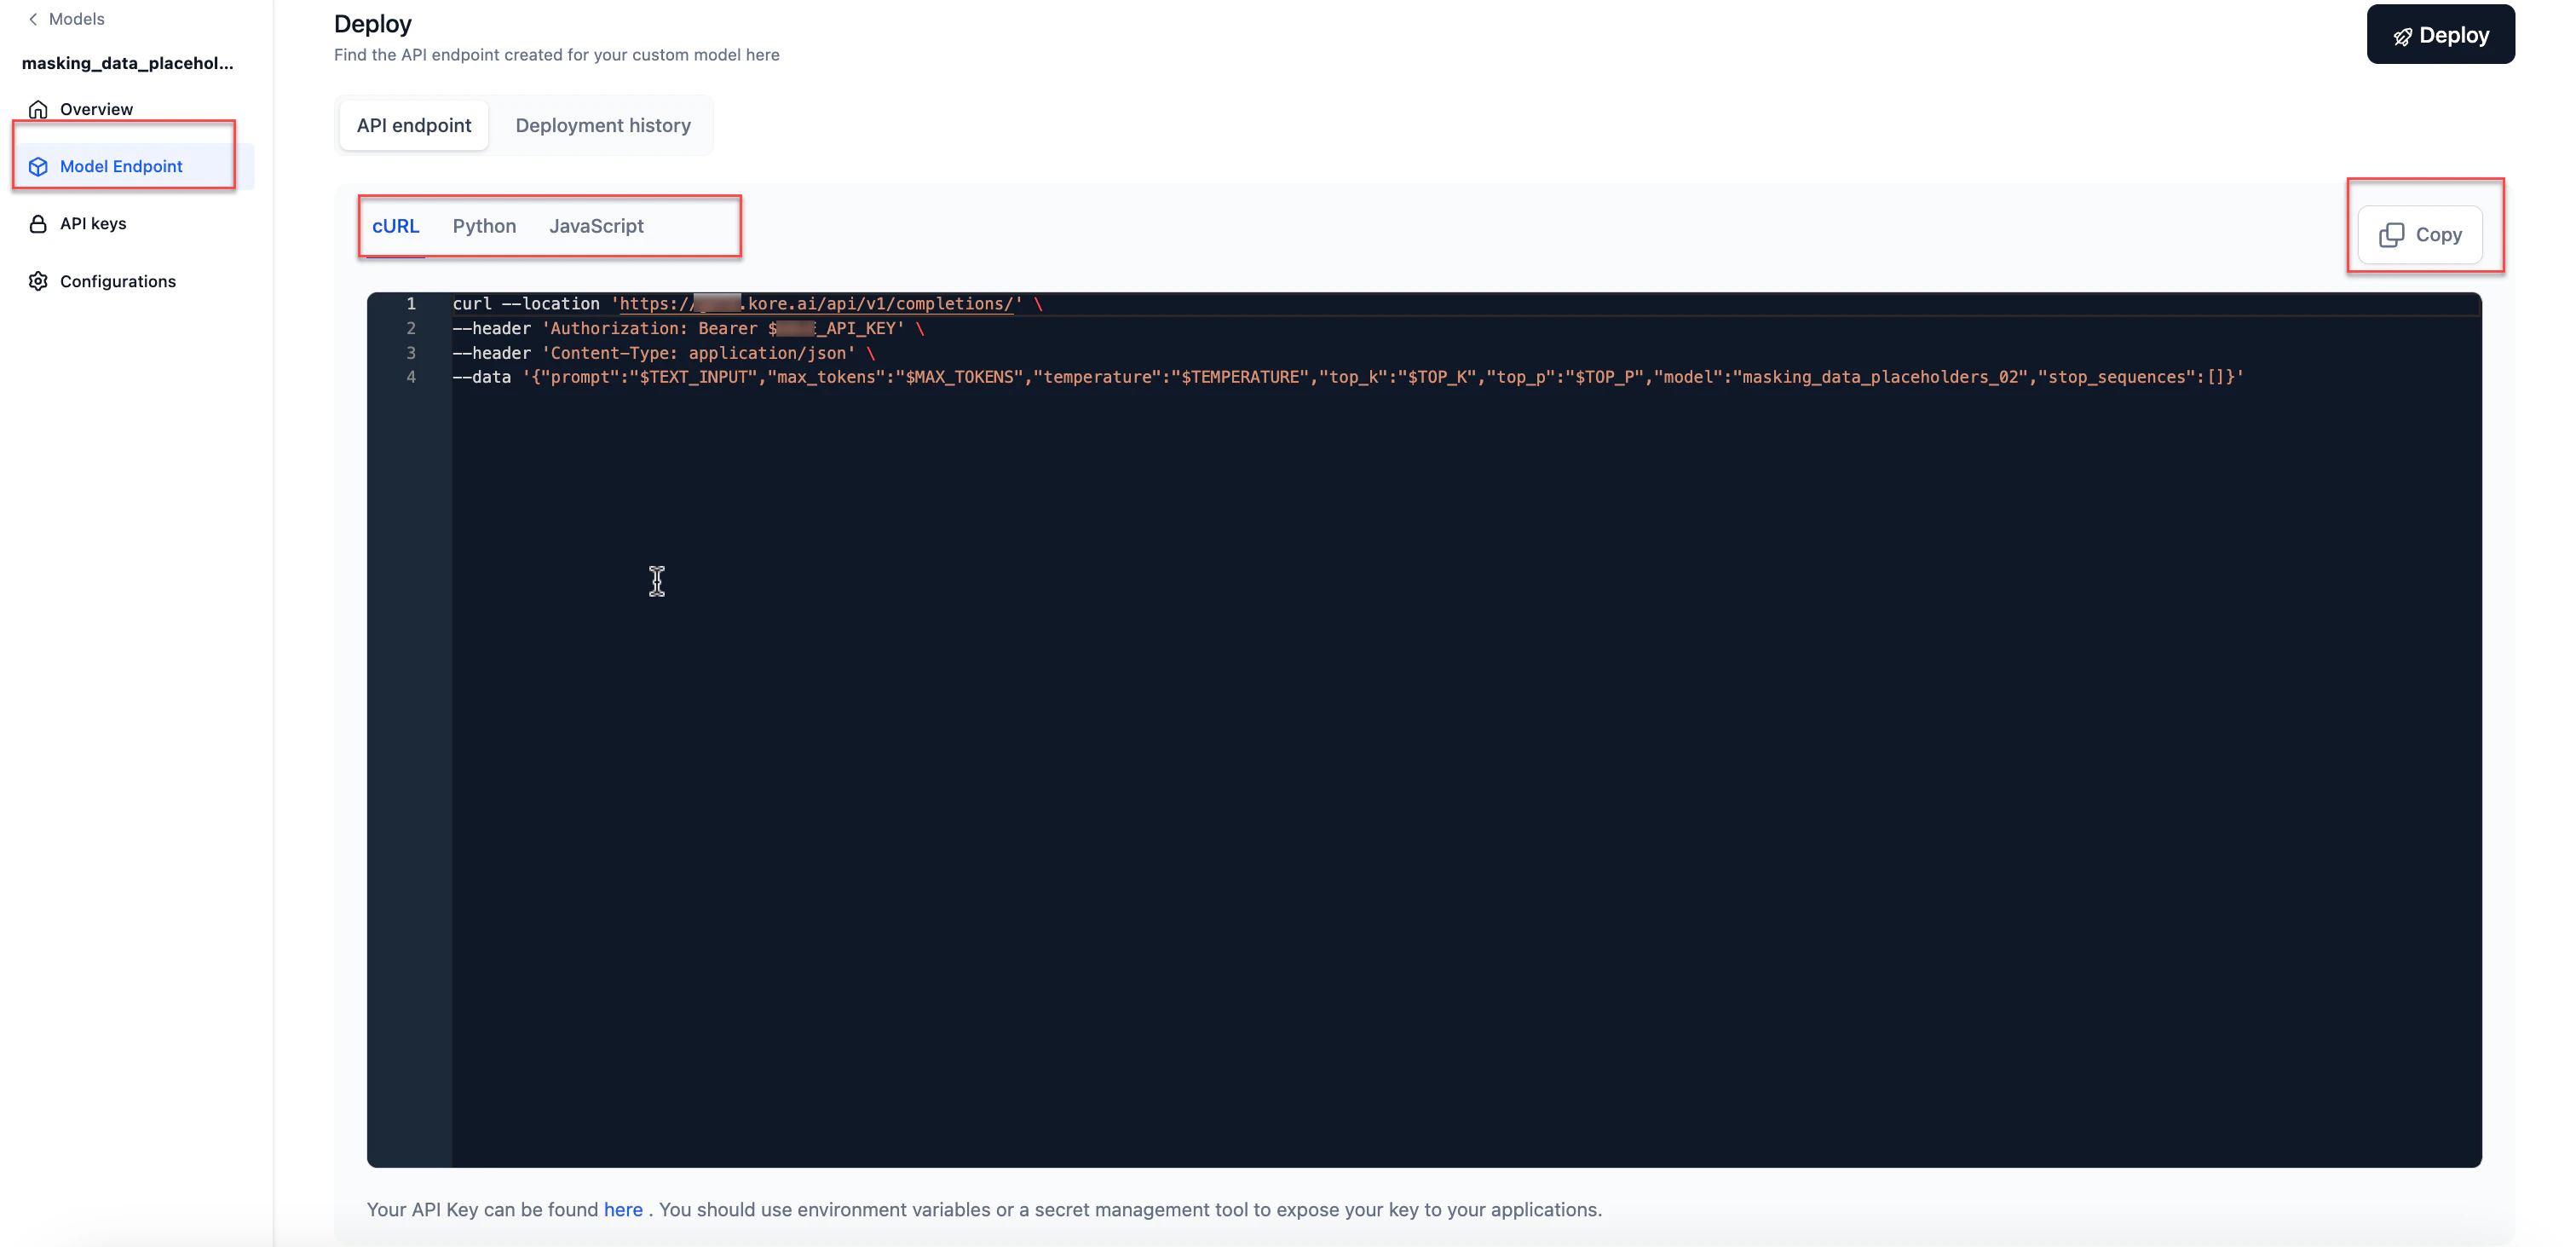 The endpoint is available in three formats. Use the one that fits your integration.
### API endpoint use cases
Use the deployed fine-tuned model in AI for Process for:
* The **Prompt Playground** — compare prompts across commercial, open-source, or fine-tuned models.
* A **workflow** in the workflow builder via the AI Node.
***
## Manage Deployments
Each model can have multiple deployments tracked independently. Click the **Deployments** tab on the model detail page to see all deployments.
| Field | Description |
| ------------------- | ---------------------------------------------------------------------------------------------------------------------------------------------------------------------------------------------------- |
| **Deployment Name** | Name given during deployment. |
| **Deployment ID** | System-generated ID (not editable). |
| **Status** | Current status: Deploying, Optimizing, Failed, Ready to Deploy, or Deployed. |
| **Deployed By** | User who performed the deployment. |
| **Added On** | Date of deployment. |
| **Actions** | **Copy cURL** — Copies the cURL command for this deployment. **Manage API Keys** — Opens the API key management tab. **Re-trigger** — Restarts the deployment (available only if failed or stopped). |
The endpoint is available in three formats. Use the one that fits your integration.
### API endpoint use cases
Use the deployed fine-tuned model in AI for Process for:
* The **Prompt Playground** — compare prompts across commercial, open-source, or fine-tuned models.
* A **workflow** in the workflow builder via the AI Node.
***
## Manage Deployments
Each model can have multiple deployments tracked independently. Click the **Deployments** tab on the model detail page to see all deployments.
| Field | Description |
| ------------------- | ---------------------------------------------------------------------------------------------------------------------------------------------------------------------------------------------------- |
| **Deployment Name** | Name given during deployment. |
| **Deployment ID** | System-generated ID (not editable). |
| **Status** | Current status: Deploying, Optimizing, Failed, Ready to Deploy, or Deployed. |
| **Deployed By** | User who performed the deployment. |
| **Added On** | Date of deployment. |
| **Actions** | **Copy cURL** — Copies the cURL command for this deployment. **Manage API Keys** — Opens the API key management tab. **Re-trigger** — Restarts the deployment (available only if failed or stopped). |
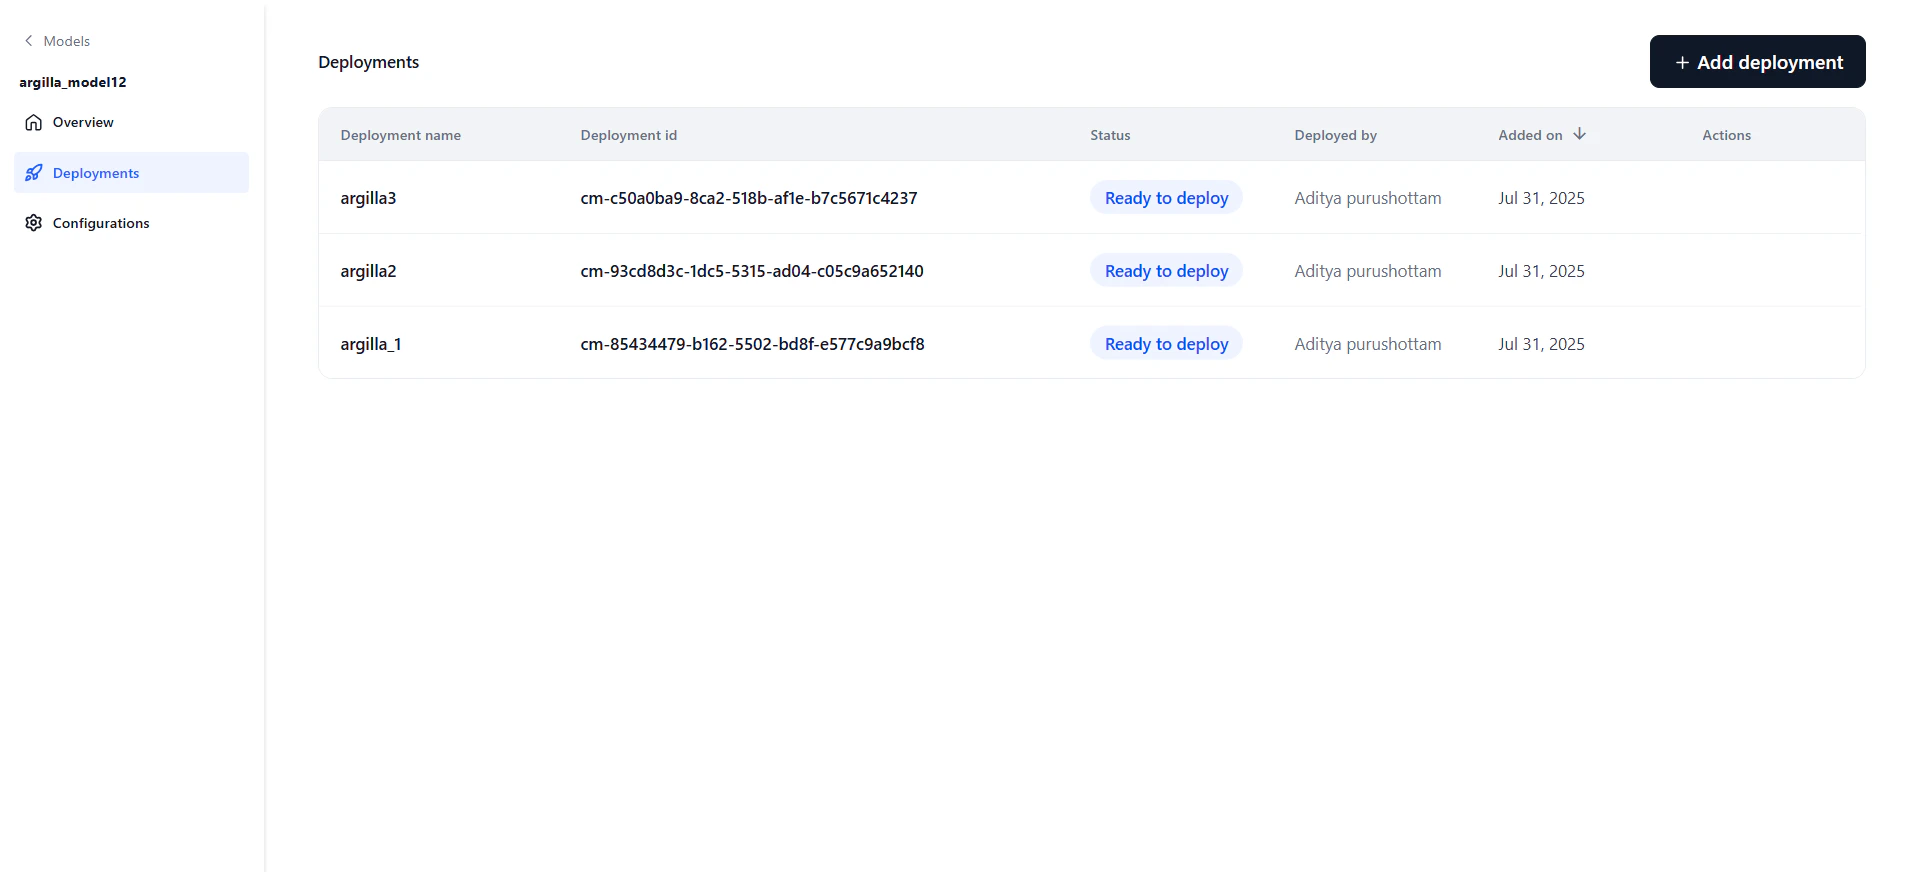 Selecting a deployment opens its detail view to manage the endpoint, API keys, and configuration for that specific deployment.
 ***
## Deployment History
The deployment history table tracks the full lifecycle of the model, showing each version's deployment name, timestamp, duration, and the user who performed the deployment.
After deploying, you can modify parameters and redeploy. The system appends a version number to the original deployment name and increments it with each redeployment. For example, "Flan T5" becomes "Flan T5\_v1," then "Flan T5\_v2," and so on. Editing the deployment name doesn't affect versioning — subsequent redeployments always use the original name.
The most recent deployment is marked with a green tick. Click any version to view its details.
***
## Deployment History
The deployment history table tracks the full lifecycle of the model, showing each version's deployment name, timestamp, duration, and the user who performed the deployment.
After deploying, you can modify parameters and redeploy. The system appends a version number to the original deployment name and increments it with each redeployment. For example, "Flan T5" becomes "Flan T5\_v1," then "Flan T5\_v2," and so on. Editing the deployment name doesn't affect versioning — subsequent redeployments always use the original name.
The most recent deployment is marked with a green tick. Click any version to view its details.
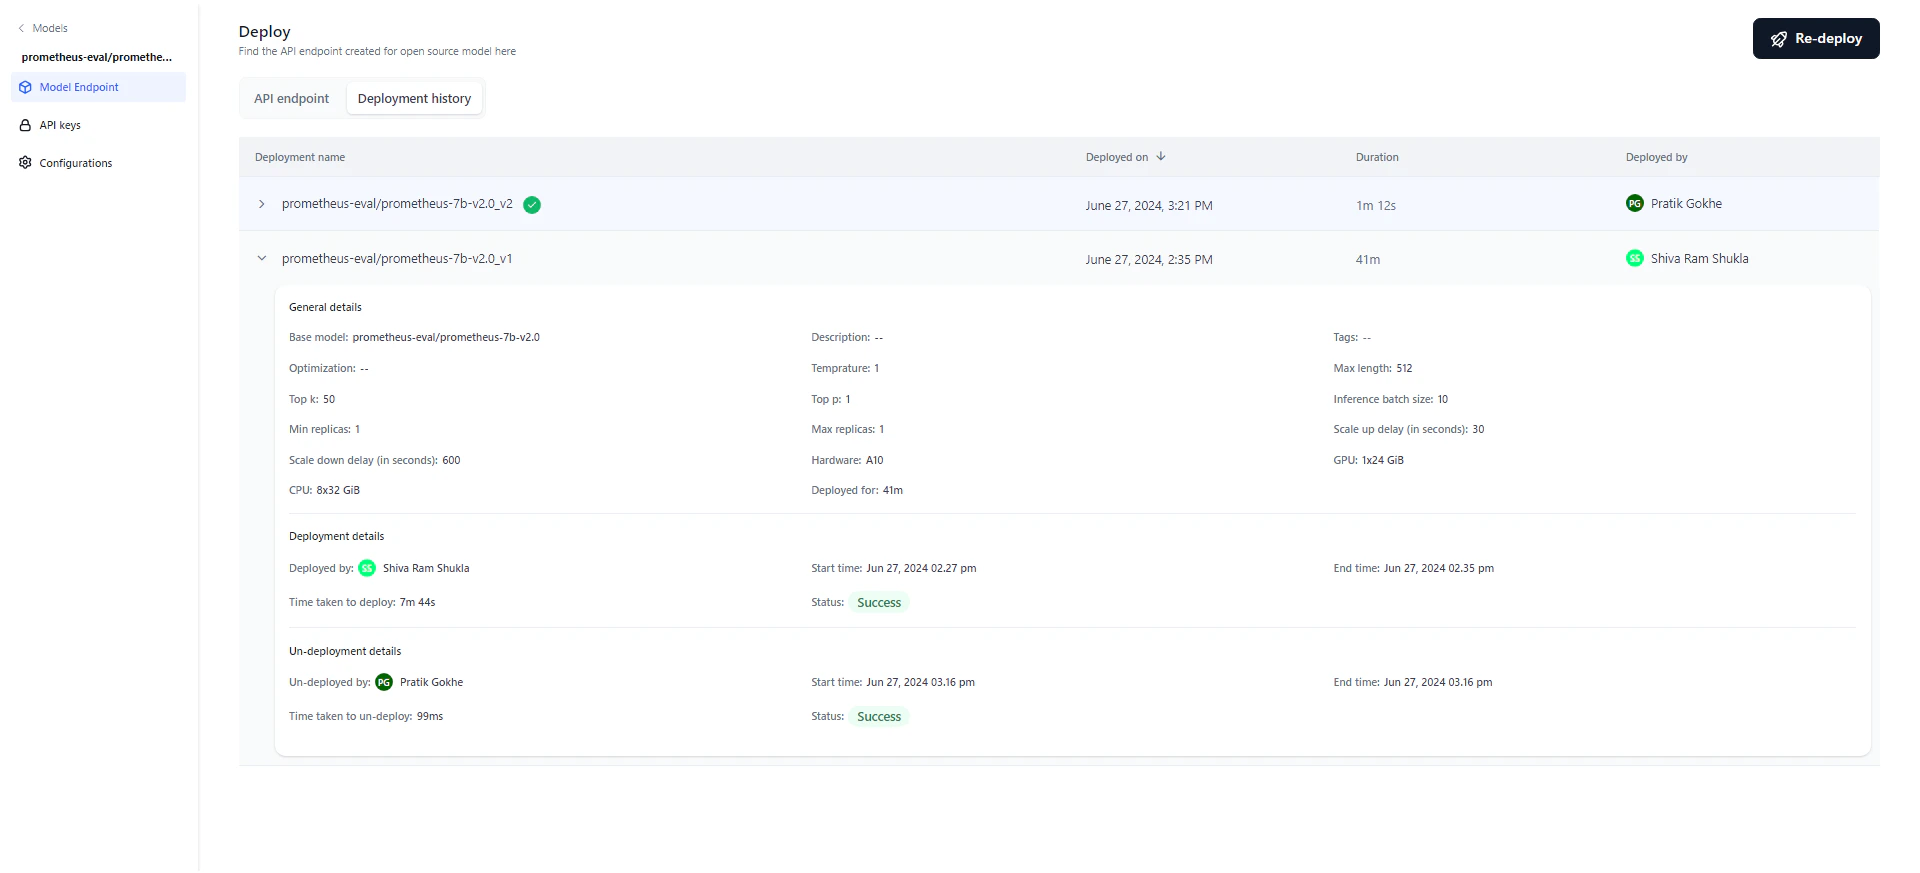 Each deployment version shows:
* **General details**: Model name, description, tags, optimization technique, parameters, hardware, and deployment duration.
* **Deployment details**: Who deployed the model, start and end timestamps, duration, and status (Success, Failed, or Deploying). Hover over "Status" on a failed deployment to see the reason.
* **Un-deployment details**: Appears only if the model was undeployed, either manually or automatically. Shows who initiated the undeployment and the start/end timestamps.
***
## Generate an API Key
Generate an API key to share access to your fine-tuned model with trusted users. A secure API key is required to connect to the model from an external environment.
1. Go to **Models** > **Fine-tuned models** and click the required model. Click **API keys** in the left navigation.
Each deployment version shows:
* **General details**: Model name, description, tags, optimization technique, parameters, hardware, and deployment duration.
* **Deployment details**: Who deployed the model, start and end timestamps, duration, and status (Success, Failed, or Deploying). Hover over "Status" on a failed deployment to see the reason.
* **Un-deployment details**: Appears only if the model was undeployed, either manually or automatically. Shows who initiated the undeployment and the start/end timestamps.
***
## Generate an API Key
Generate an API key to share access to your fine-tuned model with trusted users. A secure API key is required to connect to the model from an external environment.
1. Go to **Models** > **Fine-tuned models** and click the required model. Click **API keys** in the left navigation.
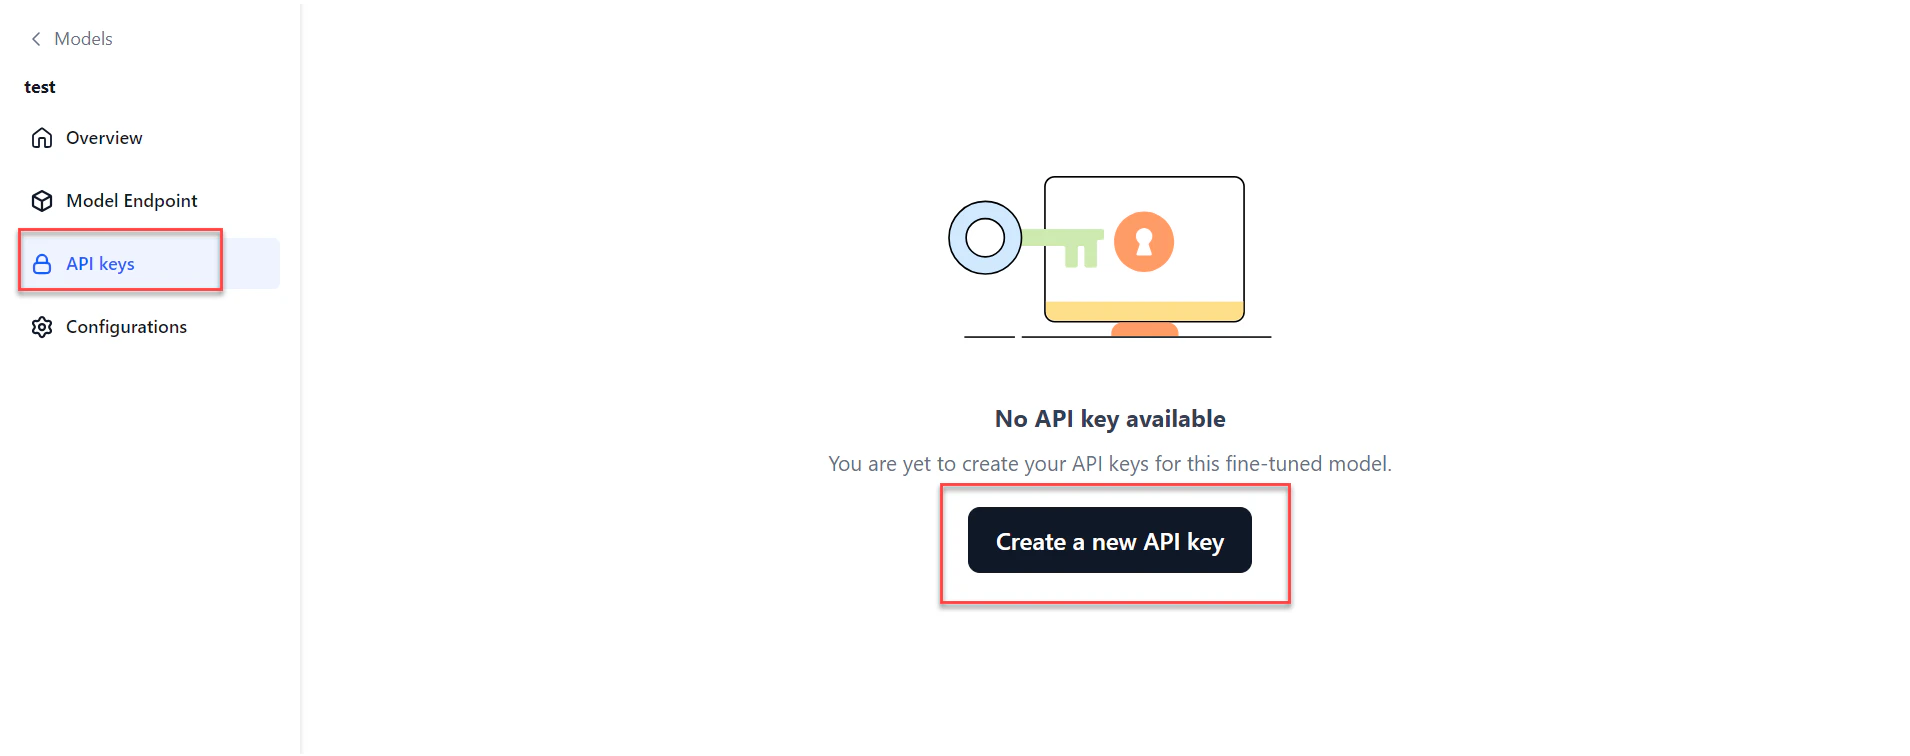 2. Click **Create a new API key**. The **Create new API key** dialog opens.
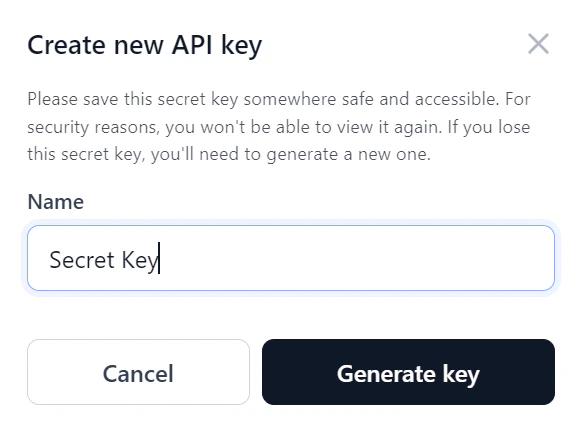 3. Enter a **Name** for the key and click **Generate key**.
4. Click **Copy and close** to copy the key and share it as needed.
3. Enter a **Name** for the key and click **Generate key**.
4. Click **Copy and close** to copy the key and share it as needed.
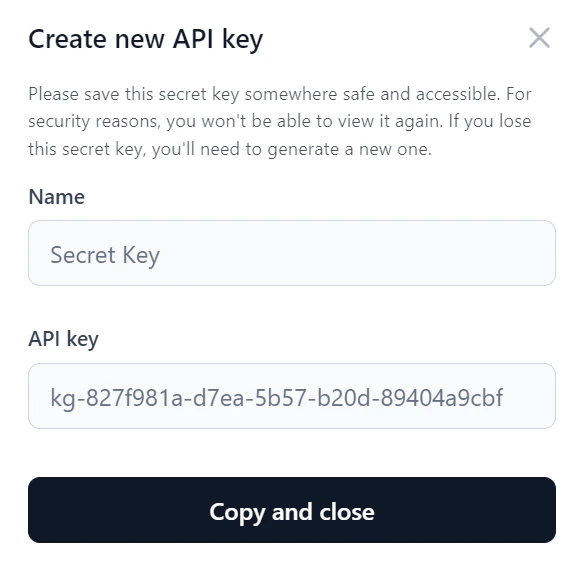 API keys are scoped per deployment for secure access control.
***
## Configure a Fine-Tuned Model
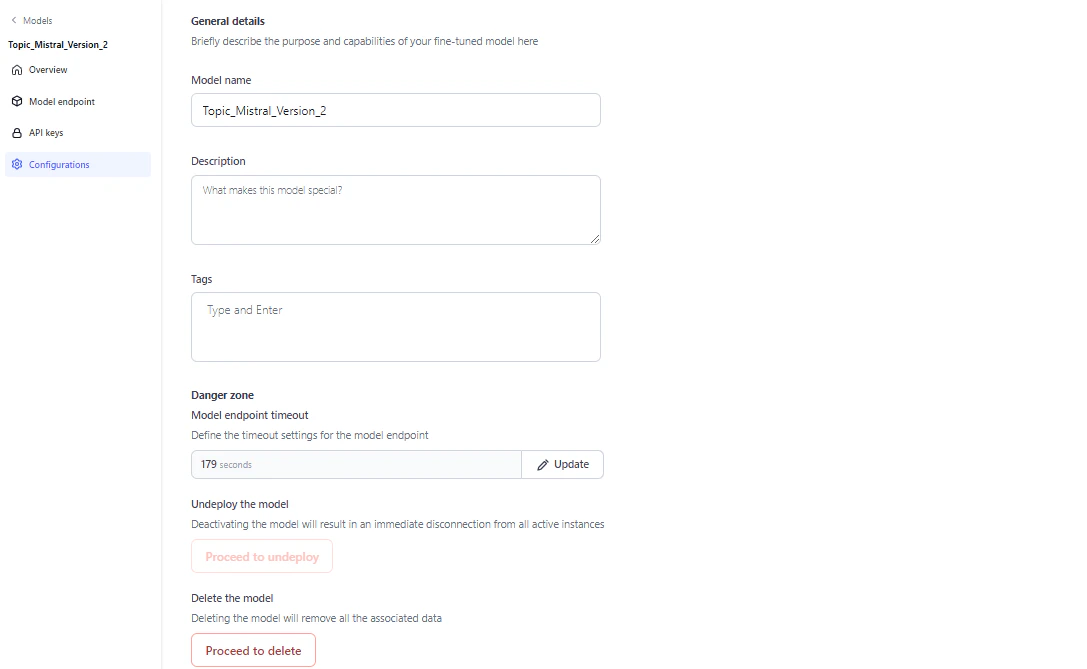
On the **Configurations** page, you can edit the model name, description, and tags, adjust the endpoint timeout, undeploy, or delete the model.
API keys are scoped per deployment for secure access control.
***
## Configure a Fine-Tuned Model
On the **Configurations** page, you can edit the model name, description, and tags, adjust the endpoint timeout, undeploy, or delete the model.
 ### Model endpoint timeout
Set a specific timeout for your model's endpoint. The allowed range is 30 to 180 seconds (3 minutes). The default is 60 seconds. If a request isn't completed within the set time, the endpoint returns a timeout error.
Timeout precedence: Workflow timeout > Node timeout > Model timeout.
### Undeploy the model
Undeploy the model if it's no longer in use. Undeploying disconnects the model immediately from all active instances. Click **Proceed to undeploy** on the Configurations page and follow the on-screen instructions.
### Delete the model
You can delete an undeployed model. Deleting the model removes all associated data. Click **Proceed to delete** on the Configurations page and follow the on-screen instructions.
***
## Export a Fine-Tuned Model
You can export your fine-tuned model for external reference.
1. On the **Models** page, click the three dots icon next to the model name. A menu appears.
### Model endpoint timeout
Set a specific timeout for your model's endpoint. The allowed range is 30 to 180 seconds (3 minutes). The default is 60 seconds. If a request isn't completed within the set time, the endpoint returns a timeout error.
Timeout precedence: Workflow timeout > Node timeout > Model timeout.
### Undeploy the model
Undeploy the model if it's no longer in use. Undeploying disconnects the model immediately from all active instances. Click **Proceed to undeploy** on the Configurations page and follow the on-screen instructions.
### Delete the model
You can delete an undeployed model. Deleting the model removes all associated data. Click **Proceed to delete** on the Configurations page and follow the on-screen instructions.
***
## Export a Fine-Tuned Model
You can export your fine-tuned model for external reference.
1. On the **Models** page, click the three dots icon next to the model name. A menu appears.
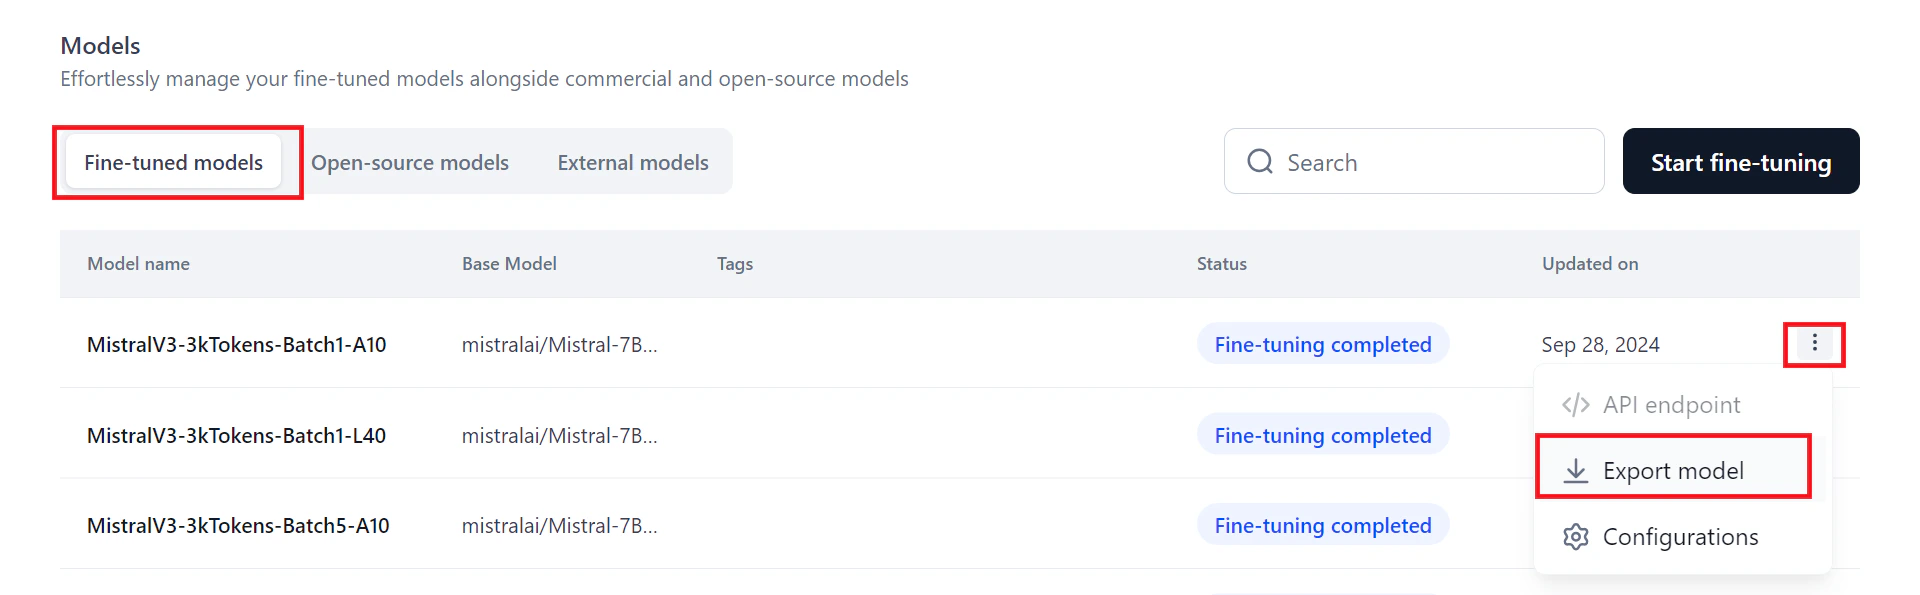 2. Click **Export model**. The exported zip file saves to your downloads folder.