> ## Documentation Index
> Fetch the complete documentation index at: https://koreai.mintlify.site/llms.txt
> Use this file to discover all available pages before exploring further.
# Open-Source Models
Import, deploy, manage, and configure open-source models in AI for Process. Covers platform-hosted models, Hugging Face imports, local file imports, optimization techniques, API endpoints, and deployment management.
Use Open-Source Models in Model Hub to deploy, import, and manage open-source AI models. You can choose from platform-hosted models, import directly from Hugging Face, or upload model files from your local machine.
***
## Model List
The Open-Source Models page lists all available models with the following details:
| Field | Description |
| ---------------------- | ------------------------------------------------------------------------------------------ |
| **Model Name** | Name of the model. For imported models, the name is derived from the uploaded `.zip` file. |
| **Active Deployments** | Number of deployments currently active. |
| **Deployment Failed** | Number of deployments that failed. |
| **Ready to Deploy** | Number of deployments ready to be deployed. |
| **Source** | Origin of the model: File (uploaded locally), Platform Hosted, or Hugging Face. |
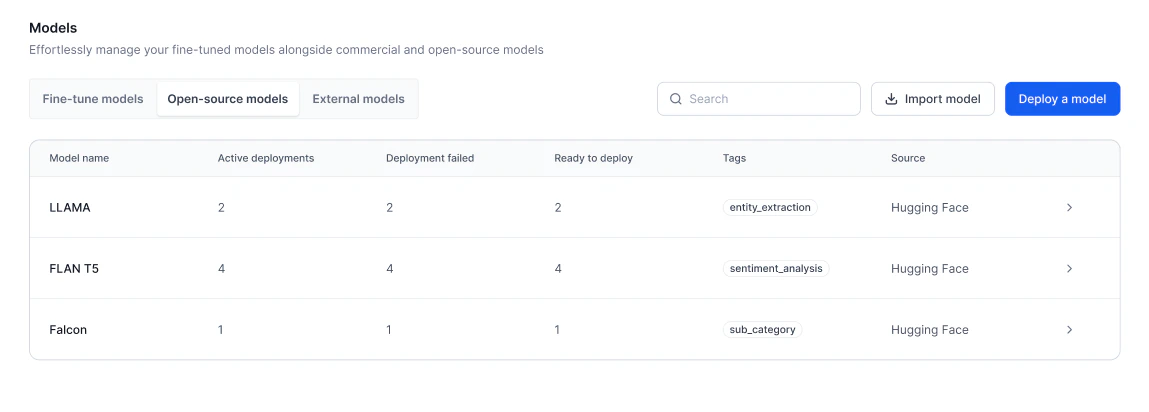 After deployment, the model appears in this listing along with the number of deployments. Selecting a model opens its **Deployments** page, where you can view and manage all related deployments.
## Import a Model
You can import model files from your local machine as base models or adapter models.
* **Base model**: A pre-trained model for general tasks as-is or fine-tuned for specific use cases.
* **Adapter model**: A smaller model that adjusts a base model for a specific task without retraining it. Importing an adapter model requires specifying its related base model.
Once imported, these models are available for deployment and can be fine-tuned further. Imported models appear in the Base model section of Models Hub during fine-tuning.
The `deployconfig.json` file is included in model exports. When you re-import the same model, the deployment wizard automatically pre-fills the previously selected optimization techniques, hyperparameters, hardware settings, and scaling configuration from this file.
### Prerequisites
* You must be logged in to AI for Process with the necessary permissions to import models.
* The model file must be available on your local machine.
### Best practices
1. **Ensure model compatibility**: When importing an adapter model, verify that it is compatible with a supported base model. Select a base model from the platform-hosted list before uploading the adapter file.
2. **Validate model files before importing**: Check the file extension and format before uploading. The system validates the file during import, so uploading a valid file upfront prevents unnecessary errors.
3. **Import one model at a time**: Avoid simultaneous imports. Ensure each model is fully imported and validated before starting the next.
4. **Monitor import and validation status**: Track the model's status during import. If an error occurs, the system provides details. Use this information to correct the file or re-upload.
5. **Prepare for deployment after validation**: Once imported and validated, the model is marked as Ready to Deploy. Before deploying, set up description, tags, and API keys.
6. **Avoid interruptions during import**: Do not switch accounts or refresh the page during import, as these actions may interrupt the process.
### Import a base model
1. Go to **Models** > **Open-source models** and click **Import model**.
2. On the **Import model** dialog, select the **Base Model** tab.
After deployment, the model appears in this listing along with the number of deployments. Selecting a model opens its **Deployments** page, where you can view and manage all related deployments.
## Import a Model
You can import model files from your local machine as base models or adapter models.
* **Base model**: A pre-trained model for general tasks as-is or fine-tuned for specific use cases.
* **Adapter model**: A smaller model that adjusts a base model for a specific task without retraining it. Importing an adapter model requires specifying its related base model.
Once imported, these models are available for deployment and can be fine-tuned further. Imported models appear in the Base model section of Models Hub during fine-tuning.
The `deployconfig.json` file is included in model exports. When you re-import the same model, the deployment wizard automatically pre-fills the previously selected optimization techniques, hyperparameters, hardware settings, and scaling configuration from this file.
### Prerequisites
* You must be logged in to AI for Process with the necessary permissions to import models.
* The model file must be available on your local machine.
### Best practices
1. **Ensure model compatibility**: When importing an adapter model, verify that it is compatible with a supported base model. Select a base model from the platform-hosted list before uploading the adapter file.
2. **Validate model files before importing**: Check the file extension and format before uploading. The system validates the file during import, so uploading a valid file upfront prevents unnecessary errors.
3. **Import one model at a time**: Avoid simultaneous imports. Ensure each model is fully imported and validated before starting the next.
4. **Monitor import and validation status**: Track the model's status during import. If an error occurs, the system provides details. Use this information to correct the file or re-upload.
5. **Prepare for deployment after validation**: Once imported and validated, the model is marked as Ready to Deploy. Before deploying, set up description, tags, and API keys.
6. **Avoid interruptions during import**: Do not switch accounts or refresh the page during import, as these actions may interrupt the process.
### Import a base model
1. Go to **Models** > **Open-source models** and click **Import model**.
2. On the **Import model** dialog, select the **Base Model** tab.
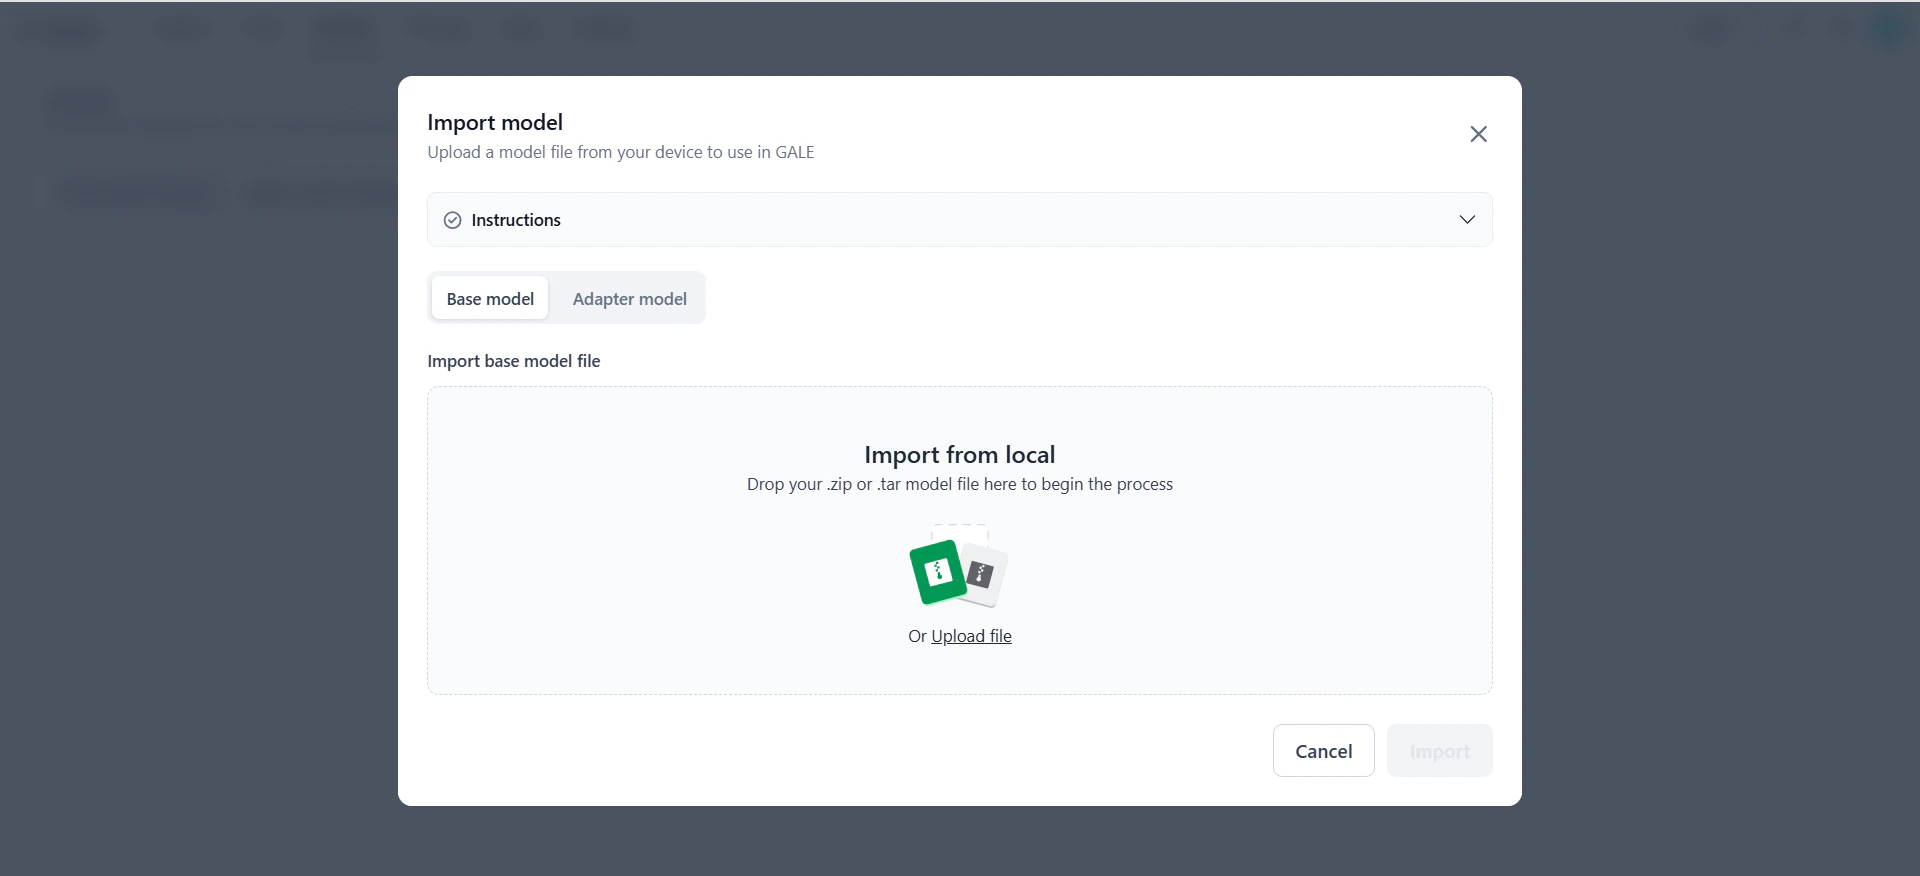 3. In the **Import base model file** section, drag and drop the model file into the upload area, or click **Upload file** to browse and select it. Click **Instructions** to view supported formats and required files for the `.zip` folder.
4. The system validates the file extension:
* If valid, the file name appears and the **Import** button is enabled.
* If invalid, an error message explains why. Correct the file before proceeding.
5. Click **Import**. The model appears in the Open-Source Models dashboard with the following status updates:
* **Importing** — File is being uploaded.
* **Validating** — File is being validated.
* **Import Failed** — An error occurred. View the error details, fix the issue, and re-import or cancel.
* **Ready to Deploy** — Model is successfully imported and validated.
6. Once ready, click the model row to manage deployment settings:
* **Configurations** — Edit the model's description and tags.
* **API keys** — Configure the API key and deployment settings.
* **Model Endpoint** — Start the deployment.
### Import an adapter model
1. Go to **Models** > **Open-source models** and click **Import model**.
2. On the **Import model** dialog, select the **Adapter Model** tab.
3. In the **Import base model file** section, drag and drop the model file into the upload area, or click **Upload file** to browse and select it. Click **Instructions** to view supported formats and required files for the `.zip` folder.
4. The system validates the file extension:
* If valid, the file name appears and the **Import** button is enabled.
* If invalid, an error message explains why. Correct the file before proceeding.
5. Click **Import**. The model appears in the Open-Source Models dashboard with the following status updates:
* **Importing** — File is being uploaded.
* **Validating** — File is being validated.
* **Import Failed** — An error occurred. View the error details, fix the issue, and re-import or cancel.
* **Ready to Deploy** — Model is successfully imported and validated.
6. Once ready, click the model row to manage deployment settings:
* **Configurations** — Edit the model's description and tags.
* **API keys** — Configure the API key and deployment settings.
* **Model Endpoint** — Start the deployment.
### Import an adapter model
1. Go to **Models** > **Open-source models** and click **Import model**.
2. On the **Import model** dialog, select the **Adapter Model** tab.
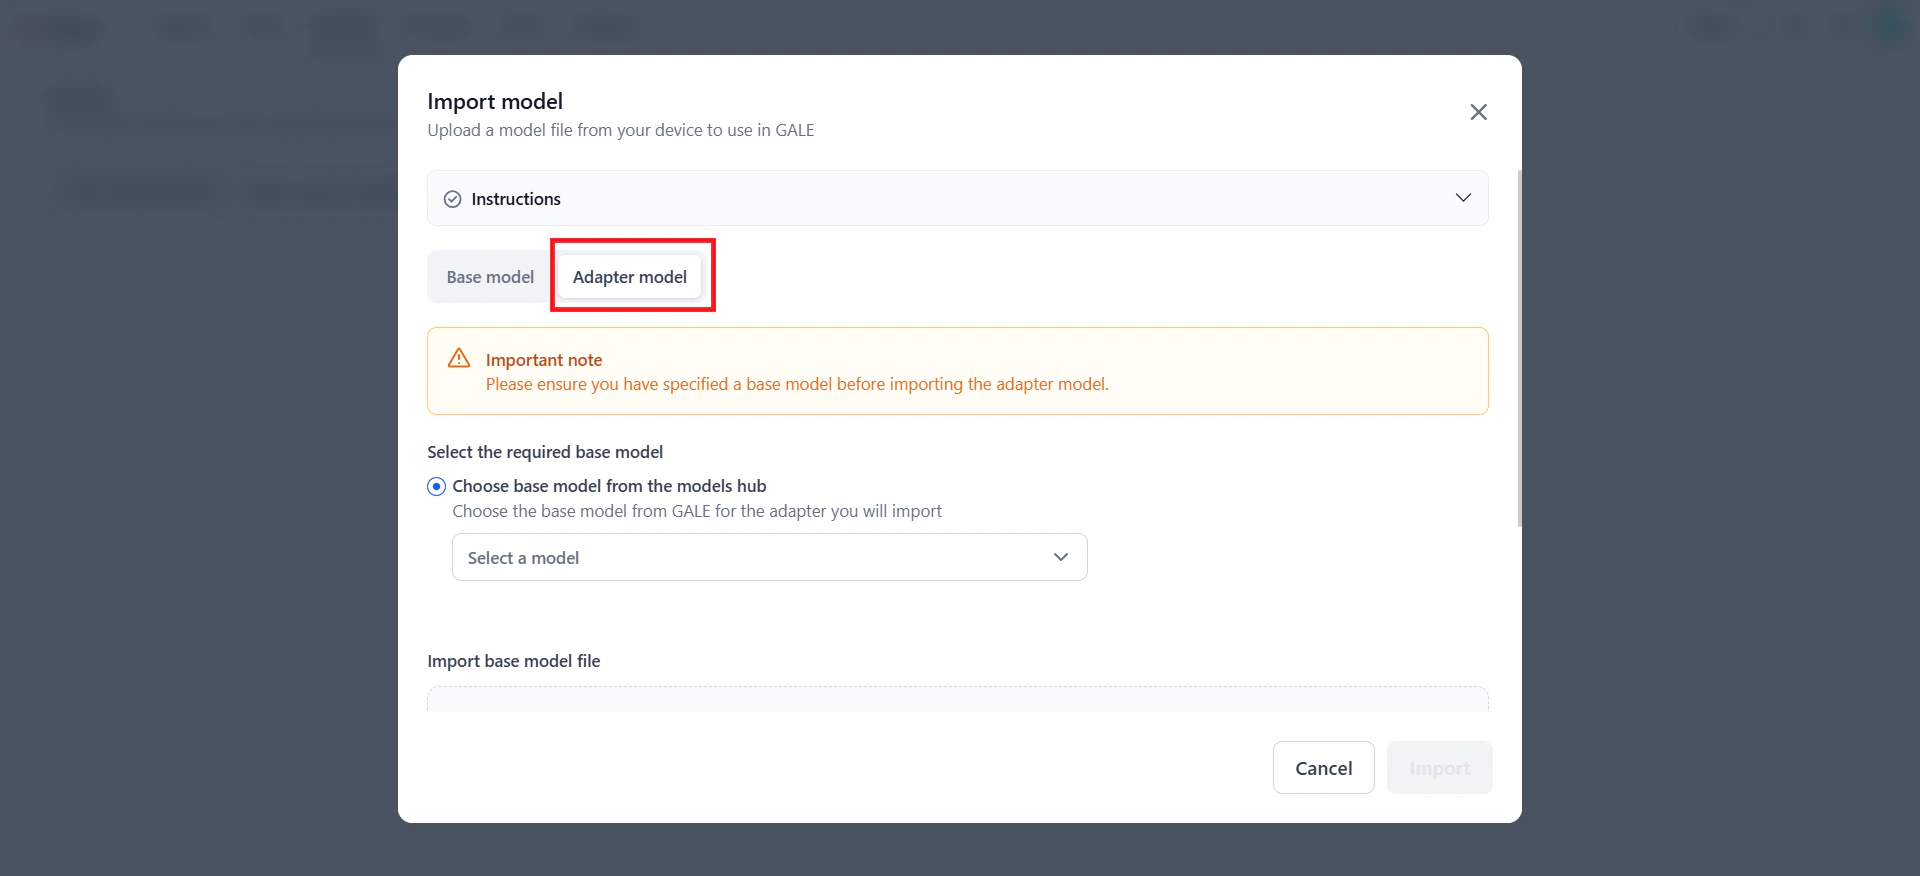 3. Browse the list of available base models and select one that supports the adapter model you are importing. Click **Instructions** to view supported formats and required files.
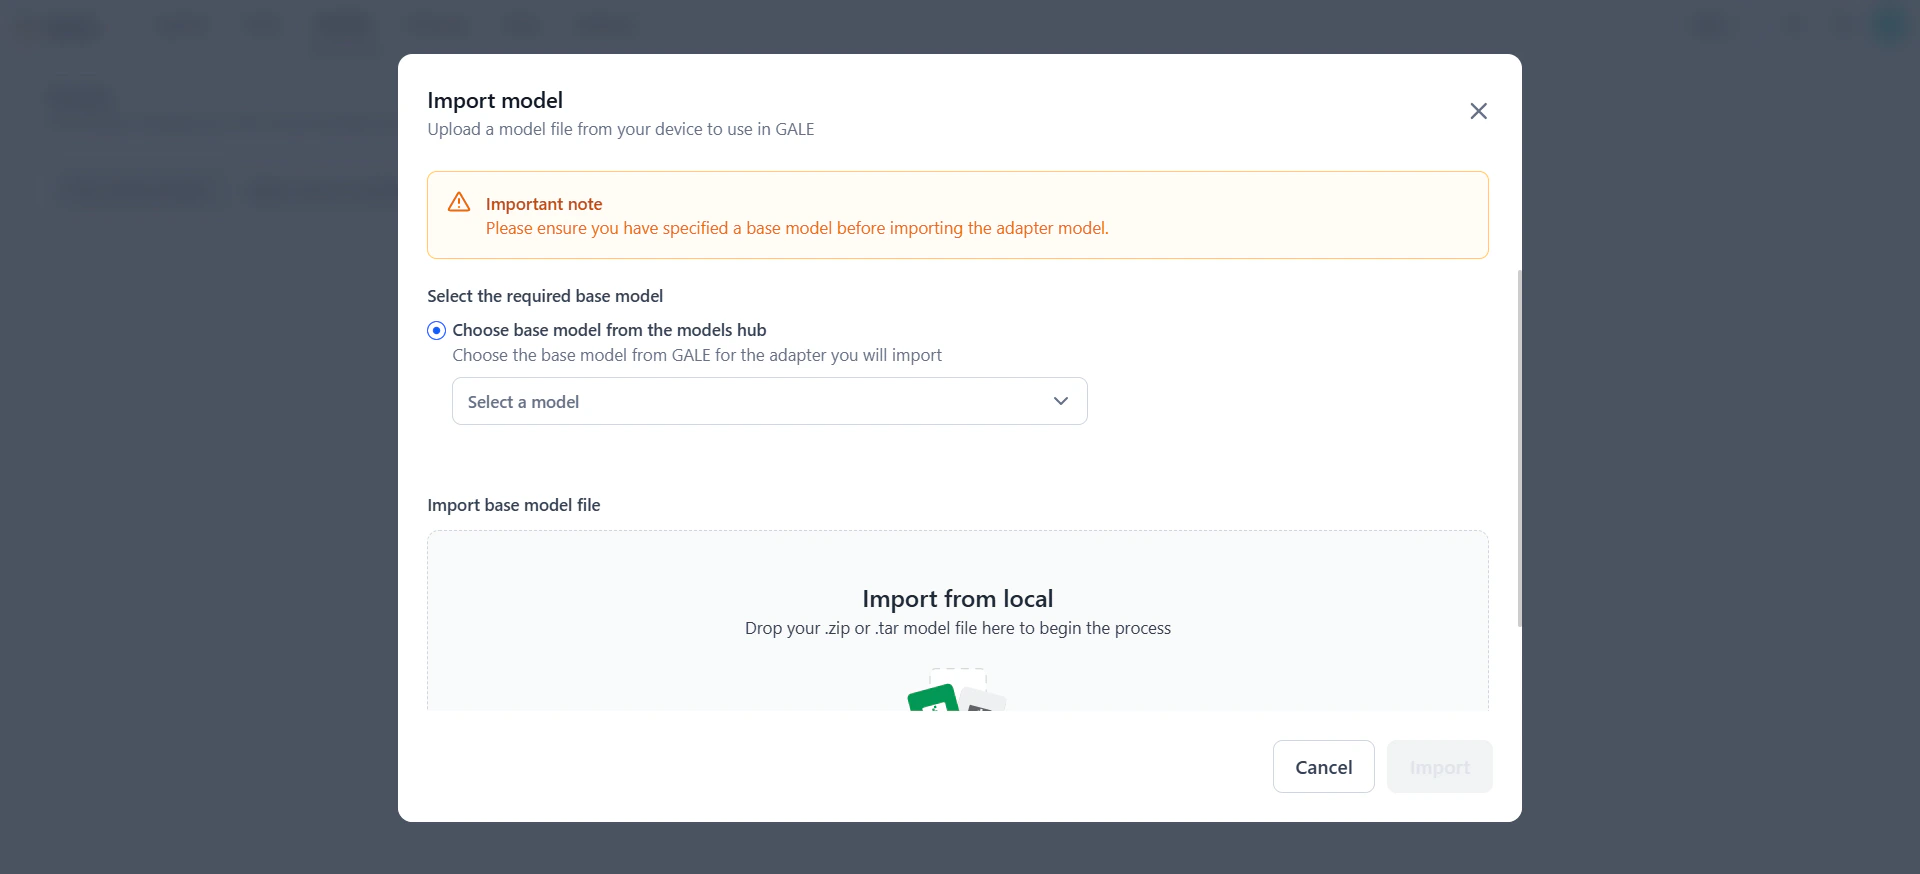 4. In the **Import base model file** section, drag and drop the adapter model file or click **Upload file** to select it.
5. The system validates the file extension:
* If valid, the file name appears and the **Import** button is enabled.
* If invalid, an error message explains why. Correct the file before proceeding.
6. Click **Import**. The model appears in the dashboard with the following status updates:
* **Importing** — File is being uploaded.
* **Validating** — File is being validated.
* **Import Failed** — An error occurred. Fix the issue, re-import, or cancel.
* **Ready to Deploy** — Model is successfully imported and validated.
7. Once ready, click the model row to manage deployment settings:
* **Configurations** — Edit the model's description and tags.
* **API keys** — Configure the API key and deployment settings.
* **Model Endpoint** — Start the deployment.
### Key considerations
* **Model details**: You can modify the description and tags after import. The model name is not editable — it is derived from the file name.
* **Deployment and management**: Deployment, re-deployment, and failure management follow the same process as other open-source models. API endpoint, deployment history, and notifications behave identically.
* **Deleting an imported model**:
* If not yet deployed or while import is in progress, delete the model using the three-dot menu on the dashboard.
* If deployed, you can trigger re-deployment or view deployment history.
* **Import errors**: If errors occur during import (invalid format, upload failure, extraction issues, or compatibility problems), refer to the error message for resolution guidance.
## Deploy a Platform-Hosted Model
AI for Process supports thirty-plus open-source models available as a service. You can optionally optimize a platform-hosted model before deployment. For the list of supported models, see [Supported models](/ai-for-process/models/supported-models#open-source-models).
1. Go to **Models** > **Open-source models** and click **Deploy a model**.
4. In the **Import base model file** section, drag and drop the adapter model file or click **Upload file** to select it.
5. The system validates the file extension:
* If valid, the file name appears and the **Import** button is enabled.
* If invalid, an error message explains why. Correct the file before proceeding.
6. Click **Import**. The model appears in the dashboard with the following status updates:
* **Importing** — File is being uploaded.
* **Validating** — File is being validated.
* **Import Failed** — An error occurred. Fix the issue, re-import, or cancel.
* **Ready to Deploy** — Model is successfully imported and validated.
7. Once ready, click the model row to manage deployment settings:
* **Configurations** — Edit the model's description and tags.
* **API keys** — Configure the API key and deployment settings.
* **Model Endpoint** — Start the deployment.
### Key considerations
* **Model details**: You can modify the description and tags after import. The model name is not editable — it is derived from the file name.
* **Deployment and management**: Deployment, re-deployment, and failure management follow the same process as other open-source models. API endpoint, deployment history, and notifications behave identically.
* **Deleting an imported model**:
* If not yet deployed or while import is in progress, delete the model using the three-dot menu on the dashboard.
* If deployed, you can trigger re-deployment or view deployment history.
* **Import errors**: If errors occur during import (invalid format, upload failure, extraction issues, or compatibility problems), refer to the error message for resolution guidance.
## Deploy a Platform-Hosted Model
AI for Process supports thirty-plus open-source models available as a service. You can optionally optimize a platform-hosted model before deployment. For the list of supported models, see [Supported models](/ai-for-process/models/supported-models#open-source-models).
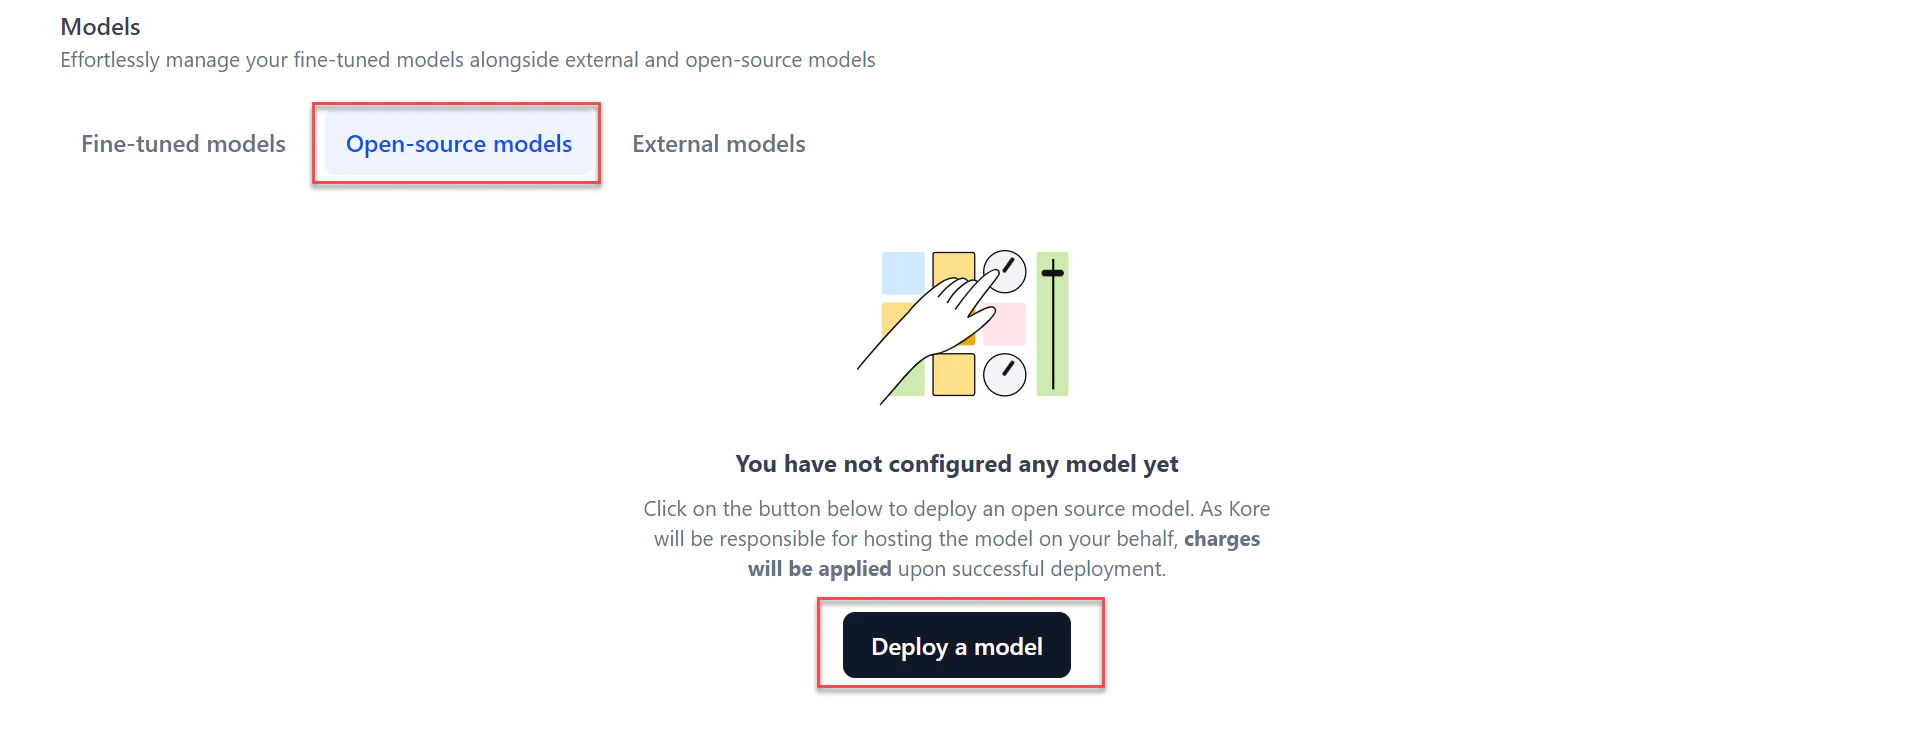
1. Go to **Models** > **Open-source models** and click **Deploy a model**.
 2. In the **General details** section of the Deploy dialog:
* Select the **model** from the dropdown.
* Add a **Description** and **tags** to help search for the model.
* Click **Next**.
2. In the **General details** section of the Deploy dialog:
* Select the **model** from the dropdown.
* Add a **Description** and **tags** to help search for the model.
* Click **Next**.
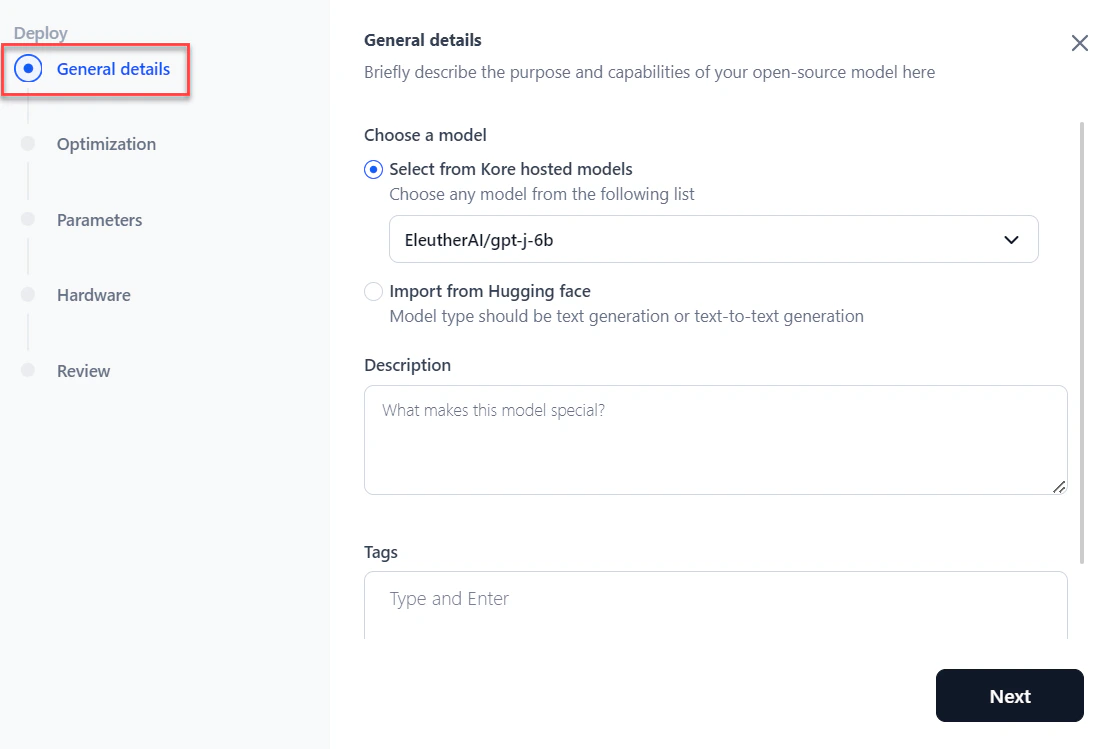 To import from Hugging Face instead, see [Deploy a Model from Hugging Face](#deploy-a-model-from-hugging-face).
3. In the **Optimization** section, choose an optimization option and click **Next**. For details, see [Model Optimization](#model-optimization).
* **Skip optimization** — Skips optimization.
* **CTranslate2** — Select a quantization option from the dropdown if applicable.
* **vLLM** — Select a quantization option from the dropdown if applicable.
To import from Hugging Face instead, see [Deploy a Model from Hugging Face](#deploy-a-model-from-hugging-face).
3. In the **Optimization** section, choose an optimization option and click **Next**. For details, see [Model Optimization](#model-optimization).
* **Skip optimization** — Skips optimization.
* **CTranslate2** — Select a quantization option from the dropdown if applicable.
* **vLLM** — Select a quantization option from the dropdown if applicable.
 Model optimization is supported only for platform-hosted models.
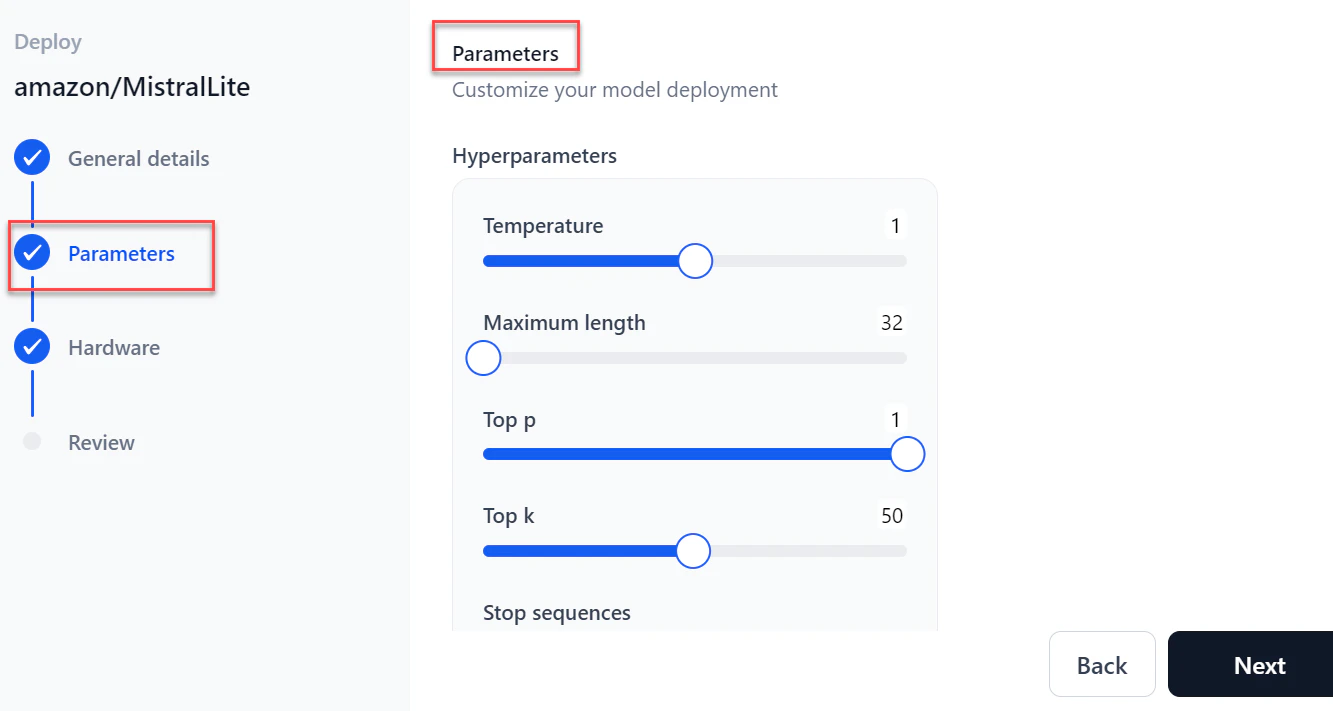
4. In the **Parameters** section, configure the following and click **Next**:
| Parameter | Description |
| ------------------------------ | ----------------------------------------------------------------------------------- |
| **Temperature** | Sampling temperature for generation. |
| **Maximum length** | Maximum number of tokens to generate. |
| **Top p** | Alternative to temperature sampling; considers tokens with top\_p probability mass. |
| **Top k** | Number of highest-probability vocabulary tokens to keep for top-k filtering. |
| **Stop sequences** | Sequences where the model stops generating tokens. |
| **Inference batch size** | Batch size for concurrent requests during inferencing. |
| **Min replicas** | Minimum number of model replicas to deploy. |
| **Max replicas** | Maximum number of replicas to auto-scale. |
| **Scale up delay (seconds)** | How long to wait before scaling up replicas. |
| **Scale down delay (seconds)** | How long to wait before scaling down replicas. |
Model optimization is supported only for platform-hosted models.
4. In the **Parameters** section, configure the following and click **Next**:
| Parameter | Description |
| ------------------------------ | ----------------------------------------------------------------------------------- |
| **Temperature** | Sampling temperature for generation. |
| **Maximum length** | Maximum number of tokens to generate. |
| **Top p** | Alternative to temperature sampling; considers tokens with top\_p probability mass. |
| **Top k** | Number of highest-probability vocabulary tokens to keep for top-k filtering. |
| **Stop sequences** | Sequences where the model stops generating tokens. |
| **Inference batch size** | Batch size for concurrent requests during inferencing. |
| **Min replicas** | Minimum number of model replicas to deploy. |
| **Max replicas** | Maximum number of replicas to auto-scale. |
| **Scale up delay (seconds)** | How long to wait before scaling up replicas. |
| **Scale down delay (seconds)** | How long to wait before scaling down replicas. |
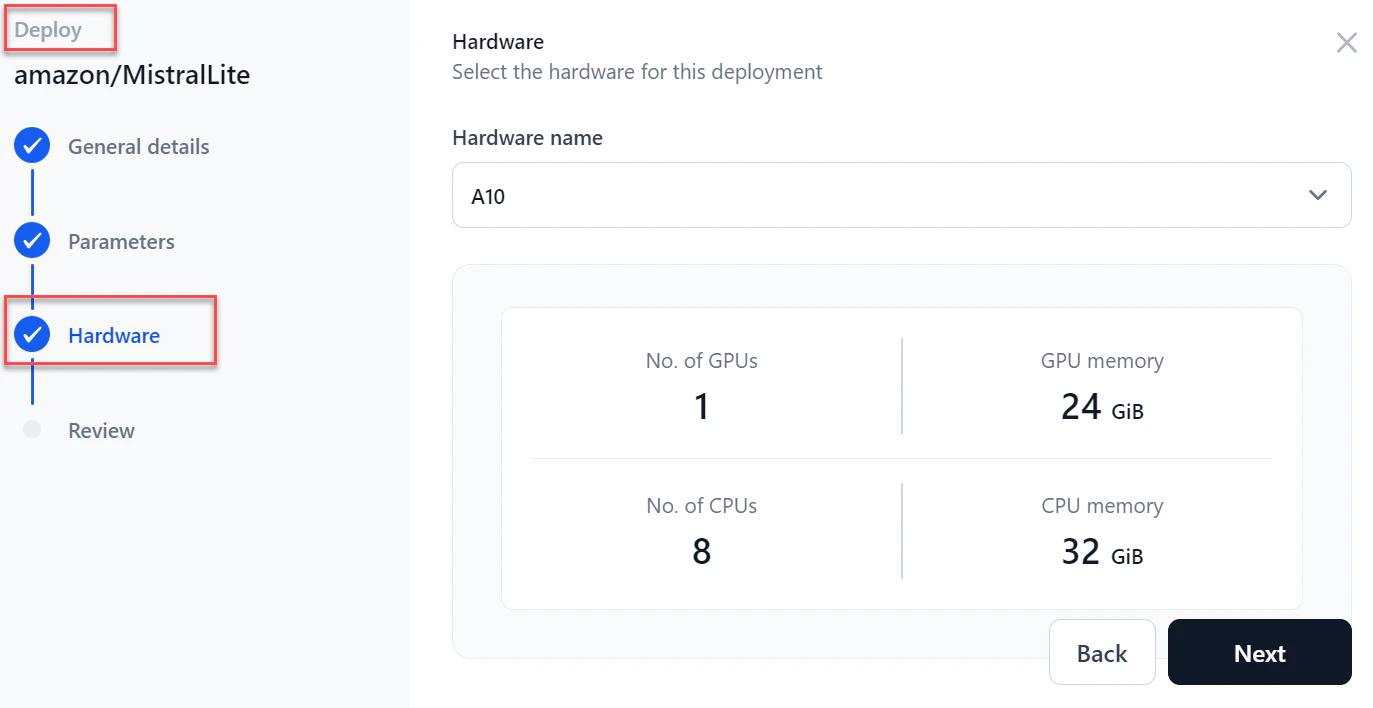
 5. In the **Hardware** section, select the required hardware from the dropdown and click **Next**.
 6. In the **Review** section, verify all details. Select **I accept all the Terms and Conditions** and click **Deploy**.
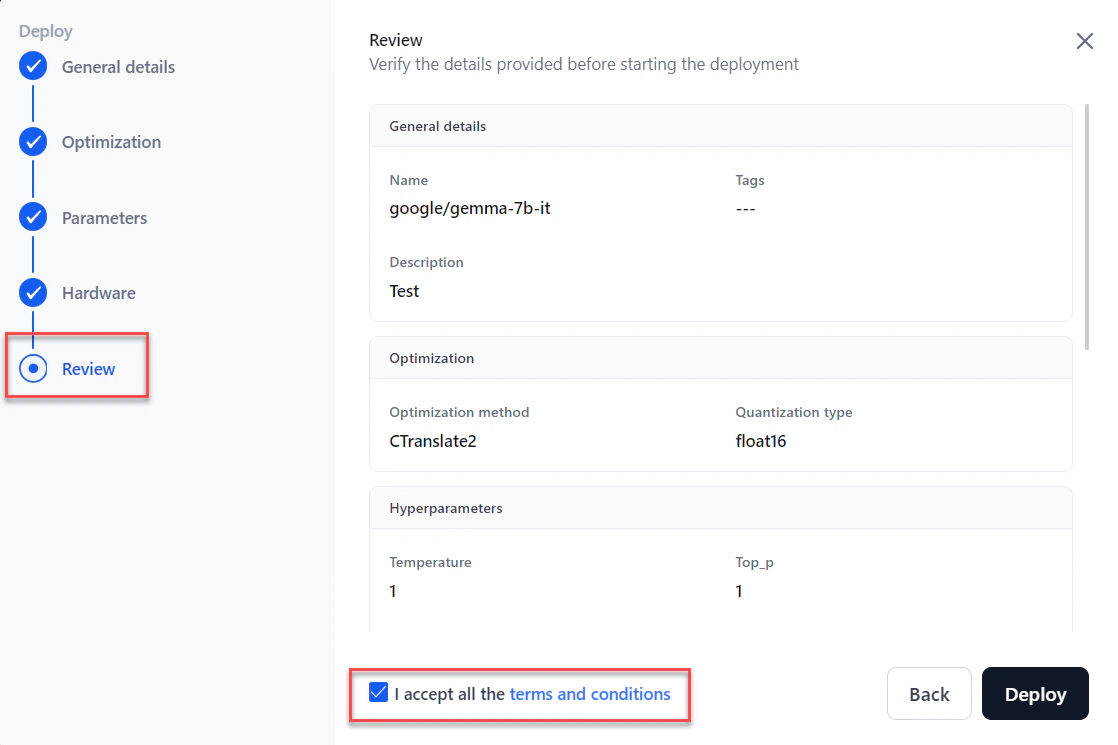 If you selected optimization, the model status changes to "Optimization" and optimization runs before deployment. Otherwise, deployment starts immediately. After deployment, the status changes to "Deployed."
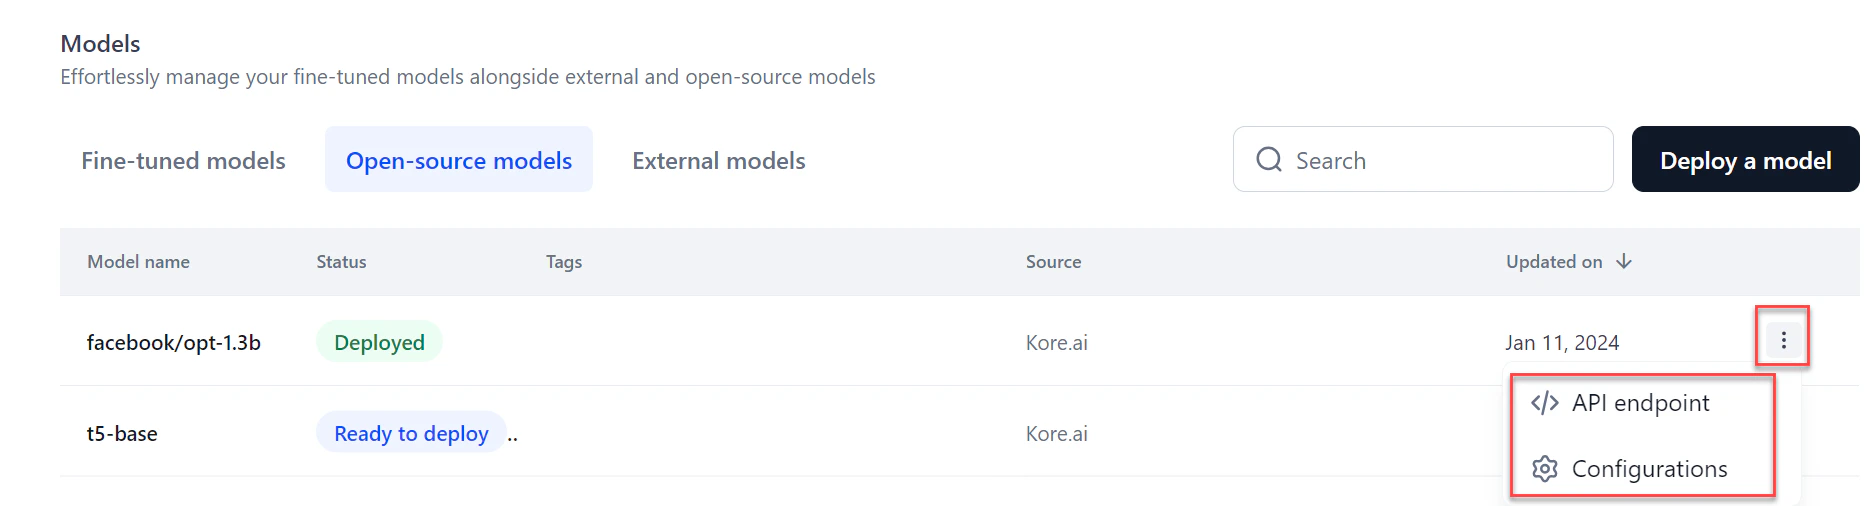 Hover over the deployed model to view the three-dot menu, which provides access to the **API endpoint** and **Configurations**.
## Deploy a Model from Hugging Face
AI for Process supports models compatible with Transformers library version 4.43.1 or lower. Models requiring a higher version are not supported.
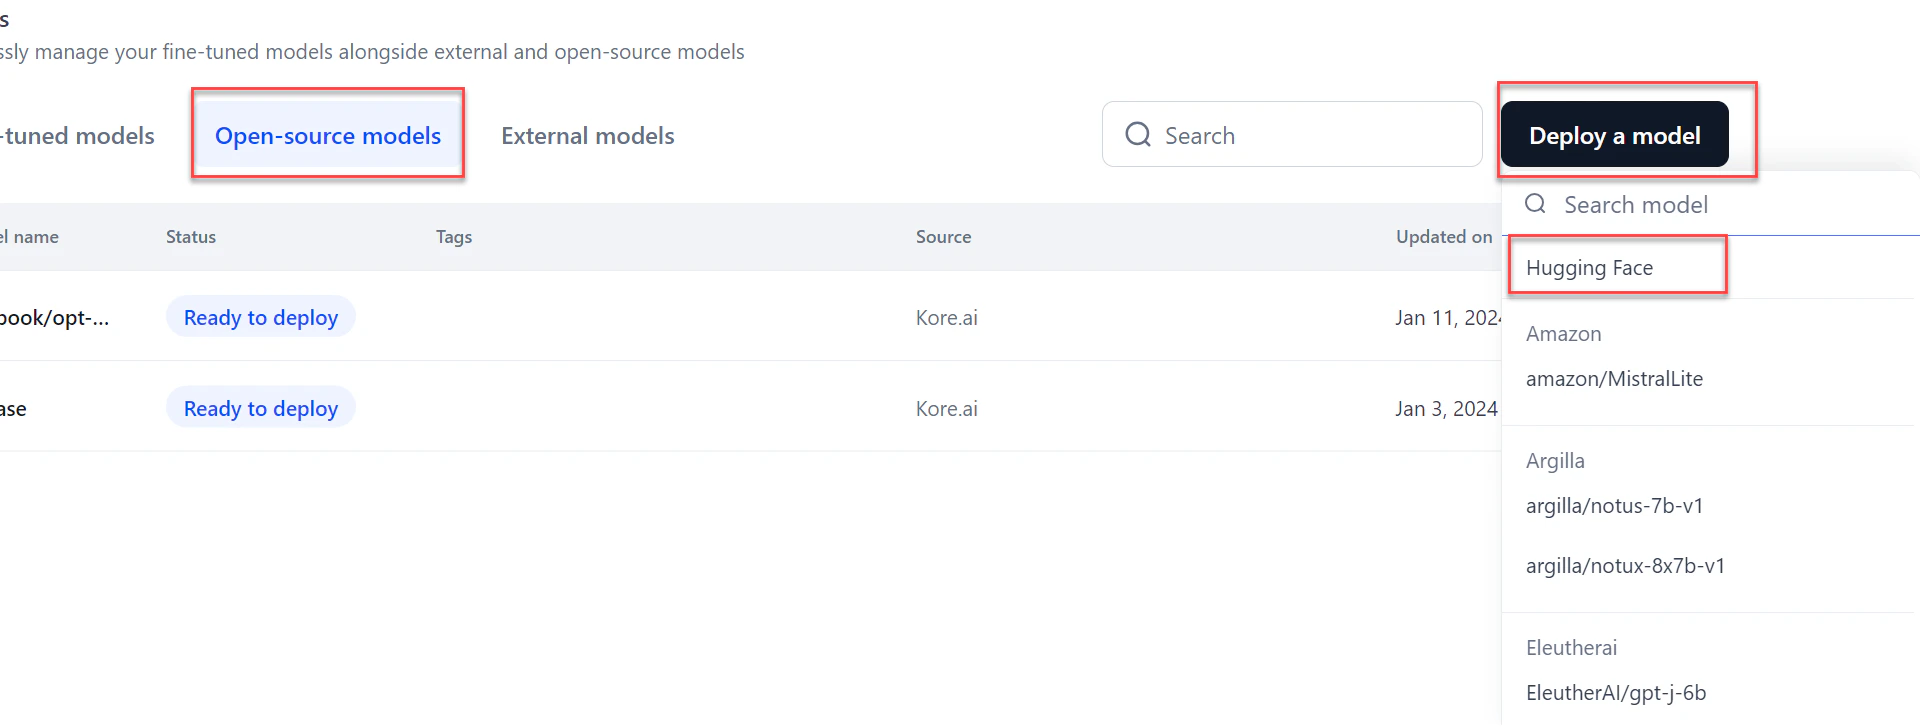
1. Go to **Models** > **Open-source models** and click **Deploy a model**.
2. Click the **Hugging Face** option from the list.
Hover over the deployed model to view the three-dot menu, which provides access to the **API endpoint** and **Configurations**.
## Deploy a Model from Hugging Face
AI for Process supports models compatible with Transformers library version 4.43.1 or lower. Models requiring a higher version are not supported.
1. Go to **Models** > **Open-source models** and click **Deploy a model**.
2. Click the **Hugging Face** option from the list.
 3. In the **General details** section:
* Enter a **Deployment name** and **Description**.
3. In the **General details** section:
* Enter a **Deployment name** and **Description**.
 * Add tags and click **Next**.
4. In the **Import model** section:
* Select the **Hugging Face connection** from the dropdown.
For public models, selecting a connection is not required.
* Add tags and click **Next**.
4. In the **Import model** section:
* Select the **Hugging Face connection** from the dropdown.
For public models, selecting a connection is not required.
 * Enter the **Hugging Face model name** and click **Next**.
5. In the **Parameters** section, configure the following and click **Next**:
| Parameter | Description |
| ------------------------------ | ----------------------------------------------------------------------------------- |
| **Temperature** | Sampling temperature for generation. |
| **Maximum length** | Maximum number of tokens to generate. |
| **Top p** | Alternative to temperature sampling; considers tokens with top\_p probability mass. |
| **Top k** | Number of highest-probability vocabulary tokens to keep for top-k filtering. |
| **Stop sequences** | Sequences where the model stops generating tokens. |
| **Inference batch size** | Batch size for concurrent requests during inferencing. |
| **Min replicas** | Minimum number of model replicas to deploy. |
| **Max replicas** | Maximum number of replicas to auto-scale. |
| **Scale up delay (seconds)** | How long to wait before scaling up replicas. |
| **Scale down delay (seconds)** | How long to wait before scaling down replicas. |
* Enter the **Hugging Face model name** and click **Next**.
5. In the **Parameters** section, configure the following and click **Next**:
| Parameter | Description |
| ------------------------------ | ----------------------------------------------------------------------------------- |
| **Temperature** | Sampling temperature for generation. |
| **Maximum length** | Maximum number of tokens to generate. |
| **Top p** | Alternative to temperature sampling; considers tokens with top\_p probability mass. |
| **Top k** | Number of highest-probability vocabulary tokens to keep for top-k filtering. |
| **Stop sequences** | Sequences where the model stops generating tokens. |
| **Inference batch size** | Batch size for concurrent requests during inferencing. |
| **Min replicas** | Minimum number of model replicas to deploy. |
| **Max replicas** | Maximum number of replicas to auto-scale. |
| **Scale up delay (seconds)** | How long to wait before scaling up replicas. |
| **Scale down delay (seconds)** | How long to wait before scaling down replicas. |
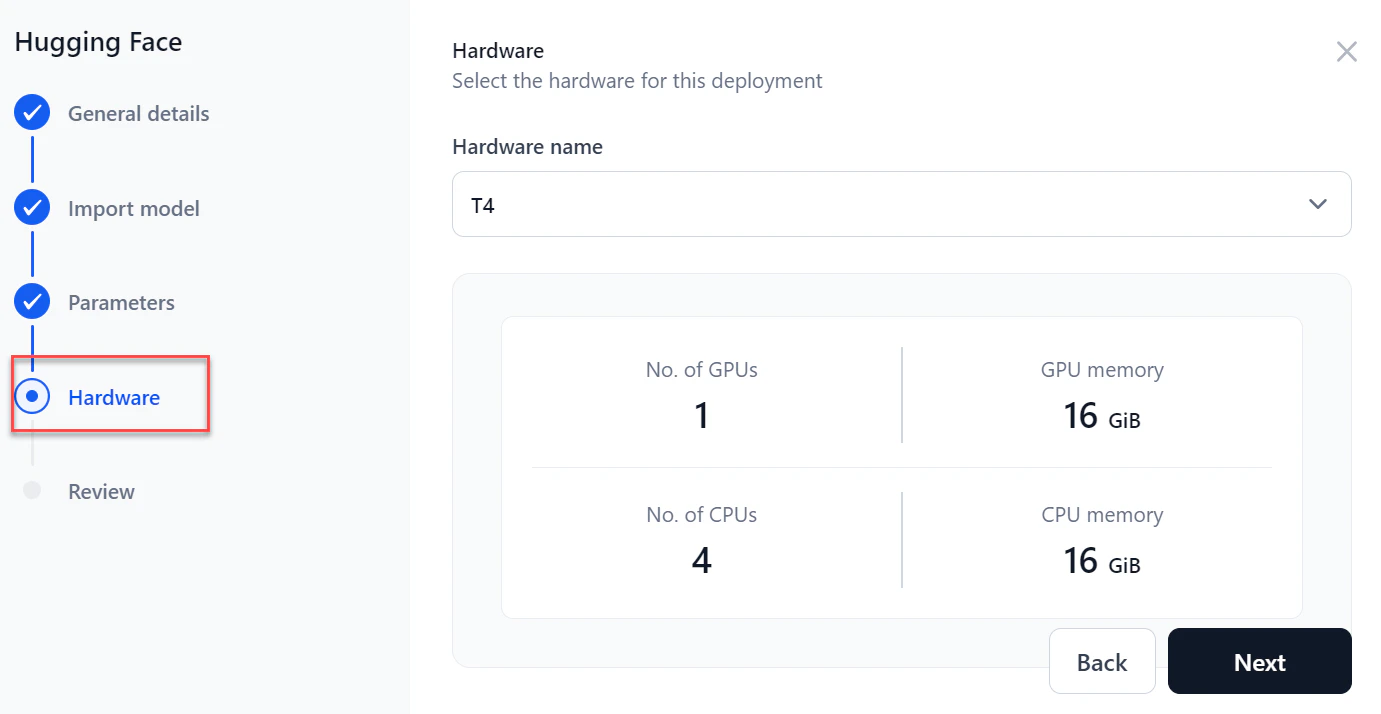
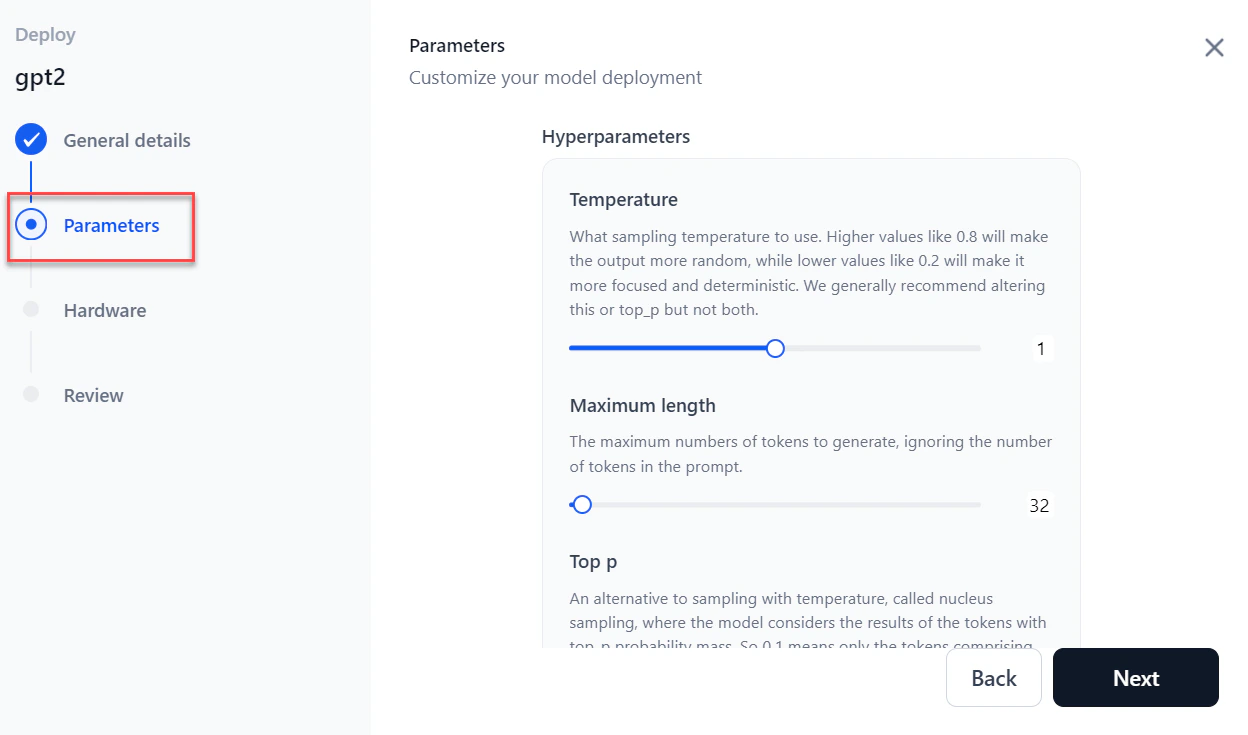 6. Select the required **Hardware** from the dropdown and click **Next**.
 7. In the **Review** step, verify all details and select **I accept all the terms and conditions**.
 To make changes, click **Back** or select a specific step in the left panel.
8. Click **Deploy**.
## Model Optimization
Model optimization improves a model's efficiency without compromising accuracy. It reduces computational resource requirements, speeds up inference, and minimizes latency — particularly valuable in real-time or resource-constrained environments.
AI for Process supports two optimization types: **CTranslate2** and **vLLM**.
Model optimization is supported only for platform-hosted models.
### CTranslate2
CTranslate2 is a fast inference engine for Transformer models, optimized for CPU and GPU deployment. It is well-suited for small to medium-sized models in translation and NLP tasks where low latency is a priority.
* **Optimized computation** — Supports CPU and GPU inference with optimized kernels to speed up inference without significant accuracy loss.
* **Quantization** — Offers `int8_float16` quantization, reducing model size and improving inference speed through post-training quantization.
* **Multi-threading** — Efficiently uses multi-threading for multi-core CPUs and handles batch processing to improve throughput.
* **Compatibility** — Supports models from PyTorch and TensorFlow for easy integration into existing workflows.
[Learn more about CTranslate2](https://opennmt.net/CTranslate2/).
### vLLM
vLLM optimization is designed for very large-scale language models with billions of parameters, such as GPT-3. It excels in high-performance environments with abundant resources.
* **Efficient memory management** — Uses advanced strategies to reduce fragmentation and maximize GPU memory, enabling larger batch sizes and faster inference.
* **Parallelism** — Supports model and data parallelism to distribute compute across multiple GPUs or nodes.
* **Layer-wise adaptive precision** — Adjusts computation precision layer by layer using mixed-precision training and inference.
* **Advanced caching** — Uses caching mechanisms to improve inference efficiency.
* **Quantization** — Supports AWQ (Activation-Weighted Quantization), which preserves a small percentage of important weights while lowering precision on the rest, enabling 4-bit precision with minimal accuracy degradation.
[Learn more about vLLM](https://docs.vllm.ai/en/stable/index.html).
### CTranslate2 vs. vLLM
Choose between CTranslate2 and vLLM based on your model size and deployment environment.
| Attribute | CTranslate2 | vLLM |
| -------------------------- | ------------------------------------------------- | -------------------------------------------------------------------- |
| **Model size** | Small to medium models | Large models (GPT-3 scale) |
| **Best for** | Translation and NLP tasks with low-latency needs | Large-scale, distributed environments |
| **Deployment environment** | Limited-resource devices or low-latency scenarios | High-performance environments with abundant GPU resources |
| **Integration** | Easy integration with PyTorch and TensorFlow | More complex setup, but delivers higher performance for large models |
| **Inference speed** | Faster for real-time responses | Better throughput for large-scale batch processing |
## Re-deploy a Model
After the initial deployment, you can update a model's parameters, hardware, or both by redeploying it.
1. Go to **Models** > **Open-source models** and select the model to redeploy.
2. Click **Deploy model**. The Model Configuration page opens.
3. Modify the required fields and click **Deploy**. Once complete, the status changes to "Deployed."
***
## Manage Deployments
Each model can have multiple deployments tracked independently. The Deployments page shows all deployments for a selected model with the following details:
| Field | Description |
| ------------------- | ---------------------------------------------------------------------------------------------------------------------------------------------------------------------------------------------------- |
| **Deployment Name** | Name given during deployment. |
| **Deployment ID** | System-generated ID (not editable). |
| **Status** | Current status: Deploying, Optimizing, Failed, Ready to Deploy, or Deployed. |
| **Tags** | Labels associated with the deployment. |
| **Added By** | User who performed the deployment. |
| **Added On** | Date and time of deployment. |
| **Actions** | **Copy cURL** — Copies the cURL command for this deployment. **Manage API Keys** — Opens the API key management tab. **Re-trigger** — Restarts the deployment (available only if failed or stopped). |
To make changes, click **Back** or select a specific step in the left panel.
8. Click **Deploy**.
## Model Optimization
Model optimization improves a model's efficiency without compromising accuracy. It reduces computational resource requirements, speeds up inference, and minimizes latency — particularly valuable in real-time or resource-constrained environments.
AI for Process supports two optimization types: **CTranslate2** and **vLLM**.
Model optimization is supported only for platform-hosted models.
### CTranslate2
CTranslate2 is a fast inference engine for Transformer models, optimized for CPU and GPU deployment. It is well-suited for small to medium-sized models in translation and NLP tasks where low latency is a priority.
* **Optimized computation** — Supports CPU and GPU inference with optimized kernels to speed up inference without significant accuracy loss.
* **Quantization** — Offers `int8_float16` quantization, reducing model size and improving inference speed through post-training quantization.
* **Multi-threading** — Efficiently uses multi-threading for multi-core CPUs and handles batch processing to improve throughput.
* **Compatibility** — Supports models from PyTorch and TensorFlow for easy integration into existing workflows.
[Learn more about CTranslate2](https://opennmt.net/CTranslate2/).
### vLLM
vLLM optimization is designed for very large-scale language models with billions of parameters, such as GPT-3. It excels in high-performance environments with abundant resources.
* **Efficient memory management** — Uses advanced strategies to reduce fragmentation and maximize GPU memory, enabling larger batch sizes and faster inference.
* **Parallelism** — Supports model and data parallelism to distribute compute across multiple GPUs or nodes.
* **Layer-wise adaptive precision** — Adjusts computation precision layer by layer using mixed-precision training and inference.
* **Advanced caching** — Uses caching mechanisms to improve inference efficiency.
* **Quantization** — Supports AWQ (Activation-Weighted Quantization), which preserves a small percentage of important weights while lowering precision on the rest, enabling 4-bit precision with minimal accuracy degradation.
[Learn more about vLLM](https://docs.vllm.ai/en/stable/index.html).
### CTranslate2 vs. vLLM
Choose between CTranslate2 and vLLM based on your model size and deployment environment.
| Attribute | CTranslate2 | vLLM |
| -------------------------- | ------------------------------------------------- | -------------------------------------------------------------------- |
| **Model size** | Small to medium models | Large models (GPT-3 scale) |
| **Best for** | Translation and NLP tasks with low-latency needs | Large-scale, distributed environments |
| **Deployment environment** | Limited-resource devices or low-latency scenarios | High-performance environments with abundant GPU resources |
| **Integration** | Easy integration with PyTorch and TensorFlow | More complex setup, but delivers higher performance for large models |
| **Inference speed** | Faster for real-time responses | Better throughput for large-scale batch processing |
## Re-deploy a Model
After the initial deployment, you can update a model's parameters, hardware, or both by redeploying it.
1. Go to **Models** > **Open-source models** and select the model to redeploy.
2. Click **Deploy model**. The Model Configuration page opens.
3. Modify the required fields and click **Deploy**. Once complete, the status changes to "Deployed."
***
## Manage Deployments
Each model can have multiple deployments tracked independently. The Deployments page shows all deployments for a selected model with the following details:
| Field | Description |
| ------------------- | ---------------------------------------------------------------------------------------------------------------------------------------------------------------------------------------------------- |
| **Deployment Name** | Name given during deployment. |
| **Deployment ID** | System-generated ID (not editable). |
| **Status** | Current status: Deploying, Optimizing, Failed, Ready to Deploy, or Deployed. |
| **Tags** | Labels associated with the deployment. |
| **Added By** | User who performed the deployment. |
| **Added On** | Date and time of deployment. |
| **Actions** | **Copy cURL** — Copies the cURL command for this deployment. **Manage API Keys** — Opens the API key management tab. **Re-trigger** — Restarts the deployment (available only if failed or stopped). |
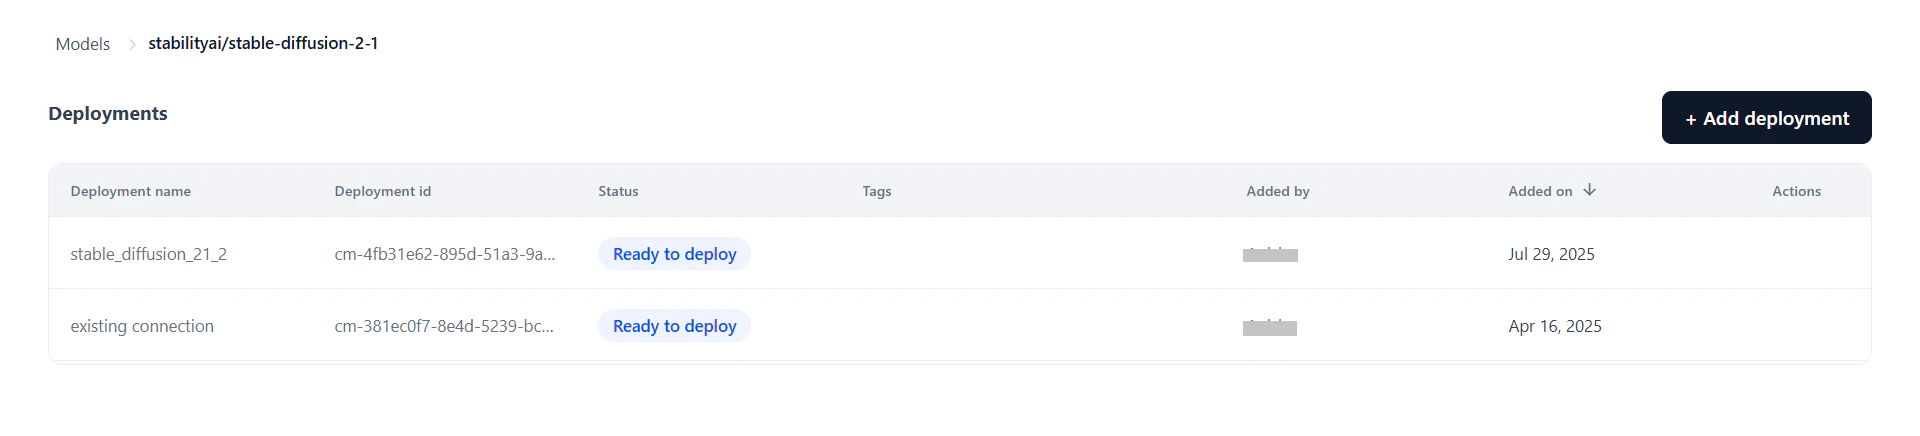 Selecting a deployment opens its detail view to manage the endpoint, API keys, and configuration for that specific deployment.
* [Model Endpoint](#view-the-api-endpoint) — View or manage the live endpoint; re-deploy if needed.
* [API Keys](#generate-an-api-key) — Generate and manage keys scoped to this deployment. Keys are isolated per deployment for secure access control.
* [Configurations](#configure-your-open-source-model) — Edit the description and tags, or undeploy/delete the model.
Selecting a deployment opens its detail view to manage the endpoint, API keys, and configuration for that specific deployment.
* [Model Endpoint](#view-the-api-endpoint) — View or manage the live endpoint; re-deploy if needed.
* [API Keys](#generate-an-api-key) — Generate and manage keys scoped to this deployment. Keys are isolated per deployment for secure access control.
* [Configurations](#configure-your-open-source-model) — Edit the description and tags, or undeploy/delete the model.
 ## View the API Endpoint
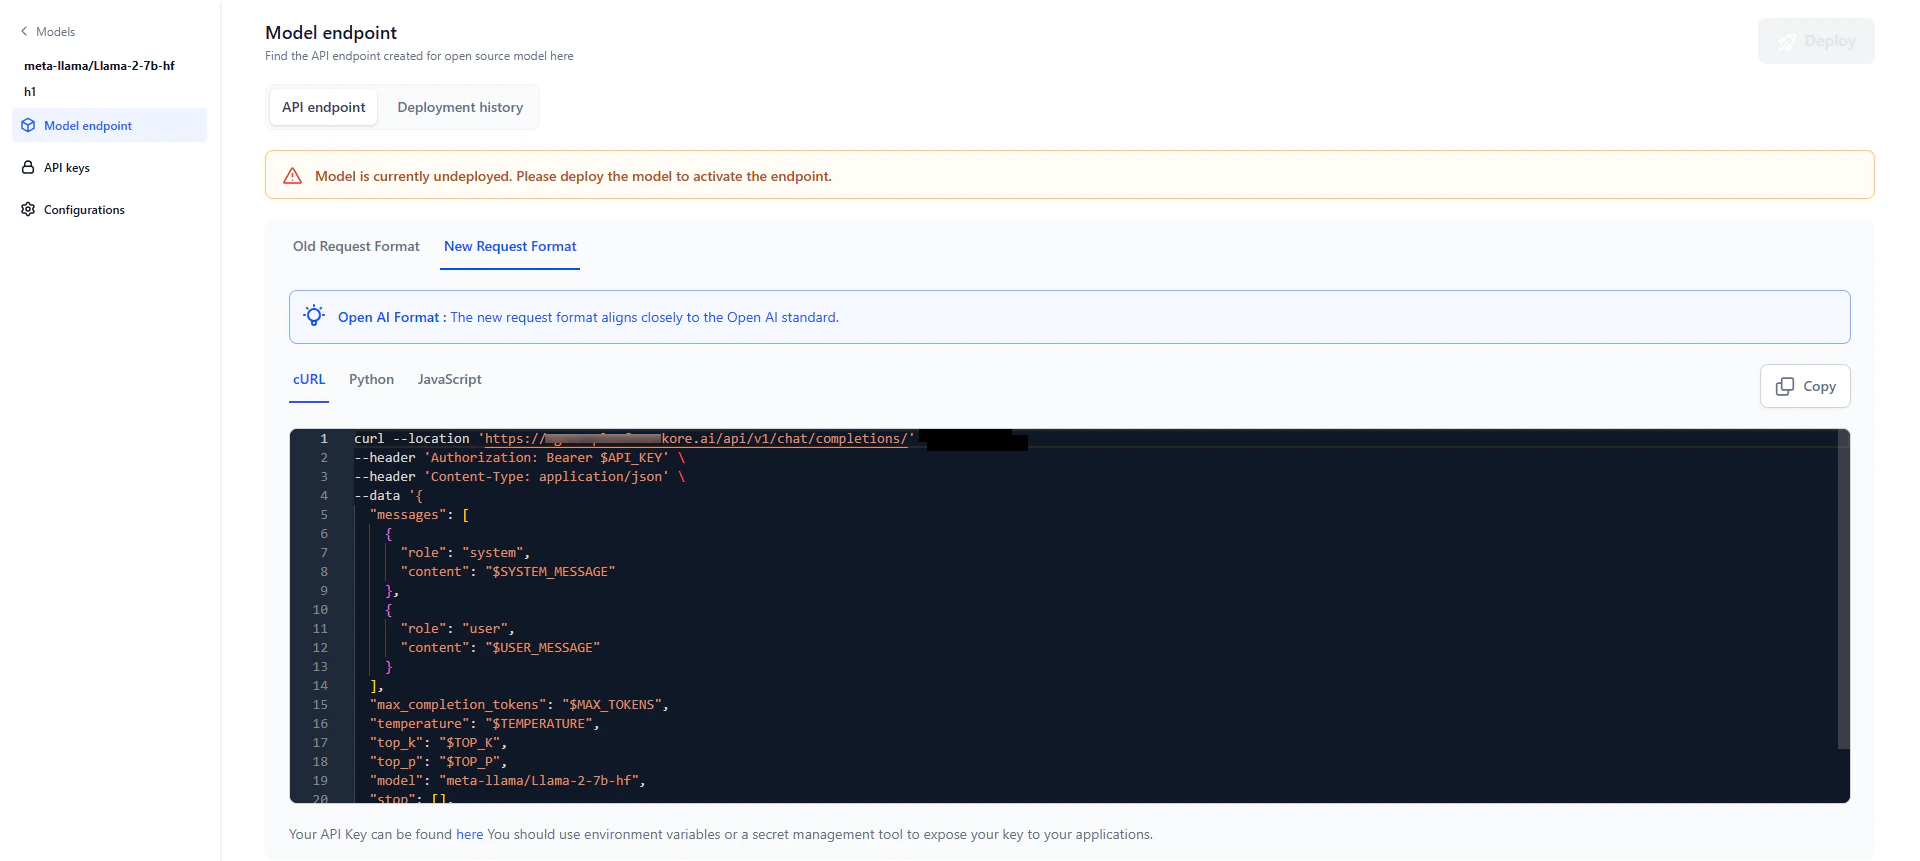
After deployment, an API endpoint is generated for external inferencing and use across AI for Process. The endpoint is available in three formats.
You receive an email notification when deployment completes and the API endpoint is ready to use.
1. Click the required model from the models listing. Click the **Model Endpoint** tab in the left panel.
2. Click the **Copy** icon to copy the API endpoint.
You can embed the generated cURL command or code into your own applications or use it externally.
### Structured output support
Open-source models can return responses in structured JSON format using the `response_format` parameter, aligned with OpenAI schema style.
You can use this in two ways:
* **API calls** — Add the `response_format` parameter to the model endpoint when calling the deployed model externally.
* **Workflow builder** — Define the schema directly in the builder. AI for Process automatically attaches it as the `response_format` parameter.
This capability is supported on `v2/chat/completions` endpoints for selected open-source models. Older `v1/completions` endpoints do not support structured output. For the list of supported models, see [Supported Models for Structured Output](/ai-for-process/models/supported-models#structured-output).
Supported schema data types: `string`, `number`, `boolean`, `integer`, `object`, `array`, `enum`, and `anyOf`.
Add a `response_format` field to your request body. If provided, the model returns a response as a JSON object matching the defined schema. If not provided, the model responds with standard text output.
If a model supports both tool calls and JSON Schema, tool calls take precedence and the schema is ignored.
## Generate an API Key
An API key is required to connect to the deployed model from an external environment. Keys are scoped per deployment.
1. Click the **API keys** tab in the left panel on the Models page.
## View the API Endpoint
After deployment, an API endpoint is generated for external inferencing and use across AI for Process. The endpoint is available in three formats.
You receive an email notification when deployment completes and the API endpoint is ready to use.
1. Click the required model from the models listing. Click the **Model Endpoint** tab in the left panel.
2. Click the **Copy** icon to copy the API endpoint.
You can embed the generated cURL command or code into your own applications or use it externally.
### Structured output support
Open-source models can return responses in structured JSON format using the `response_format` parameter, aligned with OpenAI schema style.
You can use this in two ways:
* **API calls** — Add the `response_format` parameter to the model endpoint when calling the deployed model externally.
* **Workflow builder** — Define the schema directly in the builder. AI for Process automatically attaches it as the `response_format` parameter.
This capability is supported on `v2/chat/completions` endpoints for selected open-source models. Older `v1/completions` endpoints do not support structured output. For the list of supported models, see [Supported Models for Structured Output](/ai-for-process/models/supported-models#structured-output).
Supported schema data types: `string`, `number`, `boolean`, `integer`, `object`, `array`, `enum`, and `anyOf`.
Add a `response_format` field to your request body. If provided, the model returns a response as a JSON object matching the defined schema. If not provided, the model responds with standard text output.
If a model supports both tool calls and JSON Schema, tool calls take precedence and the schema is ignored.
## Generate an API Key
An API key is required to connect to the deployed model from an external environment. Keys are scoped per deployment.
1. Click the **API keys** tab in the left panel on the Models page.
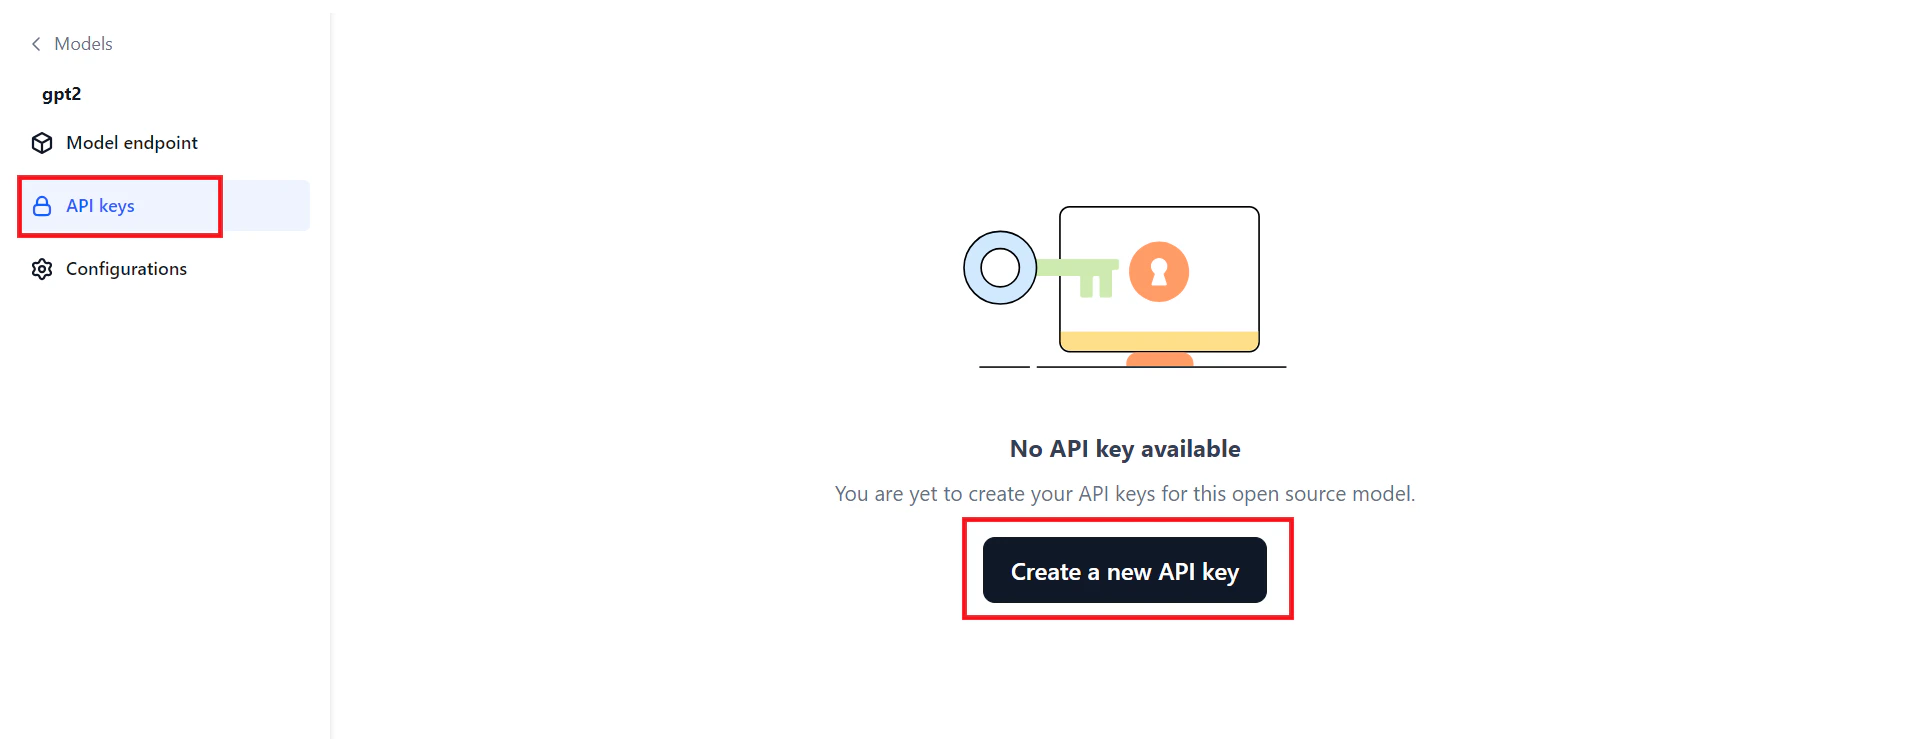 2. Click **Create a new API key**. The **Create new API key** dialog opens.
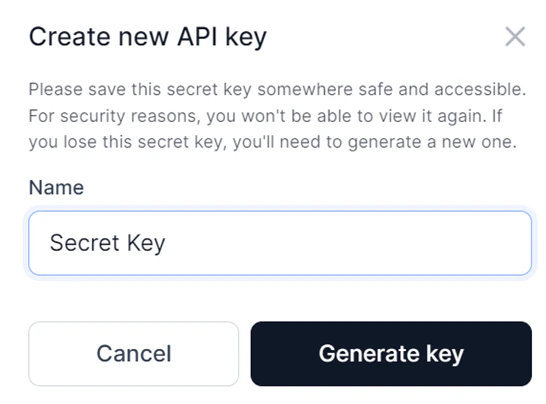 3. Enter a **Name** for the key and click **Generate key**.
4. Click **Copy and close** to copy the key and share it as needed.
3. Enter a **Name** for the key and click **Generate key**.
4. Click **Copy and close** to copy the key and share it as needed.
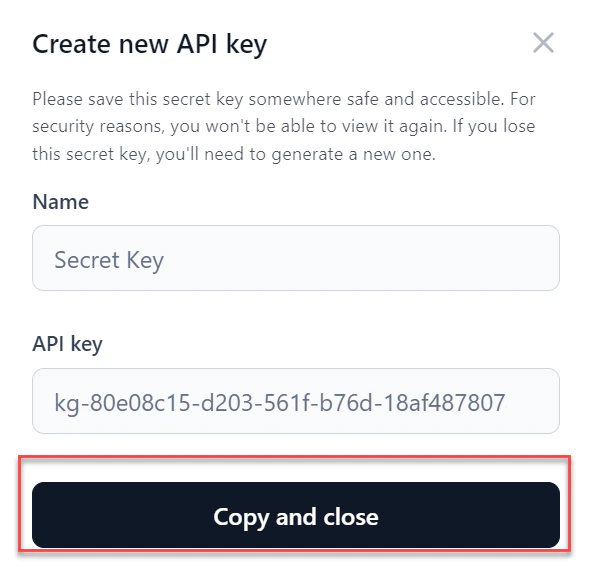 All generated API keys are listed in the API keys section. Hover over a key and click the delete icon to remove it.
## Configure your Open-Source Model
On the **Configurations** page, you can view the model name, edit the description and tags, adjust the endpoint timeout, undeploy, or delete the model.
All generated API keys are listed in the API keys section. Hover over a key and click the delete icon to remove it.
## Configure your Open-Source Model
On the **Configurations** page, you can view the model name, edit the description and tags, adjust the endpoint timeout, undeploy, or delete the model.
 ### Model endpoint timeout
Set a specific timeout for your model's endpoint. The allowed range is 30 to 180 seconds (3 minutes). The default is 60 seconds. If a request isn't completed within the set time, the endpoint returns a timeout error.
Timeout precedence: Workflow timeout > Node timeout > Model timeout.
### Undeploy the model
Undeploy the model if it's no longer in use. Undeploying disconnects the model immediately from all active instances. Click **Proceed to undeploy** on the Configurations page and follow the on-screen instructions.
### Delete the model
You can delete an undeployed model. Deleting removes all associated data. Click **Proceed to delete** on the Configurations page and follow the on-screen instructions.
## Deployment History
The deployment history table tracks the full lifecycle of the model, showing each version's deployment name, timestamp, duration, and who performed the deployment.
After deploying, you can modify parameters and redeploy. The system appends a version number to the original deployment name and increments it with each redeployment. For example, "Flan T5" becomes "Flan T5\_v1," then "Flan T5\_v2," and so on.
The most recent deployment is marked with a green tick. Click any version to view its details.
### Model endpoint timeout
Set a specific timeout for your model's endpoint. The allowed range is 30 to 180 seconds (3 minutes). The default is 60 seconds. If a request isn't completed within the set time, the endpoint returns a timeout error.
Timeout precedence: Workflow timeout > Node timeout > Model timeout.
### Undeploy the model
Undeploy the model if it's no longer in use. Undeploying disconnects the model immediately from all active instances. Click **Proceed to undeploy** on the Configurations page and follow the on-screen instructions.
### Delete the model
You can delete an undeployed model. Deleting removes all associated data. Click **Proceed to delete** on the Configurations page and follow the on-screen instructions.
## Deployment History
The deployment history table tracks the full lifecycle of the model, showing each version's deployment name, timestamp, duration, and who performed the deployment.
After deploying, you can modify parameters and redeploy. The system appends a version number to the original deployment name and increments it with each redeployment. For example, "Flan T5" becomes "Flan T5\_v1," then "Flan T5\_v2," and so on.
The most recent deployment is marked with a green tick. Click any version to view its details.
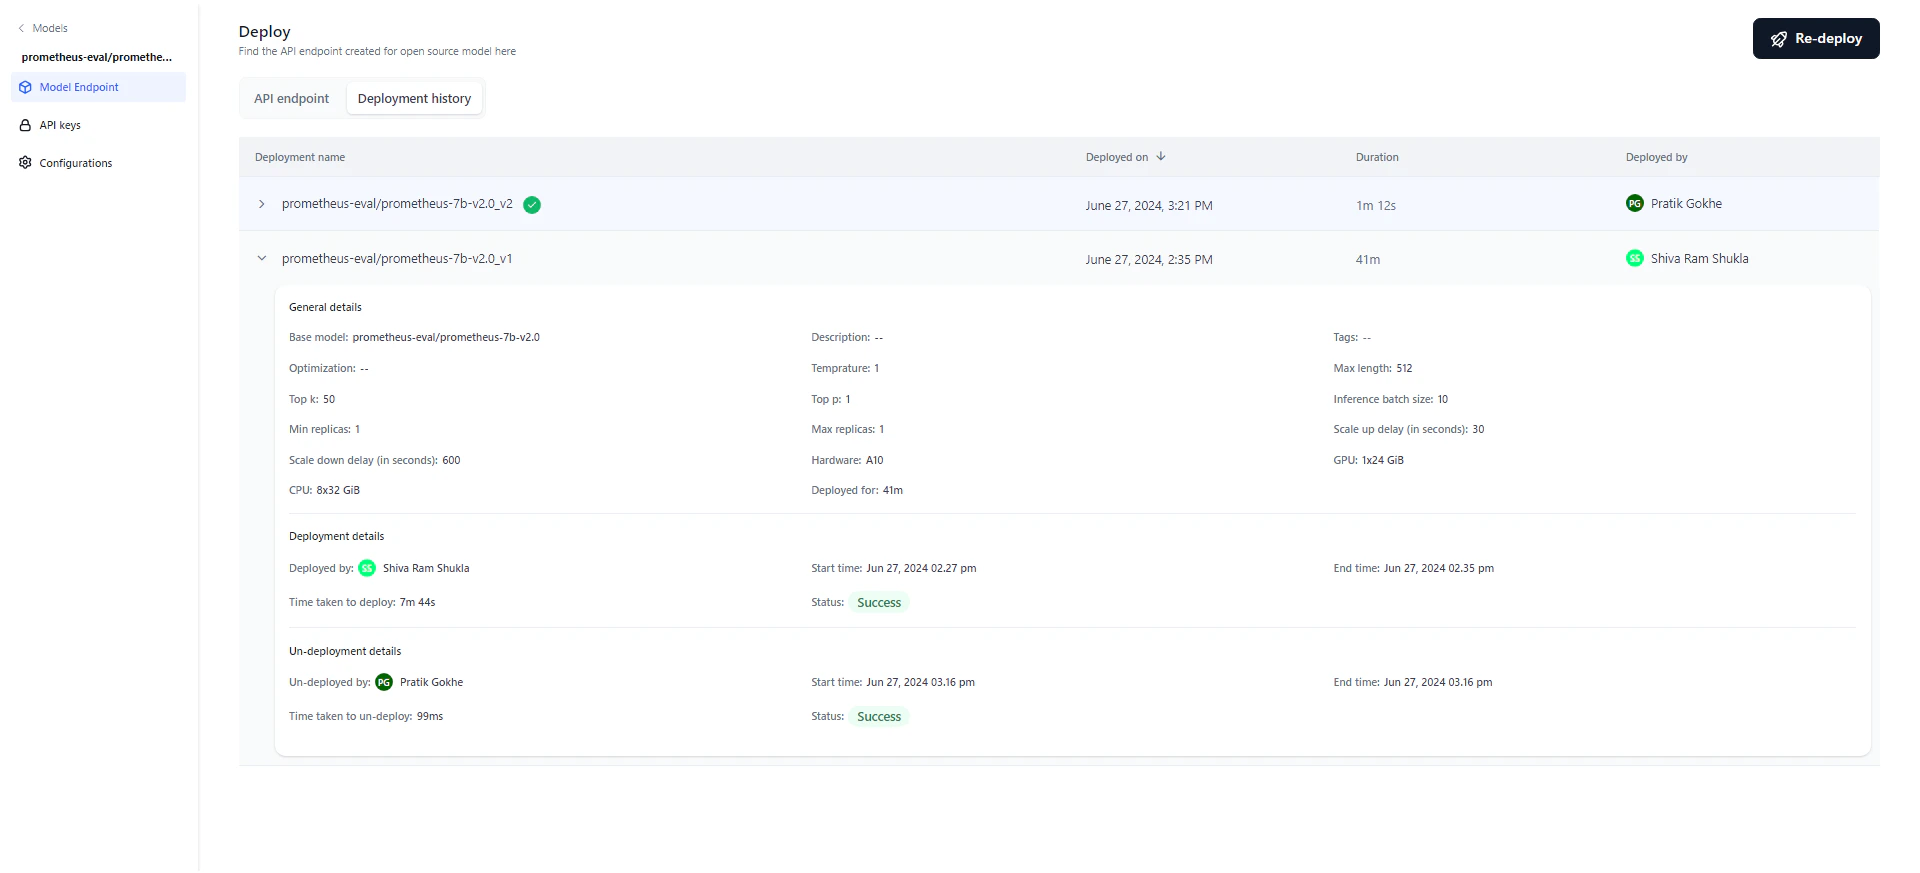 Click the **Deployment history** tab on the Deploy page to view the history. This is useful for auditing and accountability.
Each deployment version shows:
* **General details** — Model name, description, tags, optimization technique, parameters, hardware, and deployment duration.
* **Deployment details** — Who deployed the model, start and end timestamps, duration, and status (Success, Failed, or Deploying). Hover over "Status" on a failed deployment to see the reason.
* **Un-deployment details** — Appears only if the model was undeployed, either manually or automatically. Shows who initiated the undeployment and the start/end timestamps.
Click the **Deployment history** tab on the Deploy page to view the history. This is useful for auditing and accountability.
Each deployment version shows:
* **General details** — Model name, description, tags, optimization technique, parameters, hardware, and deployment duration.
* **Deployment details** — Who deployed the model, start and end timestamps, duration, and status (Success, Failed, or Deploying). Hover over "Status" on a failed deployment to see the reason.
* **Un-deployment details** — Appears only if the model was undeployed, either manually or automatically. Shows who initiated the undeployment and the start/end timestamps.