> ## Documentation Index
> Fetch the complete documentation index at: https://koreai.mintlify.site/llms.txt
> Use this file to discover all available pages before exploring further.
# Prompt Studio
Create, test, and optimize prompts across multiple AI models using templates, variables, version control, and collaboration features in Prompt Studio.
Prompt Studio manages the full lifecycle of prompts—from creation and testing to optimization and deployment. You can test prompts across external, fine-tuned, and open-source models to find the best model and configuration through iteration.
## Key Features
* 65+ pre-built templates for common use cases.
* Multi-model comparison and testing (up to 5 models simultaneously).
* Variable support to test multiple scenarios at once.
* AI-assisted prompt generation and synthetic test data creation.
* Version control, draft history, and collaboration.
* Model performance analytics: response time and token usage.
## Access Prompt Studio
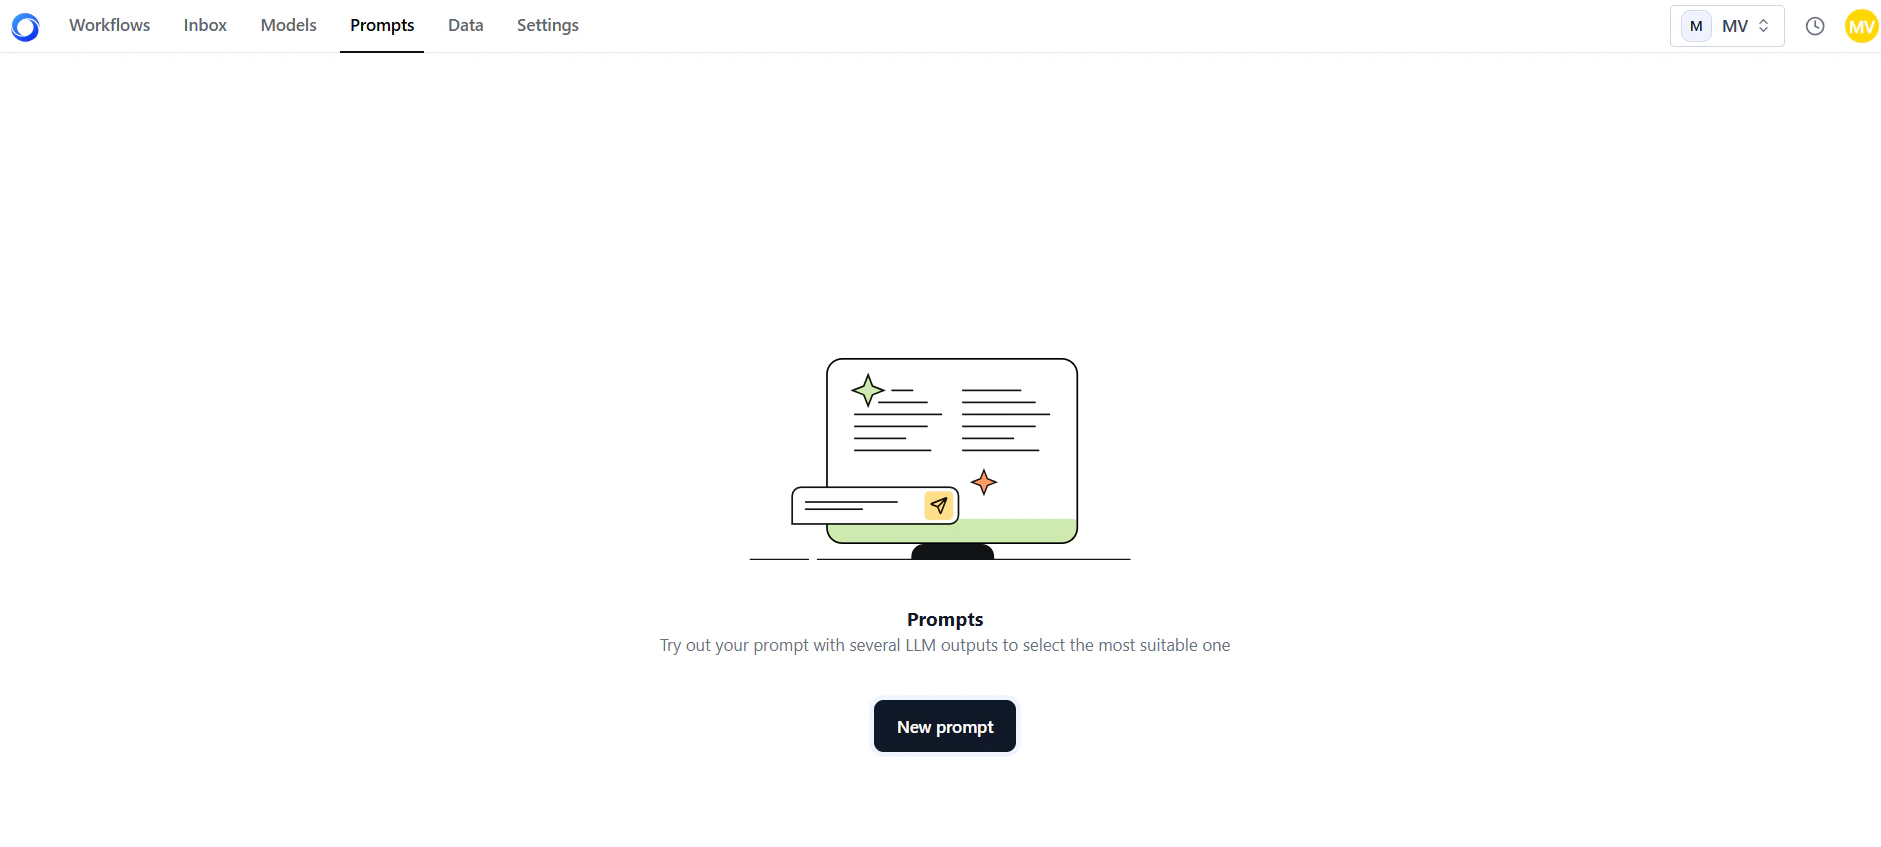
1. Log in to your AI for Process account and select **Prompts** on the top navigation bar.
2. On the **Prompts** dashboard, select a tab:
* **All prompts**: All available prompts.
* **My prompts**: Prompts you created or saved.
* **Shared prompts**: Prompts shared with you for use or collaboration.
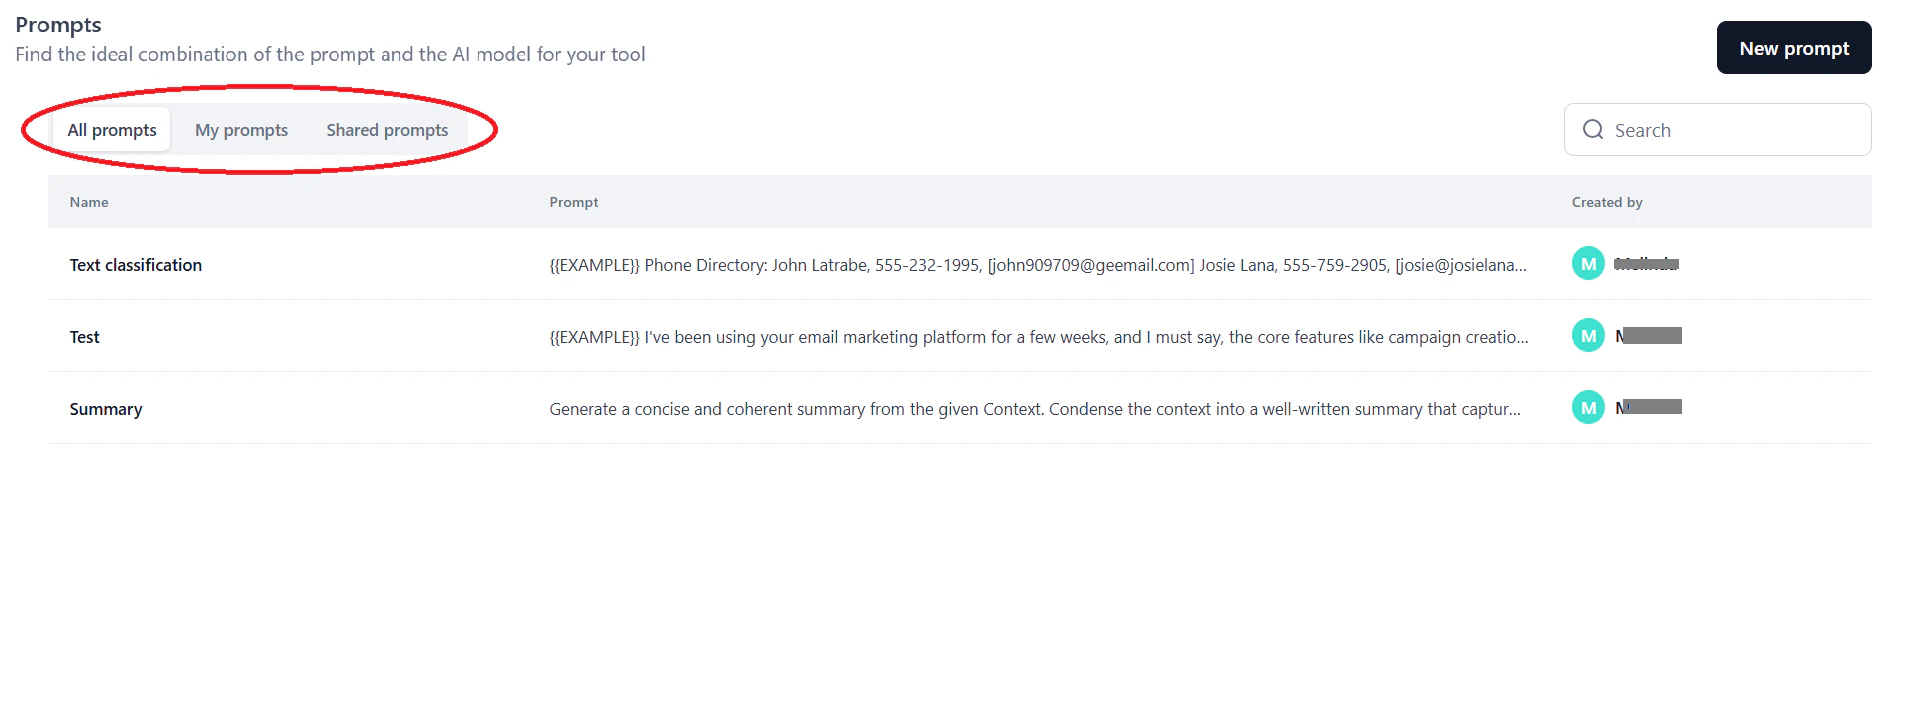 Each tab shows the prompt name, prompt text, and creator name.
3. Click **New prompt**.
Each tab shows the prompt name, prompt text, and creator name.
3. Click **New prompt**.
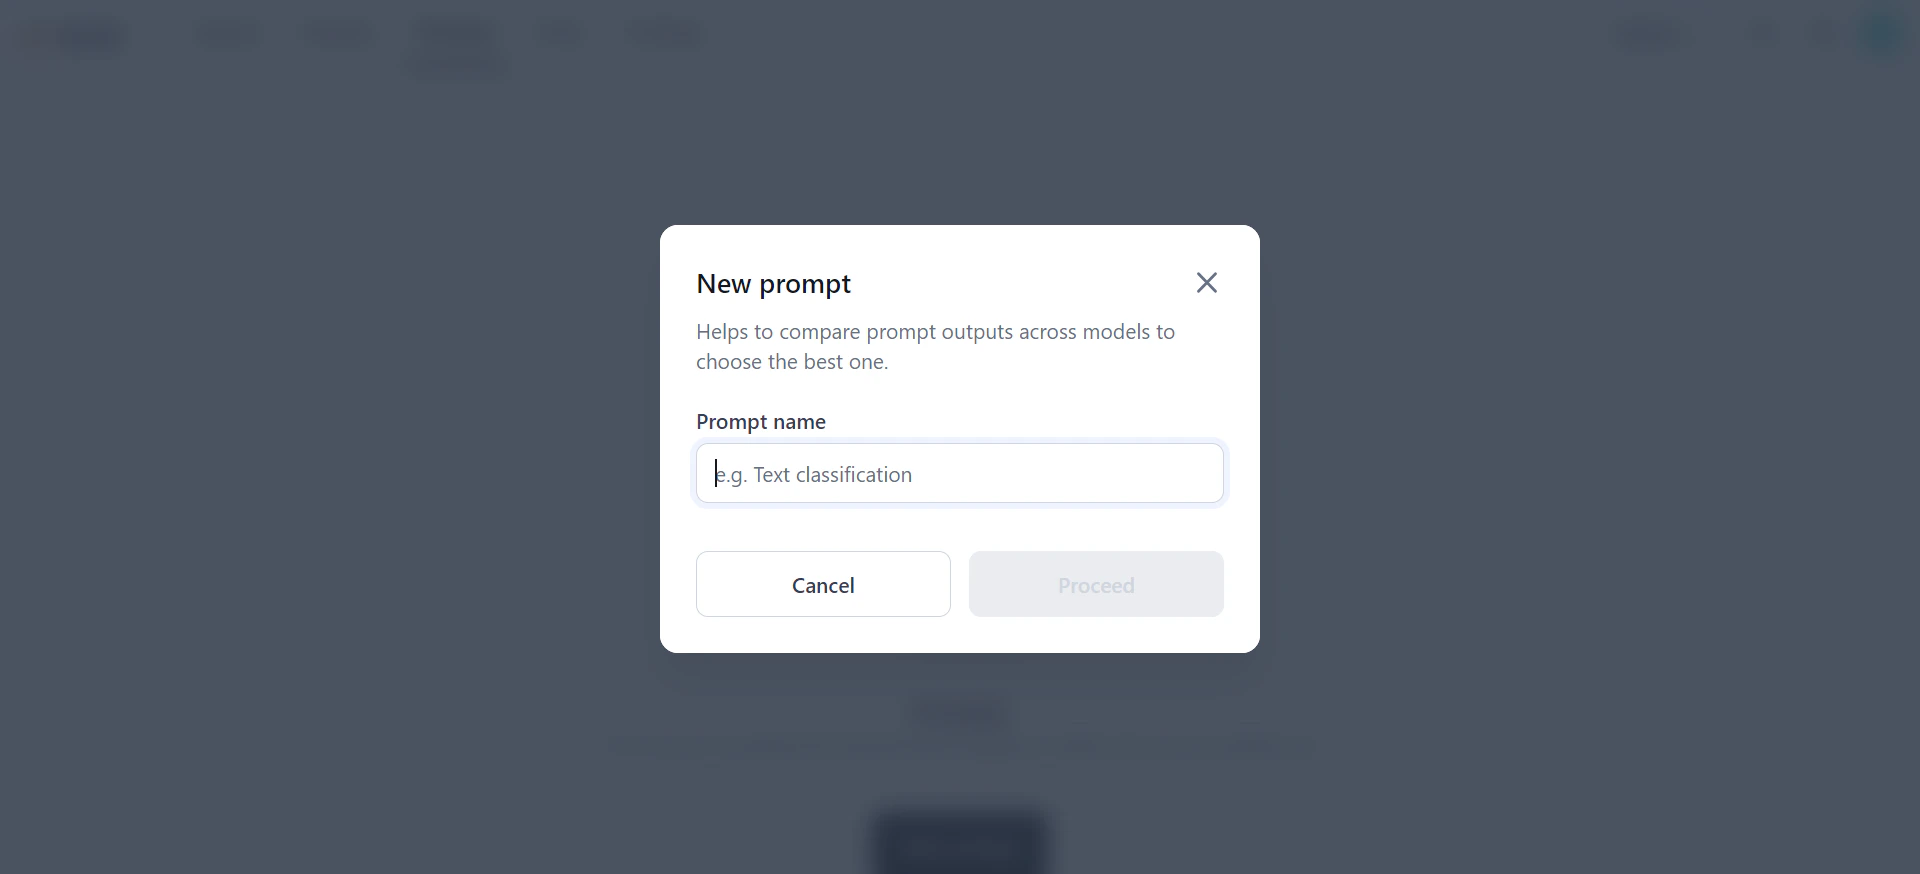
 4. In the **New prompt** dialog, enter a name and click **Proceed**. The Prompt landing page opens.
 ## Create a Prompt
On the Prompt landing page, choose one of three ways to start:
## Create a Prompt
On the Prompt landing page, choose one of three ways to start:
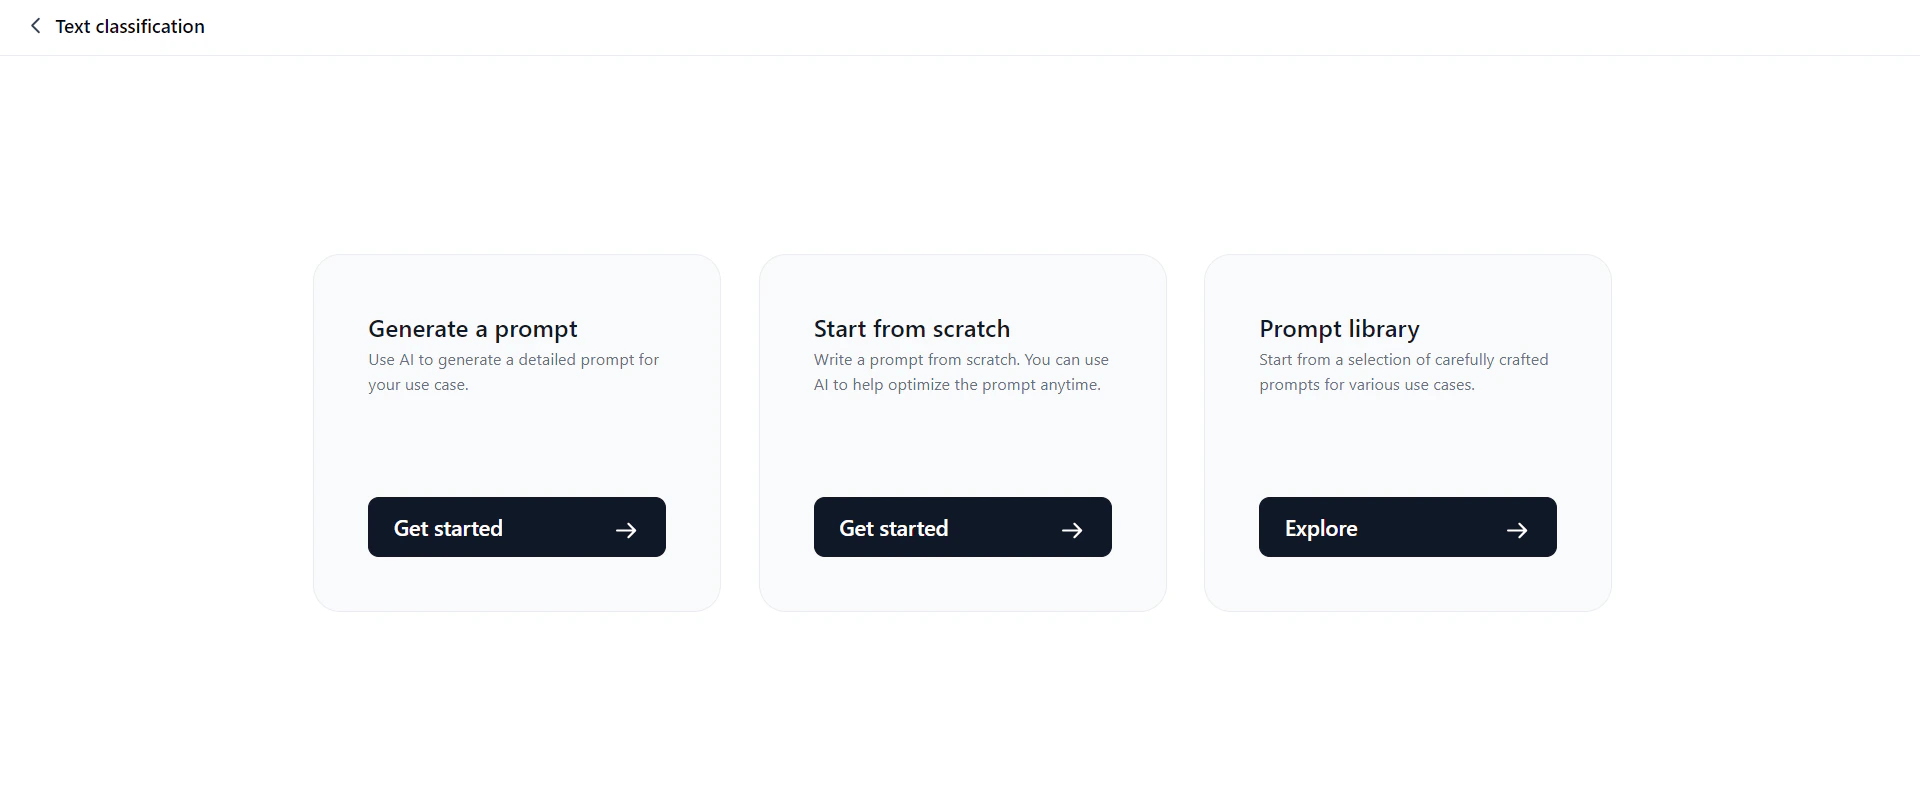 ### Generate a Prompt
This option expands a short input (one or two sentences) into a detailed, structured prompt. It helps LLMs better understand context and perform tasks more effectively.
Only OpenAI and Anthropic models are supported for prompt generation and test data generation.
1. Click **Generate a prompt**.
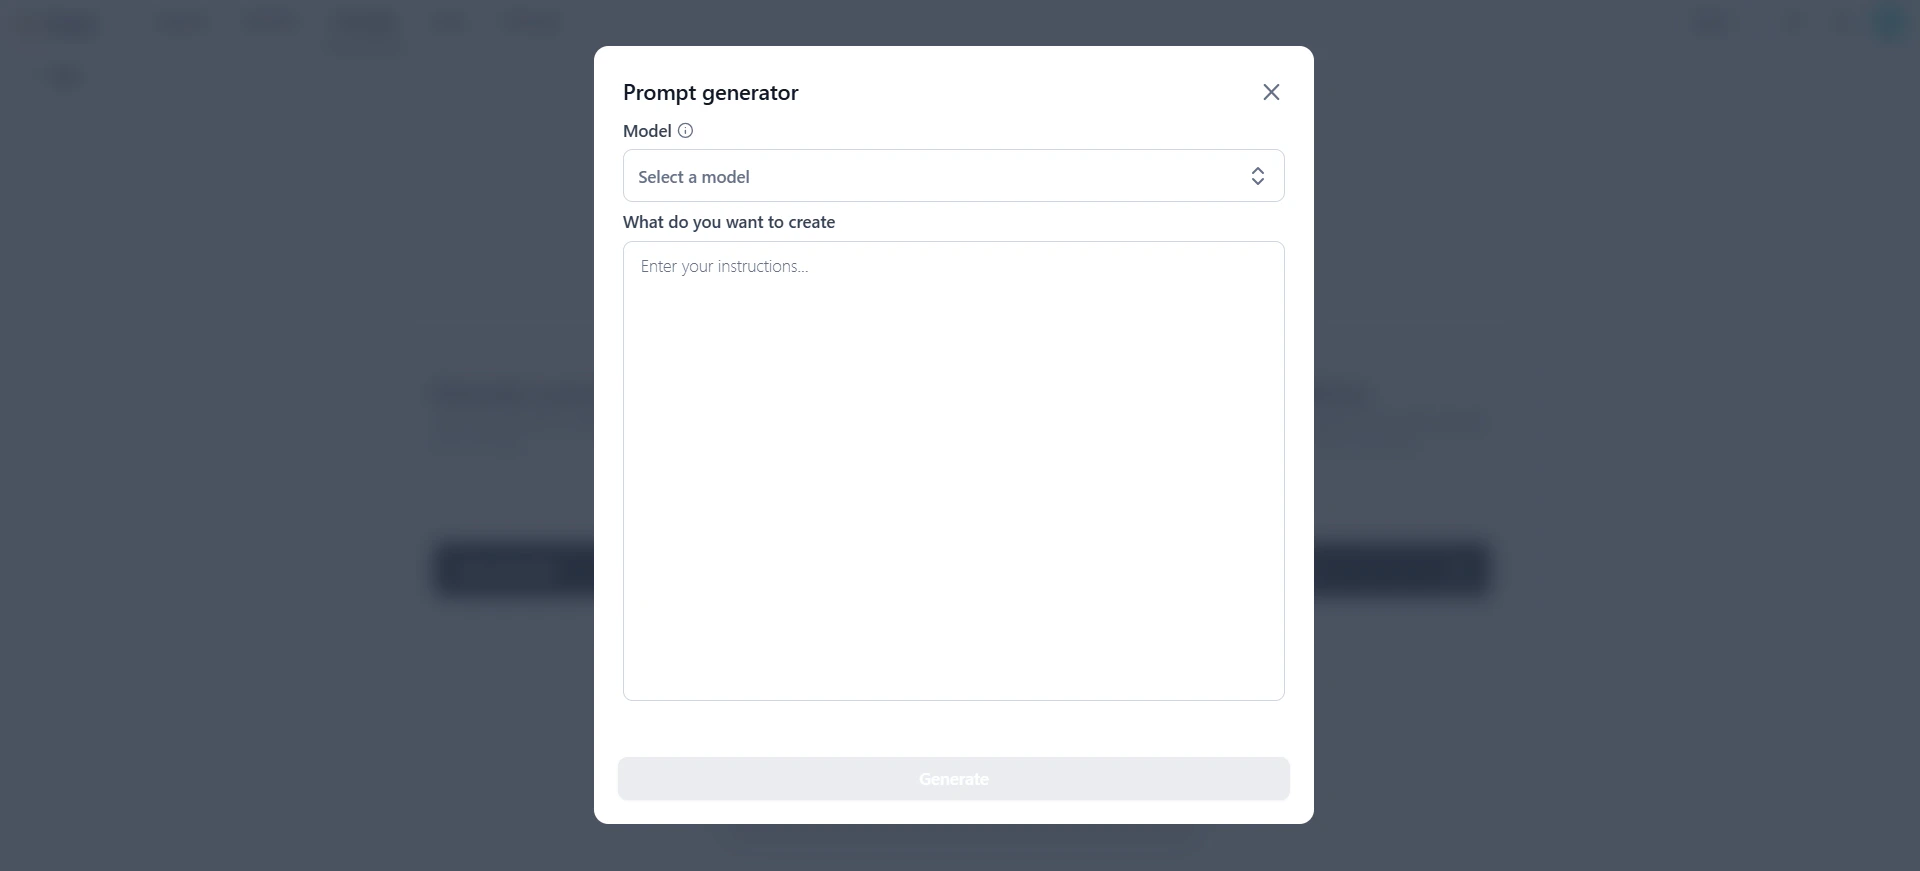
2. In the Prompt generator dialog, select a model and enter your instruction.
### Generate a Prompt
This option expands a short input (one or two sentences) into a detailed, structured prompt. It helps LLMs better understand context and perform tasks more effectively.
Only OpenAI and Anthropic models are supported for prompt generation and test data generation.
1. Click **Generate a prompt**.
2. In the Prompt generator dialog, select a model and enter your instruction.
 3. Review the AI-generated prompt.
4. Click **Proceed** to copy the prompt to the canvas. Customize it as needed.
You can also generate prompts directly on the prompt canvas by clicking **Generate Prompt** in the Prompt field.
### Start from Scratch
This option opens a blank prompt canvas where you add prompts, variables, and models, then generate output. You can also pull in templates from the prompt library.
For steps, see [Work on the Prompt Canvas](#work-on-the-prompt-canvas).
### Prompt Library
The Prompt Library includes 65+ built-in templates for common use cases—code generation, summarization, content creation, Q\&A, and more. Search templates by keyword or filter by use case category.
All templates are read-only. You can edit content only after importing a template to the prompt canvas.
1. Click **Prompt library**.
2. In the Prompt library dialog, select a tab:
* **My templates**: Templates you previously saved.
* **All templates**: All available templates.
3. Review the AI-generated prompt.
4. Click **Proceed** to copy the prompt to the canvas. Customize it as needed.
You can also generate prompts directly on the prompt canvas by clicking **Generate Prompt** in the Prompt field.
### Start from Scratch
This option opens a blank prompt canvas where you add prompts, variables, and models, then generate output. You can also pull in templates from the prompt library.
For steps, see [Work on the Prompt Canvas](#work-on-the-prompt-canvas).
### Prompt Library
The Prompt Library includes 65+ built-in templates for common use cases—code generation, summarization, content creation, Q\&A, and more. Search templates by keyword or filter by use case category.
All templates are read-only. You can edit content only after importing a template to the prompt canvas.
1. Click **Prompt library**.
2. In the Prompt library dialog, select a tab:
* **My templates**: Templates you previously saved.
* **All templates**: All available templates.
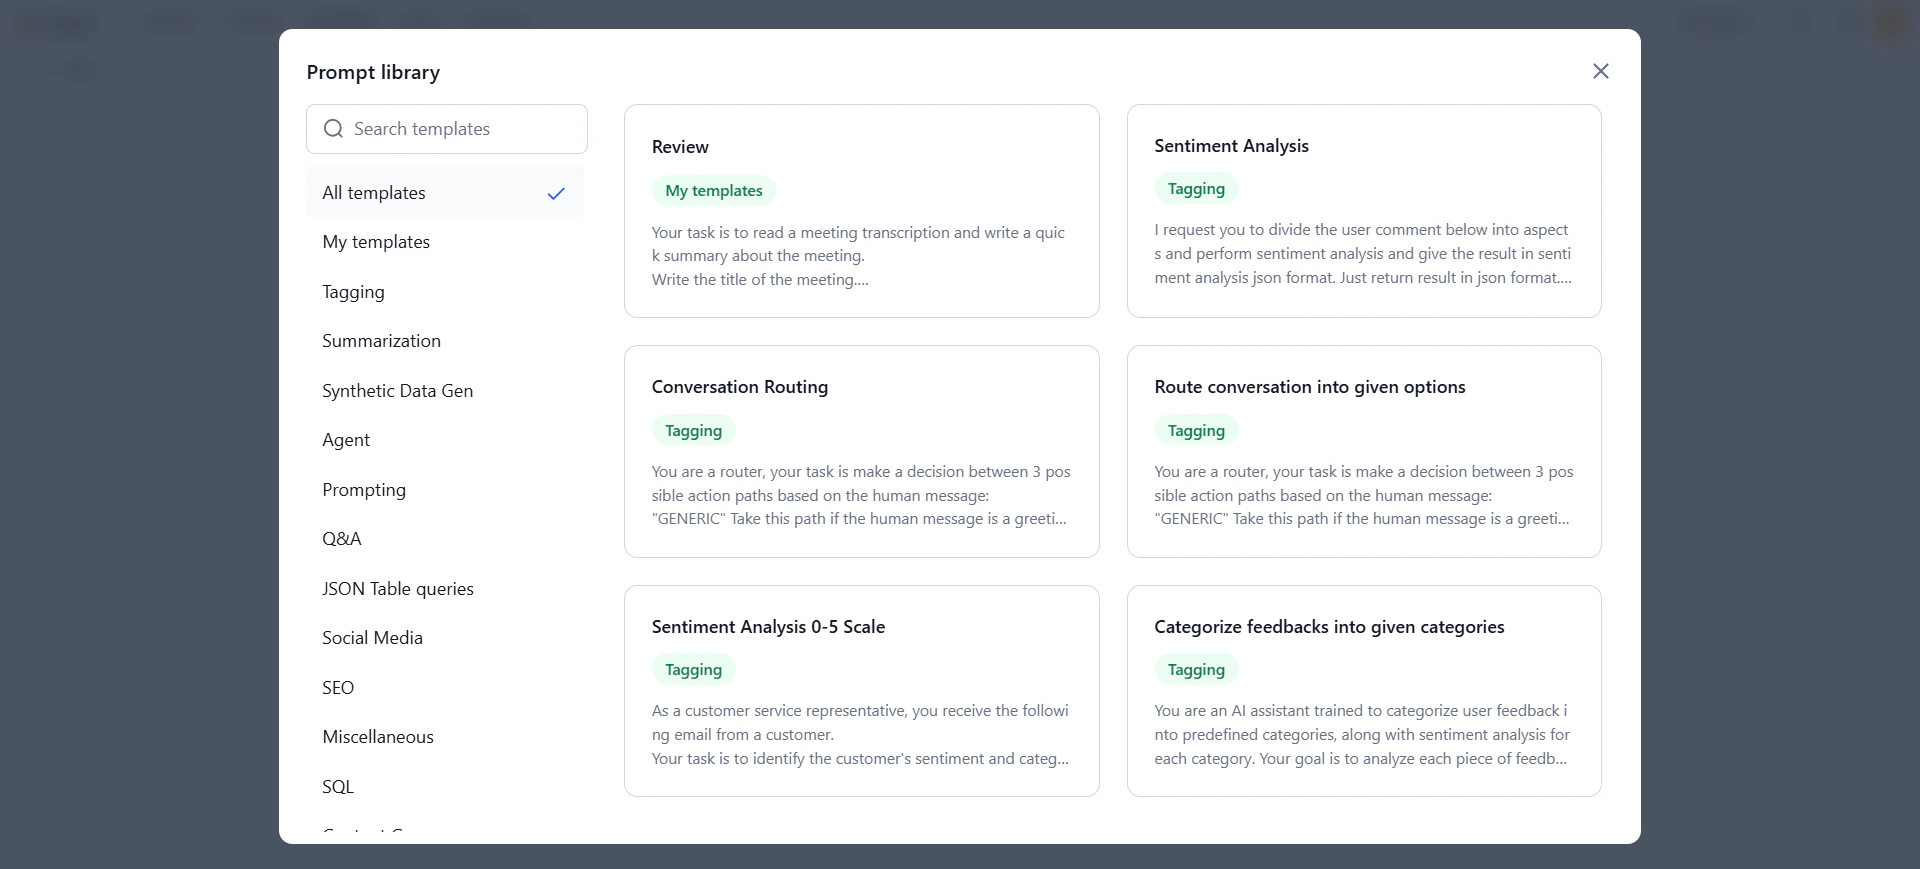 3. Click a template to preview it, then click **Use template**.
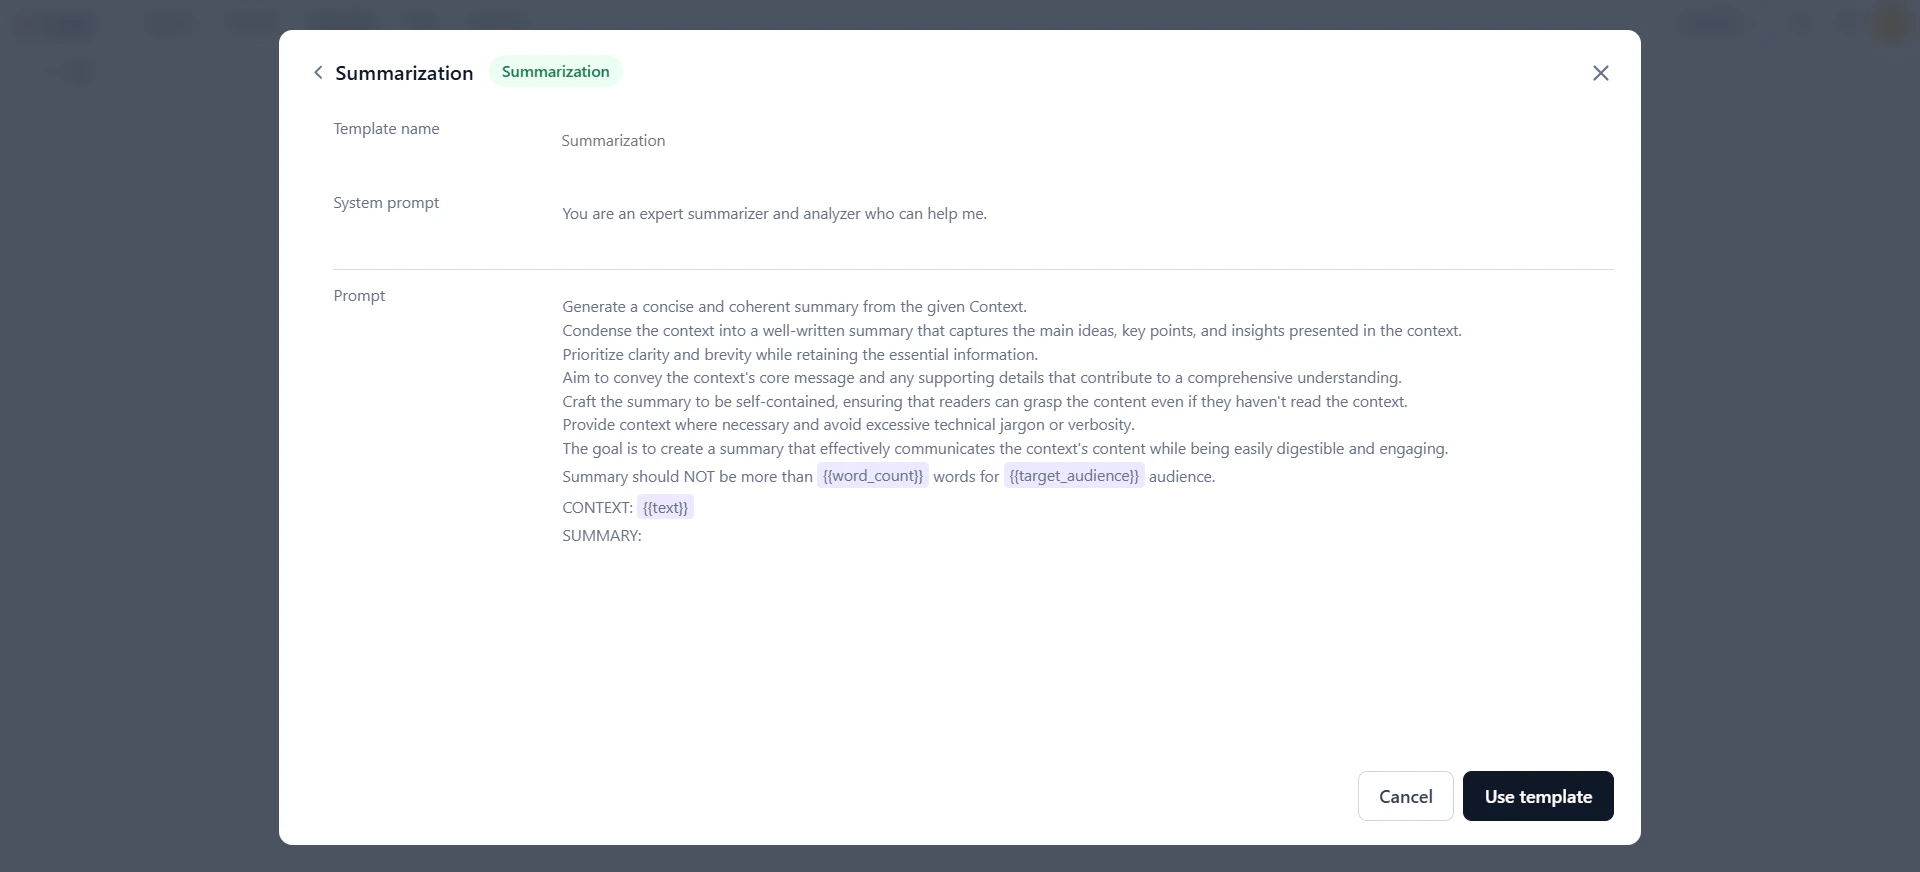 4. The template loads on the prompt canvas. Customize it as needed.
 ## Work on the Prompt Canvas
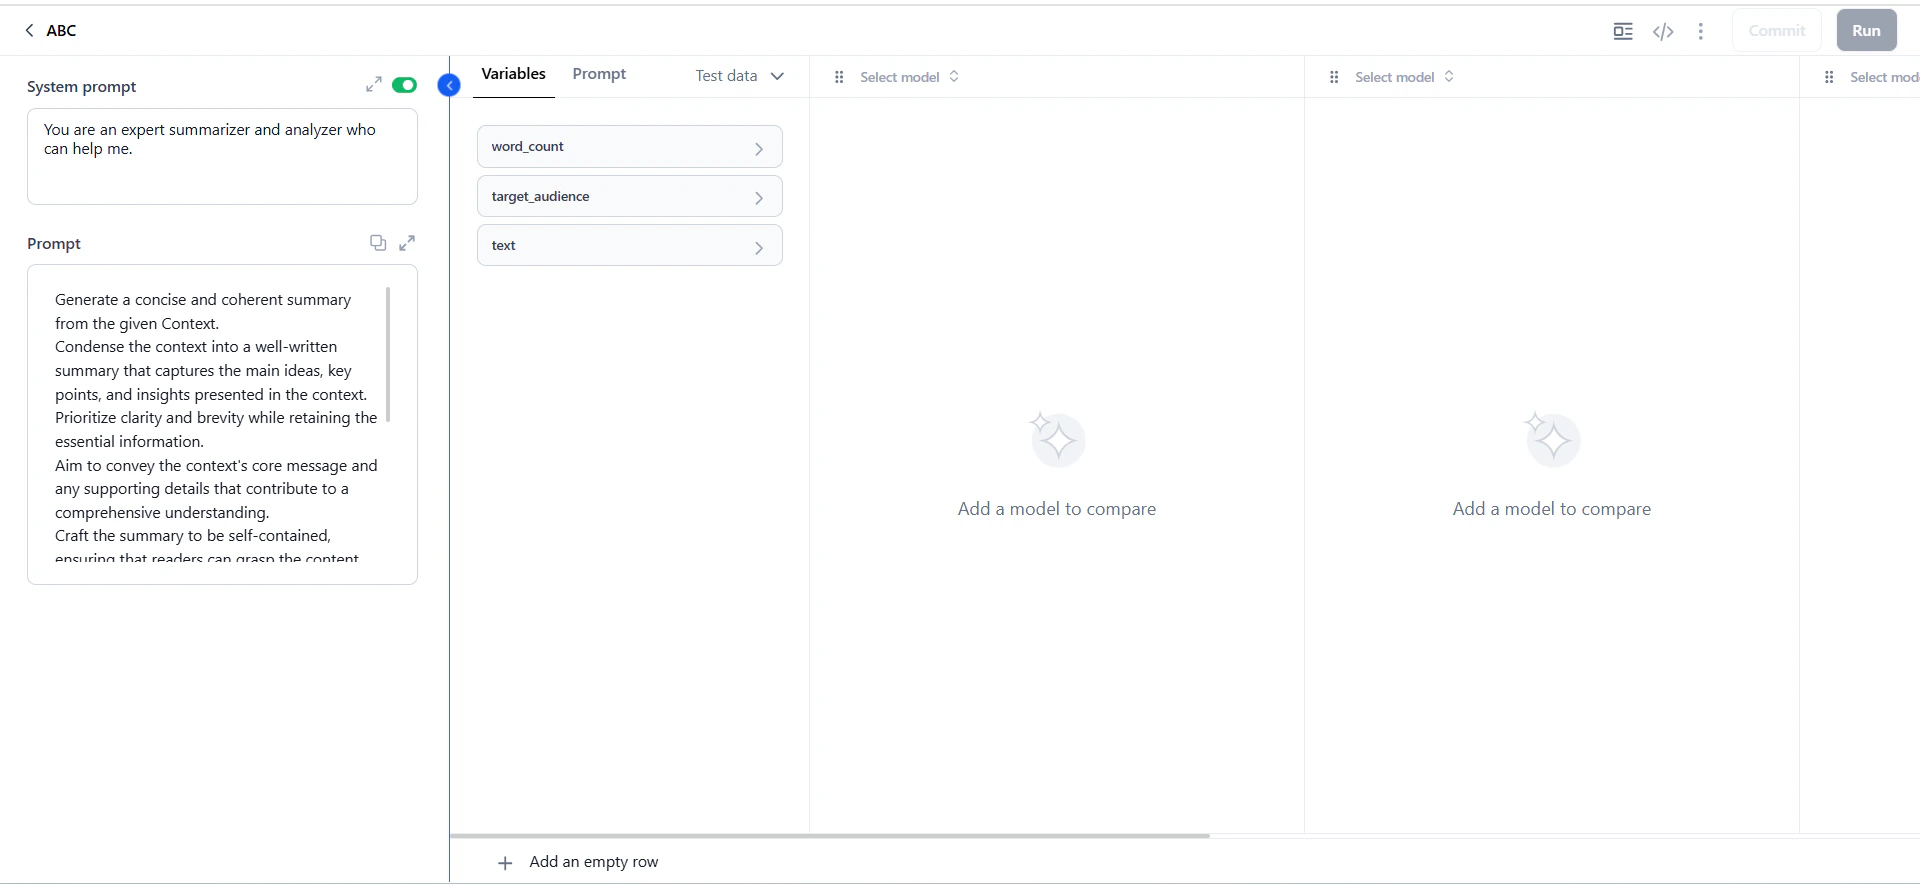
The prompt canvas is the core workspace for prompt experiments—testing and comparing AI model performance on a specific input (phrase, question, or paragraph). The workflow follows four steps:
```text theme={null}
Add prompts → Apply variables → Select models → Generate output
```
### Add Prompts
1. In the **System prompt** field, assign a role to the model. This field is optional—use the toggle to enable or disable it.
## Work on the Prompt Canvas
The prompt canvas is the core workspace for prompt experiments—testing and comparing AI model performance on a specific input (phrase, question, or paragraph). The workflow follows four steps:
```text theme={null}
Add prompts → Apply variables → Select models → Generate output
```
### Add Prompts
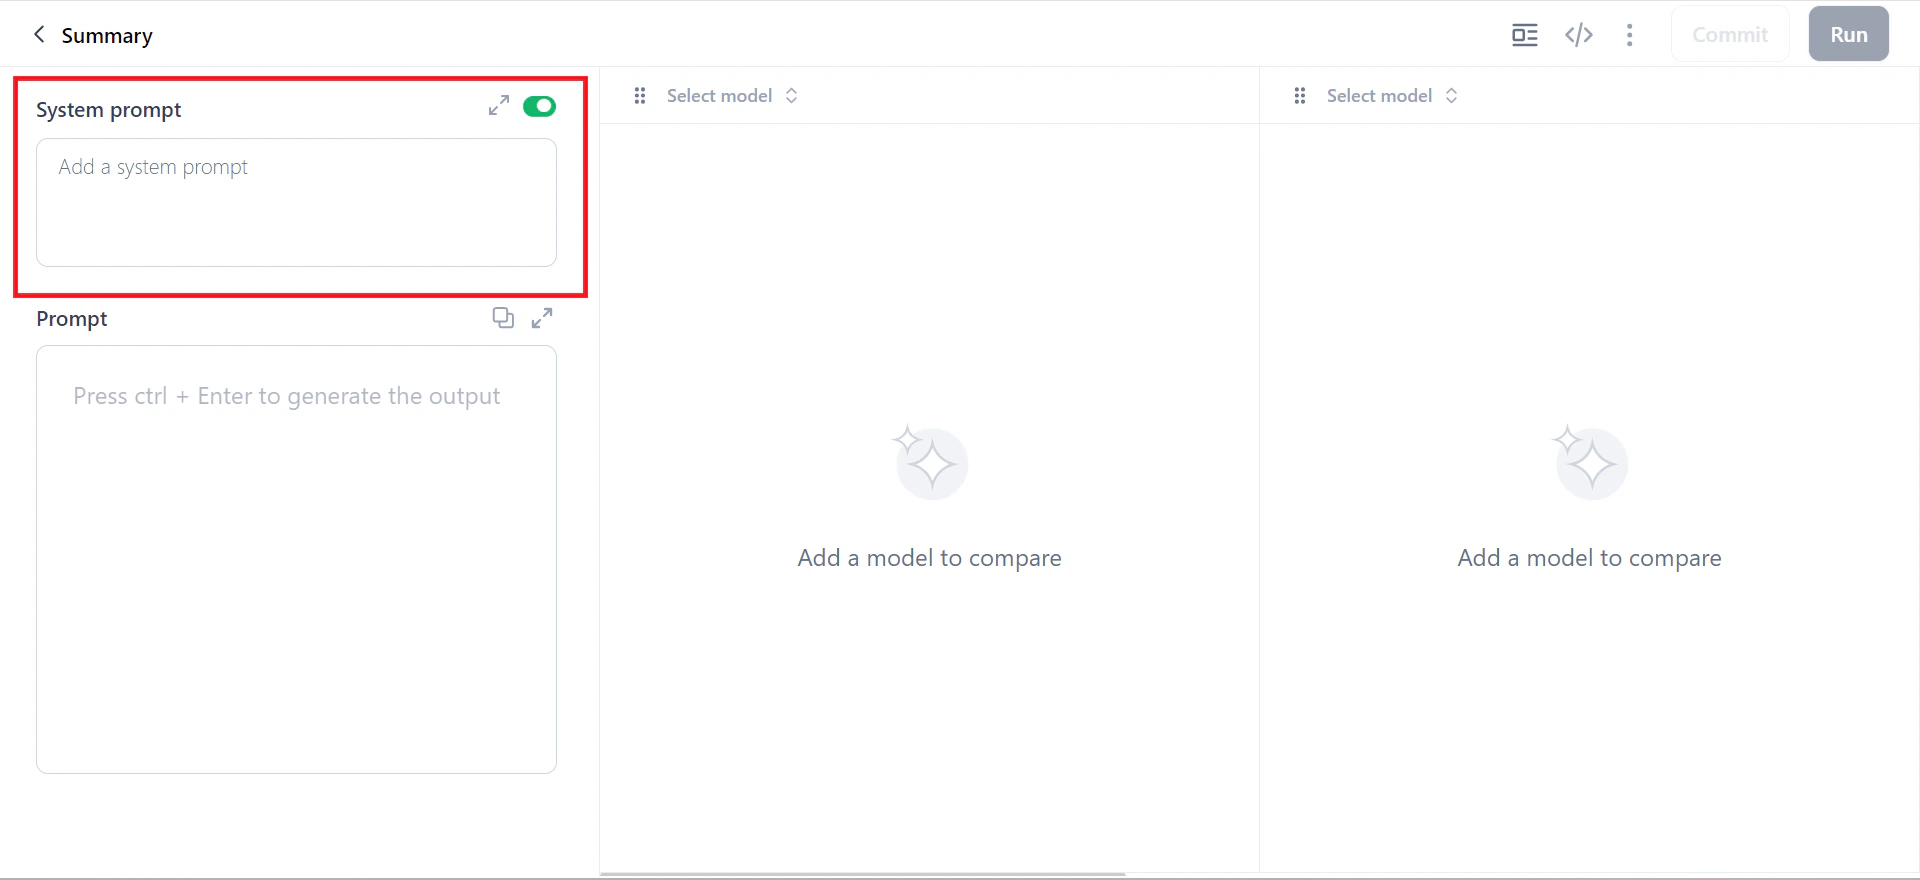
1. In the **System prompt** field, assign a role to the model. This field is optional—use the toggle to enable or disable it.
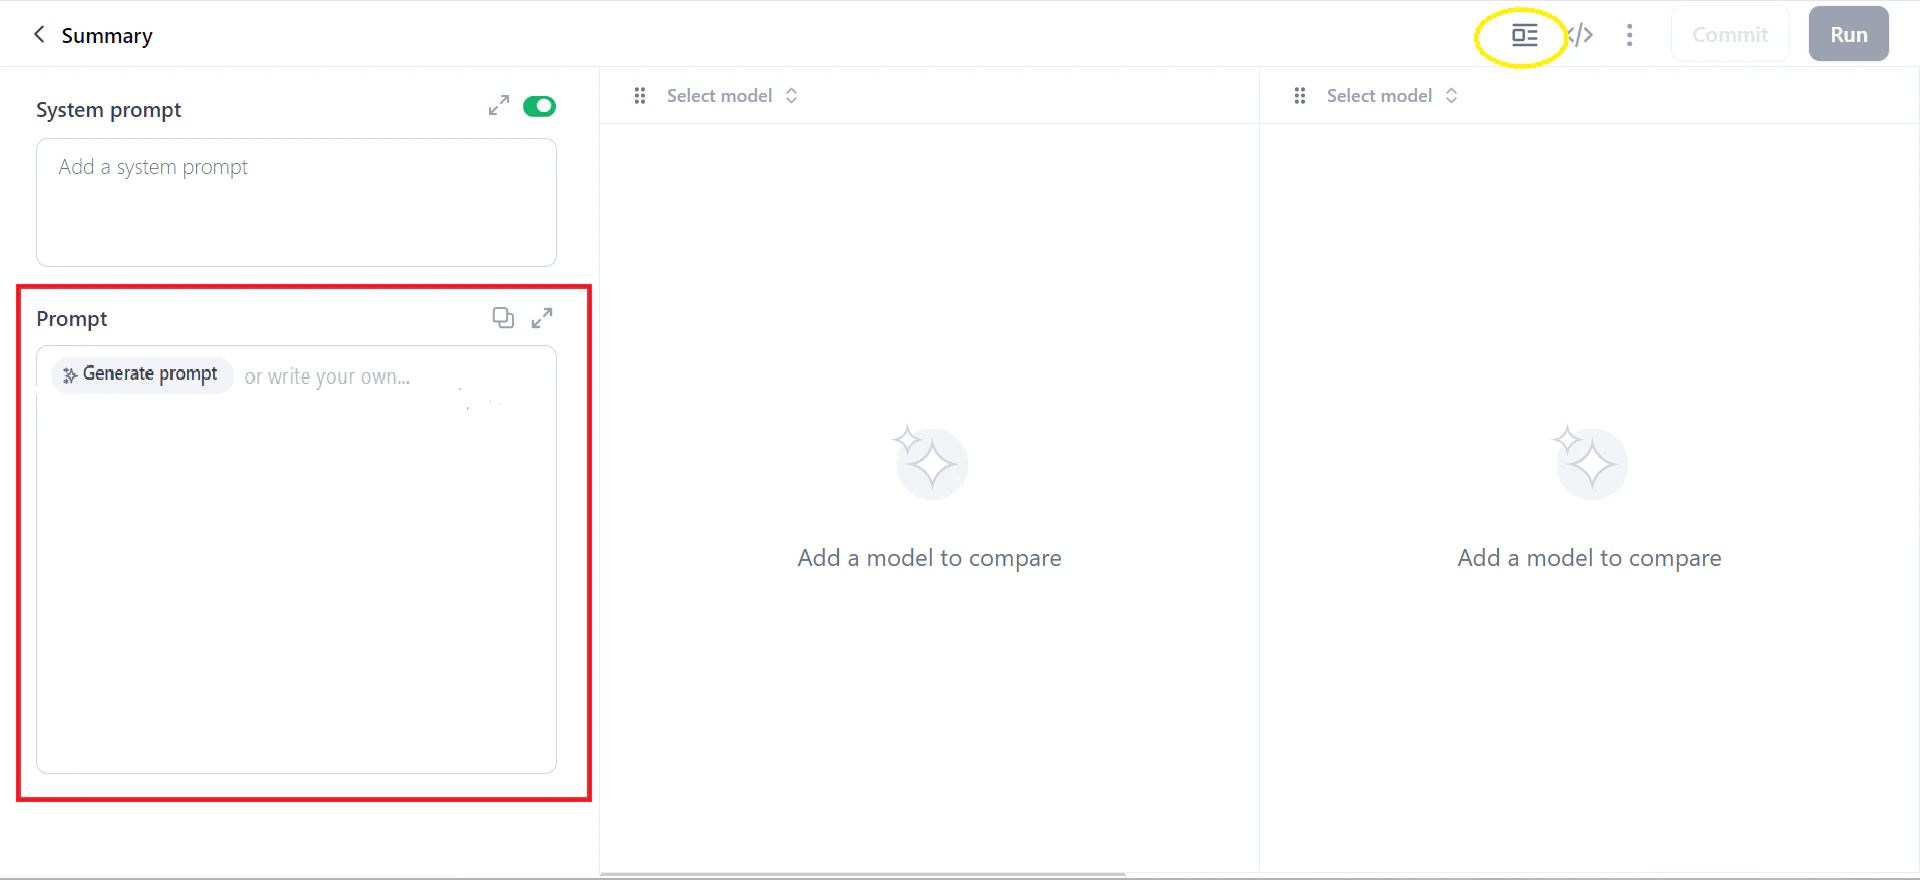
 2. In the **Prompt** field, enter your instructions. Click **Generate Prompt** to expand a short instruction into a more detailed prompt.
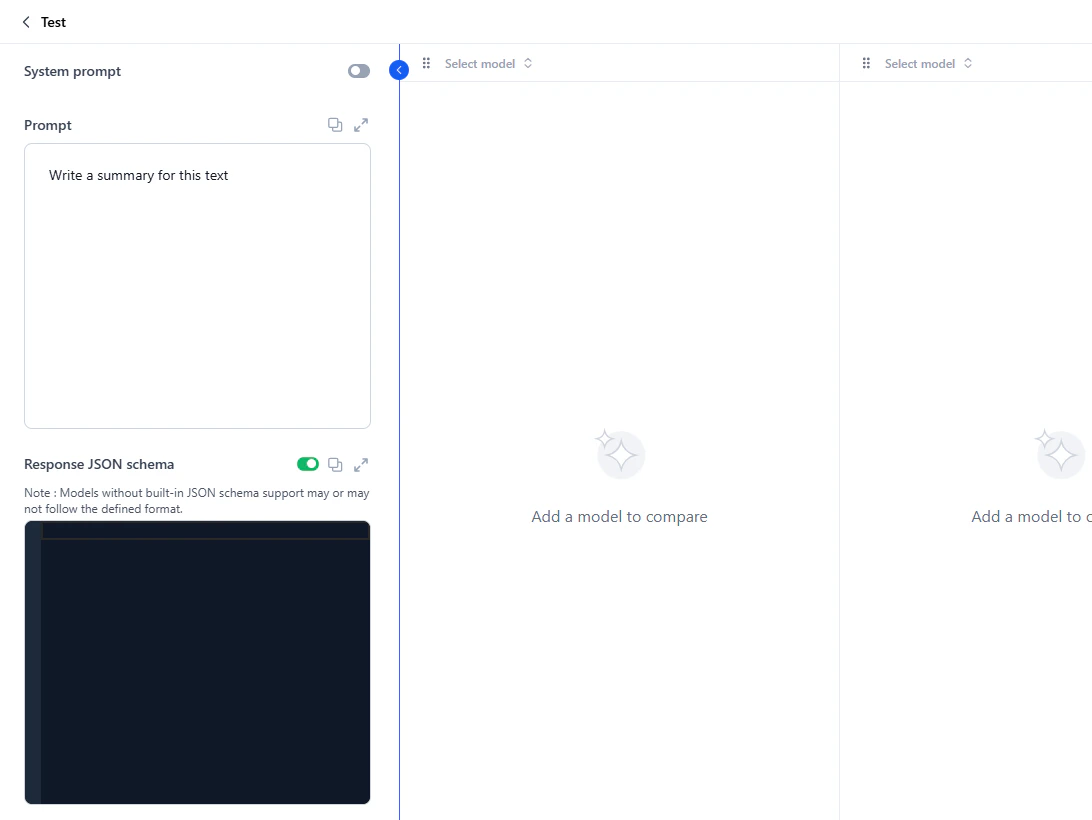
 3. Optionally, define a **Response JSON schema** to structure model responses.
If the selected model supports response formatting, the schema is applied directly. If not, the schema is included with the prompt, and the model responds in the requested format if it can. Without a schema, the model responds in plain text.
Supported types: String, Boolean, Number, Integer, Object, Array, Enum, and anyOf. For schema syntax, see [Defining JSON schema](/ai-for-process/workflows/workflow-builder#json-schema-format). Resolve any schema errors before proceeding.
3. Optionally, define a **Response JSON schema** to structure model responses.
If the selected model supports response formatting, the schema is applied directly. If not, the schema is included with the prompt, and the model responds in the requested format if it can. Without a schema, the model responds in plain text.
Supported types: String, Boolean, Number, Integer, Object, Array, Enum, and anyOf. For schema syntax, see [Defining JSON schema](/ai-for-process/workflows/workflow-builder#json-schema-format). Resolve any schema errors before proceeding.
 * **System prompts** guide the model's overall behavior or tone. Example: "You are a helpful assistant."
* **Human prompts** specify what the user wants. Example: "Summarize this error log and tell me the likely cause of the issue."
### Apply Variables
Variables let you run prompts with multiple values simultaneously—generating outputs for all values at once. Use the `{{variable}}` syntax anywhere in the prompt or system prompt.
For datasets, map CSV column names to variable names (case-sensitive). For example, `{{Name}}` maps to a CSV column named "Name."
1. In the **Prompt** field, add variables in double curly braces. For example, `{{xyz}}`. The **Variables** column appears automatically.
2. In the **Variables** window, assign a value to each variable. Click **Add an empty row** to add multiple rows.
* **System prompts** guide the model's overall behavior or tone. Example: "You are a helpful assistant."
* **Human prompts** specify what the user wants. Example: "Summarize this error log and tell me the likely cause of the issue."
### Apply Variables
Variables let you run prompts with multiple values simultaneously—generating outputs for all values at once. Use the `{{variable}}` syntax anywhere in the prompt or system prompt.
For datasets, map CSV column names to variable names (case-sensitive). For example, `{{Name}}` maps to a CSV column named "Name."
1. In the **Prompt** field, add variables in double curly braces. For example, `{{xyz}}`. The **Variables** column appears automatically.
2. In the **Variables** window, assign a value to each variable. Click **Add an empty row** to add multiple rows.
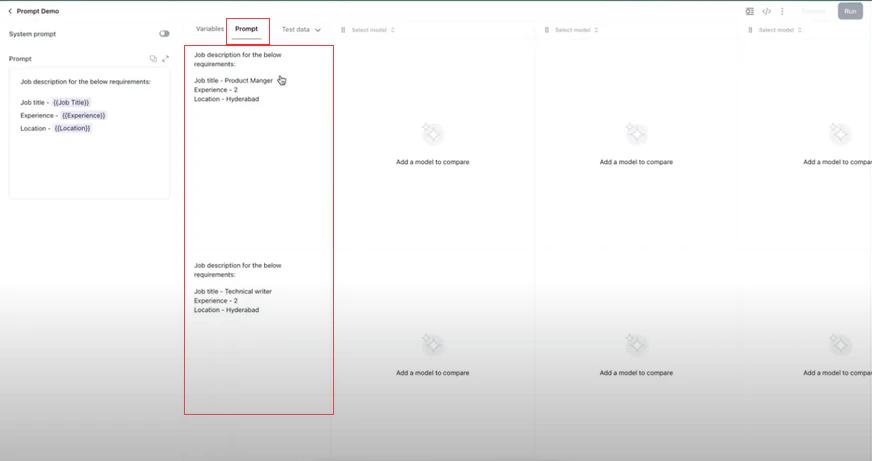
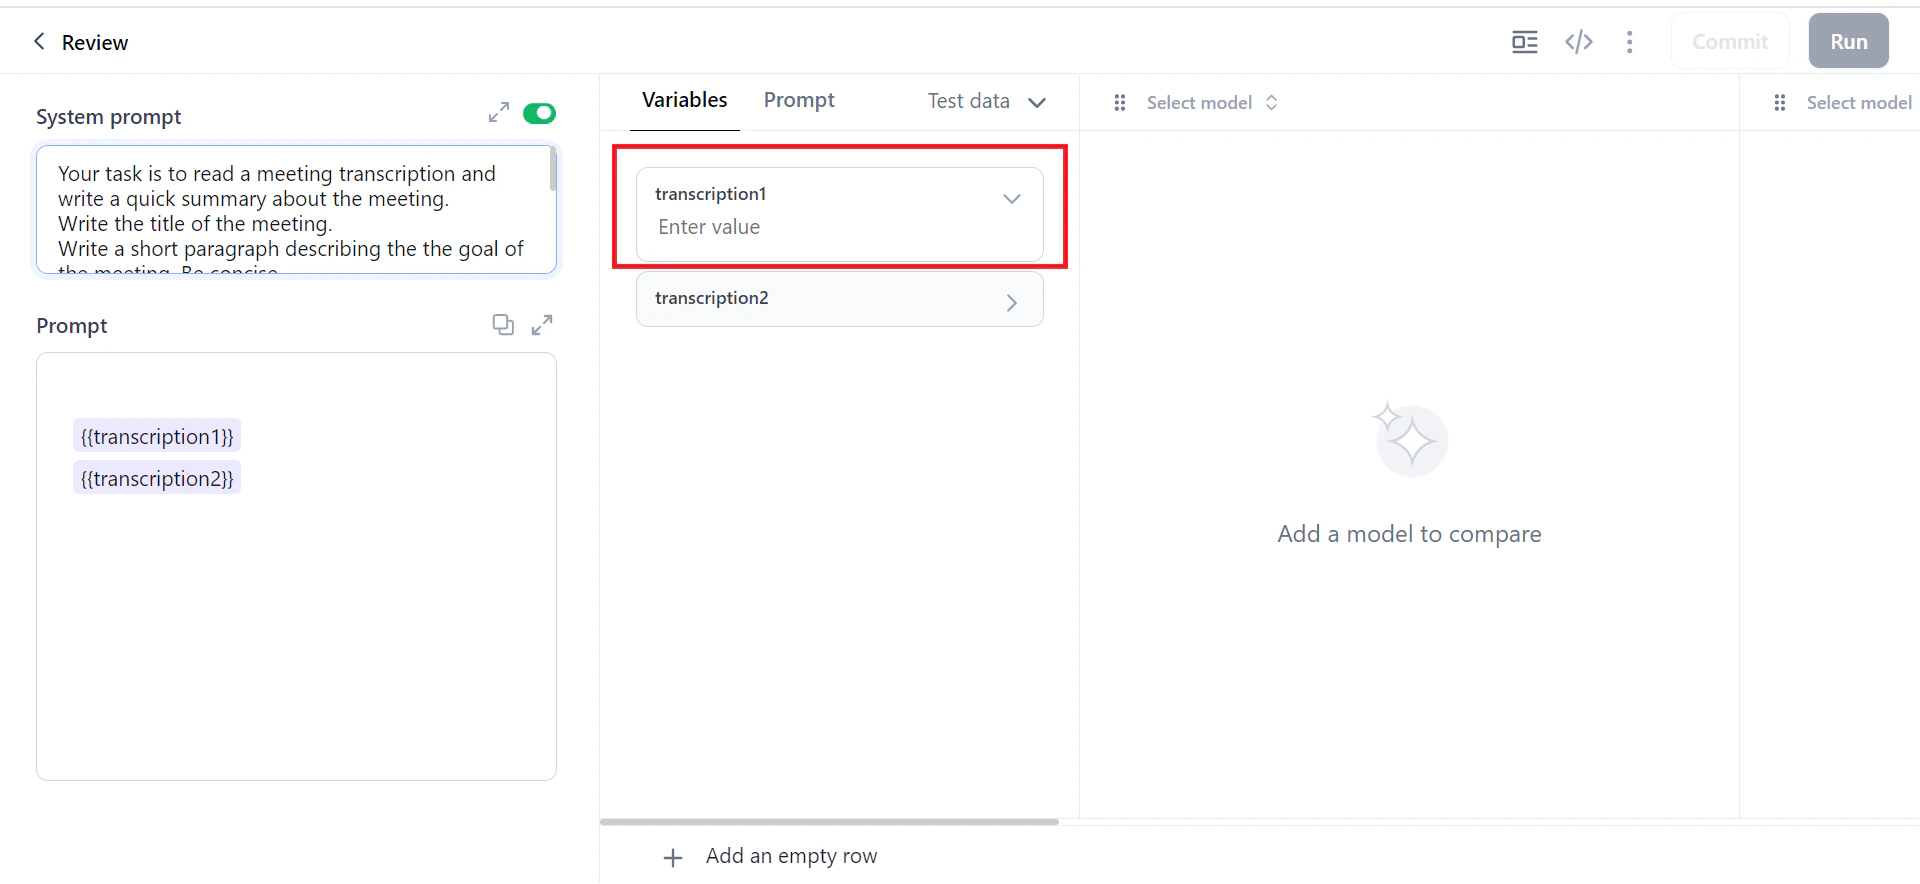 3. Verify that the variables are substituted correctly in the **Prompt** window.
 ### Select Models
Test prompts with up to 5 models simultaneously to compare accuracy, tone, and relevance.
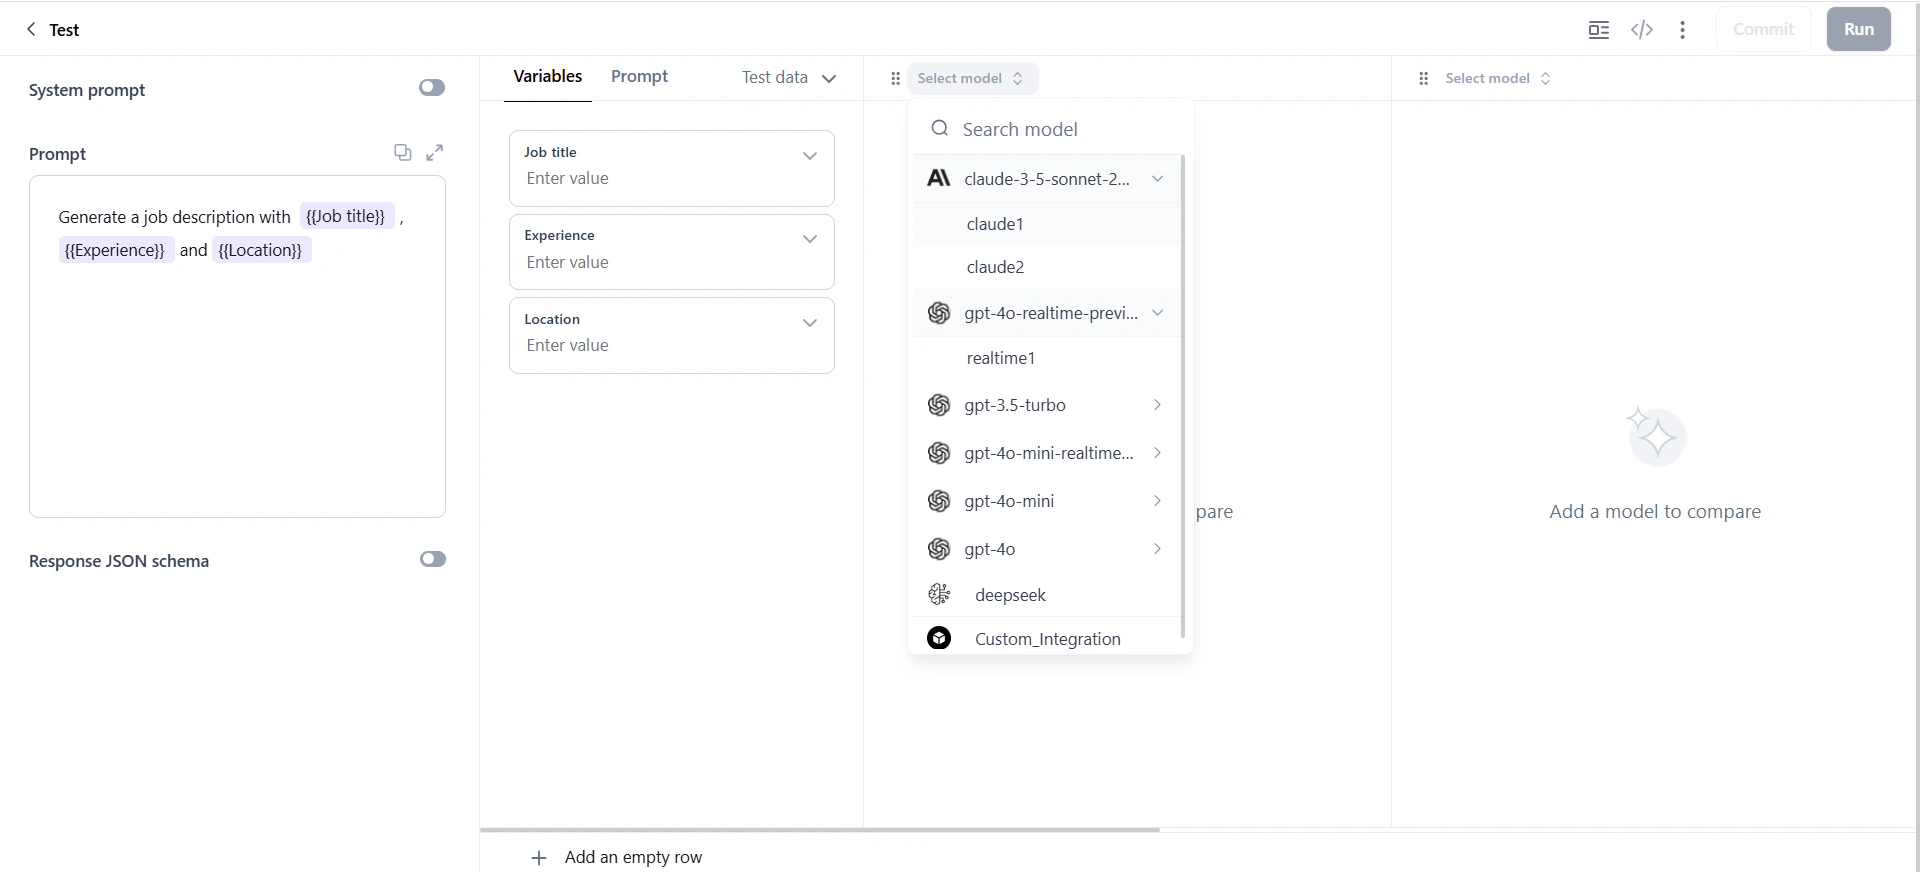
1. In the prompt canvas, click the **Select Model** field and choose a model and connection.
2. To add more models, select from the columns on the right.
### Select Models
Test prompts with up to 5 models simultaneously to compare accuracy, tone, and relevance.
1. In the prompt canvas, click the **Select Model** field and choose a model and connection.
2. To add more models, select from the columns on the right.
 3. Click the model settings icon to adjust parameters: temperature, top k, top p, and max tokens.
For model settings, bookmarking, and other options, see [Prompt Canvas Options](#prompt-canvas-options).
### Generate Output
After selecting models, click **Run** to generate output.
You can generate a maximum of 10 rows of data simultaneously.
3. Click the model settings icon to adjust parameters: temperature, top k, top p, and max tokens.
For model settings, bookmarking, and other options, see [Prompt Canvas Options](#prompt-canvas-options).
### Generate Output
After selecting models, click **Run** to generate output.
You can generate a maximum of 10 rows of data simultaneously.
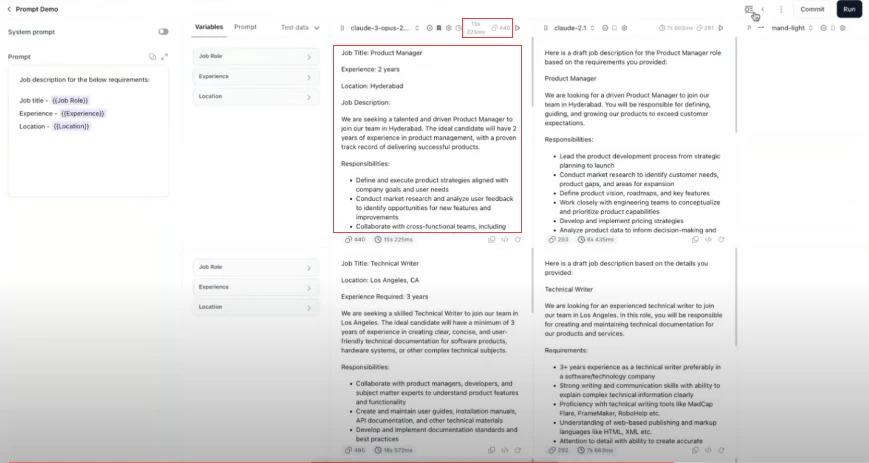 The output area displays:
* Model responses.
* Total input and output tokens.
* Time taken to generate each response.
## Prompt Canvas Options
### Model Column Options
| Icon | Feature | Description |
| ---- | ----------------- | -------------------------------------------------------------------------------------------------------- |
| ⋮⋮ | Rearrange | Drag to reorder model columns |
| ✕ | Remove Model | Remove a model from comparison |
| ★ | Bookmark | Set as preferred model (required when committing if none selected) |
| ⚙ | Model Settings | Adjust temperature, top k, top p, max tokens (defaults: top p=1, top k=5, temperature=1, max tokens=256) |
| ▶ | Play | Regenerate output for the entire column |
| ⏱ | Avg Response Time | View average generation time |
| 🔢 | Avg Tokens | View mean input/output token usage |
| 📋 | Copy | Copy output to clipboard |
| { } | View JSON | View request/response in JSON format |
| ↻ | Regenerate | Regenerate output for a single cell |
### Top Toolbar Options
| Icon | Feature | Description |
| ---- | --------------- | ------------------------------------------------------------------------ |
| 📚 | Prompt Library | Browse \~70 templates |
| 🔗 | Prompt API | Share prompts via version-specific API endpoints (cURL, Python, Node.js) |
| 💾 | Save to Library | Save current prompt as a reusable template |
| 📝 | Draft History | Capture and restore canvas states |
| 📤 | Export CSV | Export canvas data (inputs, outputs, metadata) for analysis |
| 👥 | Share | Share prompts for collaboration |
| 🕐 | Versions | View, compare, and restore prompt versions |
| ✓ | Commit | Save current prompt as a new version (V1, V2, etc.) |
| ▶ | Run | Execute prompts and generate outputs |
## Advanced Features
To create, import, and manage data, see [manage dataset](/ai-for-process/settings/manage-dataset).
### Bookmark a Model
Bookmarking sets a model as your preferred model for a prompt. The bookmarked model is recorded when you commit a version. If no model is bookmarked at commit time, you must select one manually.
1. Click the **Bookmark model with its settings** icon on the model column.
The output area displays:
* Model responses.
* Total input and output tokens.
* Time taken to generate each response.
## Prompt Canvas Options
### Model Column Options
| Icon | Feature | Description |
| ---- | ----------------- | -------------------------------------------------------------------------------------------------------- |
| ⋮⋮ | Rearrange | Drag to reorder model columns |
| ✕ | Remove Model | Remove a model from comparison |
| ★ | Bookmark | Set as preferred model (required when committing if none selected) |
| ⚙ | Model Settings | Adjust temperature, top k, top p, max tokens (defaults: top p=1, top k=5, temperature=1, max tokens=256) |
| ▶ | Play | Regenerate output for the entire column |
| ⏱ | Avg Response Time | View average generation time |
| 🔢 | Avg Tokens | View mean input/output token usage |
| 📋 | Copy | Copy output to clipboard |
| { } | View JSON | View request/response in JSON format |
| ↻ | Regenerate | Regenerate output for a single cell |
### Top Toolbar Options
| Icon | Feature | Description |
| ---- | --------------- | ------------------------------------------------------------------------ |
| 📚 | Prompt Library | Browse \~70 templates |
| 🔗 | Prompt API | Share prompts via version-specific API endpoints (cURL, Python, Node.js) |
| 💾 | Save to Library | Save current prompt as a reusable template |
| 📝 | Draft History | Capture and restore canvas states |
| 📤 | Export CSV | Export canvas data (inputs, outputs, metadata) for analysis |
| 👥 | Share | Share prompts for collaboration |
| 🕐 | Versions | View, compare, and restore prompt versions |
| ✓ | Commit | Save current prompt as a new version (V1, V2, etc.) |
| ▶ | Run | Execute prompts and generate outputs |
## Advanced Features
To create, import, and manage data, see [manage dataset](/ai-for-process/settings/manage-dataset).
### Bookmark a Model
Bookmarking sets a model as your preferred model for a prompt. The bookmarked model is recorded when you commit a version. If no model is bookmarked at commit time, you must select one manually.
1. Click the **Bookmark model with its settings** icon on the model column.
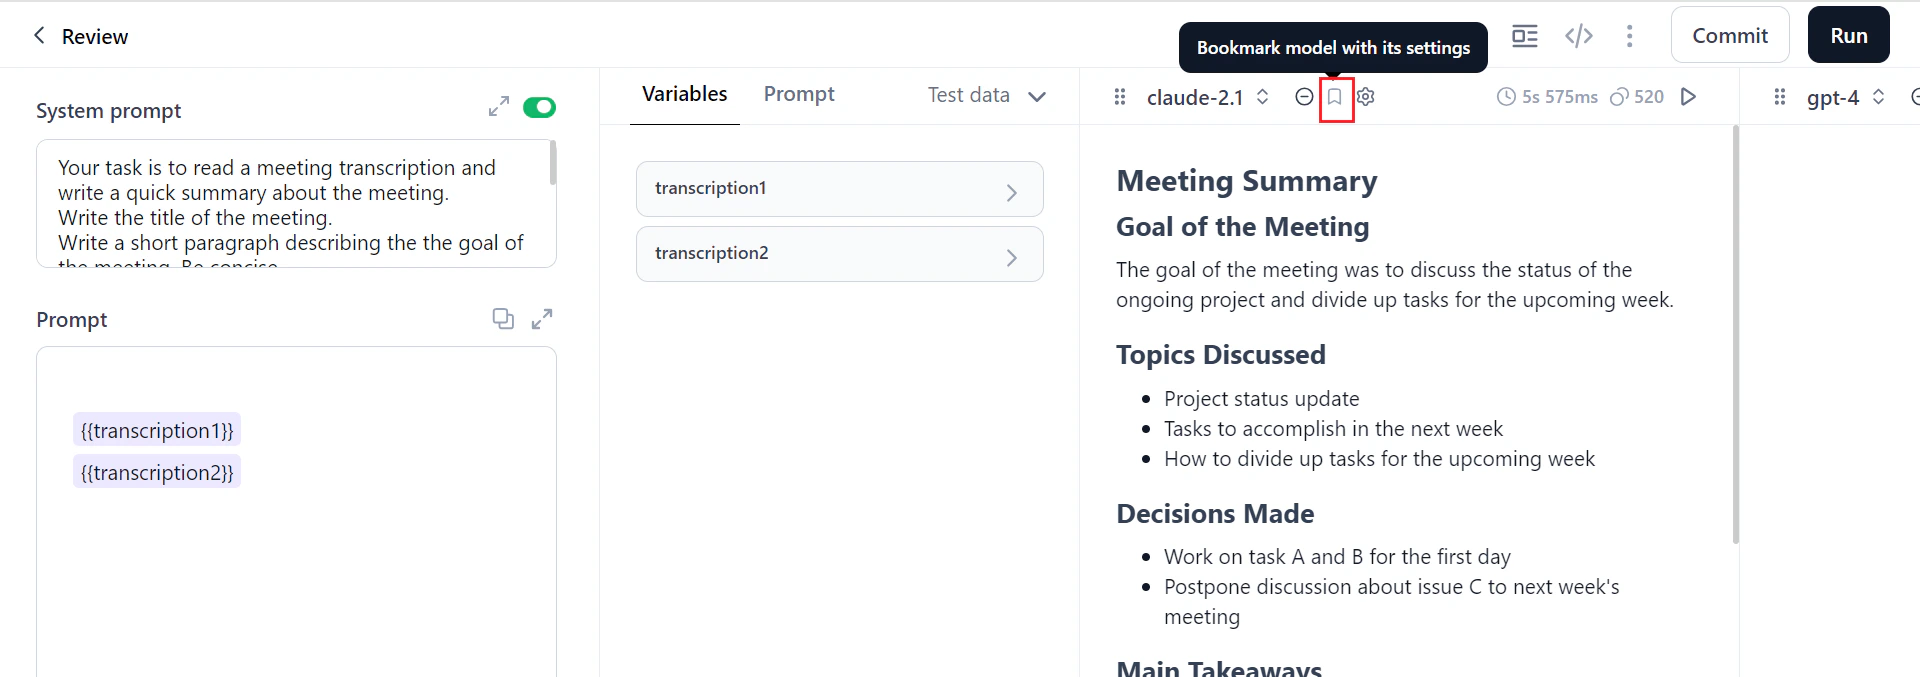 The icon changes to **Model bookmarked with its settings** after bookmarking.
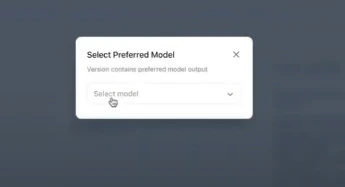
2. If you commit without bookmarking, a dialog prompts you to select a preferred model.
The icon changes to **Model bookmarked with its settings** after bookmarking.
2. If you commit without bookmarking, a dialog prompts you to select a preferred model.
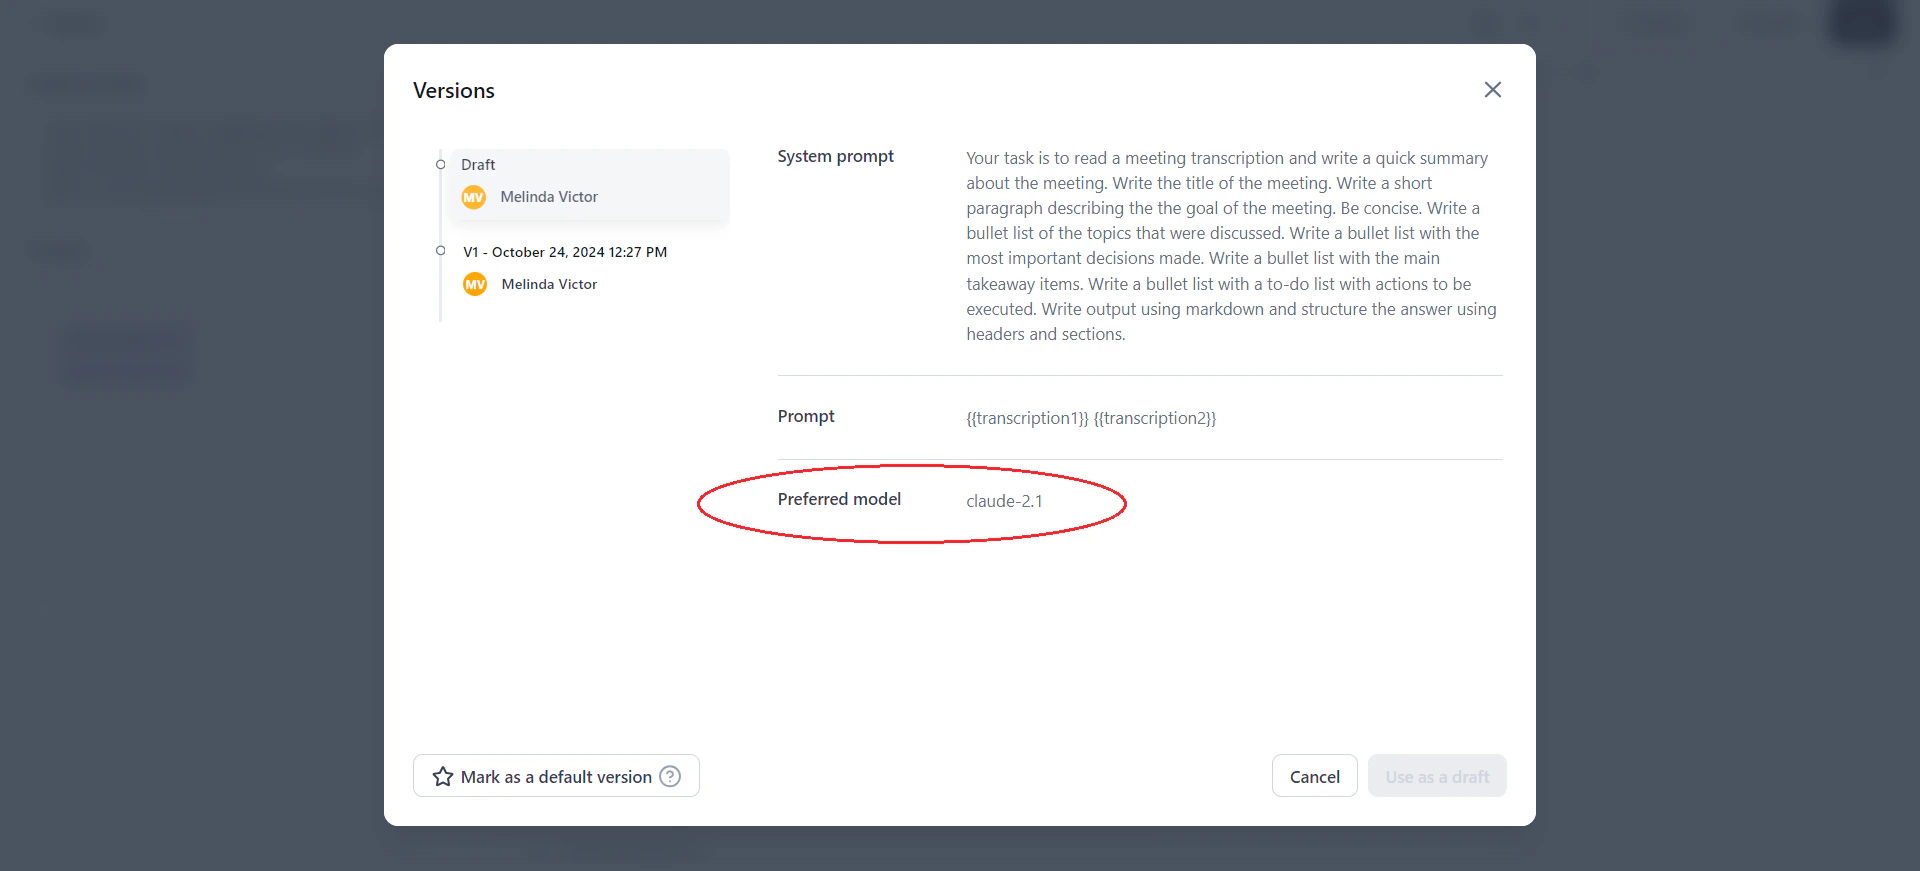
 3. After committing, click **Versions** to see the preferred model recorded in the version history.
 ### Draft History
Draft history saves the complete state of the prompt canvas at different points in time—including inputs, outputs, model selections, and variable values.
### Draft History
Draft history saves the complete state of the prompt canvas at different points in time—including inputs, outputs, model selections, and variable values.
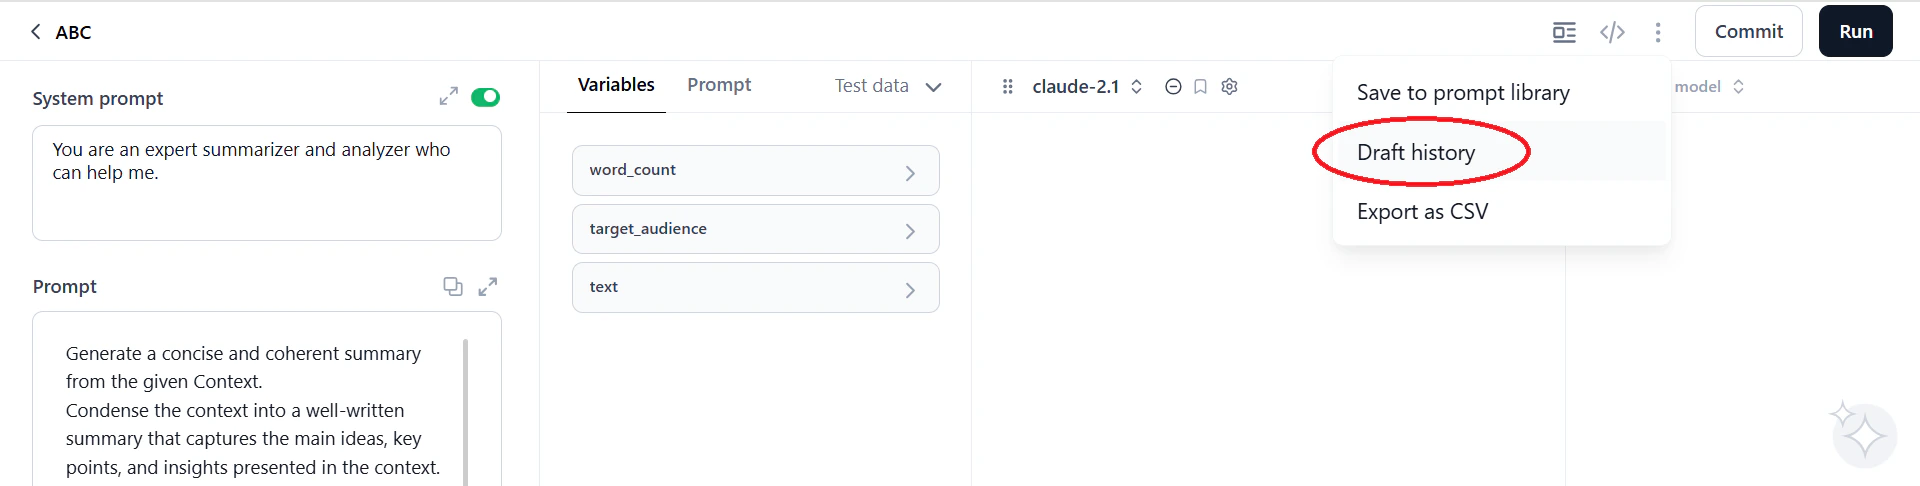 Click **Draft History** (from the three dots menu) to open the dialog. It lists all saved drafts with system prompts, human prompts, variables, and generated outputs. Click **Restore** to revert to that state.
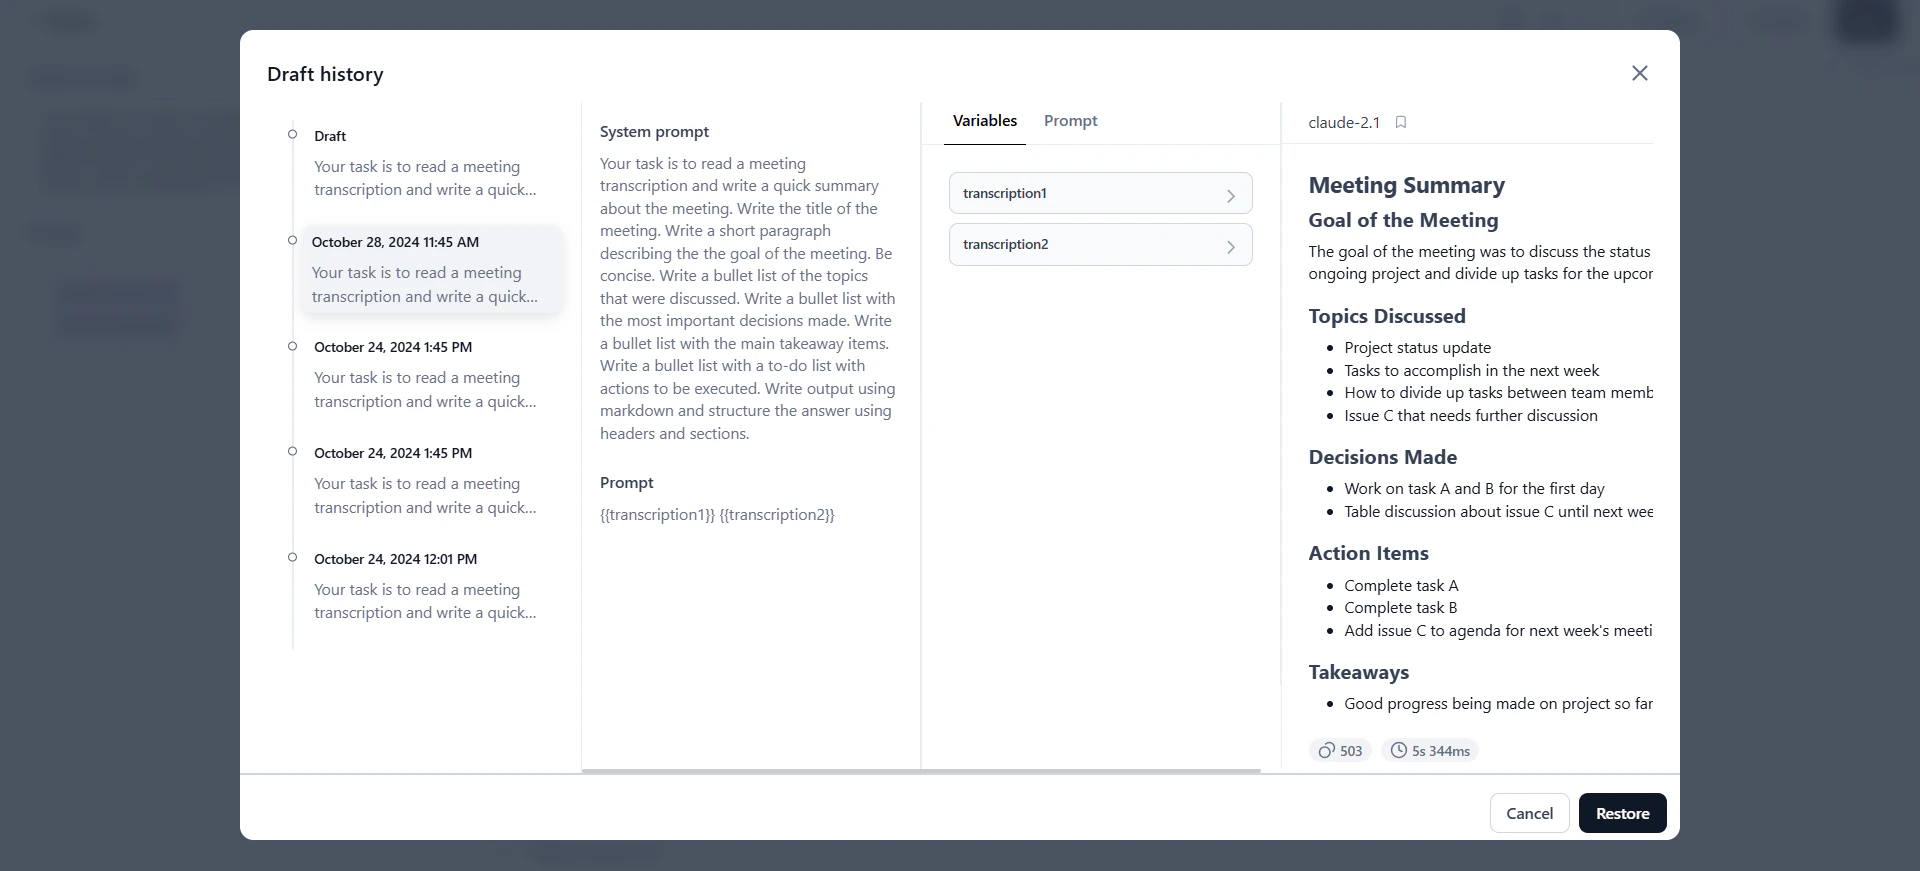 * **Draft History** captures both inputs and outputs—the full context of each iteration.
* **Versions** track only prompt inputs (system and human prompts), not outputs.
### Regenerate Output
Selective regeneration lets you re-run specific prompts without regenerating all outputs, reducing unnecessary model usage.
Use regeneration to:
* Fine-tune specific prompts for better quality.
* Compare model performance on the same prompt.
* Adjust prompts to reduce bias.
* Experiment with specific cells while preserving other outputs.
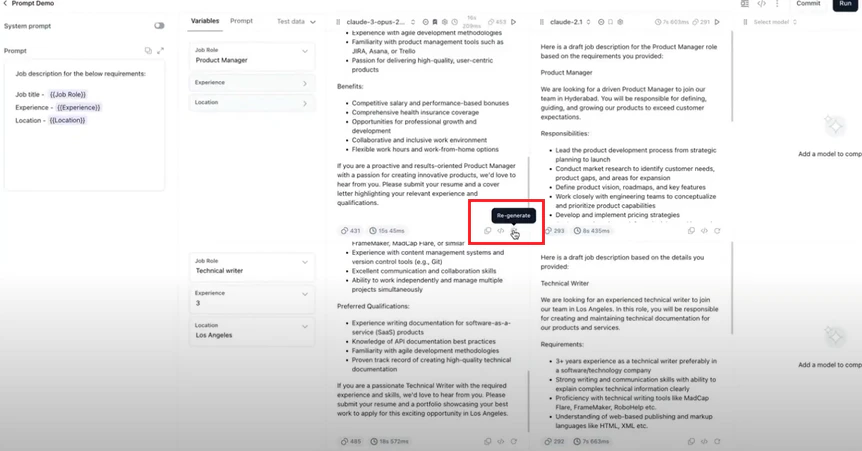
**Cell-level regeneration** — re-runs a single output cell:
* **Draft History** captures both inputs and outputs—the full context of each iteration.
* **Versions** track only prompt inputs (system and human prompts), not outputs.
### Regenerate Output
Selective regeneration lets you re-run specific prompts without regenerating all outputs, reducing unnecessary model usage.
Use regeneration to:
* Fine-tune specific prompts for better quality.
* Compare model performance on the same prompt.
* Adjust prompts to reduce bias.
* Experiment with specific cells while preserving other outputs.
**Cell-level regeneration** — re-runs a single output cell:
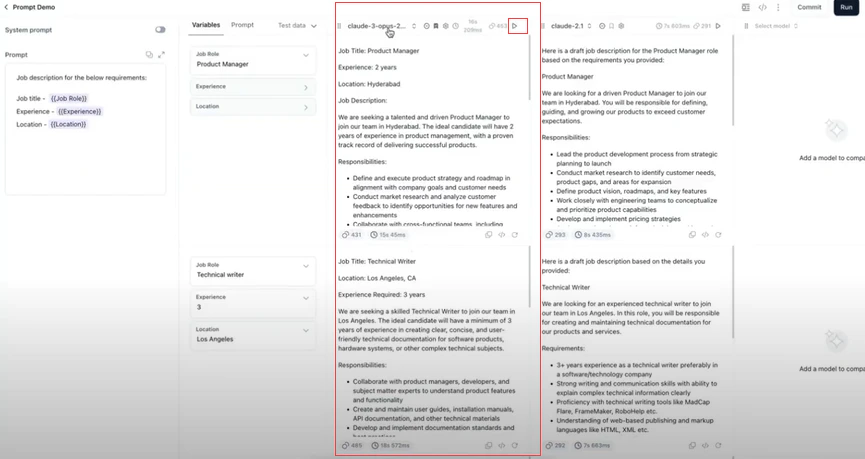
 **Column-level regeneration** — re-runs all rows for a model:
 ### Manage Prompt Versions
Prompt versioning tracks iterations in a shared repository. Each committed version records the prompt, system prompt, and preferred model—creating an auditable history of changes.
**Key behaviors:**
* **Committing**: You must generate output before committing. The first commit creates V1; subsequent commits create V2, V3, and so on. Version names are assigned automatically.
* **Default version**: The latest committed version is the default. To change it, select a version and click **Mark as a default version**.
* **Using versions as drafts**: Load any version as a draft to edit without affecting the original. Commit the draft to create a new version.
**To commit a version:**
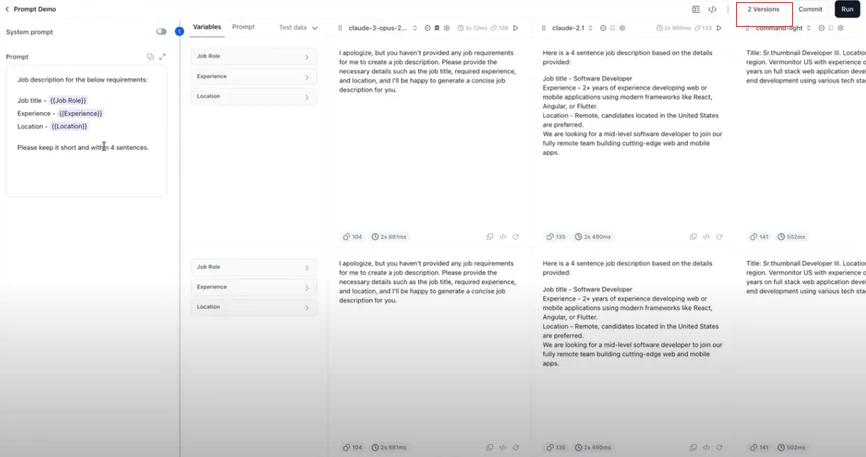
1. Click **Commit** on the prompt canvas. The system saves the current prompt, system prompt, and preferred model as a new version.
### Manage Prompt Versions
Prompt versioning tracks iterations in a shared repository. Each committed version records the prompt, system prompt, and preferred model—creating an auditable history of changes.
**Key behaviors:**
* **Committing**: You must generate output before committing. The first commit creates V1; subsequent commits create V2, V3, and so on. Version names are assigned automatically.
* **Default version**: The latest committed version is the default. To change it, select a version and click **Mark as a default version**.
* **Using versions as drafts**: Load any version as a draft to edit without affecting the original. Commit the draft to create a new version.
**To commit a version:**
1. Click **Commit** on the prompt canvas. The system saves the current prompt, system prompt, and preferred model as a new version.
 2. Click **Versions** to view the version history.
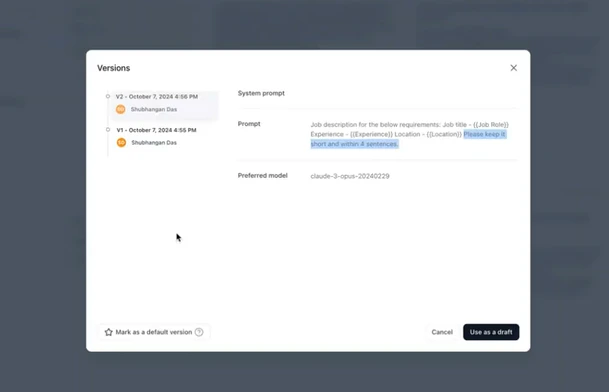 3. Select a version and click **Use as a draft** to load it on the canvas for editing.
Select **Mark as a default version** to set a specific version as the default for the API endpoint and collaborators.
### Share Prompts
Prompt sharing lets you collaborate by sharing prompts—including inputs, outputs, and settings—with other users. The original creator is the Owner.
| Scenario | What is shared | Version history |
| -------------------------------- | ------------------------------------------------------ | -------------------------------------- |
| Share before committing | Inputs, outputs, and settings | Not shared (no versions committed yet) |
| Share after committing | Inputs, outputs, settings, and full version history | Shared; new user sees all versions |
| Share with multiple contributors | All versions; each version shows the contributing user | Shared |
**To share a prompt:**
1. Open the prompt and click the **three dots** icon > **Share**.
3. Select a version and click **Use as a draft** to load it on the canvas for editing.
Select **Mark as a default version** to set a specific version as the default for the API endpoint and collaborators.
### Share Prompts
Prompt sharing lets you collaborate by sharing prompts—including inputs, outputs, and settings—with other users. The original creator is the Owner.
| Scenario | What is shared | Version history |
| -------------------------------- | ------------------------------------------------------ | -------------------------------------- |
| Share before committing | Inputs, outputs, and settings | Not shared (no versions committed yet) |
| Share after committing | Inputs, outputs, settings, and full version history | Shared; new user sees all versions |
| Share with multiple contributors | All versions; each version shows the contributing user | Shared |
**To share a prompt:**
1. Open the prompt and click the **three dots** icon > **Share**.
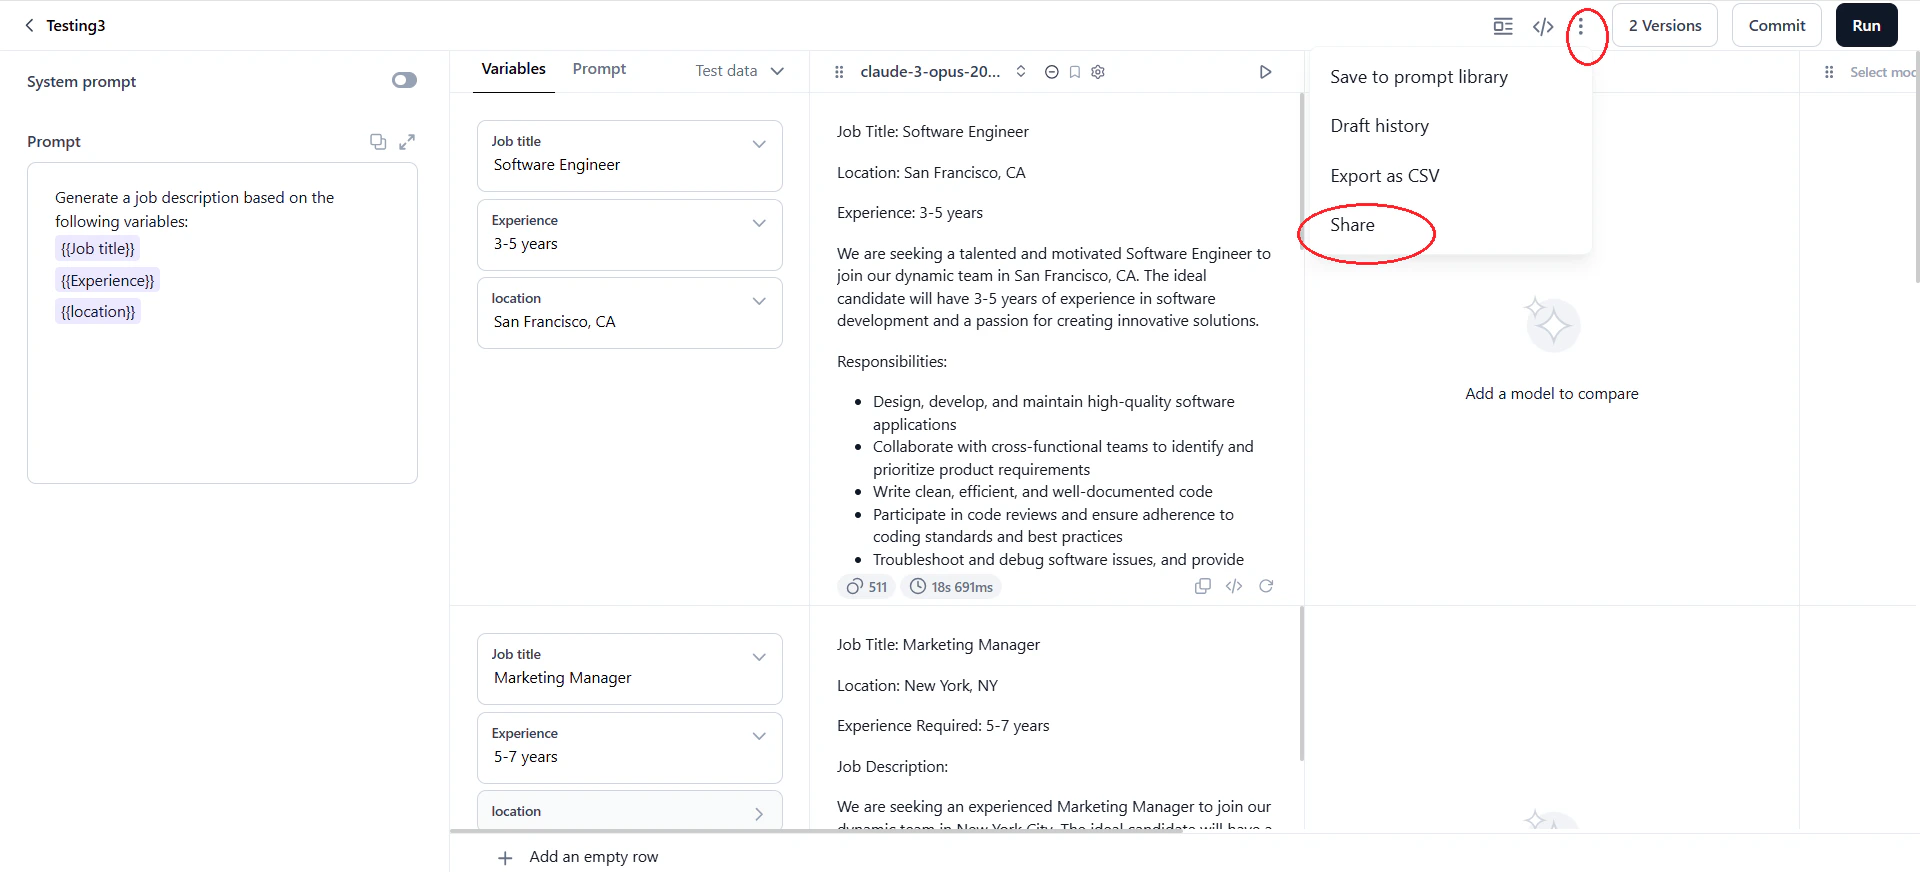 2. In the **Share** dialog, select users from your account. To add users not in your account, go to **Settings**.
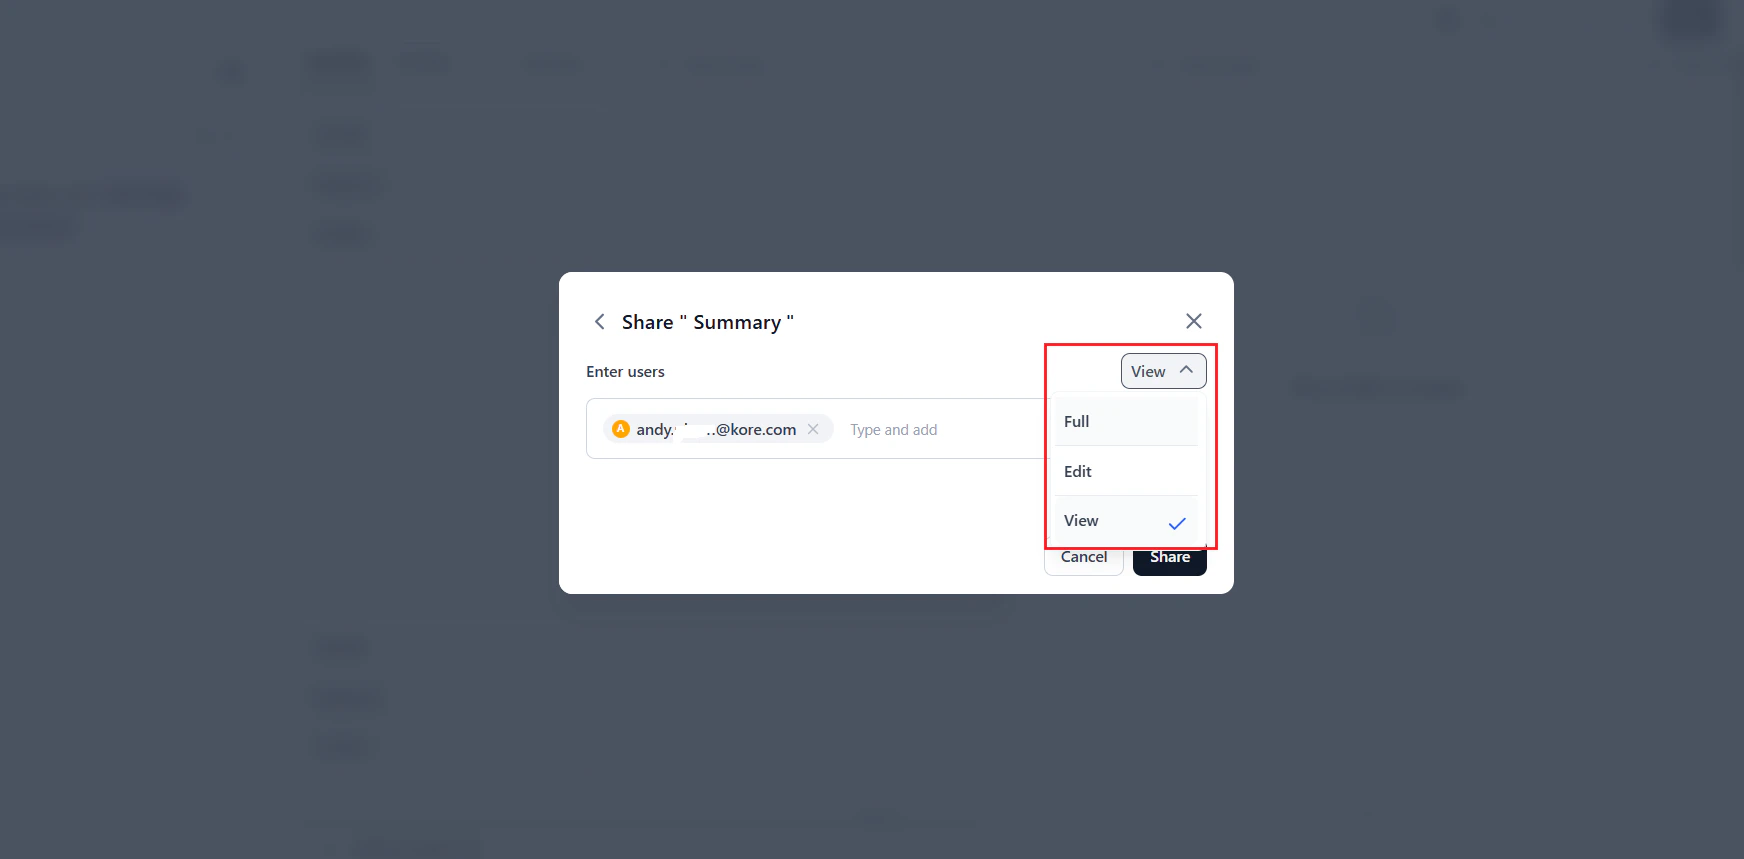
3. Assign a role and click **Share**. The system notifies selected users about the shared prompt and their permissions.
2. In the **Share** dialog, select users from your account. To add users not in your account, go to **Settings**.
3. Assign a role and click **Share**. The system notifies selected users about the shared prompt and their permissions.
 #### Prompt Roles and Permissions
| Role | Permissions |
| ----------------------- | --------------------------------------------------------------------------------------- |
| **Full (Owner)** | View, edit, restore, commit, and delete prompts. Manage users, API keys, and test data. |
| **Edit (Collaborator)** | All Full permissions except delete. |
| **View (Viewer)** | View prompts and versions only. Cannot edit, delete, or commit. |
### Prompt API Endpoint
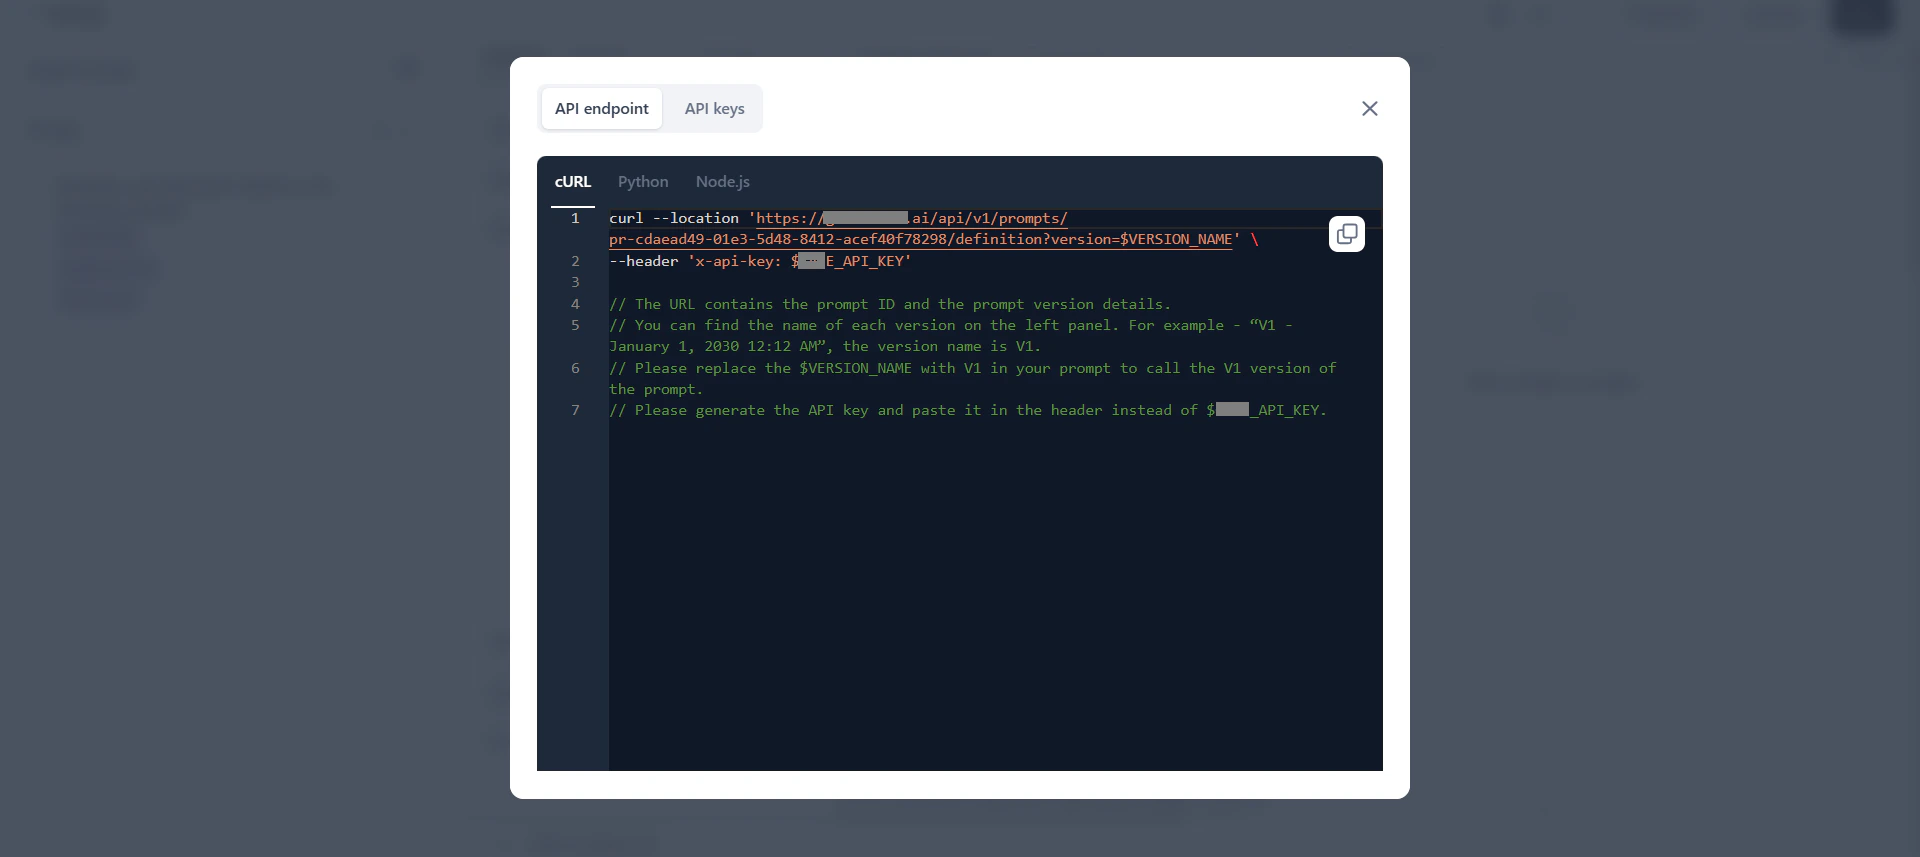
The Prompt API lets you access prompts externally using version-specific API keys, eliminating manual copy-pasting. The endpoint generates automatically when you commit the first version of a prompt.
**How it works:**
* Each prompt has one API endpoint. By default, it returns the latest version. Set a default version to control which version the endpoint serves.
* A successful API request returns the `SystemPrompt` and `HumanPrompt` from the specified version.
* Edit the endpoint's query parameters to target a specific version. Without a version parameter, it returns the default version.
* You can create multiple API keys per endpoint. Each key can be copied once and deleted but cannot be reused.
* Deleting an API key invalidates it in all external systems where it was used.
**Supported request formats:** cURL, Python, Node.js.
#### Prompt Roles and Permissions
| Role | Permissions |
| ----------------------- | --------------------------------------------------------------------------------------- |
| **Full (Owner)** | View, edit, restore, commit, and delete prompts. Manage users, API keys, and test data. |
| **Edit (Collaborator)** | All Full permissions except delete. |
| **View (Viewer)** | View prompts and versions only. Cannot edit, delete, or commit. |
### Prompt API Endpoint
The Prompt API lets you access prompts externally using version-specific API keys, eliminating manual copy-pasting. The endpoint generates automatically when you commit the first version of a prompt.
**How it works:**
* Each prompt has one API endpoint. By default, it returns the latest version. Set a default version to control which version the endpoint serves.
* A successful API request returns the `SystemPrompt` and `HumanPrompt` from the specified version.
* Edit the endpoint's query parameters to target a specific version. Without a version parameter, it returns the default version.
* You can create multiple API keys per endpoint. Each key can be copied once and deleted but cannot be reused.
* Deleting an API key invalidates it in all external systems where it was used.
**Supported request formats:** cURL, Python, Node.js.
 ## Best Practices
* **Start with templates**: Use the prompt library for common use cases to accelerate prompt creation.
* **Use variables**: Run multiple prompts simultaneously and ensure consistent testing across scenarios.
* **Bookmark strong models**: Track better-performing models by bookmarking them.
* **Use version control**: Commit versions for significant changes and log updates clearly.
* **Export results as CSV**: Save important outputs for sharing and analysis.
* **Save successful prompts**: Save effective prompts as templates in the prompt library for future use.
## Best Practices
* **Start with templates**: Use the prompt library for common use cases to accelerate prompt creation.
* **Use variables**: Run multiple prompts simultaneously and ensure consistent testing across scenarios.
* **Bookmark strong models**: Track better-performing models by bookmarking them.
* **Use version control**: Commit versions for significant changes and log updates clearly.
* **Export results as CSV**: Save important outputs for sharing and analysis.
* **Save successful prompts**: Save effective prompts as templates in the prompt library for future use.