> ## Documentation Index
> Fetch the complete documentation index at: https://koreai.mintlify.site/llms.txt
> Use this file to discover all available pages before exploring further.
# Playground: Design, Simulate, and Test Experiments
The Browser Automation Playground is where you create, simulate, test, and publish automation experiments. After deploying a pod, you link it to an experiment, provide natural-language instructions to an LLM, and simulate the automation step by step. Once published, the automation integrates into workflows using the [**Browser Automation node**](/ai-for-process/nodes#browser-automation-node), where static and dynamic variables are passed at runtime.
Navigation: Go to **Settings** → **Browser Automation** → **Playground**.
***
## Use Cases
* Automatically filling and submitting web forms.
* Scraping data from websites and generating reports or invoices.
* Uploading or downloading files from web portals.
* Running end-to-end workflows across multiple web pages.
* Validating UI elements, page loads, and form submissions.
* Triggering event-based emails or notifications.
## Limitations
Browser Automation may not work in the following scenarios:
* Two-factor authentication (2FA) or OTP verification is required.
* CAPTCHA validation is required.
* Bot or robot detection checks are involved.
* Tasks require complex logic or advanced data manipulation.
* LLM instructions are unclear or ambiguous.
***
## Supported LLM Models
Select the LLM that best fits your use case.
| Provider | Available Models |
| ------------ | ------------------------------------------------------------------------------------- |
| Gemini | `gemini-2.5-flash`, `gemini-2.0-flash`, `gemini-2.5-pro`, `gemini-2.5-flash-lite` |
| Anthropic | `claude-sonnet-4-20250514`, `claude-sonnet-4-5-20250929`, `claude-haiku-4-5-20251001` |
| OpenAI (GPT) | `gpt-4o`, `gpt-4o-mini`, `gpt-4.1`, `gpt-5` |
***
## How It Works
1. Deploy a browser automation pod and create an experiment linked to it.
2. Select an LLM model and provide step-by-step instructions with static and dynamic variables.
3. Simulate the automation by defining inputs, a system prompt, and the maximum number of execution steps.
4. The LLM executes the simulation and displays a preview with a final summary.
5. Refine instructions and re-run the simulation as needed, then publish the automation.
***
## Playground Dashboard
The Playground page lists all automation experiments with the following information:
| Field | Description |
| ------------------- | ----------------------------------------------------------------------------------- |
| **Automation name** | Name assigned to the automation. |
| **Description** | Brief description of the automation. |
| **Pod** | Deployed pod used for the automation. |
| **Status** | Current status: *Draft*, *Deploying*, *Published*, *Ready to Publish*, or *Failed*. |
| **Created by** | User who created the automation. |
| **Updated on** | Date the automation was last updated. |
| **Action** | Option to delete the automation. |
***
## Create an Automation Experiment
**Prerequisites:**
* An active external model connection.
* The automation pod must be in *Deployed* status under **Browser Automation** > **Deployment**. If no deployments exist, click **Create Deployment** in the **Create Automation** form to go to the Deployment page.
* Sufficient credit balance to run and publish the automation.
* Clear, concise, and logical LLM instructions.
**Steps:**
1. On the **Browser Playground** page, click **Create Automation**.
2. In the **Create Automation** window, enter the automation name and description, select the active pod, and click **Create**.
* The name must be under 30 characters and cannot include: `\ / : * ? " < > |`
* The description cannot exceed 1024 characters.
3. Enter the LLM instructions in the text field.
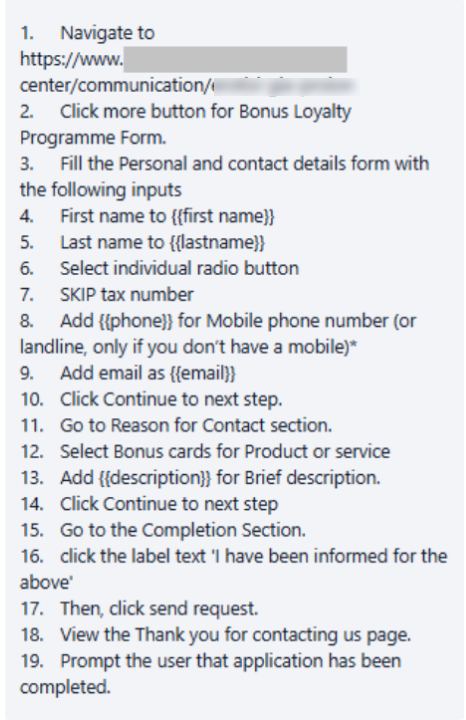 4. Select the model and connection from the dropdown.
5. Click the **Arrow** icon to start the simulation.
6. In the **Simulate Automation** window:
* Provide dummy values for dynamic variables defined in the instructions — for example, enter *John* for `{{first name}}`.
* Under **Configurations**, define the **System Prompt** and set the **Max Steps** for the simulation.
* Click **Confirm**.
A preview is generated showing the LLM's execution steps and a final summary in the left panel.
4. Select the model and connection from the dropdown.
5. Click the **Arrow** icon to start the simulation.
6. In the **Simulate Automation** window:
* Provide dummy values for dynamic variables defined in the instructions — for example, enter *John* for `{{first name}}`.
* Under **Configurations**, define the **System Prompt** and set the **Max Steps** for the simulation.
* Click **Confirm**.
A preview is generated showing the LLM's execution steps and a final summary in the left panel.
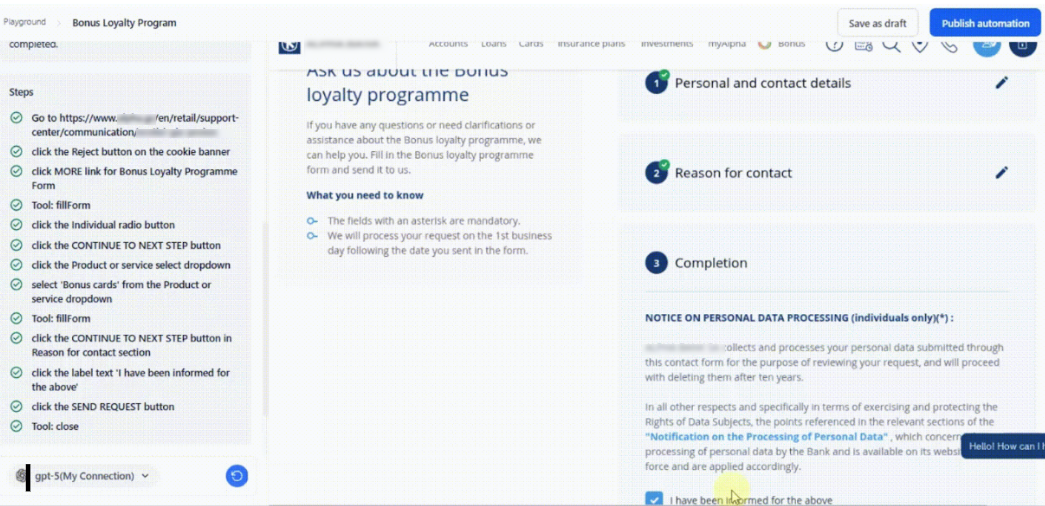 Click **Save as draft** to continue later, or publish the automation when it is ready.
***
## Publish an Automation
After a simulation completes successfully, publish the automation to make it available in workflows via the **Browser Automation** node.
* **Publish Automation** is disabled until the simulation completes.
* If the linked pod changes from *Deployed* to *Undeployed*, the automation status automatically reverts to *Draft*.
* Published automations can only be deleted, not modified. You can re-publish using another deployed pod.
**Steps:**
1. Click **Publish Automation** in the top-right corner.
2. In the **Publish Automation** window, review the name and description under **General Details**, then click **Next**.
3. Select an existing configuration or an active pod from the dropdown, then click **Next**. Only pods deployed under **Browser Automation** > **Deployment** are available.
4. Review the configurations, accept the terms and conditions, and click **Publish**.
A success message confirms the automation is *Published* and ready for use in workflows.
***
## Stop an Automation
While an automation is running, you can stop it to update instructions, change configurations, select another pod, or fix errors.
Stopping an automation saves it as a draft and may cause associated data to be lost. Only draft automations can be stopped and modified.
***
## Republish an Automation
Republish an automation after making updates or when its pods have been undeployed.
1. Go to **Settings** > **Browser Automation** > **Playground**.
2. Select the automation to republish.
> Verify that the automation status is **Published** or **Ready to Publish**. **Ready to Publish** appears when the automation was previously published and its pods were undeployed.
3. In the Configuration step, review the pre-filled settings from the last successful publish. Update any values if required.
4. On the **Overview** page, select **Re-publish**.
5. Select **Next** to proceed to the Review step and confirm the details.
6. Select **Confirm** to republish.
On success, the status changes to **Published**.
If the republish fails, the status changes to **Failed**. Select **Retry** to try again.
***
## Modify a Draft Automation
You can update the LLM instructions or model selection for any draft automation.
1. On the **Browser Automation Playground** page, select the automation.
2. Hover over the instructions panel (left) and click the **Edit** icon.
3. In the confirmation dialog, click **Update**.
4. Make the required changes and update the model selection if needed.
5. Click the **Arrow** button to run the simulation.
6. In the **Simulate Automation** window, provide the required inputs.
7. Click **Publish**.
The LLM runs the automation using the updated instructions.
The Playground uses an automatic editing lock. Only one user can edit an automation at a time. Other users are placed in view-only mode. The lock is released when the active user exits or after one hour of inactivity.
***
## View Published Automation Details
Click a published automation to view the following:
| Section | Details |
| ------------------ | ----------------------------------------------------------------------------------------------------------------------------------------------------------- |
| **Overview** | General info (name, description), automation details (LLM instructions and model), and resource allocation (deployment name, scaling parameters, hardware). |
| **Configurations** | General details and a **Danger Zone** option to delete the automation. |
***
## Delete an Automation
Deleting an automation is permanent and may impact related functions.
> You can delete an automation only when its status is **Draft**. If the automation is in **Published** or **Ready to Publish** status, unpublish it first.
**To unpublish the automation:**
1. Select the automation.
2. Click **Configurations** in the left panel.
3. Under **Danger Zone**, click **Proceed to Unpublish**.
4. Confirm the action. The status changes to **Draft**.
**From the Playground dashboard:**
1. On the **Browser Playground** page, click the **Delete** icon under the **Actions** column for the automation in the **Draft** status.
2. Click **Delete** in the confirmation dialog.
**From within an automation:**
1. On the **Browser Playground** page, select the automation.
2. Click **Configurations** in the left panel.
3. Under **Danger Zone**, click **Proceed to Delete**.
4. Click **Delete** in the confirmation dialog.
Click **Save as draft** to continue later, or publish the automation when it is ready.
***
## Publish an Automation
After a simulation completes successfully, publish the automation to make it available in workflows via the **Browser Automation** node.
* **Publish Automation** is disabled until the simulation completes.
* If the linked pod changes from *Deployed* to *Undeployed*, the automation status automatically reverts to *Draft*.
* Published automations can only be deleted, not modified. You can re-publish using another deployed pod.
**Steps:**
1. Click **Publish Automation** in the top-right corner.
2. In the **Publish Automation** window, review the name and description under **General Details**, then click **Next**.
3. Select an existing configuration or an active pod from the dropdown, then click **Next**. Only pods deployed under **Browser Automation** > **Deployment** are available.
4. Review the configurations, accept the terms and conditions, and click **Publish**.
A success message confirms the automation is *Published* and ready for use in workflows.
***
## Stop an Automation
While an automation is running, you can stop it to update instructions, change configurations, select another pod, or fix errors.
Stopping an automation saves it as a draft and may cause associated data to be lost. Only draft automations can be stopped and modified.
***
## Republish an Automation
Republish an automation after making updates or when its pods have been undeployed.
1. Go to **Settings** > **Browser Automation** > **Playground**.
2. Select the automation to republish.
> Verify that the automation status is **Published** or **Ready to Publish**. **Ready to Publish** appears when the automation was previously published and its pods were undeployed.
3. In the Configuration step, review the pre-filled settings from the last successful publish. Update any values if required.
4. On the **Overview** page, select **Re-publish**.
5. Select **Next** to proceed to the Review step and confirm the details.
6. Select **Confirm** to republish.
On success, the status changes to **Published**.
If the republish fails, the status changes to **Failed**. Select **Retry** to try again.
***
## Modify a Draft Automation
You can update the LLM instructions or model selection for any draft automation.
1. On the **Browser Automation Playground** page, select the automation.
2. Hover over the instructions panel (left) and click the **Edit** icon.
3. In the confirmation dialog, click **Update**.
4. Make the required changes and update the model selection if needed.
5. Click the **Arrow** button to run the simulation.
6. In the **Simulate Automation** window, provide the required inputs.
7. Click **Publish**.
The LLM runs the automation using the updated instructions.
The Playground uses an automatic editing lock. Only one user can edit an automation at a time. Other users are placed in view-only mode. The lock is released when the active user exits or after one hour of inactivity.
***
## View Published Automation Details
Click a published automation to view the following:
| Section | Details |
| ------------------ | ----------------------------------------------------------------------------------------------------------------------------------------------------------- |
| **Overview** | General info (name, description), automation details (LLM instructions and model), and resource allocation (deployment name, scaling parameters, hardware). |
| **Configurations** | General details and a **Danger Zone** option to delete the automation. |
***
## Delete an Automation
Deleting an automation is permanent and may impact related functions.
> You can delete an automation only when its status is **Draft**. If the automation is in **Published** or **Ready to Publish** status, unpublish it first.
**To unpublish the automation:**
1. Select the automation.
2. Click **Configurations** in the left panel.
3. Under **Danger Zone**, click **Proceed to Unpublish**.
4. Confirm the action. The status changes to **Draft**.
**From the Playground dashboard:**
1. On the **Browser Playground** page, click the **Delete** icon under the **Actions** column for the automation in the **Draft** status.
2. Click **Delete** in the confirmation dialog.
**From within an automation:**
1. On the **Browser Playground** page, select the automation.
2. Click **Configurations** in the left panel.
3. Under **Danger Zone**, click **Proceed to Delete**.
4. Click **Delete** in the confirmation dialog.