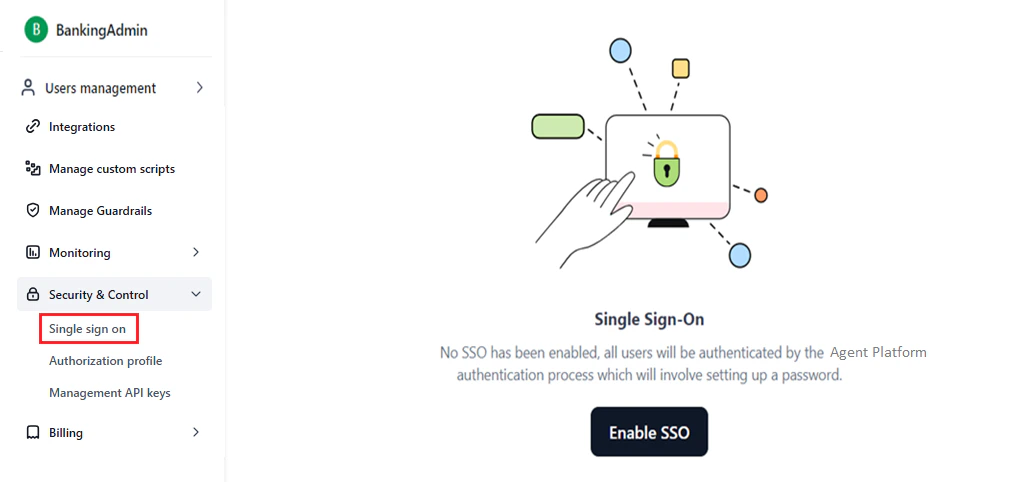
 If SSO is already configured, the **Single sign-on** setup page is displayed, as shown below.
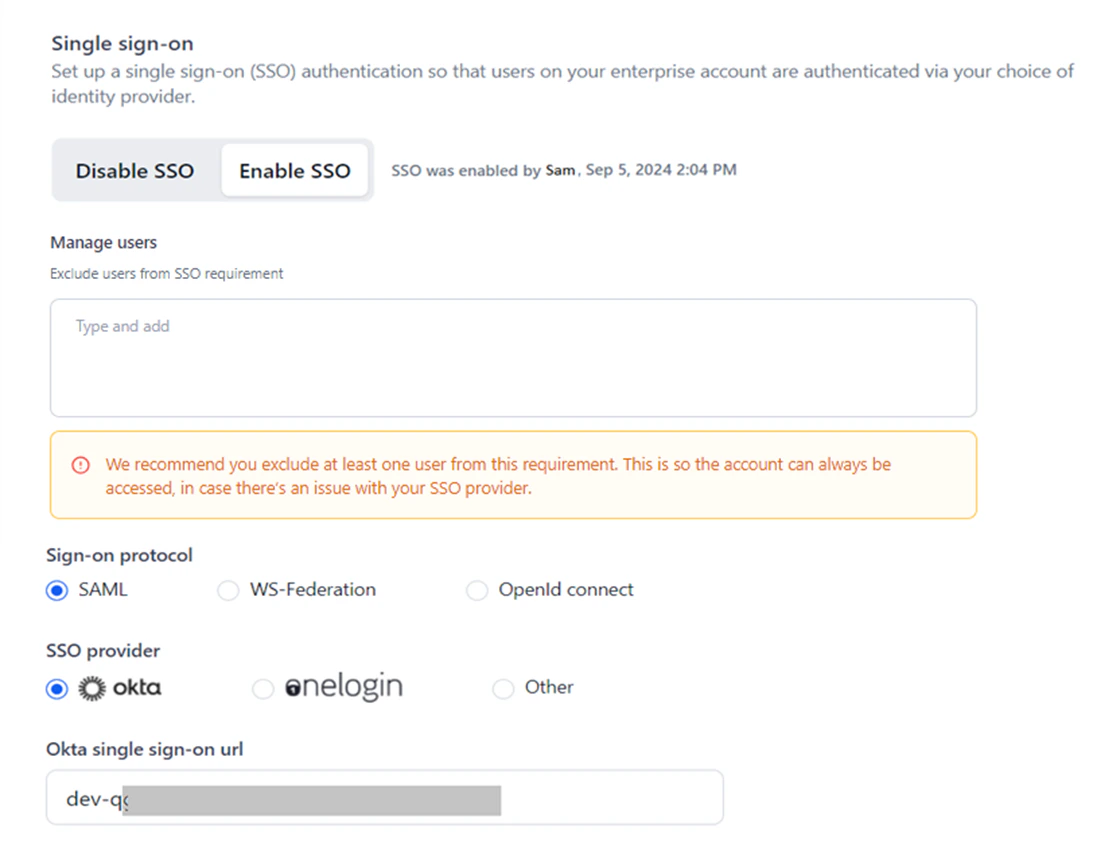 Enabling SSO requires selecting the protocol and IDP and providing the [parameters](#configuration-parameters) to integrate with the IDP service.
#### Configuration Parameters
Configure the following parameters based on your protocol and IDP:
| Protocol | IDP | Parameters |
| -------------- | ------------- | ---------------------------------------------------------------------------------------------------------------------------------------------------------------------------------------------------------------------------------------------------------------------------------------------------------------------------------------------------------------------------------------------------------------------------------------------------------------------------------- |
| SAML | Okta | **Okta single sign-on url**: The SSO endpoint URL for *Okta* to enable Service Provider initiated SAML flow.
Enabling SSO requires selecting the protocol and IDP and providing the [parameters](#configuration-parameters) to integrate with the IDP service.
#### Configuration Parameters
Configure the following parameters based on your protocol and IDP:
| Protocol | IDP | Parameters |
| -------------- | ------------- | ---------------------------------------------------------------------------------------------------------------------------------------------------------------------------------------------------------------------------------------------------------------------------------------------------------------------------------------------------------------------------------------------------------------------------------------------------------------------------------- |
| SAML | Okta | **Okta single sign-on url**: The SSO endpoint URL for *Okta* to enable Service Provider initiated SAML flow.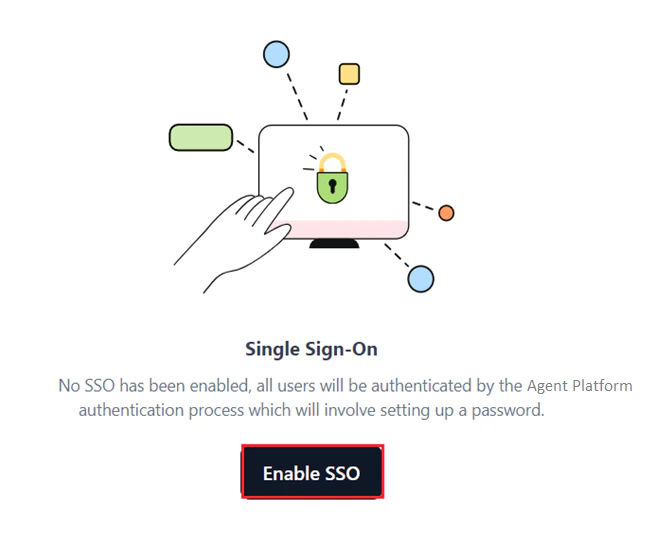 3. If SSO is already enabled for a provider, click the **Enable SSO** tab and do one of the following:
* Change and save the existing [parameters](#configuration-parameters) for the enabled SSO provider.
* Disable the enabled SSO and set up a new configuration.
* Select a different protocol/provider and complete the configuration.
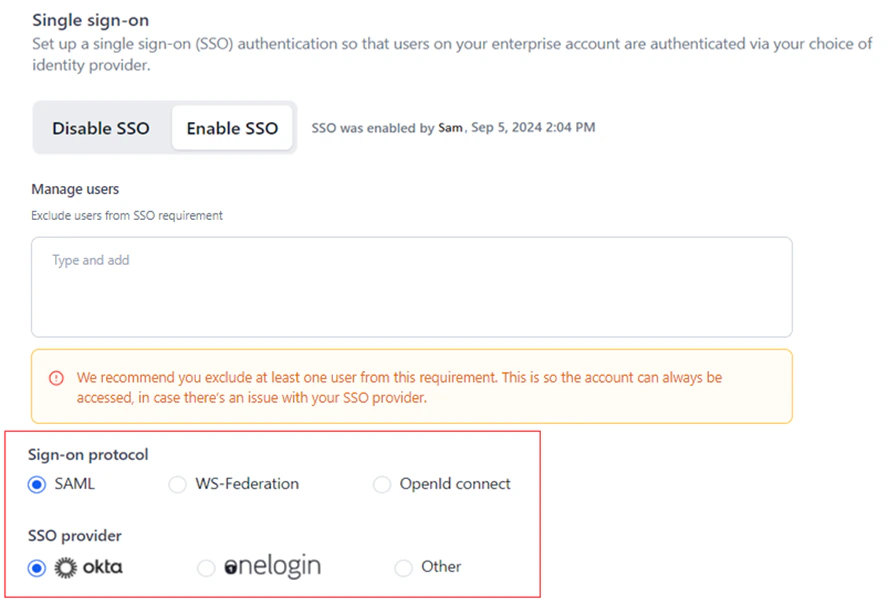
4. Select the required protocol and SP. The default selections are **SAML** and **Okta**.
5. Configure the [parameters](#configuration-parameters) for one of the following SSO protocols and providers:
* **SAML**: [Okta](#okta-configuration), [OneLogin](#onelogin-configuration), or [Other](#other-saml-providers). [Learn more](#saml).
* **WS-Federation**: [Windows Azure](#windows-azure-configuration) or [Other](#other-ws-federation-providers). [Learn more](#ws-federation).
* **OpenID Connect**: [Google](#google-configuration). [Learn more](#openid-connect).
6. Click **Save**.
A success message is displayed once the SSO setup is complete.
3. If SSO is already enabled for a provider, click the **Enable SSO** tab and do one of the following:
* Change and save the existing [parameters](#configuration-parameters) for the enabled SSO provider.
* Disable the enabled SSO and set up a new configuration.
* Select a different protocol/provider and complete the configuration.
4. Select the required protocol and SP. The default selections are **SAML** and **Okta**.
5. Configure the [parameters](#configuration-parameters) for one of the following SSO protocols and providers:
* **SAML**: [Okta](#okta-configuration), [OneLogin](#onelogin-configuration), or [Other](#other-saml-providers). [Learn more](#saml).
* **WS-Federation**: [Windows Azure](#windows-azure-configuration) or [Other](#other-ws-federation-providers). [Learn more](#ws-federation).
* **OpenID Connect**: [Google](#google-configuration). [Learn more](#openid-connect).
6. Click **Save**.
A success message is displayed once the SSO setup is complete.
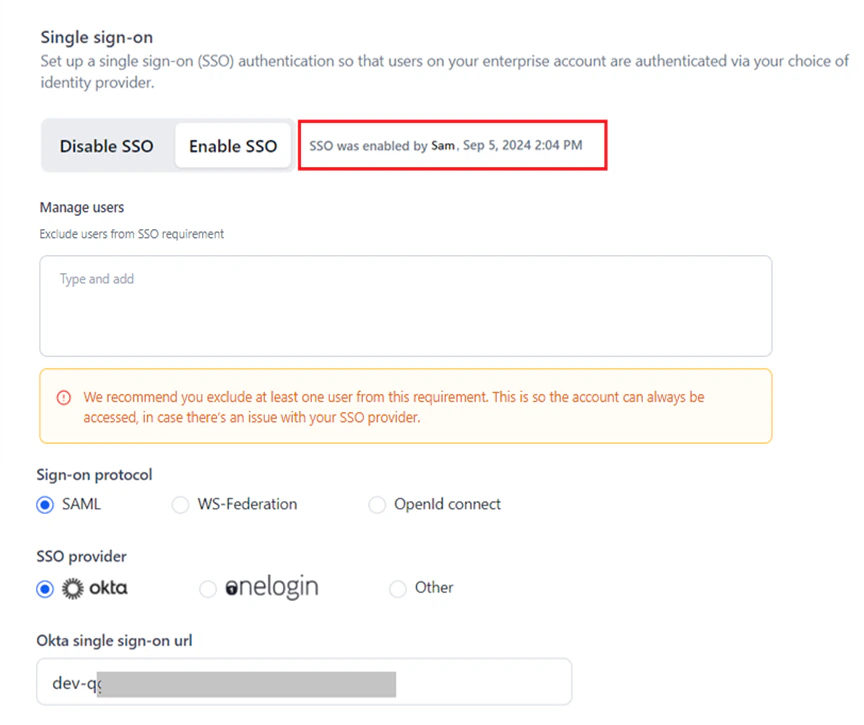
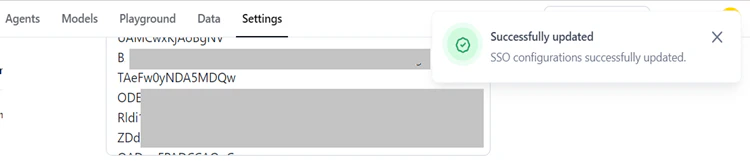 Additionally, the timestamp of when you enabled SSO is displayed as shown below:
 ### SAML
Security Assertion Markup Language (SAML) is a protocol for web-based SSO that uses secure tokens instead of passwords. It allows IDPs and SPs to operate separately. When a user logs into a SAML-enabled app, the service provider requests authorization from the IDP, which authenticates the user and grants access to the application.
#### How SAML Works
SAML SSO works by transferring the user's identity from one place (the IDP) to another (the SP) through an exchange of digitally signed XML documents.
When a user logs into a system that acts as an IDP and tries to access their AI for Process account, the following happens:
1. The user accesses the remote app on the IDP portal using the sign-on endpoint URL, and the application loads.
2. The application identifies the user's origin (by application subdomain, user IP address, or similar) and redirects the user back to the IDP, asking for authentication. This is the authentication request.
3. The user either has an existing active browser session with the IDP or establishes one by logging into the IDP.
4. The IDP builds the authentication response in an XML document containing the user's username or email address, signs it using an X.509 certificate, and posts this information to the SP.
5. The SP, which already knows the IDP and has a certificate fingerprint, retrieves the authentication response and validates it using the certificate fingerprint.
6. The user's identity is established, and the user is provided with the AI for Process account access.
#### Okta Configuration
To configure SSO using SAML and Okta:
1. Go to AI for Process' **Single sign-on** page.
2. Select the **Enable SSO** tab.
3. Select **SAML** for **Sign-on protocol** and **Okta** for **SSO provider**.
### SAML
Security Assertion Markup Language (SAML) is a protocol for web-based SSO that uses secure tokens instead of passwords. It allows IDPs and SPs to operate separately. When a user logs into a SAML-enabled app, the service provider requests authorization from the IDP, which authenticates the user and grants access to the application.
#### How SAML Works
SAML SSO works by transferring the user's identity from one place (the IDP) to another (the SP) through an exchange of digitally signed XML documents.
When a user logs into a system that acts as an IDP and tries to access their AI for Process account, the following happens:
1. The user accesses the remote app on the IDP portal using the sign-on endpoint URL, and the application loads.
2. The application identifies the user's origin (by application subdomain, user IP address, or similar) and redirects the user back to the IDP, asking for authentication. This is the authentication request.
3. The user either has an existing active browser session with the IDP or establishes one by logging into the IDP.
4. The IDP builds the authentication response in an XML document containing the user's username or email address, signs it using an X.509 certificate, and posts this information to the SP.
5. The SP, which already knows the IDP and has a certificate fingerprint, retrieves the authentication response and validates it using the certificate fingerprint.
6. The user's identity is established, and the user is provided with the AI for Process account access.
#### Okta Configuration
To configure SSO using SAML and Okta:
1. Go to AI for Process' **Single sign-on** page.
2. Select the **Enable SSO** tab.
3. Select **SAML** for **Sign-on protocol** and **Okta** for **SSO provider**.
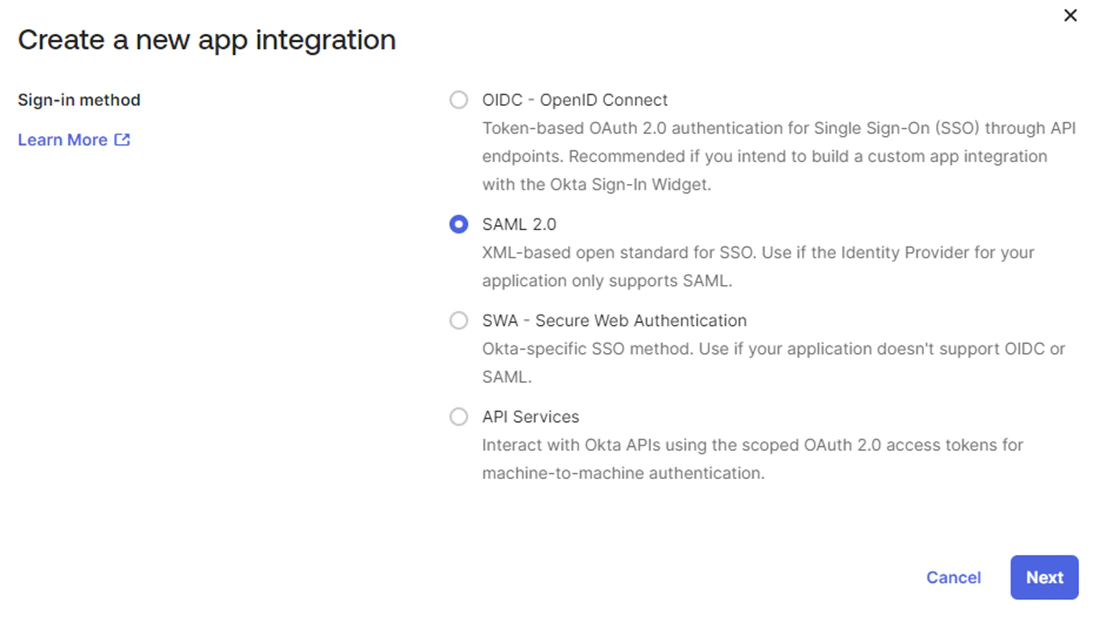
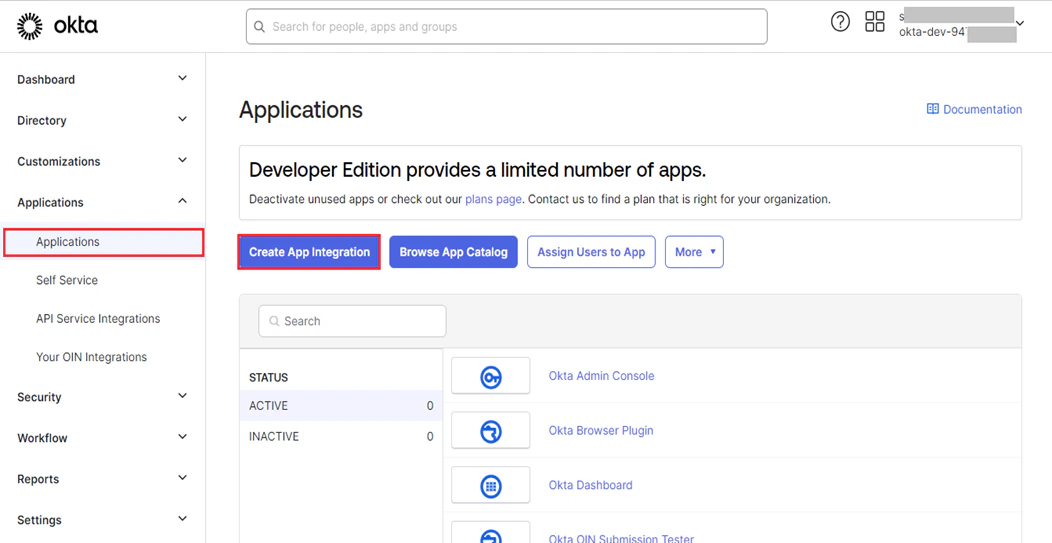 7. In the **Create a new app integration** window, select **SAML 2.0** and click **Next**.
 8. On the **Create SAML Integration** page, provide the **App Name** under **General Settings**, and click **Next**.
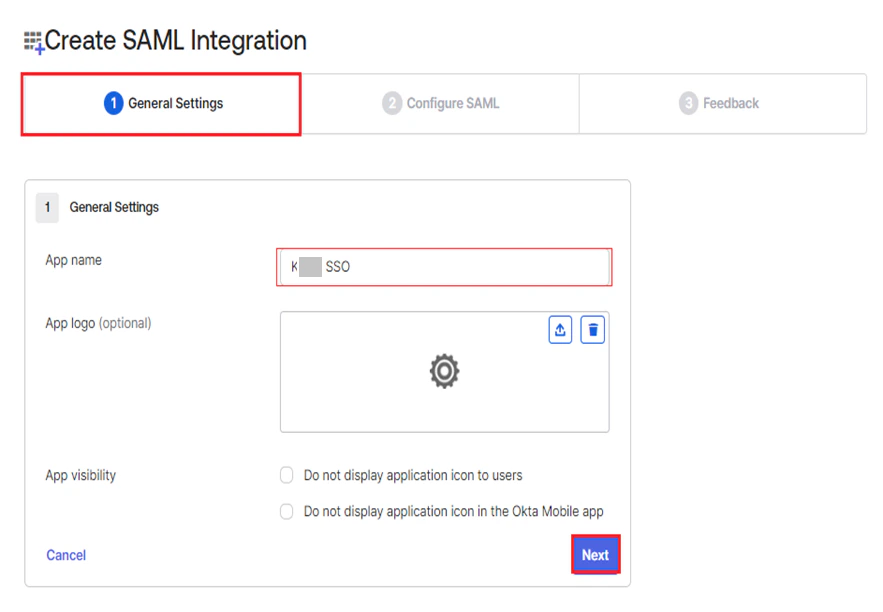 9. Copy the following values from AI for Process' SSO setup page and paste them into Okta under **Configure SAML**:
* **ACS url for SP initiated SAML flow**: Paste into *Single sign-on URL*.
* **ACS url for IDP initiated SAML flow**: Paste into *Audience URI (SP Entity ID)*.
| Okta Parameter | Description |
| ------------------------------- | --------------------------------------------------------------------------------------------------------------------------------------------------------- |
| **Single sign-on URL** | The location where the SAML assertion is sent with an HTTP POST. This is often called the SAML Assertion Consumer Service (ACS) URL for your application. |
| **Audience URI (SP Entity ID)** | The application-defined unique identifier that is the intended audience of the SAML assertion. This is most often the SP Entity ID of your application. |
10. Click **Next**.
11. Click **Finish** under **Feedback** on Okta's **Create SAML Integration** page.
12. Once the app is created, go to the **Sign On** tab and click **View Setup Instructions**.
13. On the **How to Configure SAML 2.0** for `
9. Copy the following values from AI for Process' SSO setup page and paste them into Okta under **Configure SAML**:
* **ACS url for SP initiated SAML flow**: Paste into *Single sign-on URL*.
* **ACS url for IDP initiated SAML flow**: Paste into *Audience URI (SP Entity ID)*.
| Okta Parameter | Description |
| ------------------------------- | --------------------------------------------------------------------------------------------------------------------------------------------------------- |
| **Single sign-on URL** | The location where the SAML assertion is sent with an HTTP POST. This is often called the SAML Assertion Consumer Service (ACS) URL for your application. |
| **Audience URI (SP Entity ID)** | The application-defined unique identifier that is the intended audience of the SAML assertion. This is most often the SP Entity ID of your application. |
10. Click **Next**.
11. Click **Finish** under **Feedback** on Okta's **Create SAML Integration** page.
12. Once the app is created, go to the **Sign On** tab and click **View Setup Instructions**.
13. On the **How to Configure SAML 2.0** for `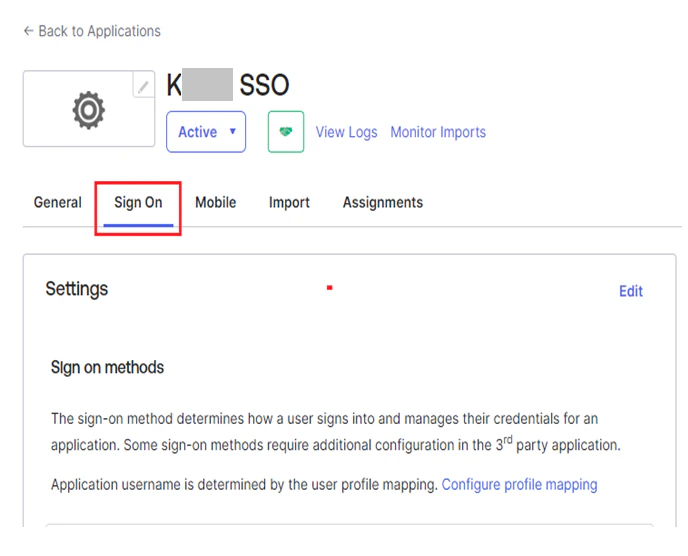 14. Go to **Sign On** > **SAML Signing Certificates** on your Okta app.
15. Click **Download certificate** under **Actions** for the required certificate.
14. Go to **Sign On** > **SAML Signing Certificates** on your Okta app.
15. Click **Download certificate** under **Actions** for the required certificate.
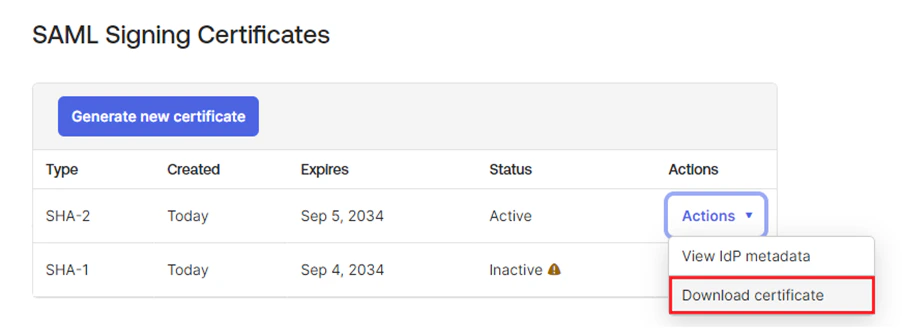 16. Once the certificate is downloaded, open it in Notepad and copy the data between the **BEGIN CERTIFICATE** header and **END CERTIFICATE** footer.
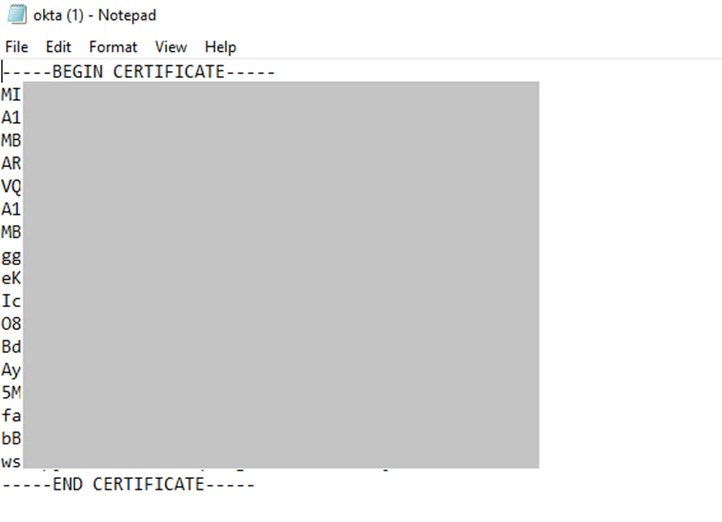 17. Paste the value into the **Certificate** field on AI for Process' SSO setup page.
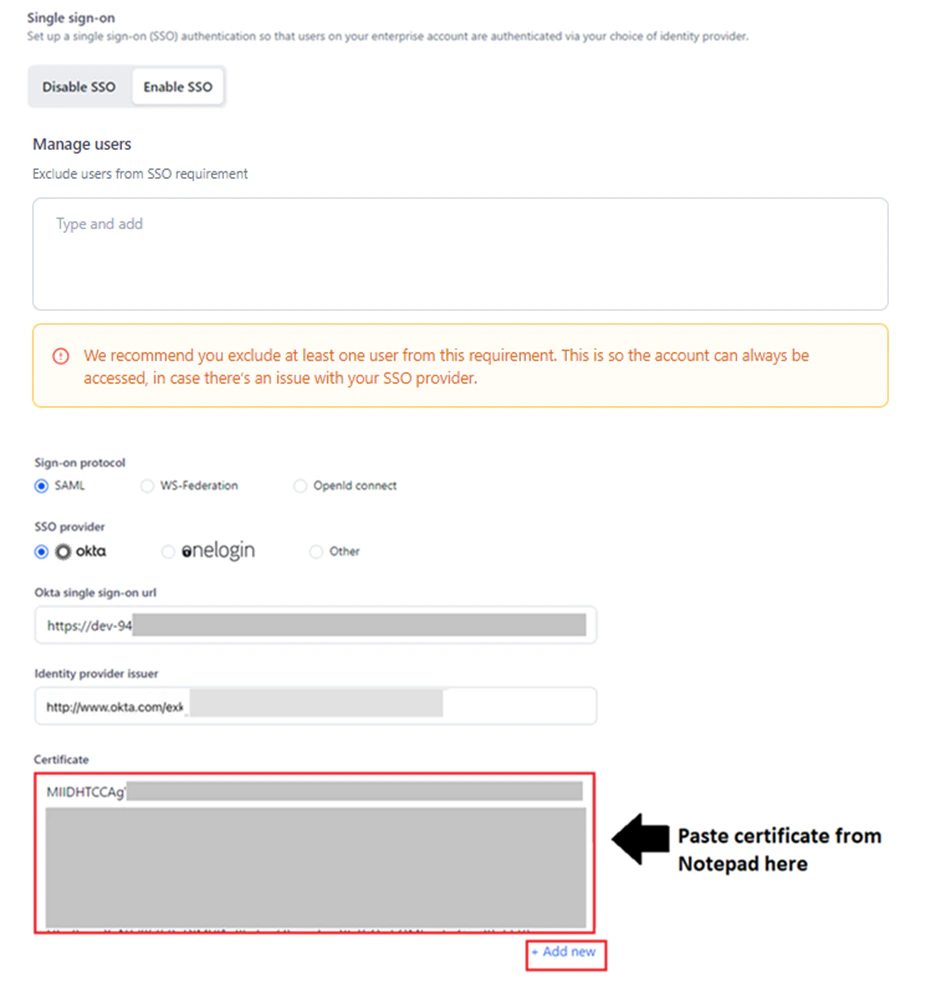 To add a new certificate, click **+ Add new**.
 #### OneLogin Configuration
To configure SSO using SAML and OneLogin:
1. Go to AI for Process' **Single sign-on** page.
2. Select the **Enable SSO** tab.
3. Select **SAML** for **Sign-on protocol** and **OneLogin** for **SSO provider**.
4. Log in to the [OneLogin developer portal](https://app.onelogin.com/login).
5. Go to **Applications** > **Add Apps** to access your app.
#### OneLogin Configuration
To configure SSO using SAML and OneLogin:
1. Go to AI for Process' **Single sign-on** page.
2. Select the **Enable SSO** tab.
3. Select **SAML** for **Sign-on protocol** and **OneLogin** for **SSO provider**.
4. Log in to the [OneLogin developer portal](https://app.onelogin.com/login).
5. Go to **Applications** > **Add Apps** to access your app.
 * To learn how to **add a new app**, see [Add a new app](https://onelogin.service-now.com/support?id=kb_article\&sys_id=9bf39e0047ccbd509d8dfd1f536d431c\&kb_category=e9866930db185340d5505eea4b9619b7#manage-add).
* To learn how to **configure apps**, see [Configure apps](https://onelogin.service-now.com/support?id=kb_article\&sys_id=9bf39e0047ccbd509d8dfd1f536d431c\&kb_category=e9866930db185340d5505eea4b9619b7#config).
6. Search for your AI for Process app and click **Enter**.
7. Click your app to view the **Add App** page. Optionally, change the display name or the icons displayed to your users in the *OneLogin* portal, and then click **SAVE**. The AI for Process app has been added to your company apps for *OneLogin* and is listed on the app page.
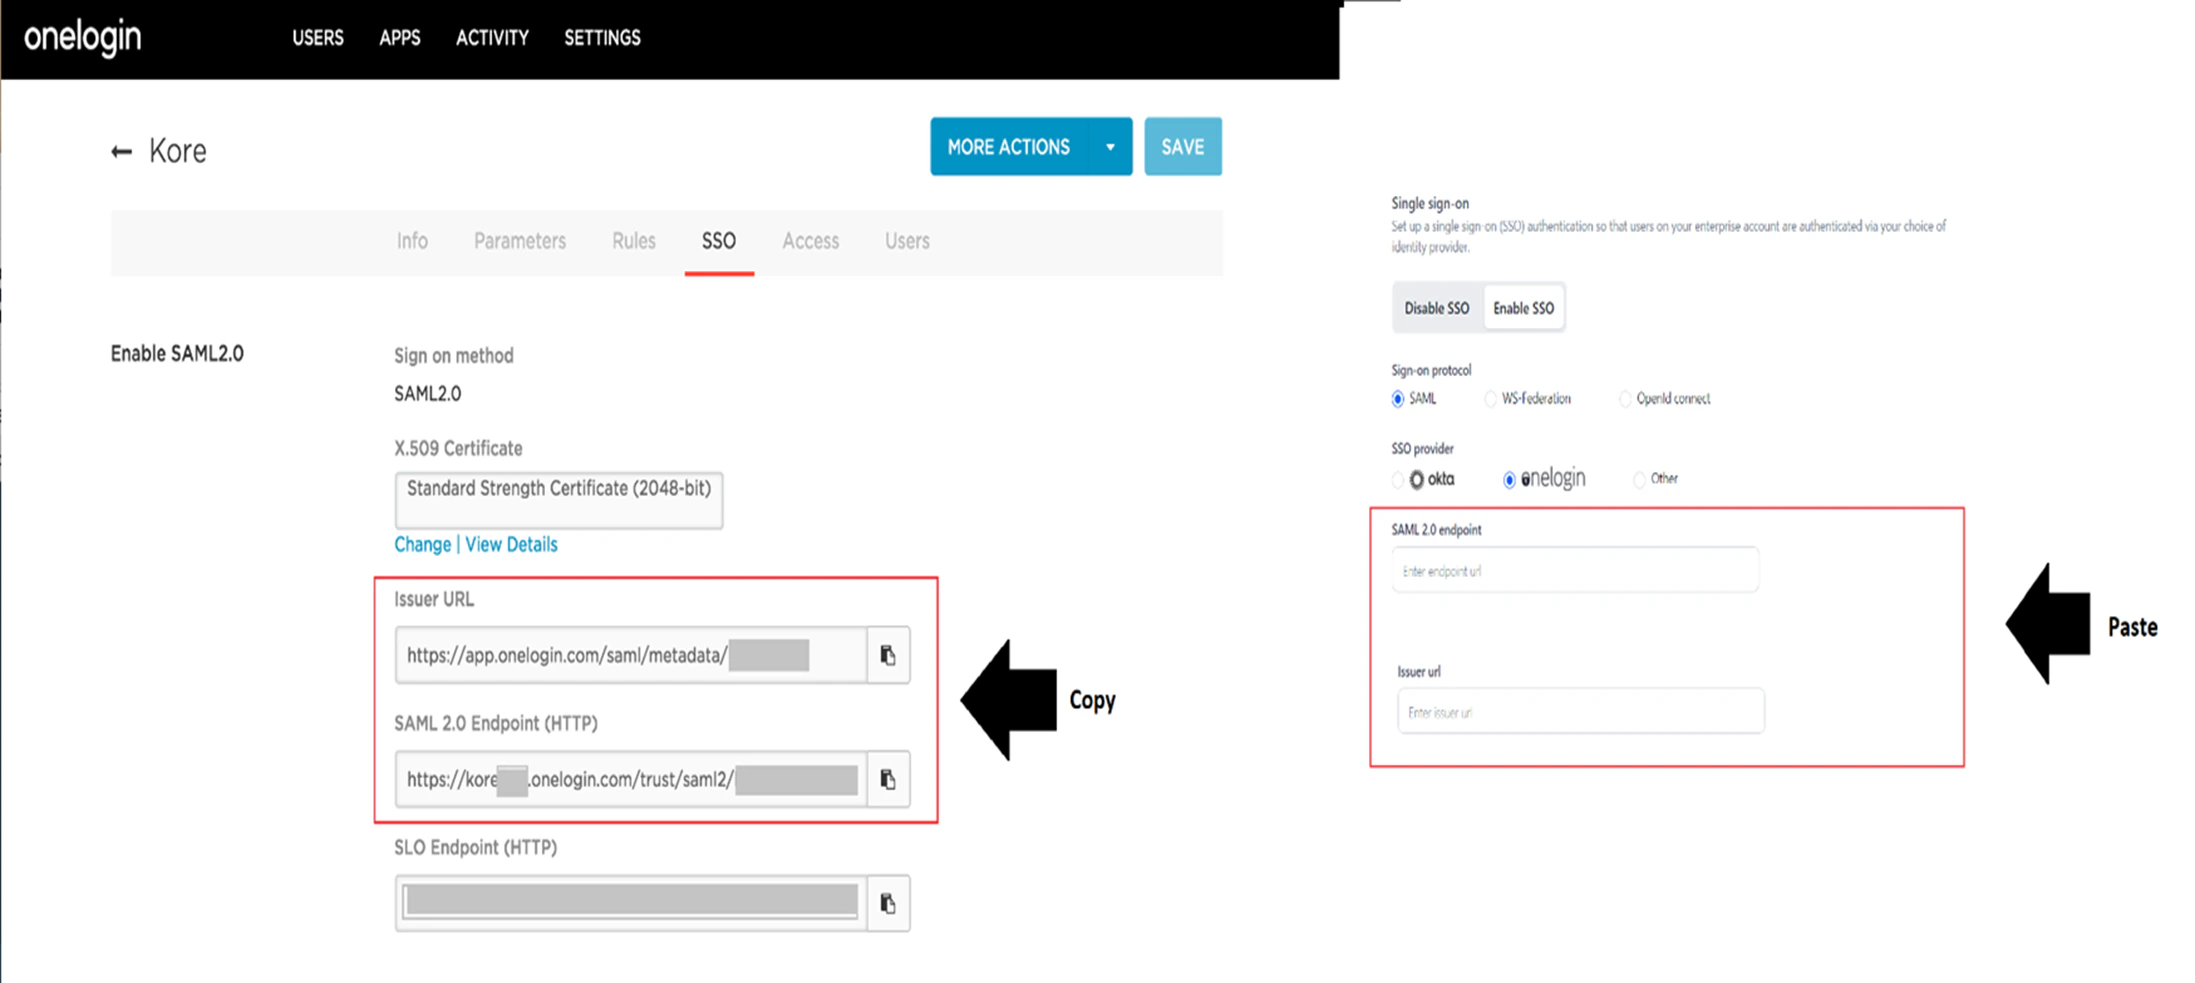
8. Copy the following values from **SSO** > **Enable SAML2.0** on OneLogin and paste them into the relevant fields on AI for Process' SSO setup page:
* **OneLogin SAML 2.0 Endpoint (HTTP)**: Paste into **SAML 2.0 endpoint**.
* **OneLogin Issuer URL**: Paste into **Issuer URL**.
* To learn how to **add a new app**, see [Add a new app](https://onelogin.service-now.com/support?id=kb_article\&sys_id=9bf39e0047ccbd509d8dfd1f536d431c\&kb_category=e9866930db185340d5505eea4b9619b7#manage-add).
* To learn how to **configure apps**, see [Configure apps](https://onelogin.service-now.com/support?id=kb_article\&sys_id=9bf39e0047ccbd509d8dfd1f536d431c\&kb_category=e9866930db185340d5505eea4b9619b7#config).
6. Search for your AI for Process app and click **Enter**.
7. Click your app to view the **Add App** page. Optionally, change the display name or the icons displayed to your users in the *OneLogin* portal, and then click **SAVE**. The AI for Process app has been added to your company apps for *OneLogin* and is listed on the app page.
8. Copy the following values from **SSO** > **Enable SAML2.0** on OneLogin and paste them into the relevant fields on AI for Process' SSO setup page:
* **OneLogin SAML 2.0 Endpoint (HTTP)**: Paste into **SAML 2.0 endpoint**.
* **OneLogin Issuer URL**: Paste into **Issuer URL**.
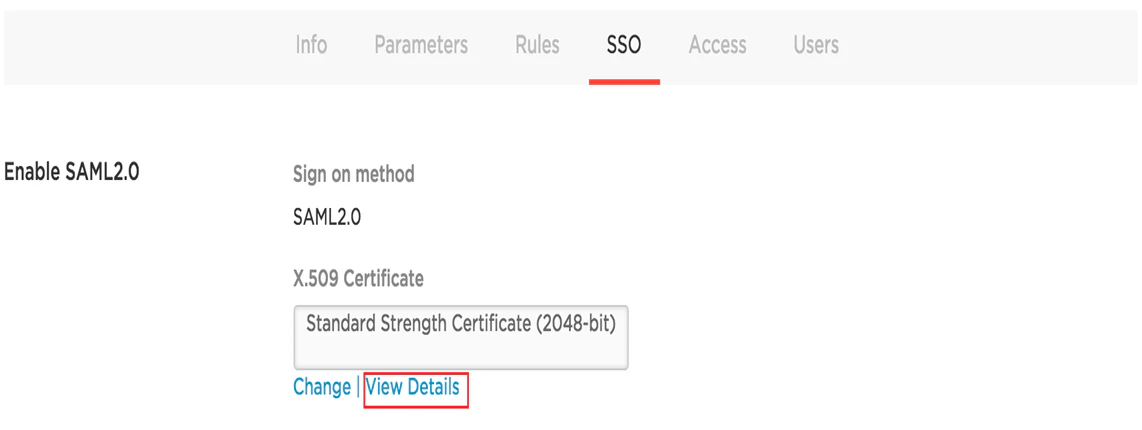
 9. In the **OneLogin X.509 Certificate** field, click **View Details**. The **Standard Strength Certificate (2048-bit)** page is displayed.
 10. In the **X.509 Certificate** section, copy the certificate data and then paste it into the **X.509 Certificate** field on AI for Process' SSO setup page.
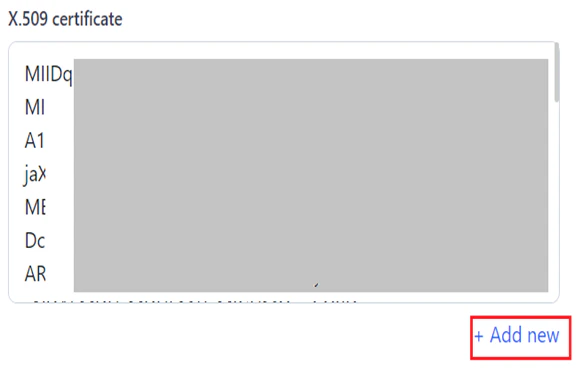
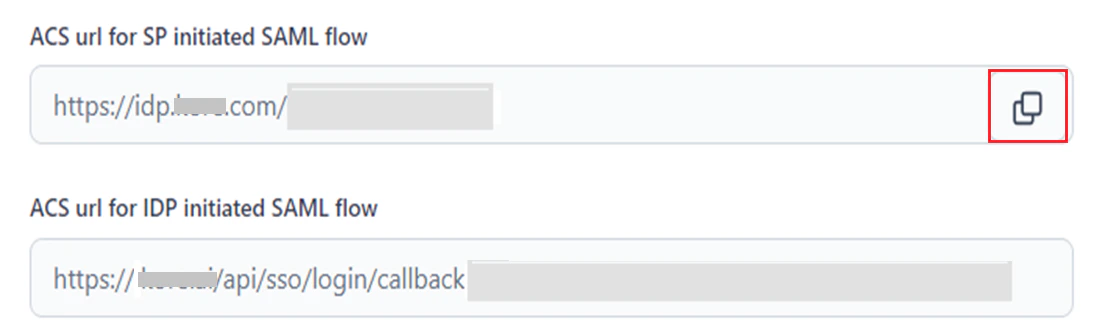 12. Click **Save** on AI for Process and OneLogin.
Once SSO for OneLogin is complete, the system redirects to the **OneLogin Sign in** page for AI for Process account authentication.
12. Click **Save** on AI for Process and OneLogin.
Once SSO for OneLogin is complete, the system redirects to the **OneLogin Sign in** page for AI for Process account authentication.
 #### Other SAML Providers
To configure SSO using SAML for other IDPs:
1. Go to AI for Process' **Single sign-on** page.
2. Select the **Enable SSO** tab.
3. Select **SAML** for **Sign-on protocol** and **Other** for **SSO provider**.
#### Other SAML Providers
To configure SSO using SAML for other IDPs:
1. Go to AI for Process' **Single sign-on** page.
2. Select the **Enable SSO** tab.
3. Select **SAML** for **Sign-on protocol** and **Other** for **SSO provider**.
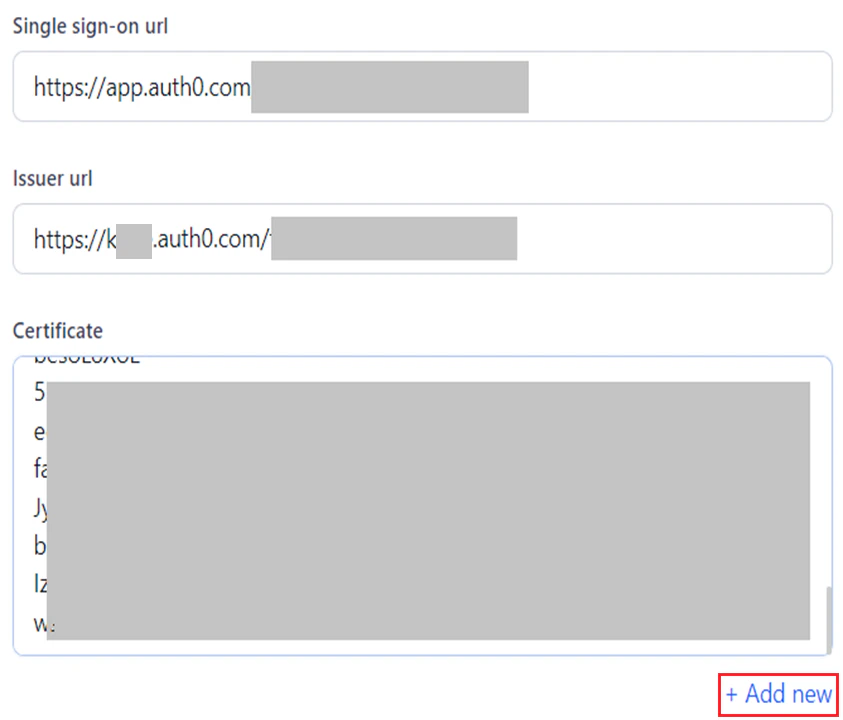
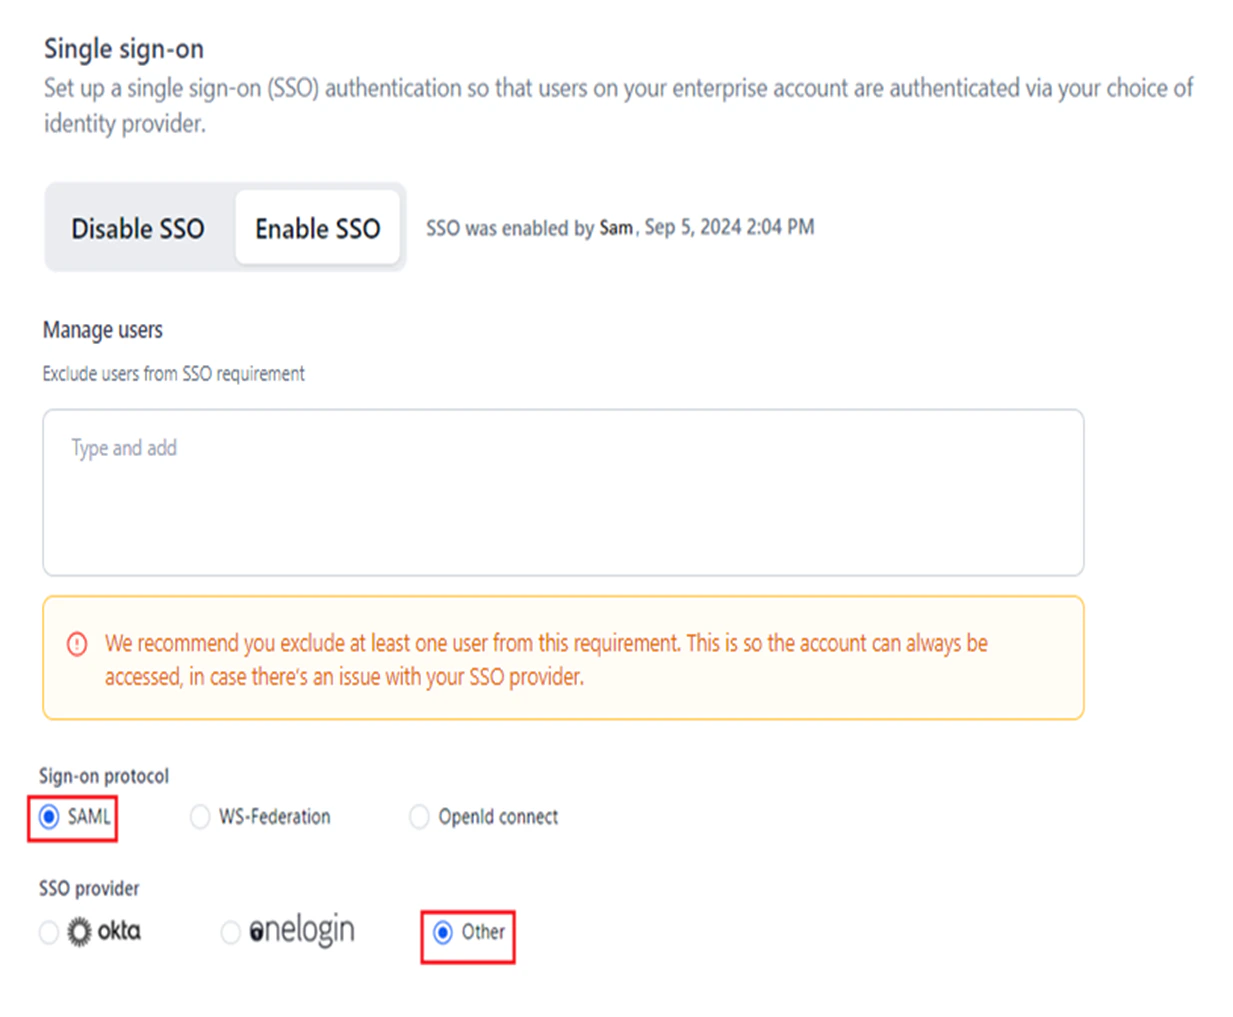 4. Fetch the necessary SSO configuration parameters listed in the [Configuration Parameters](#configuration-parameters) table from your app's **Settings** page within the IDP developer portal.
5. Paste them into the relevant fields on AI for Process' SSO setup page.
To add a new certificate, click **+Add new**.
4. Fetch the necessary SSO configuration parameters listed in the [Configuration Parameters](#configuration-parameters) table from your app's **Settings** page within the IDP developer portal.
5. Paste them into the relevant fields on AI for Process' SSO setup page.
To add a new certificate, click **+Add new**.
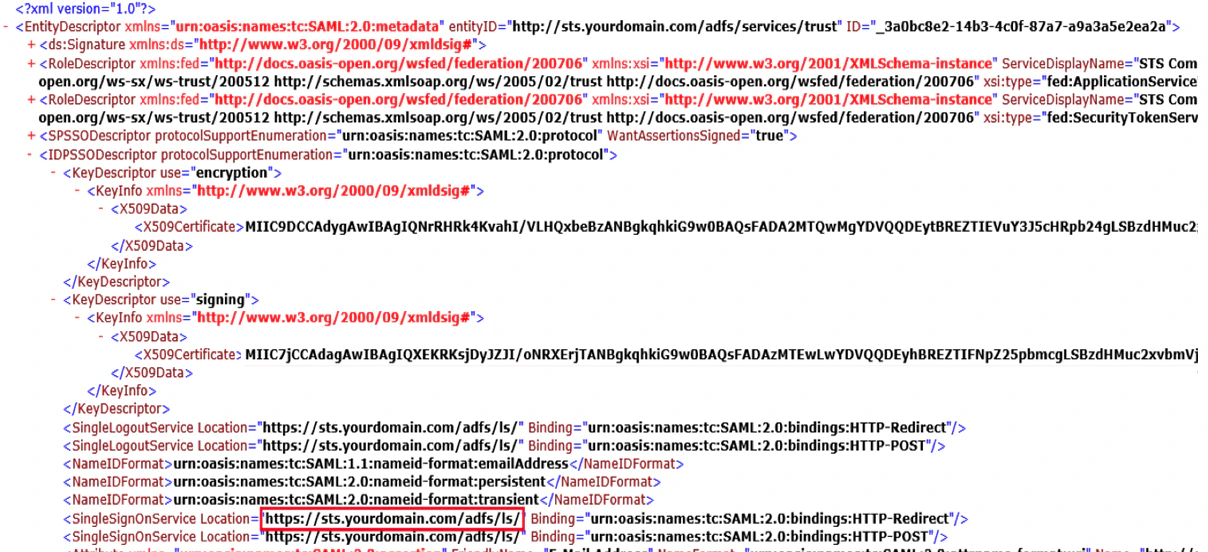 6. Paste this value into the **Azure AD sign-on end point url** field on AI for Process' SSO setup page.
7. Copy and paste [this](https://login.microsoftonline.com/common/FederationMetadata/2007-06/FederationMetadata.xml) URL link into the **Azure AD federation metadata document** field on AI for Process' SSO setup page.
6. Paste this value into the **Azure AD sign-on end point url** field on AI for Process' SSO setup page.
7. Copy and paste [this](https://login.microsoftonline.com/common/FederationMetadata/2007-06/FederationMetadata.xml) URL link into the **Azure AD federation metadata document** field on AI for Process' SSO setup page.
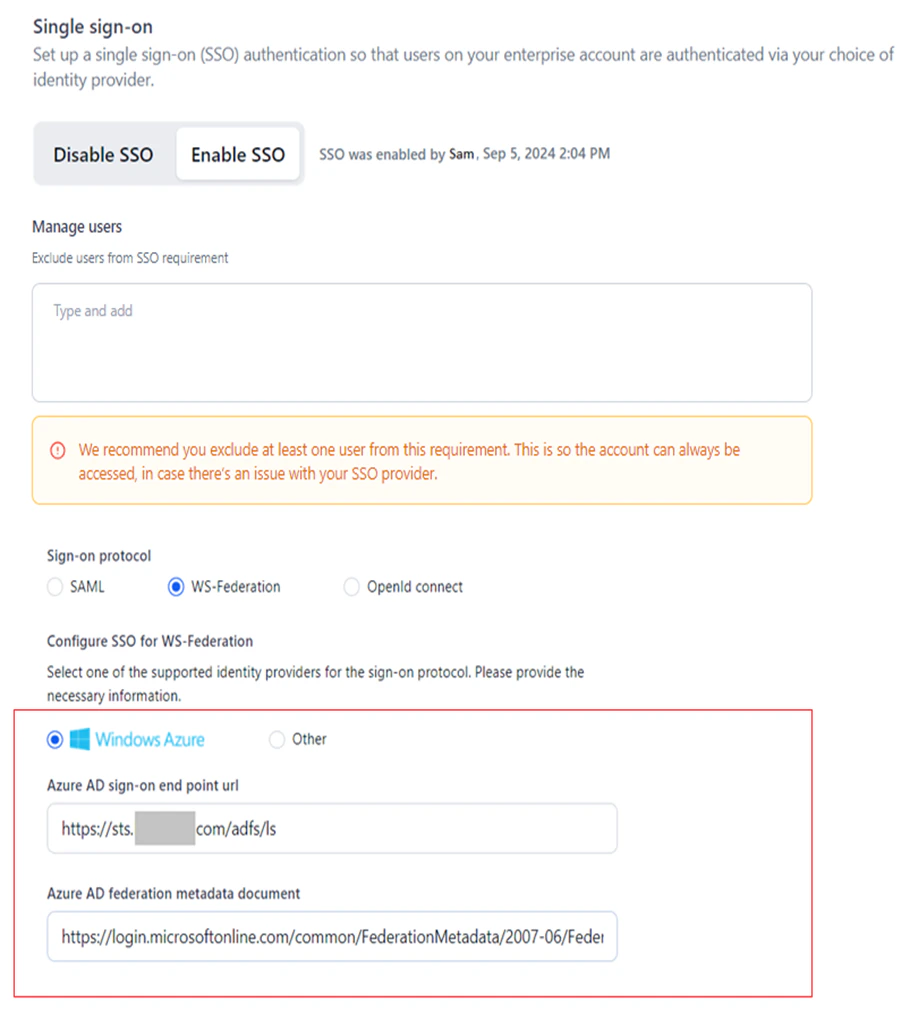 8. Click **Save**.
#### Other WS-Federation Providers
To configure SSO using WS-Federation for other IDPs:
1. Go to AI for Process's **Single sign-on** page.
2. Select the **Enable SSO** tab.
3. Select **WS-Federation** for **Sign-on protocol** and **Other** to **Configure SSO for WS-Federation**.
4. Copy and paste the SSO endpoint URL from the IDP's portal into **AD sign-on end point url** on AI for Process' SSO setup page.
5. Copy and paste the URL for the WS-Federation metadata document from the IDP's portal into the **AD federation metadata document url** on AI for Process' SSO setup page.
8. Click **Save**.
#### Other WS-Federation Providers
To configure SSO using WS-Federation for other IDPs:
1. Go to AI for Process's **Single sign-on** page.
2. Select the **Enable SSO** tab.
3. Select **WS-Federation** for **Sign-on protocol** and **Other** to **Configure SSO for WS-Federation**.
4. Copy and paste the SSO endpoint URL from the IDP's portal into **AD sign-on end point url** on AI for Process' SSO setup page.
5. Copy and paste the URL for the WS-Federation metadata document from the IDP's portal into the **AD federation metadata document url** on AI for Process' SSO setup page.
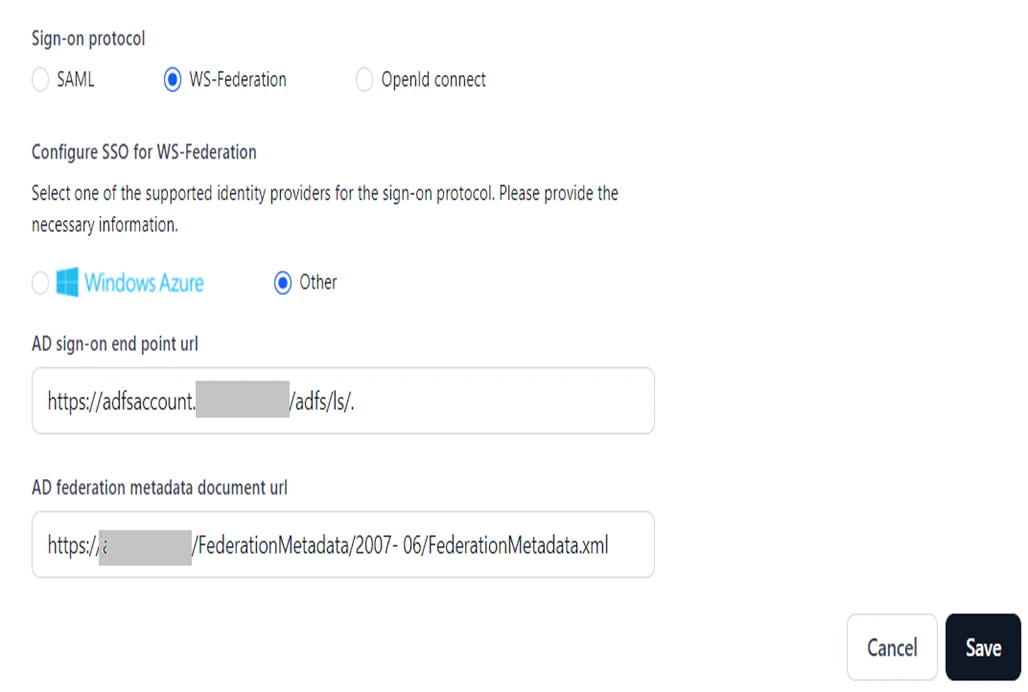 6. Click **Save**.
### OpenID Connect
**OpenID Connect** (OIDC) is an authentication layer built on top of the OAuth 2.0 framework that enables Single Sign-On (SSO) by providing a standardized way for applications to authenticate users and obtain user identity information. AI for Process currently supports Sign in with Google for this protocol.
#### How OpenID Connect Works
When a user logs into a system that acts as an IDP and tries to access their AI for Process account, the following happens:
1. The application redirects the user to the IDP for authentication.
2. The user logs in at the IDP portal.
3. IDP redirects the user back with an authorization code.
4. The application exchanges the code for ID and access tokens.
5. The application validates tokens and grants access.
6. Users can access other integrated applications without re-authenticating.
#### Google Configuration
To configure SSO using OpenID Connect and Google:
1. Go to AI for Process's **Single sign-on** page.
2. Select the **Enable SSO** tab.
3. Select **OpenId Connect** for **Sign-on protocol** and **Sign in with Google** to **Configure SSO for OpenId connect**.
6. Click **Save**.
### OpenID Connect
**OpenID Connect** (OIDC) is an authentication layer built on top of the OAuth 2.0 framework that enables Single Sign-On (SSO) by providing a standardized way for applications to authenticate users and obtain user identity information. AI for Process currently supports Sign in with Google for this protocol.
#### How OpenID Connect Works
When a user logs into a system that acts as an IDP and tries to access their AI for Process account, the following happens:
1. The application redirects the user to the IDP for authentication.
2. The user logs in at the IDP portal.
3. IDP redirects the user back with an authorization code.
4. The application exchanges the code for ID and access tokens.
5. The application validates tokens and grants access.
6. Users can access other integrated applications without re-authenticating.
#### Google Configuration
To configure SSO using OpenID Connect and Google:
1. Go to AI for Process's **Single sign-on** page.
2. Select the **Enable SSO** tab.
3. Select **OpenId Connect** for **Sign-on protocol** and **Sign in with Google** to **Configure SSO for OpenId connect**.
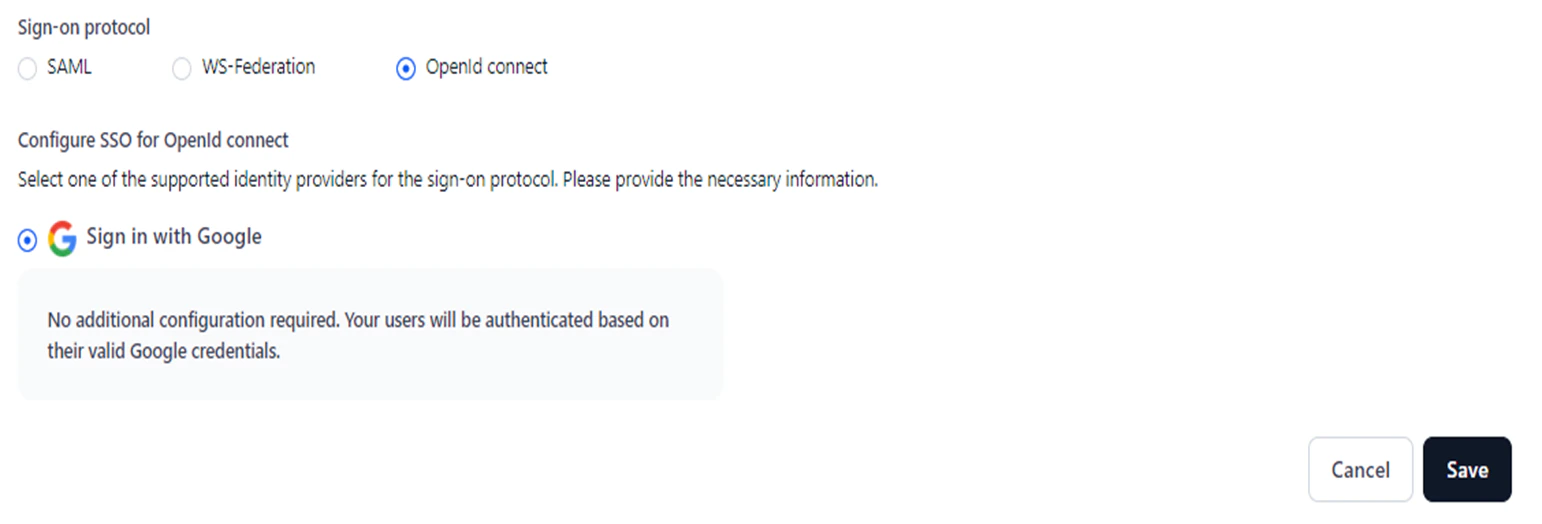 4. Click **Save**.
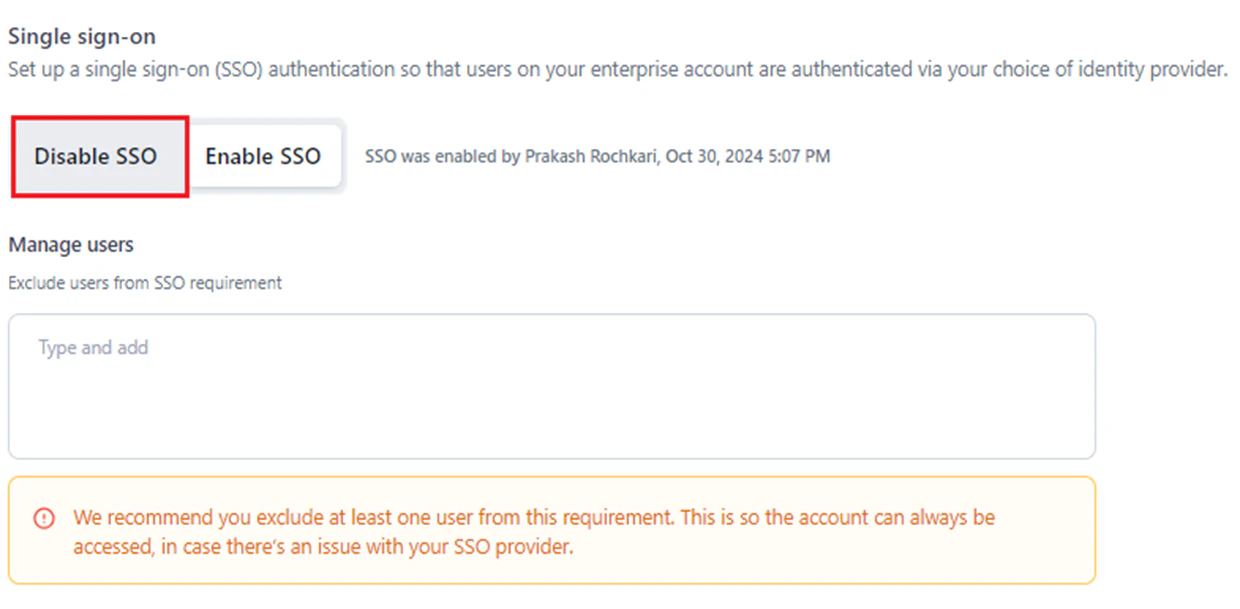 3. In the **Disable SSO** confirmation window, click **Yes**.
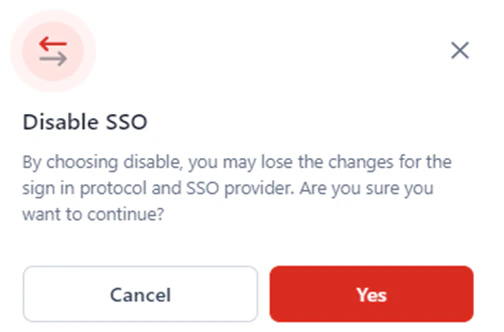 The following screen is displayed after SSO is disabled.
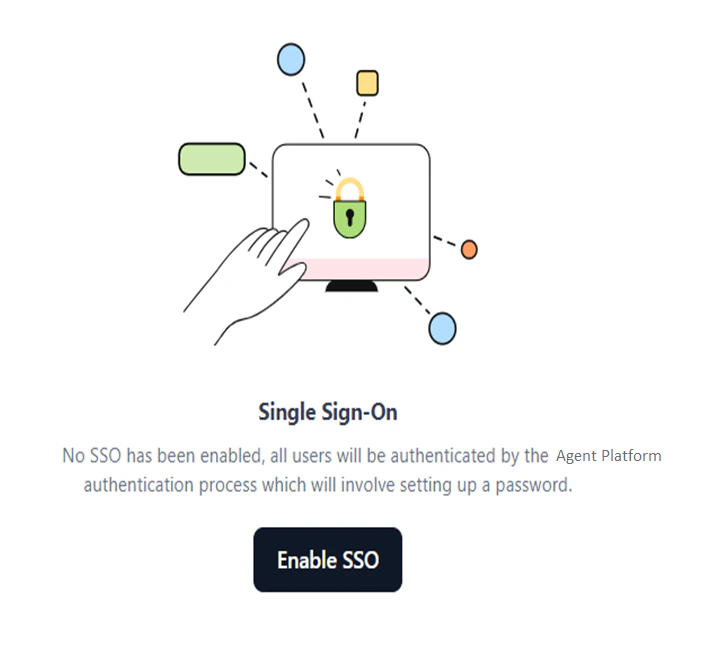 ### Exclude Users from SSO
The **Manage Users** feature lets the account owner exclude specific users from mandatory SSO, allowing them to use either the default sign-in or SSO. This is helpful in the following situations:
* An error occurs during the SSO provider configuration, and the system prevents the user from logging in.
* The user wants to bypass log-in via the configured SSO provider.
* Technical issues arise with the SSO provider.
* The SSO configuration profile has expired.
* Business policy changes at the provider prevent the configured SSO from functioning.
**Key Considerations**
* By default, the account owner is excluded from the SSO requirement and can choose between the SSO flow or the default sign-in flow during login. It is recommended to exclude at least one more account user.
* Excluded users can instantly switch to another account without signing in through SSO, if SSO is enabled.
* For users who are not excluded:
* If SSO is enabled for the account, they must sign in via SSO.
* If SSO is disabled, they can switch accounts directly without additional sign-in.
To exclude a user from the SSO requirement, follow the steps below:
1. [Navigate](#enable-sso) to the **Single Sign-on** page.
2. Type and add an email address or select from the dropdown in the **Manage Users** textbox.
### Exclude Users from SSO
The **Manage Users** feature lets the account owner exclude specific users from mandatory SSO, allowing them to use either the default sign-in or SSO. This is helpful in the following situations:
* An error occurs during the SSO provider configuration, and the system prevents the user from logging in.
* The user wants to bypass log-in via the configured SSO provider.
* Technical issues arise with the SSO provider.
* The SSO configuration profile has expired.
* Business policy changes at the provider prevent the configured SSO from functioning.
**Key Considerations**
* By default, the account owner is excluded from the SSO requirement and can choose between the SSO flow or the default sign-in flow during login. It is recommended to exclude at least one more account user.
* Excluded users can instantly switch to another account without signing in through SSO, if SSO is enabled.
* For users who are not excluded:
* If SSO is enabled for the account, they must sign in via SSO.
* If SSO is disabled, they can switch accounts directly without additional sign-in.
To exclude a user from the SSO requirement, follow the steps below:
1. [Navigate](#enable-sso) to the **Single Sign-on** page.
2. Type and add an email address or select from the dropdown in the **Manage Users** textbox.
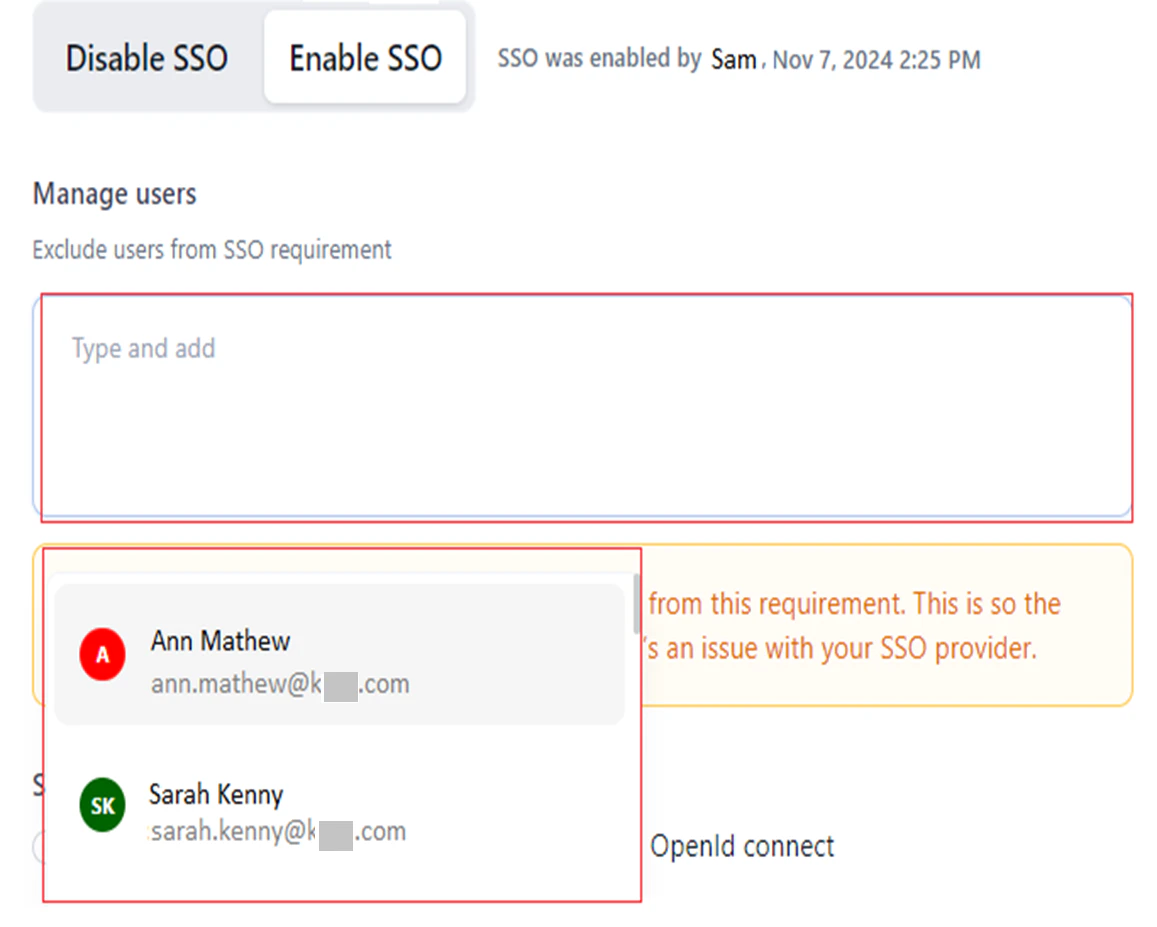 You can add multiple users to the list, as shown below:
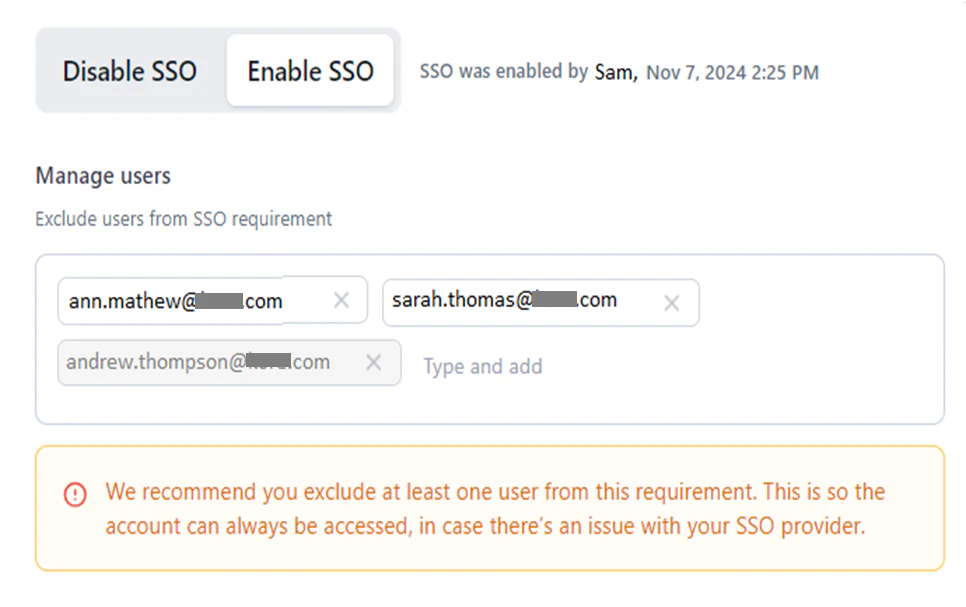 3. Click **Save**.
A success message is displayed, and the SSO sign-in is made optional for the user.
#### Sign-In Flow for Excluded Users
During sign-in, the following screen is displayed for the excluded user.
3. Click **Save**.
A success message is displayed, and the SSO sign-in is made optional for the user.
#### Sign-In Flow for Excluded Users
During sign-in, the following screen is displayed for the excluded user.
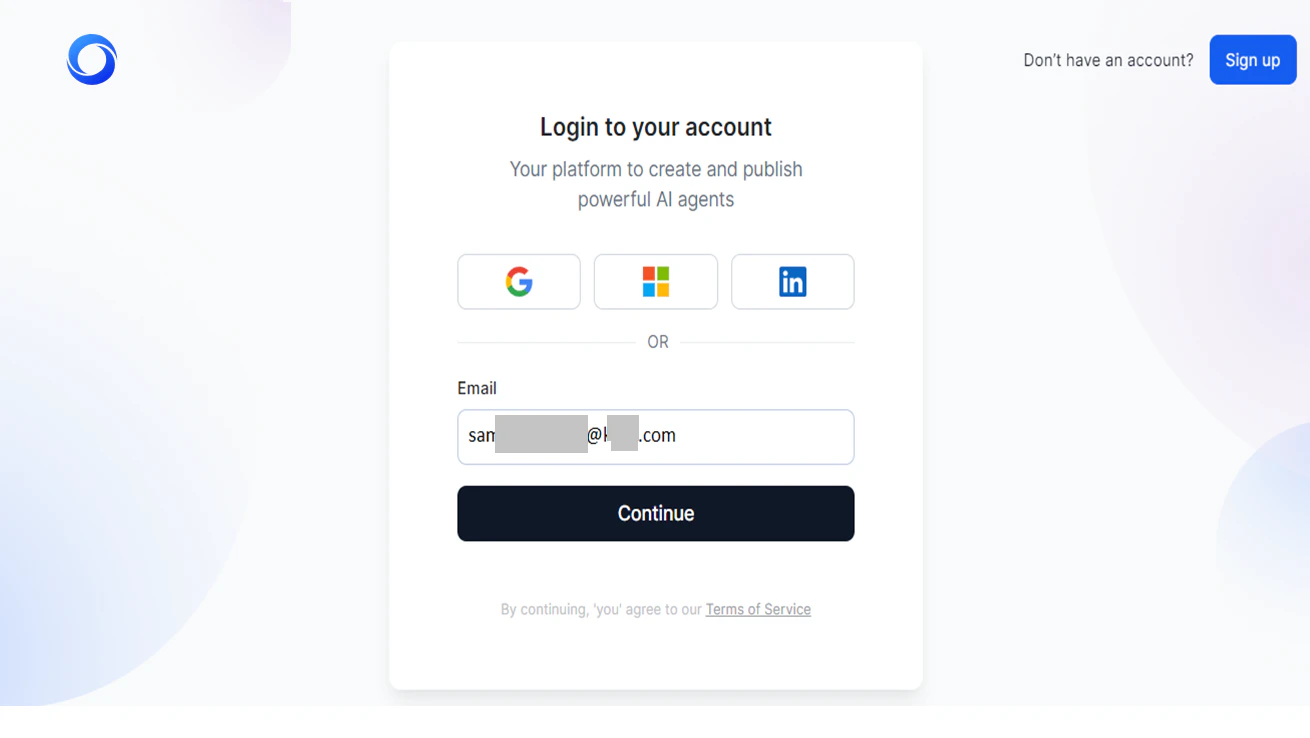 When the user clicks **Continue**, one of the following happens:
When **SSO is enabled**, the following page is displayed.
When the user clicks **Continue**, one of the following happens:
When **SSO is enabled**, the following page is displayed.
 The user can do one of the following:
* Click **Continue** to log in using the configured SSO provider service's sign-in page, for example, OKTA, as shown below:
The user can do one of the following:
* Click **Continue** to log in using the configured SSO provider service's sign-in page, for example, OKTA, as shown below:
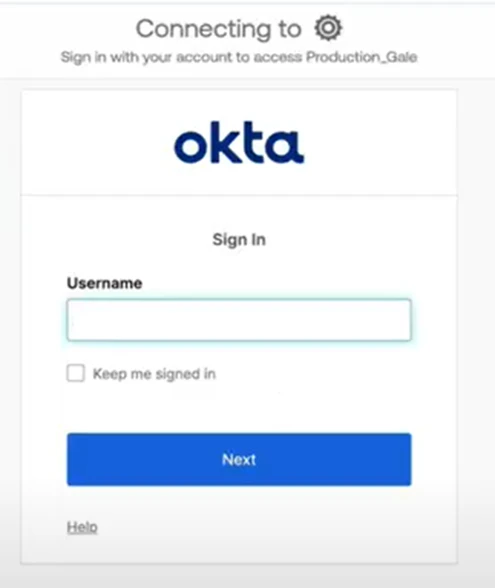 * Click "**Having trouble logging in with SSO?**" to sign in using the default option (email and password, Google, Windows, etc.) set during AI for Process sign-up.
When **SSO is disabled**, the user is taken through the default sign-in flow (email and password, Google, Windows, etc.).
### Default Sign-in Flow
As an AI for Process admin, you can enable Single Sign-On (SSO) using a third-party provider. However, if your SSO security system fails or you forget your SSO credentials for your IDP, you can log in to AI for Process using either email sign-in or your default SSO provider.
***
## API Scopes
AI for Process introduces **API scopes** in the **Settings** console, moving from unrestricted management API keys to more secure, scoped API key-based application management.
Users can select specific scopes for managing workflows, models, and guardrails. This allows for the creation of internal applications with restricted access to only the necessary API endpoints. By limiting API access, this feature reduces security risks, allowing administrators to generate multiple API keys and ensure secure, controlled access for authorized personnel.
**Important Considerations for API Keys**
* **Scope-restricted access**: API keys grant access exclusively to their assigned scopes.
* **Unauthorized access**: Any attempt to access unassigned scopes is automatically rejected.
* **Multiple keys per app**: You can generate multiple API keys for a single app.
* **One key per app**: An API key cannot be shared across multiple apps.
* **Immutable keys**: API keys can be deleted, but cannot be modified after they are created.
* **Copy-once policy**: For security reasons, each API key can only be copied once.
Users can rename an app, modify its selected scopes, or delete the app as needed. Once the admin defines or updates the API scopes, the changes are applied platform-wide, ensuring consistent and controlled access to the APIs wherever they are used.
For roles and permissions for API-scoped apps, see [Module-wise Permissions and Access Levels](/ai-for-process/settings/role-management#module-wise-permissions-and-access-levels).
### Use Case: Scoped API Access for Banking Departments
A bank automates workflows and integrates various internal systems across different departments, including **Risk & Compliance**, **Customer Support**, and **Marketing**. This requires access to APIs with different scopes.
* **Risk & Compliance Department**: This team requires access only to models and workflows for generating reports from transaction logs and audit trails. The admin creates a scoped app that grants access to workflows and models. This prevents the team from accidentally accessing unrelated customer information available for guardrails.
* **Customer Support Department**: Support agents require access to monitoring AI customer interactions, but should not have access to risk and compliance workflows or model management. A scoped app ensures support teams stay within their operational boundaries.
By using API-scoped apps and API keys, the bank minimizes the risk of data exposure while maintaining security, ensuring compliance, and strictly regulating access to authorized system users.
### Supported API Scopes
| API Scope | Description |
| ------------------- | ---------------------------------------------------------------------------------------------------------------------------------------------------------------------------------------------------------------- |
| Deploy workflow | Deploy a specific workflow into an environment. It allows the user to control the deployment process either synchronously or asynchronously. [Learn more](/ai-for-process/workflows/overview#deploy-a-workflow). |
| Undeploy workflow | Undeploy a workflow that is deployed in an environment. |
| Deploy Model | Deploy an open-source or fine-tuned model in the ***Ready to Deploy*** state. |
| Undeploy Model | Undeploy a model from the environment. |
| Import Model | Import a model in chunks into the AI for Process environment. |
| Import workflow | Import a new workflow into the system. |
| Export Model | Export a trained AI model from the system. |
| Export workflow | Export a workflow's configuration and associated data. |
| Deploy Guardrails | Deploy pre-defined **guardrails** to enhance security, compliance, and content moderation in AI interactions. |
| Undeploy Guardrails | Remove the previously deployed guardrails that regulate AI interactions. |
### Implement API Scoping
To access **API Scopes**:
1. Log in → In AI for Process Modules top menu → Click **Settings**.
* Click "**Having trouble logging in with SSO?**" to sign in using the default option (email and password, Google, Windows, etc.) set during AI for Process sign-up.
When **SSO is disabled**, the user is taken through the default sign-in flow (email and password, Google, Windows, etc.).
### Default Sign-in Flow
As an AI for Process admin, you can enable Single Sign-On (SSO) using a third-party provider. However, if your SSO security system fails or you forget your SSO credentials for your IDP, you can log in to AI for Process using either email sign-in or your default SSO provider.
***
## API Scopes
AI for Process introduces **API scopes** in the **Settings** console, moving from unrestricted management API keys to more secure, scoped API key-based application management.
Users can select specific scopes for managing workflows, models, and guardrails. This allows for the creation of internal applications with restricted access to only the necessary API endpoints. By limiting API access, this feature reduces security risks, allowing administrators to generate multiple API keys and ensure secure, controlled access for authorized personnel.
**Important Considerations for API Keys**
* **Scope-restricted access**: API keys grant access exclusively to their assigned scopes.
* **Unauthorized access**: Any attempt to access unassigned scopes is automatically rejected.
* **Multiple keys per app**: You can generate multiple API keys for a single app.
* **One key per app**: An API key cannot be shared across multiple apps.
* **Immutable keys**: API keys can be deleted, but cannot be modified after they are created.
* **Copy-once policy**: For security reasons, each API key can only be copied once.
Users can rename an app, modify its selected scopes, or delete the app as needed. Once the admin defines or updates the API scopes, the changes are applied platform-wide, ensuring consistent and controlled access to the APIs wherever they are used.
For roles and permissions for API-scoped apps, see [Module-wise Permissions and Access Levels](/ai-for-process/settings/role-management#module-wise-permissions-and-access-levels).
### Use Case: Scoped API Access for Banking Departments
A bank automates workflows and integrates various internal systems across different departments, including **Risk & Compliance**, **Customer Support**, and **Marketing**. This requires access to APIs with different scopes.
* **Risk & Compliance Department**: This team requires access only to models and workflows for generating reports from transaction logs and audit trails. The admin creates a scoped app that grants access to workflows and models. This prevents the team from accidentally accessing unrelated customer information available for guardrails.
* **Customer Support Department**: Support agents require access to monitoring AI customer interactions, but should not have access to risk and compliance workflows or model management. A scoped app ensures support teams stay within their operational boundaries.
By using API-scoped apps and API keys, the bank minimizes the risk of data exposure while maintaining security, ensuring compliance, and strictly regulating access to authorized system users.
### Supported API Scopes
| API Scope | Description |
| ------------------- | ---------------------------------------------------------------------------------------------------------------------------------------------------------------------------------------------------------------- |
| Deploy workflow | Deploy a specific workflow into an environment. It allows the user to control the deployment process either synchronously or asynchronously. [Learn more](/ai-for-process/workflows/overview#deploy-a-workflow). |
| Undeploy workflow | Undeploy a workflow that is deployed in an environment. |
| Deploy Model | Deploy an open-source or fine-tuned model in the ***Ready to Deploy*** state. |
| Undeploy Model | Undeploy a model from the environment. |
| Import Model | Import a model in chunks into the AI for Process environment. |
| Import workflow | Import a new workflow into the system. |
| Export Model | Export a trained AI model from the system. |
| Export workflow | Export a workflow's configuration and associated data. |
| Deploy Guardrails | Deploy pre-defined **guardrails** to enhance security, compliance, and content moderation in AI interactions. |
| Undeploy Guardrails | Remove the previously deployed guardrails that regulate AI interactions. |
### Implement API Scoping
To access **API Scopes**:
1. Log in → In AI for Process Modules top menu → Click **Settings**.
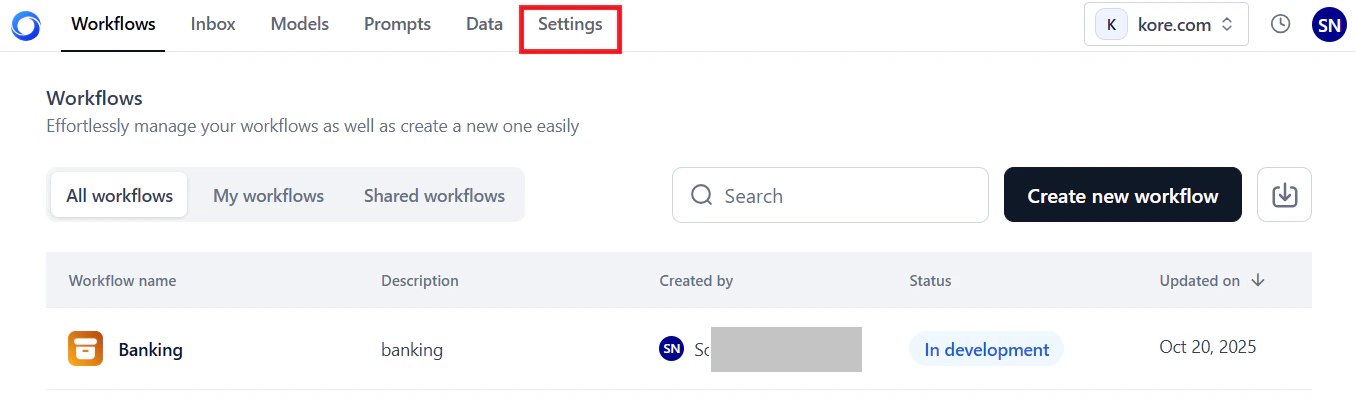 2. Click **Security & Control** > **API Scopes** on the left navigation menu.
The key steps to implement API scoping include:
1. [Create an API app and assign scopes](#create-an-api-application): API-scoped apps have limited and specific permissions tied only to the API endpoints they need. Creating an API-scoped app enables you to restrict permissions, enhance security, better control and monitor access, and tailor the app specifically to meet the integration's needs.
2. [Create one or more API keys to access the app](#create-an-api-key): API keys for scoped apps provide secure, manageable, and auditable access control tailored to the app's needs, making access and usage safer and easier to track.
#### Create an API Application
To create an app:
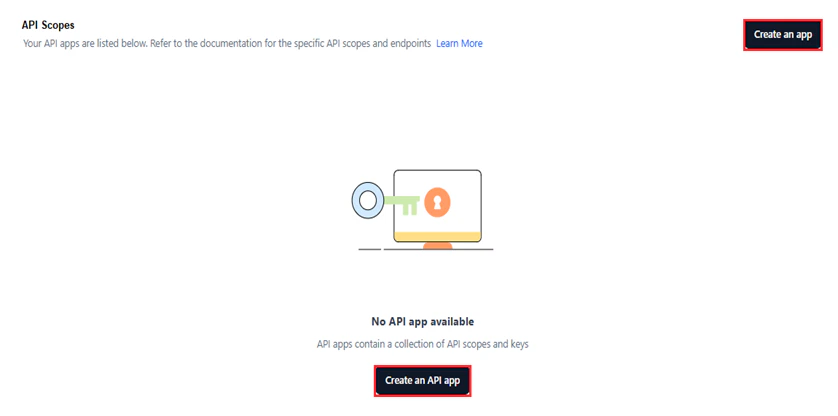
1. Click **Create an API App** or **Create an App**.
2. Click **Security & Control** > **API Scopes** on the left navigation menu.
The key steps to implement API scoping include:
1. [Create an API app and assign scopes](#create-an-api-application): API-scoped apps have limited and specific permissions tied only to the API endpoints they need. Creating an API-scoped app enables you to restrict permissions, enhance security, better control and monitor access, and tailor the app specifically to meet the integration's needs.
2. [Create one or more API keys to access the app](#create-an-api-key): API keys for scoped apps provide secure, manageable, and auditable access control tailored to the app's needs, making access and usage safer and easier to track.
#### Create an API Application
To create an app:
1. Click **Create an API App** or **Create an App**.
 2. Click **Untitled app** and provide the app name.
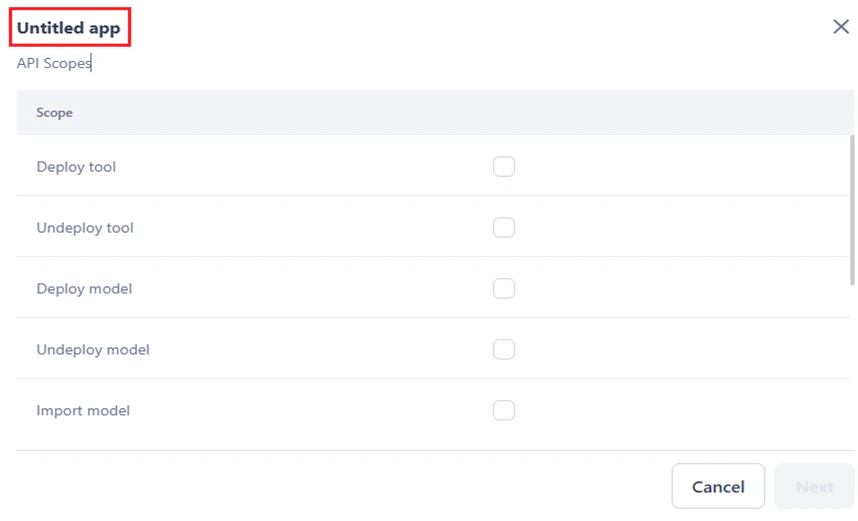 3. Select the required scopes from the list.
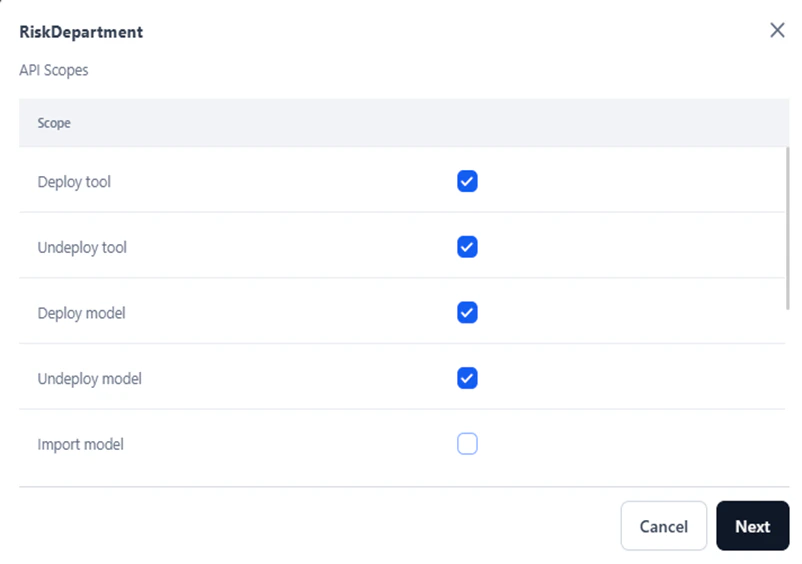 4. Click **Next**.
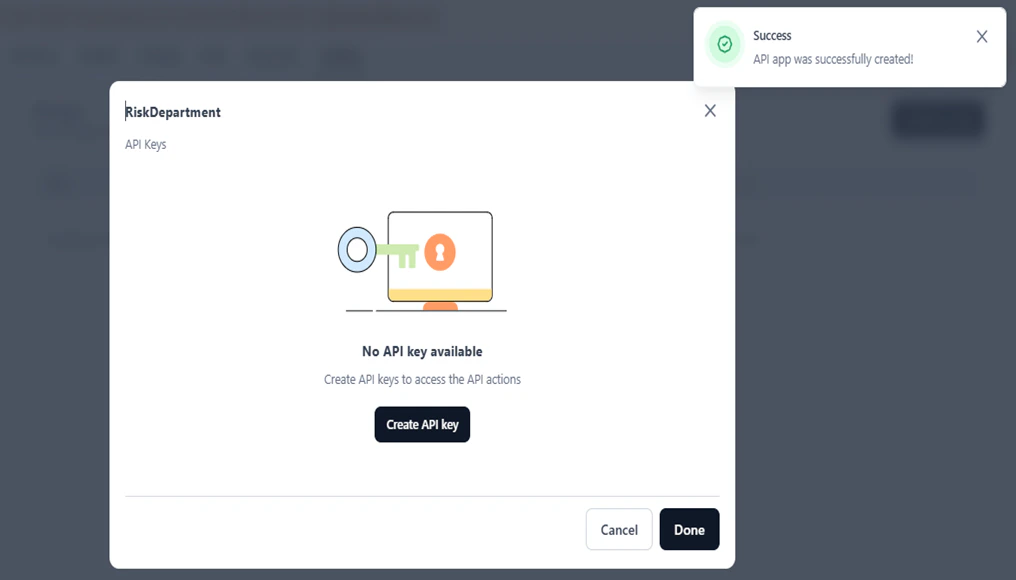
A success message is displayed, and the following window is displayed. Follow the steps in [Create an API Key](#create-an-api-key) to complete the process.
4. Click **Next**.
A success message is displayed, and the following window is displayed. Follow the steps in [Create an API Key](#create-an-api-key) to complete the process.
 #### Create an API Key
To complete the app creation, create an API key:
1. Click **Create API Key**.
2. In the **Create new API key** dialog, provide a name and click **Generate Key**.
#### Create an API Key
To complete the app creation, create an API key:
1. Click **Create API Key**.
2. In the **Create new API key** dialog, provide a name and click **Generate Key**.
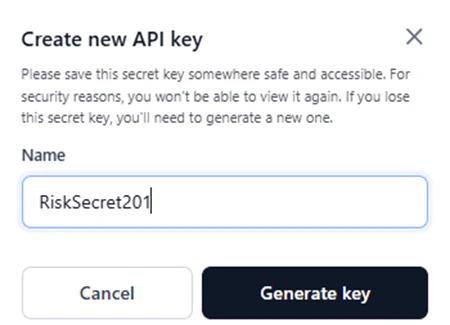 3. Once the key is successfully generated, click **Copy and Close** to copy the API key.
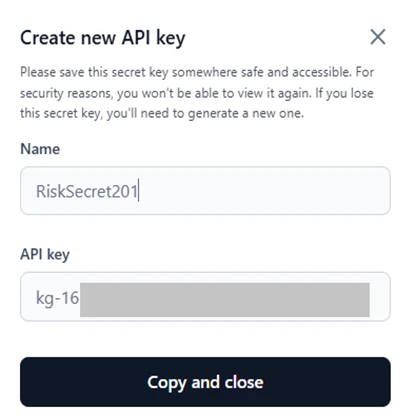 A success message is displayed once the key is copied.
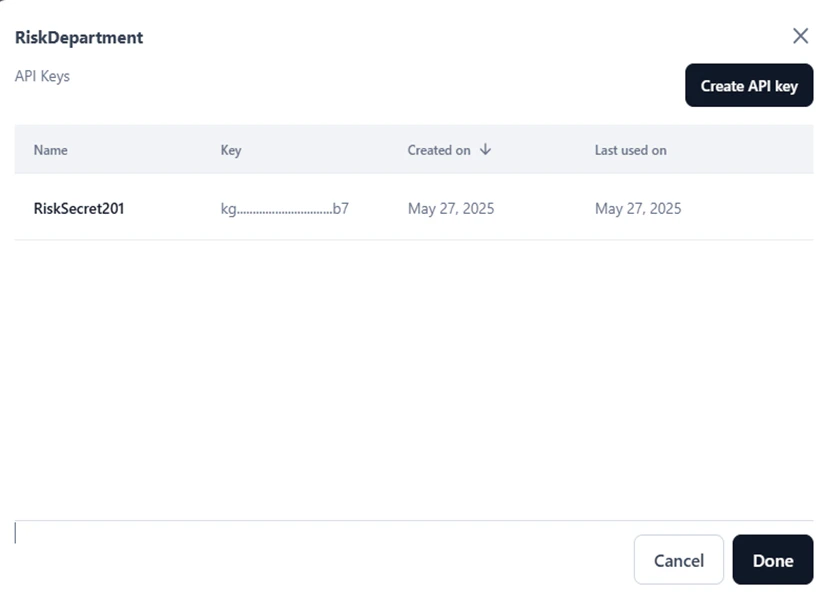 4. Click **Done**.
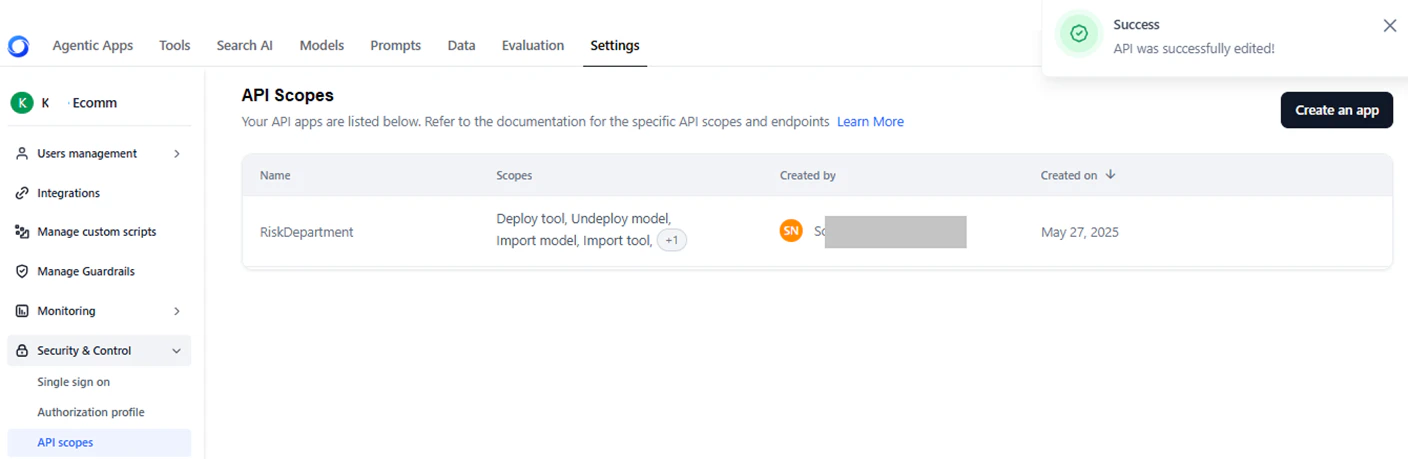
The app summary displays:
* **Name**: The API app name.
* **Scopes**: The selected API scopes.
* **Created by**: The name of the user who created the app.
* **Created on**: The date when the app was created.
4. Click **Done**.
The app summary displays:
* **Name**: The API app name.
* **Scopes**: The selected API scopes.
* **Created by**: The name of the user who created the app.
* **Created on**: The date when the app was created.
 ### Manage API Apps and Keys
You can edit or delete an API app, including its name and scopes. However, you cannot edit an API key; you can only delete it.
#### Edit App
To edit an API app:
1. Hover over and click the **Edit** icon for the required app.
### Manage API Apps and Keys
You can edit or delete an API app, including its name and scopes. However, you cannot edit an API key; you can only delete it.
#### Edit App
To edit an API app:
1. Hover over and click the **Edit** icon for the required app.
 2. In the App's configuration window, do the following:
* To change the app name, click and modify the title.
* To change the scopes, click the **API Scopes** tab and select/unselect the listed scopes.
2. In the App's configuration window, do the following:
* To change the app name, click and modify the title.
* To change the scopes, click the **API Scopes** tab and select/unselect the listed scopes.
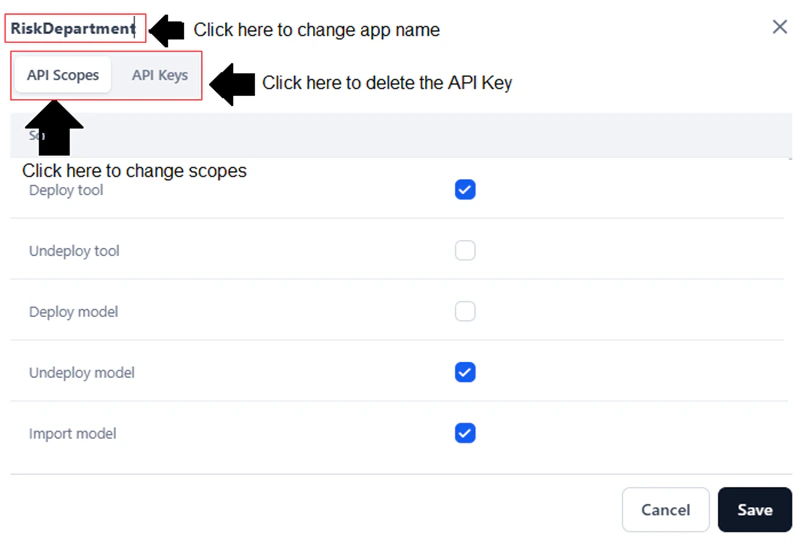 * To delete an API key, follow the steps below:
* Click the **API Keys** tab.
* Hover over and click the **Delete** icon for the required key.
* To delete an API key, follow the steps below:
* Click the **API Keys** tab.
* Hover over and click the **Delete** icon for the required key.
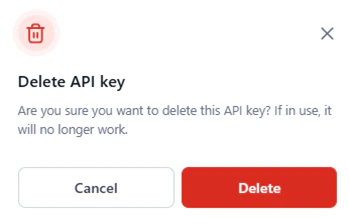
 * Click **Delete** in the confirmation window.
 #### Delete App
To delete an API app:
1. Hover over and click the **Delete** icon for the required app.
#### Delete App
To delete an API app:
1. Hover over and click the **Delete** icon for the required app.
 2. Click **Delete** in the confirmation window.
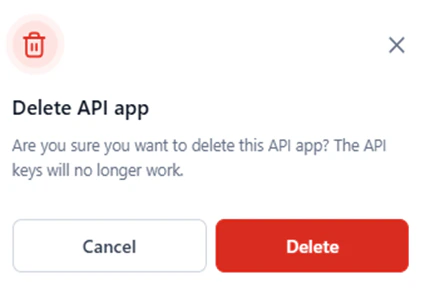 A success message is displayed, and the app is removed from the list.
***
## Authorization Profiles
AI for Process offers a secure and streamlined way to manage authorization when integrating with external web services. By configuring **Authorization (Auth) Profiles**, users can enforce access control policies while ensuring data privacy and regulatory compliance.
Whether connecting to external or commercial models via custom APIs or integrating workflows through the AI or API node, the platform provides a structured framework to handle user authorization. This simplifies security configurations, strengthens access control, and enables smooth identity verification across various services.
Key capabilities of managing Auth Profiles on AI for Process include:
* **Defining Authorization Rules**: Specify auth methods and requirements, such as passwords, token fields, and custom authorization parameters.
* **Securing Access**: Ensure only authorized users or systems can connect to external services, protecting sensitive data from unauthorized access.
* **Profile Reusability**: Reuse Auth Profiles across multiple integrations and endpoints for consistency, reduced configuration effort, and streamlined maintenance.
* **Connection Testing and Validation**: Verify that identity and authorization tokens are correctly passed to external services, ensuring the integration is secure and functional.
To access **Authorization Profiles**:
1. Log in → In AI for Process Modules top menu → Click **Settings**.
2. Click **Security & Control** > **Authorization profile** on the left navigation menu.
### Supported Auth Types
You can enable a single auth profile or create custom profiles tailored for accessing third-party web services. These profiles support the following authorization types:
#### OAuth V2
OAuth 2.0 (OAuth2) is a standard authorization framework that enables applications to obtain limited, secure, and token-based access to a user's account on an HTTP service, such as Google, Facebook, or GitHub without exposing the user's credentials. It supports multiple grant types, uses scopes for permissions, and enables long-term access with refresh tokens, making it ideal for API authentication.
**Key Features**
* **Secure, Token-Based Authorization** – Grants access without sharing user credentials, using short-lived access tokens.
* **Multiple Authorization Flows** – Supports different grant types (e.g., Authorization Code, Client Credentials) for various use cases.
* **Scope-Based Access Control** – Users can grant apps limited permissions (e.g., read-only access).
* **Refresh Token Support** – Enables seamless re-authorization without requiring user login.
* **Third-Party & Scalable Integration** – Widely adopted for API authentication, allowing secure third-party access (e.g., "*Sign in with Google*").
#### OAuth V2 Client Credentials
The Client Credentials flow is one of the OAuth 2.0 authorization grant types. It is primarily used in Machine-to-Machine (M2M) scenarios, where an application needs to access resources or perform operations on its own behalf — without user interaction.
**How it Works**
1. The client application authenticates with the Authorization Server by presenting its client ID and client secret.
2. Upon successful authentication, the Authorization Server issues an access token.
3. The client uses this token to authenticate API requests to the Resource Server.
**Key Features**
* **Client Credentials**: This flow uses the client's unique identifier (client ID) and a secret (client secret) to authenticate the application with the authorization server.
* **No User Interaction**: Unlike flows involving user authorization (e.g., authorization code flow), the client credentials flow doesn't require the user to log in or grant permissions.
* **Machine-to-Machine (M2M) Communication**: This flow is ideal for scenarios where one application needs to access resources owned by another application, such as microservices or server-to-server communication.
* **Resource Access**: The client uses the acquired access token to interact with the resource server and access protected resources.
* **Access Token**: The authorization server issues an access token, a short-lived credential that allows the client to access specific resources.
### Add an Authorization Profile
To add an auth profile:
1. Click **Create Authorization Profile** if this is your first auth profile.
A success message is displayed, and the app is removed from the list.
***
## Authorization Profiles
AI for Process offers a secure and streamlined way to manage authorization when integrating with external web services. By configuring **Authorization (Auth) Profiles**, users can enforce access control policies while ensuring data privacy and regulatory compliance.
Whether connecting to external or commercial models via custom APIs or integrating workflows through the AI or API node, the platform provides a structured framework to handle user authorization. This simplifies security configurations, strengthens access control, and enables smooth identity verification across various services.
Key capabilities of managing Auth Profiles on AI for Process include:
* **Defining Authorization Rules**: Specify auth methods and requirements, such as passwords, token fields, and custom authorization parameters.
* **Securing Access**: Ensure only authorized users or systems can connect to external services, protecting sensitive data from unauthorized access.
* **Profile Reusability**: Reuse Auth Profiles across multiple integrations and endpoints for consistency, reduced configuration effort, and streamlined maintenance.
* **Connection Testing and Validation**: Verify that identity and authorization tokens are correctly passed to external services, ensuring the integration is secure and functional.
To access **Authorization Profiles**:
1. Log in → In AI for Process Modules top menu → Click **Settings**.
2. Click **Security & Control** > **Authorization profile** on the left navigation menu.
### Supported Auth Types
You can enable a single auth profile or create custom profiles tailored for accessing third-party web services. These profiles support the following authorization types:
#### OAuth V2
OAuth 2.0 (OAuth2) is a standard authorization framework that enables applications to obtain limited, secure, and token-based access to a user's account on an HTTP service, such as Google, Facebook, or GitHub without exposing the user's credentials. It supports multiple grant types, uses scopes for permissions, and enables long-term access with refresh tokens, making it ideal for API authentication.
**Key Features**
* **Secure, Token-Based Authorization** – Grants access without sharing user credentials, using short-lived access tokens.
* **Multiple Authorization Flows** – Supports different grant types (e.g., Authorization Code, Client Credentials) for various use cases.
* **Scope-Based Access Control** – Users can grant apps limited permissions (e.g., read-only access).
* **Refresh Token Support** – Enables seamless re-authorization without requiring user login.
* **Third-Party & Scalable Integration** – Widely adopted for API authentication, allowing secure third-party access (e.g., "*Sign in with Google*").
#### OAuth V2 Client Credentials
The Client Credentials flow is one of the OAuth 2.0 authorization grant types. It is primarily used in Machine-to-Machine (M2M) scenarios, where an application needs to access resources or perform operations on its own behalf — without user interaction.
**How it Works**
1. The client application authenticates with the Authorization Server by presenting its client ID and client secret.
2. Upon successful authentication, the Authorization Server issues an access token.
3. The client uses this token to authenticate API requests to the Resource Server.
**Key Features**
* **Client Credentials**: This flow uses the client's unique identifier (client ID) and a secret (client secret) to authenticate the application with the authorization server.
* **No User Interaction**: Unlike flows involving user authorization (e.g., authorization code flow), the client credentials flow doesn't require the user to log in or grant permissions.
* **Machine-to-Machine (M2M) Communication**: This flow is ideal for scenarios where one application needs to access resources owned by another application, such as microservices or server-to-server communication.
* **Resource Access**: The client uses the acquired access token to interact with the resource server and access protected resources.
* **Access Token**: The authorization server issues an access token, a short-lived credential that allows the client to access specific resources.
### Add an Authorization Profile
To add an auth profile:
1. Click **Create Authorization Profile** if this is your first auth profile.
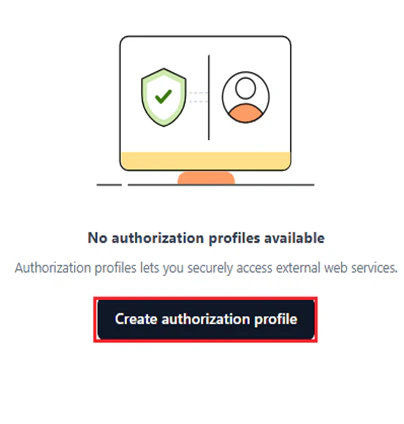 Otherwise, click **Add new auth**.
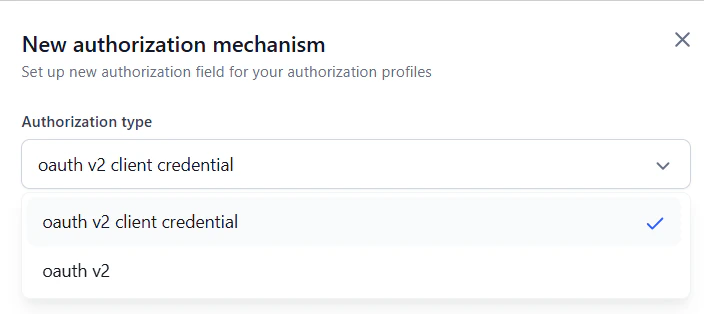
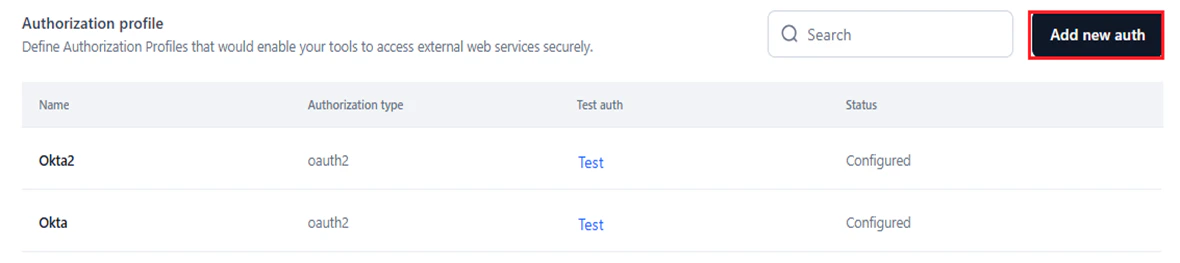 2. In the **New Authorization Mechanism** dialog, select the required option for **Authorization Type**.
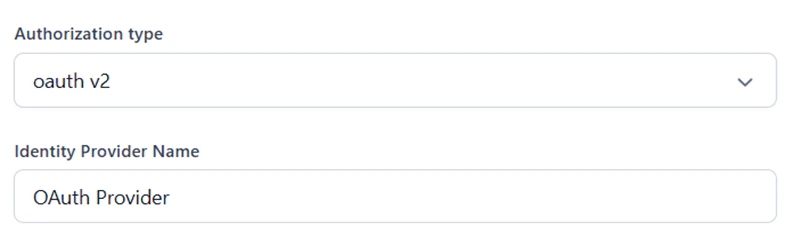
 3. In the **Identity Provider Name** field, enter a name for the authorization type, which is mandatory.
 4. Provide the values for the mandatory authorization fields. For details, refer to [Define Authorization Fields](#define-authorization-fields).
If the mandatory fields are left blank, validation error messages appear, as shown below.
4. Provide the values for the mandatory authorization fields. For details, refer to [Define Authorization Fields](#define-authorization-fields).
If the mandatory fields are left blank, validation error messages appear, as shown below.
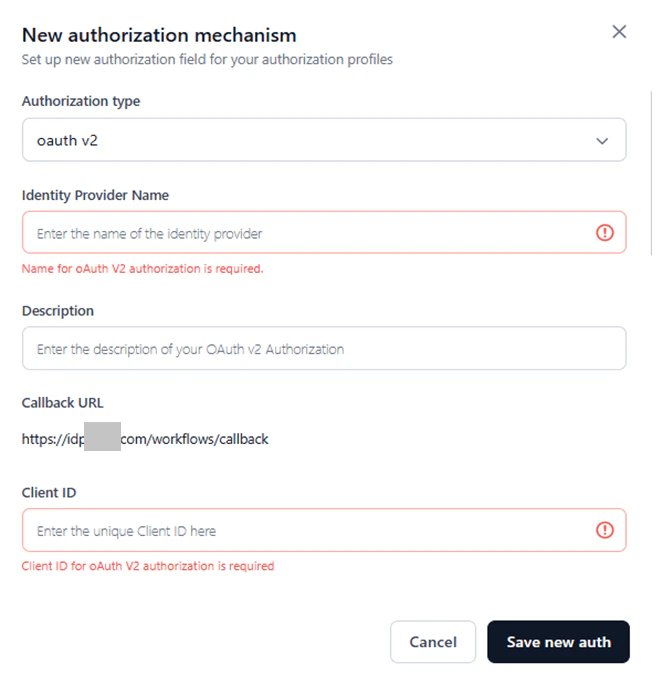 5. (Optional) Click **+ Add Additional Field** to add additional fields for authorization. See [Add Additional Fields](#add-additional-fields).
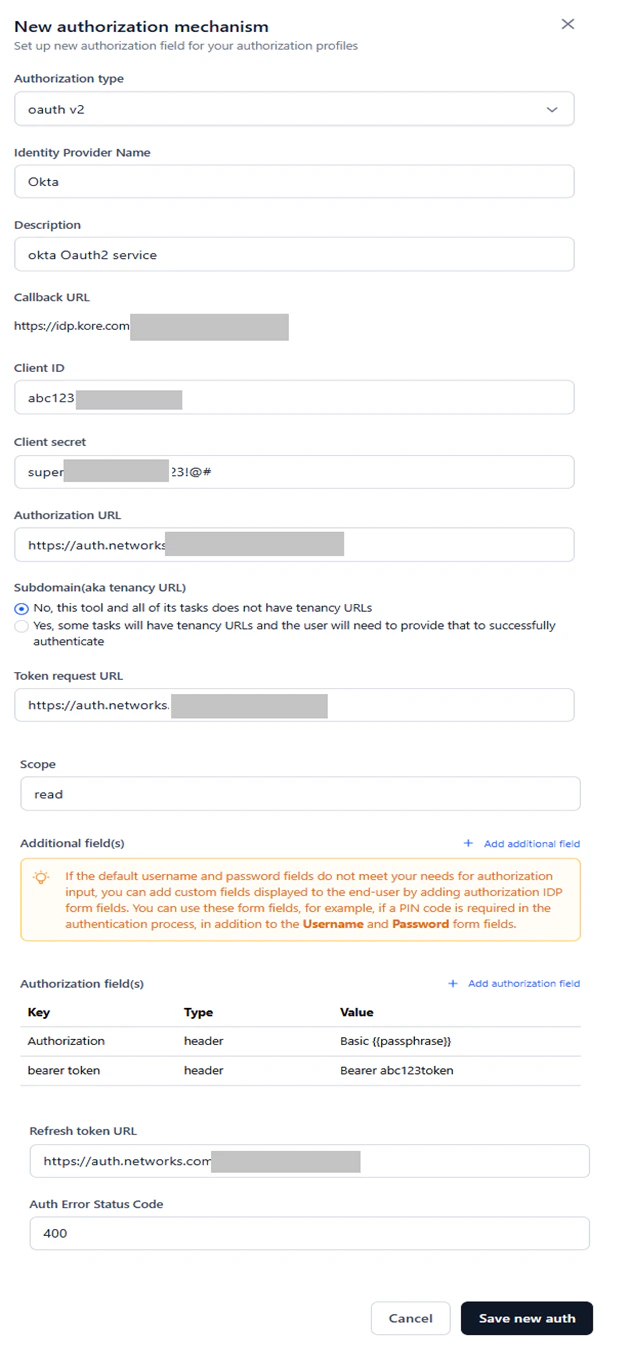 A success message is displayed, and the new auth profile is added to the **Authorization Profile** page.
#### Define Authorization Fields
Define the following fields to configure the OAuth2 profile:
A success message is displayed, and the new auth profile is added to the **Authorization Profile** page.
#### Define Authorization Fields
Define the following fields to configure the OAuth2 profile:
**Note**: When the **Refresh Token URL** or refresh token expires: The auth profile starts failing everywhere it is used. The user will receive an email to reconfigure a new URL or refresh token to ensure continuous and uninterrupted service. | Optional | OAuth V2 | | **Auth Error Status Code** | When authorization fails in OAuth 2.0, the server returns an HTTP status code along with an error message to indicate the issue. | Optional | OAuth V2 and OAuth V2 Client Credentials | #### Add Additional Fields Additional fields collect extra authorization details from end users — such as a PIN code or device ID — alongside standard *OAuth V2* credentials. Use them to align the authorization process with your security or compliance needs. To add additional fields: 1. Click **+ Add Additional Field** in the **New Authorization Mechanism** window and enter one or more key-value pairs.
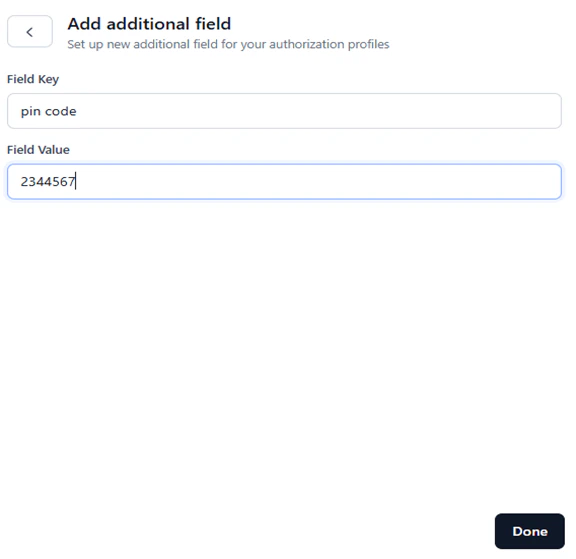
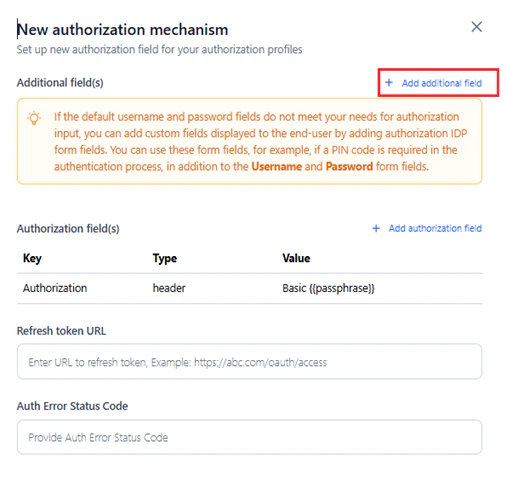 2. Add values for the following fields:
| Parameter | Description | Required/Optional | Example |
| --------------- | ----------------------------------- | ----------------- | -------- |
| **Field Key** | The name of the additional field. | Required | Pin code |
| **Field Value** | The value for the additional field. | Required | 2344567 |
3. Click **Done**.
2. Add values for the following fields:
| Parameter | Description | Required/Optional | Example |
| --------------- | ----------------------------------- | ----------------- | -------- |
| **Field Key** | The name of the additional field. | Required | Pin code |
| **Field Value** | The value for the additional field. | Required | 2344567 |
3. Click **Done**.
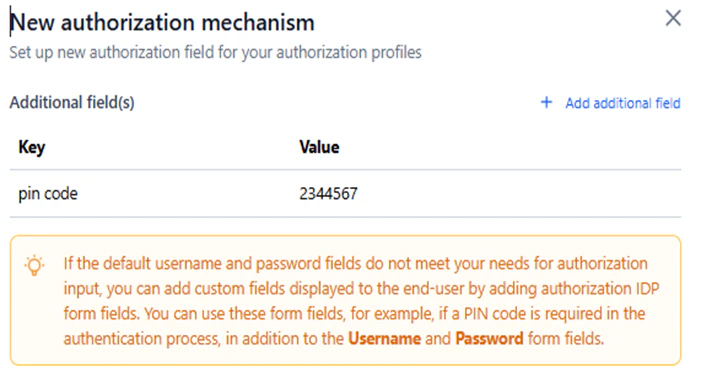
 The new field is added to the additional fields list. You can edit or delete this custom field.
 #### Add Authorization Fields
Authorization fields are data fields used in API requests to verify the identity of a user, system, or application and determine their permissions to access resources. These fields ensure authorization and access control in APIs, particularly for token-based authorization in AI for Process.
To add auth fields:
1. Click **+ Add Authorization Field** in the **New Authorization Mechanism** window and enter one or more key/value pairs.
#### Add Authorization Fields
Authorization fields are data fields used in API requests to verify the identity of a user, system, or application and determine their permissions to access resources. These fields ensure authorization and access control in APIs, particularly for token-based authorization in AI for Process.
To add auth fields:
1. Click **+ Add Authorization Field** in the **New Authorization Mechanism** window and enter one or more key/value pairs.
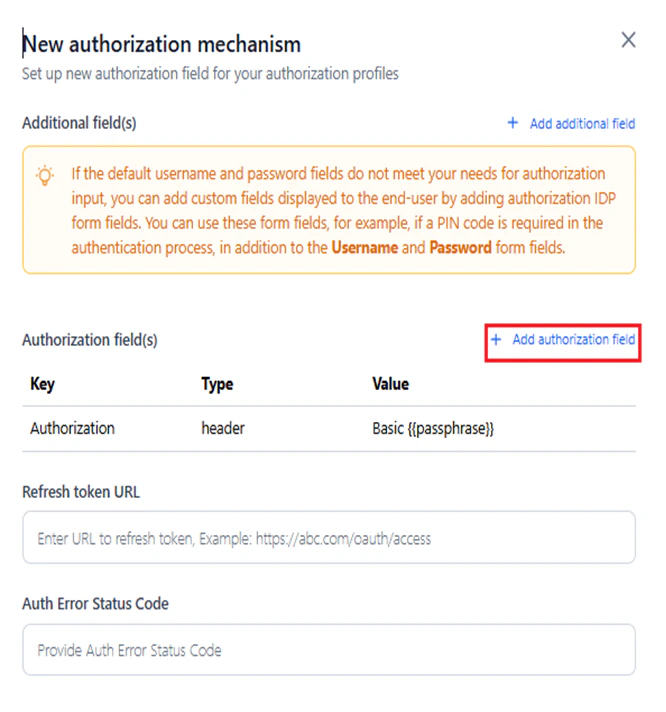 2. Add values for the following fields:
| Parameter | Description | Required/Optional |
| ----------- | ------------------------------------------------------------------------------------------------------------------------------------------------------------------------------------------------------------------------------------------------------------------------------------------------------------------------------------------------------------------------------------------------------------------------------------------------ | ----------------- |
| Field Type | Defines how authorization data is sent and verified in an API request within AI for Process for token-based authorization. The supported types include: **Header**: Used to send authorization credentials, such as API tokens. **Payload**: Used in `POST` or `PUT` requests, sending credentials in the request body. **Query String**: Credentials are passed in the URL. **Path Param**: Credentials or tokens are included in the URL path. | Required |
| Field Key | The name of the auth field. Example: *Profile\_id.* | Required |
| Field Value | The value of the auth field. Example: *123\_xyz*. | Optional |
3. Click **Done**.
2. Add values for the following fields:
| Parameter | Description | Required/Optional |
| ----------- | ------------------------------------------------------------------------------------------------------------------------------------------------------------------------------------------------------------------------------------------------------------------------------------------------------------------------------------------------------------------------------------------------------------------------------------------------ | ----------------- |
| Field Type | Defines how authorization data is sent and verified in an API request within AI for Process for token-based authorization. The supported types include: **Header**: Used to send authorization credentials, such as API tokens. **Payload**: Used in `POST` or `PUT` requests, sending credentials in the request body. **Query String**: Credentials are passed in the URL. **Path Param**: Credentials or tokens are included in the URL path. | Required |
| Field Key | The name of the auth field. Example: *Profile\_id.* | Required |
| Field Value | The value of the auth field. Example: *123\_xyz*. | Optional |
3. Click **Done**.
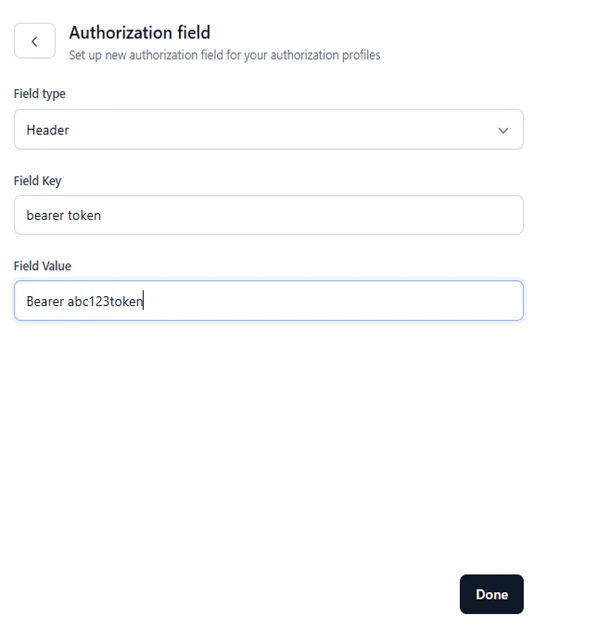 The new field is added to the Authorization Fields list. You can edit or delete this custom field.
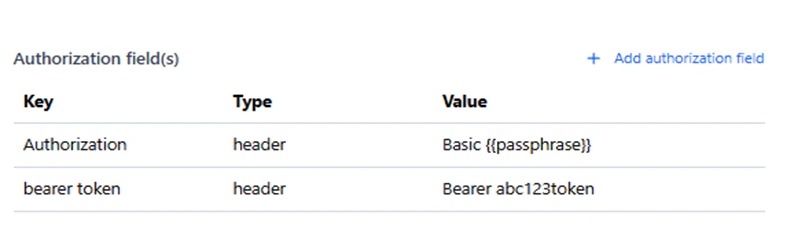 ### Authorization Profile Summary
The **Authorization Profile** window displays the following for each profile:
* **Name**: The name you provide to the Auth profile you create.
* **Authorization Type**: The method/type set for the Auth Profile. Currently, only **oauth v2** is available.
* **Test auth**: Click the **Test** button corresponding to a configured profile to check if it establishes a connection with an external service based on the configured profile.
* **Status**: Displays **Configured** or **Not Configured** based on the configuration status.
### Authorization Profile Summary
The **Authorization Profile** window displays the following for each profile:
* **Name**: The name you provide to the Auth profile you create.
* **Authorization Type**: The method/type set for the Auth Profile. Currently, only **oauth v2** is available.
* **Test auth**: Click the **Test** button corresponding to a configured profile to check if it establishes a connection with an external service based on the configured profile.
* **Status**: Displays **Configured** or **Not Configured** based on the configuration status.
 ### Test an Auth Profile
Once all fields are provided in the **New authorization mechanism** window, click **Test** to validate the connection. AI for Process attempts to connect to the external service through the configured auth profile.
A successful connection is shown below:
### Test an Auth Profile
Once all fields are provided in the **New authorization mechanism** window, click **Test** to validate the connection. AI for Process attempts to connect to the external service through the configured auth profile.
A successful connection is shown below:
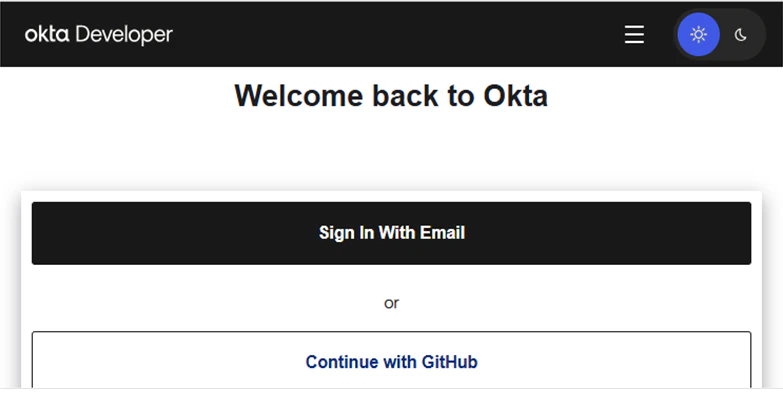 If the connection fails, edit the auth profile with the correct information and test the connection again.
### Manage Auth Profiles
Edit or delete a configured auth profile as needed.
#### Edit
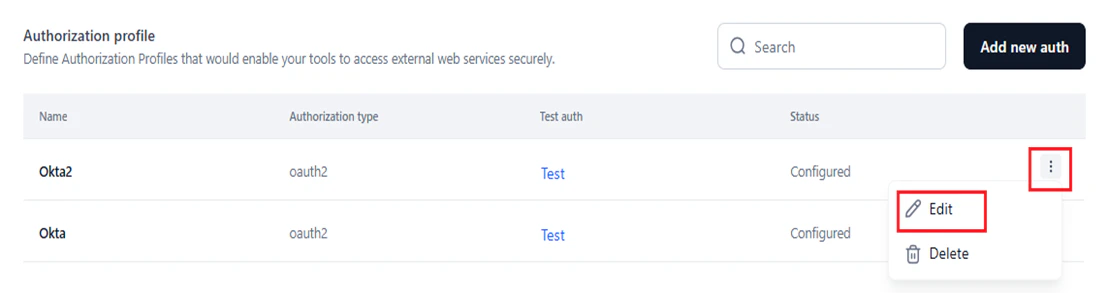
1. Click the **Ellipses** icon for an Auth profile on the **Authorization Profile** page.
2. Click **Edit**.
If the connection fails, edit the auth profile with the correct information and test the connection again.
### Manage Auth Profiles
Edit or delete a configured auth profile as needed.
#### Edit
1. Click the **Ellipses** icon for an Auth profile on the **Authorization Profile** page.
2. Click **Edit**.
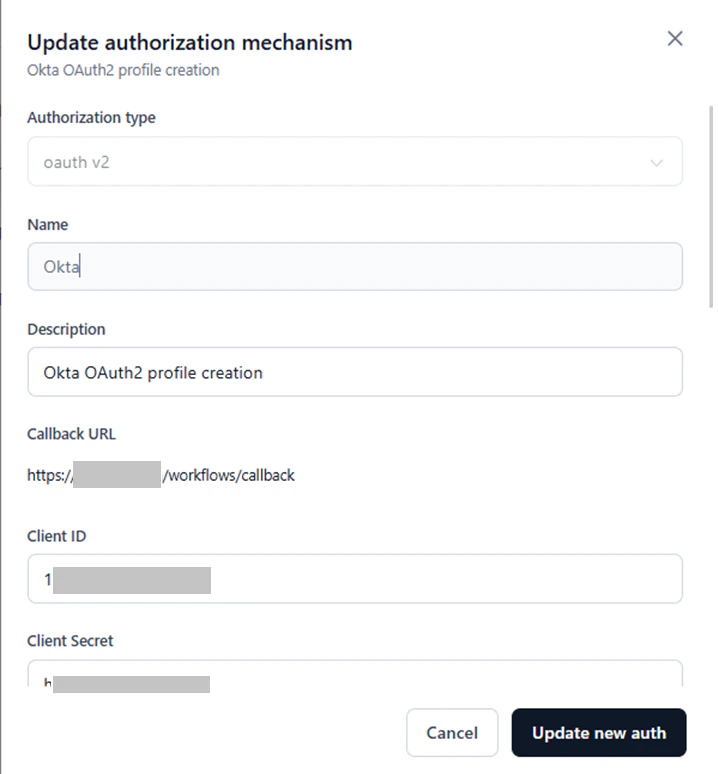
 3. Modify the required fields in the **Update authorization mechanism** window.
4. Click **Update new auth**.
3. Modify the required fields in the **Update authorization mechanism** window.
4. Click **Update new auth**.
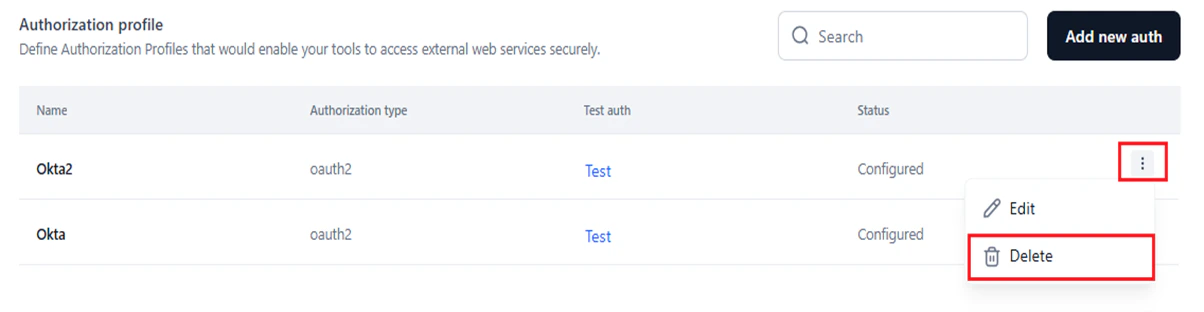 2. Click **Delete** in the following window.
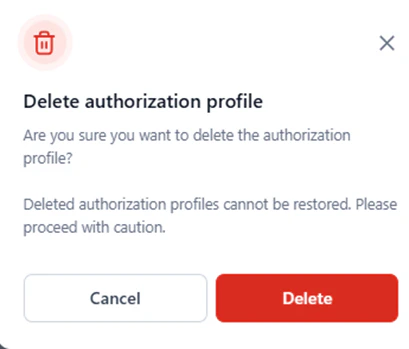 A success message is displayed, and the profile is removed from the **Authorization profile** page.
2. Click **Manage Custom Scripts** in the left menu.
### Import and Deploy a Custom Script
A success message is displayed, and the profile is removed from the **Authorization profile** page.
2. Click **Manage Custom Scripts** in the left menu.
### Import and Deploy a Custom Script
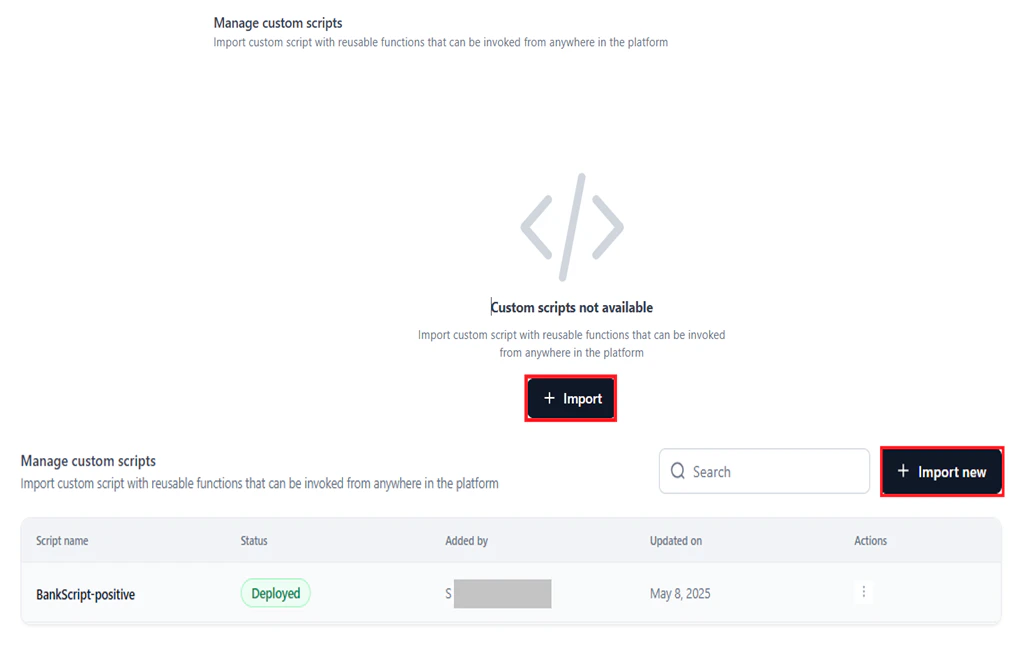 3. Follow [Step 1: General Details](#step-1-general-details) through [Step 4: Review and Deploy](#step-4-review-and-deploy).
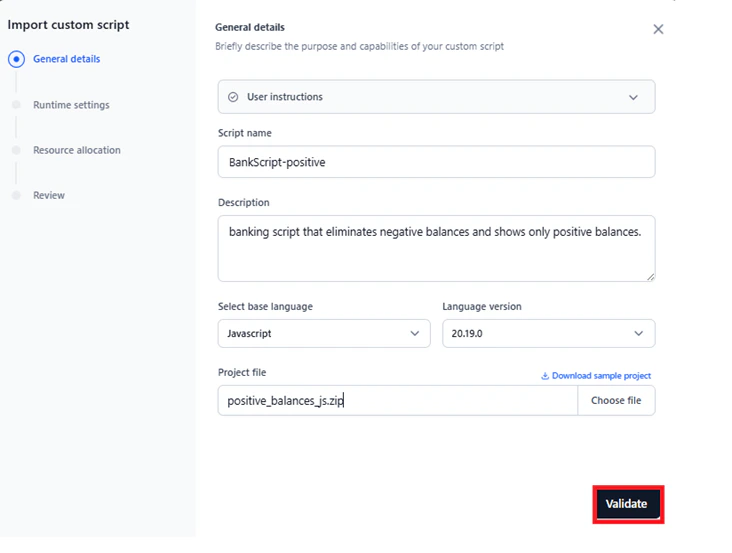
#### Step 1: General Details
1. Enter a **Script name**.
2. Enter a **Description** to define the purpose and capabilities of the script.
3. Select the **Base Language** and **Language Version**. Supported options: **JavaScript 20.19.0** and **Python 3.10.15**. The default version is auto-selected when you pick a language.
4. Under **Project File**, click **Choose File** and select a file from your local system. The supported file formats are `.zip`, `.gz`, and `.tar` and the maximum permitted file size is 1 GB.
5. Click **Validate** to check the file for errors.
3. Follow [Step 1: General Details](#step-1-general-details) through [Step 4: Review and Deploy](#step-4-review-and-deploy).
#### Step 1: General Details
1. Enter a **Script name**.
2. Enter a **Description** to define the purpose and capabilities of the script.
3. Select the **Base Language** and **Language Version**. Supported options: **JavaScript 20.19.0** and **Python 3.10.15**. The default version is auto-selected when you pick a language.
4. Under **Project File**, click **Choose File** and select a file from your local system. The supported file formats are `.zip`, `.gz`, and `.tar` and the maximum permitted file size is 1 GB.
5. Click **Validate** to check the file for errors.

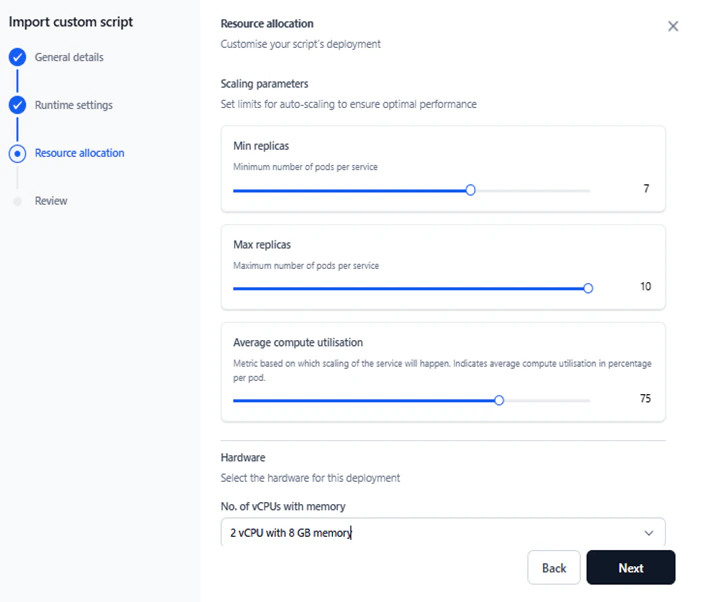
 #### Step 3: Resource Allocation
Define scaling parameters and hardware requirements to ensure the script performs optimally under varying loads.
1. Set the following **Scaling parameters**:
* **Min Replicas** and **Max Replicas**: Minimum and maximum number of pods per service to handle increased load. Allowed range: 1–10. Default: 1. Min Replicas must be less than or equal to Max Replicas.
* **Average Compute Utilization**: The metric used to trigger auto-scaling, expressed as average compute utilization (%) per pod. Default: 75. Allowed range: 1–100. This setting is disabled when Min and Max Replicas are equal.
2. Select the **hardware profile** for the deployment. The unit is number of vCPUs with memory. Profiles are virtualized for standardization.
| Hardware configuration | Actual CPU and memory | Credits per hour |
| ------------------------ | ---------------------------- | ---------------- |
| 1 vCPU with 2GB memory | 0.7 vCPUs with 1.1GB memory | 0.07698 |
| 2 vCPUs with 4GB memory | 1.5 vCPUs with 2.5GB memory | 0.15396 |
| 2 vCPUs with 8GB memory | 1.5 vCPUs with 6.5GB memory | 0.144 |
| 4 vCPUs with 8GB memory | 3.5 vCPUs with 6GB memory | 0.30792 |
| 4 vCPUs with 16GB memory | 3.5 vCPUs with 13.5GB memory | 0.288 |
3. Click **Next**.
#### Step 3: Resource Allocation
Define scaling parameters and hardware requirements to ensure the script performs optimally under varying loads.
1. Set the following **Scaling parameters**:
* **Min Replicas** and **Max Replicas**: Minimum and maximum number of pods per service to handle increased load. Allowed range: 1–10. Default: 1. Min Replicas must be less than or equal to Max Replicas.
* **Average Compute Utilization**: The metric used to trigger auto-scaling, expressed as average compute utilization (%) per pod. Default: 75. Allowed range: 1–100. This setting is disabled when Min and Max Replicas are equal.
2. Select the **hardware profile** for the deployment. The unit is number of vCPUs with memory. Profiles are virtualized for standardization.
| Hardware configuration | Actual CPU and memory | Credits per hour |
| ------------------------ | ---------------------------- | ---------------- |
| 1 vCPU with 2GB memory | 0.7 vCPUs with 1.1GB memory | 0.07698 |
| 2 vCPUs with 4GB memory | 1.5 vCPUs with 2.5GB memory | 0.15396 |
| 2 vCPUs with 8GB memory | 1.5 vCPUs with 6.5GB memory | 0.144 |
| 4 vCPUs with 8GB memory | 3.5 vCPUs with 6GB memory | 0.30792 |
| 4 vCPUs with 16GB memory | 3.5 vCPUs with 13.5GB memory | 0.288 |
3. Click **Next**.
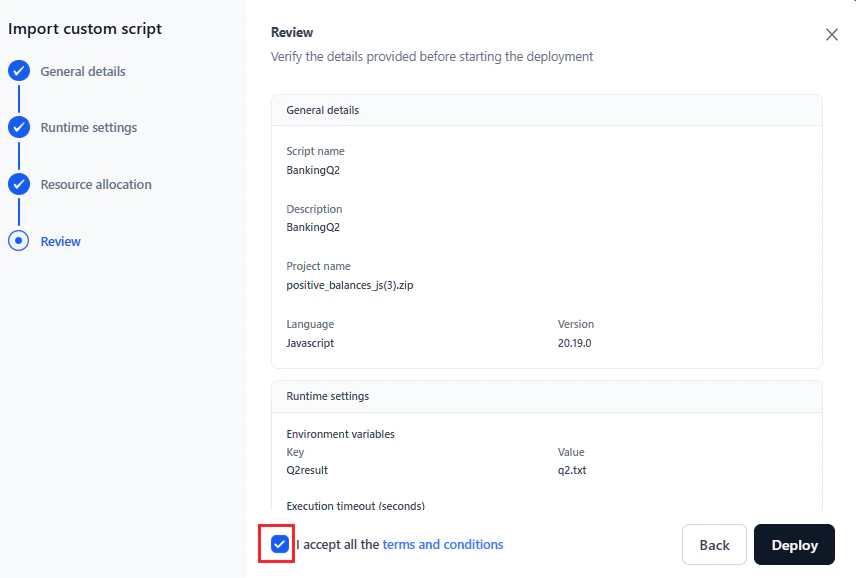
 #### Step 4: Review and Deploy
1. Review the [General Details](#step-1-general-details), [Runtime Settings](#step-2-runtime-settings), and [Resource Allocation](#step-3-resource-allocation) sections. Click any section to return and modify values.
2. Read the **Terms and Conditions** and select **Accept** to enable deployment.
3. Click **Deploy**.
#### Step 4: Review and Deploy
1. Review the [General Details](#step-1-general-details), [Runtime Settings](#step-2-runtime-settings), and [Resource Allocation](#step-3-resource-allocation) sections. Click any section to return and modify values.
2. Read the **Terms and Conditions** and select **Accept** to enable deployment.
3. Click **Deploy**.
 Optionally, click **Save as Draft** to save the configuration and deploy later. The script is saved with the *Draft* status.
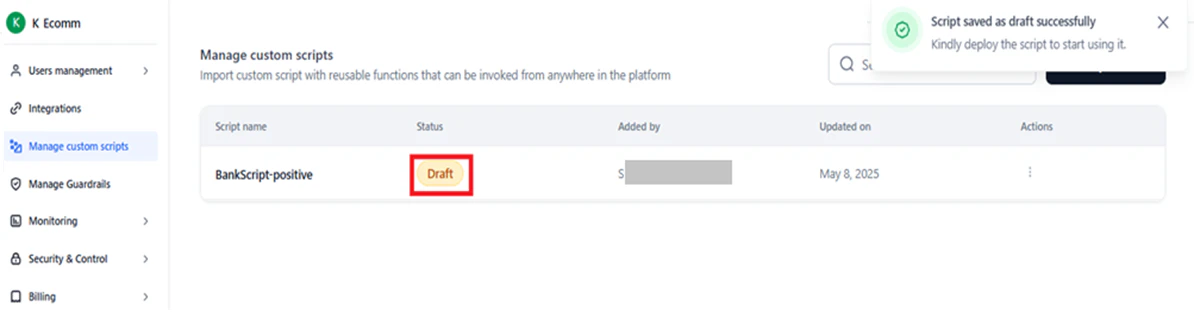 The deployment status changes to *Deploying* while the script is being deployed.
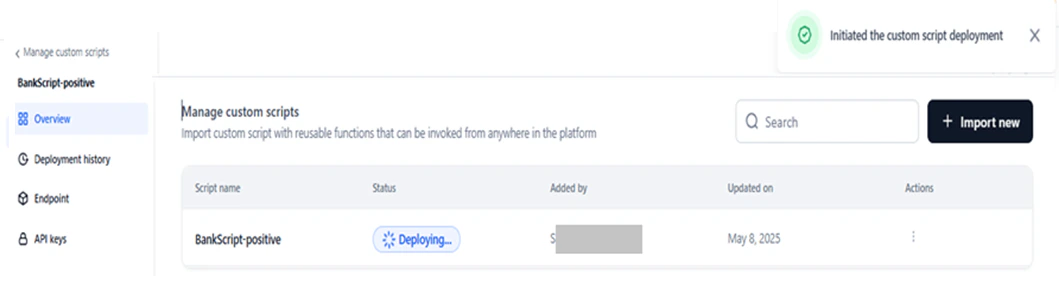 Once deployed, the status changes to *Deployed* and a success message is displayed.
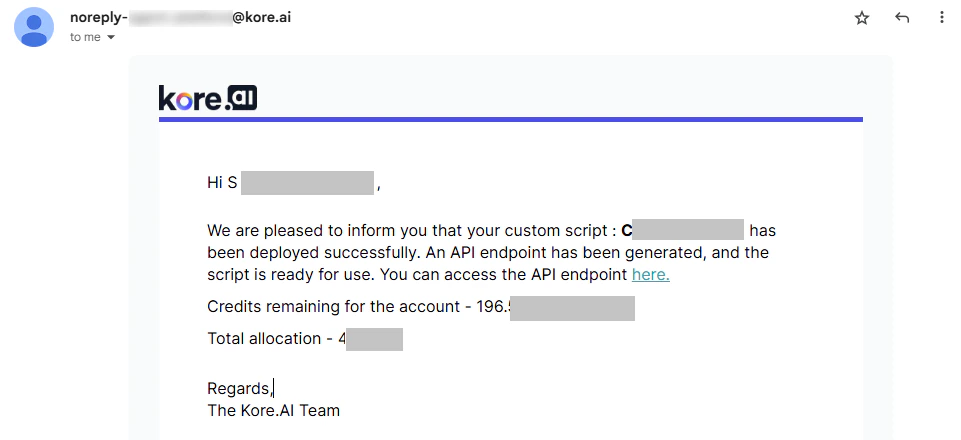
#### Email Notification
After successful deployment, a confirmation email with the subject "*Custom script deployed successfully - API Endpoint Available*" is sent to the admin. The email shows credits remaining and total allocation for the account.
Once deployed, the status changes to *Deployed* and a success message is displayed.
#### Email Notification
After successful deployment, a confirmation email with the subject "*Custom script deployed successfully - API Endpoint Available*" is sent to the admin. The email shows credits remaining and total allocation for the account.
 ### View Deployed Scripts and Statuses
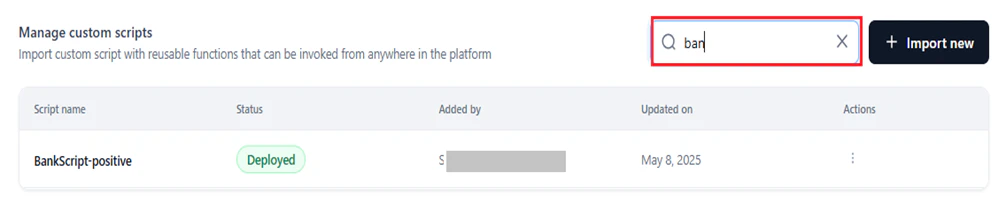
The **Manage Custom Scripts** page lists all scripts and their statuses once a script is deployed or saved as a draft.
* **Search**: Enter the script name in the **Search** field to filter the list.
### View Deployed Scripts and Statuses
The **Manage Custom Scripts** page lists all scripts and their statuses once a script is deployed or saved as a draft.
* **Search**: Enter the script name in the **Search** field to filter the list.
 The summary table displays the following fields:
* **Script Name**: The name assigned during import.
* **Status**: The current deployment status.
The summary table displays the following fields:
* **Script Name**: The name assigned during import.
* **Status**: The current deployment status.
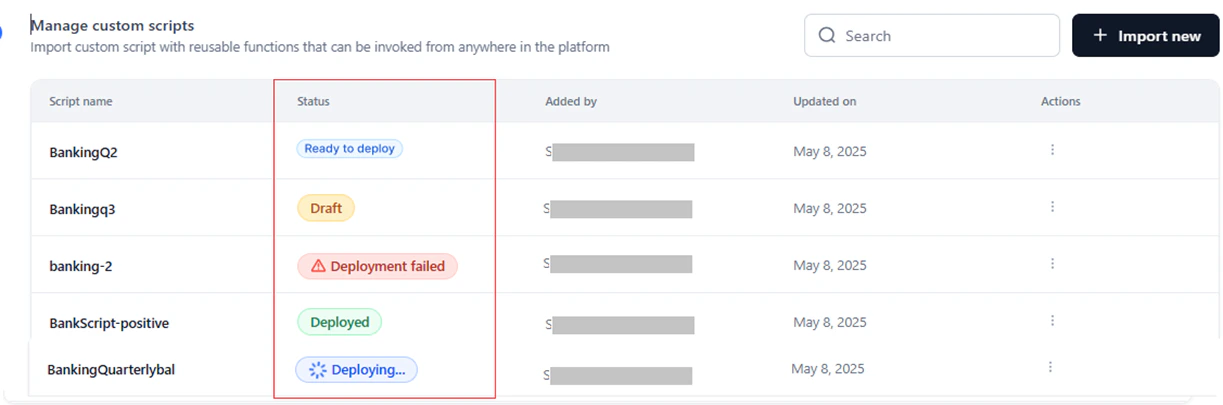 * **Added by**: The user who added the script.
* **Updated on**: The timestamp of the last action (deploy, redeploy, or undeploy).
* **Action**: Actions available based on the script's status — undeploy, delete, or export.
#### Script Deployment Statuses
The table below lists all statuses and the actions available on each script management page.
| Status | Description | Overview | Deployment History | Endpoint | API Keys | Redeploy |
| --------------------- | ----------------------------------------------------------------------------------------------------------------- | -------------------------- | -------------------------------------------------------------------------------------- | ------------------------------------------------------------------------ | -------------------------------- | -------- |
| **Draft** | Draft copy of the script. Can be modified and deployed later. | Export, Delete, Deploy | Deploy Custom Script | Deploy Custom Script | Create a New API Key | No |
| **Deploying** | Script is being deployed. A success message appears on completion; a failure message appears if deployment fails. | Export, Delete | Rename deployment version | Endpoint not activated | Create API keys | No |
| **Ready to Deploy** | Script is configured and ready to deploy. | Export, Delete, Deploy | Rename deployment version | Endpoint not activated | Create API keys | Yes |
| **Deployed** | Script is successfully deployed. | Redeploy, Undeploy, Export | View configuration and deployment details; rename deployment version | Redeploy script; view endpoint code (cURL, JS, Python); copy script code | Create API keys; manage API keys | Yes |
| **Deployment Failed** | Script deployment failed. | Deploy, Delete, Export | View configuration and deployment details (except duration); rename deployment version | Endpoint not activated | Create API keys | Yes |
* **Added by**: The user who added the script.
* **Updated on**: The timestamp of the last action (deploy, redeploy, or undeploy).
* **Action**: Actions available based on the script's status — undeploy, delete, or export.
#### Script Deployment Statuses
The table below lists all statuses and the actions available on each script management page.
| Status | Description | Overview | Deployment History | Endpoint | API Keys | Redeploy |
| --------------------- | ----------------------------------------------------------------------------------------------------------------- | -------------------------- | -------------------------------------------------------------------------------------- | ------------------------------------------------------------------------ | -------------------------------- | -------- |
| **Draft** | Draft copy of the script. Can be modified and deployed later. | Export, Delete, Deploy | Deploy Custom Script | Deploy Custom Script | Create a New API Key | No |
| **Deploying** | Script is being deployed. A success message appears on completion; a failure message appears if deployment fails. | Export, Delete | Rename deployment version | Endpoint not activated | Create API keys | No |
| **Ready to Deploy** | Script is configured and ready to deploy. | Export, Delete, Deploy | Rename deployment version | Endpoint not activated | Create API keys | Yes |
| **Deployed** | Script is successfully deployed. | Redeploy, Undeploy, Export | View configuration and deployment details; rename deployment version | Redeploy script; view endpoint code (cURL, JS, Python); copy script code | Create API keys; manage API keys | Yes |
| **Deployment Failed** | Script deployment failed. | Deploy, Delete, Export | View configuration and deployment details (except duration); rename deployment version | Endpoint not activated | Create API keys | Yes |

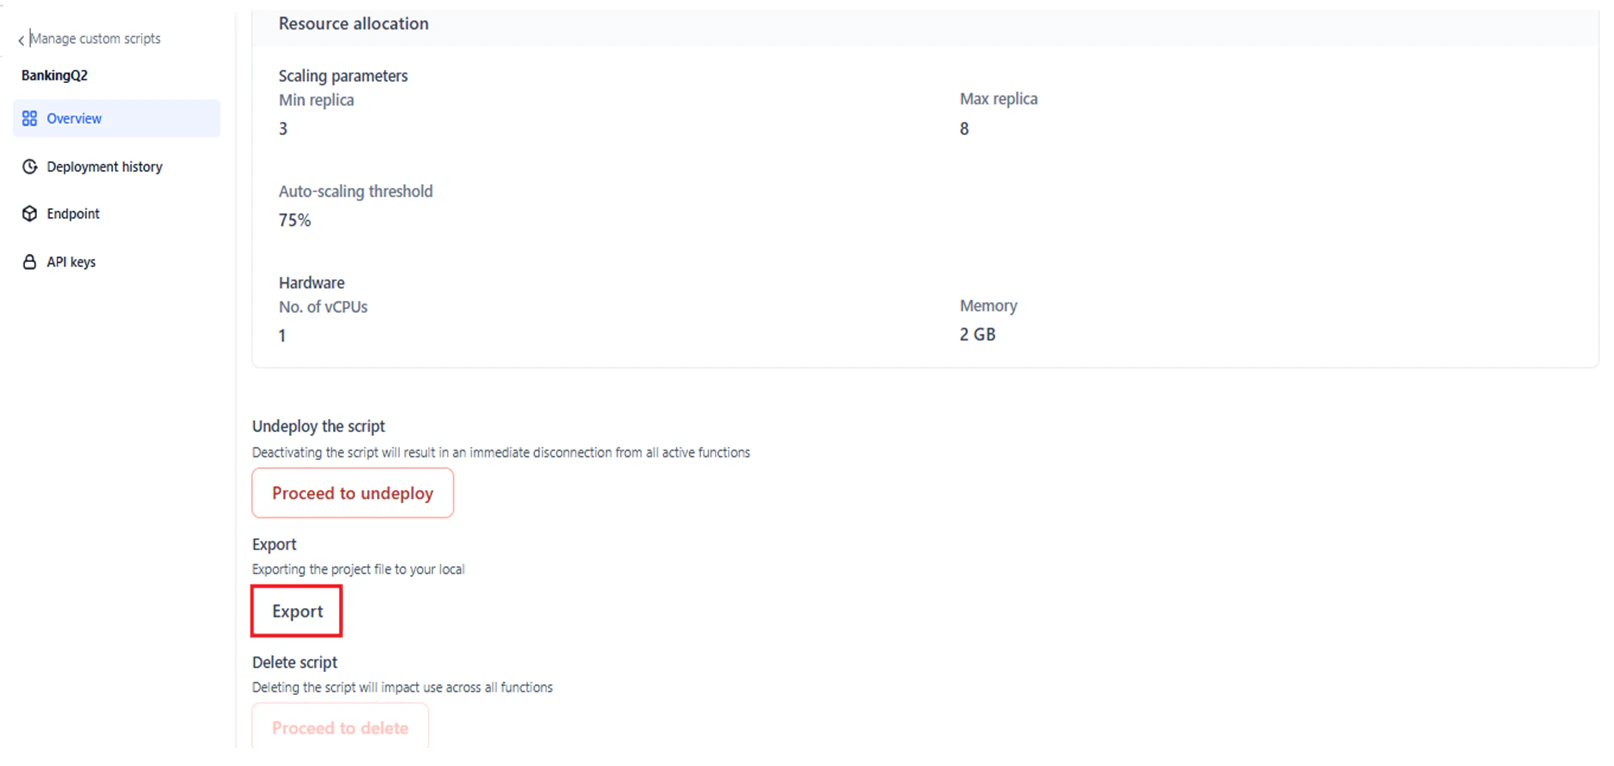
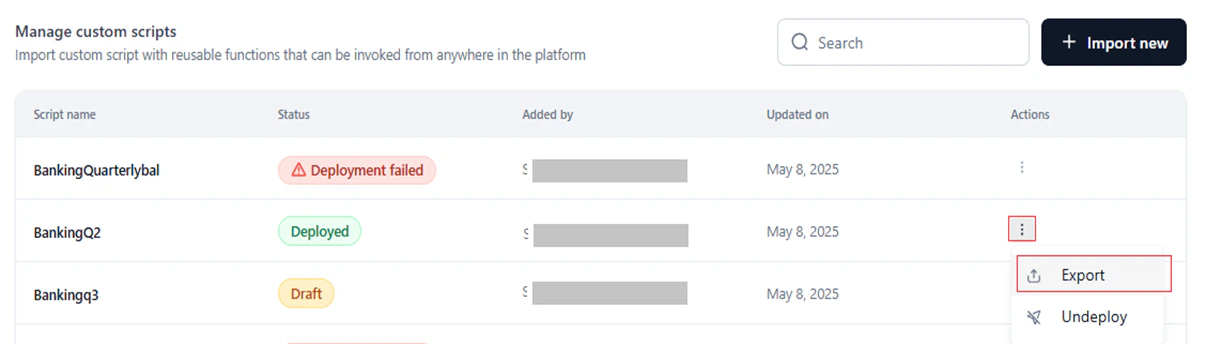 Alternatively, click the script entry and select **Export** on the **Overview** page.
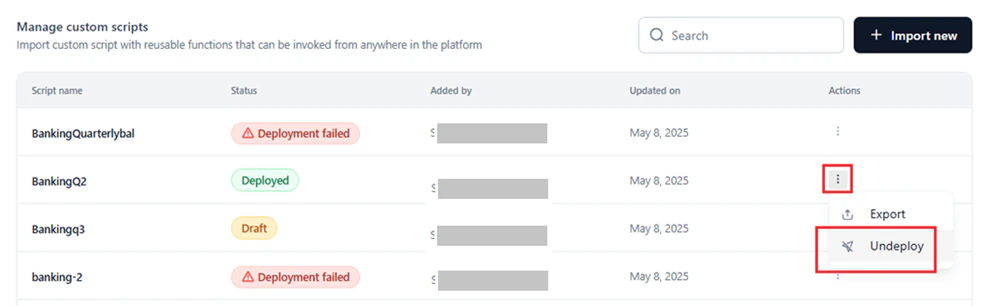 Alternatively, click the script entry and select **Proceed to Undeploy** on the **Overview** page.
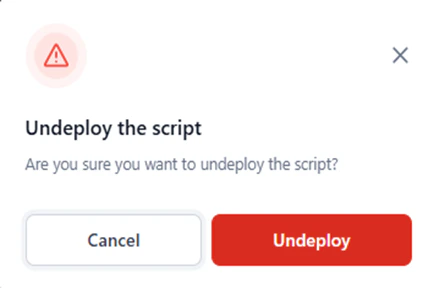
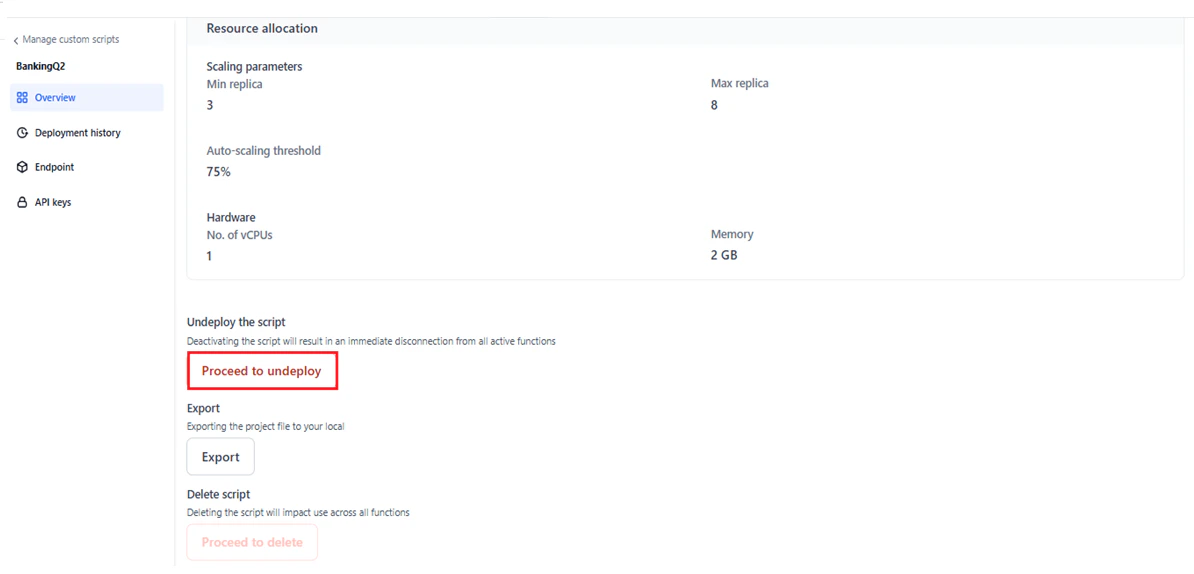 2. Click **Undeploy** in the confirmation window.
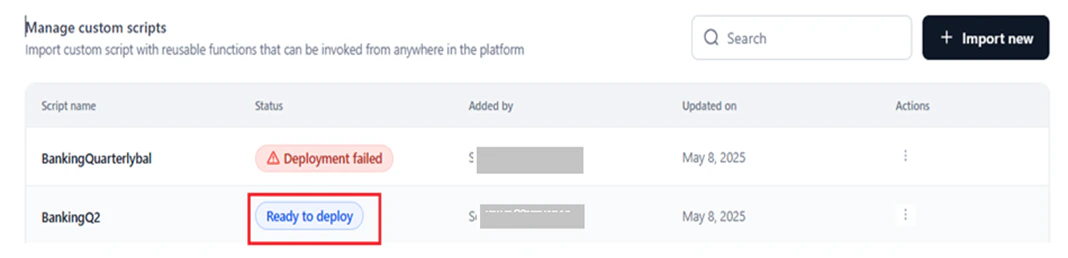
 The script status changes to **Ready to Deploy**.
 For undeploy availability by status, see the [Script Deployment Statuses](#script-deployment-statuses) table.
#### Email Notification
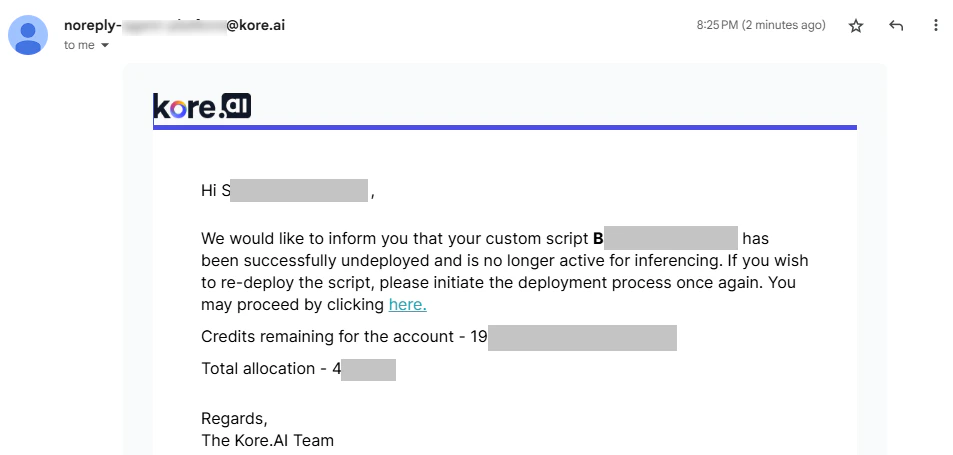
After a successful undeploy, a confirmation email with the subject "*Your custom script has been undeployed successfully*" is sent to the admin. The email shows credits remaining and total allocation for the account.
For undeploy availability by status, see the [Script Deployment Statuses](#script-deployment-statuses) table.
#### Email Notification
After a successful undeploy, a confirmation email with the subject "*Your custom script has been undeployed successfully*" is sent to the admin. The email shows credits remaining and total allocation for the account.
 ### Delete a Script
Permanently deletes a script, including its configurations and definitions, from the system.
### Delete a Script
Permanently deletes a script, including its configurations and definitions, from the system.
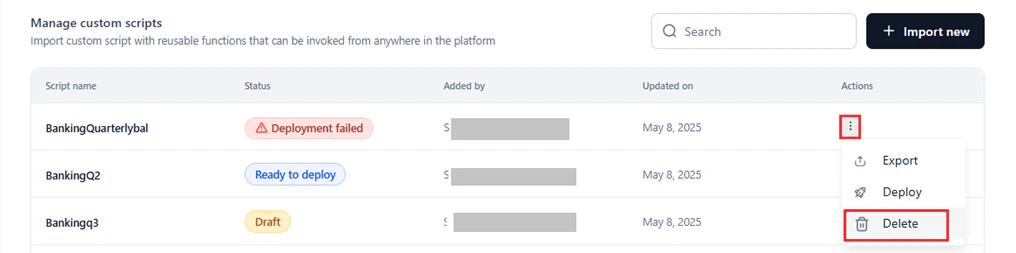 Alternatively, click the script entry and select **Proceed to Delete** on the **Overview** page.
 2. Click **Delete** in the confirmation window.
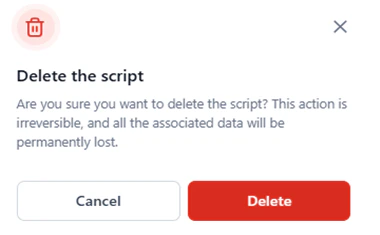 A success message is displayed and the script is permanently removed.
For delete availability by status, see the [Script Deployment Statuses](#script-deployment-statuses) table.
### Redeploy a Script
Redeployment lets you update a script's description, project file, runtime settings, and resource allocation. You cannot change the script name, base language, or version number during redeployment. Redeploy is only available for scripts with the **Deployed** status.
To redeploy a script:
1. Click the script with the **Deployed** status on the **Manage Custom Scripts** page.
2. Click **Re-deploy** on the **Overview** page.
A success message is displayed and the script is permanently removed.
For delete availability by status, see the [Script Deployment Statuses](#script-deployment-statuses) table.
### Redeploy a Script
Redeployment lets you update a script's description, project file, runtime settings, and resource allocation. You cannot change the script name, base language, or version number during redeployment. Redeploy is only available for scripts with the **Deployed** status.
To redeploy a script:
1. Click the script with the **Deployed** status on the **Manage Custom Scripts** page.
2. Click **Re-deploy** on the **Overview** page.
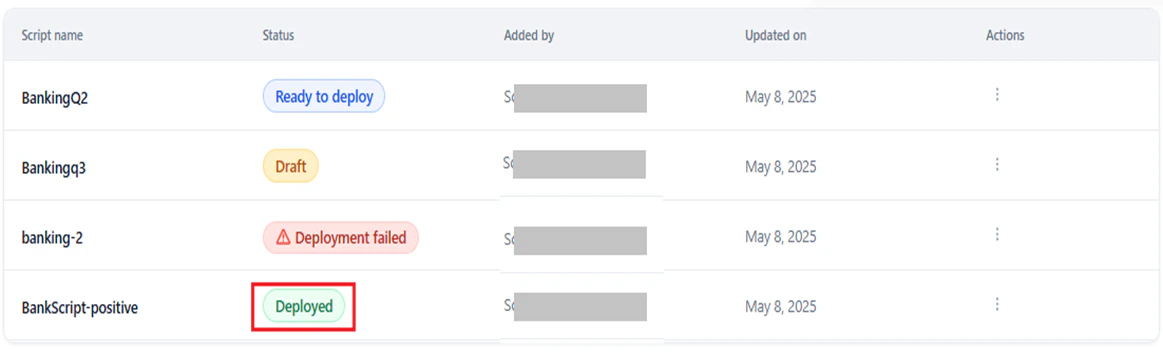
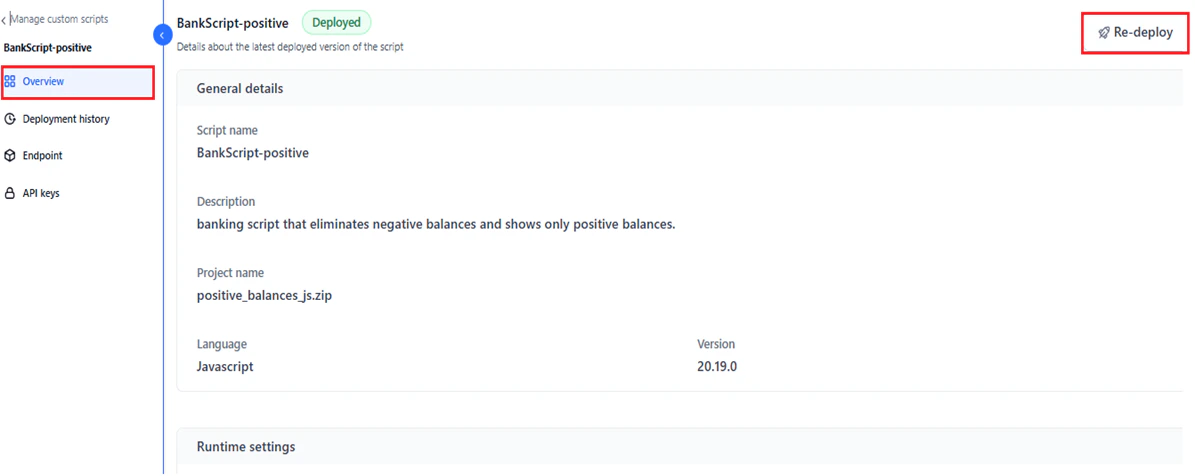 3. The import wizard opens with the existing configuration. Update the required fields.
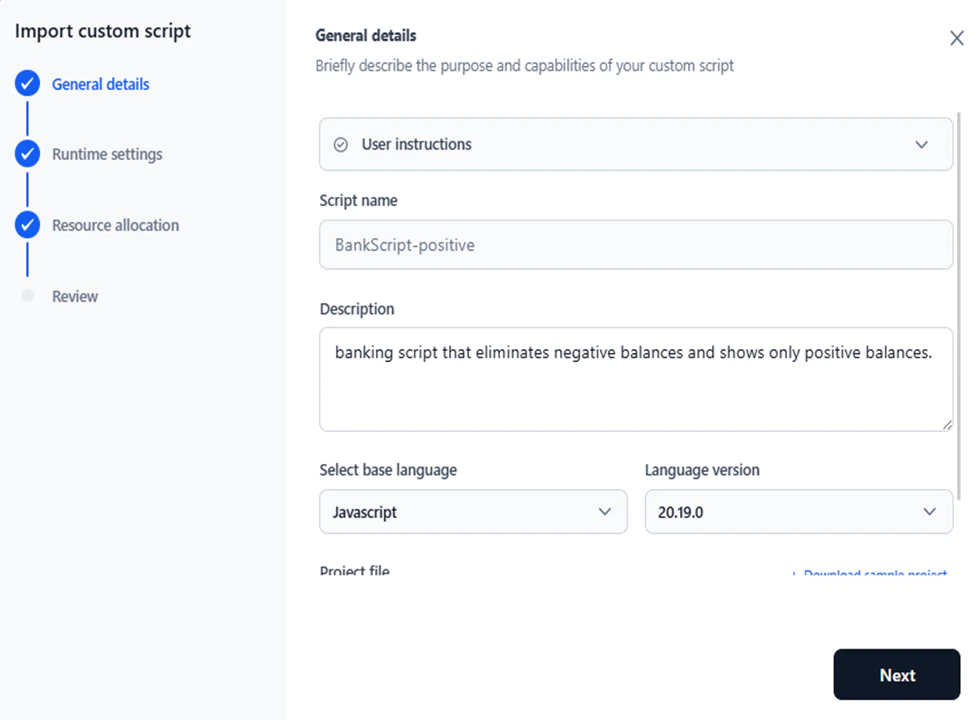 After redeployment, the **Overview** page is updated with the latest deployment information.
### Script Overview
The **Overview** page shows the configuration details of the latest deployed version of a script. To open it, click any script entry on the **Manage Custom Scripts** page.
The page is available for all script statuses and displays:
* Script name and assigned status.
* [General Details](#step-1-general-details) configuration.
* [Runtime Settings](#step-2-runtime-settings) configuration.
* [Resource Allocation](#step-3-resource-allocation) configuration.
Available actions depend on the script's status. See the [Script Deployment Statuses](#script-deployment-statuses) table.
After redeployment, the **Overview** page is updated with the latest deployment information.
### Script Overview
The **Overview** page shows the configuration details of the latest deployed version of a script. To open it, click any script entry on the **Manage Custom Scripts** page.
The page is available for all script statuses and displays:
* Script name and assigned status.
* [General Details](#step-1-general-details) configuration.
* [Runtime Settings](#step-2-runtime-settings) configuration.
* [Resource Allocation](#step-3-resource-allocation) configuration.
Available actions depend on the script's status. See the [Script Deployment Statuses](#script-deployment-statuses) table.
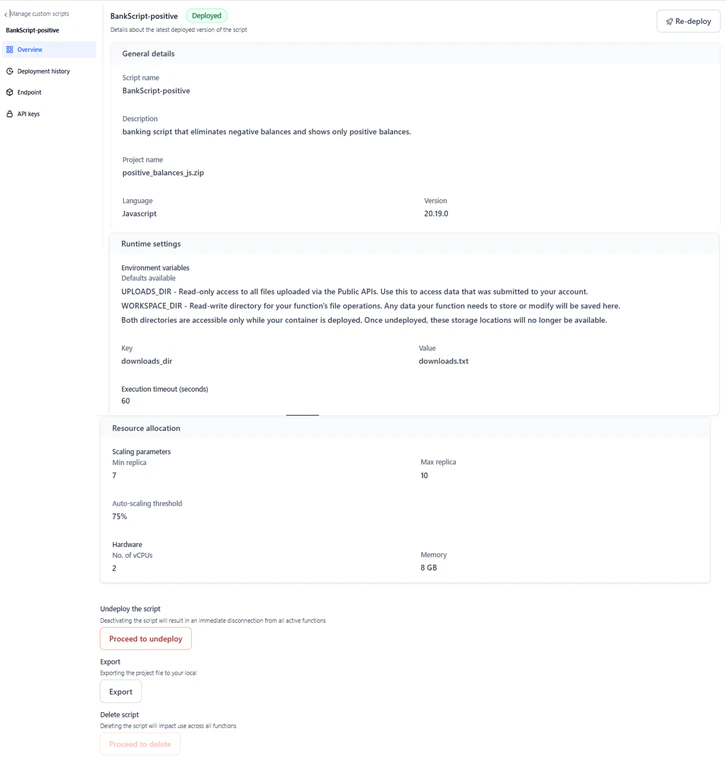 ### Deployment History
The **Deployment History** page shows previous and current deployment and undeployment actions for a script. Use it to track version history, deployment statuses, and actions performed.
### Deployment History
The **Deployment History** page shows previous and current deployment and undeployment actions for a script. Use it to track version history, deployment statuses, and actions performed.
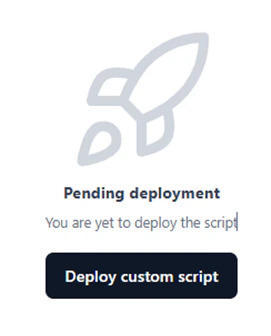 Click **Deploy custom script** and follow the steps in [Import and Deploy a Custom Script](#import-and-deploy-a-custom-script).
* Undeployment information is shown only when the status is **Ready to Deploy**.
* Hover over a failed status to view the reason for failure.
Click **Deploy custom script** and follow the steps in [Import and Deploy a Custom Script](#import-and-deploy-a-custom-script).
* Undeployment information is shown only when the status is **Ready to Deploy**.
* Hover over a failed status to view the reason for failure.

 To rename a deployment version, click the **Edit** icon, enter the new name, and click **Confirm**.
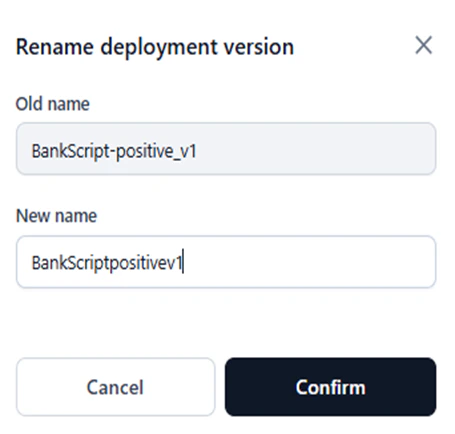
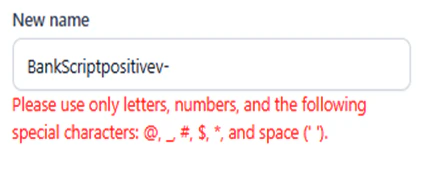 Additional deployment details:
* **Deployed on**: Timestamp of the deployment or undeployment.
* **Duration**: Duration of the deployment. Shows "–" for all statuses except **Deployed**.
* **Deployed by**: The system user who deployed or undeployed the version.
To view the full deployment or undeployment summary, click the **Expand** arrow.
Additional deployment details:
* **Deployed on**: Timestamp of the deployment or undeployment.
* **Duration**: Duration of the deployment. Shows "–" for all statuses except **Deployed**.
* **Deployed by**: The system user who deployed or undeployed the version.
To view the full deployment or undeployment summary, click the **Expand** arrow.
 The expanded view shows the [General Details](#step-1-general-details), [Runtime Settings](#step-2-runtime-settings), and [Resource Allocation](#step-3-resource-allocation) configured during import or undeployment, plus:
* **Deployed by**: Name of the user who performed the action.
* **Start Time**: When the deployment or undeployment started.
* **End Time**: When the deployment or undeployment ended.
* **Time Taken to Deploy**: Total duration from start to end.
* **Status**: Final outcome of the action (Success or Failed).
The expanded view shows the [General Details](#step-1-general-details), [Runtime Settings](#step-2-runtime-settings), and [Resource Allocation](#step-3-resource-allocation) configured during import or undeployment, plus:
* **Deployed by**: Name of the user who performed the action.
* **Start Time**: When the deployment or undeployment started.
* **End Time**: When the deployment or undeployment ended.
* **Time Taken to Deploy**: Total duration from start to end.
* **Status**: Final outcome of the action (Success or Failed).
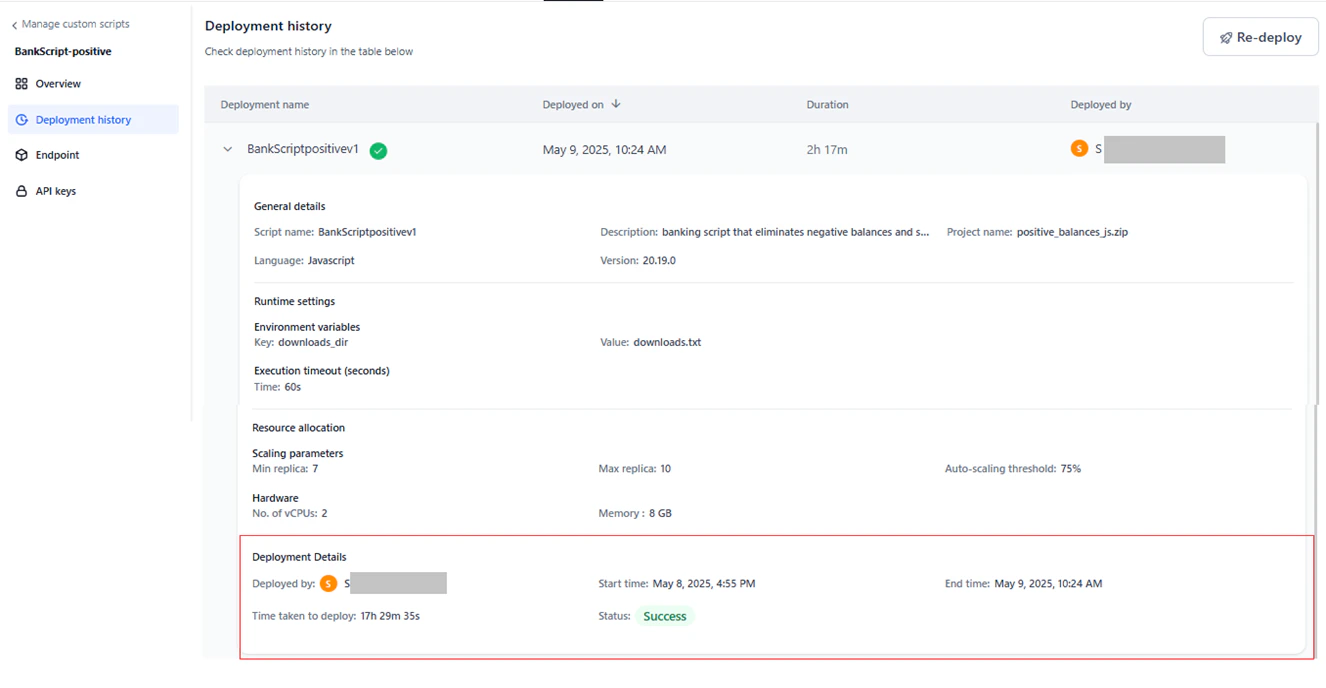 #### Deployment History by Status
**Deployed**
#### Deployment History by Status
**Deployed**
 **Deployment Failed**
 **Ready to Deploy**
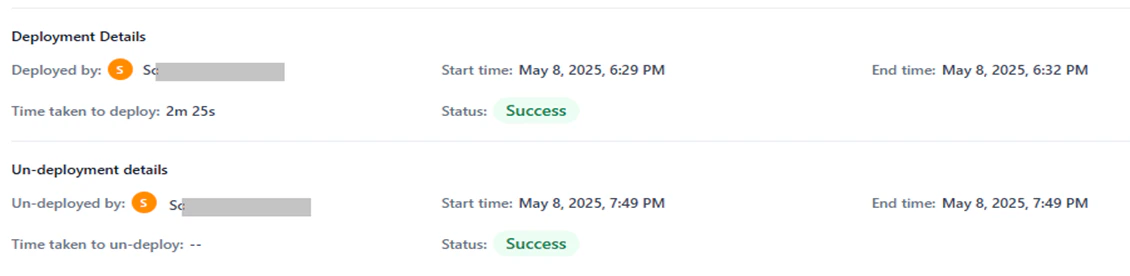 **Deploying**
 ### Endpoint
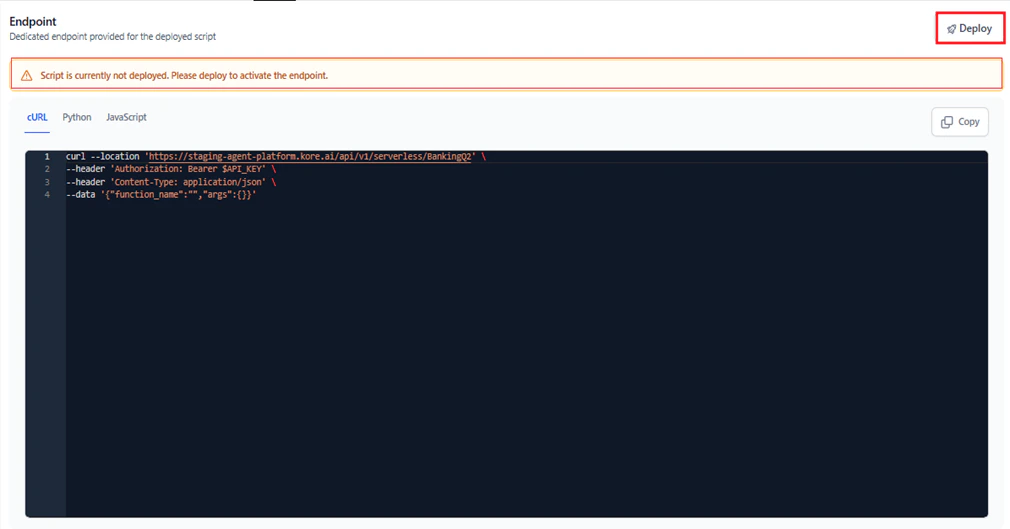
The **Endpoint** page shows the activated endpoint code for a deployed script in multiple formats. Copy the code in your preferred format to integrate it into your applications.
### Endpoint
The **Endpoint** page shows the activated endpoint code for a deployed script in multiple formats. Copy the code in your preferred format to integrate it into your applications.
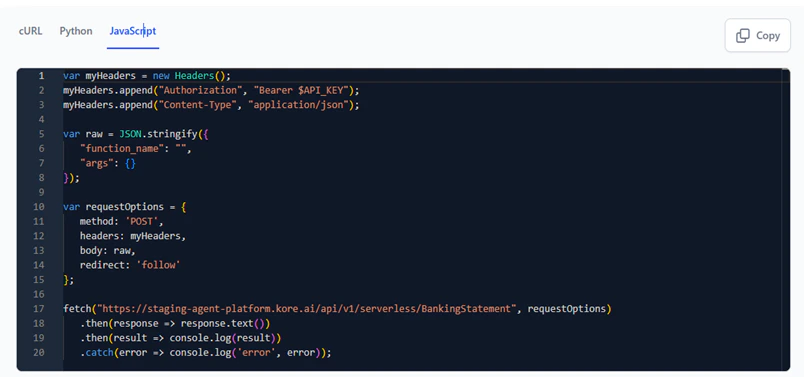
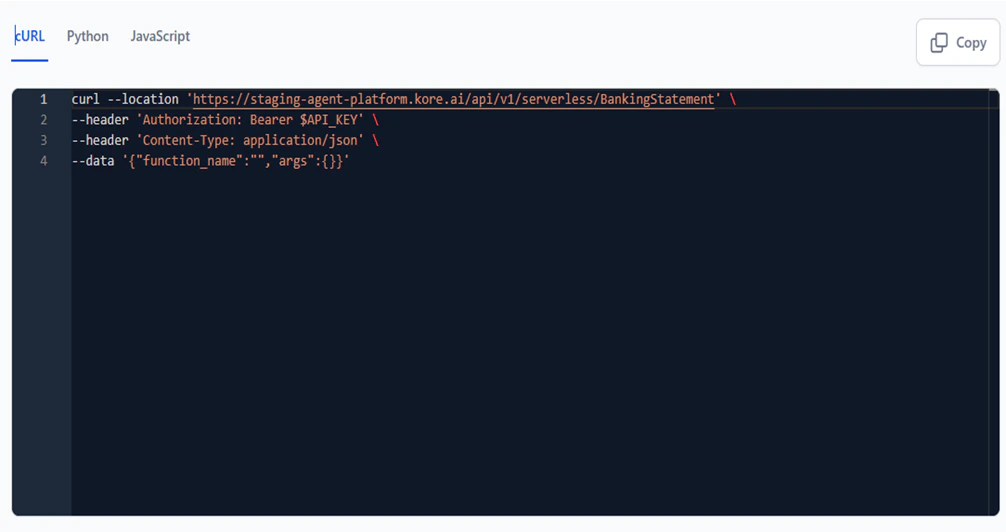 * **JavaScript**: Payload JSON code in JavaScript format.
 * **Python**: Payload JSON code in Python format.
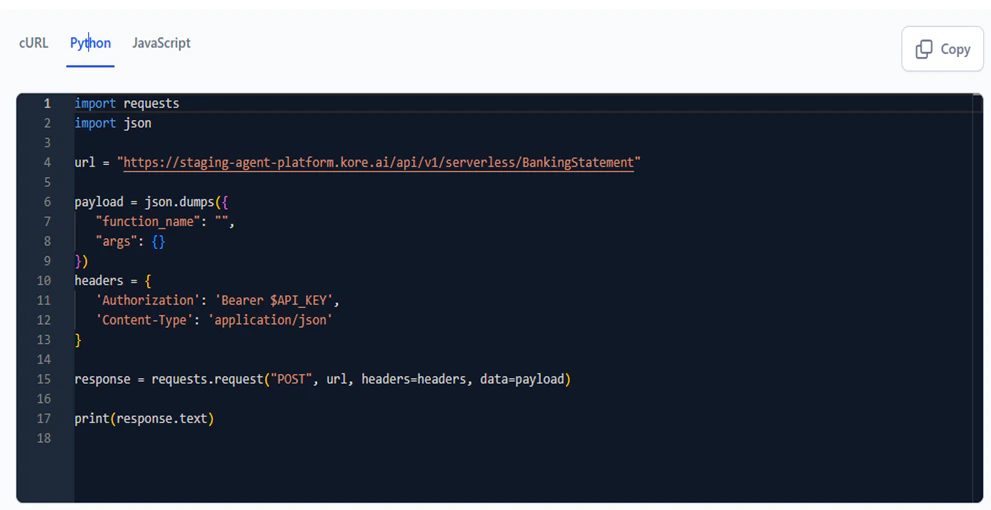 Click **Copy** to copy the selected format to the clipboard. A success message confirms the copy.
 For scripts with the *Deploying*, *Deployment Failed*, or *Ready to Deploy* status, the page shows a prompt to deploy the script and activate the endpoint.
 ### API Keys
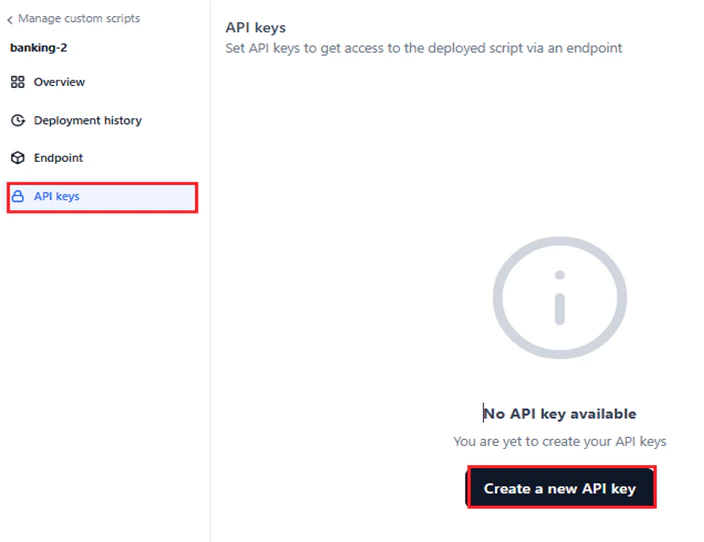
API keys control access to a deployed script's endpoint. Create at least one API key before calling a script via an endpoint.
### API Keys
API keys control access to a deployed script's endpoint. Create at least one API key before calling a script via an endpoint.
 3. Enter a unique name for the key. The default name is "Secret Key."
4. Click **Generate Key**.
3. Enter a unique name for the key. The default name is "Secret Key."
4. Click **Generate Key**.
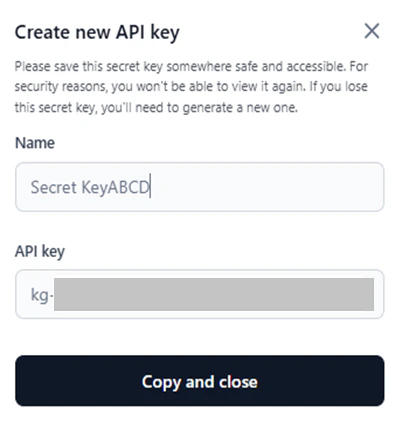
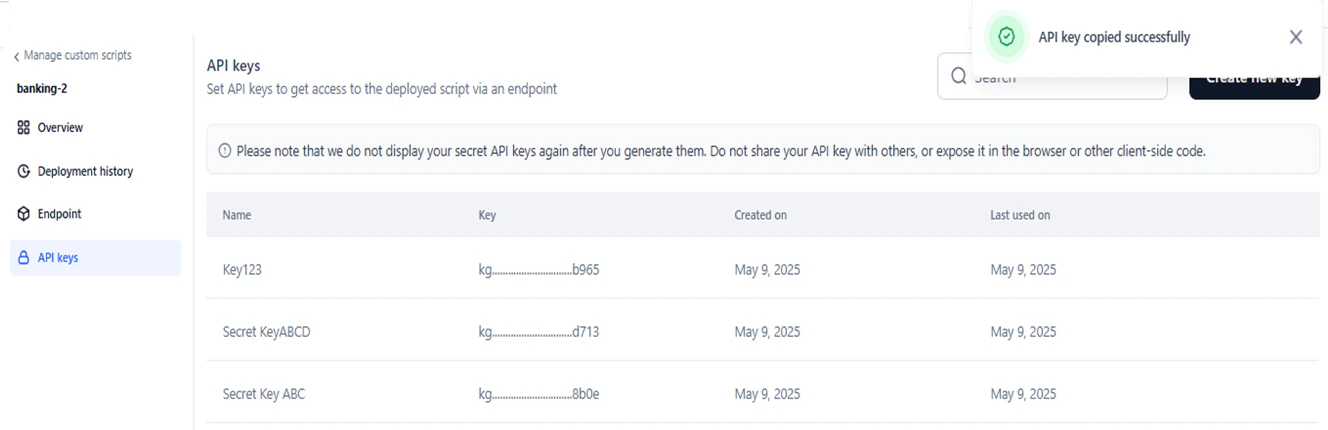
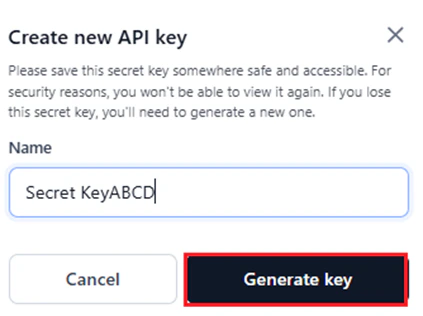 5. Click **Copy and Close**.
 #### Delete an API Key
1. On the **API Keys** page, hover over the key you want to delete.
2. Click the **Delete** icon.
#### Delete an API Key
1. On the **API Keys** page, hover over the key you want to delete.
2. Click the **Delete** icon.
 3. Click **Delete** in the confirmation window.
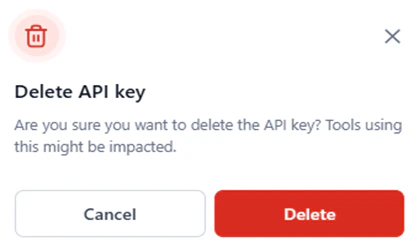 A success message is displayed and the key is removed. A deleted API key is immediately invalidated and can no longer be used to access the script.
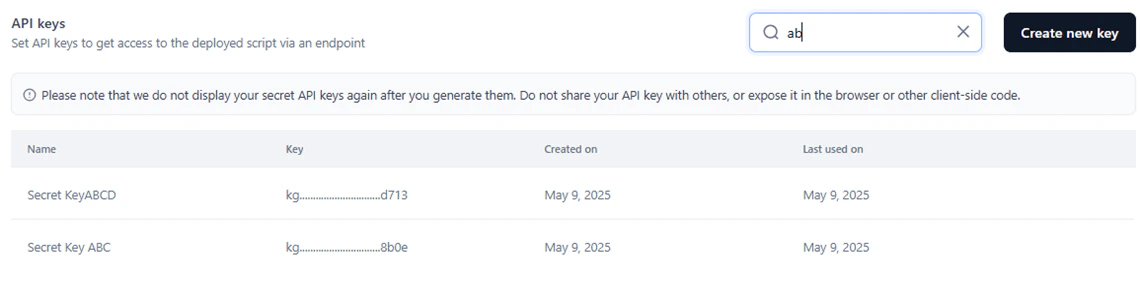
#### Search API Keys
Enter the key name (partial or full) in the **Search** field to find a specific key.
A success message is displayed and the key is removed. A deleted API key is immediately invalidated and can no longer be used to access the script.
#### Search API Keys
Enter the key name (partial or full) in the **Search** field to find a specific key.
 ### Use a Custom Script in the API Node
To call a deployed custom script from the API node in a workflow:
1. In the API node configuration, click **Define Request**.
### Use a Custom Script in the API Node
To call a deployed custom script from the API node in a workflow:
1. In the API node configuration, click **Define Request**.
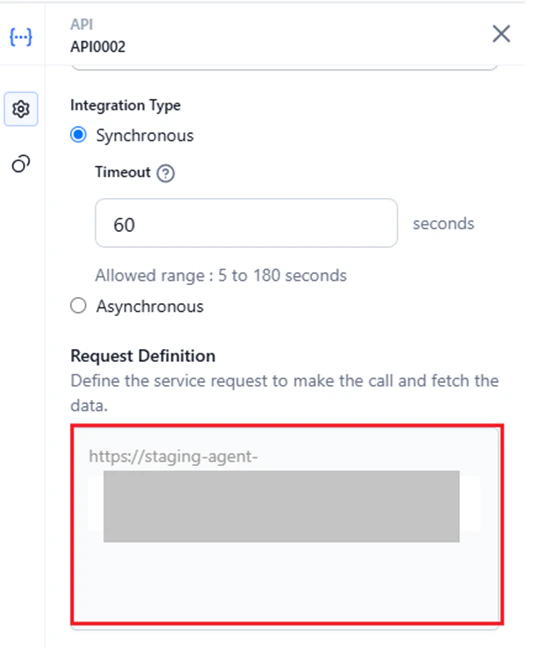 2. In the **Edit Request** dialog, configure the following:
* Select the request type.
* Copy the cURL from the [Endpoint](#endpoint) page of the custom script.
2. In the **Edit Request** dialog, configure the following:
* Select the request type.
* Copy the cURL from the [Endpoint](#endpoint) page of the custom script.
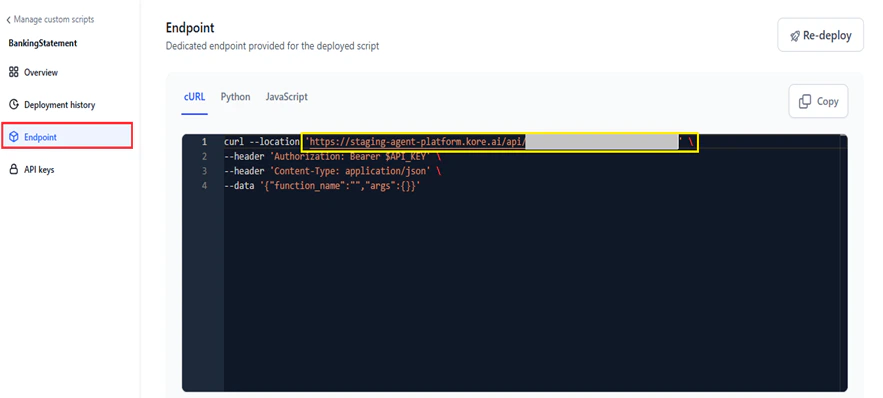 * Paste it in the text field.
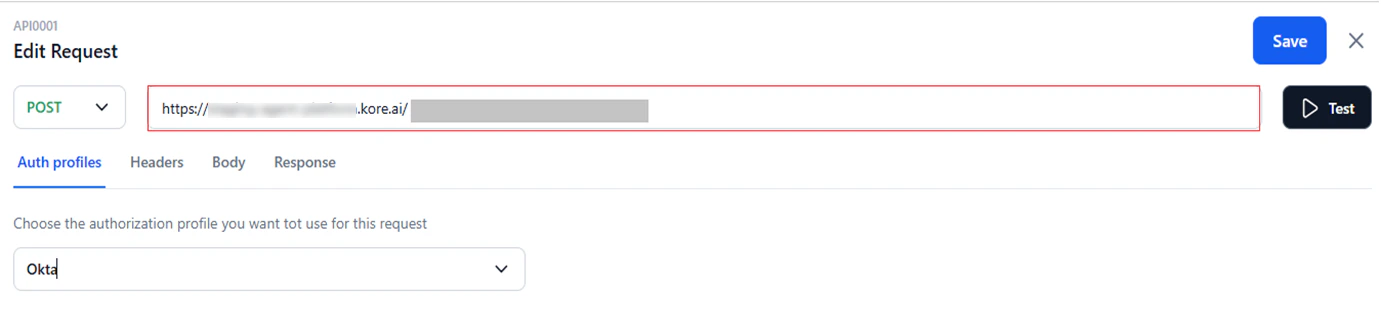 * In **Auth Profiles**, select an authentication profile or **None** (default) if authentication is not required. [Learn more](#authorization-profiles) about Auth Profiles.
* In the **Headers** tab, add key-value pairs. For example, **Key**: `Content-Type`, **Value**: `application/json`.
* In the **Body** tab (not available for GET requests), select the content type:
* **application/x-www-form-urlencoded**: File uploads via HTTP POST. Key/value pairs are encoded by the platform.
* **application/json**: JSON data exchange between servers and web applications.
* **application/xml**: XML payload for SOAP services using POST, with the option to include node values.
* **Custom**: Non-standard payload formats, such as for blogs or custom variables.
* Click **Test** to send a test request. The API response appears in the **Response** tab.
* Click **Save**.
For more information, see the [API node](/ai-for-process/nodes#api-node) documentation.
* In **Auth Profiles**, select an authentication profile or **None** (default) if authentication is not required. [Learn more](#authorization-profiles) about Auth Profiles.
* In the **Headers** tab, add key-value pairs. For example, **Key**: `Content-Type`, **Value**: `application/json`.
* In the **Body** tab (not available for GET requests), select the content type:
* **application/x-www-form-urlencoded**: File uploads via HTTP POST. Key/value pairs are encoded by the platform.
* **application/json**: JSON data exchange between servers and web applications.
* **application/xml**: XML payload for SOAP services using POST, with the option to include node values.
* **Custom**: Non-standard payload formats, such as for blogs or custom variables.
* Click **Test** to send a test request. The API response appears in the **Response** tab.
* Click **Save**.
For more information, see the [API node](/ai-for-process/nodes#api-node) documentation.