> ## Documentation Index
> Fetch the complete documentation index at: https://koreai.mintlify.site/llms.txt
> Use this file to discover all available pages before exploring further.
# Invite and Manage Account Users
> Manage users in your AI for Process account — invite individuals or import in bulk, synchronize from Active Directory, assign roles, monitor status, and unlock accounts.
The **Users Management** module in the **Settings** console provides centralized workflows for inviting, importing, and managing users. As an admin, you can:
* Invite users via email or bulk-import from a file.
* Synchronize users from your organization's Active Directory (AD).
* Assign and change roles to control access and permissions.
* Monitor and manage user statuses — active, inactive, and locked.
* Configure user profile fields for your domain.
Only users with the Admin role or higher (with Users Management permissions) can access the **Settings** console.
**Best practices:**
* Regularly review and update user roles.
* Use bulk import to add multiple users efficiently.
* Monitor locked users and inactive invitations.
***
## Users Dashboard
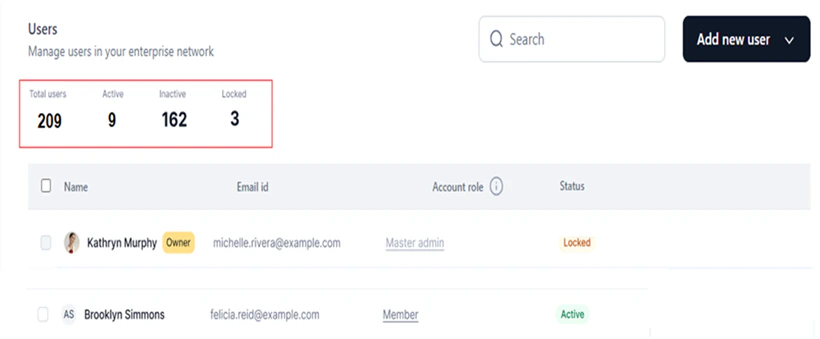
The dashboard displays user counts by status and detailed user information including name, email, role, and status.
**User status types:**
| Status | Description |
| -------- | ---------------------------------------------------------------------------- |
| Active | Users with active accounts who can interact with other AI for Process users. |
| Inactive | Invited users who have not yet accepted the invitation. |
| Locked | Users who exceeded 5 failed login attempts and are locked out. |
 For information on default system roles, see [System-defined Roles](/ai-for-process/settings/role-management#system-defined-roles).
***
## Add Users
You can add users via email invitation or by importing a file.
### Invite via Email
1. Click **Settings** on the top navigation bar.
2. Click **Users Management** > **Users** > **Add New User**.
For information on default system roles, see [System-defined Roles](/ai-for-process/settings/role-management#system-defined-roles).
***
## Add Users
You can add users via email invitation or by importing a file.
### Invite via Email
1. Click **Settings** on the top navigation bar.
2. Click **Users Management** > **Users** > **Add New User**.
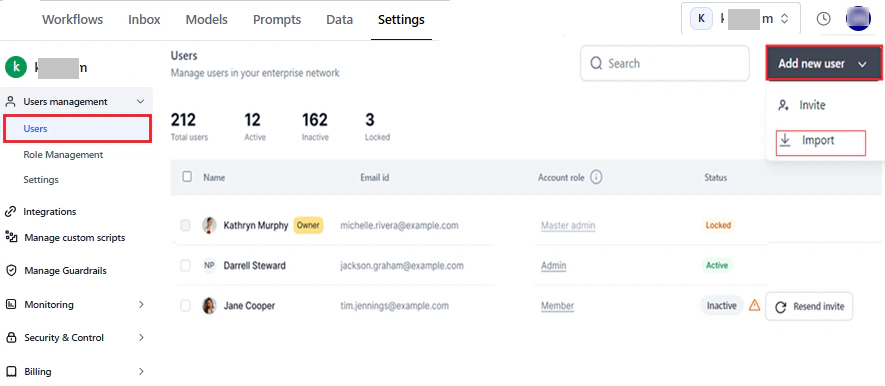 3. Click **Invite**.
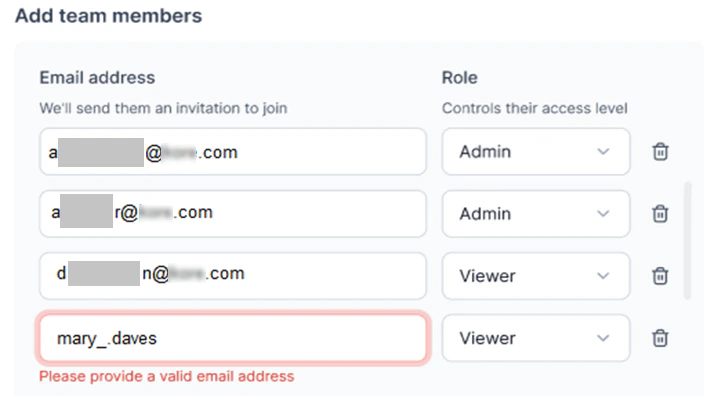
4. Enter a valid email address.
5. Select a role from the dropdown to define the user's access.
3. Click **Invite**.
4. Enter a valid email address.
5. Select a role from the dropdown to define the user's access.
 System-defined and custom roles available in your account can be assigned. [Learn more](/ai-for-process/settings/role-management) about roles and permissions.
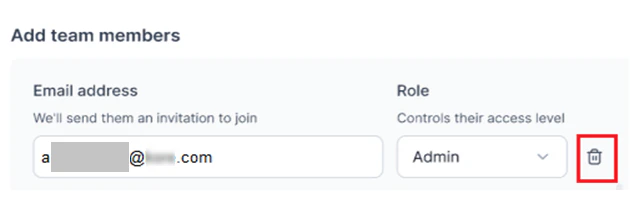
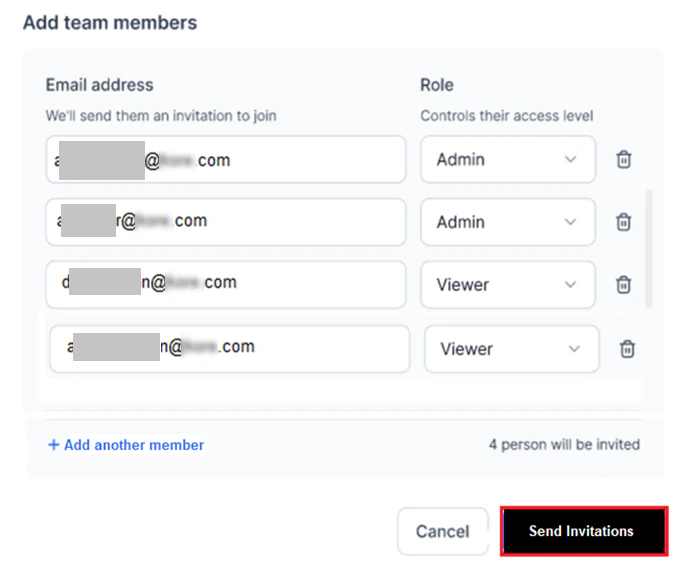
6. To invite multiple users, click **+ Add another member** and repeat steps 4–5. To remove an invitation row, click the **Delete** icon.
System-defined and custom roles available in your account can be assigned. [Learn more](/ai-for-process/settings/role-management) about roles and permissions.
6. To invite multiple users, click **+ Add another member** and repeat steps 4–5. To remove an invitation row, click the **Delete** icon.
 7. Click **Send invitation(s)**. The count updates as you add or remove invites.
 A success message appears when the invite is sent. If it fails, check the highlighted email addresses and try again.
**Email address requirements:**
* The field must not be empty.
* No spaces before, between, or after the email address.
* Must include a valid domain (for example, `john@doe.com`).
A success message appears when the invite is sent. If it fails, check the highlighted email addresses and try again.
**Email address requirements:**
* The field must not be empty.
* No spaces before, between, or after the email address.
* Must include a valid domain (for example, `john@doe.com`).
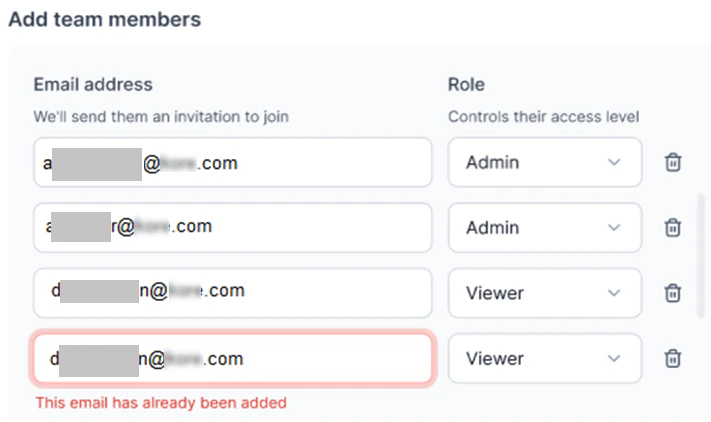
 * Duplicate invitations are not allowed. The system displays: *"This email has already been added."*
 - Invitations expire 15 days after being sent.
- The user status is **Inactive** until the invitation is accepted, then changes to **Active**.
### Bulk Import
The bulk import feature lets administrators add multiple users at once using `.txt` or `.csv` files.
**Requirements:**
* Valid file types: .txt or .csv only.
* Required fields: name, email ID, and status.
* Each row must contain information for one user.
* Accepted delimiters: comma (`,`), pipe (`|`), semicolon (`;`), and tab.
* The first row must contain field names.
* Mandatory fields are marked with `*` in the sample file.
* The **User Status** field determines the post-import action: *New*, *Update*, or *Delete*.
* Entries with invalid email formats or missing domains are skipped during import.
* Once validated, an email invitation is sent to activate the user's account.
* If a user is already active in your account, no invitation email is sent.
#### Import Users from a File
1. Click **Settings** on the top navigation bar.
- Invitations expire 15 days after being sent.
- The user status is **Inactive** until the invitation is accepted, then changes to **Active**.
### Bulk Import
The bulk import feature lets administrators add multiple users at once using `.txt` or `.csv` files.
**Requirements:**
* Valid file types: .txt or .csv only.
* Required fields: name, email ID, and status.
* Each row must contain information for one user.
* Accepted delimiters: comma (`,`), pipe (`|`), semicolon (`;`), and tab.
* The first row must contain field names.
* Mandatory fields are marked with `*` in the sample file.
* The **User Status** field determines the post-import action: *New*, *Update*, or *Delete*.
* Entries with invalid email formats or missing domains are skipped during import.
* Once validated, an email invitation is sent to activate the user's account.
* If a user is already active in your account, no invitation email is sent.
#### Import Users from a File
1. Click **Settings** on the top navigation bar.
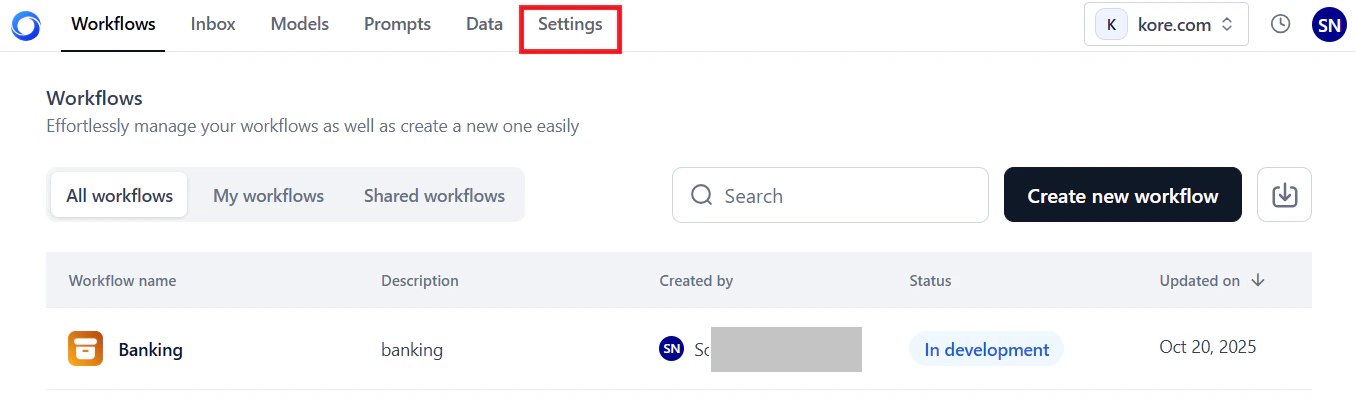 2. On the **Users** dashboard, click **Add New User** > **Import**.
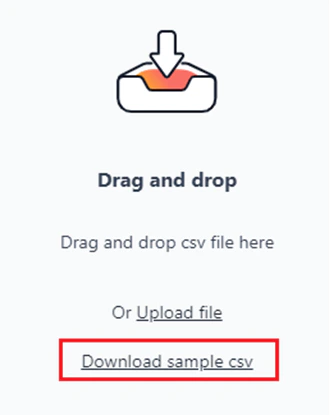
3. On the **Import Users** page, upload the file by either:
* Clicking **Upload File** and selecting the file from your system.
2. On the **Users** dashboard, click **Add New User** > **Import**.
3. On the **Import Users** page, upload the file by either:
* Clicking **Upload File** and selecting the file from your system.
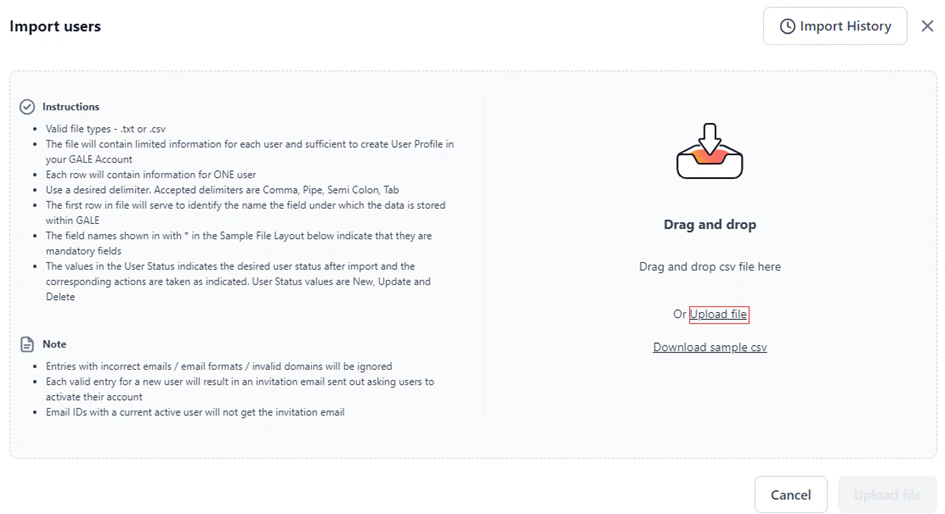 * Dragging and dropping the file into the **Upload File** window.
**Tip:** Download the sample `.csv` file for reference. The fields are pre-defined with data requirements.
* Dragging and dropping the file into the **Upload File** window.
**Tip:** Download the sample `.csv` file for reference. The fields are pre-defined with data requirements.
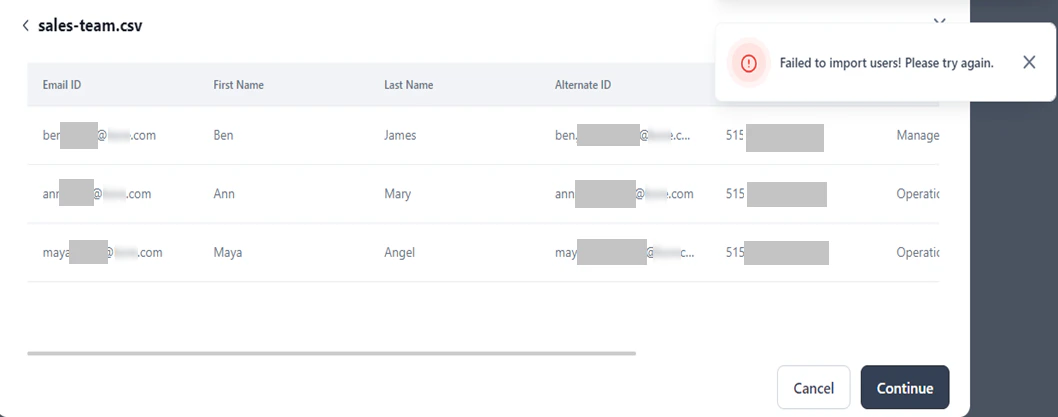
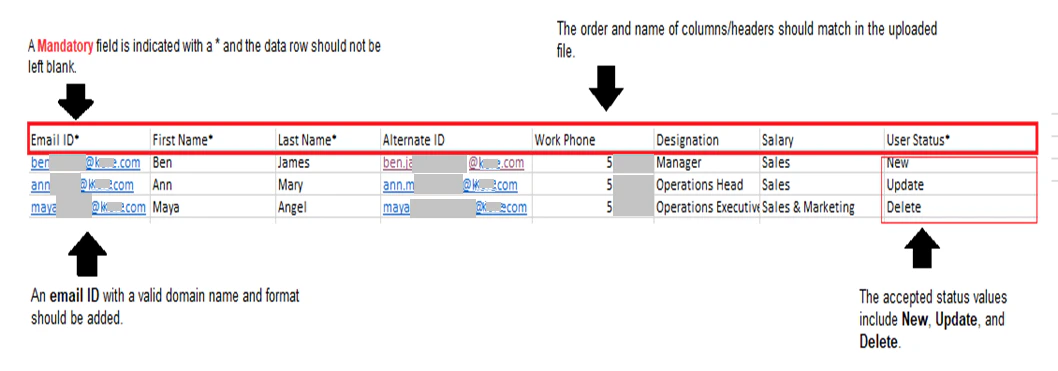 Ensure column names and field mandates match the sample file. A mismatch causes an error:
 4. A preview window shows the file data with a success message. Click **Continue**.
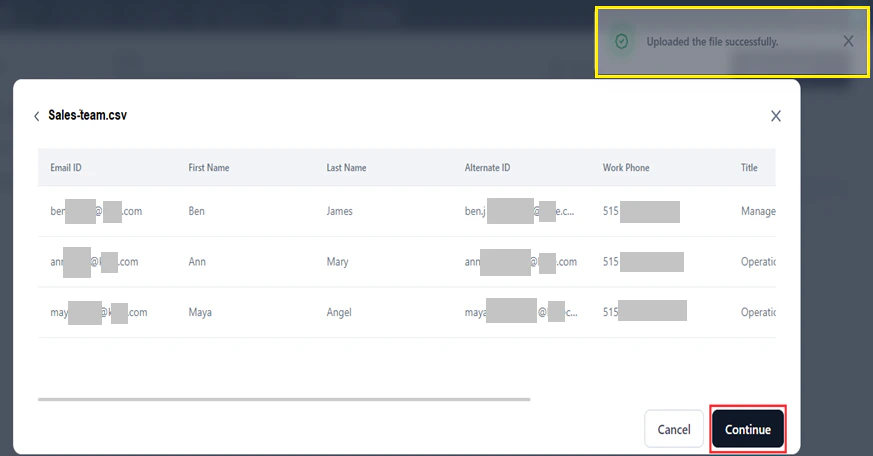 5. When the import completes, click **Continue**.
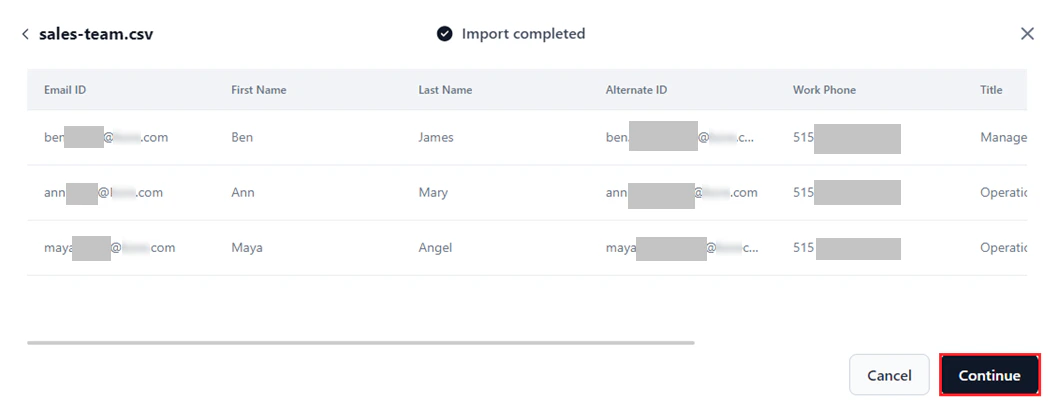 6. If validation errors exist, a window shows the import status and error reasons.
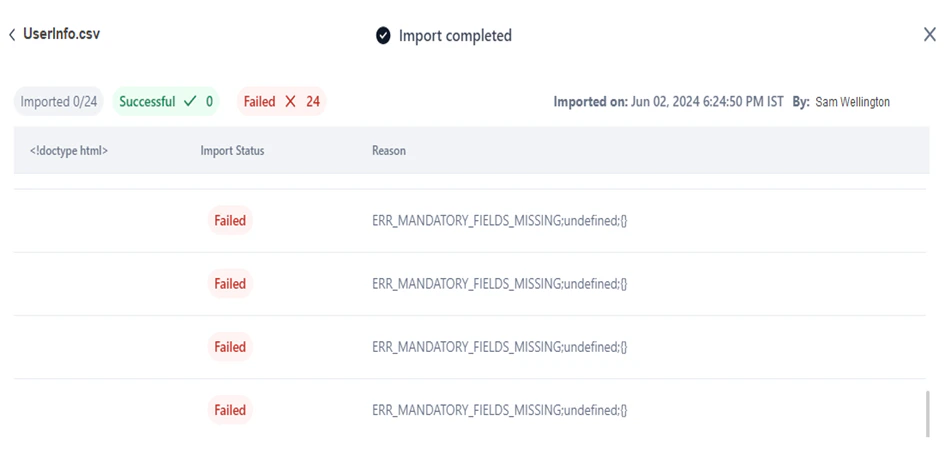 Correct the highlighted values and re-upload. Then repeat steps 4–5.
The file takes a few minutes to import. A progress dialog shows the status. When complete:
Correct the highlighted values and re-upload. Then repeat steps 4–5.
The file takes a few minutes to import. A progress dialog shows the status. When complete:
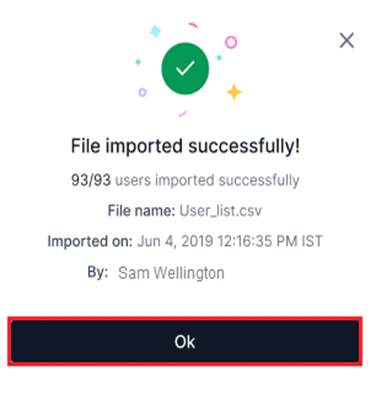 Click **OK** to view imported users on the dashboard.
Imported users are assigned the **Viewer** role by default. You can change this later. [Learn more](/ai-for-process/settings/role-management#system-defined-roles).
Click **OK** to view imported users on the dashboard.
Imported users are assigned the **Viewer** role by default. You can change this later. [Learn more](/ai-for-process/settings/role-management#system-defined-roles).
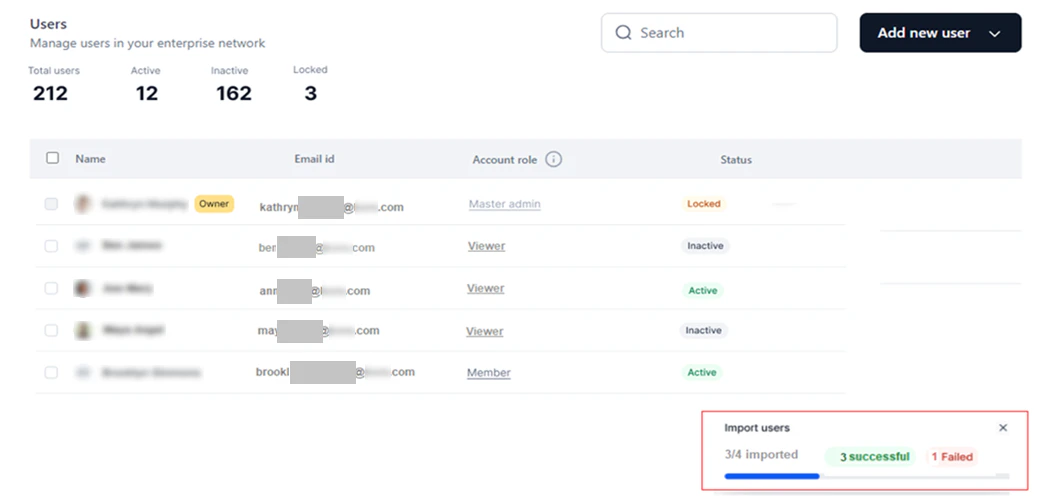
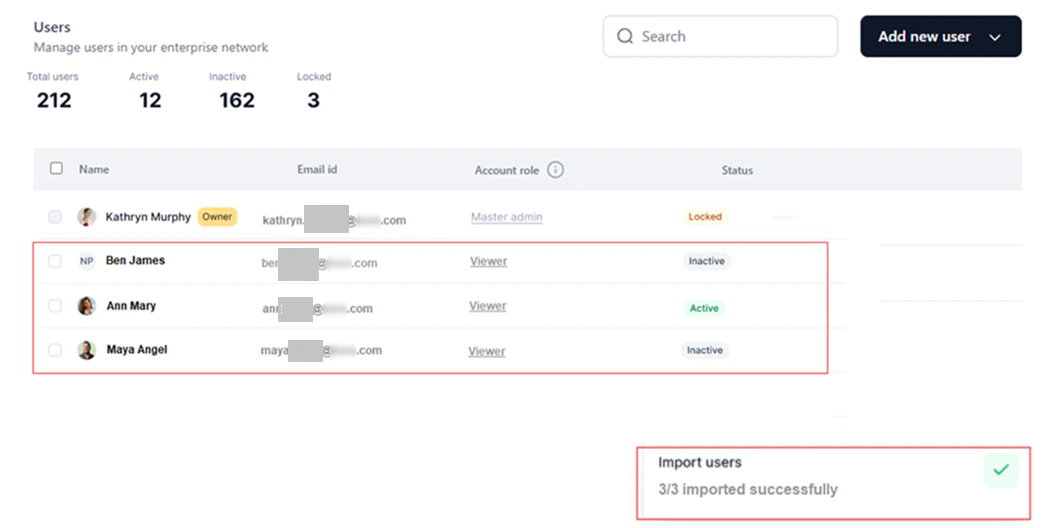 The dashboard shows success and failed import statuses:
 **Failed import**
If user data fails to import, the following message appears:
**Failed import**
If user data fails to import, the following message appears:
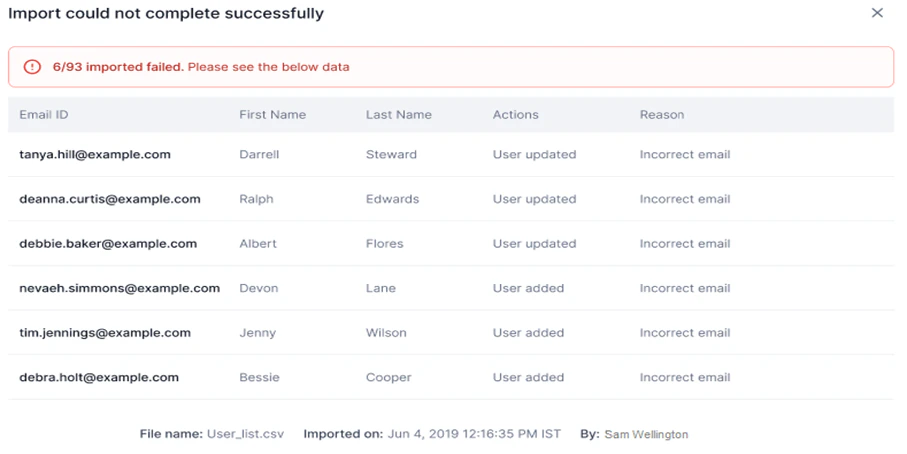 Review which users failed, the actions attempted, and the reason. Then retry with corrected data.
**Canceled import**
The system cancels imports for entries that fail validation (for example, an invalid email address). A window shows the import status and cancellation reason:
Review which users failed, the actions attempted, and the reason. Then retry with corrected data.
**Canceled import**
The system cancels imports for entries that fail validation (for example, an invalid email address). A window shows the import status and cancellation reason:
 #### Import History
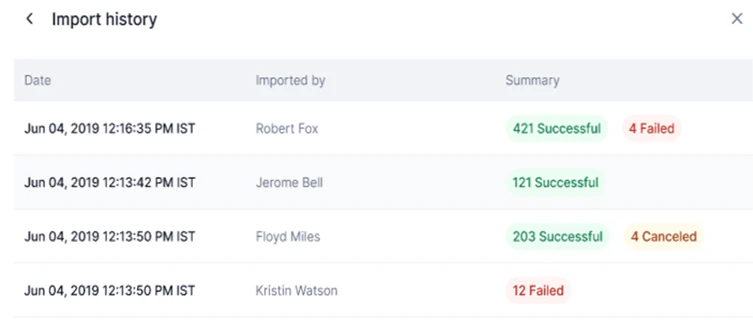
Click **Import History** in the **Import Users** window to view past imports.
#### Import History
Click **Import History** in the **Import Users** window to view past imports.
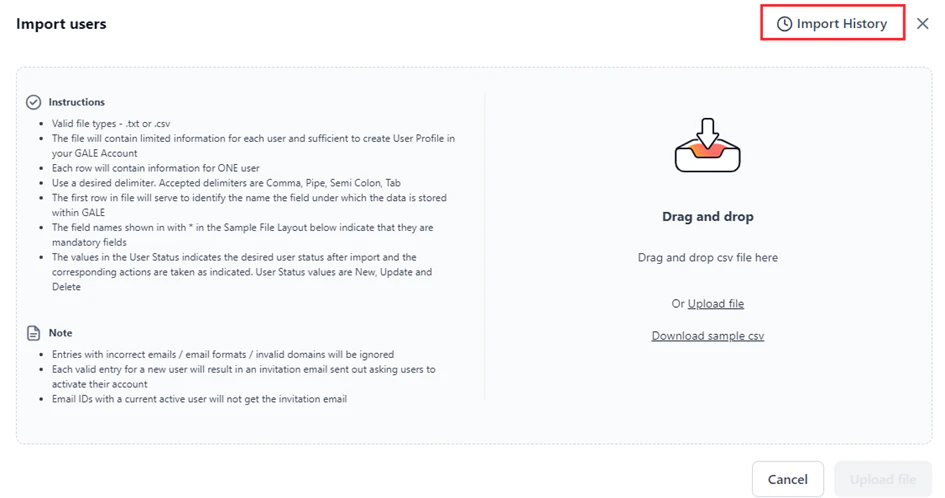 The history shows the import date and time, the importing user, and a summary of successful and failed imports.
 ***
## Manage Users
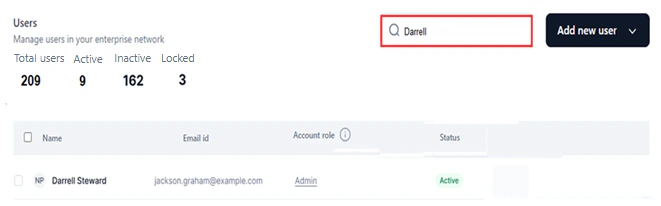
### Search for a User
1. Go to the **Users** dashboard.
2. Click the **Search** text field.
3. Enter the user's name.
Matching results appear automatically.
***
## Manage Users
### Search for a User
1. Go to the **Users** dashboard.
2. Click the **Search** text field.
3. Enter the user's name.
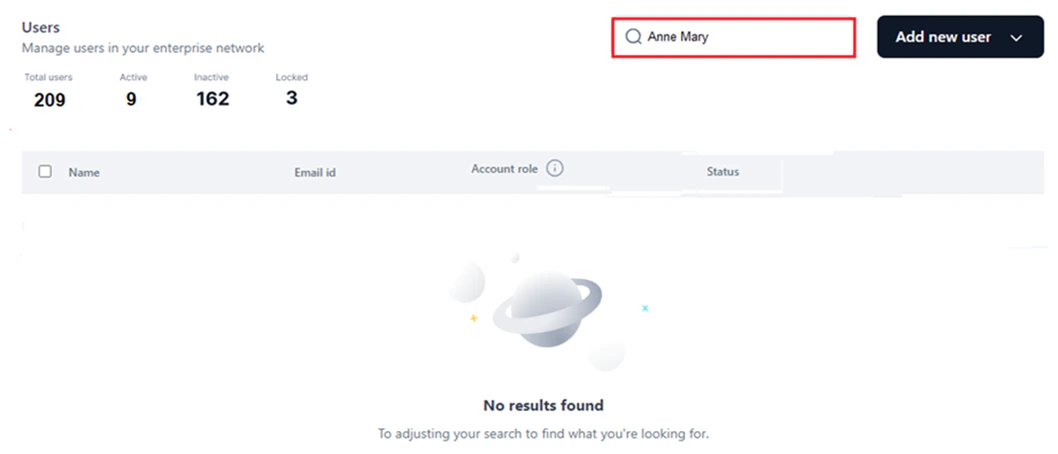
Matching results appear automatically.
 If no match is found:
 ### Unlock a Locked User
Locked users cannot access their accounts until an admin unlocks them.
1. Go to **Settings** > **Users Management** > **Users**.
2. Hover over the user with status **Locked**.
3. Click **Unlock**.
### Unlock a Locked User
Locked users cannot access their accounts until an admin unlocks them.
1. Go to **Settings** > **Users Management** > **Users**.
2. Hover over the user with status **Locked**.
3. Click **Unlock**.
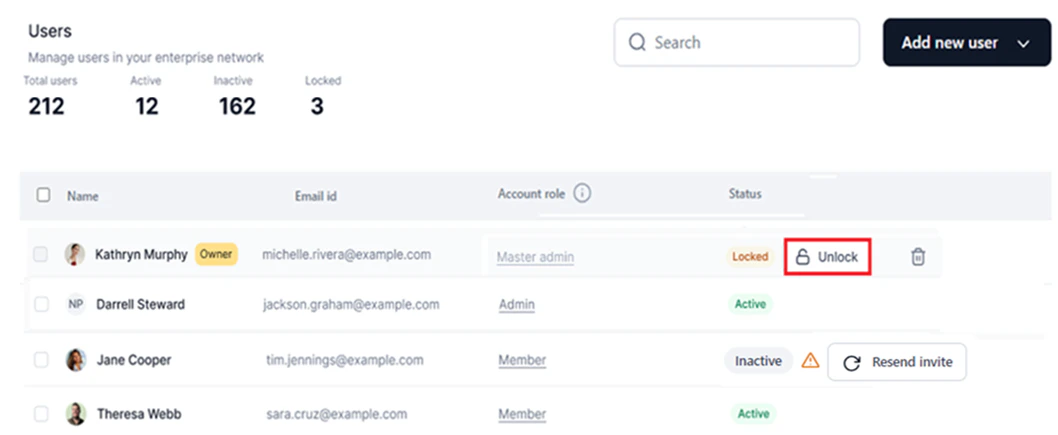 4. Click **Confirm**.
The account is unlocked and the status changes to **Active**.
### Change User Role
On the **Users** dashboard, you can change the account-level role for one or more users. Only roles allowed for the user type (admin or account) can be assigned. When you change a user's role, the corresponding permissions and access levels apply automatically.
To change an individual user's role, see [Reassign an Alternative Role to Active Users](/ai-for-process/settings/role-management#reassign-an-alternative-role-to-active-users).
**Bulk role change**
To assign the same role to multiple users simultaneously:
1. Select the required users on the **Users** dashboard.
2. Click the **Role** dropdown in the bottom pane and select the role.
4. Click **Confirm**.
The account is unlocked and the status changes to **Active**.
### Change User Role
On the **Users** dashboard, you can change the account-level role for one or more users. Only roles allowed for the user type (admin or account) can be assigned. When you change a user's role, the corresponding permissions and access levels apply automatically.
To change an individual user's role, see [Reassign an Alternative Role to Active Users](/ai-for-process/settings/role-management#reassign-an-alternative-role-to-active-users).
**Bulk role change**
To assign the same role to multiple users simultaneously:
1. Select the required users on the **Users** dashboard.
2. Click the **Role** dropdown in the bottom pane and select the role.
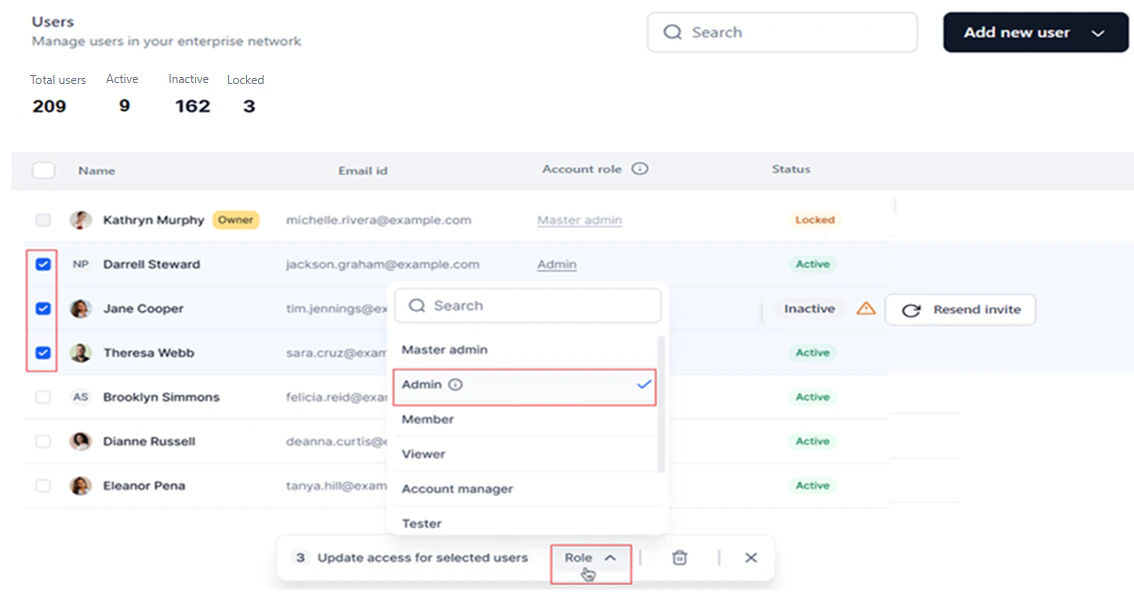 The role updates for all selected users.
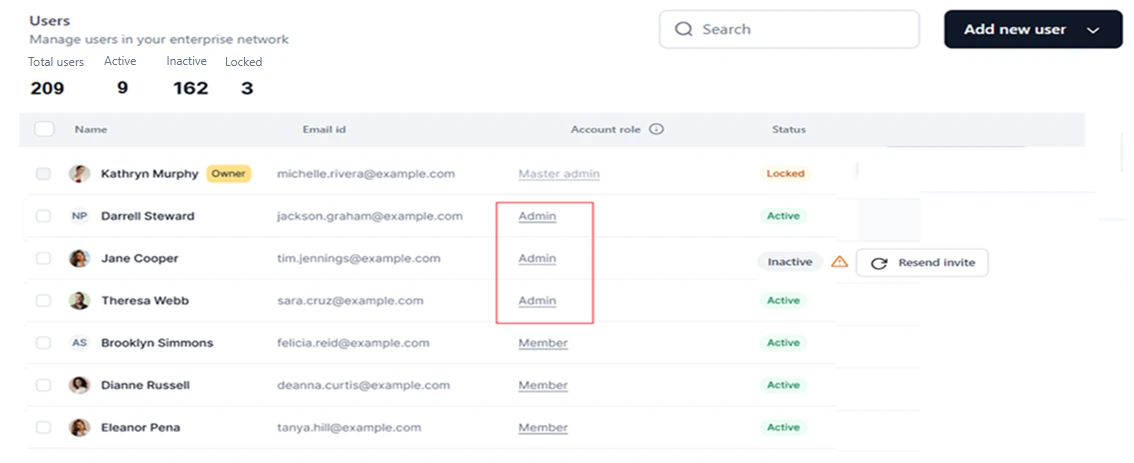 To assign different roles to multiple users, change roles individually.
### Delete a User
* Deleting a user revokes their access and removes their data from your account. The user can still access their personal AI for Process account. To rejoin, you must invite them again.
* You cannot delete users who own active workflows. The user must remove all active workflows before deletion.
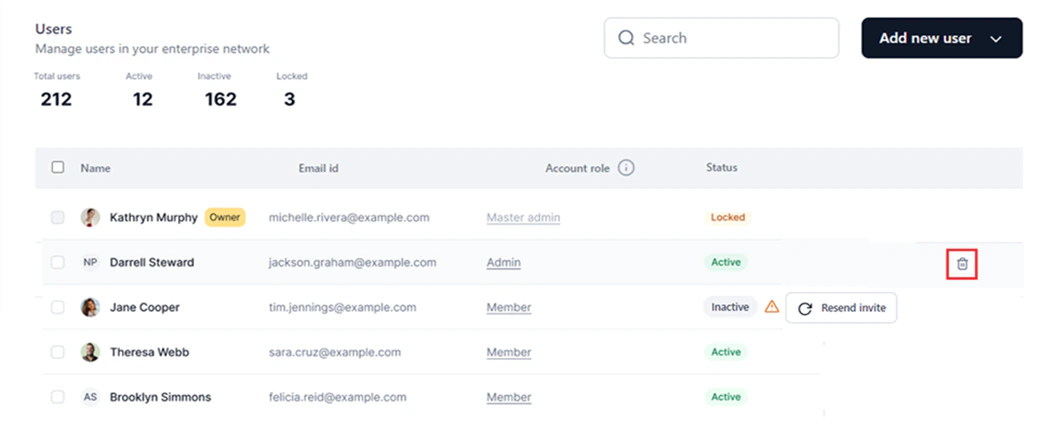
**Delete a single user:**
1. Click **Users Management** > **Users** on the left menu.
2. Hover over the user entry you want to delete.
3. Click the **Delete** icon.
To assign different roles to multiple users, change roles individually.
### Delete a User
* Deleting a user revokes their access and removes their data from your account. The user can still access their personal AI for Process account. To rejoin, you must invite them again.
* You cannot delete users who own active workflows. The user must remove all active workflows before deletion.
**Delete a single user:**
1. Click **Users Management** > **Users** on the left menu.
2. Hover over the user entry you want to delete.
3. Click the **Delete** icon.
 **Bulk delete:**
1. Select the required users and click the **Delete** icon at the bottom of the screen.
**Bulk delete:**
1. Select the required users and click the **Delete** icon at the bottom of the screen.
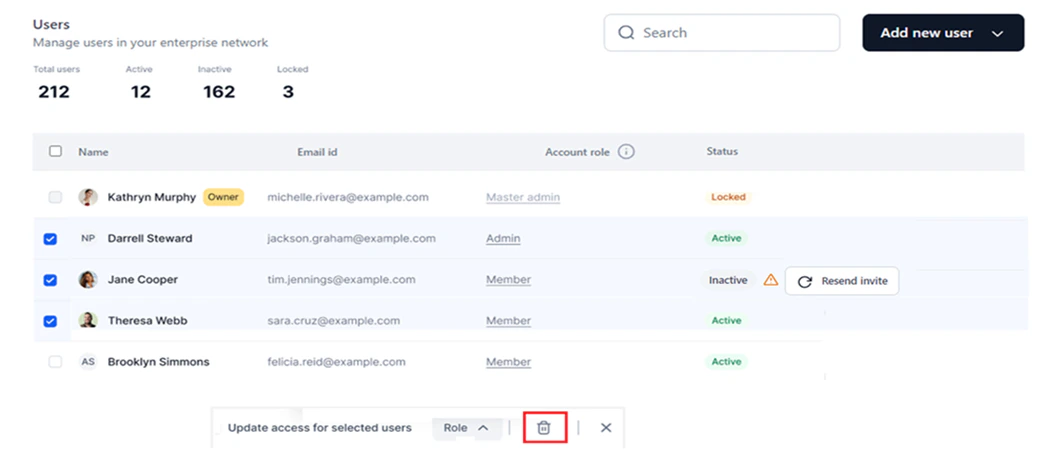 2. Click **Remove** in the **Remove users** window.
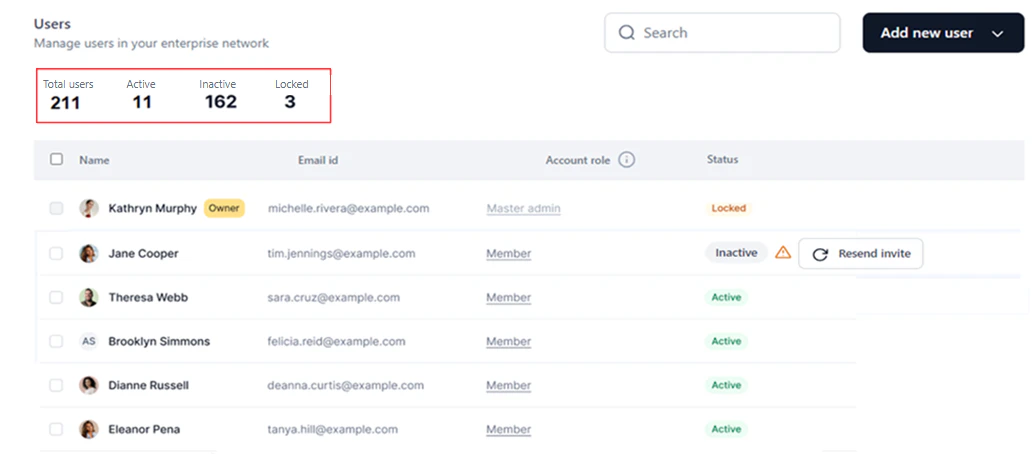
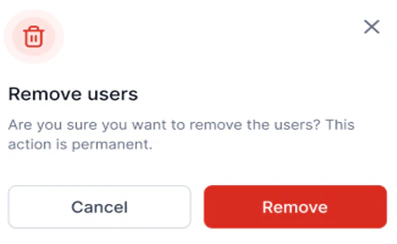 The users are removed from the list and the **Total Users** and **Active Users** counts update.
 Deleting a user is permanent.
***
## Active Directory Sync
By configuring Active Directory (AD) import, you can sync your organizational user information into the Settings console from a single source of truth, eliminating the need for email invitations or manual file imports.
The auto sync feature keeps user data in AI for Process current, including deletions and modifications in the AD.
An AD professional with the necessary technical expertise should handle the auto sync configuration process.
**Configuration steps overview:**
1. [Set up the Connection](#step-1-set-up-the-connection): Connect the Settings console to your organization's AD.
2. [Import Organization Units](#step-2-import-organization-units): Choose the OUs from which to import user data.
3. [Specify User Attributes and Configure Rules](#step-3-specify-user-attributes-and-configure-rules-for-selective-import): Define user profile fields and inclusion/exclusion rules for selective import.
4. [Schedule Automatic AD Sync](#step-4-schedule-automatic-ad-sync): Set up scheduled sync to keep user data current.
### Steps to Configure AD Sync
1. Click **Settings** on the top navigation bar.
2. On the **Users** dashboard, click **Configure Directory** in the **Configure sync with directory** section.
Deleting a user is permanent.
***
## Active Directory Sync
By configuring Active Directory (AD) import, you can sync your organizational user information into the Settings console from a single source of truth, eliminating the need for email invitations or manual file imports.
The auto sync feature keeps user data in AI for Process current, including deletions and modifications in the AD.
An AD professional with the necessary technical expertise should handle the auto sync configuration process.
**Configuration steps overview:**
1. [Set up the Connection](#step-1-set-up-the-connection): Connect the Settings console to your organization's AD.
2. [Import Organization Units](#step-2-import-organization-units): Choose the OUs from which to import user data.
3. [Specify User Attributes and Configure Rules](#step-3-specify-user-attributes-and-configure-rules-for-selective-import): Define user profile fields and inclusion/exclusion rules for selective import.
4. [Schedule Automatic AD Sync](#step-4-schedule-automatic-ad-sync): Set up scheduled sync to keep user data current.
### Steps to Configure AD Sync
1. Click **Settings** on the top navigation bar.
2. On the **Users** dashboard, click **Configure Directory** in the **Configure sync with directory** section.
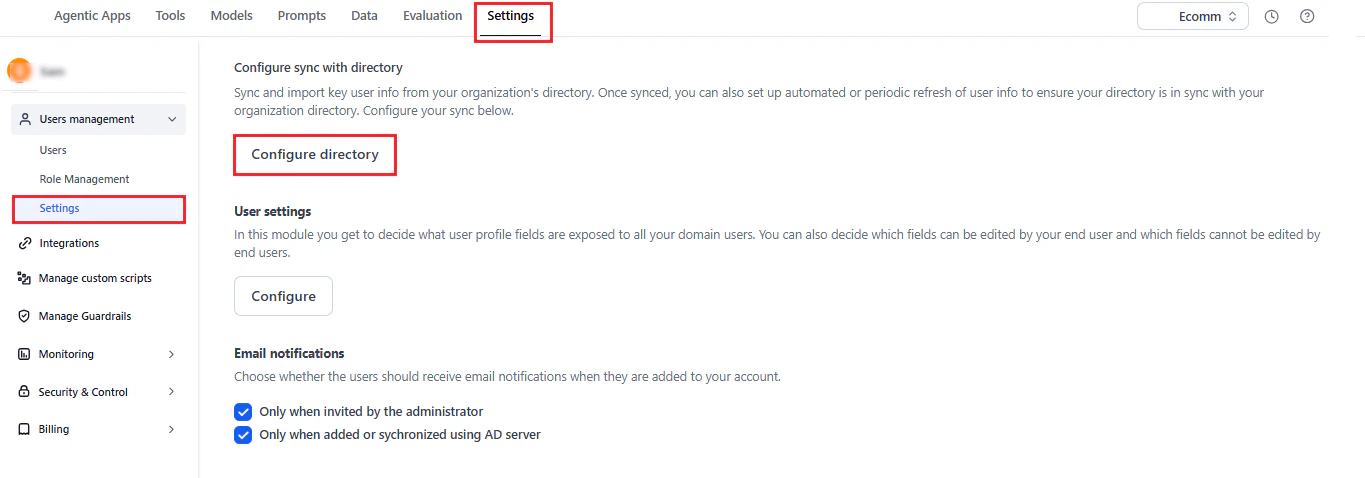 3. Complete the setup in the **Configure Directory** window by following each step in order.
* The left panel tracks your progress — completed steps show a check mark, and in-progress steps show a dot.
* Complete each step in order without skipping.
### Step 1: Set up the Connection
1. Provide the following fields to configure the AD connection:
| Field | Description |
| ------------------ | ---------------------------------------------------------- |
| **Host Name** | The domain's hostname or IP address where AD services run. |
| **Server Port** | The network port number used by the domain host. |
| **Base DN** | The server location for users and groups in the domain. |
| **User ID** | The identity used to log into the AD. |
| **Password** | The password used to log into the AD. |
| **SSL** (Optional) | Enable to secure communications over HTTPS. |
3. Complete the setup in the **Configure Directory** window by following each step in order.
* The left panel tracks your progress — completed steps show a check mark, and in-progress steps show a dot.
* Complete each step in order without skipping.
### Step 1: Set up the Connection
1. Provide the following fields to configure the AD connection:
| Field | Description |
| ------------------ | ---------------------------------------------------------- |
| **Host Name** | The domain's hostname or IP address where AD services run. |
| **Server Port** | The network port number used by the domain host. |
| **Base DN** | The server location for users and groups in the domain. |
| **User ID** | The identity used to log into the AD. |
| **Password** | The password used to log into the AD. |
| **SSL** (Optional) | Enable to secure communications over HTTPS. |
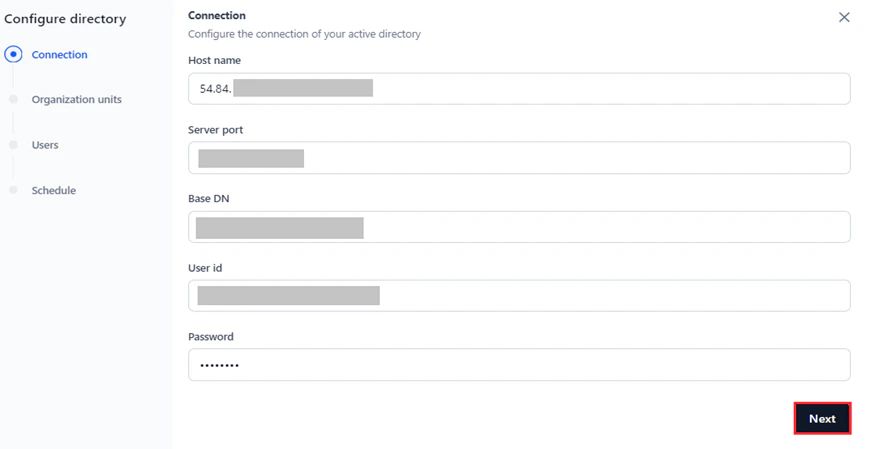 2. Click **Next** to validate the credentials before proceeding. Validation errors appear on screen so you can correct them.
### Step 2: Import Organization Units
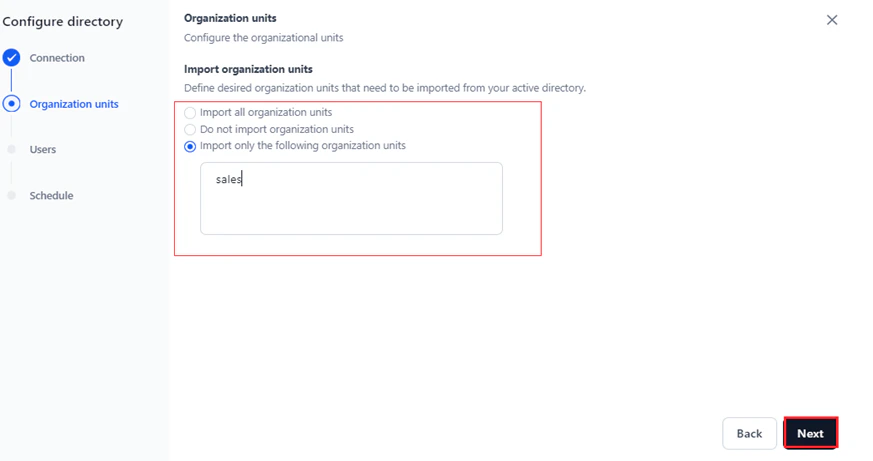
1. Select one of the following options:
* **Import all organization units**: Imports user data from all OUs.
* **Do not import organization units**: No user data is imported from any OUs.
* **Import only the following organization units**: Imports user data only from the selected OUs.
2. Click **Next** to proceed to user profile fields mapping.
2. Click **Next** to validate the credentials before proceeding. Validation errors appear on screen so you can correct them.
### Step 2: Import Organization Units
1. Select one of the following options:
* **Import all organization units**: Imports user data from all OUs.
* **Do not import organization units**: No user data is imported from any OUs.
* **Import only the following organization units**: Imports user data only from the selected OUs.
2. Click **Next** to proceed to user profile fields mapping.
 ### Step 3: Specify User Attributes and Configure Rules for Selective Import
In this step, you can:
* Define the LDAP user attributes (profile fields) to import from the AD.
* Set inclusion and exclusion rules to filter which users are imported.
* **Inclusion rules**: Define which users to include in sync or import based on criteria.
* **Exclusion rules**: Define which users to exclude from the AD import.
**To configure user attributes:**
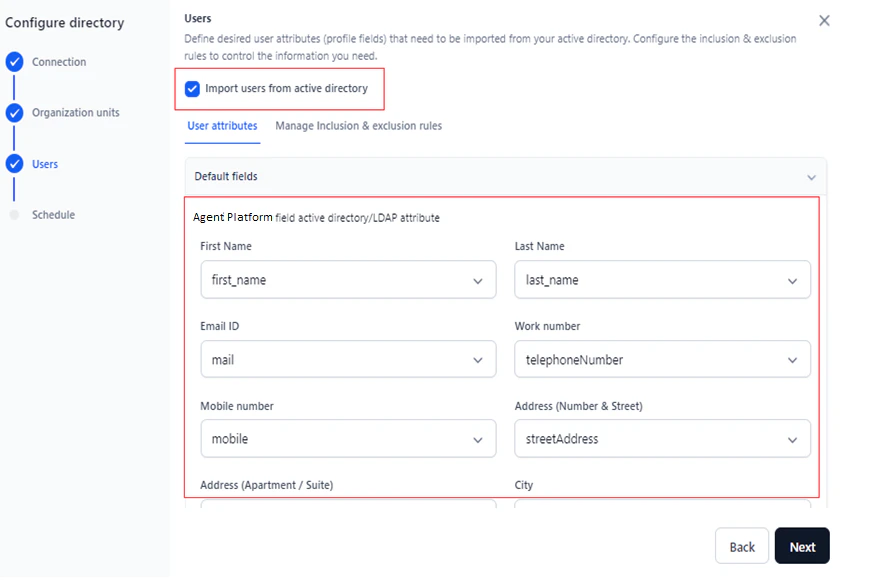
1. (Optional) Select **Import users from active directory** to fetch default fields from the AD.
2. Click the **User Attributes** tab and map each field under **Default Fields** to the corresponding AD attribute from the dropdown.
### Step 3: Specify User Attributes and Configure Rules for Selective Import
In this step, you can:
* Define the LDAP user attributes (profile fields) to import from the AD.
* Set inclusion and exclusion rules to filter which users are imported.
* **Inclusion rules**: Define which users to include in sync or import based on criteria.
* **Exclusion rules**: Define which users to exclude from the AD import.
**To configure user attributes:**
1. (Optional) Select **Import users from active directory** to fetch default fields from the AD.
2. Click the **User Attributes** tab and map each field under **Default Fields** to the corresponding AD attribute from the dropdown.
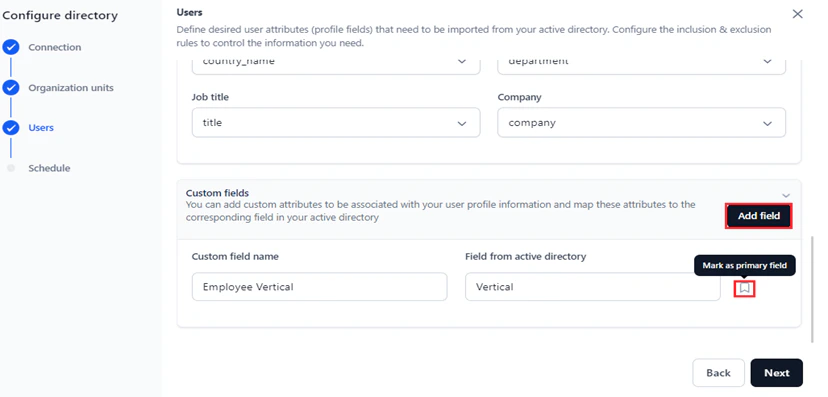
 3. (Optional) To add custom field mappings in the **Custom Fields** section:
* Click **Add Field**.
* Enter the custom field name in **Custom field name**.
* Enter the corresponding AD field in **Field from Active Directory**.
* (Optional) Click the **tag** icon to set the custom field as the primary field. To delete this field, you must first remove the primary field tag.
* Click **Next** to complete the mapping.
3. (Optional) To add custom field mappings in the **Custom Fields** section:
* Click **Add Field**.
* Enter the custom field name in **Custom field name**.
* Enter the corresponding AD field in **Field from Active Directory**.
* (Optional) Click the **tag** icon to set the custom field as the primary field. To delete this field, you must first remove the primary field tag.
* Click **Next** to complete the mapping.
 To remove a field, click the **Delete** icon.
 Deleting a custom field is only allowed if multiple fields exist.
**To configure inclusion and exclusion rules:**
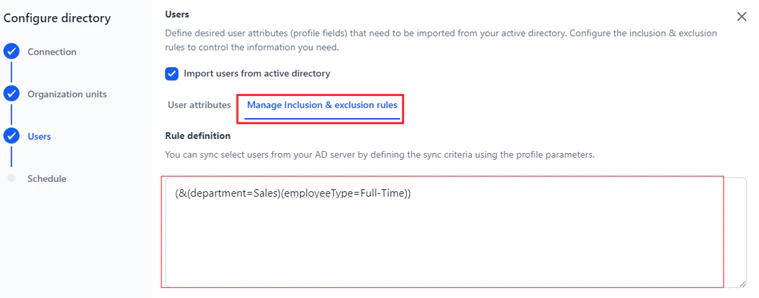
4. Click the **Manage Inclusion & Exclusion Rules** tab.
5. Under **Inclusion Rules**, enter the rule expression using user profile parameters in the **Rule Definition** textbox, following LDAP filter syntax.
Deleting a custom field is only allowed if multiple fields exist.
**To configure inclusion and exclusion rules:**
4. Click the **Manage Inclusion & Exclusion Rules** tab.
5. Under **Inclusion Rules**, enter the rule expression using user profile parameters in the **Rule Definition** textbox, following LDAP filter syntax.
 6. (Optional) Under **Exclusion Rules**, set the **AD/LDAP field**, **Match Type**, and **Value**. Match Type options:
| Match Type | Description |
| ---------------- | ----------------------------------------------------- |
| Exact Match | The AD field must exactly match the specified value. |
| Partial Match | The AD field can partially match the specified value. |
| Multiple Matches | The AD field must match all specified values. |
**Steps to set exclusion rules:**
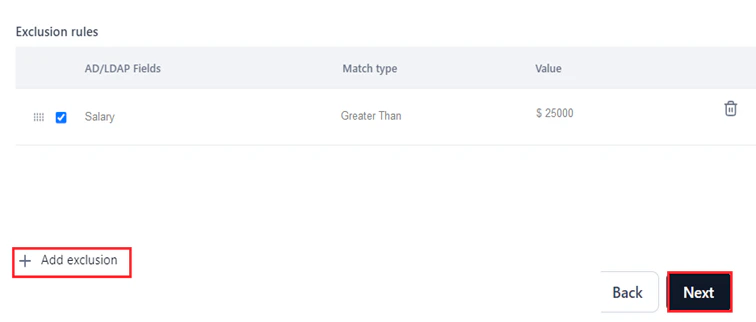
1. Click **+ Add exclusion** to add a new rule entry.
2. Select the entry to enable the exclusion rule.
3. Click **Next** to proceed.
All mandatory fields must be filled in before you can proceed to the next step.
6. (Optional) Under **Exclusion Rules**, set the **AD/LDAP field**, **Match Type**, and **Value**. Match Type options:
| Match Type | Description |
| ---------------- | ----------------------------------------------------- |
| Exact Match | The AD field must exactly match the specified value. |
| Partial Match | The AD field can partially match the specified value. |
| Multiple Matches | The AD field must match all specified values. |
**Steps to set exclusion rules:**
1. Click **+ Add exclusion** to add a new rule entry.
2. Select the entry to enable the exclusion rule.
3. Click **Next** to proceed.
All mandatory fields must be filled in before you can proceed to the next step.
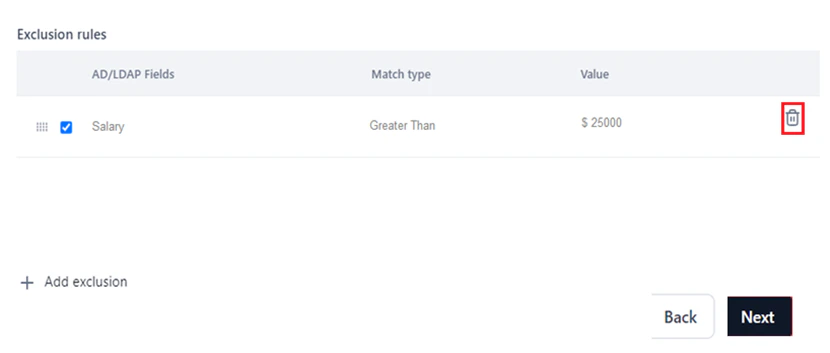
 To delete a rule, hover over the entry and click the **Delete** icon.
 ### Step 4: Schedule Automatic AD Sync
Enabling auto sync is optional but recommended to keep your AD data on AI for Process current.
When auto sync is disabled, initiate AD sync manually by clicking **Sync Now** under **Configure Sync with Directory**.
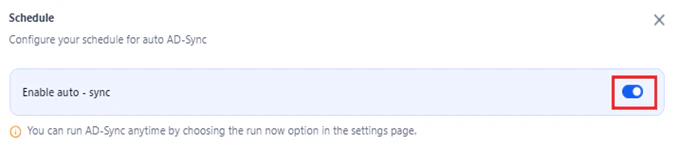
1. Click the **Enable auto-sync** toggle.
### Step 4: Schedule Automatic AD Sync
Enabling auto sync is optional but recommended to keep your AD data on AI for Process current.
When auto sync is disabled, initiate AD sync manually by clicking **Sync Now** under **Configure Sync with Directory**.
1. Click the **Enable auto-sync** toggle.
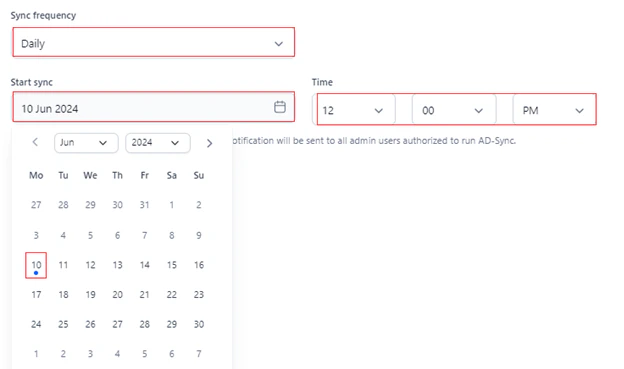
 2. Configure the following sync fields:
| Field | Options | Default |
| ------------------ | --------------------------------- | ------------ |
| **Sync Frequency** | Daily, Weekly, Monthly, Other | Daily |
| **Sync Start** | Any future date (calendar picker) | Current date |
| **Time** | Based on selected frequency | 12:00 PM |
* For weekly and monthly syncs, you can select only one date from the calendar.
* You can only schedule sync with a future date and time.
**Frequency options:**
* **Daily**: Syncs every day starting from the **Sync Start** date.
*Example:* Syncs daily from 10 June 2024 at 12:00 PM.
2. Configure the following sync fields:
| Field | Options | Default |
| ------------------ | --------------------------------- | ------------ |
| **Sync Frequency** | Daily, Weekly, Monthly, Other | Daily |
| **Sync Start** | Any future date (calendar picker) | Current date |
| **Time** | Based on selected frequency | 12:00 PM |
* For weekly and monthly syncs, you can select only one date from the calendar.
* You can only schedule sync with a future date and time.
**Frequency options:**
* **Daily**: Syncs every day starting from the **Sync Start** date.
*Example:* Syncs daily from 10 June 2024 at 12:00 PM.
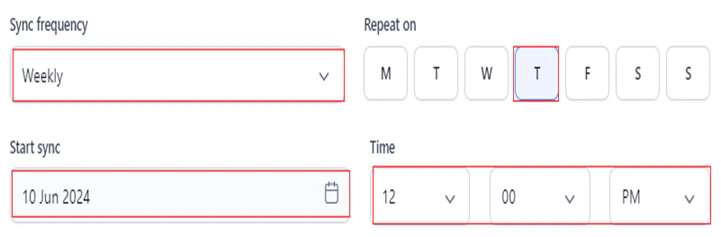
 * **Weekly**: Syncs on the selected day (**Repeat On**) every week, starting from the **Sync Start** date.
*Example:* Syncs every Thursday from 10 June 2024 at 12:00 PM.
* **Weekly**: Syncs on the selected day (**Repeat On**) every week, starting from the **Sync Start** date.
*Example:* Syncs every Thursday from 10 June 2024 at 12:00 PM.
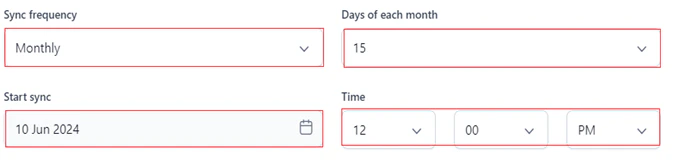
 * **Monthly**: Syncs on the designated day of each month, starting from the **Sync Start** date.
*Example:* Syncs on the 15th of each month, starting 10 June 2024 at 12:00 PM.
* **Monthly**: Syncs on the designated day of each month, starting from the **Sync Start** date.
*Example:* Syncs on the 15th of each month, starting 10 June 2024 at 12:00 PM.
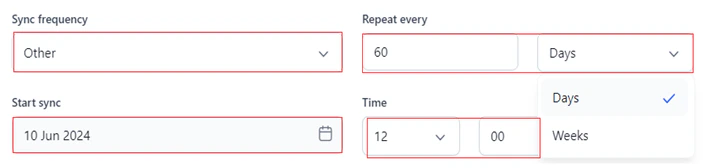
 * **Other**: Syncs at custom intervals (for example, every 60 days or weeks) starting from the **Sync Start** date and time.
*Example:* Syncs every 60 days, starting 10 June 2024 at 12:00 PM.
* **Other**: Syncs at custom intervals (for example, every 60 days or weeks) starting from the **Sync Start** date and time.
*Example:* Syncs every 60 days, starting 10 June 2024 at 12:00 PM.
 3. Click **Save**.
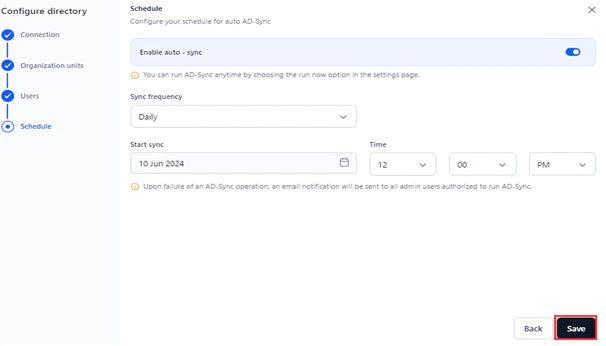 If auto sync is disabled, **Save** only saves the configuration. Enabling auto sync saves the configuration and initiates sync at the scheduled time.
### After Setup
After configuring AD sync, the following options appear under **Configure sync with directory**:
| Option | Description |
| ------------------------- | ------------------------------------------------------------------------------------------------------------------------------------ |
| **Sync now** | Performs an ad hoc AD sync without waiting for the schedule. |
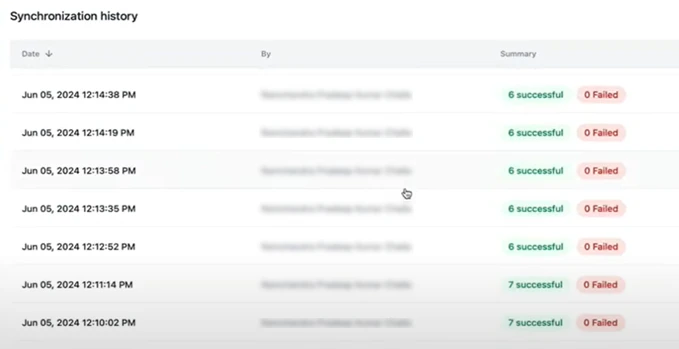
| **Sync History** | Displays the history of AD syncs, including date and time, the initiating user, and a count of successful and failed records synced. |
| **Manage directory sync** | Opens the **Configure Directory** window to edit existing configurations. |
| **Reset** | Resets the AD sync configuration but retains the last sync data on AI for Process. |
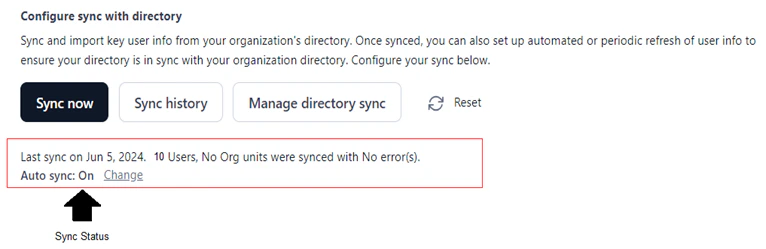
| **Sync Status** | Shows the date of last sync, total users and OUs synchronized, and any errors encountered. |
Even if auto sync is off, click the **Change** link in Sync Status to access and schedule auto sync on the configuration page.
If auto sync is disabled, **Save** only saves the configuration. Enabling auto sync saves the configuration and initiates sync at the scheduled time.
### After Setup
After configuring AD sync, the following options appear under **Configure sync with directory**:
| Option | Description |
| ------------------------- | ------------------------------------------------------------------------------------------------------------------------------------ |
| **Sync now** | Performs an ad hoc AD sync without waiting for the schedule. |
| **Sync History** | Displays the history of AD syncs, including date and time, the initiating user, and a count of successful and failed records synced. |
| **Manage directory sync** | Opens the **Configure Directory** window to edit existing configurations. |
| **Reset** | Resets the AD sync configuration but retains the last sync data on AI for Process. |
| **Sync Status** | Shows the date of last sync, total users and OUs synchronized, and any errors encountered. |
Even if auto sync is off, click the **Change** link in Sync Status to access and schedule auto sync on the configuration page.
 ### Sync Status Email Notifications
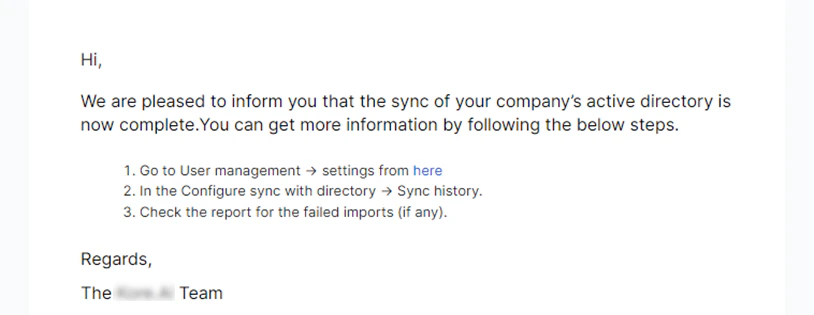
For a **successful** sync:
### Sync Status Email Notifications
For a **successful** sync:
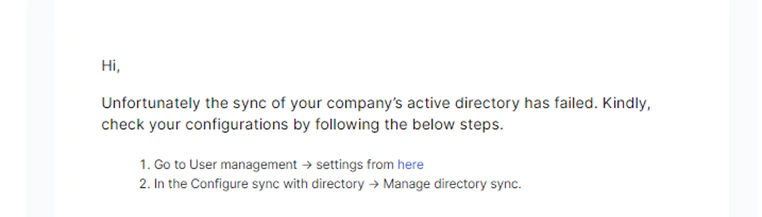
 For a **failed** sync: