> ## Documentation Index
> Fetch the complete documentation index at: https://koreai.mintlify.site/llms.txt
> Use this file to discover all available pages before exploring further.
# Workflow Management
The Platform provides features for end-to-end workflow implementation and maintenance.
| Section | Description |
| :------------------------------------------------------------------------------------------------ | :------------------------------------------------------------------------------------------------------------------------------------- |
| [Workflow Builder](/ai-for-process/workflows/workflow-builder) | Visual no-code/low-code builder for creating and managing workflows and workflow versions. Build from scratch or import existing ones. |
| [Sharing and Permissions](/ai-for-process/workflows/workflow-management#collaborate-on-workflows) | Invite users to collaborate on specific workflows. Invited users see only the workflows they're invited to. |
| [Workflow Endpoint](/ai-for-process/workflows/workflow-management#workflow-endpoints) | Deploy a workflow to generate a dedicated API endpoint for integration with external systems. |
| [API Keys](/ai-for-process/workflows/workflow-management#api-keys-and-workflow-access) | Create API keys to enable secure access to deployed workflows. |
| [Monitoring](/ai-for-process/workflows/monitor-and-debug#workflow-monitor) | Track and analyze workflow executions across multiple runs to identify issues and optimize performance. |
| [Guardrails](/ai-for-process/workflows/workflow-management#guardrails) | Apply guardrail models to scan LLM inputs and outputs, enforcing safety and content policies. |
| [Audit Logs](/ai-for-process/workflows/workflow-management#audit-logs) | View detailed audit logs for all workflow activities for troubleshooting and traceability. |
| [Configurations](/ai-for-process/workflows/workflow-management#configure-a-workflow) | Manage workflow metadata, define reusable values using environment variables, and control workflow deployment. |
## Collaborate on Workflows
Account owners can invite users to collaborate on specific workflows. They can invite only those users who already have access to their account. The invited users can access the Models and Data modules for the account but can only see the workflows they're invited to.
To invite users to a workflow, follow these steps:
1. In the workflow’s left navigation pane, click **Sharing & Permissions**.
2. Select **Invite**.
3. Enter the users’ email addresses, assign a role, and select **Send invitation**.
***
## Workflow Endpoints
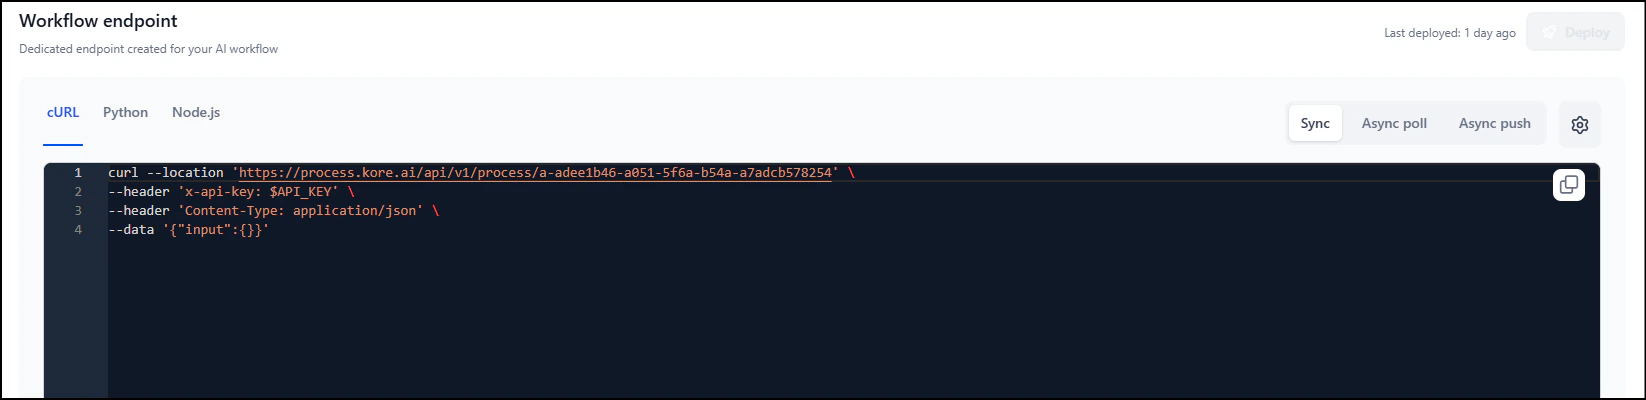
After deployment, the platform generates sync and async poll endpoints automatically. An async push endpoint requires additional configuration.
 | Endpoint type | Behavior |
| :---------------- | :----------------------------------------------------------------------------------------------------------------------------------------------- |
| Synchronous | The client waits for the workflow to complete and returns the response immediately. Suitable for real-time operations. |
| Asynchronous poll | The workflow processes the request independently. The client periodically polls the integration to retrieve the response. |
| Asynchronous push | The workflow pushes the response to a client-specified callback URL as soon as processing is complete. Requires a callback URL and access token. |
| | |
### Deploy a Workflow
Deploying a workflow generates a dedicated API endpoint for integration with external systems.
Fix all errors and warnings in the workflow before deploying.
1. In the workflow’s left navigation pane, select **Workflow endpoint**.
2. Select **Deploy**. The **Sync** and **Async poll** endpoints are generated automatically.
**To enable the Async push endpoint:**
1. On the **Workflow endpoint** page, click the **Async push** tab, and click **Settings**.
2. Turn on the **Enable async** toggle.
3. Enter the callback URL of the external application that will receive the response.
4. Enter the access token generated by the external application.
5. Set the timeout:
* **Set timeout**: 60 - 600 seconds (default: 180 seconds).
* **No timeout**: The workflow runs without a time limit.
| Endpoint type | Behavior |
| :---------------- | :----------------------------------------------------------------------------------------------------------------------------------------------- |
| Synchronous | The client waits for the workflow to complete and returns the response immediately. Suitable for real-time operations. |
| Asynchronous poll | The workflow processes the request independently. The client periodically polls the integration to retrieve the response. |
| Asynchronous push | The workflow pushes the response to a client-specified callback URL as soon as processing is complete. Requires a callback URL and access token. |
| | |
### Deploy a Workflow
Deploying a workflow generates a dedicated API endpoint for integration with external systems.
Fix all errors and warnings in the workflow before deploying.
1. In the workflow’s left navigation pane, select **Workflow endpoint**.
2. Select **Deploy**. The **Sync** and **Async poll** endpoints are generated automatically.
**To enable the Async push endpoint:**
1. On the **Workflow endpoint** page, click the **Async push** tab, and click **Settings**.
2. Turn on the **Enable async** toggle.
3. Enter the callback URL of the external application that will receive the response.
4. Enter the access token generated by the external application.
5. Set the timeout:
* **Set timeout**: 60 - 600 seconds (default: 180 seconds).
* **No timeout**: The workflow runs without a time limit.
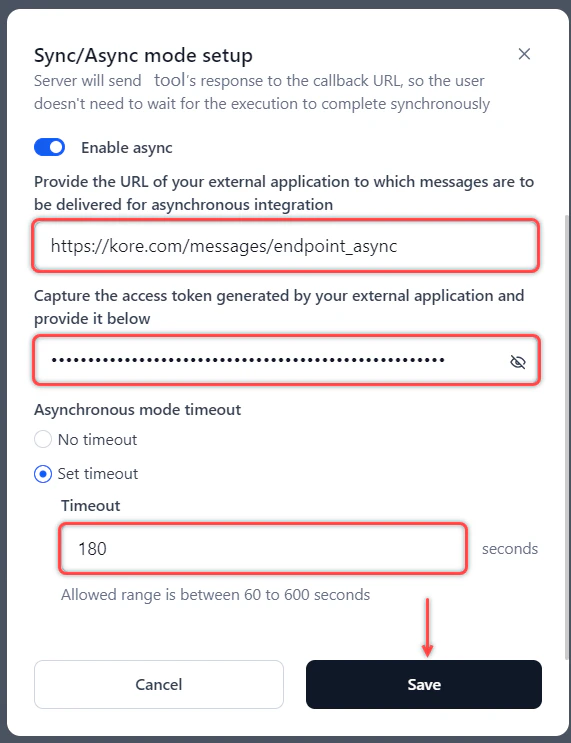 6. Click **Save**. The async push endpoint is created.
Timeout precedence: Workflow timeout > Node timeout > Model timeout.
If you change the sync/async mode after deployment, you must redeploy the workflow for the change to take effect.
### Redeploy a Workflow
You can redeploy a workflow to publish updates made to its flow.
1. On the **Workflow** page:
* View the **deployed** flow in read-only mode.
* Update the **in-development** version of the flow.
2. On the Workflow endpoint page, select **Deploy** to publish the updated flow.
Redeploying does not change the workflow’s endpoint.
***
## API Keys
When you deploy a workflow, the platform generates a dedicated API endpoint. External systems call this endpoint to invoke the workflow. API keys control who can access the endpoint.
To create an API key:
1. In the workflow’s left navigation pane, click **API keys**.
2. Click **Create a new API key**, enter a descriptive name for the key, and click **Generate key**. The key is displayed once.
3. Click **Copy and close** to save the key to your clipboard.
AI for Process doesn't display the API key after you close this dialog. Copy the key and keep it secure and confidential. Don't expose it in client-side code and don't share it with unauthorized users.
A list of all generated keys is displayed the **API keys** section for reference and management.
***
## Monitoring
Monitoring provides visibility into workflow activity after deployment. It helps you track trigger behavior, review workflow executions, diagnose failures, and understand performance over time. Use these monitoring tools to ensure workflows continue running reliably in production.
### Trigger History
The **Triggers** page shows all configured triggers for a deployed workflow and their recent activity.
To access triggers: In the workflow’s left navigation pane, click **Monitoring** > **Triggers**.
| Trigger type | Details included |
| ------------------ | ----------------------------------------------------------------------------------------------- |
| **Event-based** | Provider, trigger name, description, setup time, last run |
| **Schedule-based** | Frequency, description, setup time, start and end time, time zone, last run, next scheduled run |
Inactive triggers show a warning with recommended actions. If a trigger is inactive:
* Redeploy the workflow to refresh connections.
* Retest the auth profile in **Settings** > **Security & Control** > **Authorization profiles**.
***
### Workflow Monitor
The **Workflow Monitor** gives you a time-based, run-level view of every execution of a deployed workflow. Use it to track performance, inspect inputs and outputs, diagnose failures, and review the history of runs and configuration changes.
Monitoring is only available for workflows deployed to production. Workflows in design or debug phases are not tracked in the Workflow Monitor.
To access workflow monitor: In the workflow’s left navigation pane, click **Monitoring > Workflow runs**.
The Workflow Monitor provides two analytics views:
* **All runs**: Shows all workflow run instances, including runs triggered by events, schedules, or API calls.
* **Model runs**: Shows individual AI node executions within each workflow run.
Both tabs display summary metrics at the top:
| Metric | Description |
| ------------------------- | ---------------------------------------------------------------------- |
| **Total runs / requests** | Total number of workflow runs or AI node calls in the selected period. |
| **Response time (P90)** | The response time below which 90% of runs fall. |
| **Response time (P99)** | The response time below which 99% of runs fall. |
| **Failure rate** | Percentage of runs that ended in failure. |
These metrics update dynamically when you apply filters or change the date range.
#### All Runs
Each row in the **All runs** tab represents one workflow execution and shows:
* **Run ID**: Unique identifier for the run.
* **Status**: One of the following:
* **In Progress**: The run is actively executing.
* **Waiting**: Execution is paused, waiting for a response from an external system (typically an async API node).
* **Success**: The run completed without errors.
* **Failed**: The run did not complete successfully.
* **Response time**: Total time from request to output.
* **Nodes executed**: Number of nodes that ran in this execution.
* **Start time / End time**: When the run began and ended.
* **Type**: The trigger type—Event-based, Schedule-based, or API-based.
* **Source**: The service or schedule that initiated the run (for example, Gmail for an event-based trigger).
#### Model Runs
The **Model runs** tab tracks each AI node call separately. If a workflow has three AI nodes, each run produces three entries in this tab. The tab is empty if the workflow has no AI nodes.
Each entry shows:
* **Request ID**: Unique identifier for the AI node call.
* **Status**: In Progress, Waiting, Success, or Failed.
* **Node name**: The name of the AI node.
* **Model name**: The AI model used.
* **Connection / Deployment name**: The connection or deployment linked to the model.
* **Response time**: Time taken for the AI node to complete.
* **Start time / End time**: Execution window for the AI node.
#### Viewing Execution Results
Clicking any row in the Workflow Monitor opens a detailed run panel. This panel mirrors the **Run dialog** on the workflow canvas and shows:
* **Run ID / Request ID**: Unique identifier for the run.
* **Response time**: Total execution time.
* **Debug icon**: Opens the debug log for the run.
* **Input section**: The inputs passed to the workflow.
* **Flow log**: Node-by-node execution log.
* **Success**: Shows the same debug output as in the canvas debug panel.
* **Failure**: Shows failure details and error information for the failed node. For AI nodes, you can expand the node to see scanner information.
* **Output section**: The final output from the workflow (available for successful runs). You can copy the output and view token usage.
***
## Guardrails
Enable safety scanning to enforce safety, policy, and compliance checks:
```yaml theme={null}
guardrails:
input_scanning: true
output_scanning: true
scanners:
- toxicity
- pii_detection
- jailbreak_detection
```
Guardrails scan LLM inputs and outputs, prevent unsafe or non-compliant responses, and apply consistent enforcement across workflows.
To access guardrails for a workflow: In the workflow’s left navigation pane, click **Guardrails**.
For more information, see [Guardrails](/ai-for-process/guardrails).
***
## Audit Logs
Audit logs track all user actions and system events for a workflow, including logins, role changes, and configuration updates.
To access audit logs: In the workflow’s left navigation pane, click **Audit logs**.
Each log entry includes:
* **Event name**: The action or event that occurred.
* **Category**: The module or entity affected.
* **User name**: The user who performed the action.
* **Date and time**: When the event occurred.
* **Description**: Details about the action.
You can filter audit logs by date range, category, event, or user.
***
## Configure a Workflow
From your workflow's **Configurations** page, you can update workflow details, set the sync/async mode, and manage environment variables.
### Set sync/async mode
The sync/async mode determines how the workflow endpoint responds to callers. Synchronous mode blocks the client until the workflow completes and returns a response. Asynchronous mode lets the client continue working while the workflow processes the request and delivers the result to a callback URL.
If you change the mode after deployment, you must redeploy the workflow for the change to take effect.
1. In the workflow’s left navigation pane, click **Configurations > Setup sync/async**.
2. Configure the mode:
* **Synchronous mode**: Set the timeout duration. The allowed range is 60 - 300 seconds (default: 180 seconds). The endpoint returns a timeout error if the workflow does not complete within this window.
* **Asynchronous mode**: Turn on the **Enable async** toggle, then:
1. Enter the URL of the external application to receive the workflow's response.
2. Enter the access token generated by the external application.
3. Set the timeout:
* **Set timeout**: Allowed range is 60-600 seconds (default: 180 seconds).
* **No timeout**: The workflow runs without a time limit.
3. Select **Save**.
Timeout precedence: Workflow timeout > Node timeout > Model timeout.
### Manage environment variables
Environment variables store reusable values—such as API base URLs or configuration flags—that nodes across the workflow can reference. Marking a variable as secure encrypts its value.
**To add an environment variable**:
1. In the workflow’s left navigation pane, click **Configurations > Manage environment variables**.
2. Select **Add** or **Add variable**. The **Add variable** dialog box opens.
3. Provide the following details and select **Save**.
| Field | Description |
| :--------------- | :-------------------------------------------------------------------------------------- |
| Variable name | A descriptive name for the variable. |
| Secure variable | Enable to encrypt the variable's value. Read the on-screen information before enabling. |
| Value | The value to store. |
| Notes (optional) | Usage notes or context for the variable. |
To edit or delete an environment variable, select the three-dots icon next to the variable name and choose **Edit** or **Delete**.
### Import a Workflow as a Version
You can import a workflow package as a **new version** of an existing parent workflow.
It replaces the existing in‑development version with the imported one and can optionally back up the current version first (saved as `Exported_.zip`).
**Required files for version import**:
* `flow_definition.json` – workflow canvas definitions and AI node configurations
* `app_definition.json` – workflow version info and guardrails
* `env_variables.json` – environment variables set for the workflow
Any environment variable conflicts must be resolved during the import process.
**Steps to Import a Workflow Version**:
1. In the workflow’s left navigation pane, click **Configurations > Import a workflow**, and click **Import**.
2. (Optional) Select the **Back up your current workflow** option to preserve the data of the version being replaced. Backing up automatically saves a `.zip` package of the workflow definition files to the designated location.
3. Click **Import** in the confirmation dialog.
4. In the **Import Workflow** window, upload the required JSON files and click **Import**.
If validation succeeds, the workflow is imported successfully. The imported version is added under the parent workflow.
The status of the parent workflow is set to **In Development**.
**Resolving conflicting environment variables**:
During a workflow version import, conflicts may occur between the parent workflow’s environment variables and those in the imported version:
* If neither workflow has variables, no conflict occurs.
* For conflicting values, existing variables are retained by default unless replaced.
1. In the Edit environment variable dialog, go to the **Conflicting variables** tab.
2. For each variable, choose **Overwrite** (replace with imported value) or **Keep existing**.
3. Click **Proceed** to continue importing.
### Export a Workflow
You can export workflow versions as self-contained packages for sharing and data preservation, without compromising the integrity or security of your workflow setup.
AI for Process creates a `.zip` file named after the workflow—for example, *Banking Assistant.zip* for a workflow named *Banking Assistant*. Save this file to any local location.
The package can be reimported to create a new workflow or add it as a version to an existing one.
The [exported package](#exported-information) preserves the following workflow configurations within JSON files:
* Name and description
* API, Condition, AI, and Script node configurations
* Input/output variables and scanners
* Environment variables
* Sync/Async setup
For security, the exported package excludes **API keys**, **sharing permissions**, **workflow endpoint**, and **audit logs**.
Users with only **Viewer** permissions cannot export a workflow.
**To export a workflow:**
1. In the workflow’s left navigation pane, click **Configurations > Export workflow**.
2. By default, the currently deployed version is selected in the dropdown.
3. Click the **Export** button.
A success message is displayed after the workflow is validated and the export completes.
Once export begins, the selected version cannot be changed.
**Exported Information**:
The exported package contains the following JSON files:
* **`flow_definition.json`**: Includes the workflow canvas definitions (node definitions) and AI node configurations, including prompts, hyperparameters, and timeout information.
* **`app_definition.json`**: Includes general information about the workflow version and guardrails.
* **`env_variables.json`**: Includes the environment variables set for the workflow. [Learn more](#configure-a-workflow).
### Undeploy a Workflow
Undeploying a workflow disconnects it from all active instances immediately. Use this when you need to take a workflow offline without permanently removing it.
In the workflow’s left navigation pane, click **Configurations** > **Proceed to undeploy**, and follow the on-screen instructions.
### Delete a Workflow
You can only delete a workflow that is not deployed. Deleting a workflow removes the workflow and all its associated data permanently.
In the workflow’s left navigation pane, click **Configurations** > **Proceed to delete**, and follow the on-screen instructions.
6. Click **Save**. The async push endpoint is created.
Timeout precedence: Workflow timeout > Node timeout > Model timeout.
If you change the sync/async mode after deployment, you must redeploy the workflow for the change to take effect.
### Redeploy a Workflow
You can redeploy a workflow to publish updates made to its flow.
1. On the **Workflow** page:
* View the **deployed** flow in read-only mode.
* Update the **in-development** version of the flow.
2. On the Workflow endpoint page, select **Deploy** to publish the updated flow.
Redeploying does not change the workflow’s endpoint.
***
## API Keys
When you deploy a workflow, the platform generates a dedicated API endpoint. External systems call this endpoint to invoke the workflow. API keys control who can access the endpoint.
To create an API key:
1. In the workflow’s left navigation pane, click **API keys**.
2. Click **Create a new API key**, enter a descriptive name for the key, and click **Generate key**. The key is displayed once.
3. Click **Copy and close** to save the key to your clipboard.
AI for Process doesn't display the API key after you close this dialog. Copy the key and keep it secure and confidential. Don't expose it in client-side code and don't share it with unauthorized users.
A list of all generated keys is displayed the **API keys** section for reference and management.
***
## Monitoring
Monitoring provides visibility into workflow activity after deployment. It helps you track trigger behavior, review workflow executions, diagnose failures, and understand performance over time. Use these monitoring tools to ensure workflows continue running reliably in production.
### Trigger History
The **Triggers** page shows all configured triggers for a deployed workflow and their recent activity.
To access triggers: In the workflow’s left navigation pane, click **Monitoring** > **Triggers**.
| Trigger type | Details included |
| ------------------ | ----------------------------------------------------------------------------------------------- |
| **Event-based** | Provider, trigger name, description, setup time, last run |
| **Schedule-based** | Frequency, description, setup time, start and end time, time zone, last run, next scheduled run |
Inactive triggers show a warning with recommended actions. If a trigger is inactive:
* Redeploy the workflow to refresh connections.
* Retest the auth profile in **Settings** > **Security & Control** > **Authorization profiles**.
***
### Workflow Monitor
The **Workflow Monitor** gives you a time-based, run-level view of every execution of a deployed workflow. Use it to track performance, inspect inputs and outputs, diagnose failures, and review the history of runs and configuration changes.
Monitoring is only available for workflows deployed to production. Workflows in design or debug phases are not tracked in the Workflow Monitor.
To access workflow monitor: In the workflow’s left navigation pane, click **Monitoring > Workflow runs**.
The Workflow Monitor provides two analytics views:
* **All runs**: Shows all workflow run instances, including runs triggered by events, schedules, or API calls.
* **Model runs**: Shows individual AI node executions within each workflow run.
Both tabs display summary metrics at the top:
| Metric | Description |
| ------------------------- | ---------------------------------------------------------------------- |
| **Total runs / requests** | Total number of workflow runs or AI node calls in the selected period. |
| **Response time (P90)** | The response time below which 90% of runs fall. |
| **Response time (P99)** | The response time below which 99% of runs fall. |
| **Failure rate** | Percentage of runs that ended in failure. |
These metrics update dynamically when you apply filters or change the date range.
#### All Runs
Each row in the **All runs** tab represents one workflow execution and shows:
* **Run ID**: Unique identifier for the run.
* **Status**: One of the following:
* **In Progress**: The run is actively executing.
* **Waiting**: Execution is paused, waiting for a response from an external system (typically an async API node).
* **Success**: The run completed without errors.
* **Failed**: The run did not complete successfully.
* **Response time**: Total time from request to output.
* **Nodes executed**: Number of nodes that ran in this execution.
* **Start time / End time**: When the run began and ended.
* **Type**: The trigger type—Event-based, Schedule-based, or API-based.
* **Source**: The service or schedule that initiated the run (for example, Gmail for an event-based trigger).
#### Model Runs
The **Model runs** tab tracks each AI node call separately. If a workflow has three AI nodes, each run produces three entries in this tab. The tab is empty if the workflow has no AI nodes.
Each entry shows:
* **Request ID**: Unique identifier for the AI node call.
* **Status**: In Progress, Waiting, Success, or Failed.
* **Node name**: The name of the AI node.
* **Model name**: The AI model used.
* **Connection / Deployment name**: The connection or deployment linked to the model.
* **Response time**: Time taken for the AI node to complete.
* **Start time / End time**: Execution window for the AI node.
#### Viewing Execution Results
Clicking any row in the Workflow Monitor opens a detailed run panel. This panel mirrors the **Run dialog** on the workflow canvas and shows:
* **Run ID / Request ID**: Unique identifier for the run.
* **Response time**: Total execution time.
* **Debug icon**: Opens the debug log for the run.
* **Input section**: The inputs passed to the workflow.
* **Flow log**: Node-by-node execution log.
* **Success**: Shows the same debug output as in the canvas debug panel.
* **Failure**: Shows failure details and error information for the failed node. For AI nodes, you can expand the node to see scanner information.
* **Output section**: The final output from the workflow (available for successful runs). You can copy the output and view token usage.
***
## Guardrails
Enable safety scanning to enforce safety, policy, and compliance checks:
```yaml theme={null}
guardrails:
input_scanning: true
output_scanning: true
scanners:
- toxicity
- pii_detection
- jailbreak_detection
```
Guardrails scan LLM inputs and outputs, prevent unsafe or non-compliant responses, and apply consistent enforcement across workflows.
To access guardrails for a workflow: In the workflow’s left navigation pane, click **Guardrails**.
For more information, see [Guardrails](/ai-for-process/guardrails).
***
## Audit Logs
Audit logs track all user actions and system events for a workflow, including logins, role changes, and configuration updates.
To access audit logs: In the workflow’s left navigation pane, click **Audit logs**.
Each log entry includes:
* **Event name**: The action or event that occurred.
* **Category**: The module or entity affected.
* **User name**: The user who performed the action.
* **Date and time**: When the event occurred.
* **Description**: Details about the action.
You can filter audit logs by date range, category, event, or user.
***
## Configure a Workflow
From your workflow's **Configurations** page, you can update workflow details, set the sync/async mode, and manage environment variables.
### Set sync/async mode
The sync/async mode determines how the workflow endpoint responds to callers. Synchronous mode blocks the client until the workflow completes and returns a response. Asynchronous mode lets the client continue working while the workflow processes the request and delivers the result to a callback URL.
If you change the mode after deployment, you must redeploy the workflow for the change to take effect.
1. In the workflow’s left navigation pane, click **Configurations > Setup sync/async**.
2. Configure the mode:
* **Synchronous mode**: Set the timeout duration. The allowed range is 60 - 300 seconds (default: 180 seconds). The endpoint returns a timeout error if the workflow does not complete within this window.
* **Asynchronous mode**: Turn on the **Enable async** toggle, then:
1. Enter the URL of the external application to receive the workflow's response.
2. Enter the access token generated by the external application.
3. Set the timeout:
* **Set timeout**: Allowed range is 60-600 seconds (default: 180 seconds).
* **No timeout**: The workflow runs without a time limit.
3. Select **Save**.
Timeout precedence: Workflow timeout > Node timeout > Model timeout.
### Manage environment variables
Environment variables store reusable values—such as API base URLs or configuration flags—that nodes across the workflow can reference. Marking a variable as secure encrypts its value.
**To add an environment variable**:
1. In the workflow’s left navigation pane, click **Configurations > Manage environment variables**.
2. Select **Add** or **Add variable**. The **Add variable** dialog box opens.
3. Provide the following details and select **Save**.
| Field | Description |
| :--------------- | :-------------------------------------------------------------------------------------- |
| Variable name | A descriptive name for the variable. |
| Secure variable | Enable to encrypt the variable's value. Read the on-screen information before enabling. |
| Value | The value to store. |
| Notes (optional) | Usage notes or context for the variable. |
To edit or delete an environment variable, select the three-dots icon next to the variable name and choose **Edit** or **Delete**.
### Import a Workflow as a Version
You can import a workflow package as a **new version** of an existing parent workflow.
It replaces the existing in‑development version with the imported one and can optionally back up the current version first (saved as `Exported_.zip`).
**Required files for version import**:
* `flow_definition.json` – workflow canvas definitions and AI node configurations
* `app_definition.json` – workflow version info and guardrails
* `env_variables.json` – environment variables set for the workflow
Any environment variable conflicts must be resolved during the import process.
**Steps to Import a Workflow Version**:
1. In the workflow’s left navigation pane, click **Configurations > Import a workflow**, and click **Import**.
2. (Optional) Select the **Back up your current workflow** option to preserve the data of the version being replaced. Backing up automatically saves a `.zip` package of the workflow definition files to the designated location.
3. Click **Import** in the confirmation dialog.
4. In the **Import Workflow** window, upload the required JSON files and click **Import**.
If validation succeeds, the workflow is imported successfully. The imported version is added under the parent workflow.
The status of the parent workflow is set to **In Development**.
**Resolving conflicting environment variables**:
During a workflow version import, conflicts may occur between the parent workflow’s environment variables and those in the imported version:
* If neither workflow has variables, no conflict occurs.
* For conflicting values, existing variables are retained by default unless replaced.
1. In the Edit environment variable dialog, go to the **Conflicting variables** tab.
2. For each variable, choose **Overwrite** (replace with imported value) or **Keep existing**.
3. Click **Proceed** to continue importing.
### Export a Workflow
You can export workflow versions as self-contained packages for sharing and data preservation, without compromising the integrity or security of your workflow setup.
AI for Process creates a `.zip` file named after the workflow—for example, *Banking Assistant.zip* for a workflow named *Banking Assistant*. Save this file to any local location.
The package can be reimported to create a new workflow or add it as a version to an existing one.
The [exported package](#exported-information) preserves the following workflow configurations within JSON files:
* Name and description
* API, Condition, AI, and Script node configurations
* Input/output variables and scanners
* Environment variables
* Sync/Async setup
For security, the exported package excludes **API keys**, **sharing permissions**, **workflow endpoint**, and **audit logs**.
Users with only **Viewer** permissions cannot export a workflow.
**To export a workflow:**
1. In the workflow’s left navigation pane, click **Configurations > Export workflow**.
2. By default, the currently deployed version is selected in the dropdown.
3. Click the **Export** button.
A success message is displayed after the workflow is validated and the export completes.
Once export begins, the selected version cannot be changed.
**Exported Information**:
The exported package contains the following JSON files:
* **`flow_definition.json`**: Includes the workflow canvas definitions (node definitions) and AI node configurations, including prompts, hyperparameters, and timeout information.
* **`app_definition.json`**: Includes general information about the workflow version and guardrails.
* **`env_variables.json`**: Includes the environment variables set for the workflow. [Learn more](#configure-a-workflow).
### Undeploy a Workflow
Undeploying a workflow disconnects it from all active instances immediately. Use this when you need to take a workflow offline without permanently removing it.
In the workflow’s left navigation pane, click **Configurations** > **Proceed to undeploy**, and follow the on-screen instructions.
### Delete a Workflow
You can only delete a workflow that is not deployed. Deleting a workflow removes the workflow and all its associated data permanently.
In the workflow’s left navigation pane, click **Configurations** > **Proceed to delete**, and follow the on-screen instructions.