> ## Documentation Index
> Fetch the complete documentation index at: https://koreai.mintlify.site/llms.txt
> Use this file to discover all available pages before exploring further.
# Groups Management
[Back to Admin Console](/ai-for-service/administration/overview)
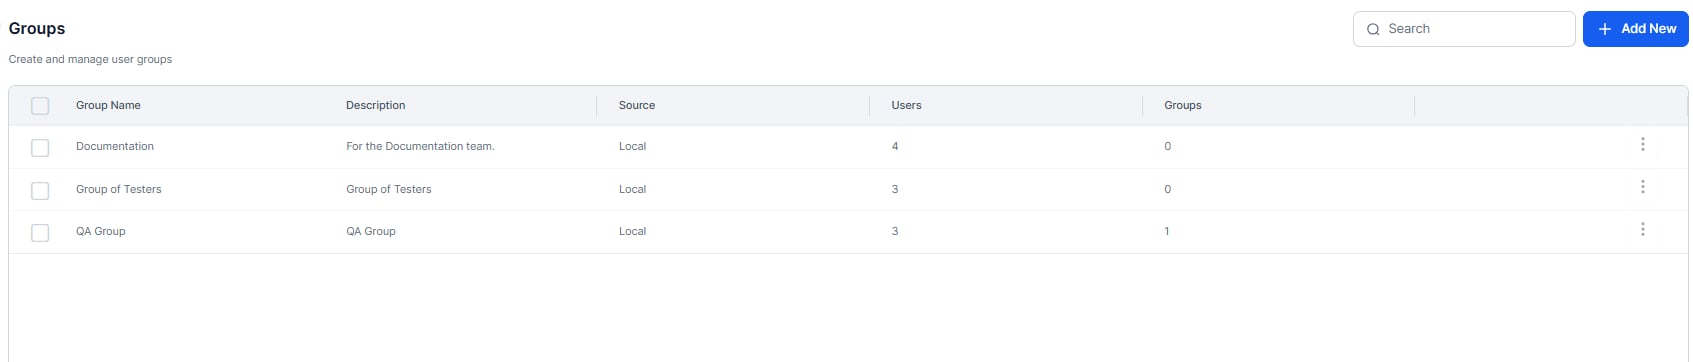
Use the **Groups** page in the **User Management** module to create and manage logically related user groups or import groups, such as your organization's Active Directory groups. When your enterprise has diverse app requirements across departments or business units, create groups, add developers, and assign apps to those groups. You can also create custom groups based on factors such as geographic location, department, or shared interests. The system automatically creates groups when you import organizational units through Active Directory. The following illustration shows the Groups page in the User Management module.
 ## Details
The following list describes the columns displayed in the Groups listing.
| Column | Description |
| ----------- | ---------------------------------------------------------------------------------------------------------------------------------------------------------------------------------------------------------------------------------------------------------- |
| Group Name | Displays the group name. |
| Description | Displays the description of the group. This is an optional field. |
| Source | The source used to create the group. One of: **Local** - The group was created manually from the **User Management** module. **AD**. The group was imported or synchronized using Active Directory. **System** – The group was created as a default group. |
| Users | Displays the number of group members as users. Click the link to edit the list of users for the selected group. |
| Groups | Displays the number of groups as child members of the parent group. Click the link to edit the list of child groups for the selected group. |
### Using the Search Field
The list of entries in an admin console table can be extensive, depending on your company's size. To locate specific users or groups, enter at least three characters in the **Search** field to start the find-as-you-type process.
The number of search terms in a search query is unlimited; however, no more than the first 20 characters of each search term are used to return search results.
To view all entries, clear the search field, and then press the **Enter** key.
## Creation
Create one or more user groups in your account based on common factors such as interests, departments, or locations. Groups created by an admin aren't visible to end users and serve administrative purposes only. This topic explains how to create a new group and add users or existing groups to it.
1. In the **User Management** module, select **Groups**.
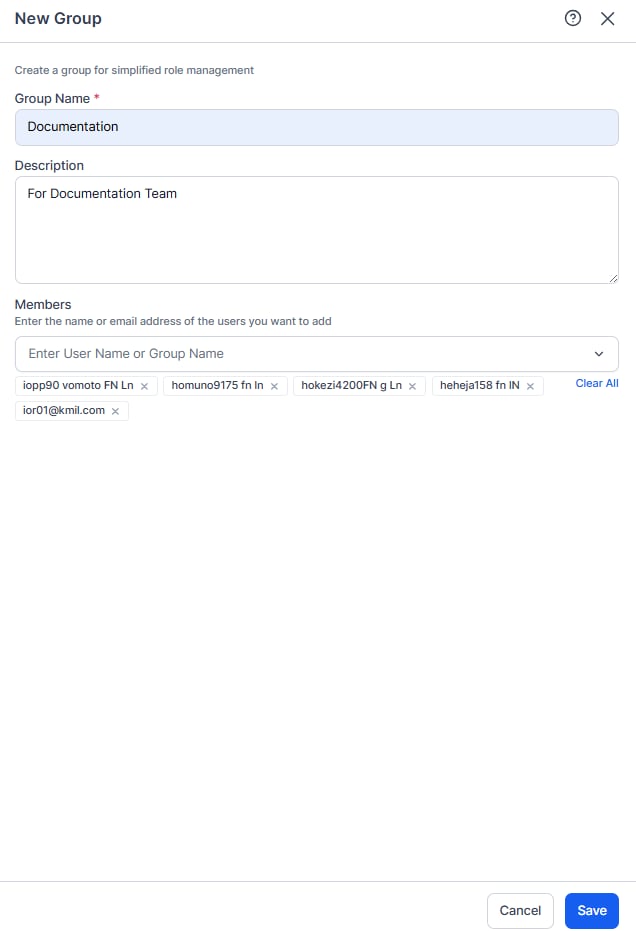
2. Click **Add New** to open the **New Group** dialog.
3. In the **Group Name** field, enter a name for the group.
4. (Optional) In the Description field, enter a description for the group.
5. Select the users and/or groups that you want to add to this new group.
6. Click **Save**. The system creates the group and returns you to the **Groups** page.
## Details
The following list describes the columns displayed in the Groups listing.
| Column | Description |
| ----------- | ---------------------------------------------------------------------------------------------------------------------------------------------------------------------------------------------------------------------------------------------------------- |
| Group Name | Displays the group name. |
| Description | Displays the description of the group. This is an optional field. |
| Source | The source used to create the group. One of: **Local** - The group was created manually from the **User Management** module. **AD**. The group was imported or synchronized using Active Directory. **System** – The group was created as a default group. |
| Users | Displays the number of group members as users. Click the link to edit the list of users for the selected group. |
| Groups | Displays the number of groups as child members of the parent group. Click the link to edit the list of child groups for the selected group. |
### Using the Search Field
The list of entries in an admin console table can be extensive, depending on your company's size. To locate specific users or groups, enter at least three characters in the **Search** field to start the find-as-you-type process.
The number of search terms in a search query is unlimited; however, no more than the first 20 characters of each search term are used to return search results.
To view all entries, clear the search field, and then press the **Enter** key.
## Creation
Create one or more user groups in your account based on common factors such as interests, departments, or locations. Groups created by an admin aren't visible to end users and serve administrative purposes only. This topic explains how to create a new group and add users or existing groups to it.
1. In the **User Management** module, select **Groups**.
2. Click **Add New** to open the **New Group** dialog.
3. In the **Group Name** field, enter a name for the group.
4. (Optional) In the Description field, enter a description for the group.
5. Select the users and/or groups that you want to add to this new group.
6. Click **Save**. The system creates the group and returns you to the **Groups** page.
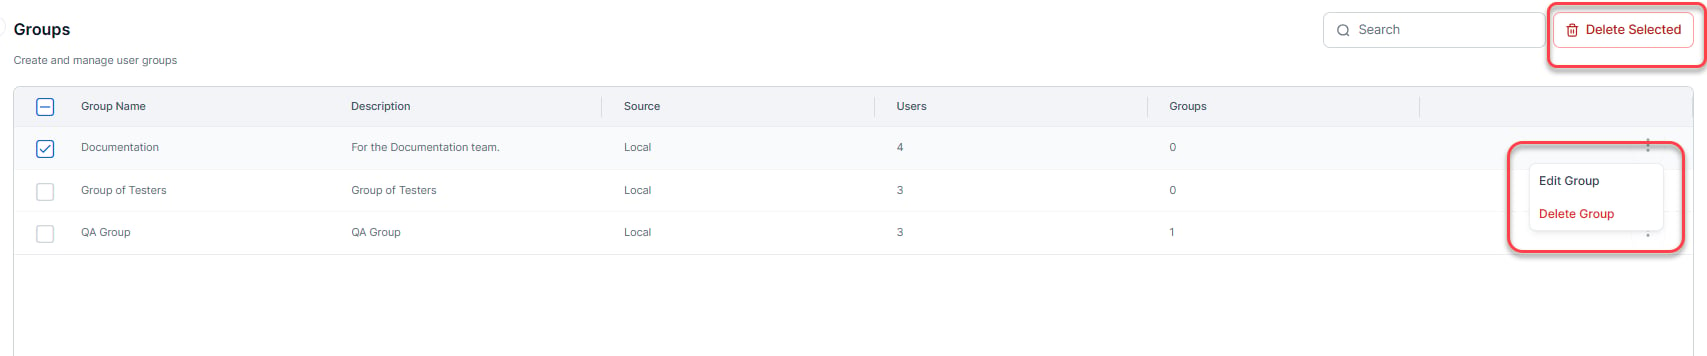
 As an admin, you can edit or delete a group by using the ellipsis (three dots) next to each group on the **Groups** page. You can also delete a group by selecting it and clicking **Delete Selected**.