> ## Documentation Index
> Fetch the complete documentation index at: https://koreai.mintlify.site/llms.txt
> Use this file to discover all available pages before exploring further.
# User Management
[Back to Admin Console](/ai-for-service/administration/overview)
**User Management** involves managing users and user groups.
* From the **[Users section](#users)**, you can view and manage your users' roles and status, and monitor user message activity.
* From **[User Settings section](#user-settings)**, you can define the user profile fields displayed to the user in their profile, such as address information, and whether the user can edit those fields.
## Users
You can manage users in your enterprise network from the Admin Console in the **User Management > Users** section.
 The following list describes the columns displayed for each user.
| Column | Description |
| ------------ | ------------------------------------------------------------------------------------------------------------------------------------------------------------------------------------------------------------------------------------------------------------------------------------------------------------------------------------- |
| Name | Displays the username and selection box. |
| Email Id | Registered email ID of the user. |
| Account Role | Displays the role of the user. |
| Status | Displays the user status.
The following list describes the columns displayed for each user.
| Column | Description |
| ------------ | ------------------------------------------------------------------------------------------------------------------------------------------------------------------------------------------------------------------------------------------------------------------------------------------------------------------------------------- |
| Name | Displays the username and selection box. |
| Email Id | Registered email ID of the user. |
| Account Role | Displays the role of the user. |
| Status | Displays the user status.
• **Active**: The user is active and can interact with other Kore.ai users.
• **Inactive**: Users invited by the Admin but have yet to join or accept the invitation.
• **Locked**: The user exceeded the maximum number of login attempts. The status of a locked user can be activated. |
Clicking on a specific User row from the Users page opens the **User Details** page, from where you can modify the following:
* **[User Profile](#profile)**,
* **[Sessions/Devices](#sessionsdevices)**, and
* **[Manage Product Access](#manage-product-access)**.
### Profile
You can modify the user profile information of a specific user in your account, for example, to update their address or title.
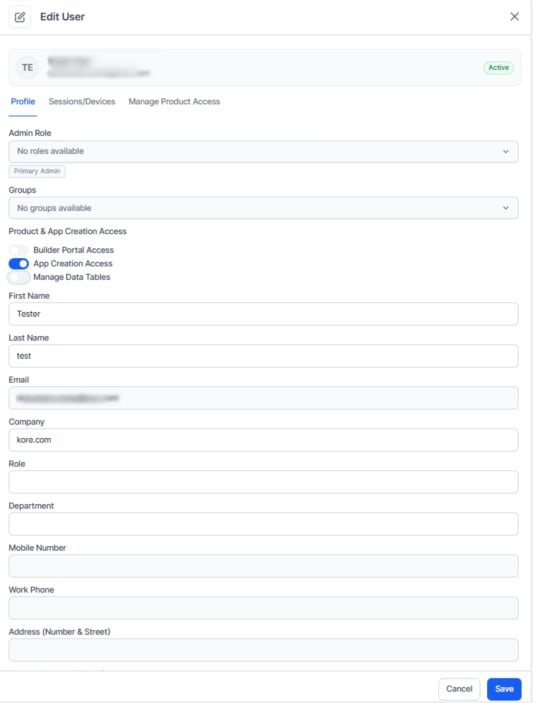 The following fields are accessible from this page:
* **Groups** to which the user is assigned. From the dropdown, select the groups for the given User. [Refer here for more on Managing Groups](/ai-for-service/administration/groups-management).
* **Admin Role** status can be updated from the drop-down.
* **Product & App Creation Access** — Turn on the required toggles for **Builder Portal Access**, **App Creation Access**, and **Manage Data Tables**.
* User Details like First Name, Last Name, email ID, etc., can be viewed and modified.
The email ID is a read-only field and can't be modified.
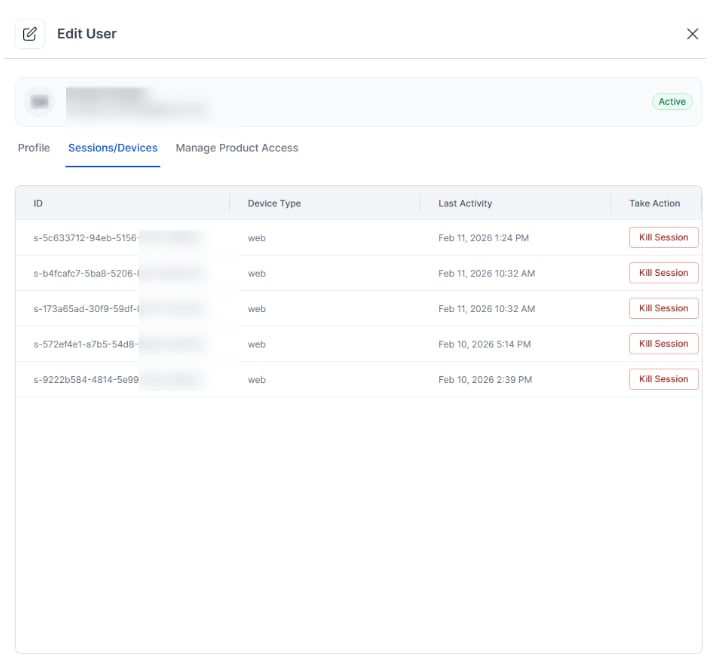
### Sessions/Devices
This tab displays the User activity – the session ID, the device type the user used, and their last activity timestamp on that session.
You can use the Kill Session button to end a mobile or desktop session for the user.
No confirmation message is displayed, and the session is immediately and abruptly ended for the user.
The following fields are accessible from this page:
* **Groups** to which the user is assigned. From the dropdown, select the groups for the given User. [Refer here for more on Managing Groups](/ai-for-service/administration/groups-management).
* **Admin Role** status can be updated from the drop-down.
* **Product & App Creation Access** — Turn on the required toggles for **Builder Portal Access**, **App Creation Access**, and **Manage Data Tables**.
* User Details like First Name, Last Name, email ID, etc., can be viewed and modified.
The email ID is a read-only field and can't be modified.
### Sessions/Devices
This tab displays the User activity – the session ID, the device type the user used, and their last activity timestamp on that session.
You can use the Kill Session button to end a mobile or desktop session for the user.
No confirmation message is displayed, and the session is immediately and abruptly ended for the user.
 ### Cross-Workspace Session Management
The platform manages user sessions at the platform level rather than the workspace level. When users log in, a single session is created that works across all workspaces. This enables administrators to monitor active sessions for their users across all workspaces and terminate any user session, regardless of workspace.
#### Security and Privacy Considerations
* **Privacy**: Users should be aware that their sessions in one workspace might be visible to administrators of other workspaces they're part of.
* **Enhanced Security**: Cross-workspace monitoring helps detect suspicious activities.
* **Session Management**: Users may be logged out if an administrator from any workspace terminates their session.
#### Best Practices
For Administrators:
* Utilize the session management feature responsibly.
* Notify users before terminating sessions, especially those in other workspaces.
* Regularly review active sessions to ensure proper account usage.
For Users:
* Be aware that your sessions are visible across multiple workspaces.
* Log out of inactive sessions to maintain good security practices.
* Report suspicious session activity to the workspace administrator.
### Manage Product Access
This tab displays the Apps to which the User has access and their role – Owner, Developer, or Tester.
As an admin, you may edit or delete the role of the User for a given App. Note that you can't delete or modify the role of an App Owner; it's assigned at the time of App creation.
You can also select an App and assign an App role to the user. For more information, see [App roles](/ai-for-service/administration/role-management).
### Other Options
### Cross-Workspace Session Management
The platform manages user sessions at the platform level rather than the workspace level. When users log in, a single session is created that works across all workspaces. This enables administrators to monitor active sessions for their users across all workspaces and terminate any user session, regardless of workspace.
#### Security and Privacy Considerations
* **Privacy**: Users should be aware that their sessions in one workspace might be visible to administrators of other workspaces they're part of.
* **Enhanced Security**: Cross-workspace monitoring helps detect suspicious activities.
* **Session Management**: Users may be logged out if an administrator from any workspace terminates their session.
#### Best Practices
For Administrators:
* Utilize the session management feature responsibly.
* Notify users before terminating sessions, especially those in other workspaces.
* Regularly review active sessions to ensure proper account usage.
For Users:
* Be aware that your sessions are visible across multiple workspaces.
* Log out of inactive sessions to maintain good security practices.
* Report suspicious session activity to the workspace administrator.
### Manage Product Access
This tab displays the Apps to which the User has access and their role – Owner, Developer, or Tester.
As an admin, you may edit or delete the role of the User for a given App. Note that you can't delete or modify the role of an App Owner; it's assigned at the time of App creation.
You can also select an App and assign an App role to the user. For more information, see [App roles](/ai-for-service/administration/role-management).
### Other Options
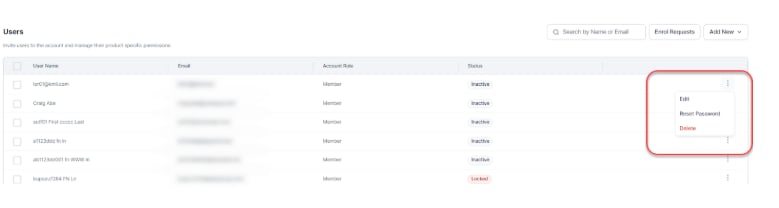 #### Reset a User Password
As an Admin, you can send a password reset email to any user, including yourself, from the Admin Console if Single Sign-On (SSO) isn't enabled.
The *password reset email* sent message is displayed, and an email is sent to the user with instructions about how to reset the password.
When SSO is enabled, password policies aren't in effect for Admins or Kore.ai users; the SSO service provider handles the password policies.
If SSO is enabled, Admins can still log on to the Admin Console directly using their password credentials and bypass SSO. For more information, see [Logging On Using Your Admin Password Instead of SSO](/ai-for-service/administration/single-sign-on).
#### Delete User
As an Admin, you can **delete a User** using the **More** icon on the Users page.
You can also **Delete a User** from the Users page by selecting a user and clicking the **Delete Selected** link.
You can't delete the Users if they're owners of the App. You must change the respective app ownership to someone else to delete the user.
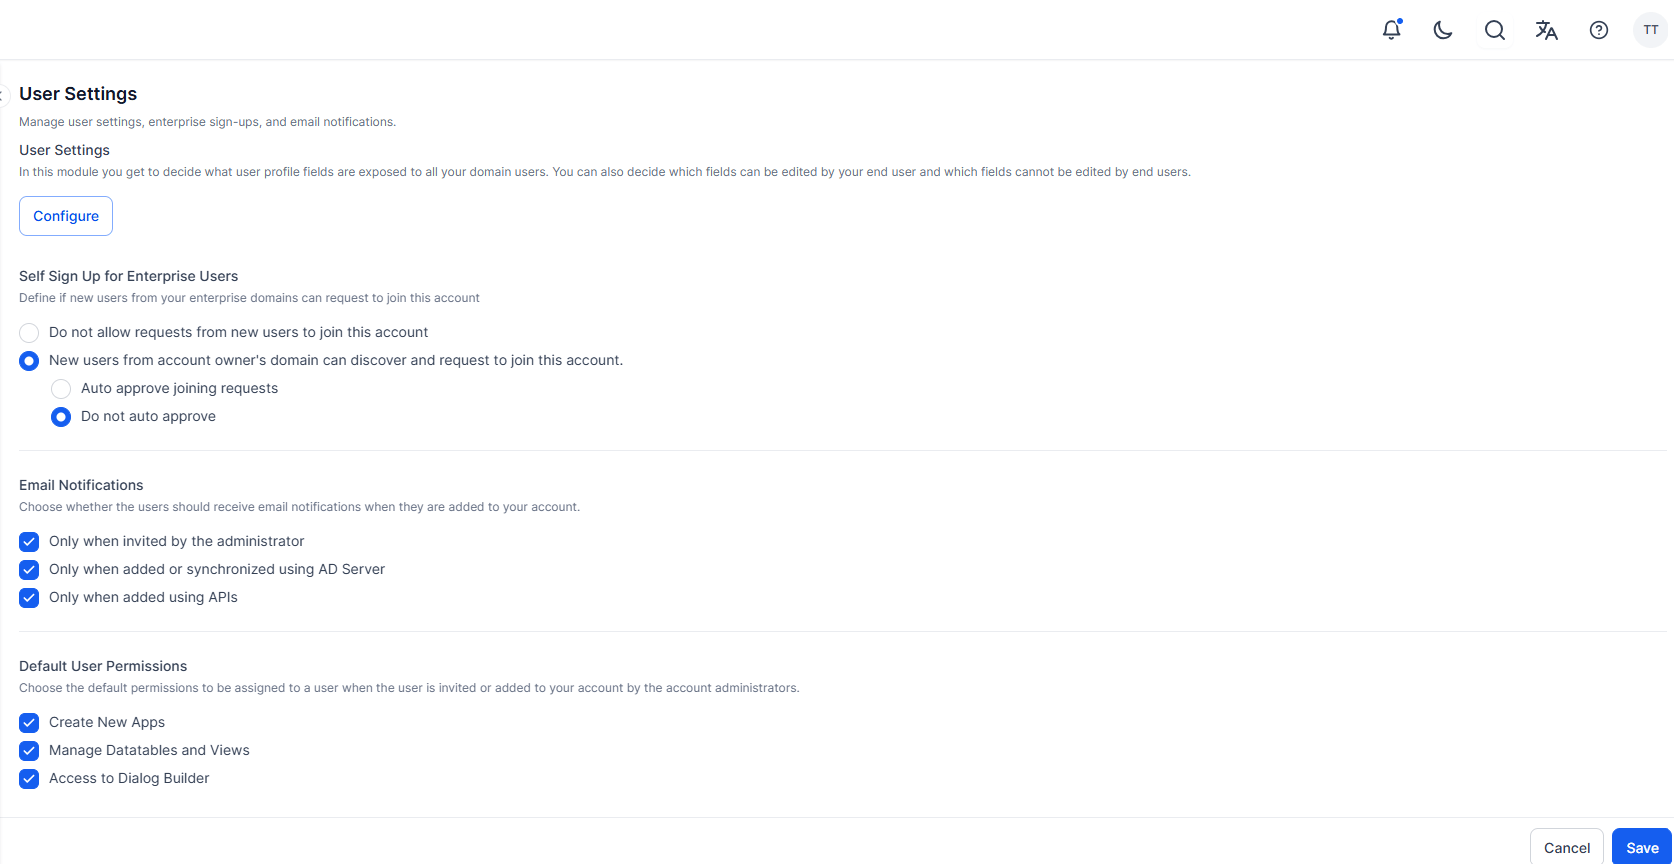
## User Settings
Use the **User Settings** page to manage how users join your account, receive notifications, and get default permissions.
### Self Sign-Up for Enterprise Users
Define whether new users from your enterprise domain can discover and request to join the account.
You can choose to:
* Block requests from new users.
* Allow discovery and requests from users in the account owner's domain.
* Auto approve joining requests.
* Do not auto approve
### Email Notifications
Choose when users should receive email notifications after being added to your account:
* Only when invited by the administrator.
* When added or synchronized using AD Server.
* When added using APIs.
### Default User Permissions
Specify the default permissions assigned to new users:
* Create New Apps.
* Manage Datatables and Views.
* Access Dialog Builder.
When you click **Configure** on the **User Settings** page, the **User Profile Field Controls** panel opens. Use this panel to manage which user profile fields are visible to domain users and which fields end users can edit.
#### Reset a User Password
As an Admin, you can send a password reset email to any user, including yourself, from the Admin Console if Single Sign-On (SSO) isn't enabled.
The *password reset email* sent message is displayed, and an email is sent to the user with instructions about how to reset the password.
When SSO is enabled, password policies aren't in effect for Admins or Kore.ai users; the SSO service provider handles the password policies.
If SSO is enabled, Admins can still log on to the Admin Console directly using their password credentials and bypass SSO. For more information, see [Logging On Using Your Admin Password Instead of SSO](/ai-for-service/administration/single-sign-on).
#### Delete User
As an Admin, you can **delete a User** using the **More** icon on the Users page.
You can also **Delete a User** from the Users page by selecting a user and clicking the **Delete Selected** link.
You can't delete the Users if they're owners of the App. You must change the respective app ownership to someone else to delete the user.
## User Settings
Use the **User Settings** page to manage how users join your account, receive notifications, and get default permissions.
### Self Sign-Up for Enterprise Users
Define whether new users from your enterprise domain can discover and request to join the account.
You can choose to:
* Block requests from new users.
* Allow discovery and requests from users in the account owner's domain.
* Auto approve joining requests.
* Do not auto approve
### Email Notifications
Choose when users should receive email notifications after being added to your account:
* Only when invited by the administrator.
* When added or synchronized using AD Server.
* When added using APIs.
### Default User Permissions
Specify the default permissions assigned to new users:
* Create New Apps.
* Manage Datatables and Views.
* Access Dialog Builder.
When you click **Configure** on the **User Settings** page, the **User Profile Field Controls** panel opens. Use this panel to manage which user profile fields are visible to domain users and which fields end users can edit.
 | Controls | Description |
| -------------------------- | ------------------------------------------------------------------------------------------------------------------------------------------------------------------------------------------------------------------------------------------------------------------------------------------------------------------------------------------- |
| Default Fields Section | The user profile fields are displayed by default and can't be disabled from the User Profile page for the user. `First Name`, `Last Name`, `Profile Picture`. You can also select or clear `Allow Edits` to enable or disable the user from overwriting the data. Modifications to the user profile take effect when the user logs in next. |
| Controlled Fields Sections | The user profile fields are disabled by default and can be enabled by the Enterprise Admin or admin user: `Company`, `Department`, `Title`, `Mobile Number`, `Work Number`, `Address (Number & Street)`, `Address (Street/Suite #)`, `City`, `State`, `Zip`, `Country`, `Employee Organisation ID`. |
| Controls | Description |
| -------------------------- | ------------------------------------------------------------------------------------------------------------------------------------------------------------------------------------------------------------------------------------------------------------------------------------------------------------------------------------------- |
| Default Fields Section | The user profile fields are displayed by default and can't be disabled from the User Profile page for the user. `First Name`, `Last Name`, `Profile Picture`. You can also select or clear `Allow Edits` to enable or disable the user from overwriting the data. Modifications to the user profile take effect when the user logs in next. |
| Controlled Fields Sections | The user profile fields are disabled by default and can be enabled by the Enterprise Admin or admin user: `Company`, `Department`, `Title`, `Mobile Number`, `Work Number`, `Address (Number & Street)`, `Address (Street/Suite #)`, `City`, `State`, `Zip`, `Country`, `Employee Organisation ID`. |