> ## Documentation Index
> Fetch the complete documentation index at: https://koreai.mintlify.site/llms.txt
> Use this file to discover all available pages before exploring further.
# Widget Theming and Layout Customization
Agent AI supports channel-specific widget customization. Changes are previewed in real time on the right side of the page as you configure them.
***
**Steps to open Layout Customization:**
1. Sign in to **Agent AI**.
2. Go to **Configuration** > **System Setup** > **Widget Theming** > **Layout Customization**.
3. Select a channel—**Chat**, **Voice**, or **Email**.
4. Select a language from the dropdown.
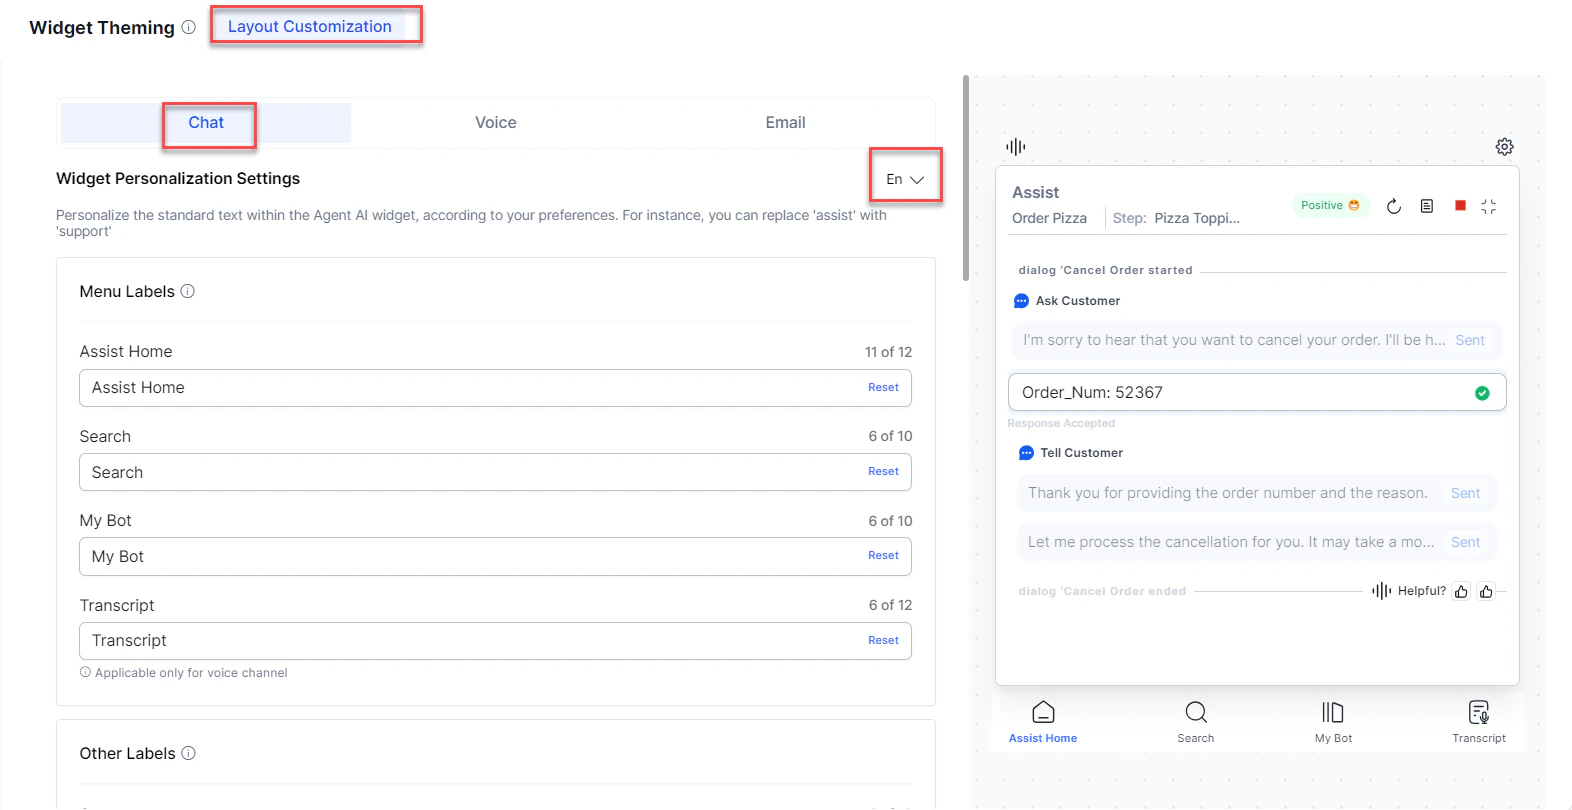 5. Customize the layout using the sections described below.
6. Select **Save**.
***
## Menu Labels
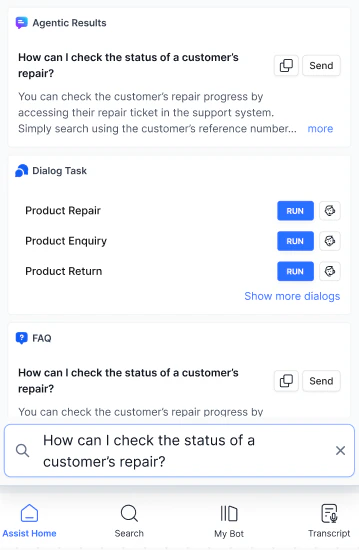
Customize the names of the widget's main menu tabs. Standard tab names are **Assist Home**, **Search**, **My AI Agent (Bot)**, and **Transcript** (Voice channels only).
5. Customize the layout using the sections described below.
6. Select **Save**.
***
## Menu Labels
Customize the names of the widget's main menu tabs. Standard tab names are **Assist Home**, **Search**, **My AI Agent (Bot)**, and **Transcript** (Voice channels only).
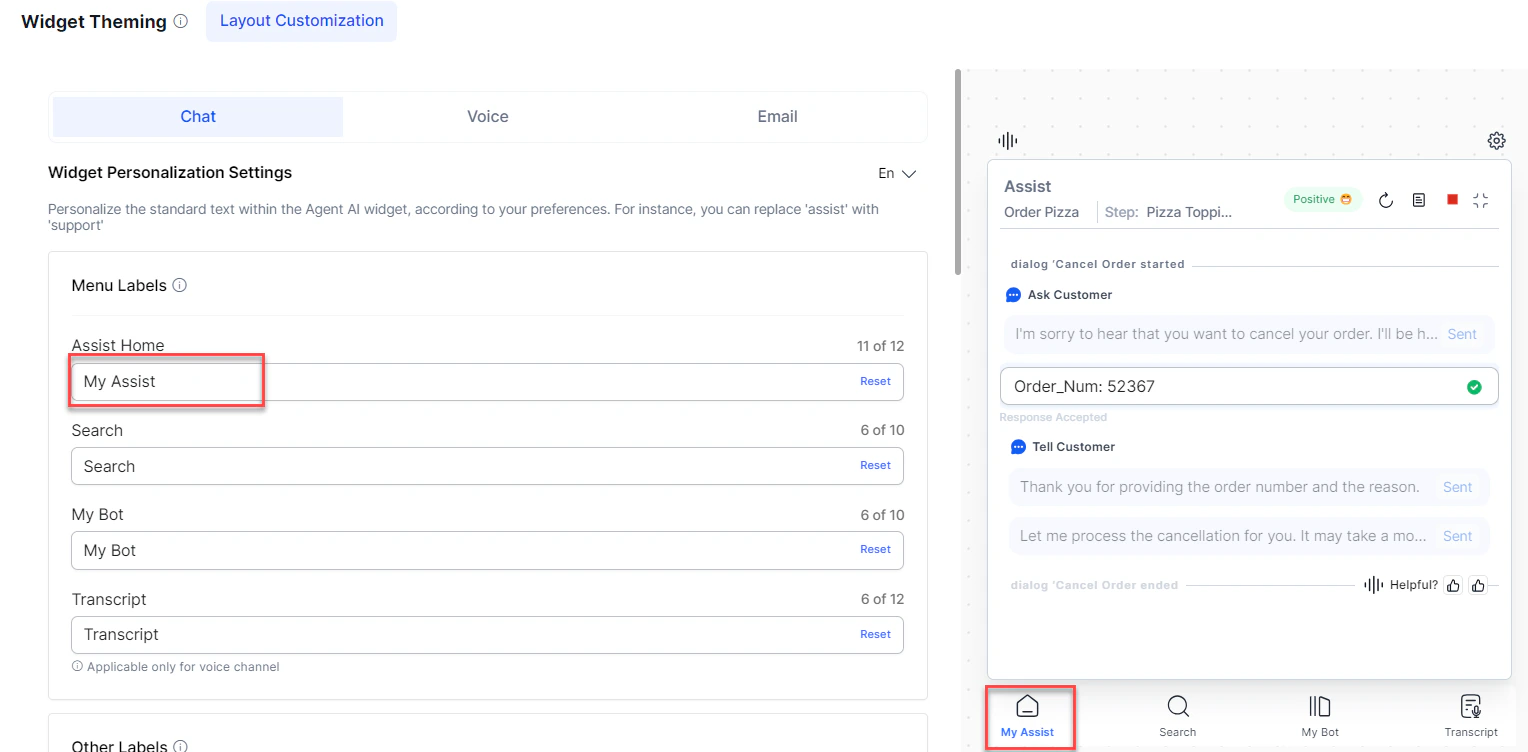 Character limits:
* **Assist Home**: 12 characters
* All other menus: 10 characters
Select **Reset** to restore the default name.
***
## Other Labels
Customize labels related to dialog tasks. You can't preview the changes since dialog tasks run in the background.
Character limits:
* **Assist Home**: 12 characters
* All other menus: 10 characters
Select **Reset** to restore the default name.
***
## Other Labels
Customize labels related to dialog tasks. You can't preview the changes since dialog tasks run in the background.
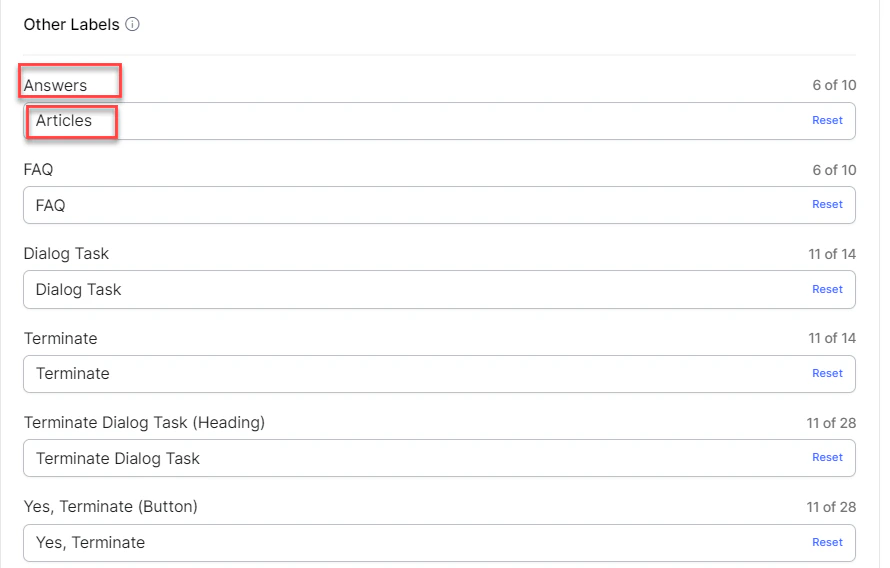 | Label | Character Limit |
| -------------------------------------------------------- | --------------- |
| Answers, FAQ | 10 characters |
| Dialog Task, Terminate | 14 characters |
| Terminate Dialog Task (Heading), Yes, Terminate (Button) | 28 characters |
Select **Reset** to restore defaults.
***
## Dialog Task Labels
Customize dialog task timeline entries and labels. Use `{{Task}}` as a placeholder for dynamic dialog task names. Toggle the section on or off using the toggle at the top. Enable or disable individual labels (**Dialog Started**, **Dialog Ended**) independently.
| Label | Character Limit |
| -------------------------------------------------------- | --------------- |
| Answers, FAQ | 10 characters |
| Dialog Task, Terminate | 14 characters |
| Terminate Dialog Task (Heading), Yes, Terminate (Button) | 28 characters |
Select **Reset** to restore defaults.
***
## Dialog Task Labels
Customize dialog task timeline entries and labels. Use `{{Task}}` as a placeholder for dynamic dialog task names. Toggle the section on or off using the toggle at the top. Enable or disable individual labels (**Dialog Started**, **Dialog Ended**) independently.
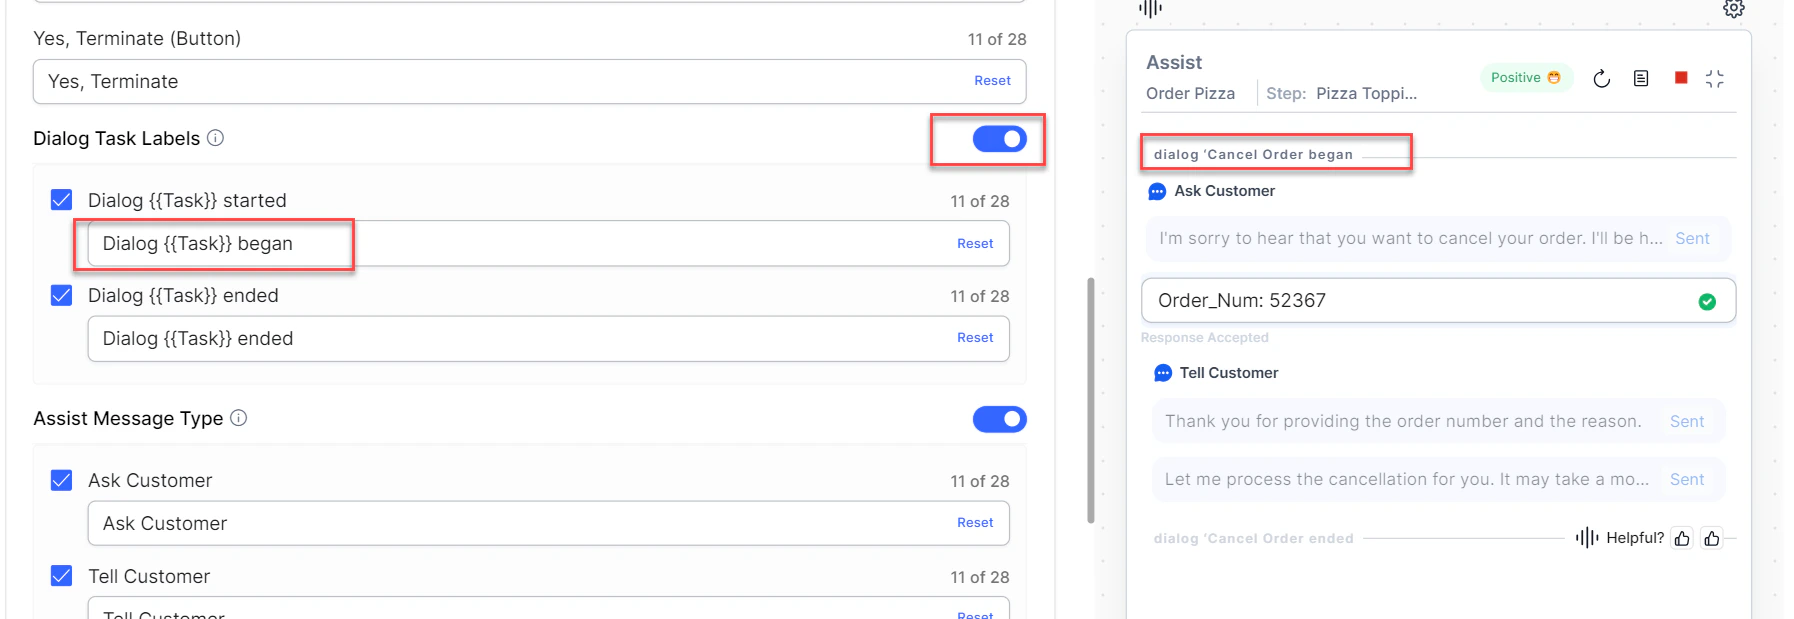 Both labels (**Dialog `{{Task}}` started** and **Dialog `{{Task}}` ended**) have a 28-character limit. Select **Reset** to restore defaults.
***
## Assist Message Type
Customize how Assist message types are displayed. Toggle the section on or off, or enable/disable the **Ask Customer** and **Tell Customer** labels individually. Each label has a 28-character limit.
Both labels (**Dialog `{{Task}}` started** and **Dialog `{{Task}}` ended**) have a 28-character limit. Select **Reset** to restore defaults.
***
## Assist Message Type
Customize how Assist message types are displayed. Toggle the section on or off, or enable/disable the **Ask Customer** and **Tell Customer** labels individually. Each label has a 28-character limit.
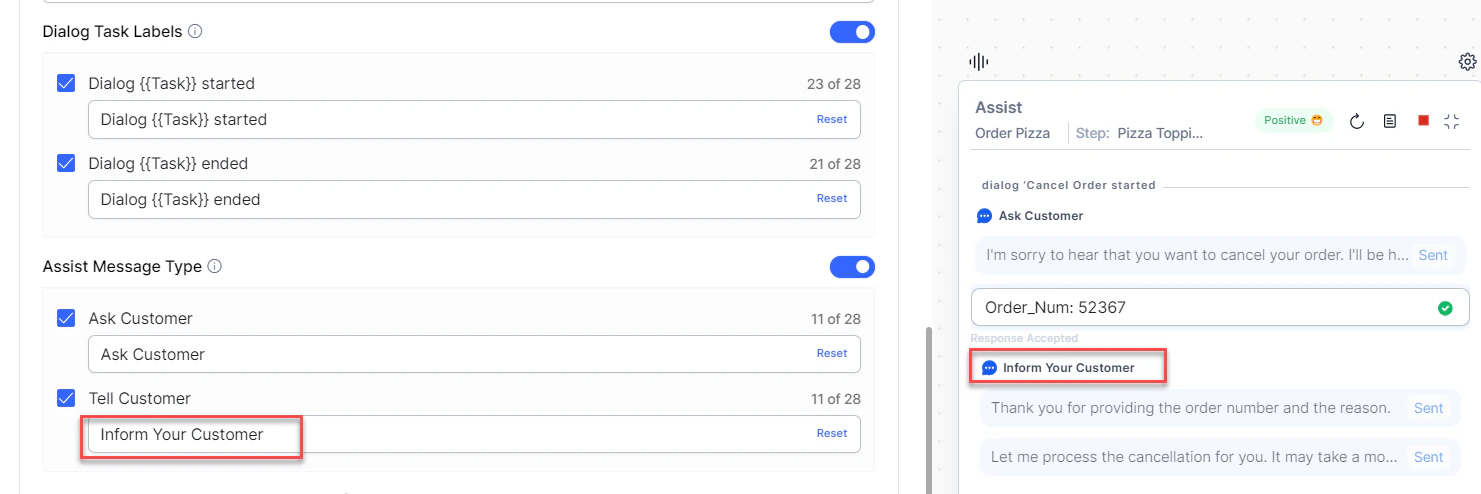 Select **Reset** to restore defaults.
***
## Visibility Controls for Sent/Copied Messages
Use the slider to control the opacity of the **Sent** and **Copied** message backgrounds. The default is 50%.
Select **Reset** to restore defaults.
***
## Visibility Controls for Sent/Copied Messages
Use the slider to control the opacity of the **Sent** and **Copied** message backgrounds. The default is 50%.
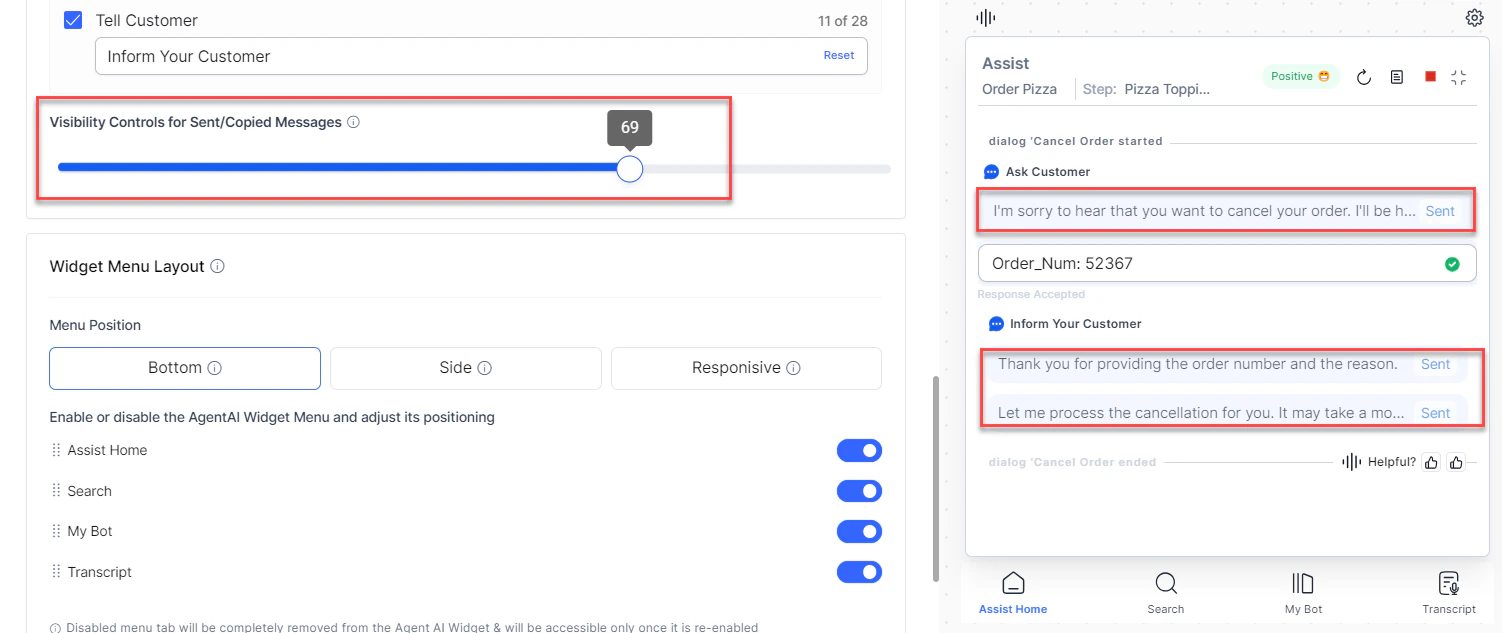 ***
## Widget Menu Layout
Enable or disable widget menus—**Assist Home**, **Search**, **My AI Agent (Bot)**, and **Transcript** (Voice channel). Additional options:
* Set a landing tab.
* Create a **Custom Tab** using **+ Add Custom Tab**.
* Position menus at the **Bottom** or **Side**, or use **Responsive** to auto position based on pixel width (below 600px = bottom, above 600px = left side).
* Reorder menus using drag-and-drop.
***
## Widget Menu Layout
Enable or disable widget menus—**Assist Home**, **Search**, **My AI Agent (Bot)**, and **Transcript** (Voice channel). Additional options:
* Set a landing tab.
* Create a **Custom Tab** using **+ Add Custom Tab**.
* Position menus at the **Bottom** or **Side**, or use **Responsive** to auto position based on pixel width (below 600px = bottom, above 600px = left side).
* Reorder menus using drag-and-drop.
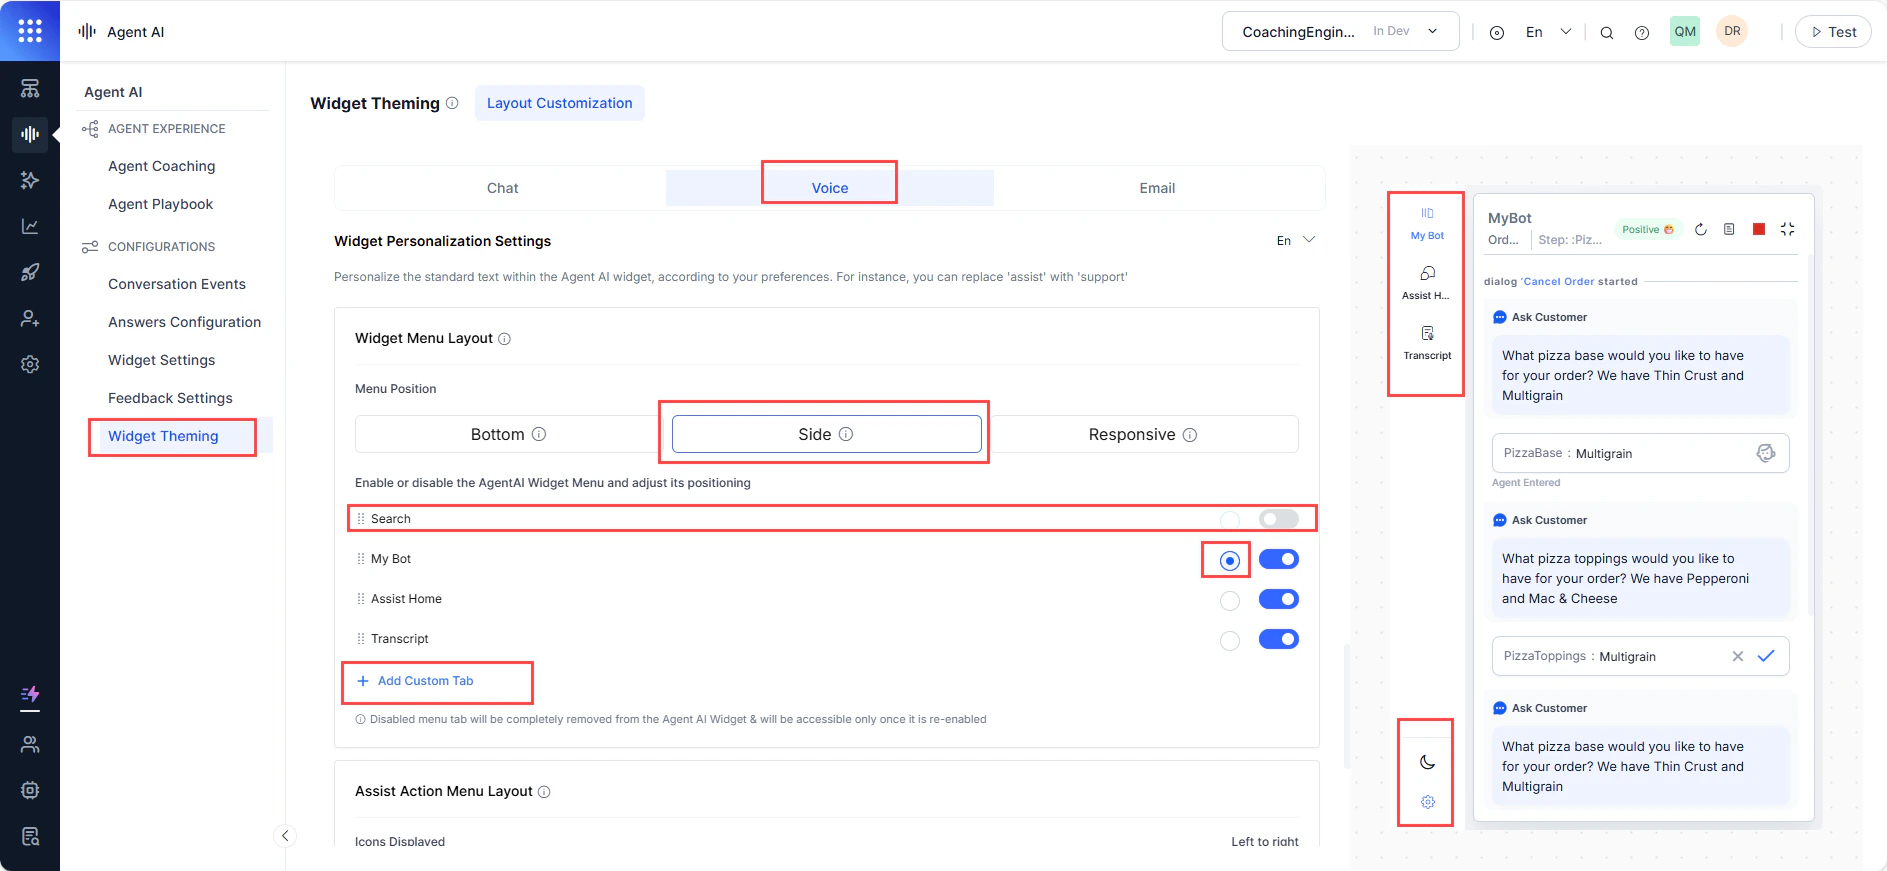 The **Dark Mode** and **Settings** icons aren't customizable. **Dark Mode** is the only functional button in widget preview mode.
### Add a Custom Tab
Create a custom tab to run a dialog task automatically or highlight it for manual execution.
1. Sign in to **Agent AI**.
2. Go to **Widget Theming** > **Layout Customization**.
3. Select **+ Add Custom Tab** under **Widget Menu Layout**.
4. Enter a name in the **Tab Name** field.
5. Select an execution mode:
* **Auto Execute Events**—select dialog tasks for **Welcome Dialog Task** and **End of Conv. Dialog Task** to run automatically based on events.
* **Show Dialog Workflow**—select dialog tasks agents can view and run manually. Search by task name and select **Apply**.
6. Select **Apply**.
The **Dark Mode** and **Settings** icons aren't customizable. **Dark Mode** is the only functional button in widget preview mode.
### Add a Custom Tab
Create a custom tab to run a dialog task automatically or highlight it for manual execution.
1. Sign in to **Agent AI**.
2. Go to **Widget Theming** > **Layout Customization**.
3. Select **+ Add Custom Tab** under **Widget Menu Layout**.
4. Enter a name in the **Tab Name** field.
5. Select an execution mode:
* **Auto Execute Events**—select dialog tasks for **Welcome Dialog Task** and **End of Conv. Dialog Task** to run automatically based on events.
* **Show Dialog Workflow**—select dialog tasks agents can view and run manually. Search by task name and select **Apply**.
6. Select **Apply**.
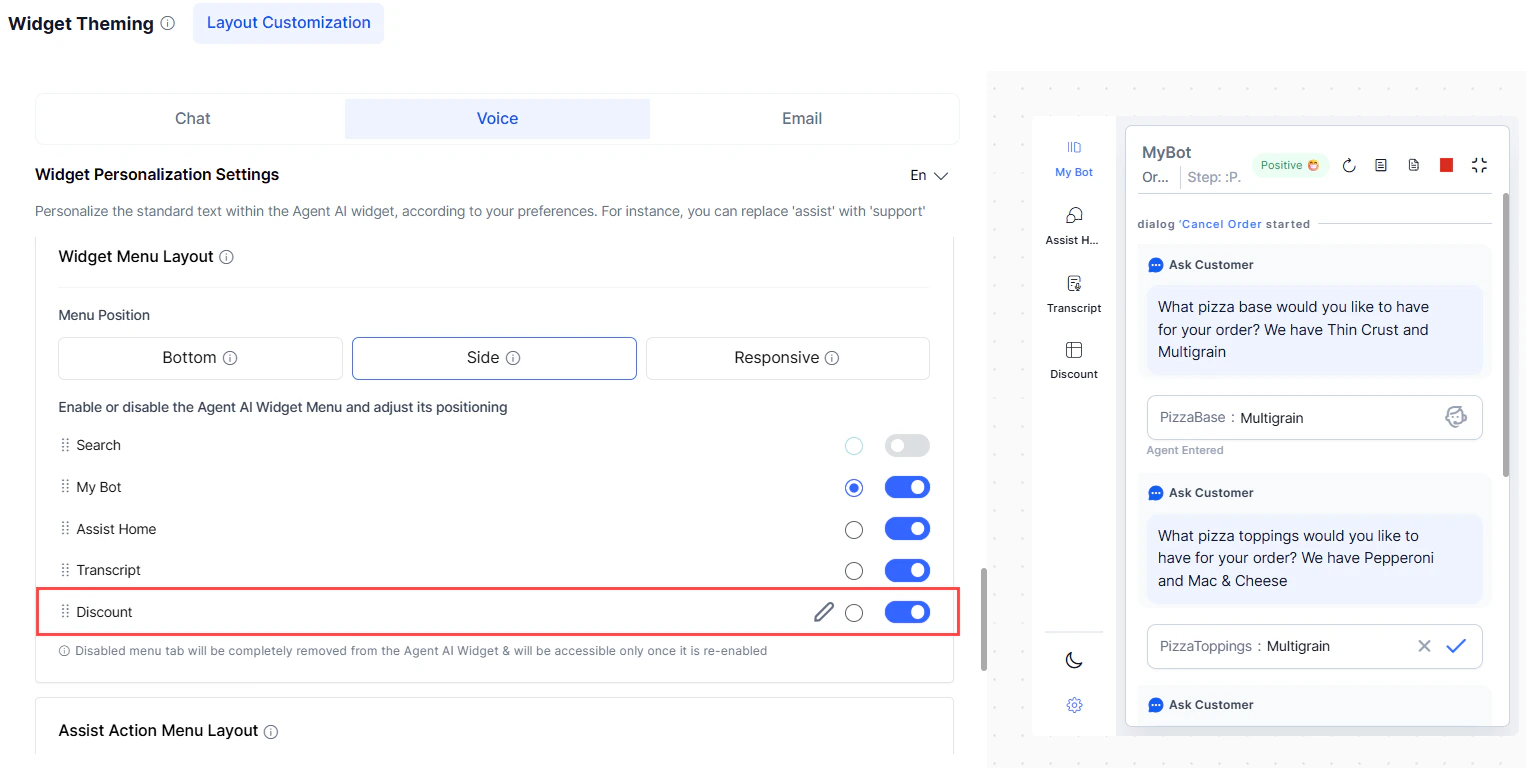 ### Edit or Delete a Custom Tab
1. Go to **Widget Theming** > **Layout Customization**.
2. Select the edit button on the custom tab under **Widget Menu Layout**.
3. Make updates and select **Update**.
4. To delete, select **Delete**, then confirm in the confirmation window.
***
## Search Result Layout
Control how search results appear in the widget.
| Option | Description |
| ---------------------------- | ------------------------------------------------------------------------------------------------------------------------------------------------------------------------- |
| **Classic Search** (default) | Shows only current search results. Each new search clears the previous query and results. |
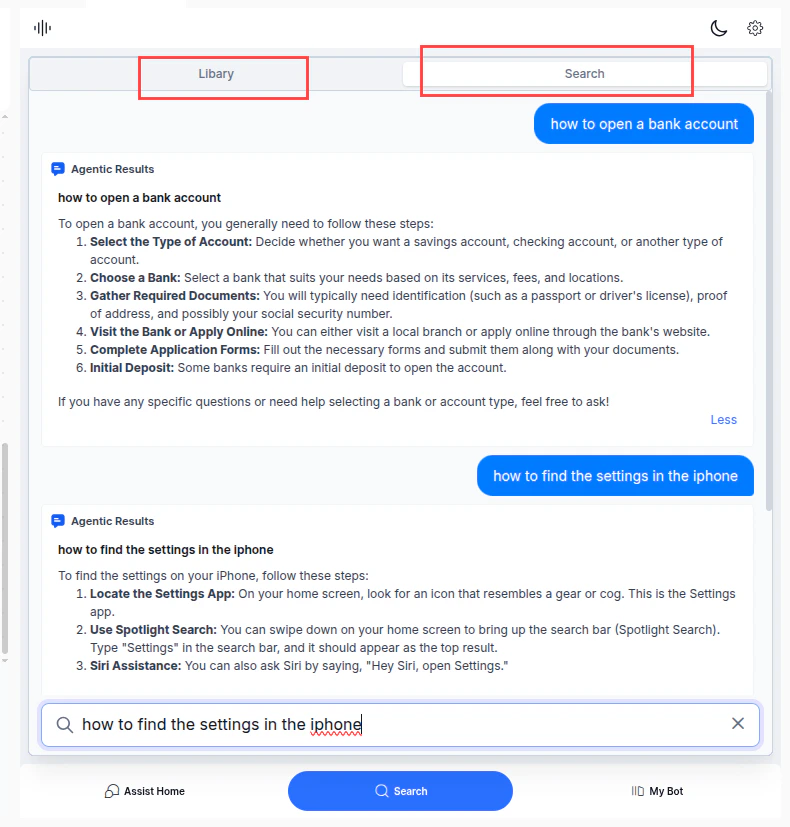
| **Conversational Search** | Displays a history of previous questions and answers. Agents can reference earlier results and ask follow-up questions. The widget shows **Library** and **Search** tabs. |
In Conversational Search, search history is maintained per agent at the conversation level. History is cleared during agent transfers.
### Edit or Delete a Custom Tab
1. Go to **Widget Theming** > **Layout Customization**.
2. Select the edit button on the custom tab under **Widget Menu Layout**.
3. Make updates and select **Update**.
4. To delete, select **Delete**, then confirm in the confirmation window.
***
## Search Result Layout
Control how search results appear in the widget.
| Option | Description |
| ---------------------------- | ------------------------------------------------------------------------------------------------------------------------------------------------------------------------- |
| **Classic Search** (default) | Shows only current search results. Each new search clears the previous query and results. |
| **Conversational Search** | Displays a history of previous questions and answers. Agents can reference earlier results and ask follow-up questions. The widget shows **Library** and **Search** tabs. |
In Conversational Search, search history is maintained per agent at the conversation level. History is cleared during agent transfers.
 **Steps**:
1. Go to **Widget Theming** > **Layout Customization**.
2. Select a channel.
3. Go to the **Search Result Layout** section.
4. Select **Classic Search** or **Conversational Search**.
5. Select **Save**.
***
## Assist Action Menu Layout
Turn action buttons in the Assist tab on or off, and reorder them using drag-and-drop.
**Steps**:
1. Go to **Widget Theming** > **Layout Customization**.
2. Select a channel.
3. Go to the **Search Result Layout** section.
4. Select **Classic Search** or **Conversational Search**.
5. Select **Save**.
***
## Assist Action Menu Layout
Turn action buttons in the Assist tab on or off, and reorder them using drag-and-drop.
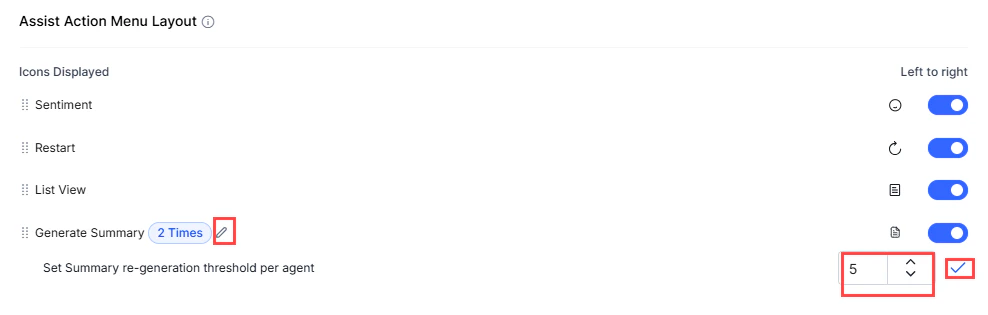
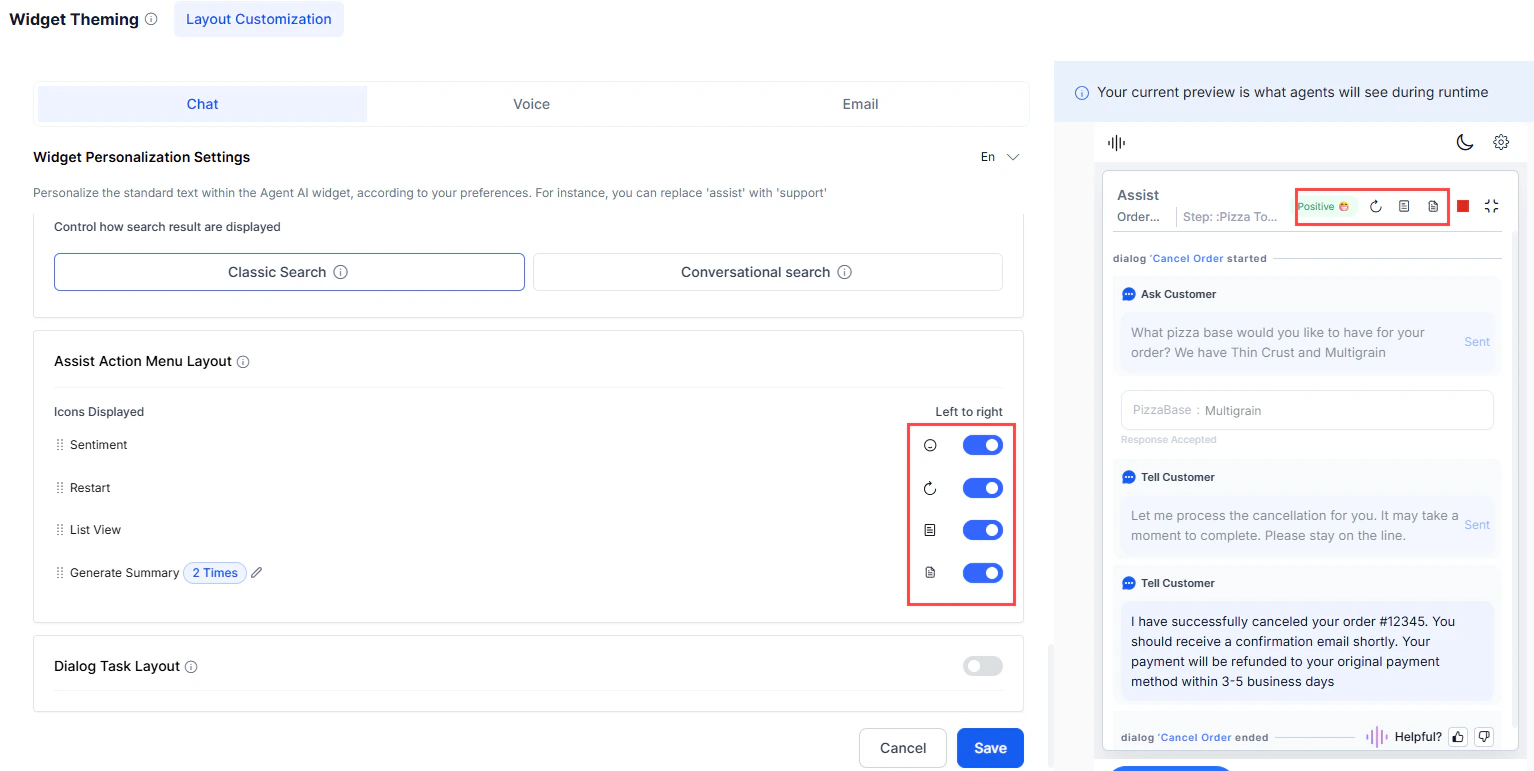 **Generate Summary**—configure how many times an agent can regenerate the summary (up to 20 per agent):
1. Turn on the **Generate Summary** toggle.
2. Select the edit icon next to the **Generate Summary** value.
3. Adjust the value using the arrow keys in **Set Summary re-generation threshold per agent**.
4. Select the tick mark to save.
**Generate Summary**—configure how many times an agent can regenerate the summary (up to 20 per agent):
1. Turn on the **Generate Summary** toggle.
2. Select the edit icon next to the **Generate Summary** value.
3. Adjust the value using the arrow keys in **Set Summary re-generation threshold per agent**.
4. Select the tick mark to save.
 ***
## Dialog Task Layout
Arrange and group dialog tasks displayed in the Library during runtime. Tasks not added to a group don't appear at runtime.
Features:
* **Dialog Task Search**—find tasks by name within the section.
* **Dialog Task Sorting**—sort alphabetically or reorder by position.
* **Dialog Task Grouping**—organize tasks into named groups.
***
## Dialog Task Layout
Arrange and group dialog tasks displayed in the Library during runtime. Tasks not added to a group don't appear at runtime.
Features:
* **Dialog Task Search**—find tasks by name within the section.
* **Dialog Task Sorting**—sort alphabetically or reorder by position.
* **Dialog Task Grouping**—organize tasks into named groups.
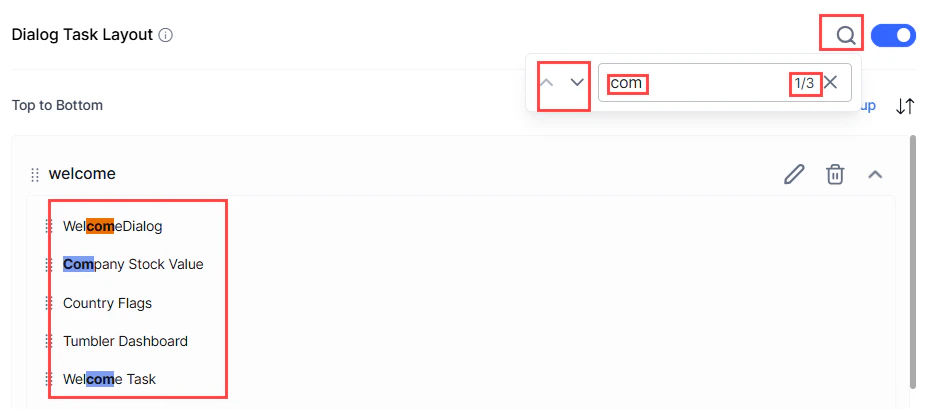
 ### Dialog Task Search
1. Select the search button in the top-right corner of the **Dialog Task Layout** section.
2. Enter letters of the task name. Matching text is highlighted with an occurrence count and navigation arrows.
### Dialog Task Search
1. Select the search button in the top-right corner of the **Dialog Task Layout** section.
2. Enter letters of the task name. Matching text is highlighted with an occurrence count and navigation arrows.
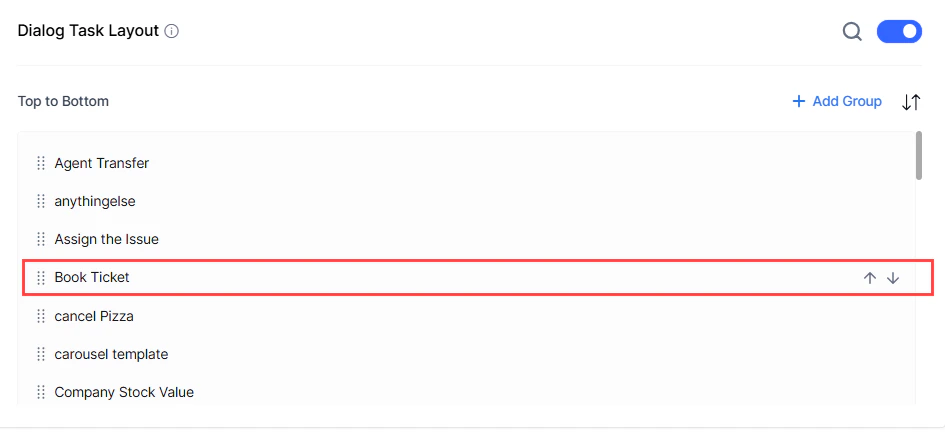
 ### Dialog Task Sorting
* Sort alphabetically: select the **up** or **down arrow** at the top of the list.
### Dialog Task Sorting
* Sort alphabetically: select the **up** or **down arrow** at the top of the list.
 * Reorder a specific task: select the **up** or **down arrow** next to the task.
 ### Dialog Task Grouping
Organize tasks into groups. During group creation, up to five selected tasks appear, with more visible via **Show All**. Group names must be unique. A task can belong to multiple groups.
Dialog tasks not added to a group don't appear during runtime.
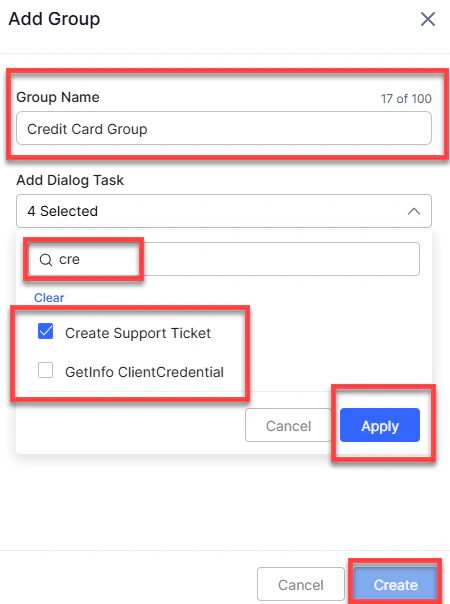
**Add a group:**
1. Select **+ Add Group** in the top-right corner.
2. Enter a unique name (up to 100 characters) in **Group Name**.
3. Select the **Add Dialog Task** field to view all tasks.
4. Select tasks, or use the search button to find specific ones.
5. Select **Apply**, then **Create**.
### Dialog Task Grouping
Organize tasks into groups. During group creation, up to five selected tasks appear, with more visible via **Show All**. Group names must be unique. A task can belong to multiple groups.
Dialog tasks not added to a group don't appear during runtime.
**Add a group:**
1. Select **+ Add Group** in the top-right corner.
2. Enter a unique name (up to 100 characters) in **Group Name**.
3. Select the **Add Dialog Task** field to view all tasks.
4. Select tasks, or use the search button to find specific ones.
5. Select **Apply**, then **Create**.
 **Edit, expand, collapse, or delete a group**:
1. Select the edit button on the group to rename or update tasks, then select **Save**.
2. Select the delete button to remove the group, then confirm.
3. Select the expand/collapse button to toggle the group's view state.
**Edit, expand, collapse, or delete a group**:
1. Select the edit button on the group to rename or update tasks, then select **Save**.
2. Select the delete button to remove the group, then confirm.
3. Select the expand/collapse button to toggle the group's view state.
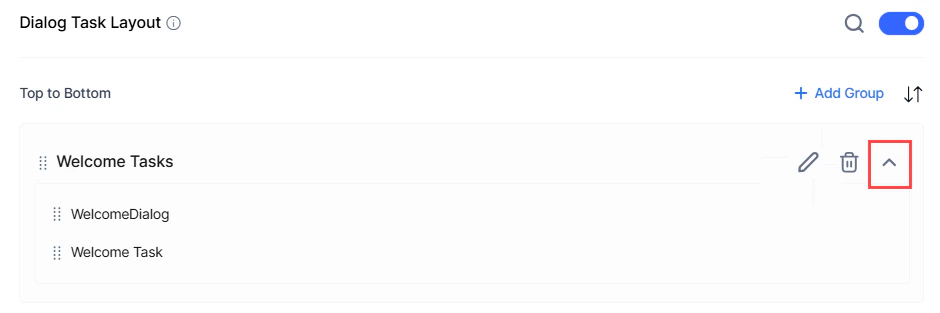 The widget retains the expanded or collapsed state as configured during the last save.
**Add, sort, or remove tasks in a group**:
1. Select the edit button on the group.
* To add: select the **Add Dialog Task** dropdown and choose tasks.
* To remove: select the **X** on a task. Select **Clear All** to remove all tasks.
2. Use the up and down arrows to sort tasks.
The widget retains the expanded or collapsed state as configured during the last save.
**Add, sort, or remove tasks in a group**:
1. Select the edit button on the group.
* To add: select the **Add Dialog Task** dropdown and choose tasks.
* To remove: select the **X** on a task. Select **Clear All** to remove all tasks.
2. Use the up and down arrows to sort tasks.
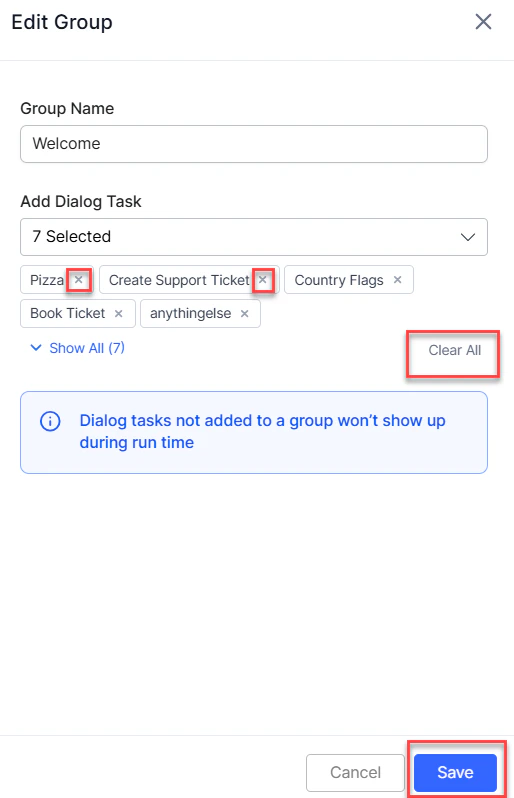 3. Select **Save**.
***
3. Select **Save**.
***