> ## Documentation Index
> Fetch the complete documentation index at: https://koreai.mintlify.site/llms.txt
> Use this file to discover all available pages before exploring further.
# Agent AI with Five9 Inbound Voice
[Back to TOC](/ai-for-service/index)
This document explains how to integrate the Agent AI widget into the Five9 Agent Desktop. The integration supports automation, [Agent Coaching](/ai-for-service/agentai/agent-experience/agent-realtime-coaching), [Agent Playbook](/ai-for-service/agentai/agent-experience/playbook), [sentiment analysis](/ai-for-service/agentai/agent-experience#sentiment-analysis), [Transcription](/ai-for-service/agentai/agent-experience#transcript-tab), with end-of-call summary, custom data, and secure custom data passing, such as agent name and ID to the Agent AI widget.
## Prerequisites
* Five9 administrators with access to the Admin Console and privileges to set up the configurations.
* Five9 administrators who can receive calls on Five9 Agent Desktop.
* Five9 VoiceStream set up for your instance. Contact your Five9 representative for help.
* Platform administrators with access to Agent AI instance and know-how of Agent AI bots.
* App credentials, such as Agent AI widget URL, Bot ID, Client ID, Client Secret, Account ID, and SIP URI.
## Definitions
| Key | Definition | Reference |
| ------------------------- | ---------------------------------------------------------------------------------------------------------------------------------------------------------------------------------------------------------------------------------------------------------------------------------------------------------------------------------- | ---------------------------------------------------------------------------------------------------------- |
| `Identifiers` | A unique identifier in the Data Table to fetch bot details at run time. It can be a skill name or a campaign name. | |
| `SecureCustomDataConfig`) | Defines the key–value pairs in `SecureCustomData`, a session-level store for sensitive data. Use the `SecureCustomDataConfig` to pass sensitive information to the Agent AI Bot. Provide a JSON object with keys and their corresponding xpath (paths to locate the value in Five9 Call Variables).
This column is optional. | **Sample:**
`{`
`"skillName": "Call.skill_name",`
`"agentName": "Agent.full_name"`
`}` |
| `CustomDataConfig` | Use this to pass information to the Agent AI bot. The KVPs you need to include in CustomData. JSON object containing the necessary keys and xpath (paths to locate the value in Five9 Call Variables).
Optional column. Use it to send custom data to Agent AI. | **Sample:**
`{`
`"skillName": "Call.skill_name",`
`"agentName": "Agent.full_name"`
`}` |
## Configurations on Platform
* [Bot Information in Agent AI Third-Party Configuration](#agent-ai-bot-mapping-for-skills-or-campaigns)
* [Access Custom Data and Secure Custom Data in Agent AI Bot](#access-custom-data-and-secure-custom-data-in-the-agent-ai-bot)
## Configurations on Five9 Admin Console
* [Five9 account set up for incoming phone call](#five9-account-setup-for-incoming-phone-call)
* [Create connector](#create-connector)
* [Create voice stream](#create-voicestream)
* [Create custom call variables](#create-custom-call-variables)
## Interaction between Five9 and Agent AI
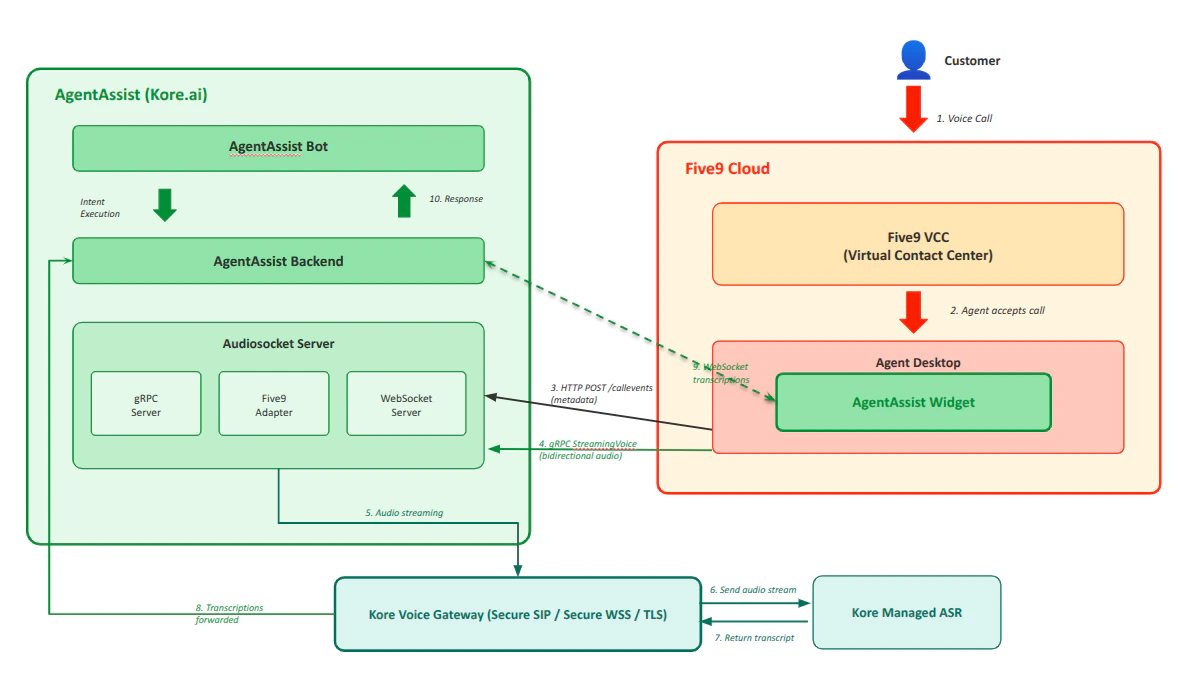 ## Five9 Agent AI - Voice Flow Steps
1. Customer calls Five9 Virtual Contact Center.
2. Agent accepts the call on Five9 Agent Desktop.
3. Five9 sends call metadata via HTTP POST /call events to Audiosocket server.
4. Five9 opens gRPC StreamingVoice bidirectional stream (audio encoding: LINEAR16, 8000Hz).
5. Five9 adapter routes audio to Voice Gateway.
6. Voice Gateway sends audio stream to Kore-managed ASR.
7. ASR returns real-time transcriptions to Voice Gateway.
8. The system forwards the transcriptions to the Agent Assist backend.
9. The Agent Assist backend shares the transcripts with Agent Desktop widget (Agent Assist Transcript tab).
10. The Agent Assist backend shares the transcripts with the Agent Assist bot, and the bot recognizes the intents and sends responses back to the Agent Assist widget. This process continues until the end of the call.
### Agent AI Bot Mapping for Skills or Campaigns
[Third-Party Configuration](/ai-for-service/agentai/configuration/third-party-configuration) maps Agent AI bots to specific skills or campaigns. Use it to set the bot’s language, custom data, and secure custom data.
**Example**: To associate Agent AI Bot1 with Skill1, create a record for Agent AI Bot1 and set the Queue Identifier to Skill1.
Map each skill or campaign to only one Agent AI bot. This setup ensures the correct Agent AI widget renders for conversations routed based on the defined skill or campaign.
Refer to [third-party configuration](/ai-for-service/agentai/configuration/third-party-configuration) for instructions on creating records for an Agent AI bot.
**Example**:
You have a skill named Chat\_Skill, that handles incoming chat requests, and you want the Agent AI widget to render for conversations routed to this skill. You must create the following details of the third-party configuration record in your Agent AI account:
## Five9 Agent AI - Voice Flow Steps
1. Customer calls Five9 Virtual Contact Center.
2. Agent accepts the call on Five9 Agent Desktop.
3. Five9 sends call metadata via HTTP POST /call events to Audiosocket server.
4. Five9 opens gRPC StreamingVoice bidirectional stream (audio encoding: LINEAR16, 8000Hz).
5. Five9 adapter routes audio to Voice Gateway.
6. Voice Gateway sends audio stream to Kore-managed ASR.
7. ASR returns real-time transcriptions to Voice Gateway.
8. The system forwards the transcriptions to the Agent Assist backend.
9. The Agent Assist backend shares the transcripts with Agent Desktop widget (Agent Assist Transcript tab).
10. The Agent Assist backend shares the transcripts with the Agent Assist bot, and the bot recognizes the intents and sends responses back to the Agent Assist widget. This process continues until the end of the call.
### Agent AI Bot Mapping for Skills or Campaigns
[Third-Party Configuration](/ai-for-service/agentai/configuration/third-party-configuration) maps Agent AI bots to specific skills or campaigns. Use it to set the bot’s language, custom data, and secure custom data.
**Example**: To associate Agent AI Bot1 with Skill1, create a record for Agent AI Bot1 and set the Queue Identifier to Skill1.
Map each skill or campaign to only one Agent AI bot. This setup ensures the correct Agent AI widget renders for conversations routed based on the defined skill or campaign.
Refer to [third-party configuration](/ai-for-service/agentai/configuration/third-party-configuration) for instructions on creating records for an Agent AI bot.
**Example**:
You have a skill named Chat\_Skill, that handles incoming chat requests, and you want the Agent AI widget to render for conversations routed to this skill. You must create the following details of the third-party configuration record in your Agent AI account:
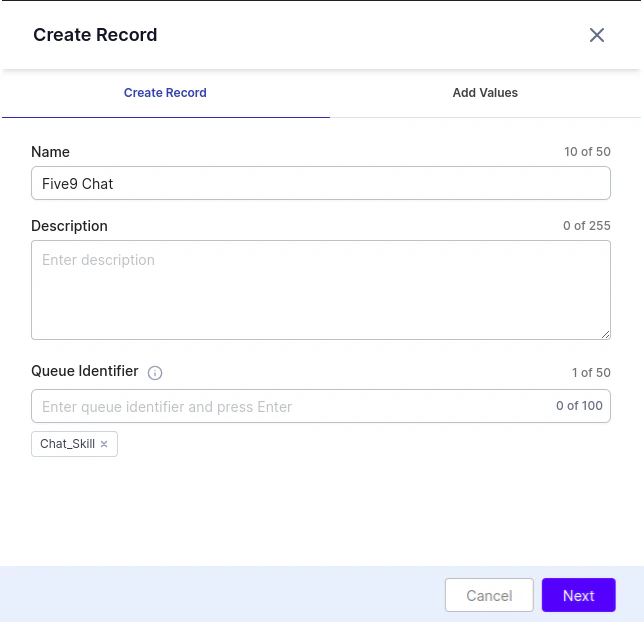
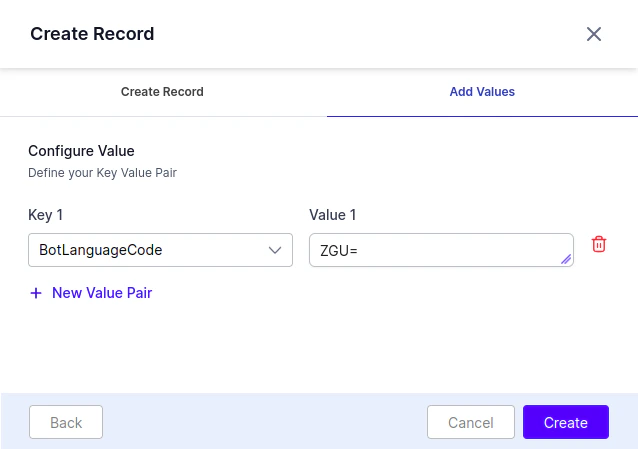 The values must be 'Base64' encoded.
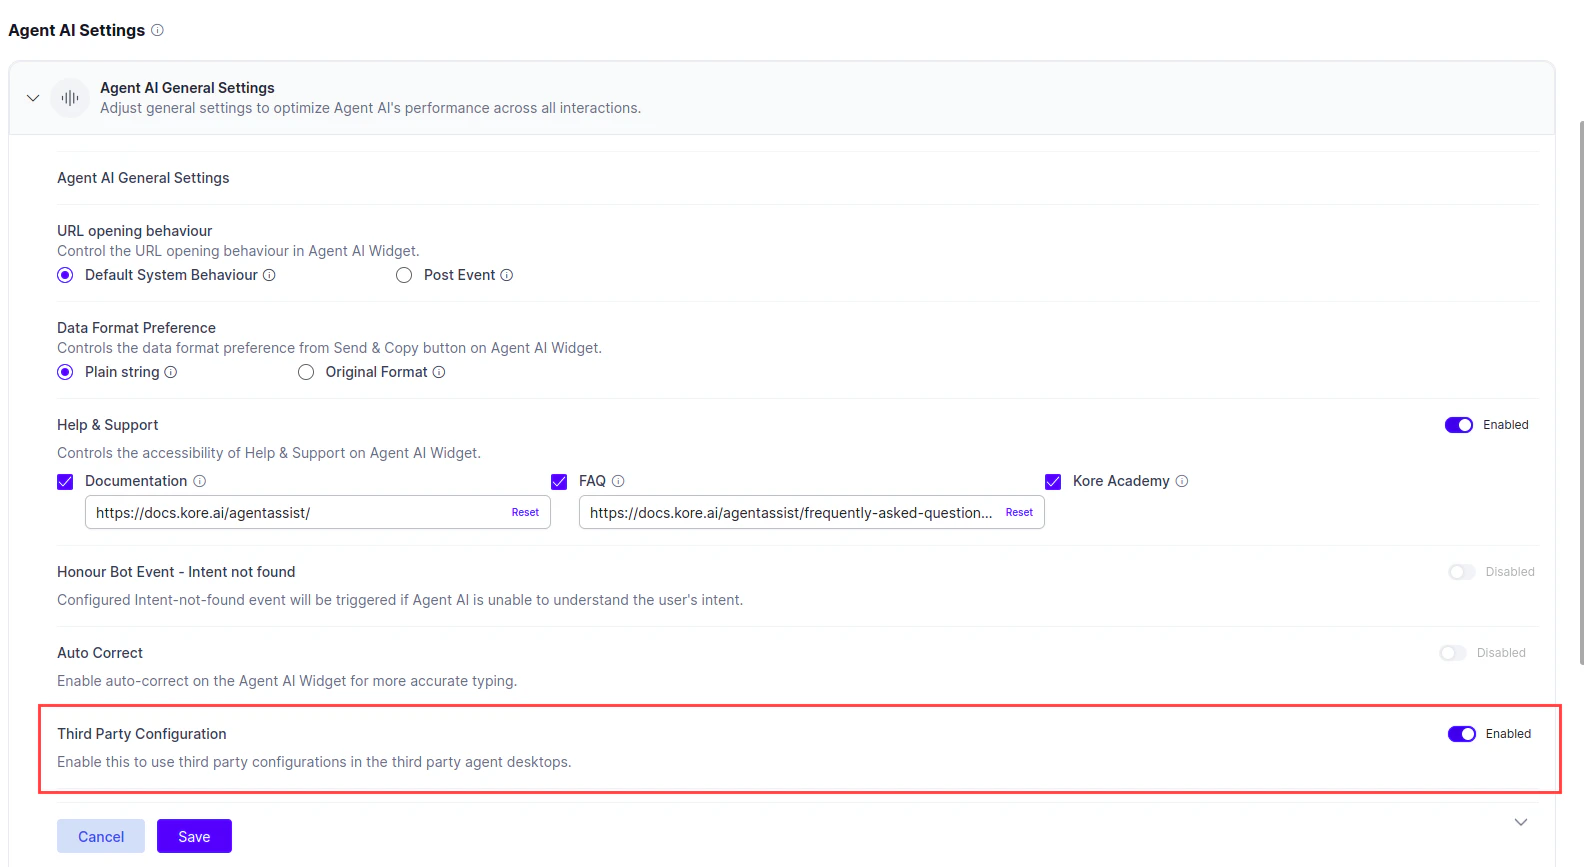
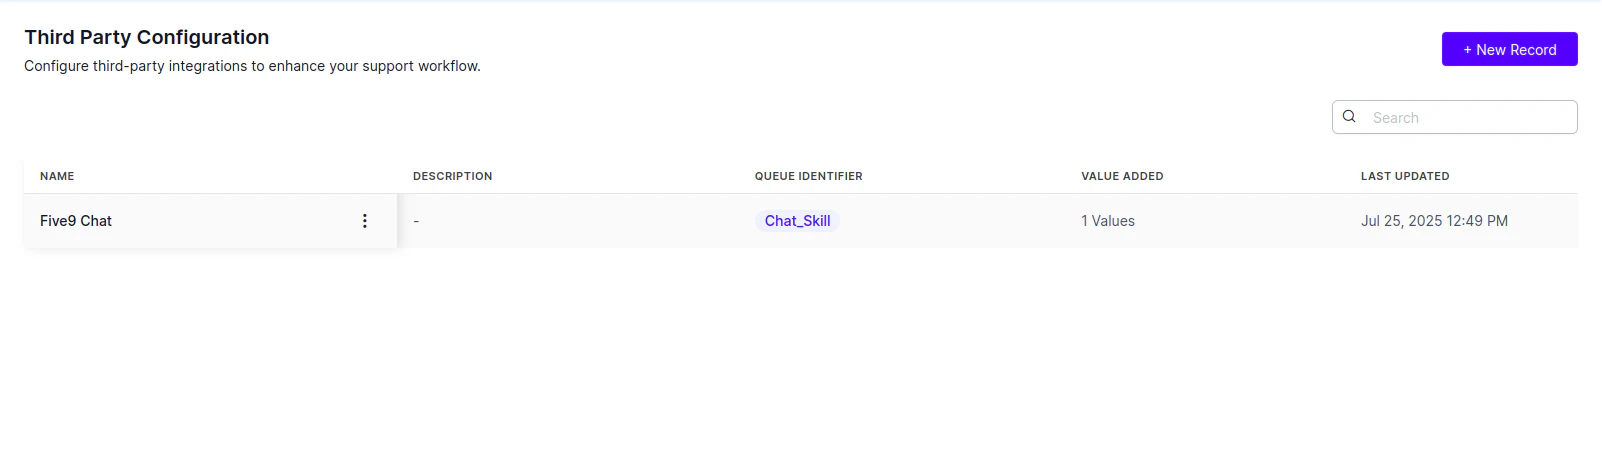 Ensure you have turned on the Third-Party Configuration setting in **Agent AI** > **Configurations** > **Widget Settings** > **Agent AI Settings** > **Agent AI General Settings**.
 ## Create SIP Trunk
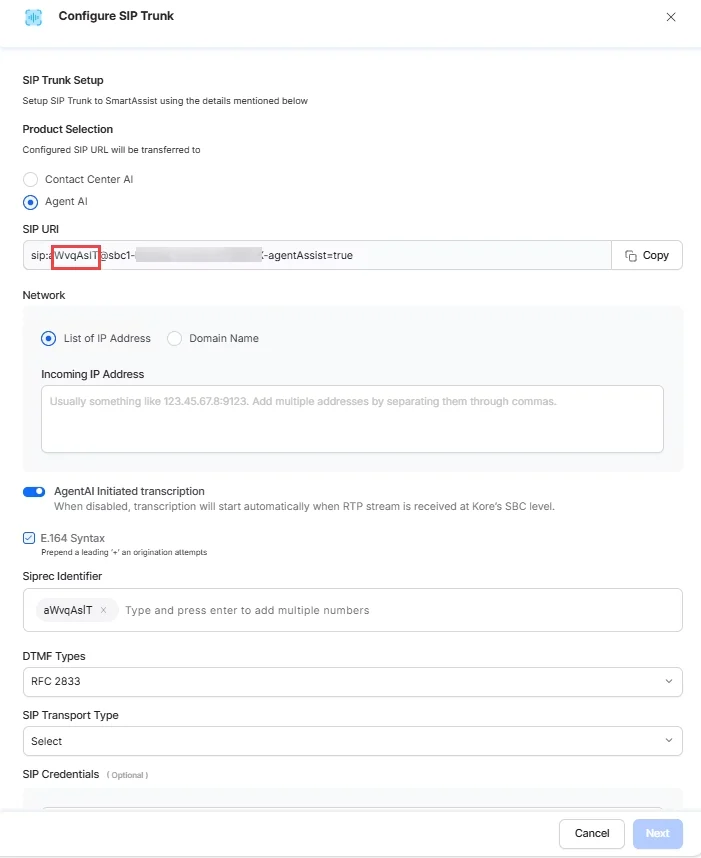
Create a SIP trunk in Kore Platform with **Agent AI** as the production selection. For steps, see [Steps to Configure SIP Trunk](/ai-for-service/channels/voice-gateway/configure-voice-gateway#steps-to-configure-sip-trunk). Use the generated SIP identifier to configure the **Five9 IVR** script in the next step.\\
## Create SIP Trunk
Create a SIP trunk in Kore Platform with **Agent AI** as the production selection. For steps, see [Steps to Configure SIP Trunk](/ai-for-service/channels/voice-gateway/configure-voice-gateway#steps-to-configure-sip-trunk). Use the generated SIP identifier to configure the **Five9 IVR** script in the next step.\\
 ## Create Connector
1. Sign in to **[Five9 Administrator Console](https://admin.us.five9.net/)**.
2. Search for **connectors** in the search bar, and select **Connectors**.
3. Select **Create**.
## Create Connector
1. Sign in to **[Five9 Administrator Console](https://admin.us.five9.net/)**.
2. Search for **connectors** in the search bar, and select **Connectors**.
3. Select **Create**.
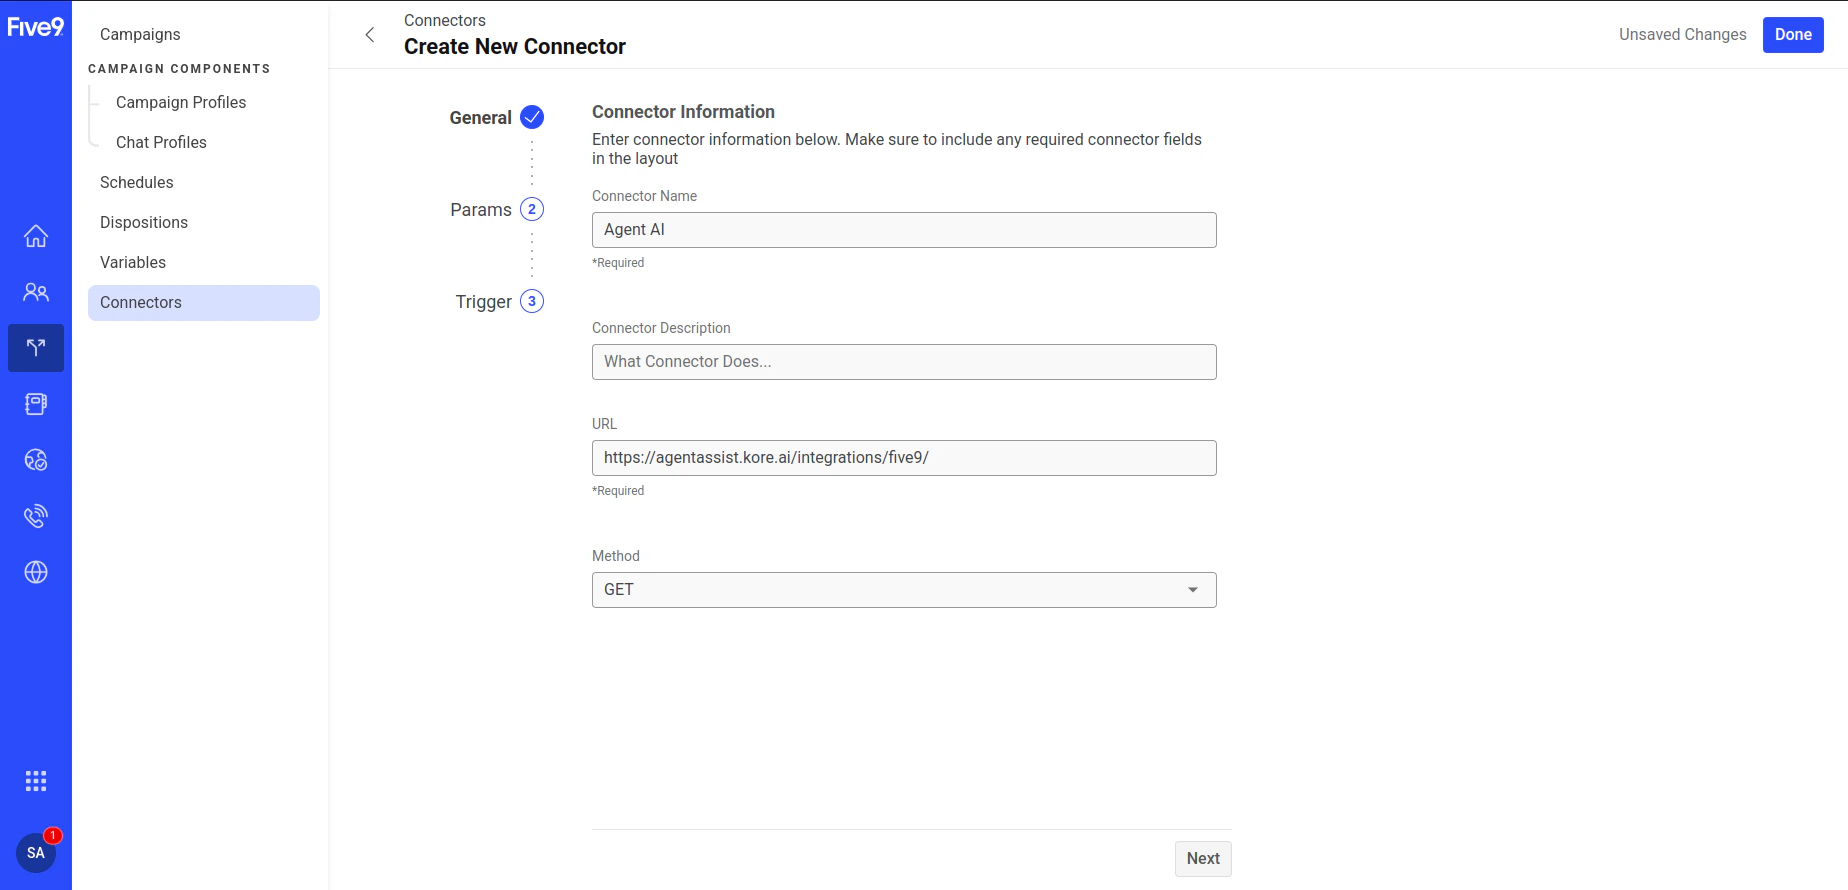
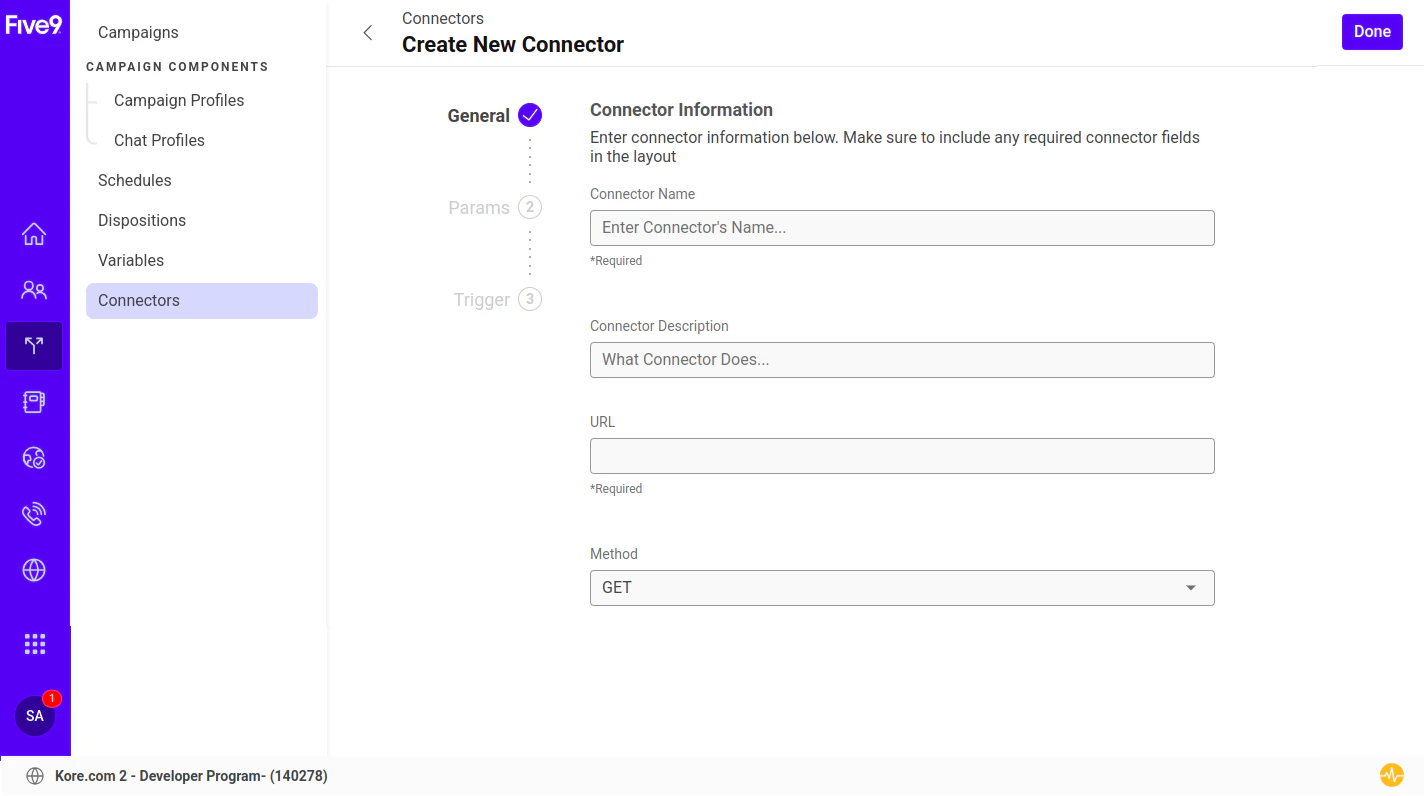 4. Enter a name in the **Connector Name** field.
5. Enter the URL as `{Agent AI URL}/integrations/five9/`.
6. Enter the method as **GET**.
4. Enter a name in the **Connector Name** field.
5. Enter the URL as `{Agent AI URL}/integrations/five9/`.
6. Enter the method as **GET**.
 7. Select **Next**.
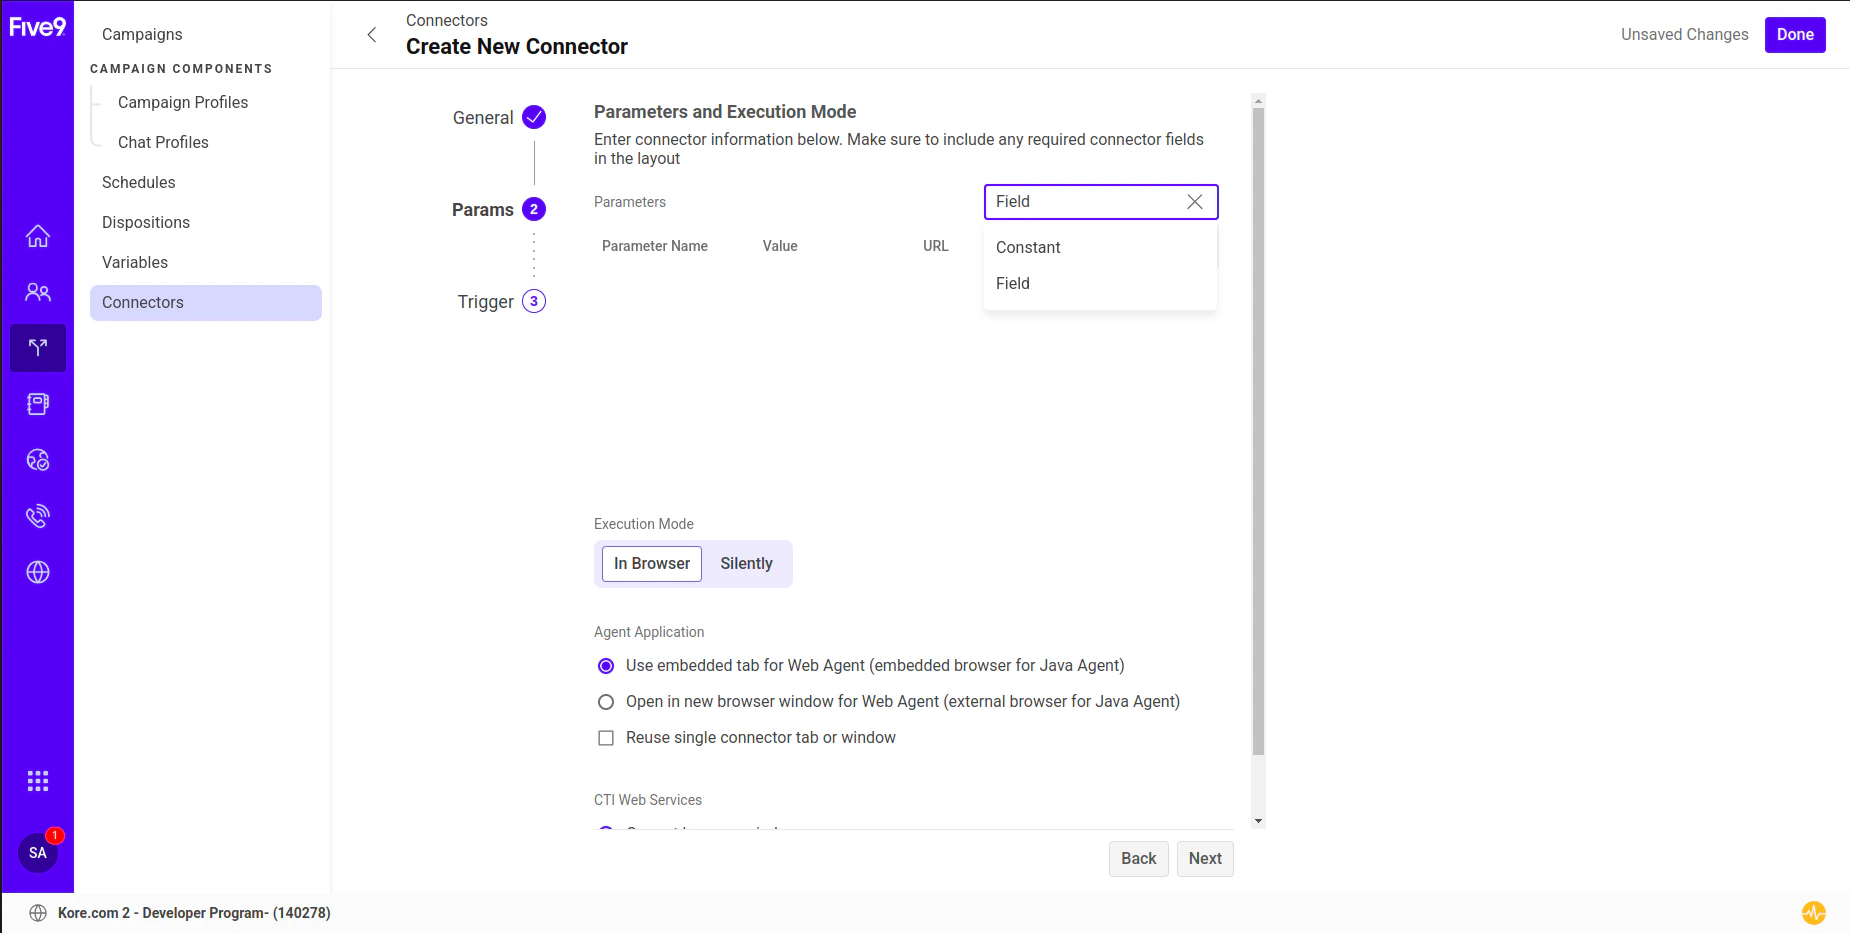
8. Select **Field** from the **Add** dropdown list in the **Parameters** section.
7. Select **Next**.
8. Select **Field** from the **Add** dropdown list in the **Parameters** section.
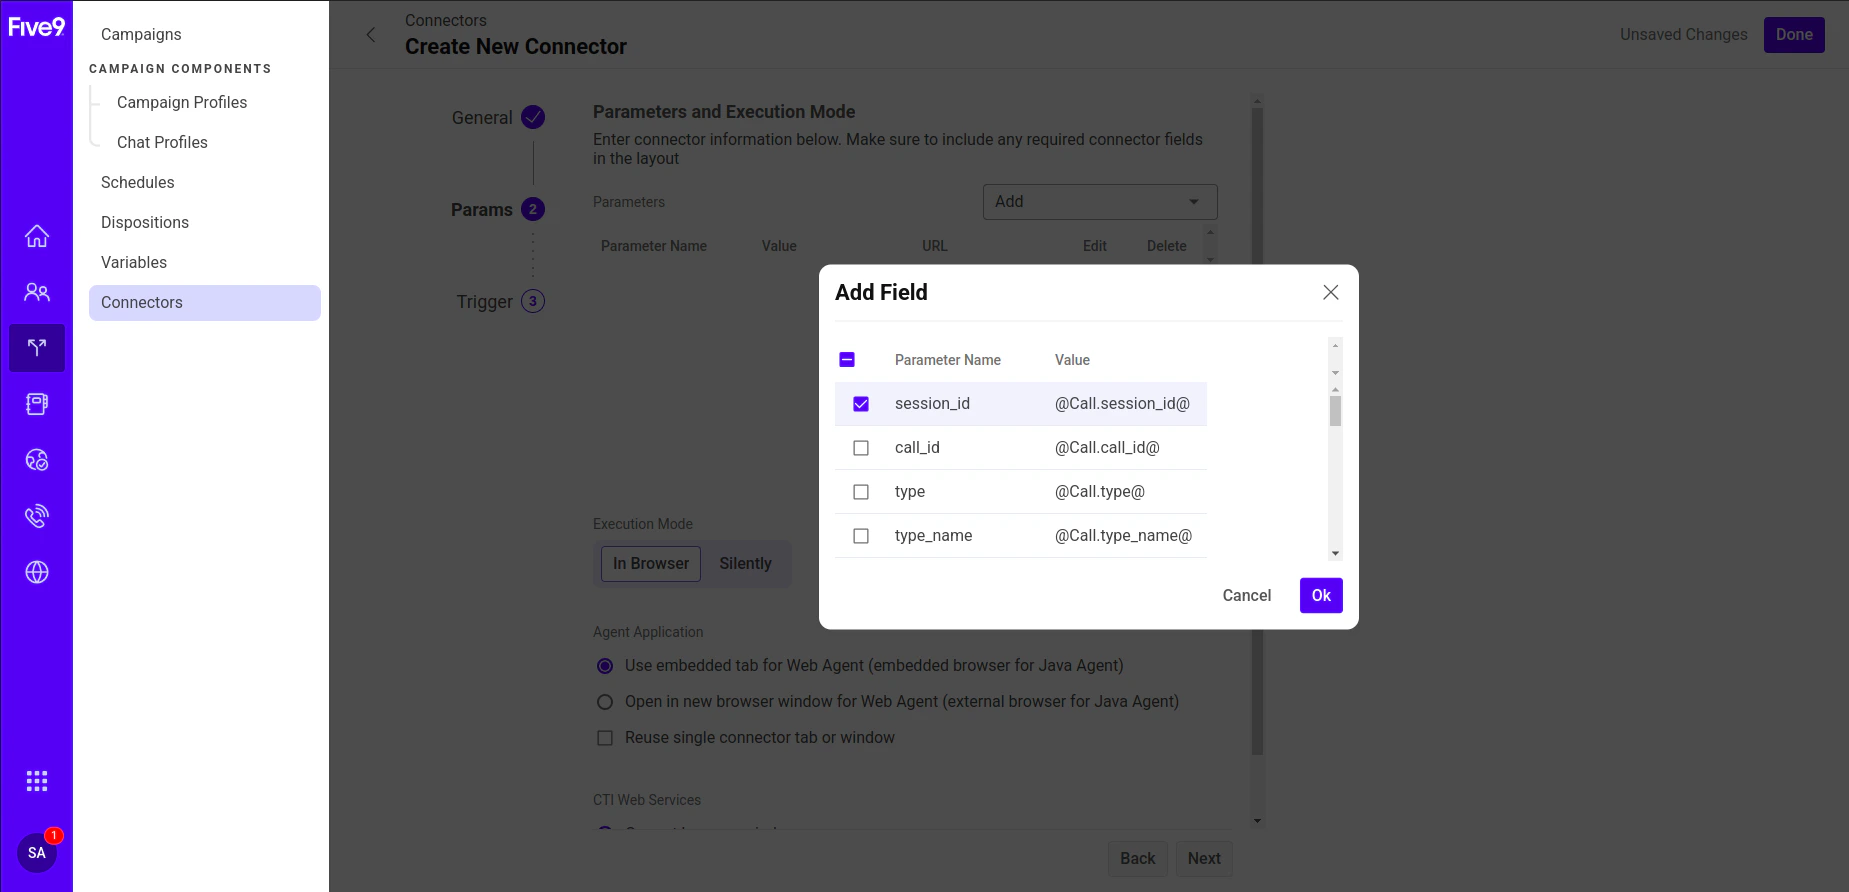
 9. Select **call\_id**, **session\_id**, **domain\_id**, **id**, **skill\_name** / **campaign\_name** (choose either skill\_name or campaign\_name, depending on which you use to map the bot in Agent AI), and select **Ok**.
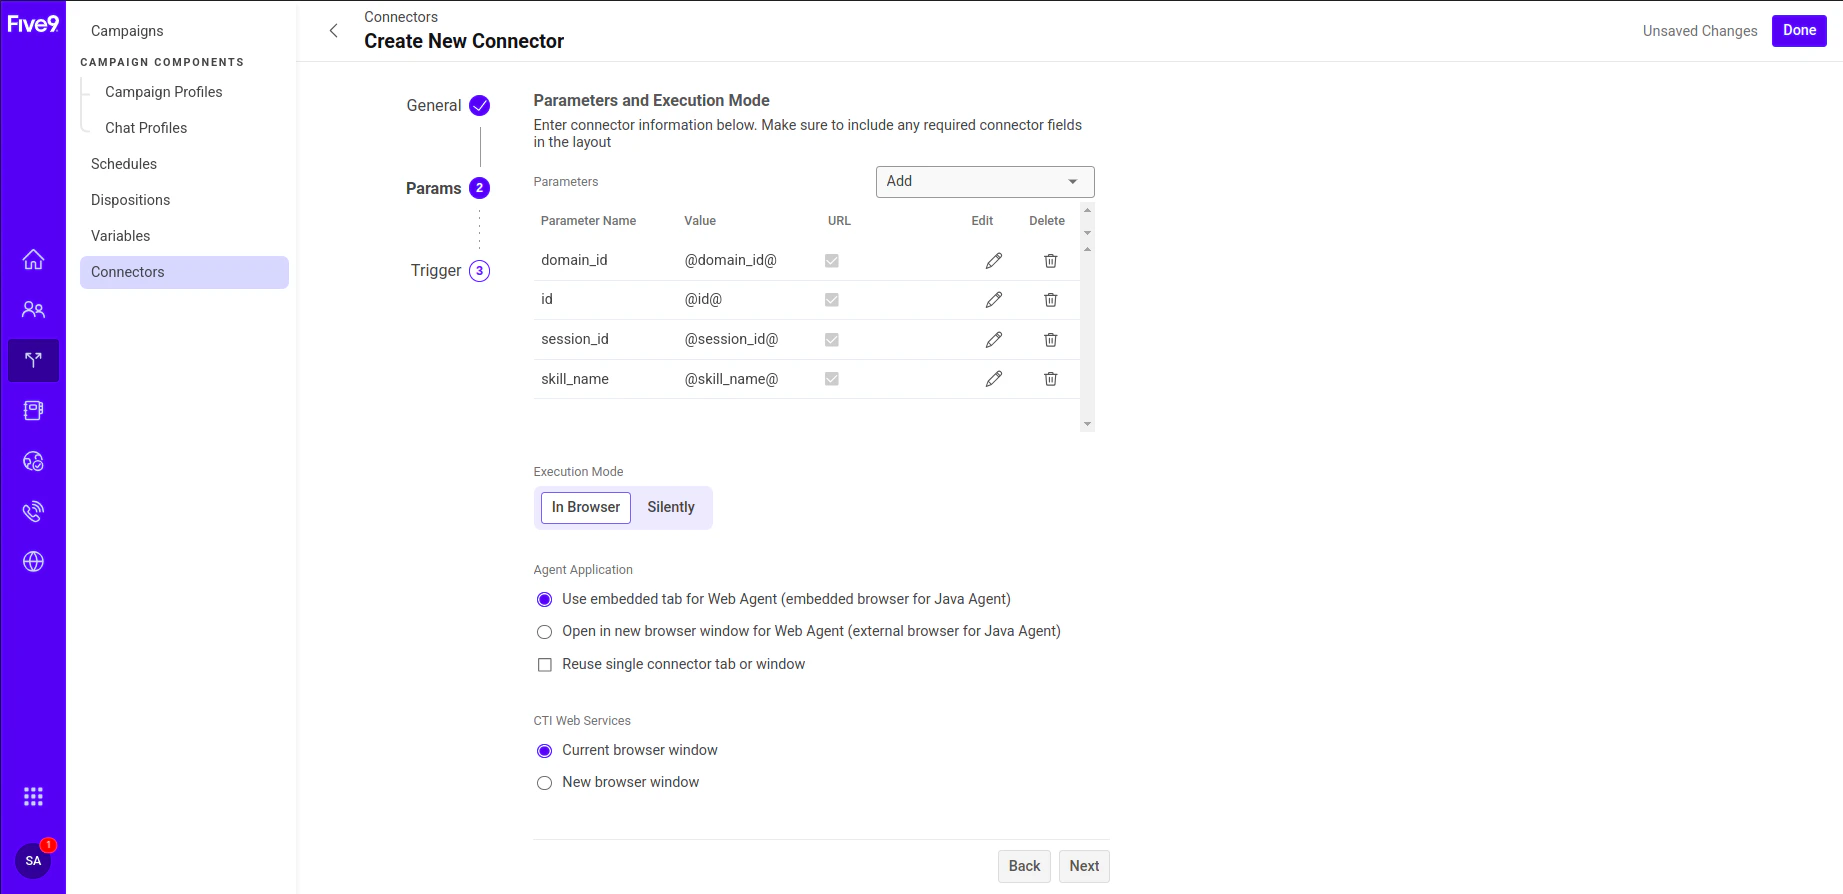 10. Select the **Edit** icon next to each parameter and update the values as follows:
* call\_id -> callid
* domain\_id -> domainid
* id -> agentid
* session\_id -> conversationid
* skill\_name/campaign\_name -> identifiers
11. Select **Constant** from the **Add** dropdown list in the **Parameters** section.
10. Select the **Edit** icon next to each parameter and update the values as follows:
* call\_id -> callid
* domain\_id -> domainid
* id -> agentid
* session\_id -> conversationid
* skill\_name/campaign\_name -> identifiers
11. Select **Constant** from the **Add** dropdown list in the **Parameters** section.
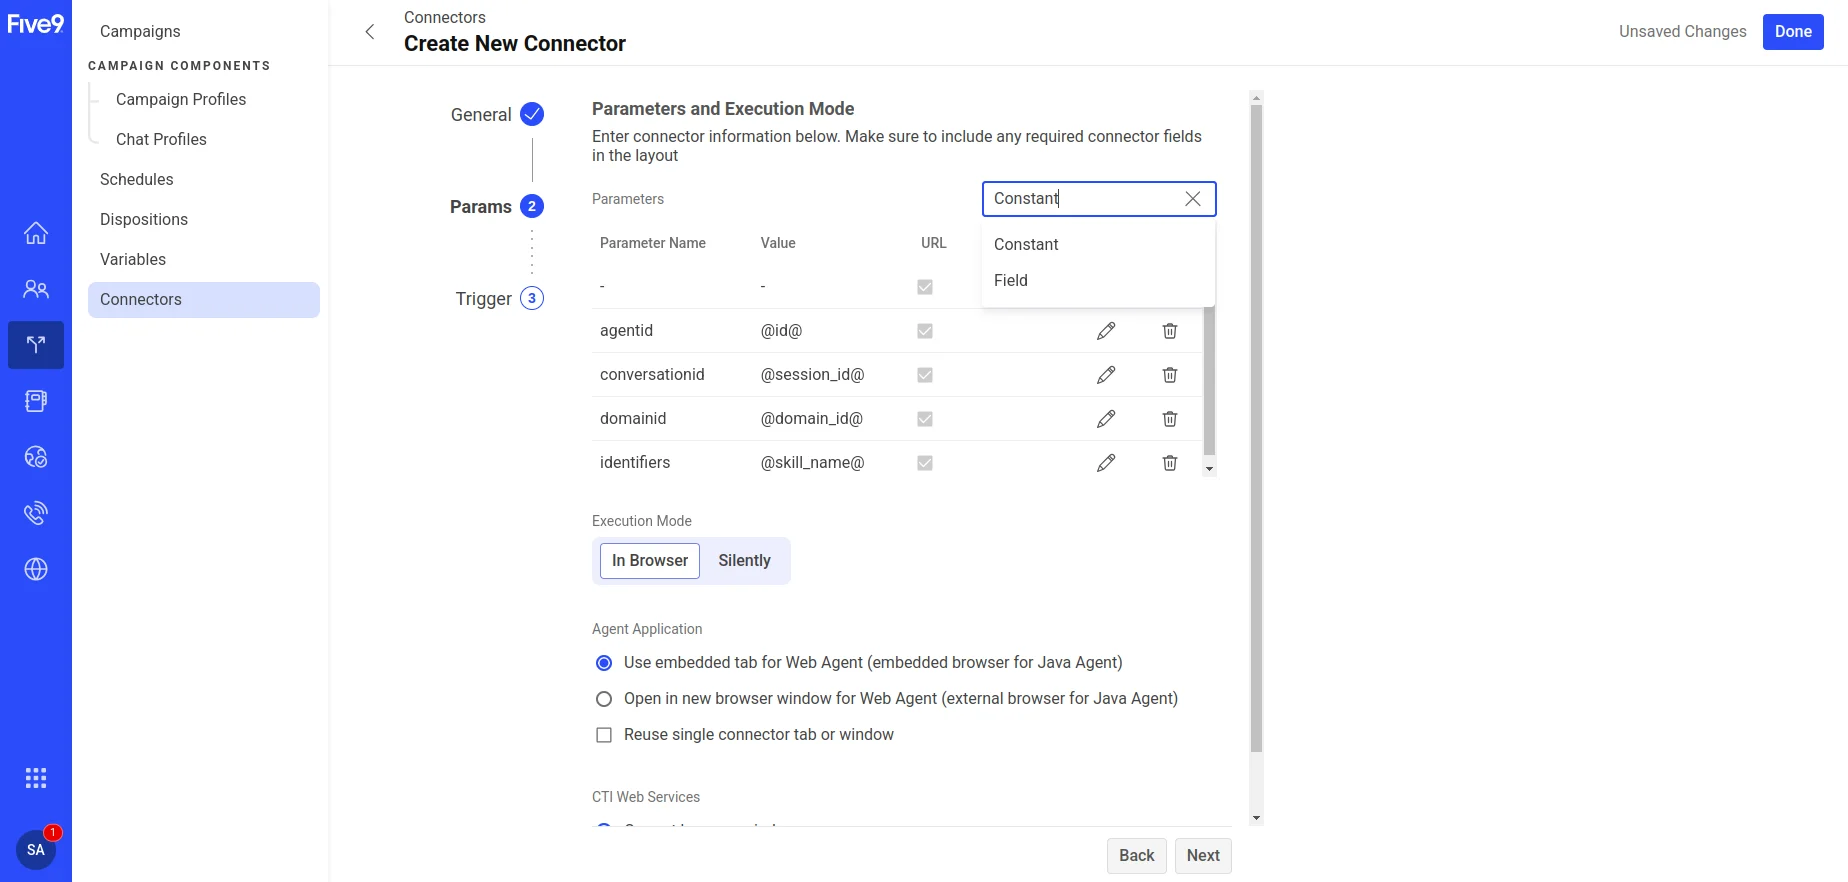 12. Enter 'accountid' in the **Name** field and the **accountid** of your Agent AI account in the **Value** field. To find this ID, go to **Agent AI** > **Flows & Channels** > **Channels** > **Digital** > **Web/Mobile Client** > **JWT App Details**. For more details, see this [doc](/ai-for-service/channels/add-web-mobile-client#add-webmobile-client-channel).
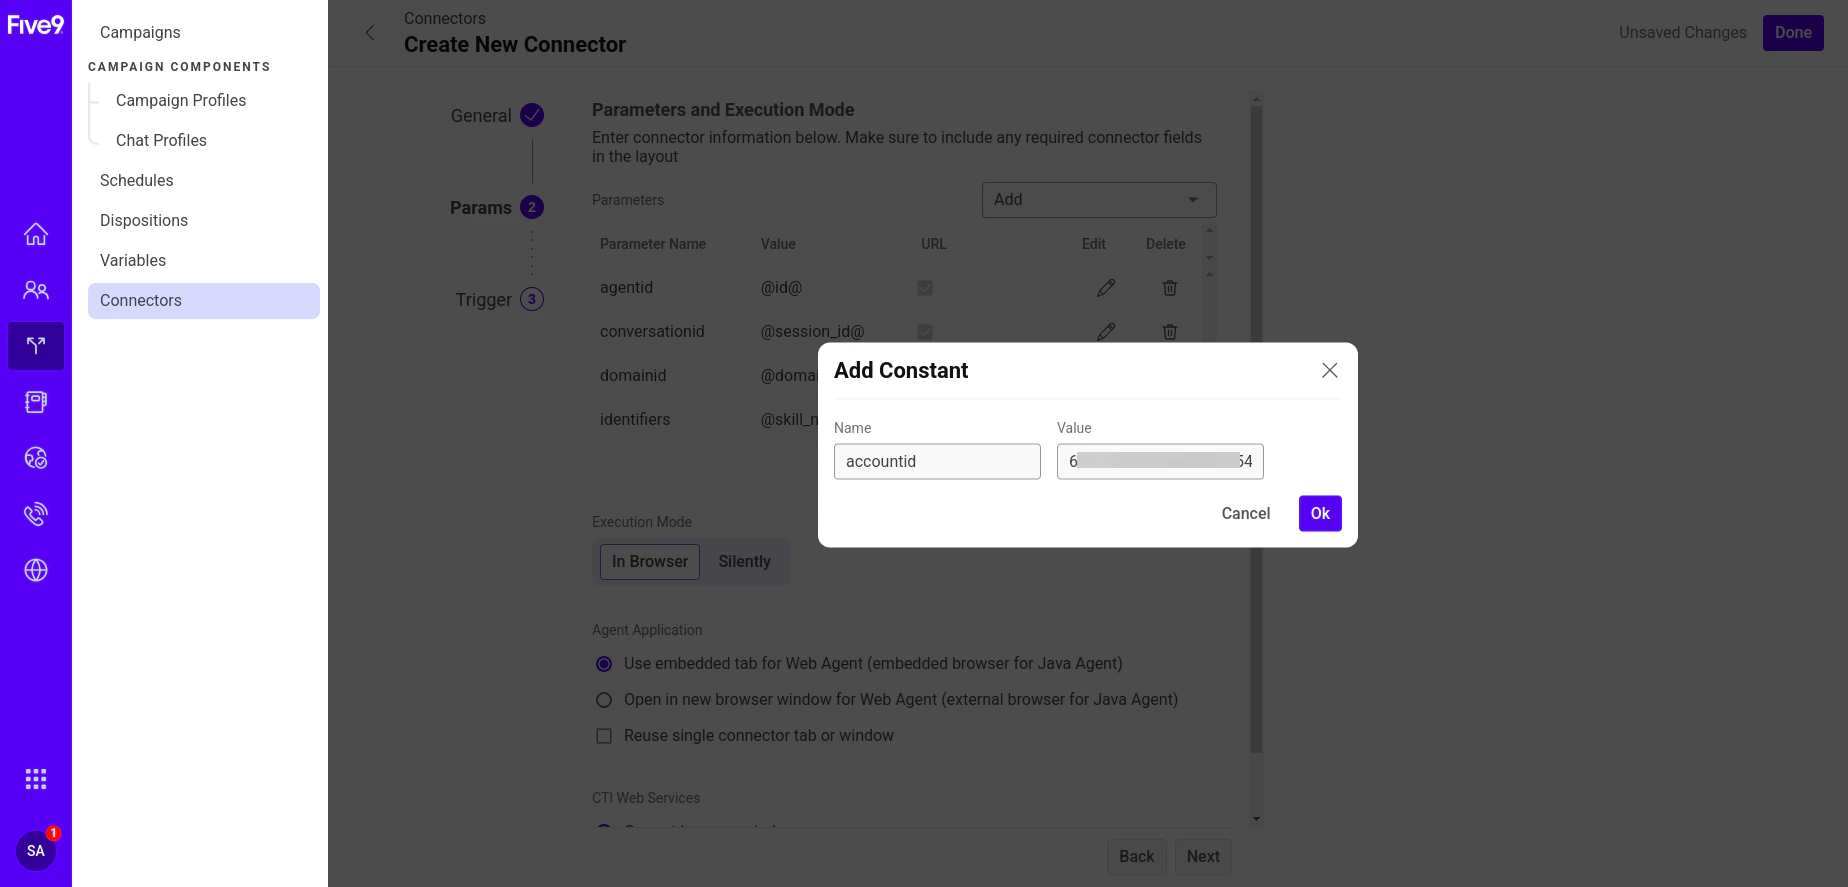 13. Select **Ok** > **Next**.
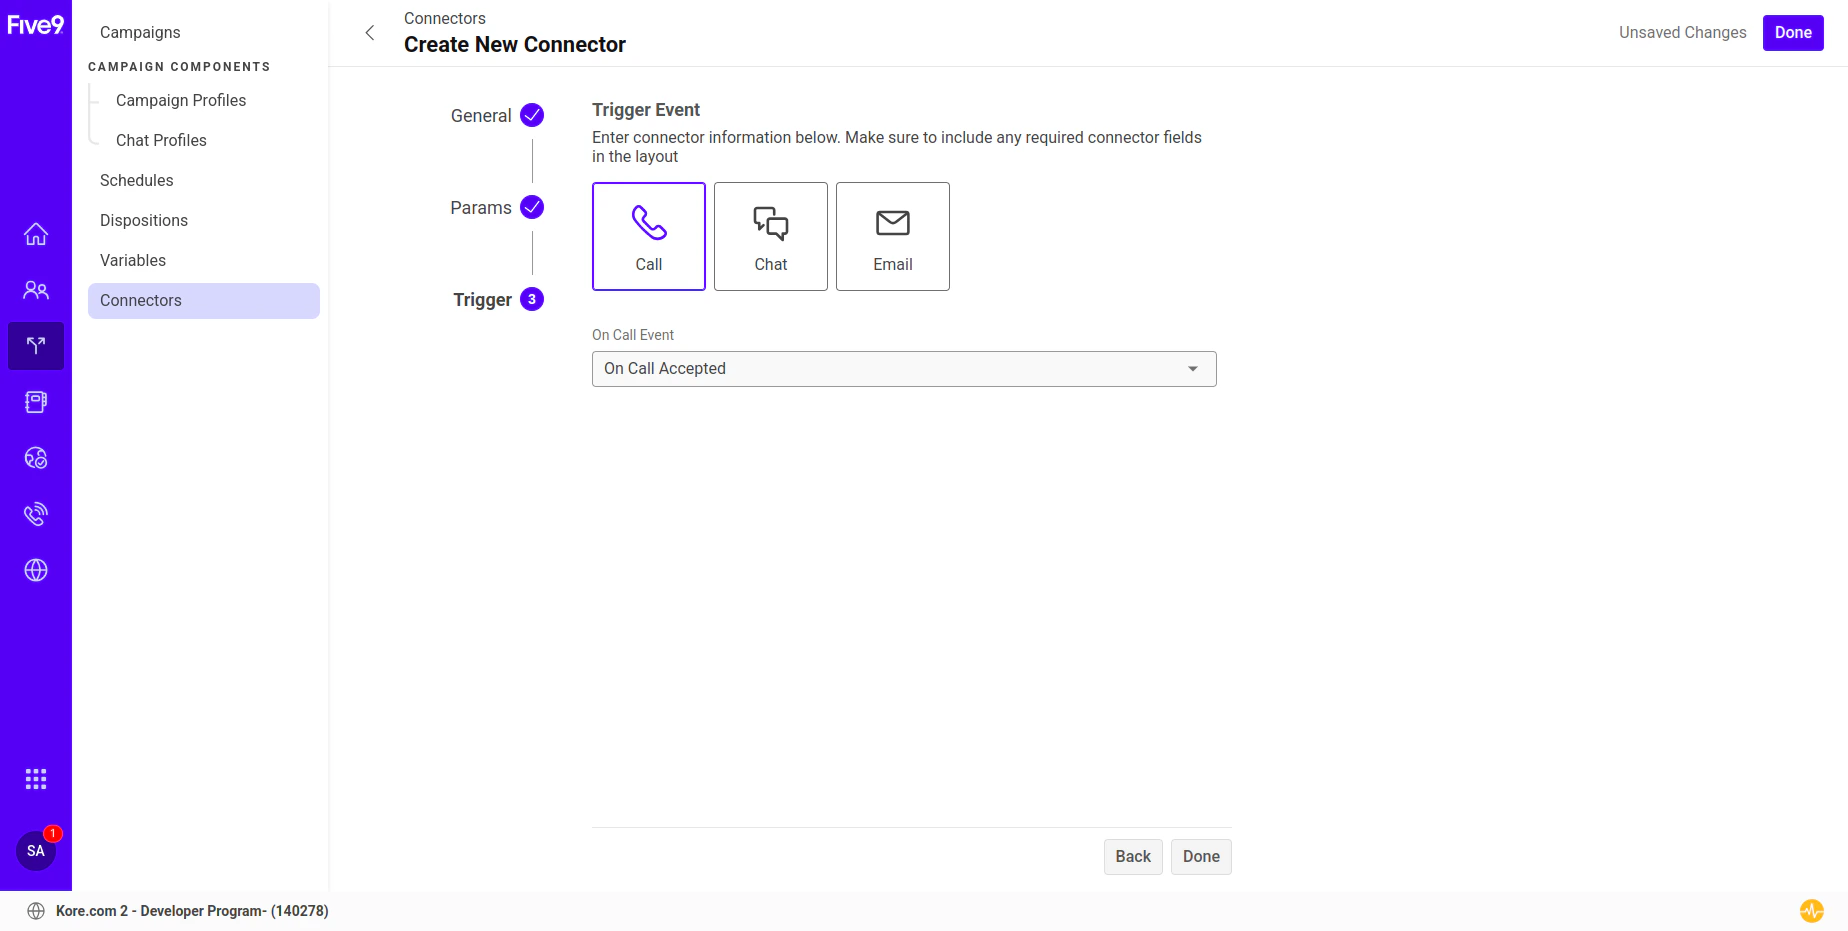 14. The default selection for **Trigger Event** is **Call** and for **On Call Event** is **On Call Accepted**.
15. Select **Done**.
## Create Custom Call Variables
1. Sign in to [Five9 Admin Console](https://admin.us.five9.net/).
2. Search for variables, and open **Variables**.
3. Select **Create**.
4. Enter **Kore** as the group **Name**, and select **Create**.
5. Select **Kore**.
14. The default selection for **Trigger Event** is **Call** and for **On Call Event** is **On Call Accepted**.
15. Select **Done**.
## Create Custom Call Variables
1. Sign in to [Five9 Admin Console](https://admin.us.five9.net/).
2. Search for variables, and open **Variables**.
3. Select **Create**.
4. Enter **Kore** as the group **Name**, and select **Create**.
5. Select **Kore**.
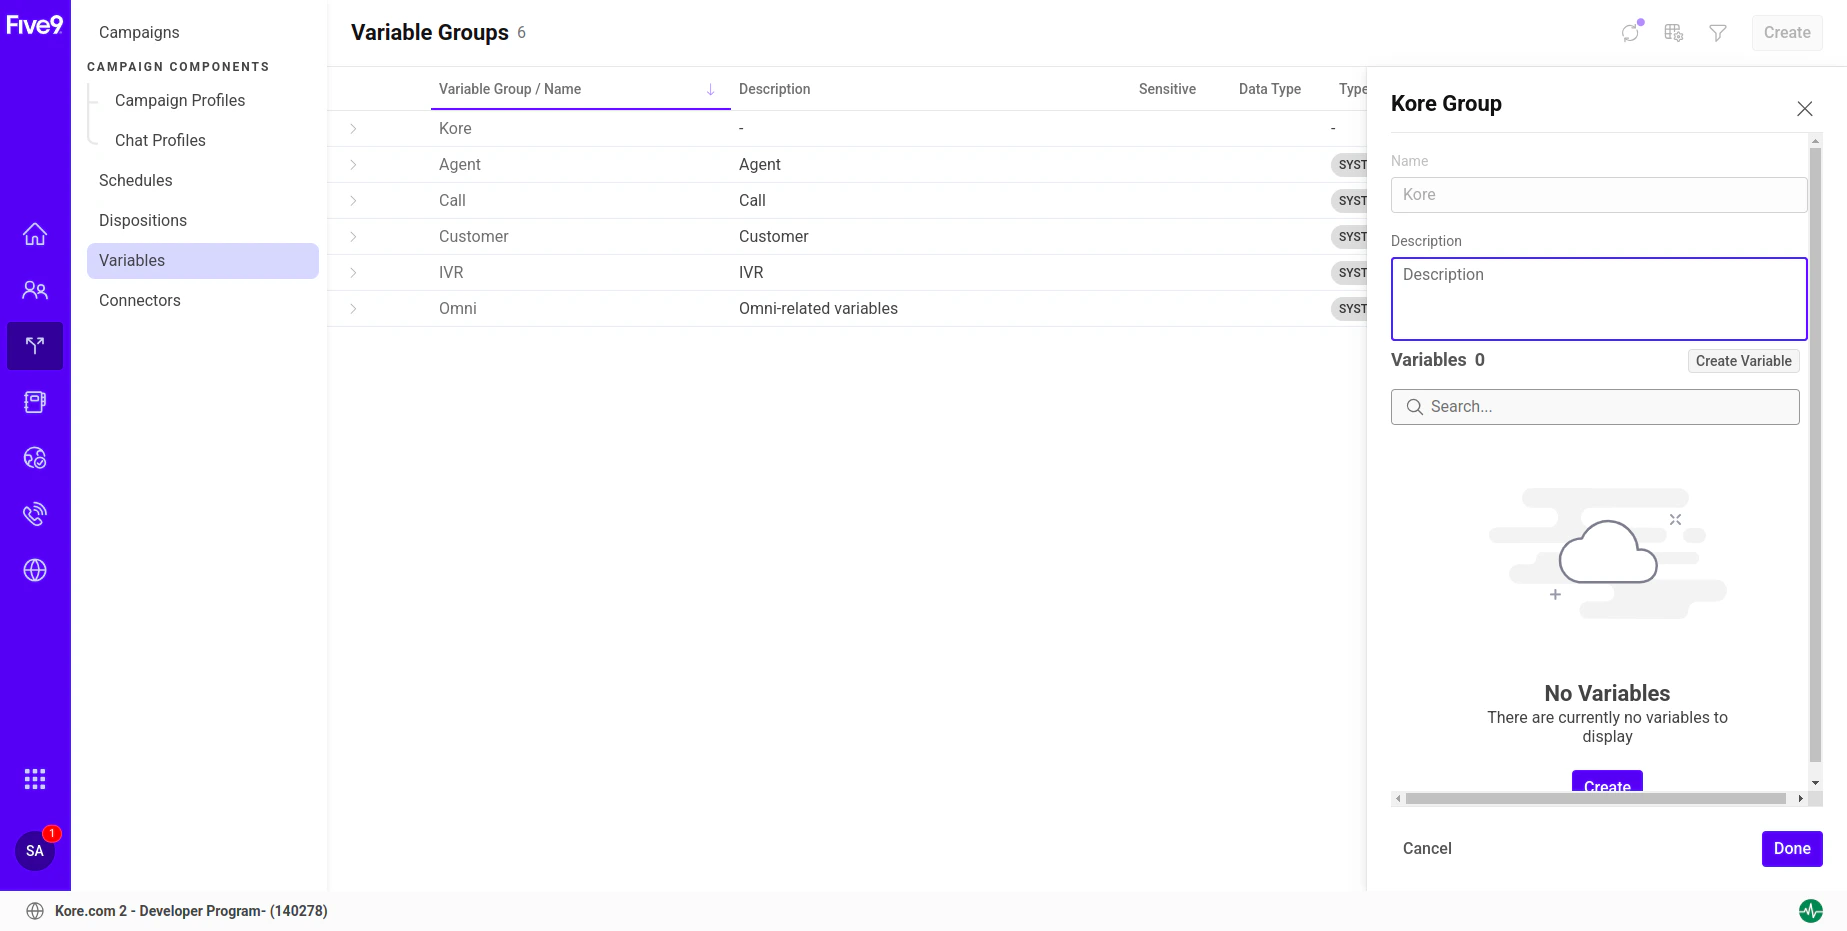 6. Select **Create Variable**.
7. Enter **botid** as the variable **Name**.
8. For the question **Will this variable contain sensitive data?**, select the **No** option, select the **Datatype** as **String**, and then select **Next**.
9. For the question **Will the data in this variable be needed in reports?**, select **No**.
10. Select **Next**.
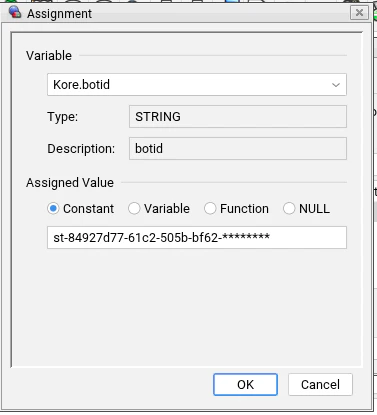
11. For the question **Should the values of this variable come from a predefined list?**, Select **No** and provide your **Bot Client ID** in the **Set Default Value** field.
12. Select **Done**.
13. Select **Create Variable**.
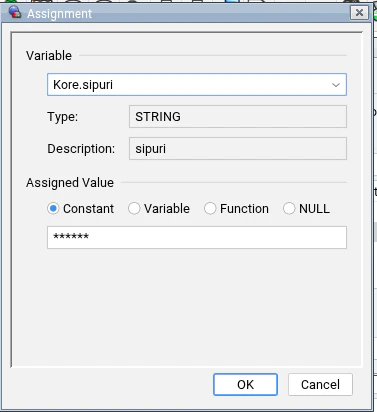
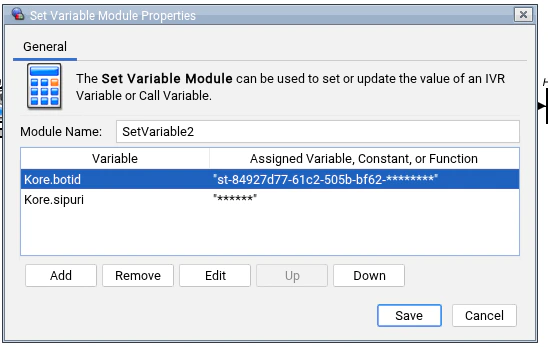
14. Repeat the same steps to create a variable named `sipuri` with a default value of the SIP URI configured for your Agent AI bot.
15. Select **Done**.
## Five9 Account Setup for Incoming Phone Call
1. Buy a phone number by following the [Numbers Inventory](https://documentation.five9.com/bundle/admin-console/page/admin-console/numbers-inventory/_ch-numbers-intro.htm) doc.
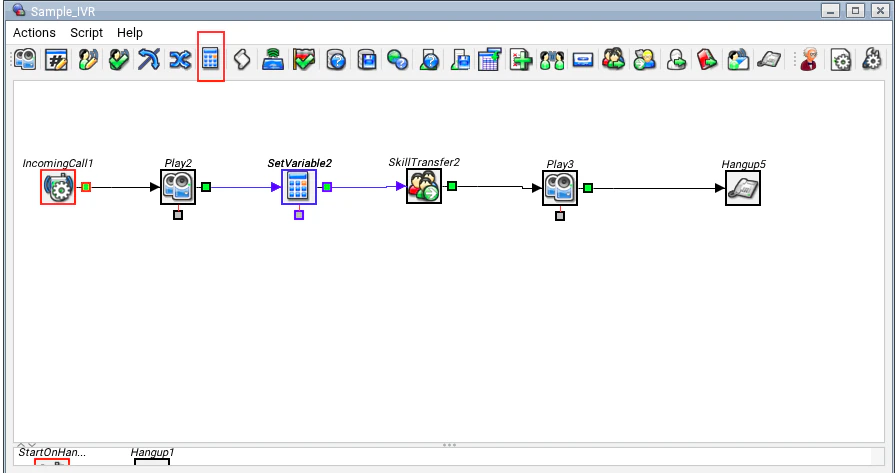
2. Create an IVR script by following the [Creating an IVR Script](https://documentation.five9.com/bundle/ivr-admin/page/ivr-admin/examples/creating-an-ivr-script.htm) doc.
**Sample IVR Script**:
6. Select **Create Variable**.
7. Enter **botid** as the variable **Name**.
8. For the question **Will this variable contain sensitive data?**, select the **No** option, select the **Datatype** as **String**, and then select **Next**.
9. For the question **Will the data in this variable be needed in reports?**, select **No**.
10. Select **Next**.
11. For the question **Should the values of this variable come from a predefined list?**, Select **No** and provide your **Bot Client ID** in the **Set Default Value** field.
12. Select **Done**.
13. Select **Create Variable**.
14. Repeat the same steps to create a variable named `sipuri` with a default value of the SIP URI configured for your Agent AI bot.
15. Select **Done**.
## Five9 Account Setup for Incoming Phone Call
1. Buy a phone number by following the [Numbers Inventory](https://documentation.five9.com/bundle/admin-console/page/admin-console/numbers-inventory/_ch-numbers-intro.htm) doc.
2. Create an IVR script by following the [Creating an IVR Script](https://documentation.five9.com/bundle/ivr-admin/page/ivr-admin/examples/creating-an-ivr-script.htm) doc.
**Sample IVR Script**:
 3. Create a skill and add agents to the skill by following the [Skills](https://documentation.five9.com/bundle/admin-console/page/admin-console/skills/_ch-user-skills.htm) doc.
4. Create an inbound campaign by following the [Create Inbound Campaigns](https://documentation.five9.com/bundle/admin-console/page/admin-console/campaigns/creating-campaigns.htm) doc.
After you create the inbound campaign, run it.
## Create VoiceStream
1. Sign in to [Five9 Admin Console](https://admin.us.five9.net/).
2. Search for **VoiceStream**, and select **VoiceStream**.
3. Create a skill and add agents to the skill by following the [Skills](https://documentation.five9.com/bundle/admin-console/page/admin-console/skills/_ch-user-skills.htm) doc.
4. Create an inbound campaign by following the [Create Inbound Campaigns](https://documentation.five9.com/bundle/admin-console/page/admin-console/campaigns/creating-campaigns.htm) doc.
After you create the inbound campaign, run it.
## Create VoiceStream
1. Sign in to [Five9 Admin Console](https://admin.us.five9.net/).
2. Search for **VoiceStream**, and select **VoiceStream**.
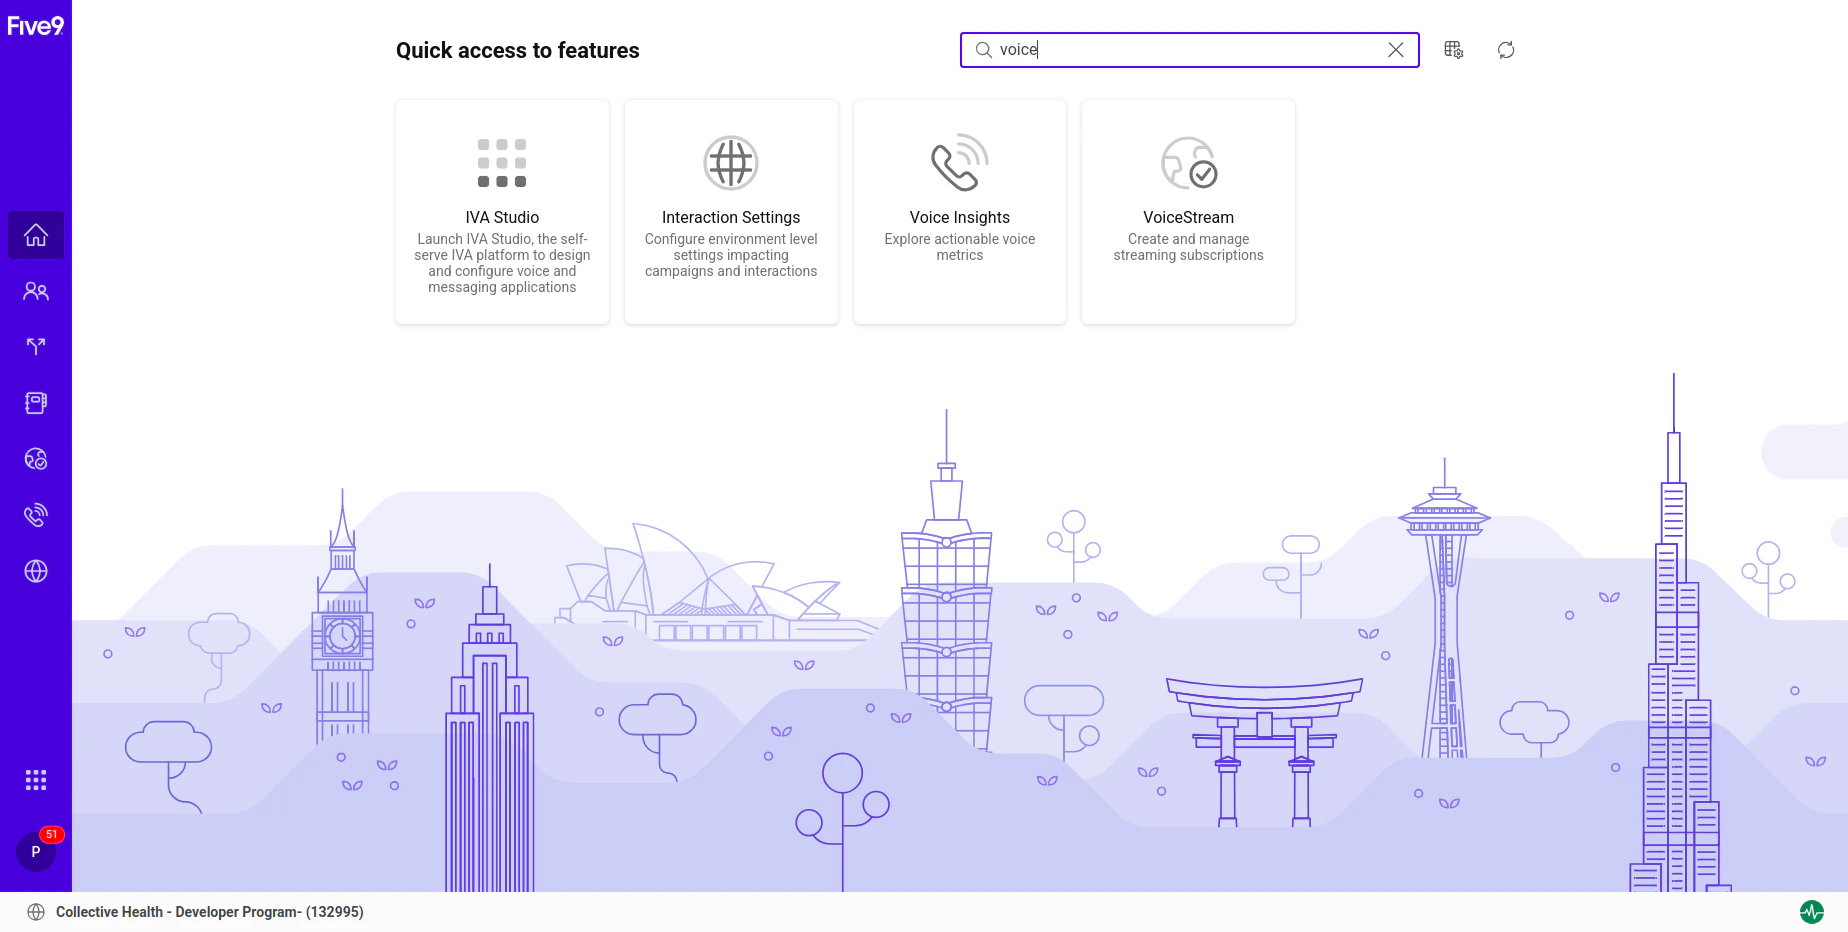 3. Select **Create**.
4. Enter a unique VoiceStream subscription name in the **Name** field.
5. Select **Other (Self Service)** in the **Streaming Destination** field.
6. Select **gRPC** as **Streaming Protocol**.
7. Configure the following destinations and provide the **Trust Token** value as **KoreGrpc**.
* **Primary Streaming Destination**: savg-us-grpc-audiosocket.kore.ai:443
* **CTI Call Event Destination**: [https://savg-webserver.kore.ai/audiosocket/five9/callevents](https://savg-webserver.kore.ai/audiosocket/five9/callevents)
* **VoiceStream Event Destination**: [https://savg-webserver.kore.ai/audiosocket/five9/callevents](https://savg-webserver.kore.ai/audiosocket/five9/callevents)
8. Select **Done**.
9. Configure the **Trust Token** while creating the subscription. It's validated at Kore by call event GET API.
## Access Custom Data and Secure Custom Data in the Agent AI Bot
You can access the custom data and secure custom data in Welcome Events in the Agent AI configuration page and in Dialog Tasks in the Agent AI automation page.
You can access the custom data as `{{context.session.UserContext.customData.}}`.
Follow [this doc](/ai-for-service/agentai/agent-experience) for the detailed steps on how to access custom data.
You can access the secure custom data as `{{context.session.UserContext.secureCustomData.}}`
Follow the same steps of [this doc](/ai-for-service/agentai/agent-experience) for detailed information on how to access secure custom data, except for the path being `{{context.session.UserContext.secureCustomData.}}`
3. Select **Create**.
4. Enter a unique VoiceStream subscription name in the **Name** field.
5. Select **Other (Self Service)** in the **Streaming Destination** field.
6. Select **gRPC** as **Streaming Protocol**.
7. Configure the following destinations and provide the **Trust Token** value as **KoreGrpc**.
* **Primary Streaming Destination**: savg-us-grpc-audiosocket.kore.ai:443
* **CTI Call Event Destination**: [https://savg-webserver.kore.ai/audiosocket/five9/callevents](https://savg-webserver.kore.ai/audiosocket/five9/callevents)
* **VoiceStream Event Destination**: [https://savg-webserver.kore.ai/audiosocket/five9/callevents](https://savg-webserver.kore.ai/audiosocket/five9/callevents)
8. Select **Done**.
9. Configure the **Trust Token** while creating the subscription. It's validated at Kore by call event GET API.
## Access Custom Data and Secure Custom Data in the Agent AI Bot
You can access the custom data and secure custom data in Welcome Events in the Agent AI configuration page and in Dialog Tasks in the Agent AI automation page.
You can access the custom data as `{{context.session.UserContext.customData.}}`.
Follow [this doc](/ai-for-service/agentai/agent-experience) for the detailed steps on how to access custom data.
You can access the secure custom data as `{{context.session.UserContext.secureCustomData.}}`
Follow the same steps of [this doc](/ai-for-service/agentai/agent-experience) for detailed information on how to access secure custom data, except for the path being `{{context.session.UserContext.secureCustomData.}}`