> ## Documentation Index
> Fetch the complete documentation index at: https://koreai.mintlify.site/llms.txt
> Use this file to discover all available pages before exploring further.
# Agent AI Integration with Salesforce Email-to-Case
The Agent AI integration with Salesforce Email-to-Case lets agents use Agent AI directly in the Salesforce Service Console for email-based cases. When a customer emails a configured Email-to-Case address, Salesforce automatically creates or updates a case and displays the Agent AI widget on the Case page.
Through the Agent AI widget, agents receive AI-powered suggestions, conversation summaries, next-best actions, guided responses, and contextual insights based on the email history retrieved from Salesforce through a configured external API. Because email interactions are asynchronous, agents can use the **Refresh** option in the Agent AI widget to sync newly received or sent emails and keep the context current, ensuring accurate intent detection and relevant suggestions.
Agents can generate **on-demand summaries** of past email interactions to quickly understand long-running conversations. The system stores these summaries in Custom Data of Agent AI for downstream use within Agent and Agentic Platform (see [Selecting conversation metadata](/ai-for-service/agentai/configuration/linked-services#conversation-metadata) or in Salesforce for future reference, helping maintain continuity and improve response quality.
The Assist tab displays a summary when the widget loads and updates the summary as new emails arrive or agents generate or submit one.
This integration helps agents respond faster, maintain context across email threads, and deliver consistent, high-quality customer support within Salesforce.
## Prerequisites
Before integrating Agent AI with Salesforce, ensure the following prerequisites:
* Configure Salesforce Email-to-Case. Refer to [Set up Email-to-Case](https://help.salesforce.com/s/articleView?id=service.setting_up_email-to-case.htm\&type=5) for help.
* Install the [Agent AI Salesforce](https://appexchange.salesforce.com/appxListingDetail?listingId=a0N4V00000HSGlnUAH) package in your Salesforce organization.
* Ensure you have Agent AI admin permissions.
## Steps to Configure Agent AI in Salesforce
1. Sign in to **Salesforce**.
2. Select **App Launcher**.
3. Type **config** in the **search bar**, and select **Kore Agent AI Configuration** from the displayed list.
4. Select **New** from the top-right corner of the page.
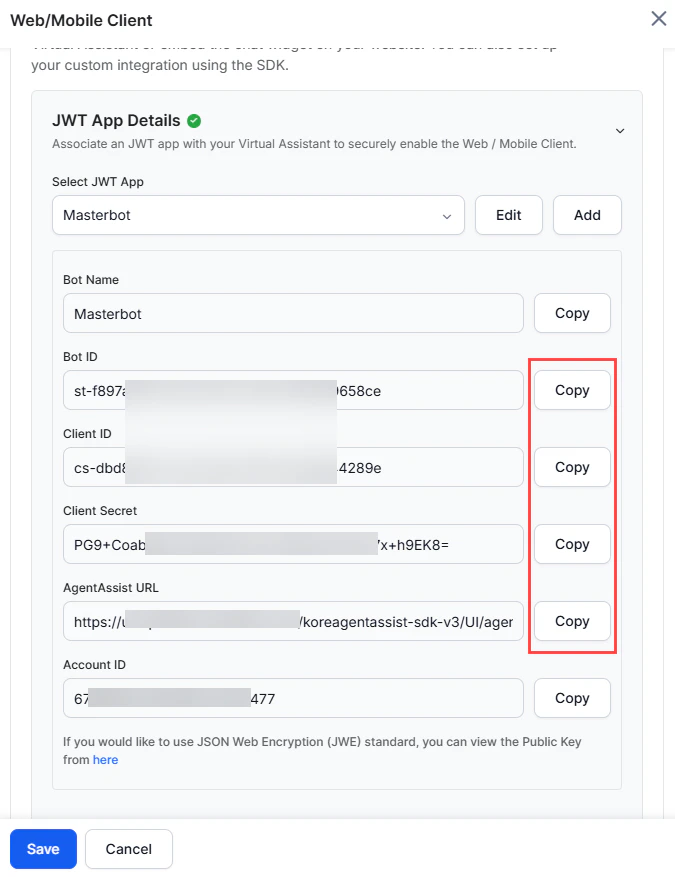
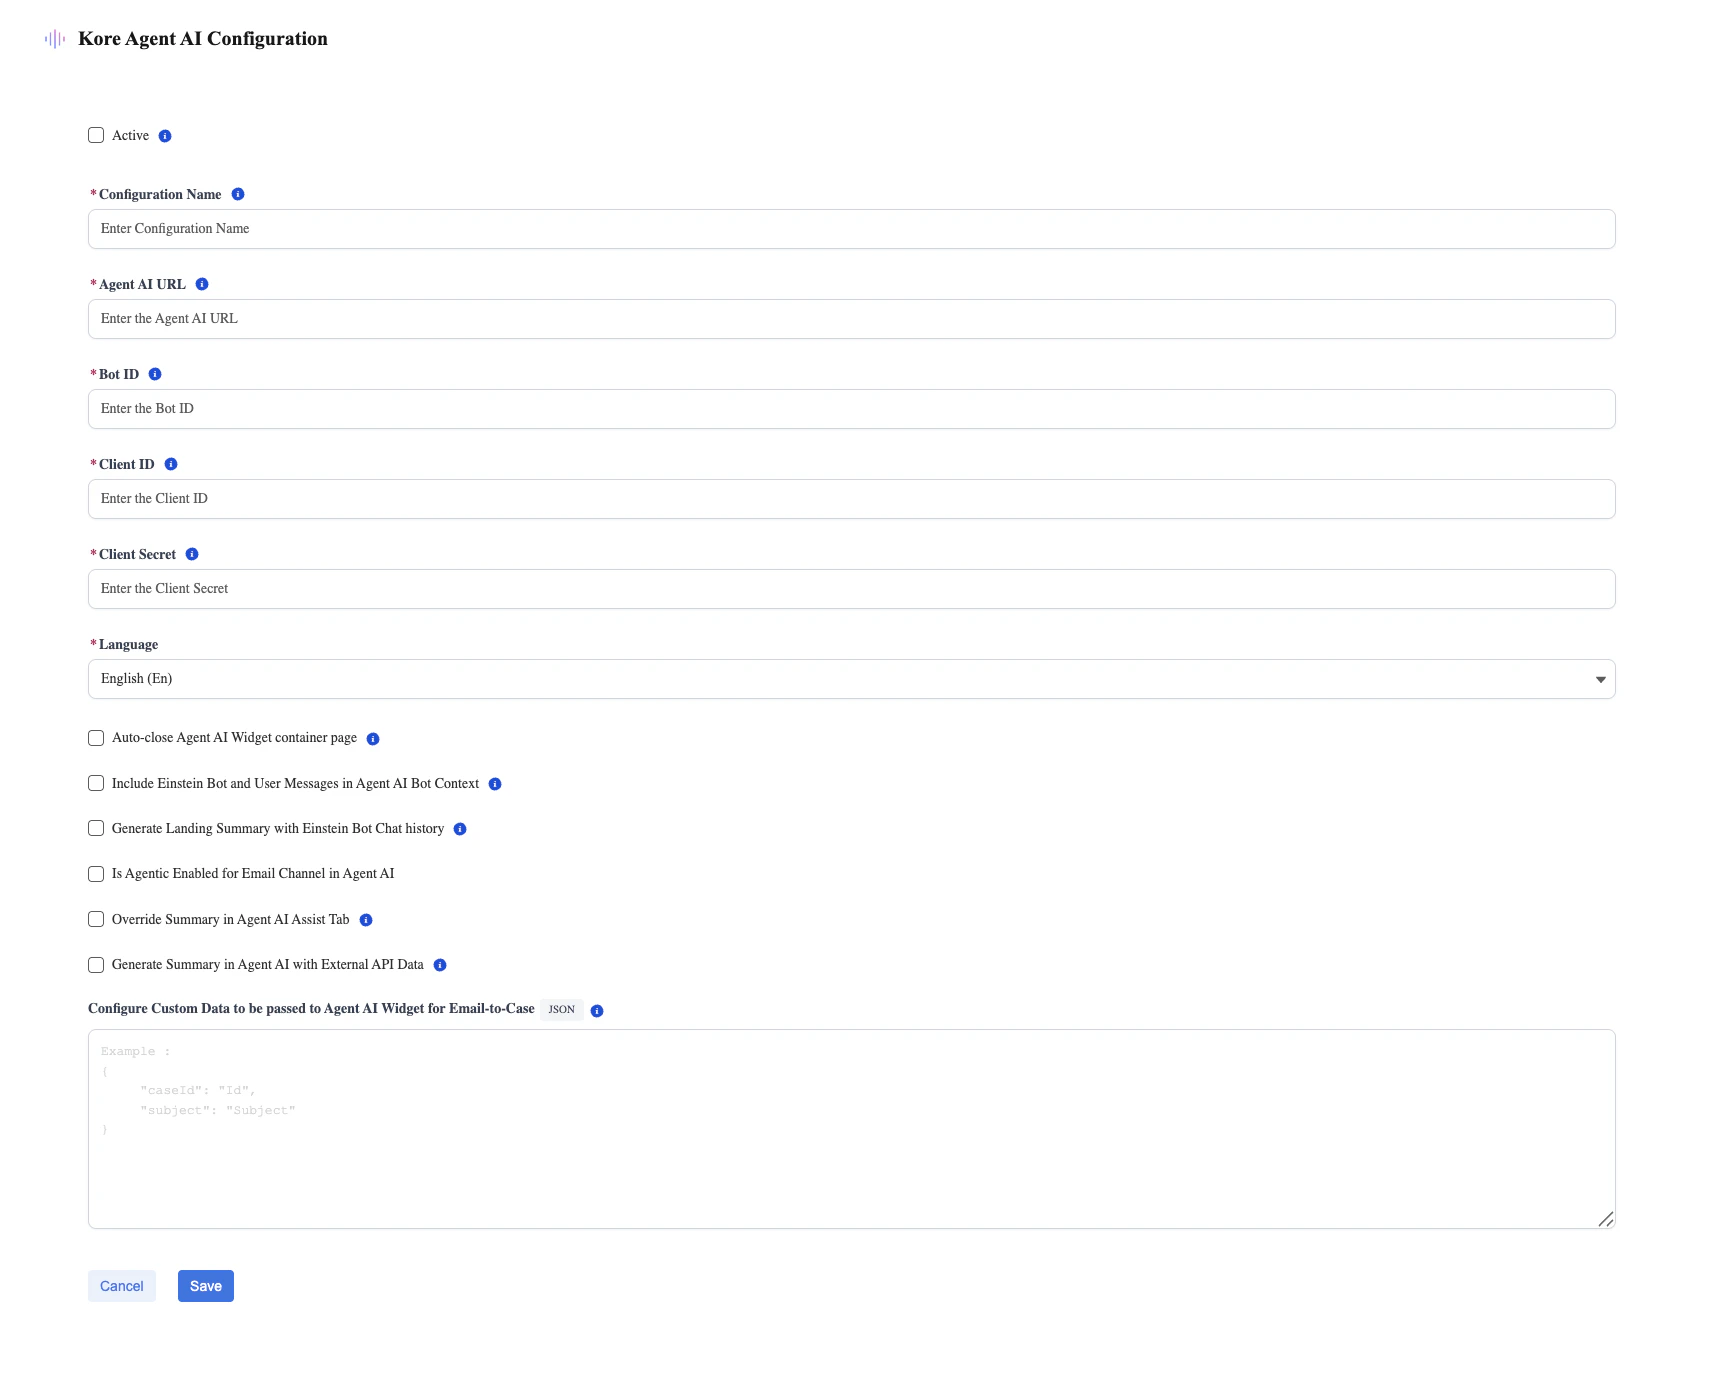 5. Enter the required values in the **Agent AI URL**, **Bot ID**, **Client ID,** **Client Secret**, and **Language (bot language)** fields. To get these values:
1. Sign in to Platform.
2. Go to **Agent AI** > **Flows & Channels** > **Digital**.
3. Select **Web/Mobile Client** and expand the **JWT App Details** section.
4. Select the **copy** buttons against the required fields.
5. Enter the required values in the **Agent AI URL**, **Bot ID**, **Client ID,** **Client Secret**, and **Language (bot language)** fields. To get these values:
1. Sign in to Platform.
2. Go to **Agent AI** > **Flows & Channels** > **Digital**.
3. Select **Web/Mobile Client** and expand the **JWT App Details** section.
4. Select the **copy** buttons against the required fields.
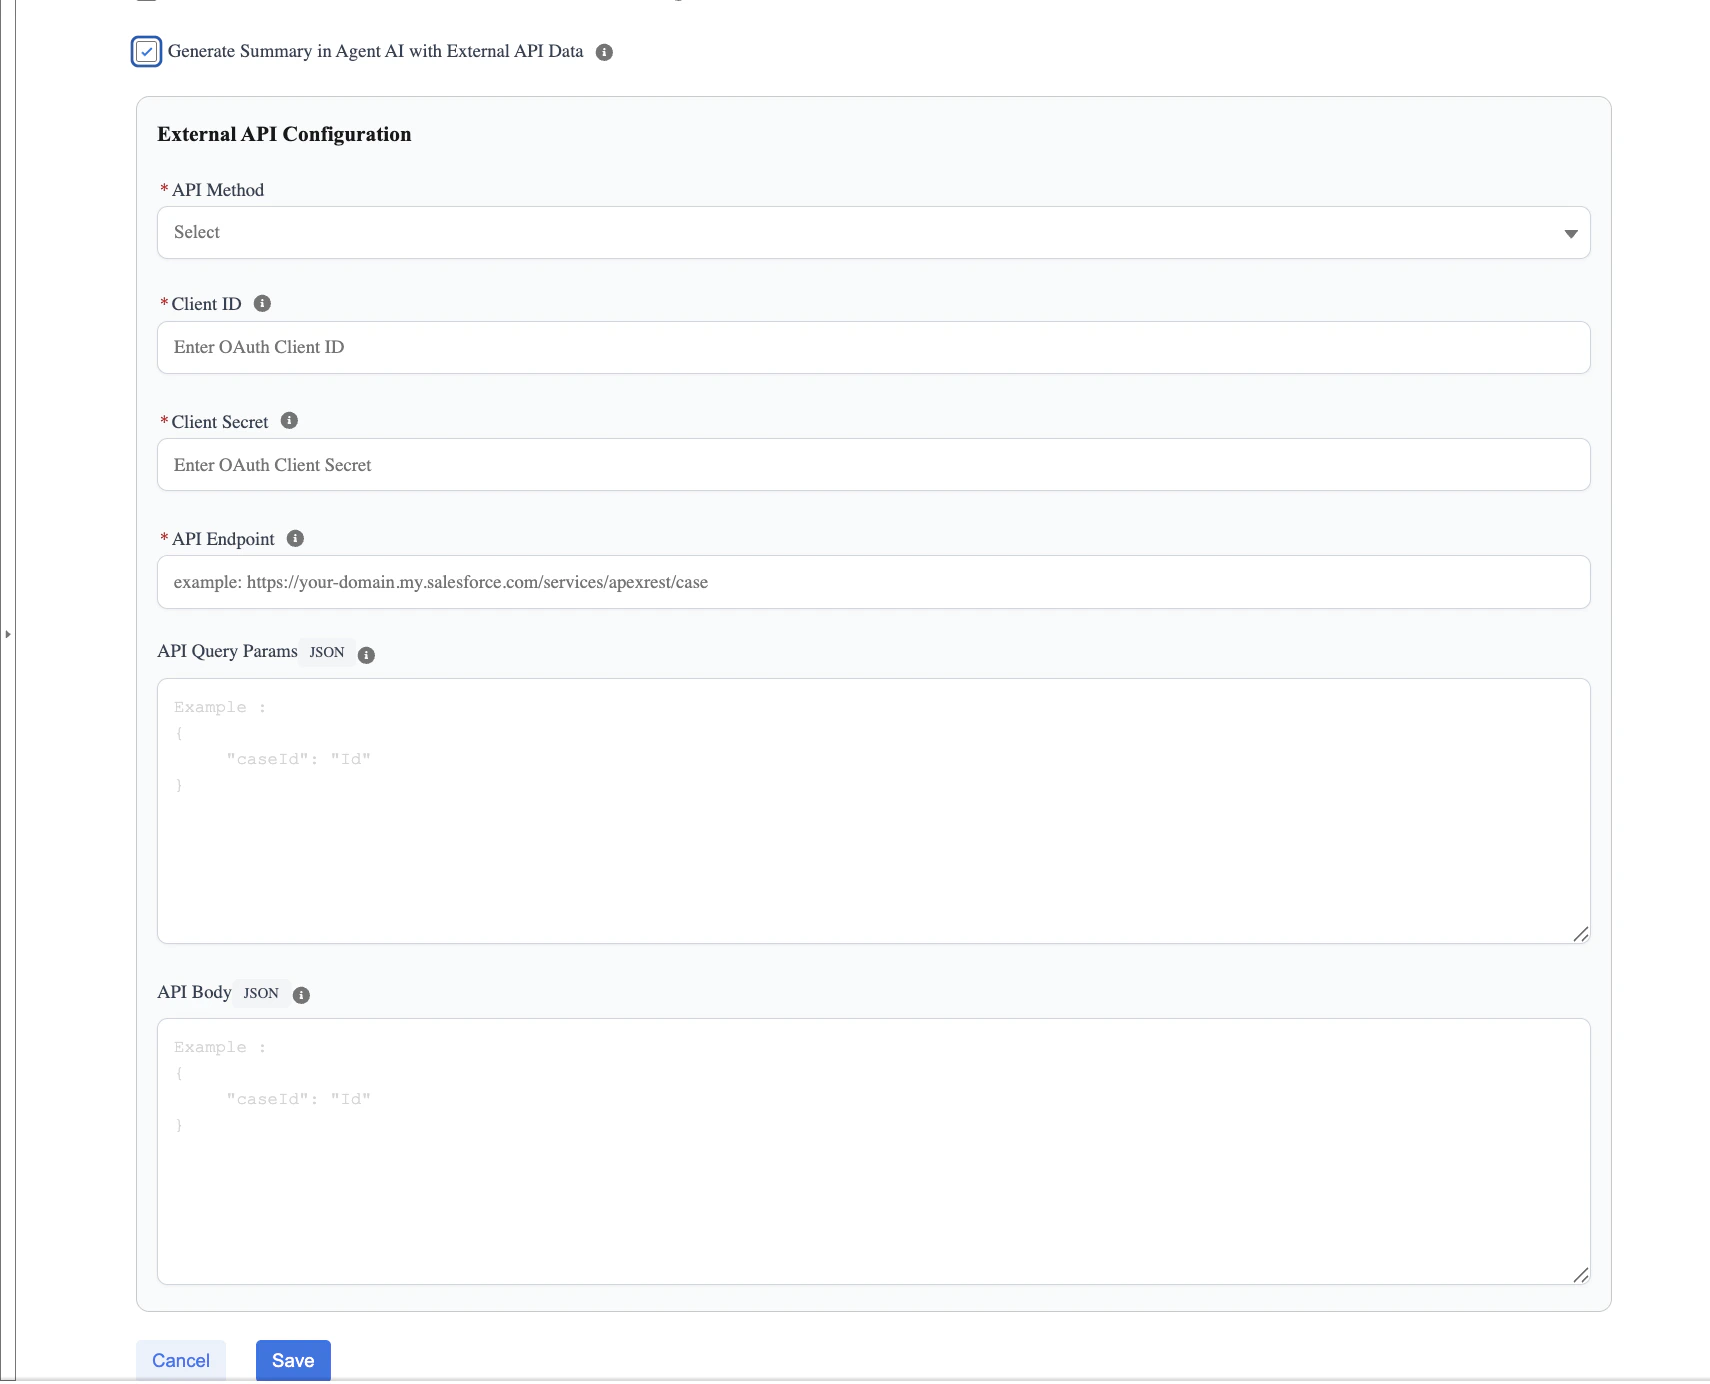
 6. Select **Generate Summary in Agent AI with External API Data** to generate both the Landing Summary and Intermittent Summary within the Agent AI widget using external data.
 7. Click **Save**.
### External API Configuration for Summary Generation
The **Generate Summary in Agent AI with External API Data** option allows Agent AI to fetch message history across channels like chat, social cases, and email. Using the details of this configured API, Agent AI fetches the history of the conversation and generates a summary. This is useful when summaries need to incorporate information beyond the email thread, such as case details, metadata, or related records.
When enabled, configure the following fields:
* **API Method**: Select the HTTP method (GET or POST) that Agent AI uses to invoke the external API.
* **Client ID**: Create an OAuth app by referring to the [Create an External Client App for the OAuth 2.0 Client Credentials Flow](https://developer.salesforce.com/docs/industries/loyalty/guide/authorization.html) doc. Enter the OAuth Consumer Key that's used to authenticate the API request.
* **Client Secret**: Enter the OAuth Consumer Secret associated with the Consumer Key.
* **API Endpoint**: Provide the complete API endpoint URL from which Agent AI fetches the data. For example, Salesforce Apex REST endpoint for retrieving case information.
You can add static query parameters that aren't associated with the Salesforce Case object directly to the API endpoint. For example, `https://your-domain.my.salesforce.com/services/apexrest/case?isSorted=true`
* **API Query Params (JSON)**: Enter the key-value pairs the system sends as query parameters, in JSON format.
Example:
```
{
"caseId": "Id"
}
```
Configure the **Case Object** field names as values in **API Query Params** and **API Body** Objects. During runtime the API call is made with the actual values. For example, if **Id** is configured, the dynamic value of the Salesforce Case ID is used at runtime.
* **API Body (JSON)**: Define the request body in JSON format (applicable for POST requests). This can include dynamic case or conversation attributes required by the API.
Once configured and saved, Agent AI invokes the external API during summary generation and enriches the summary with the returned data, ensuring more complete and context-aware summaries for email-based cases.
## Add Component to the Case Page
1. Go to **App Launcher** and select **Cases**.
7. Click **Save**.
### External API Configuration for Summary Generation
The **Generate Summary in Agent AI with External API Data** option allows Agent AI to fetch message history across channels like chat, social cases, and email. Using the details of this configured API, Agent AI fetches the history of the conversation and generates a summary. This is useful when summaries need to incorporate information beyond the email thread, such as case details, metadata, or related records.
When enabled, configure the following fields:
* **API Method**: Select the HTTP method (GET or POST) that Agent AI uses to invoke the external API.
* **Client ID**: Create an OAuth app by referring to the [Create an External Client App for the OAuth 2.0 Client Credentials Flow](https://developer.salesforce.com/docs/industries/loyalty/guide/authorization.html) doc. Enter the OAuth Consumer Key that's used to authenticate the API request.
* **Client Secret**: Enter the OAuth Consumer Secret associated with the Consumer Key.
* **API Endpoint**: Provide the complete API endpoint URL from which Agent AI fetches the data. For example, Salesforce Apex REST endpoint for retrieving case information.
You can add static query parameters that aren't associated with the Salesforce Case object directly to the API endpoint. For example, `https://your-domain.my.salesforce.com/services/apexrest/case?isSorted=true`
* **API Query Params (JSON)**: Enter the key-value pairs the system sends as query parameters, in JSON format.
Example:
```
{
"caseId": "Id"
}
```
Configure the **Case Object** field names as values in **API Query Params** and **API Body** Objects. During runtime the API call is made with the actual values. For example, if **Id** is configured, the dynamic value of the Salesforce Case ID is used at runtime.
* **API Body (JSON)**: Define the request body in JSON format (applicable for POST requests). This can include dynamic case or conversation attributes required by the API.
Once configured and saved, Agent AI invokes the external API during summary generation and enriches the summary with the returned data, ensuring more complete and context-aware summaries for email-based cases.
## Add Component to the Case Page
1. Go to **App Launcher** and select **Cases**.
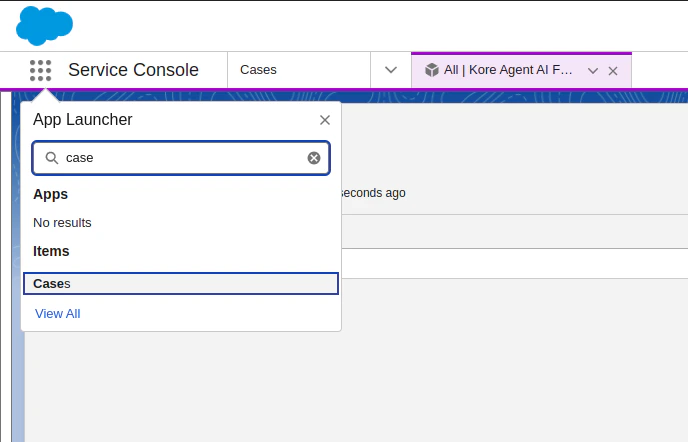 2. Open any record of cases.
3. Click the **gear** icon in the top-right corner, and then select **Edit Page**.
2. Open any record of cases.
3. Click the **gear** icon in the top-right corner, and then select **Edit Page**.
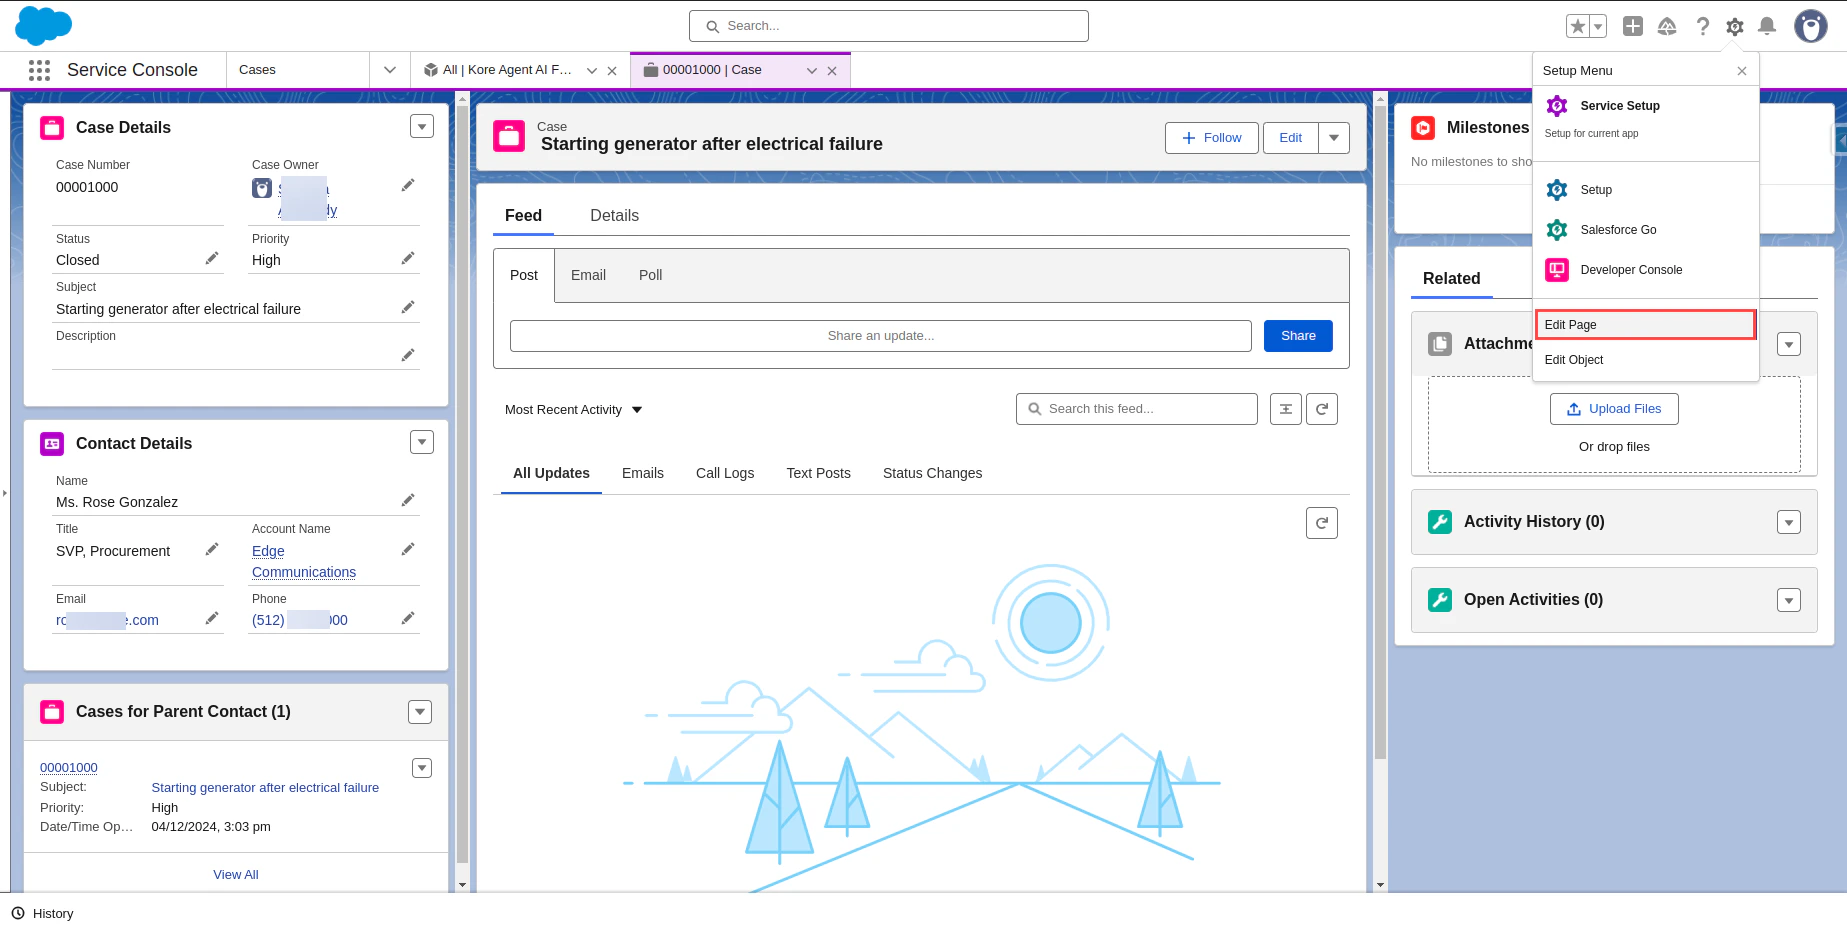 4. Under the **Custom-Managed** components, find the **OmniChannel\_AgentAIEmail** component.
 5. Drag and drop the component on the **Case** page.
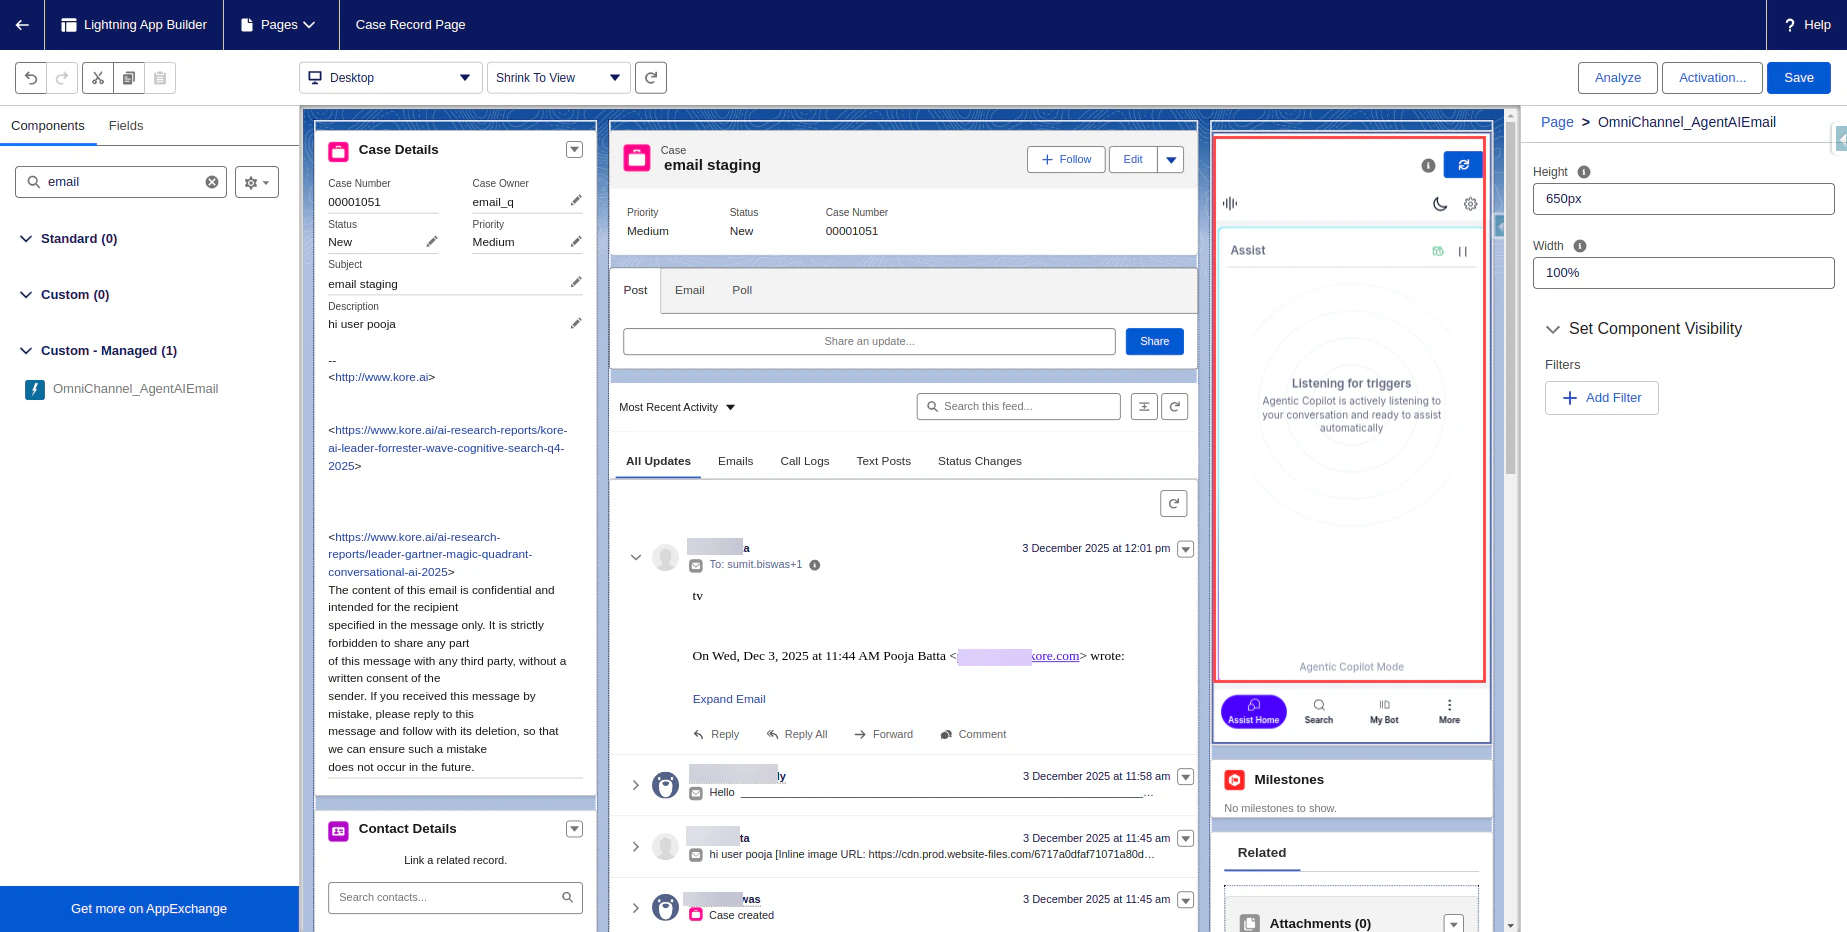 6. Select **Save**.
7. Select **Activation** and activate the page.
The **Email** section appears on the **Case** page only after **Email-to-Case** is successfully configured in your org.
## Test your Solution
1. The customer sends an email to the address configured under **Routing Addresses** in Email-to-Case.
6. Select **Save**.
7. Select **Activation** and activate the page.
The **Email** section appears on the **Case** page only after **Email-to-Case** is successfully configured in your org.
## Test your Solution
1. The customer sends an email to the address configured under **Routing Addresses** in Email-to-Case.
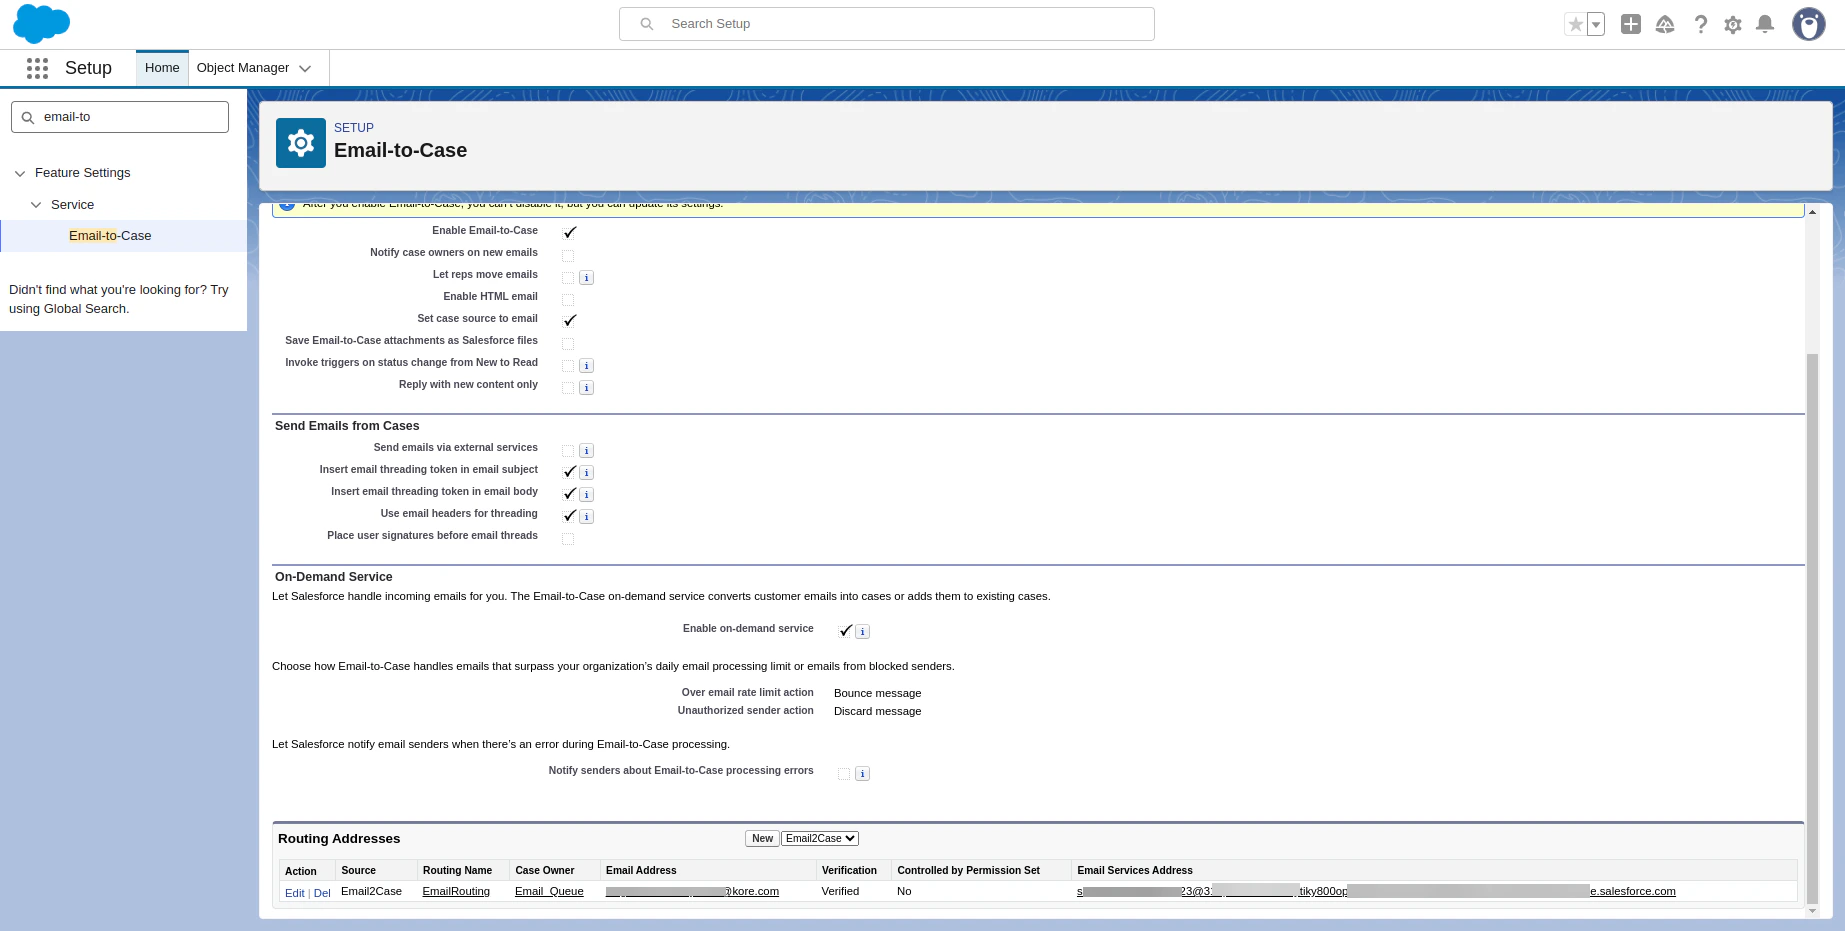 2. The system automatically creates a new case when the customer sends a new email.
3. When the case opens, the Agent AI widget loads in the location you configured during setup in the [previous step](#add-component-to-the-case-page).
2. The system automatically creates a new case when the customer sends a new email.
3. When the case opens, the Agent AI widget loads in the location you configured during setup in the [previous step](#add-component-to-the-case-page).
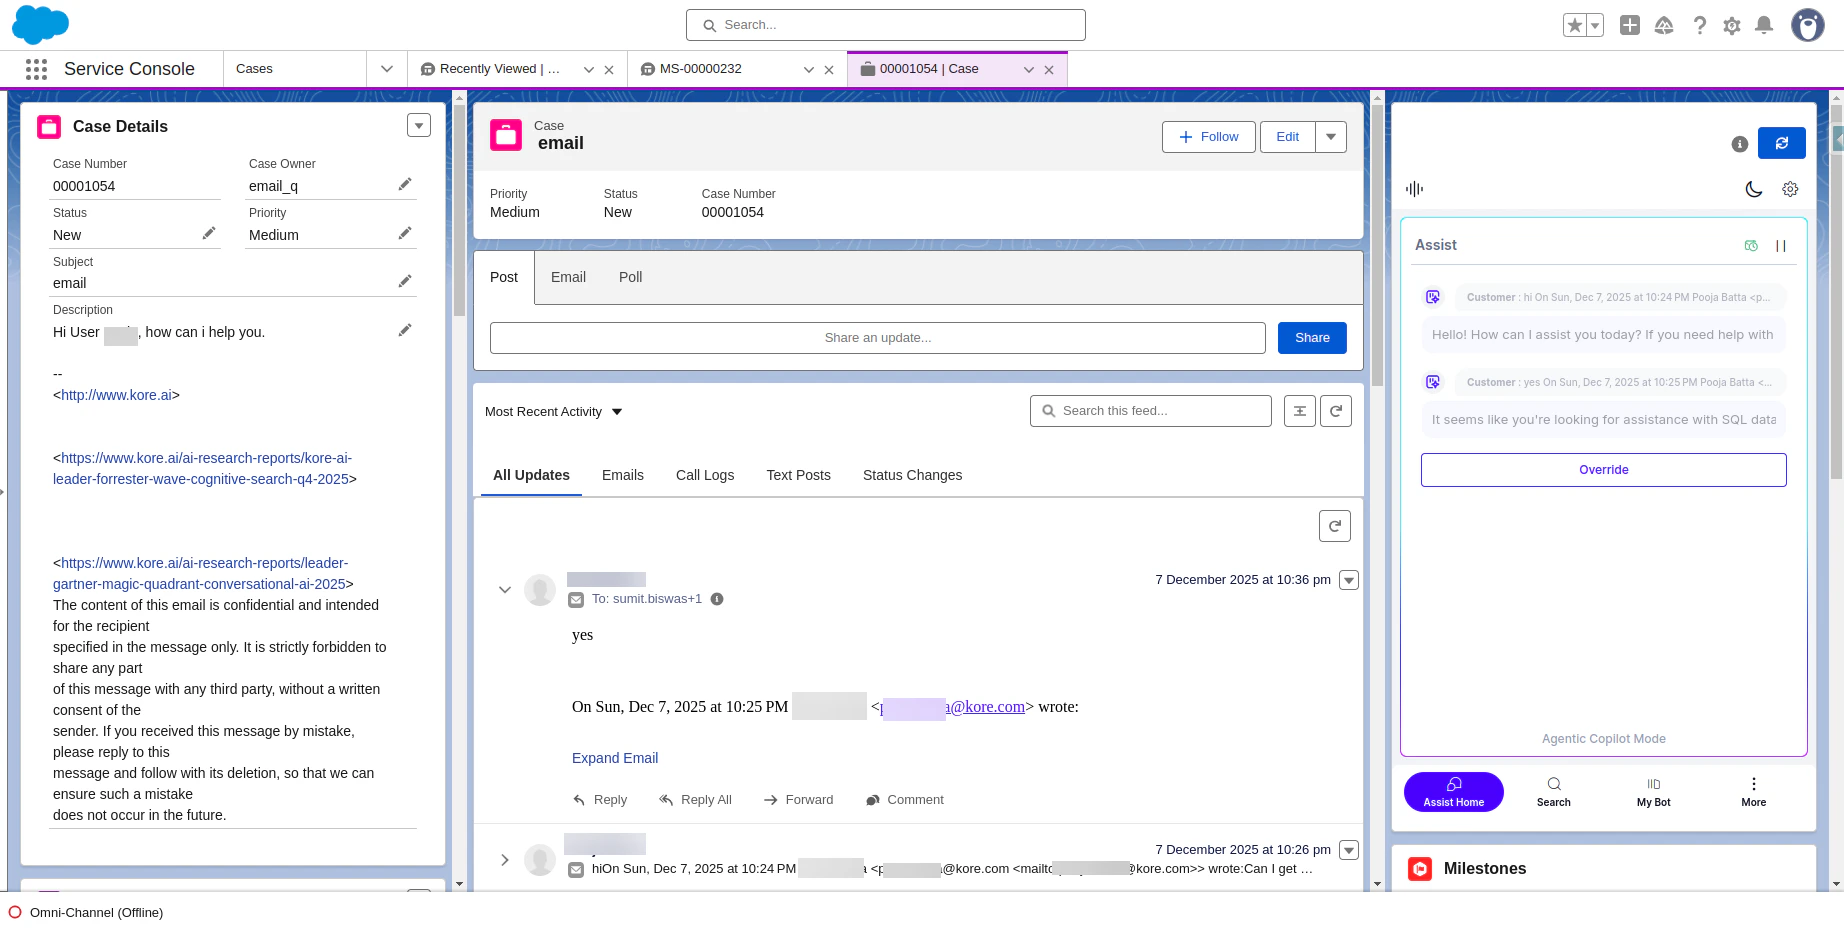 If you select and configure **Generate Summary in Agent AI with External API Data** during Agent AI Configuration, the system generates landing summary as follows:
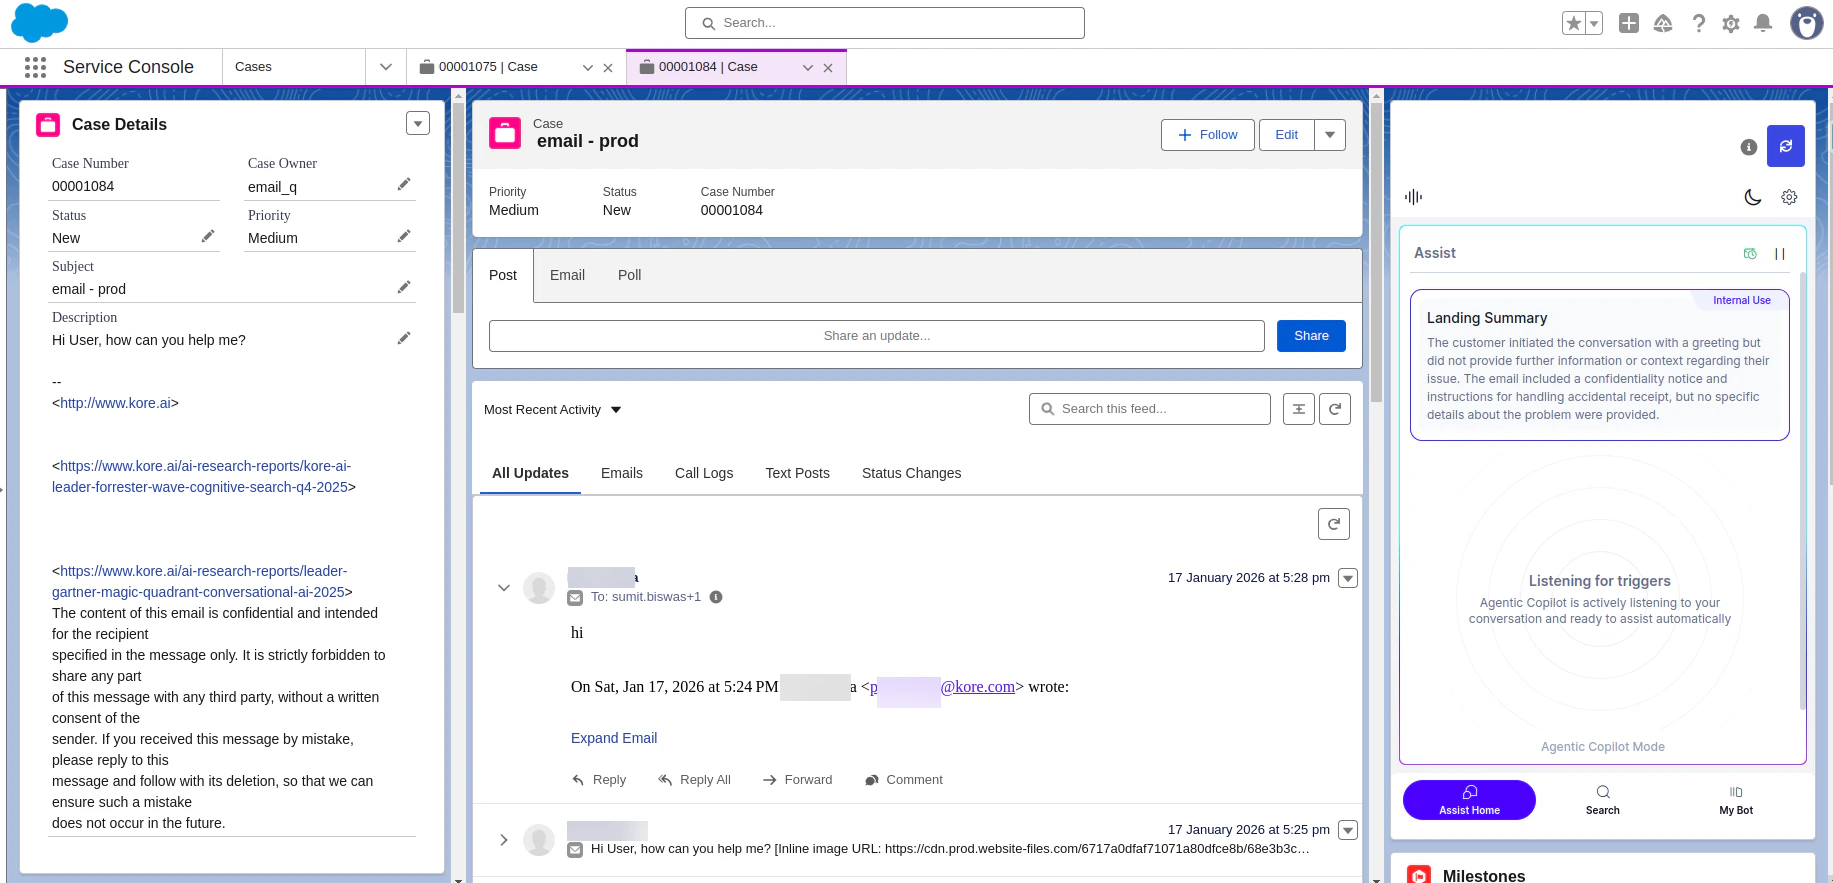 4. When a new email appears in the Email section (whether from the agent or the customer), the agent must select the **Refresh** button at the top of the widget. After refreshing, the system passes the latest email to the Agent AI widget, which then provides suggestions based on the customer's message.
5. Since email conversations don't have a defined end, agents can use the [Generate Summary](/ai-for-service/agentai/agent-experience/agent-assist-widget-v3#generate-summary) button on the Agent AI widget to generate on-demand summary of the conversation. A summary pop-up appears within the Agent AI widget.
6. Summary behavior in the Assist tab:
* When agents click **Summary** in the **Intermittent Summary** pop-up, the system displays the generated summary in the Assist tab as **Summary** (not **Landing Summary**).
* When agents click **Submit**, the system overrides the existing Assist tab summary and replaces it with the latest submitted summary.
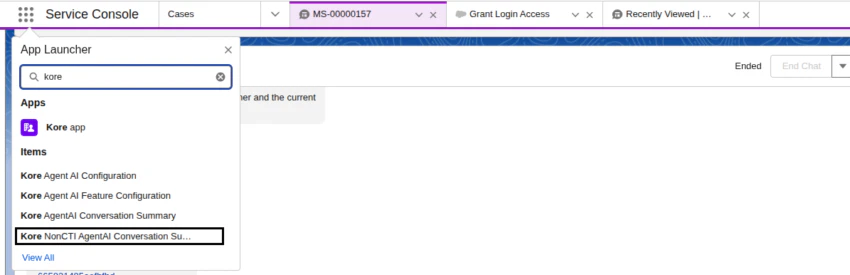
7. Select **Submit** to save the summary in one of the custom objects in Salesforce. To access these summaries, search for **Kore NonCTI AgentAI Conversation Summary** in the **App Launcher**.
4. When a new email appears in the Email section (whether from the agent or the customer), the agent must select the **Refresh** button at the top of the widget. After refreshing, the system passes the latest email to the Agent AI widget, which then provides suggestions based on the customer's message.
5. Since email conversations don't have a defined end, agents can use the [Generate Summary](/ai-for-service/agentai/agent-experience/agent-assist-widget-v3#generate-summary) button on the Agent AI widget to generate on-demand summary of the conversation. A summary pop-up appears within the Agent AI widget.
6. Summary behavior in the Assist tab:
* When agents click **Summary** in the **Intermittent Summary** pop-up, the system displays the generated summary in the Assist tab as **Summary** (not **Landing Summary**).
* When agents click **Submit**, the system overrides the existing Assist tab summary and replaces it with the latest submitted summary.
7. Select **Submit** to save the summary in one of the custom objects in Salesforce. To access these summaries, search for **Kore NonCTI AgentAI Conversation Summary** in the **App Launcher**.
 ***
***