> ## Documentation Index
> Fetch the complete documentation index at: https://koreai.mintlify.site/llms.txt
> Use this file to discover all available pages before exploring further.
# Agent AI Chat Integration with ServiceNow
This document provides detailed instructions on integrating the Agent AI widget with ServiceNow Desktop for the Chat channel. The integration supports [all Agent AI features](/ai-for-service/agentai/agent-experience/agent-assist-widget-v3), including end-of-call summary and Custom Data passing (for example, agent name and ID) to the Agent AI widget.
## Supported ServiceNow Workspaces
* HR Agent Workspace: Supported (validated)
* IT/Service Operations Workspace: Supported (validated)
* Other workspaces (CSM, custom): Supported, if they follow the HR-workspace pattern
## Key Architectural Clarification
Agent AI is a reusable UI component that you can embed in any workspace.
* You must add the Agent AI component to each workspace individually.
* Adding Agent AI to one workspace doesn't make it available in other workspaces within the same instance.
* Agent AI isn't automatically propagated across workspaces.
### Adding Agent AI to a Specific Workspace
1. Sign in to the **ServiceNow** instance.
2. Search in the **All** > **Filter** navigator.
3. Go to **UI Builder** > **Experiences** > **Workspace Experience** > **UI Builder**.
4. Select the target workspace-**HR**/**IT**/**Custom**.
5. Add the **Agent AI by kore.ai** component to the **Record Page**.
6. Bind it to the agent panel or desired region. Refer to the [Data Binding(sysId)](#additional-configuration-for-hr-agent-workspace-optional) section for help.
7. Publish the workspace.
There is no configuration flag to associate Agent AI with a workspace. You determine the workspace by embedding the component there.
## Prerequisites
This section outlines the essential components, credentials, and permissions required for integrating Agent AI Chat with ServiceNow.
* Required Components:
* ServiceNow Instance
* Xanadu, Yokohama, or Zurich release
* Configured to receive desktop chats
* Agent AI Account
* Enabled Web/Mobile channel
* Required AI Agent credentials: Bot ID, Client ID, Client Secret, and Widget URL (Credential Location: Go to **Agent AI** > **Flows and Channels** > **Channels** > **Digital** > **Web/Mobile Client** > **JWT App Details**.)
* Roles and Permissions:
* ServiceNow: Admin Role
* Platform (Optional): Required only if you are doing an Agent Transfer from Platform to ServiceNow. For more information, refer to [Configuring the ServiceNow Agent - Utah and Higher versions](/ai-for-service/integrations/agents/servicenow/configuring-the-servicenow-agent-utah-and-vancouver).
## Interaction between ServiceNow and Agent AI
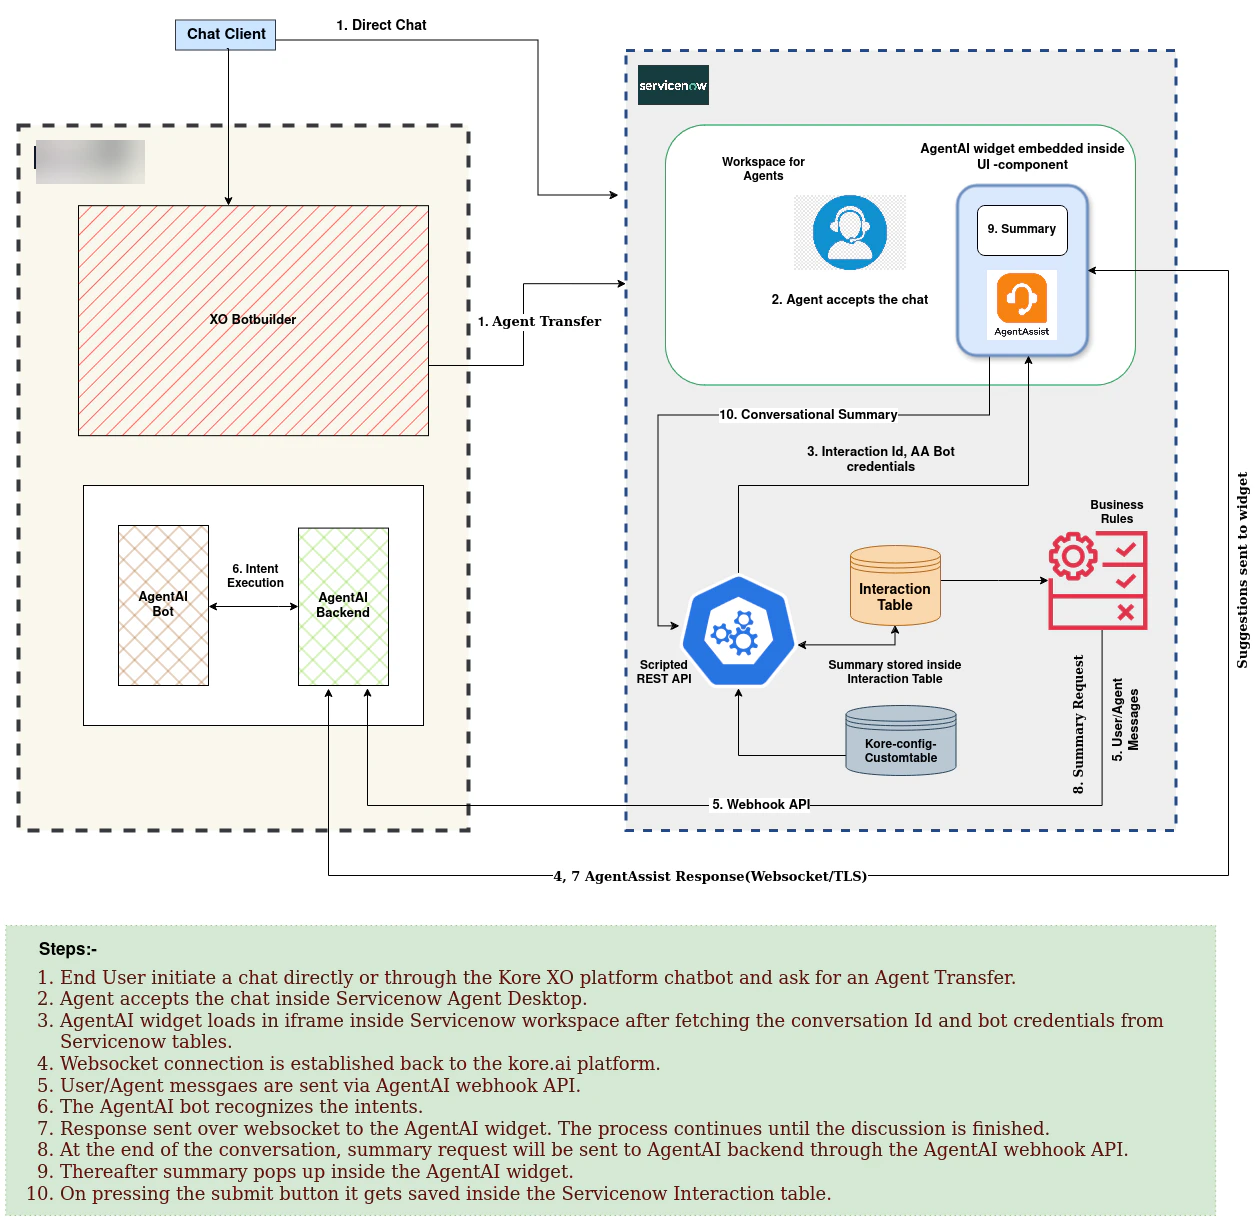
The following architecture diagram shows the interaction between ServiceNow and Agent AI:
 ## Set Up Agent AI in ServiceNow Sandbox
Setting up Agent AI chat with ServiceNow includes the following steps:
* Set Up Agent AI in ServiceNow Sandbox
* [Download from the ServiceNow Store (recommended)](#step-1-download-from-the-servicenow-store-recommended),
or
* [Install Using an Update Set](#install-using-an-update-set)
* [Set Up Agent AI App Configuration](#step-2-set-up-agent-ai-application-configuration)
* [Test the Configuration](#step-3-test-the-integration)
* [XO Configuration (Optional)](#step-4-xo-configuration-optional)
* [Using the Agent AI widget](#step-5-using-the-agent-ai-widget)
### Step 1: Download from the ServiceNow Store (recommended)
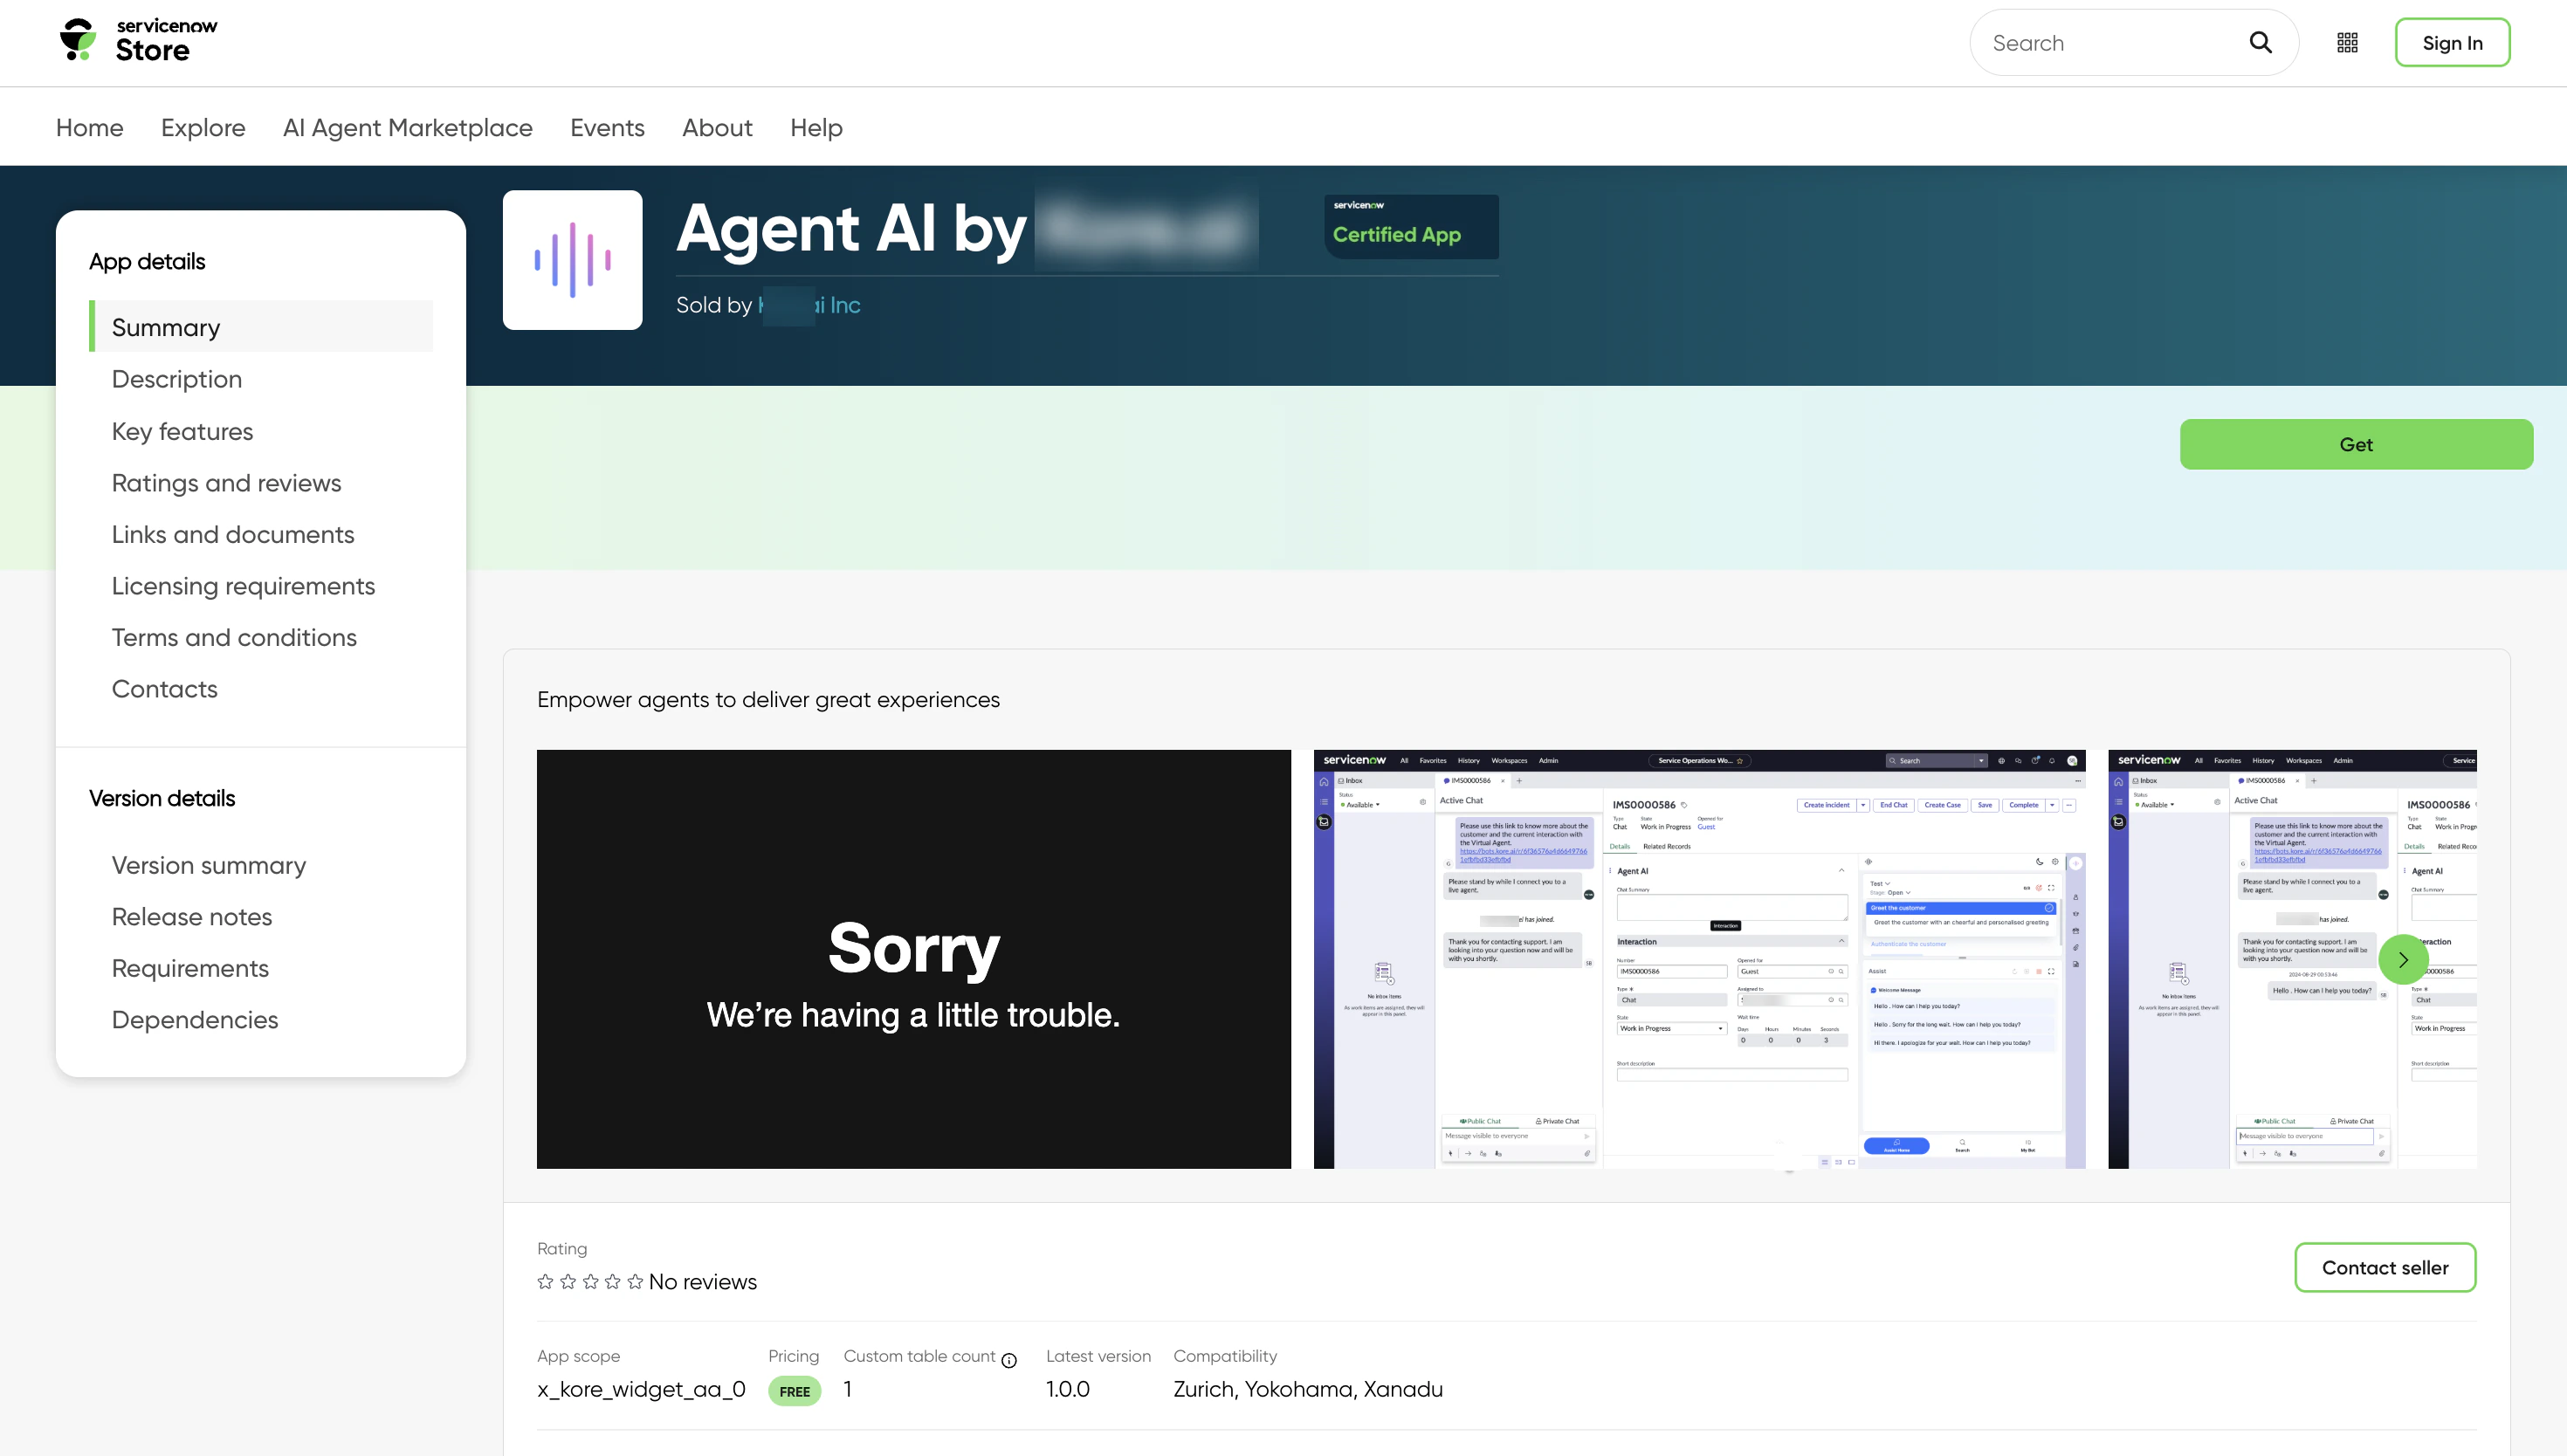
1. Get the [Agent AI by Kore.ai](https://store.servicenow.com/sn_appstore_store.do#!/store/application/92d544cec3da0a9082881b6ce0013194/1.0.0?referer=%2Fstore%2Fsearch%3Flistingtype%3Dallintegrations%25253Bancillary_app%25253Bcertified_apps%25253Bcontent%25253Bindustry_solution%25253Boem%25253Butility%25253Btemplate%25253Bgenerative_ai%25253Bsnow_solution%26q%3Dkore\&sl=sh) application from the ServiceNow store.
2. Click **GET** to begin the application entitlement process.
3. Select the organization name where you want to install this application.
## Set Up Agent AI in ServiceNow Sandbox
Setting up Agent AI chat with ServiceNow includes the following steps:
* Set Up Agent AI in ServiceNow Sandbox
* [Download from the ServiceNow Store (recommended)](#step-1-download-from-the-servicenow-store-recommended),
or
* [Install Using an Update Set](#install-using-an-update-set)
* [Set Up Agent AI App Configuration](#step-2-set-up-agent-ai-application-configuration)
* [Test the Configuration](#step-3-test-the-integration)
* [XO Configuration (Optional)](#step-4-xo-configuration-optional)
* [Using the Agent AI widget](#step-5-using-the-agent-ai-widget)
### Step 1: Download from the ServiceNow Store (recommended)
1. Get the [Agent AI by Kore.ai](https://store.servicenow.com/sn_appstore_store.do#!/store/application/92d544cec3da0a9082881b6ce0013194/1.0.0?referer=%2Fstore%2Fsearch%3Flistingtype%3Dallintegrations%25253Bancillary_app%25253Bcertified_apps%25253Bcontent%25253Bindustry_solution%25253Boem%25253Butility%25253Btemplate%25253Bgenerative_ai%25253Bsnow_solution%26q%3Dkore\&sl=sh) application from the ServiceNow store.
2. Click **GET** to begin the application entitlement process.
3. Select the organization name where you want to install this application.
 **or**
### Install Using an Update Set
1. Ask the Support team for the relevant Update Set XML file.
2. Search in **All** > **filter** navigator as **Retrieved Update Sets**, which is under **System Update Sets**, and open it.
3. Under **Related Links**, click **Import Update Set from XML**.
**or**
### Install Using an Update Set
1. Ask the Support team for the relevant Update Set XML file.
2. Search in **All** > **filter** navigator as **Retrieved Update Sets**, which is under **System Update Sets**, and open it.
3. Under **Related Links**, click **Import Update Set from XML**.
 4. Open the update set **Agent AI by kore.ai** (official update set name).
#### Preview Update Set
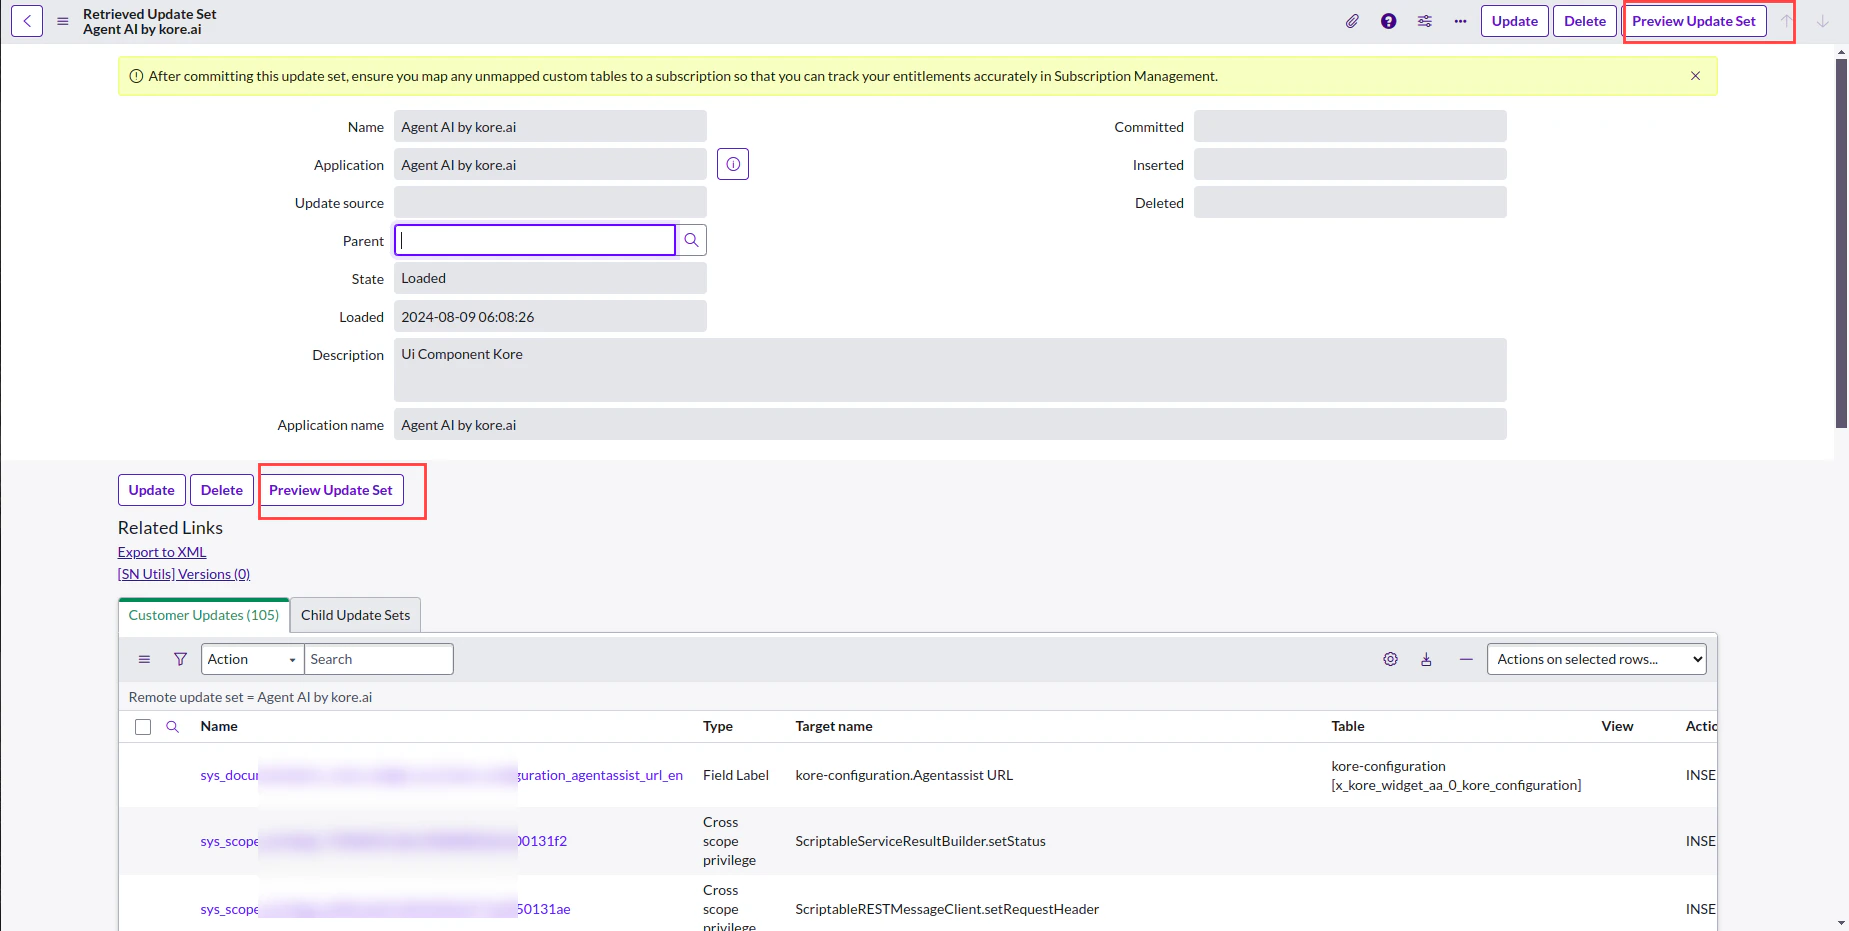
To preview the update set, click the **Preview Update Set** tab.
4. Open the update set **Agent AI by kore.ai** (official update set name).
#### Preview Update Set
To preview the update set, click the **Preview Update Set** tab.
 #### Commit Update Set
This option becomes available after a successful preview. Click **Commit Update Set** to proceed.
#### Commit Update Set
This option becomes available after a successful preview. Click **Commit Update Set** to proceed.
 ##### Tips
If you get any error (refer to the following screenshot) in the preview step, perform the following steps to resolve it.
##### Tips
If you get any error (refer to the following screenshot) in the preview step, perform the following steps to resolve it.
 Steps to resolve the error:
* Close the **Update Set Preview** dialog window.
* Go to **Update Set Review Problems**, and select all.
* On the right side of the page, select **Accept remote update** from the **Action on selected rows…** drop-down list.
**Multi-language support** for Agent AI is available only with the **Update Set**.
### Step 2: Set Up Agent AI Application Configuration
Application Name: **Agent AI by kore.ai**
This section outlines the steps to configure the Agent AI app. With the multibot solution in ServiceNow, you can configure multiple Agent AI bots. The system renders the appropriate bot when a chat enters a specific ServiceNow queue.
#### Add Agent configuration in the ServiceNow Custom Table
1. Change your ServiceNow scope from **Global** to **Agent AI by kore.ai**.
2. Go to **All** > **Filter navigator**, and search **Kore\_configuration**> **kore-config-customtable**.
Steps to resolve the error:
* Close the **Update Set Preview** dialog window.
* Go to **Update Set Review Problems**, and select all.
* On the right side of the page, select **Accept remote update** from the **Action on selected rows…** drop-down list.
**Multi-language support** for Agent AI is available only with the **Update Set**.
### Step 2: Set Up Agent AI Application Configuration
Application Name: **Agent AI by kore.ai**
This section outlines the steps to configure the Agent AI app. With the multibot solution in ServiceNow, you can configure multiple Agent AI bots. The system renders the appropriate bot when a chat enters a specific ServiceNow queue.
#### Add Agent configuration in the ServiceNow Custom Table
1. Change your ServiceNow scope from **Global** to **Agent AI by kore.ai**.
2. Go to **All** > **Filter navigator**, and search **Kore\_configuration**> **kore-config-customtable**.
 3. Click **New**.
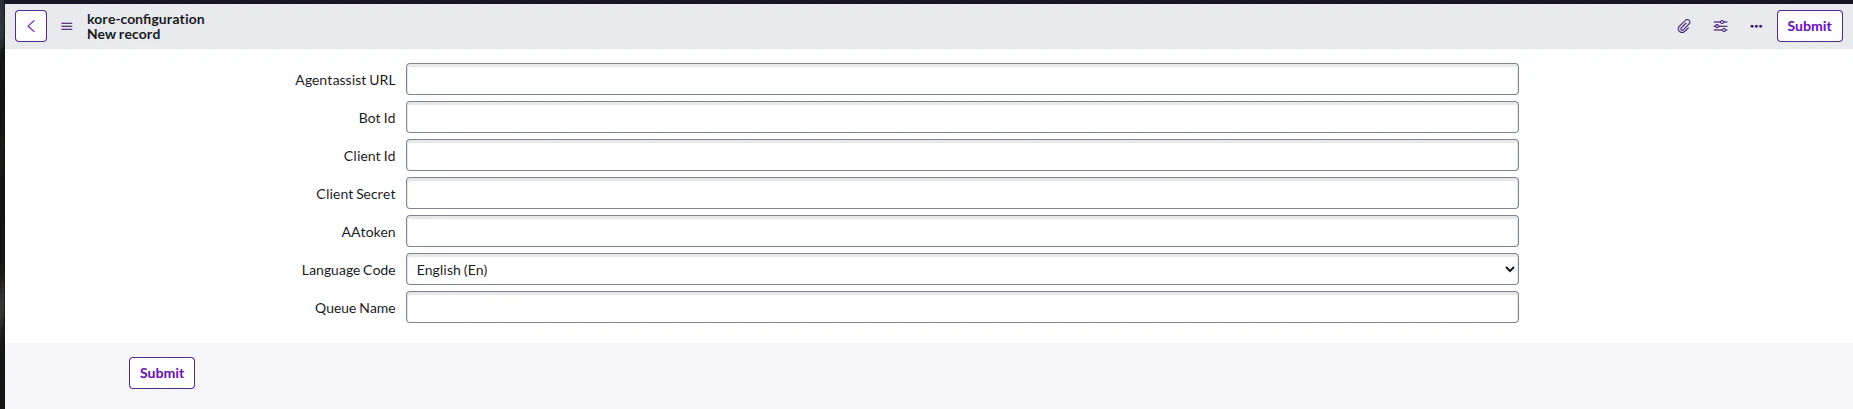
4. Add the **Agent AI URL**, **Bot Id**, **Client Id**, **Client Secret**, **Language Code**, and **Queue Name**. Refer to [Prerequisite](#prerequisites).
* **Language Code**: For any language other than English, select the language code from the drop-down list. The default language code is English (En).
* **Queue Name:** To configure the same AI Agent credentials for multiple queues, use comma-separated queue names (for example, customer\_queue, sales\_queue, service\_queue).
5. Click **Submit**.
The **Client Secret** and **AAtoken** field must be empty for the widget to load. The AAtoken field automatically populates at the runtime.
3. Click **New**.
4. Add the **Agent AI URL**, **Bot Id**, **Client Id**, **Client Secret**, **Language Code**, and **Queue Name**. Refer to [Prerequisite](#prerequisites).
* **Language Code**: For any language other than English, select the language code from the drop-down list. The default language code is English (En).
* **Queue Name:** To configure the same AI Agent credentials for multiple queues, use comma-separated queue names (for example, customer\_queue, sales\_queue, service\_queue).
5. Click **Submit**.
The **Client Secret** and **AAtoken** field must be empty for the widget to load. The AAtoken field automatically populates at the runtime.
 #### V2-V3 Migration
* For version 2 (v2) of Agent AI, `https://agentassist.kore.ai` (or the domain hosting Agent AI), add this to the Agent AI URL.
Sample v2 URL: `https://.kore.ai`
* For version 3 (v3), you must copy the Agent AI widget URL from the AI for Service > Agent AI > Channel configuration and paste it into the Agent AI URL field. For XO v11, go to **Flows and Channels** > **Channels** > **Digital** > **Web/Mobile Client** > **JWT App Details**.
Sample v3 URL: `https://.kore.ai/koreagentassist-sdk-v3/UI/agentassist-iframe.html`
### Step 3: Test the Integration
* **Agent**: Sign in to the ServiceNow Agent Console/Workspace (For example, Service Operation Workspace) with your agent credentials (agent-specific permissions) and remain available to receive chat on the ServiceNow desktop.
* Minimum permissions/roles required for an agent are **Itil** and **awa\_agent**.
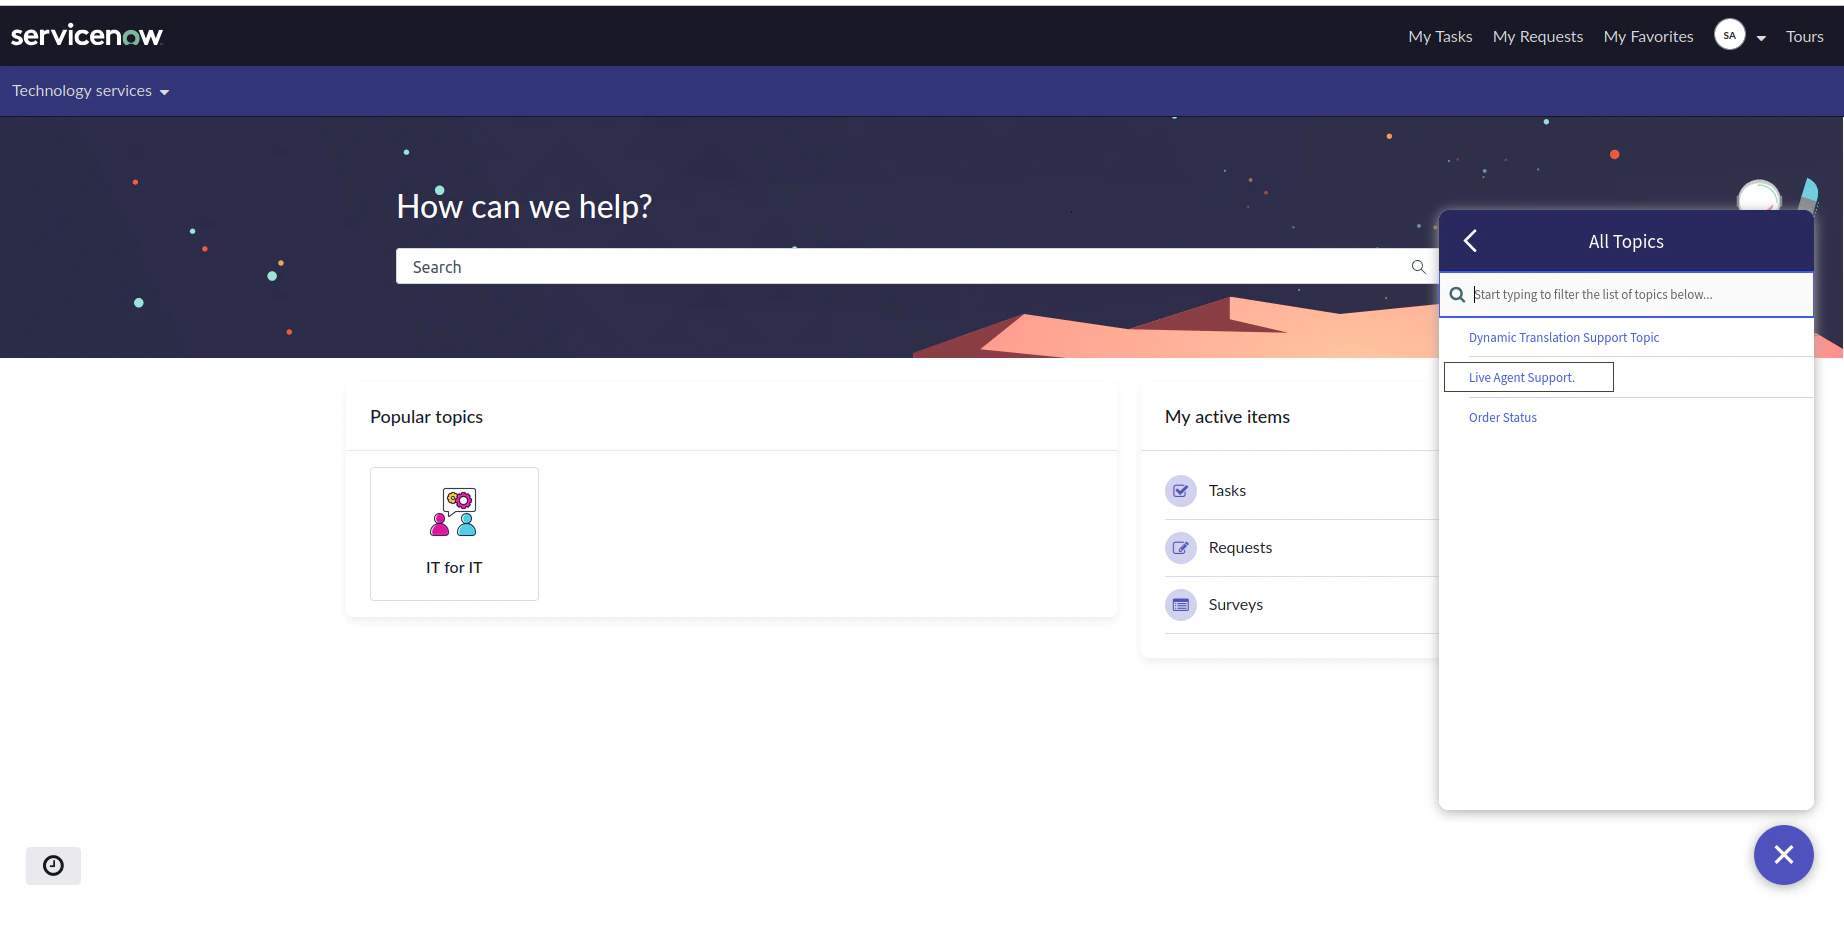
* **Customer**: To initiate a chat from the customer side, sign in to **ESC (Enterprise Service Center)** of your ServiceNow instance and initiate a chat.
ESC portal link: `/esc`.
#### V2-V3 Migration
* For version 2 (v2) of Agent AI, `https://agentassist.kore.ai` (or the domain hosting Agent AI), add this to the Agent AI URL.
Sample v2 URL: `https://.kore.ai`
* For version 3 (v3), you must copy the Agent AI widget URL from the AI for Service > Agent AI > Channel configuration and paste it into the Agent AI URL field. For XO v11, go to **Flows and Channels** > **Channels** > **Digital** > **Web/Mobile Client** > **JWT App Details**.
Sample v3 URL: `https://.kore.ai/koreagentassist-sdk-v3/UI/agentassist-iframe.html`
### Step 3: Test the Integration
* **Agent**: Sign in to the ServiceNow Agent Console/Workspace (For example, Service Operation Workspace) with your agent credentials (agent-specific permissions) and remain available to receive chat on the ServiceNow desktop.
* Minimum permissions/roles required for an agent are **Itil** and **awa\_agent**.
* **Customer**: To initiate a chat from the customer side, sign in to **ESC (Enterprise Service Center)** of your ServiceNow instance and initiate a chat.
ESC portal link: `/esc`.
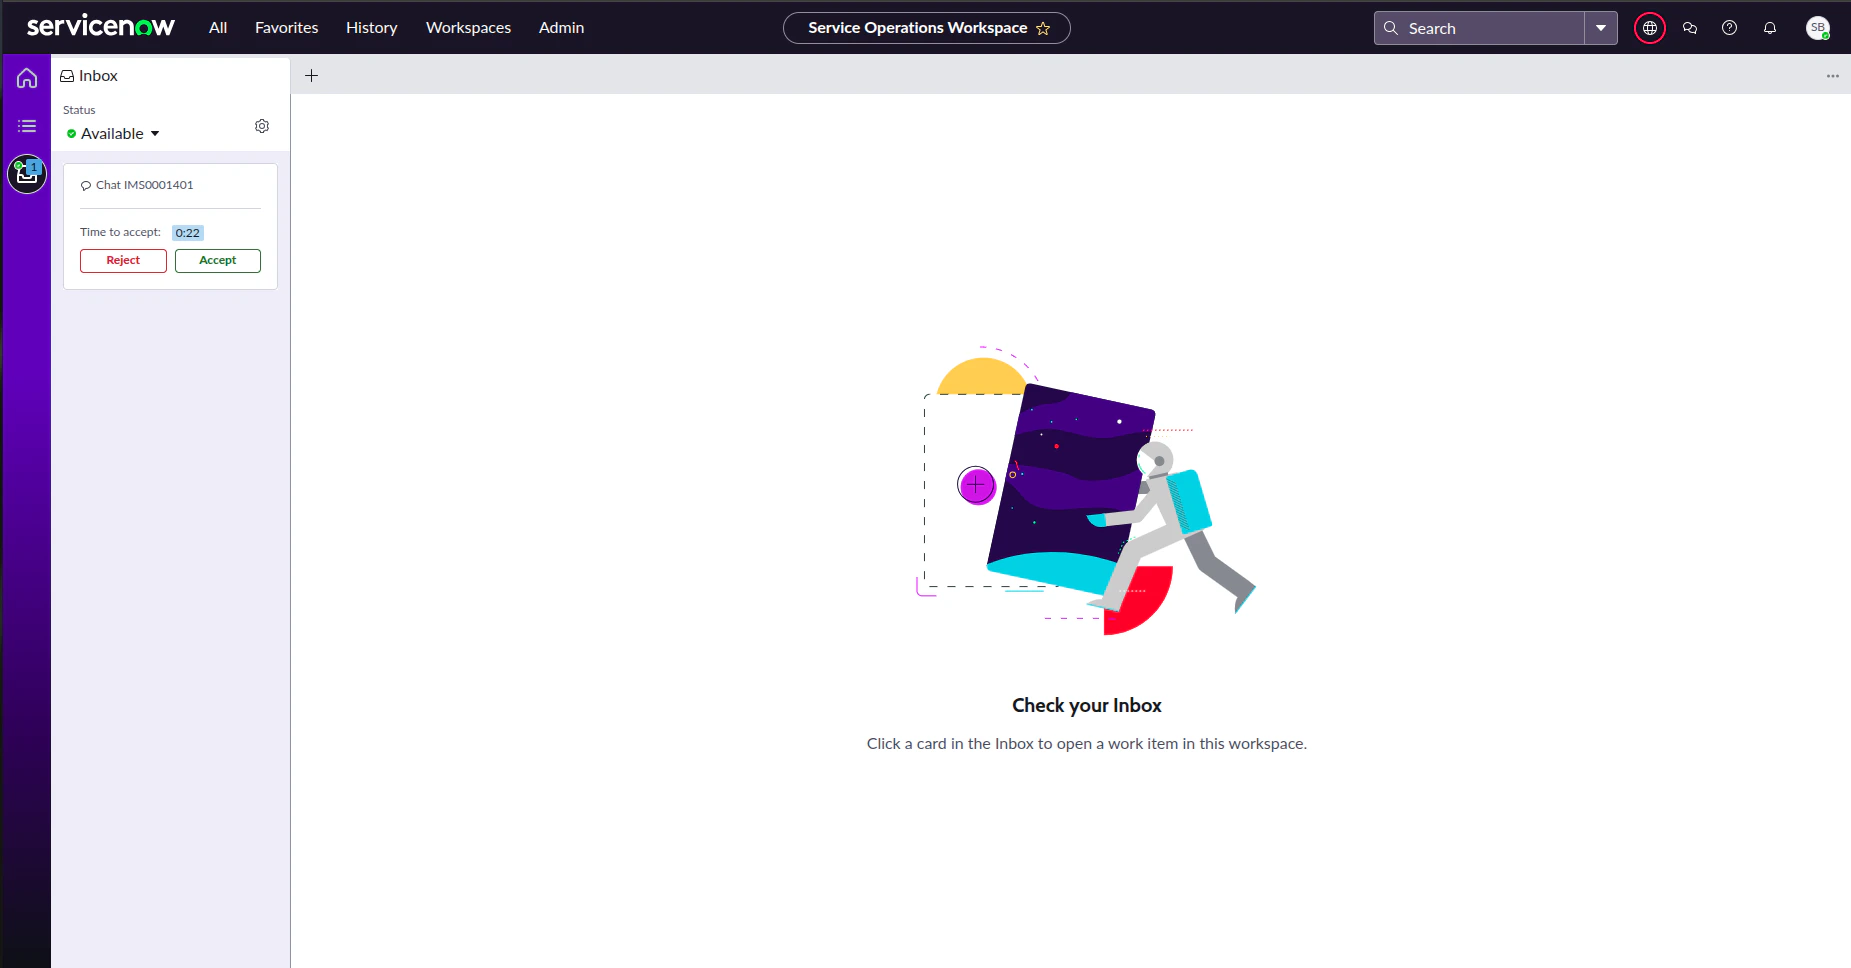
 * **Agent:** Once the agent accepts the incoming chat, an Interaction Record page opens, and the **Agent AI by Kore** is the first icon on the Contextual side panel.
* The agent gets a notification of the incoming chat.
* **Agent:** Once the agent accepts the incoming chat, an Interaction Record page opens, and the **Agent AI by Kore** is the first icon on the Contextual side panel.
* The agent gets a notification of the incoming chat.
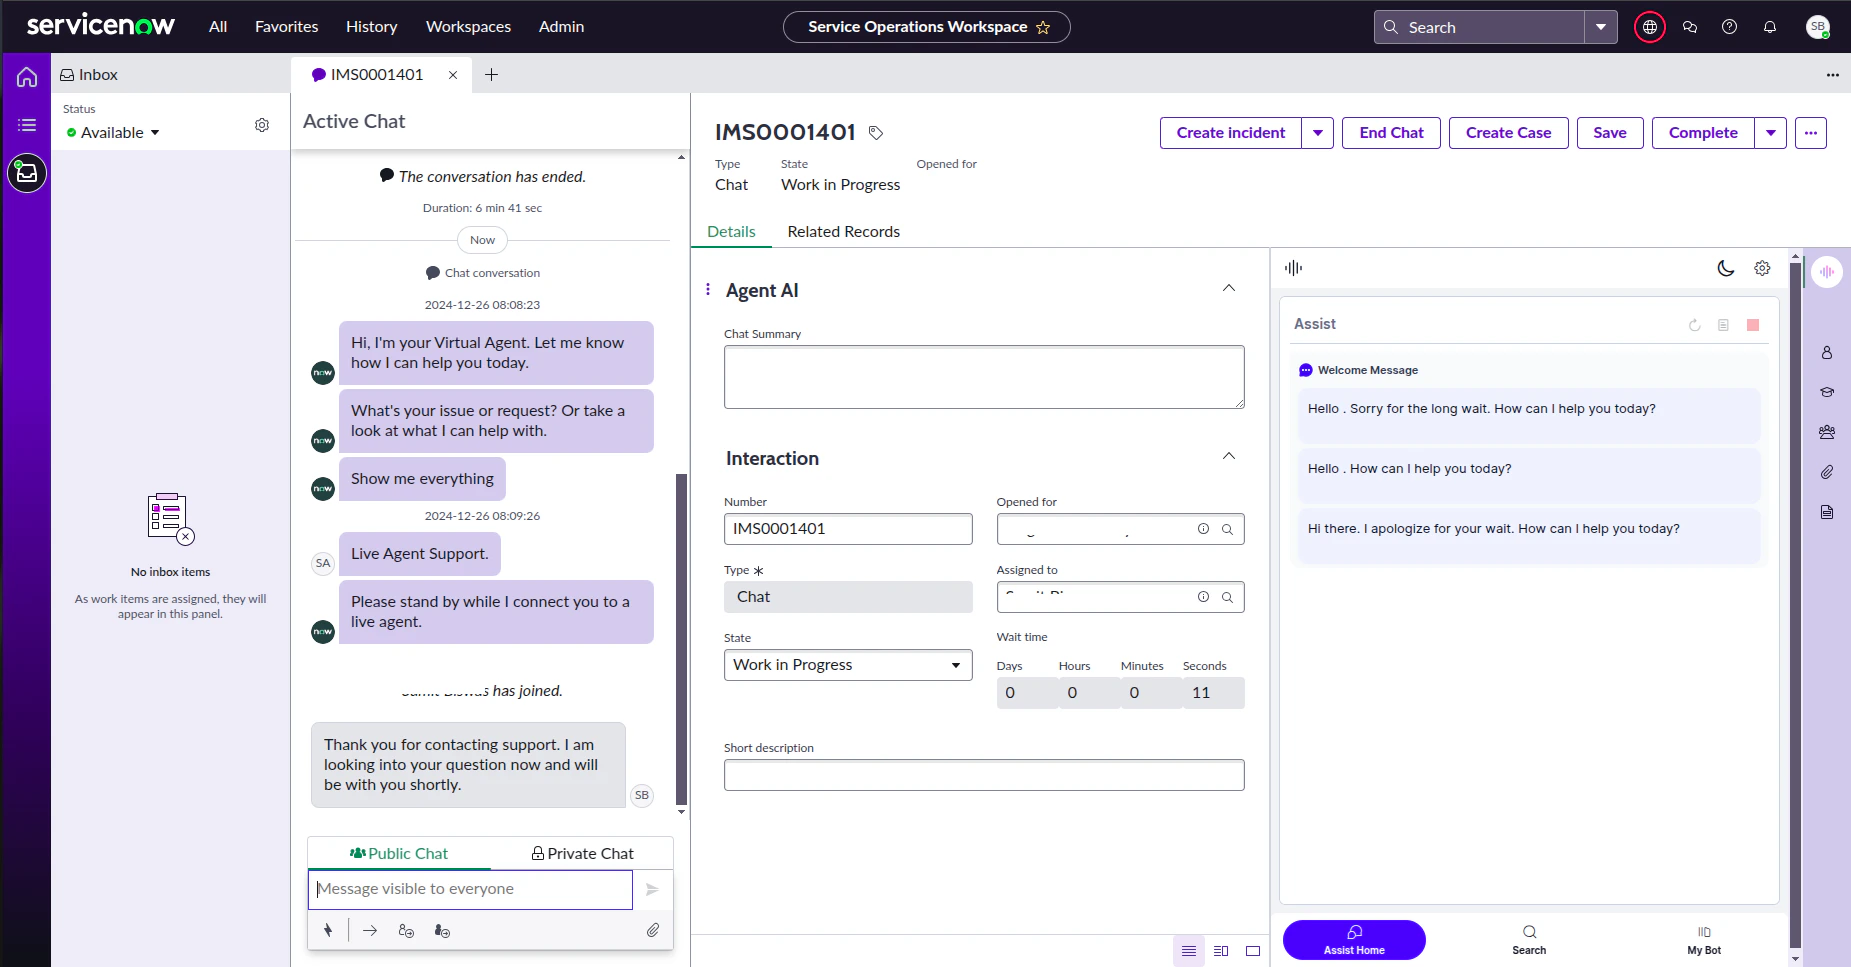
 * Once the agent accepts the chat, the Agent AI widget appears on the right Contextual side panel.
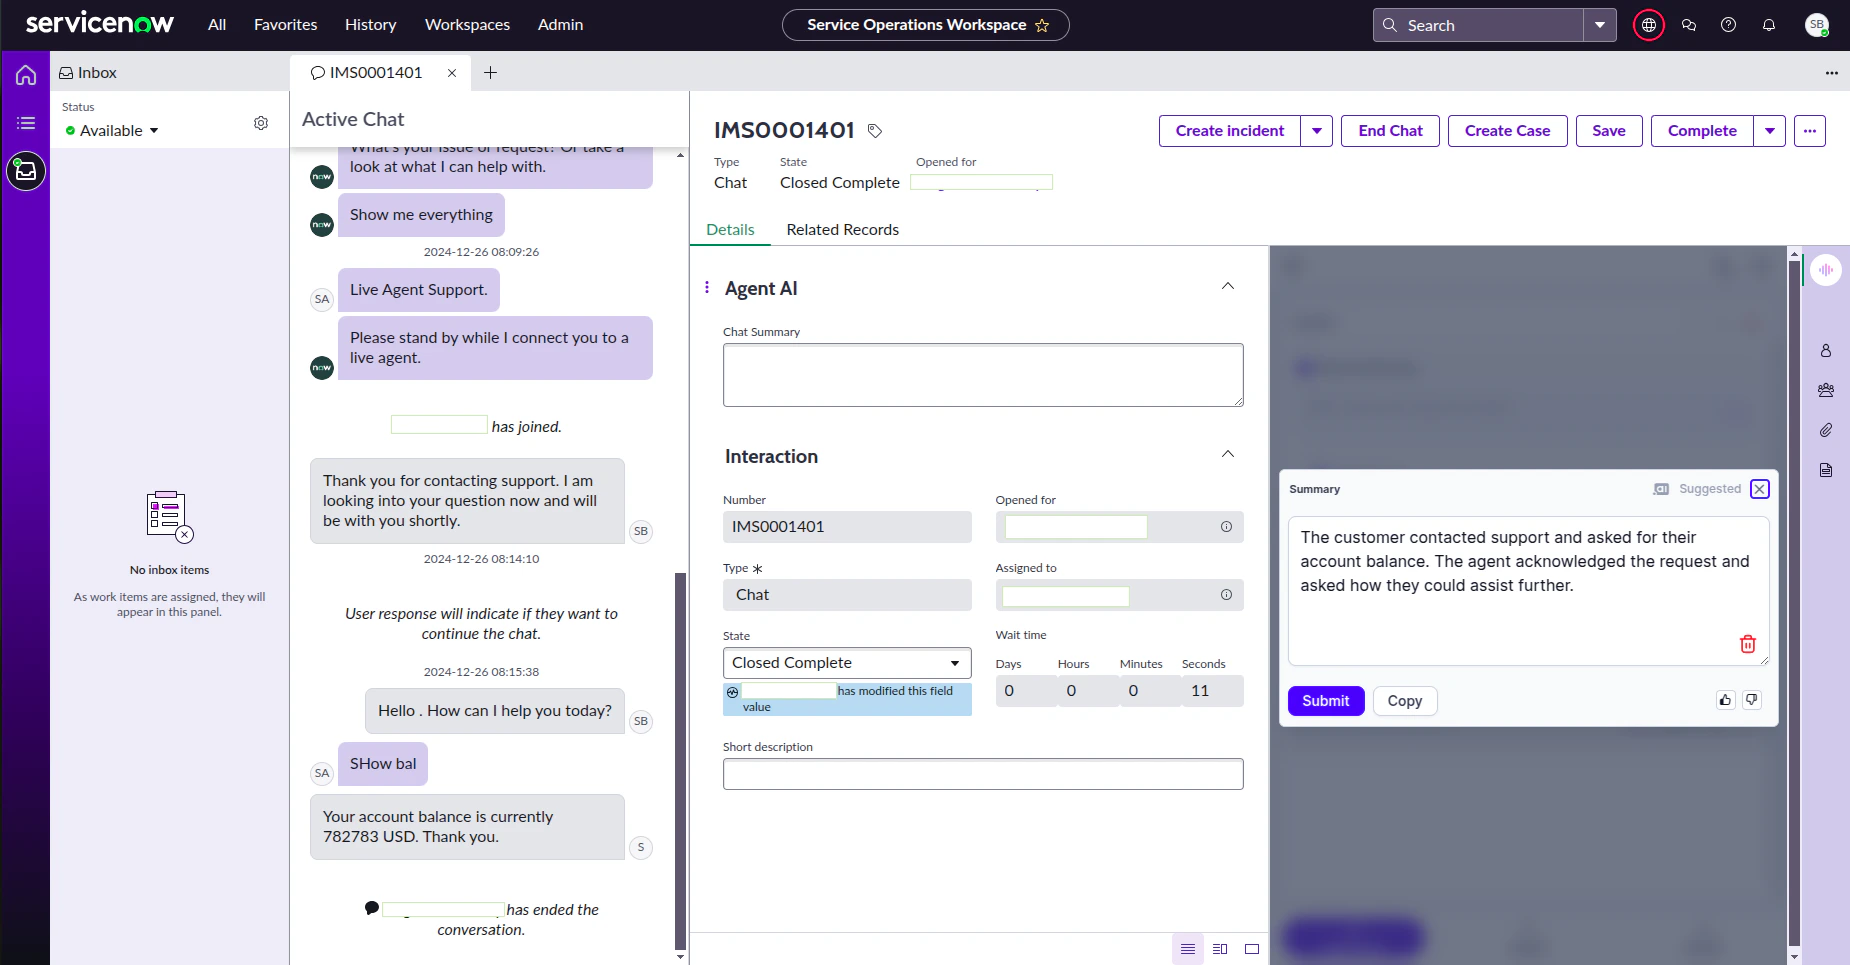
 * Once a conversation ends, the Agent AI widget generates the conversation summary.
 ### Step 4: XO Configuration (Optional)
You need this step if the chat client routes through the XO AI Agent builder, and post agent transfer, it lands into the ServiceNow Agent workspace. For more information, refer to [Configuring the ServiceNow Agent - Utah and Higher versions](/ai-for-service/integrations/agents/servicenow/configuring-the-servicenow-agent-utah-and-vancouver#configuring-the-servicenow-agent-utah-and-higher-versions).
To pass the language code and custom data dynamically from XO to the Agent AI widget inside ServiceNow, add the following JavaScript code inside a script node of XO dialog task before the Agent Transfer node of ServiceNow. Without this script node, the language code and custom data won't be automatically sent to the Agent AI widget. To access custom data in the Agent AI widget, refer to the [Access Custom Data in Agent AI App](/ai-for-service/agentai/agent-experience#access-custom-data) doc.
The following example shows how to pass data to Agent AI using the `customdata` field:
```
let metaData = {
"payloadFields" : {
"langCode":context.currentLanguage,
"customdata": {
"userId": context.session.BotUserSession.userId
}
},
"headerFields" : {
"token" : ""
}
}
agentUtils.setMetaInfo("ServiceNowMetaData", JSON.stringify(metaData));
```
### Step 4: XO Configuration (Optional)
You need this step if the chat client routes through the XO AI Agent builder, and post agent transfer, it lands into the ServiceNow Agent workspace. For more information, refer to [Configuring the ServiceNow Agent - Utah and Higher versions](/ai-for-service/integrations/agents/servicenow/configuring-the-servicenow-agent-utah-and-vancouver#configuring-the-servicenow-agent-utah-and-higher-versions).
To pass the language code and custom data dynamically from XO to the Agent AI widget inside ServiceNow, add the following JavaScript code inside a script node of XO dialog task before the Agent Transfer node of ServiceNow. Without this script node, the language code and custom data won't be automatically sent to the Agent AI widget. To access custom data in the Agent AI widget, refer to the [Access Custom Data in Agent AI App](/ai-for-service/agentai/agent-experience#access-custom-data) doc.
The following example shows how to pass data to Agent AI using the `customdata` field:
```
let metaData = {
"payloadFields" : {
"langCode":context.currentLanguage,
"customdata": {
"userId": context.session.BotUserSession.userId
}
},
"headerFields" : {
"token" : ""
}
}
agentUtils.setMetaInfo("ServiceNowMetaData", JSON.stringify(metaData));
```
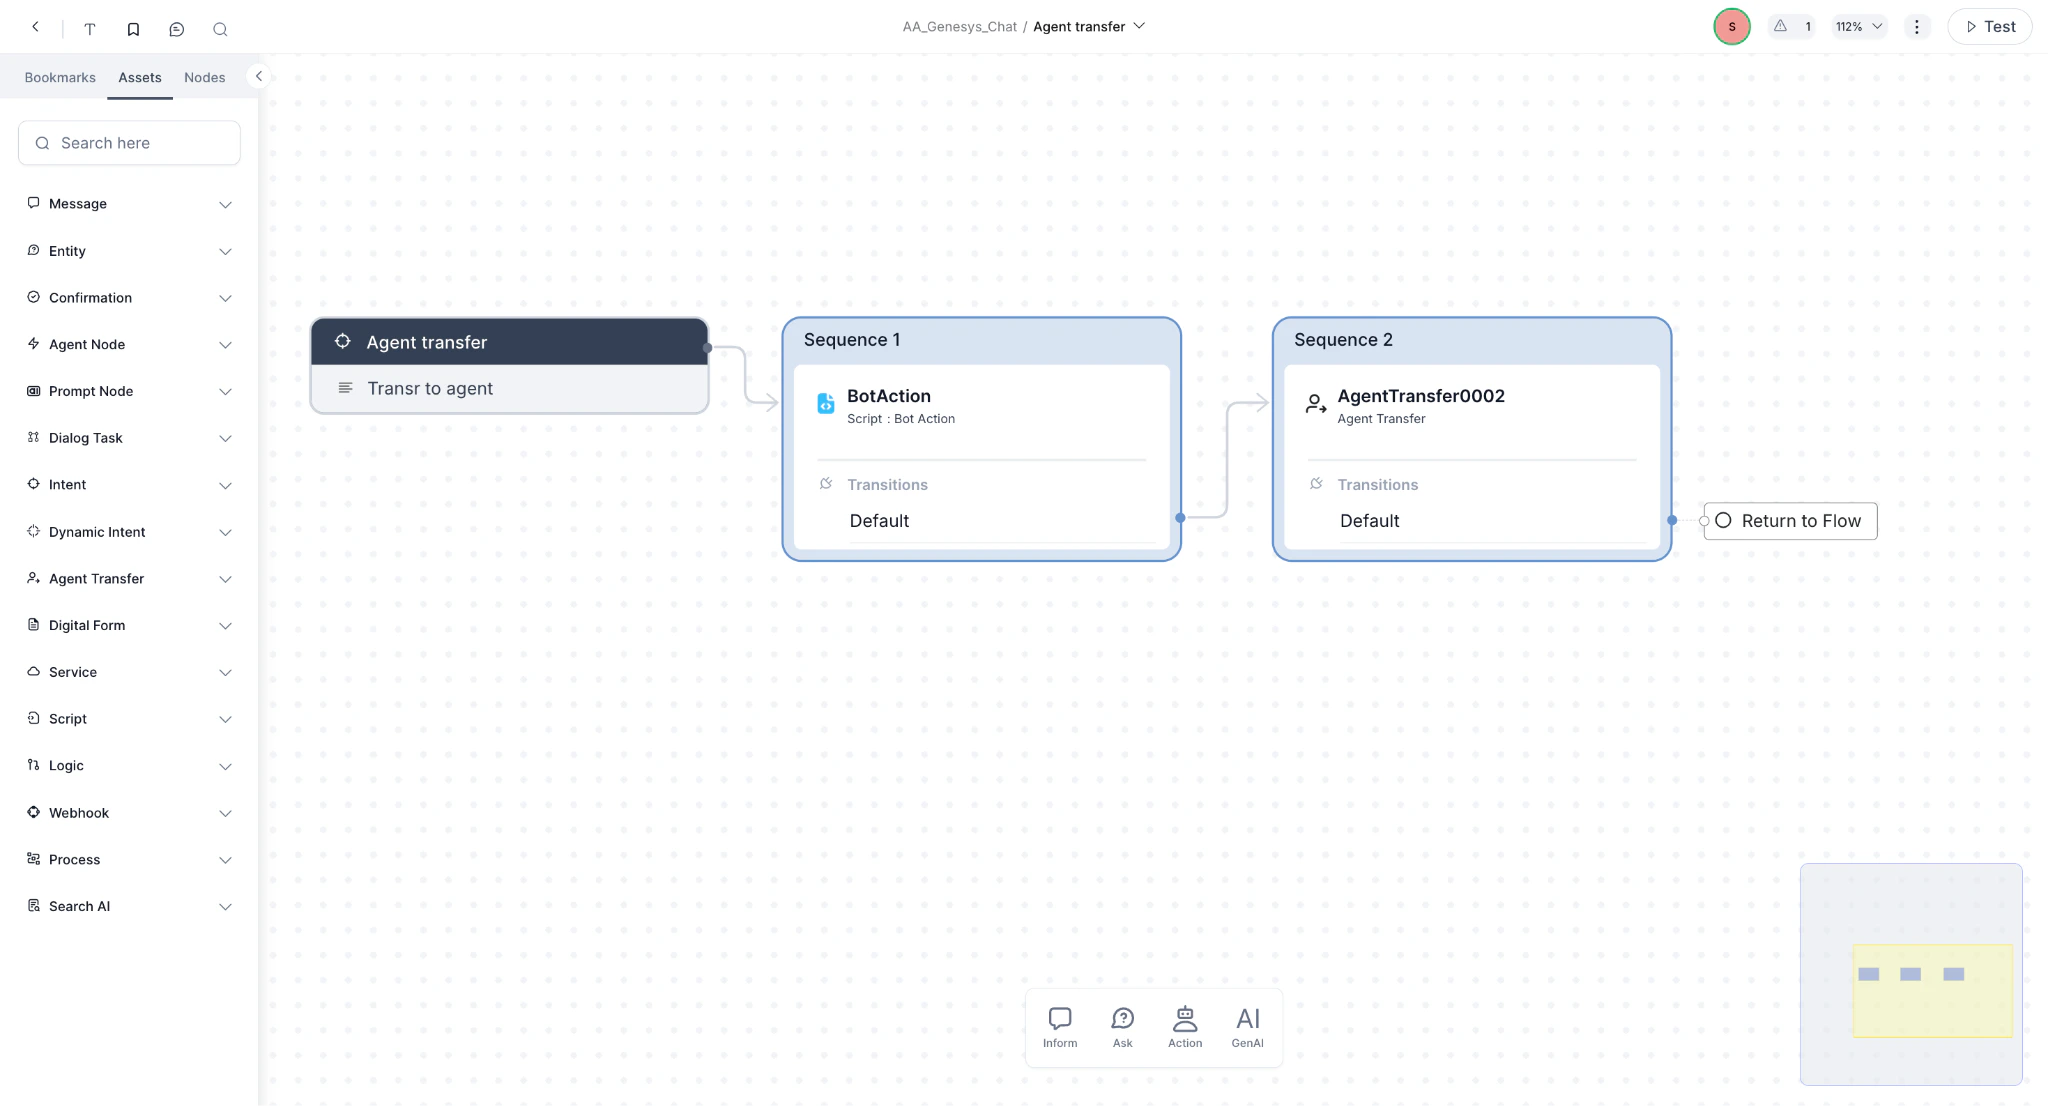 If a Language Code is sent from XO to ServiceNow, then the Agent AI widget loads according to that language code. So, the XO language code always takes precedence over the language code set inside the ServiceNow custom table in Step 2.
### Step 5: Using the Agent AI widget
From the integration perspective, along with all the features and capabilities of Agent AI [Introduction to Agent AI](/ai-for-service/agentai/agent-experience/agent-assist-widget-v3), agents on ServiceNow have the flexibility to use the following additional features:
* **Send / Copy Buttons:** Agents can use the **Send** and **Copy** buttons on the Agent AI UI to directly send and copy data from the Agent AI widget to the customer.
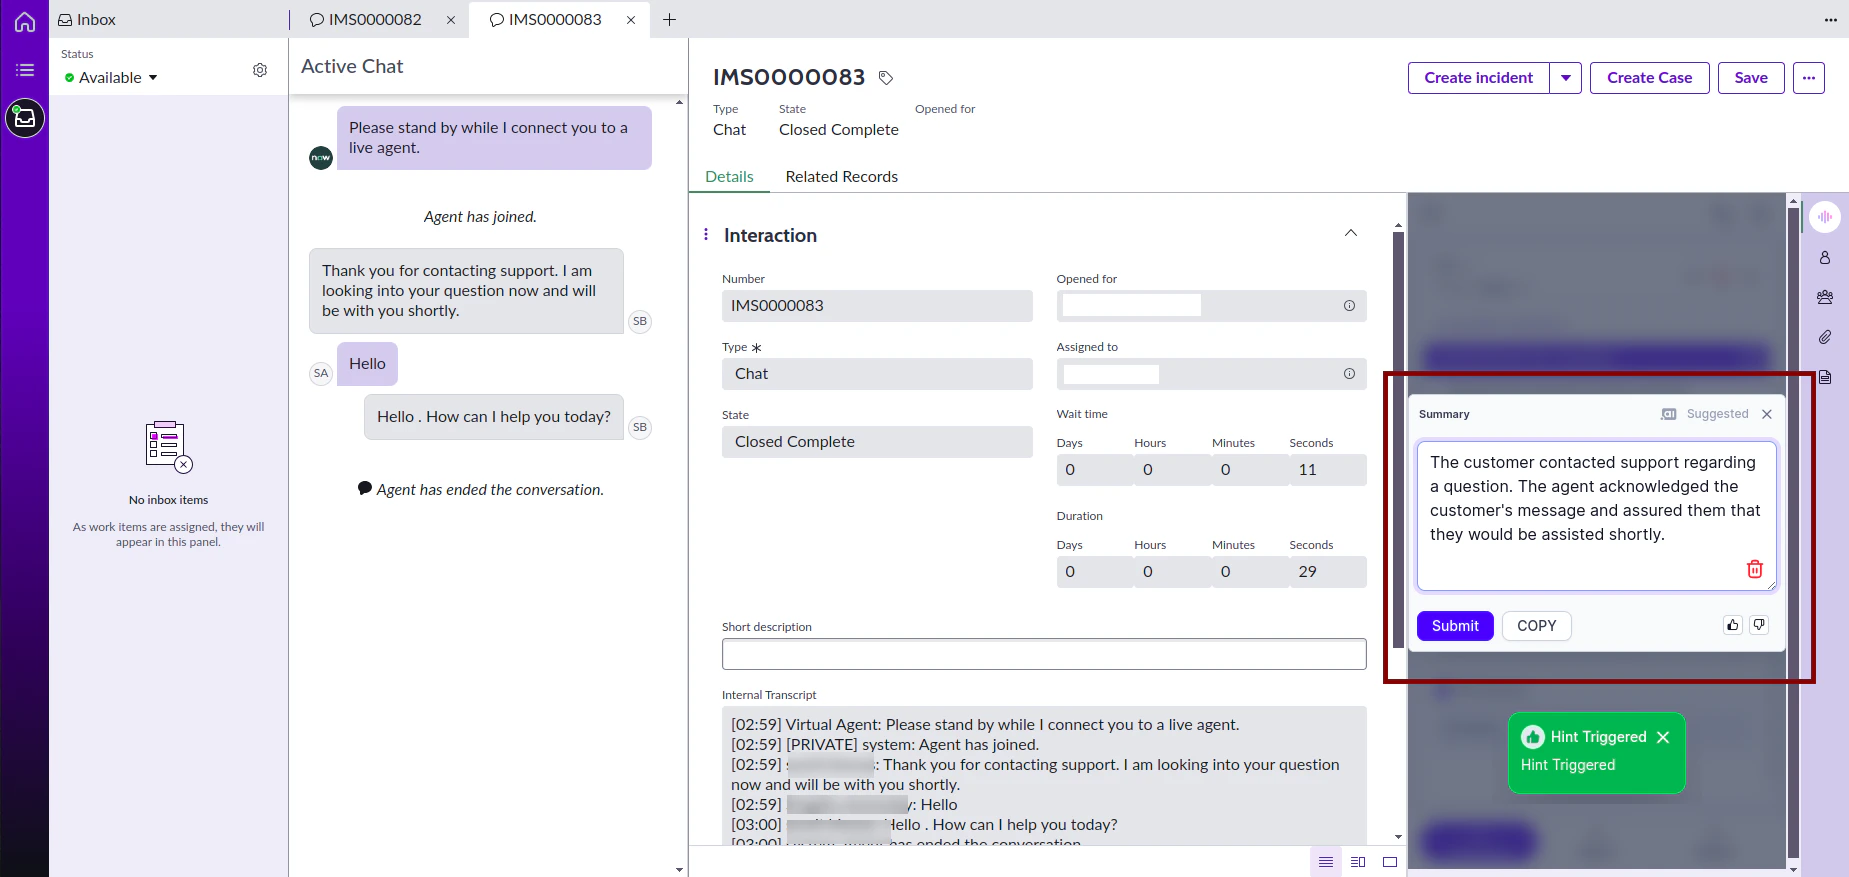
* **Conversation Summary / End Of Conversation**: The conversation summary appears in the **Summary** box of the Agent AI widget after the conversation ends. Agents can copy the summary to their notepad or save it. When agents select **Submit Summary**, the system saves the summary in the interaction table for that conversation.
If a Language Code is sent from XO to ServiceNow, then the Agent AI widget loads according to that language code. So, the XO language code always takes precedence over the language code set inside the ServiceNow custom table in Step 2.
### Step 5: Using the Agent AI widget
From the integration perspective, along with all the features and capabilities of Agent AI [Introduction to Agent AI](/ai-for-service/agentai/agent-experience/agent-assist-widget-v3), agents on ServiceNow have the flexibility to use the following additional features:
* **Send / Copy Buttons:** Agents can use the **Send** and **Copy** buttons on the Agent AI UI to directly send and copy data from the Agent AI widget to the customer.
* **Conversation Summary / End Of Conversation**: The conversation summary appears in the **Summary** box of the Agent AI widget after the conversation ends. Agents can copy the summary to their notepad or save it. When agents select **Submit Summary**, the system saves the summary in the interaction table for that conversation.
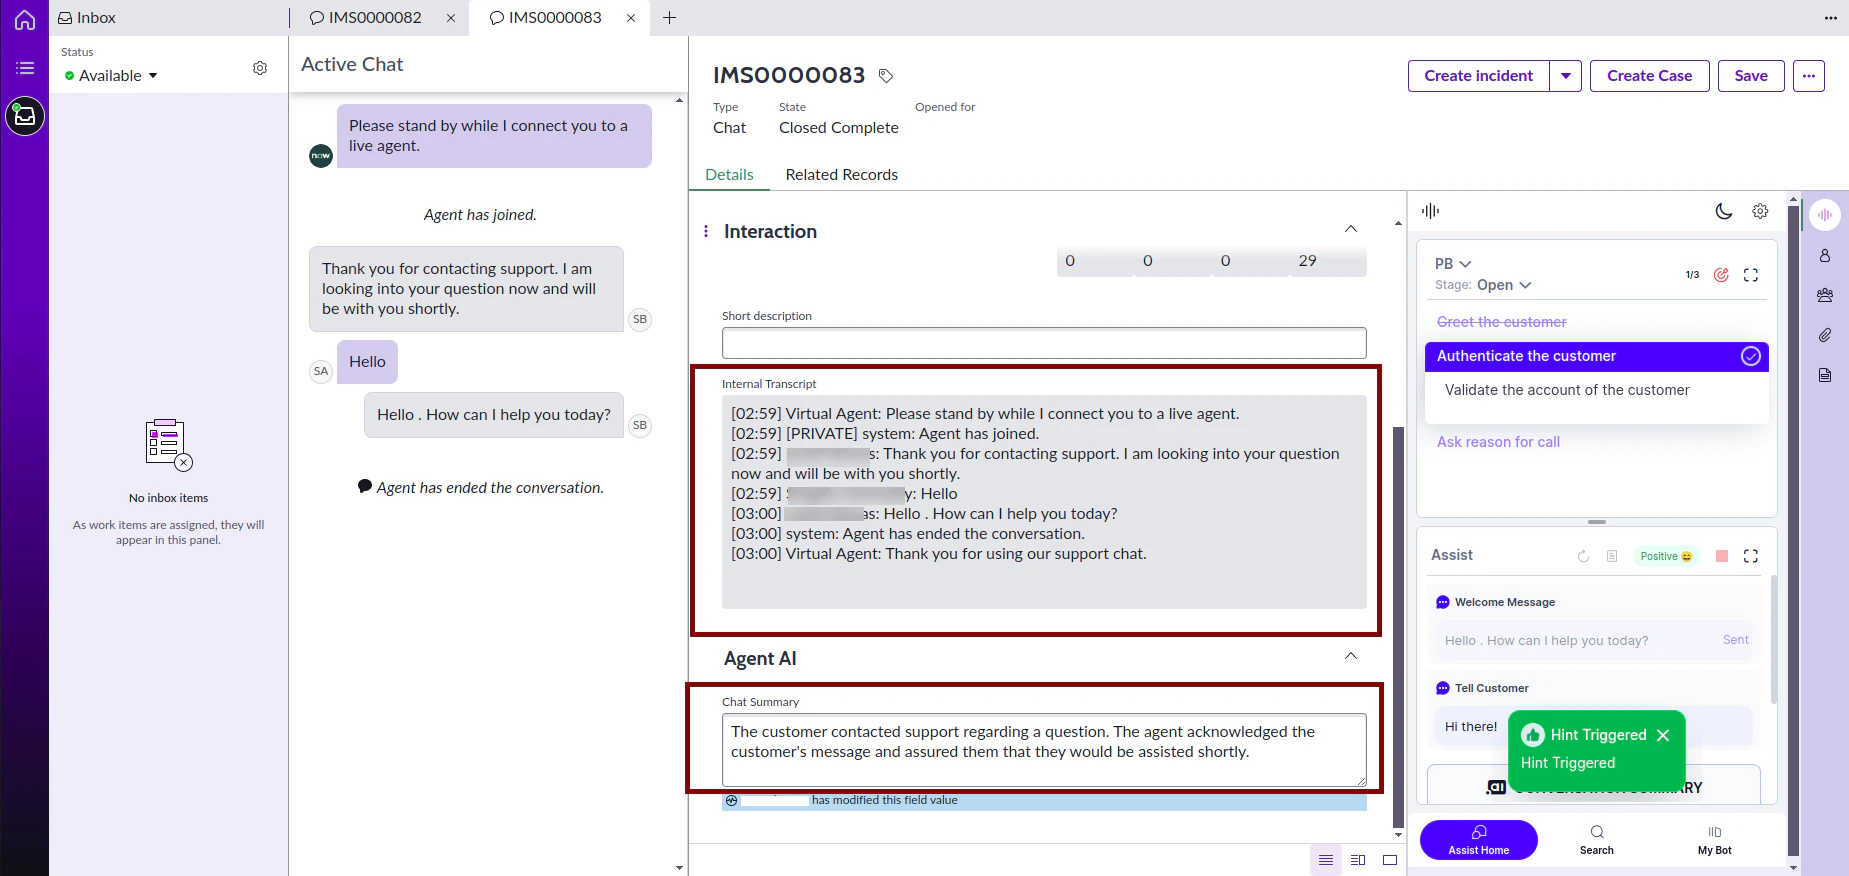
 * **Conversation logs:** Agents or supervisors can check the chat transcript along with the Agent AI summary on the Interaction record page.
 #### Additional Configuration for HR Agent Workspace (Optional)
Follow this step only if you use the HR Agent Workspace to receive incoming chats in ServiceNow:
1. Sign in to the **Servicenow** instance.
2. Search in the **All** > **Filter** navigator.
#### Additional Configuration for HR Agent Workspace (Optional)
Follow this step only if you use the HR Agent Workspace to receive incoming chats in ServiceNow:
1. Sign in to the **Servicenow** instance.
2. Search in the **All** > **Filter** navigator.
 3. Go to **UI Builder** > **Experiences**.
4. Filter with **HR Agent Workspace**, and open it.
3. Go to **UI Builder** > **Experiences**.
4. Filter with **HR Agent Workspace**, and open it.
 5. Search with **Case SRP variant** (under the **Record** page).
6. Create a copy of **Case SRP variant**, if the above one is read-only.
5. Search with **Case SRP variant** (under the **Record** page).
6. Create a copy of **Case SRP variant**, if the above one is read-only.
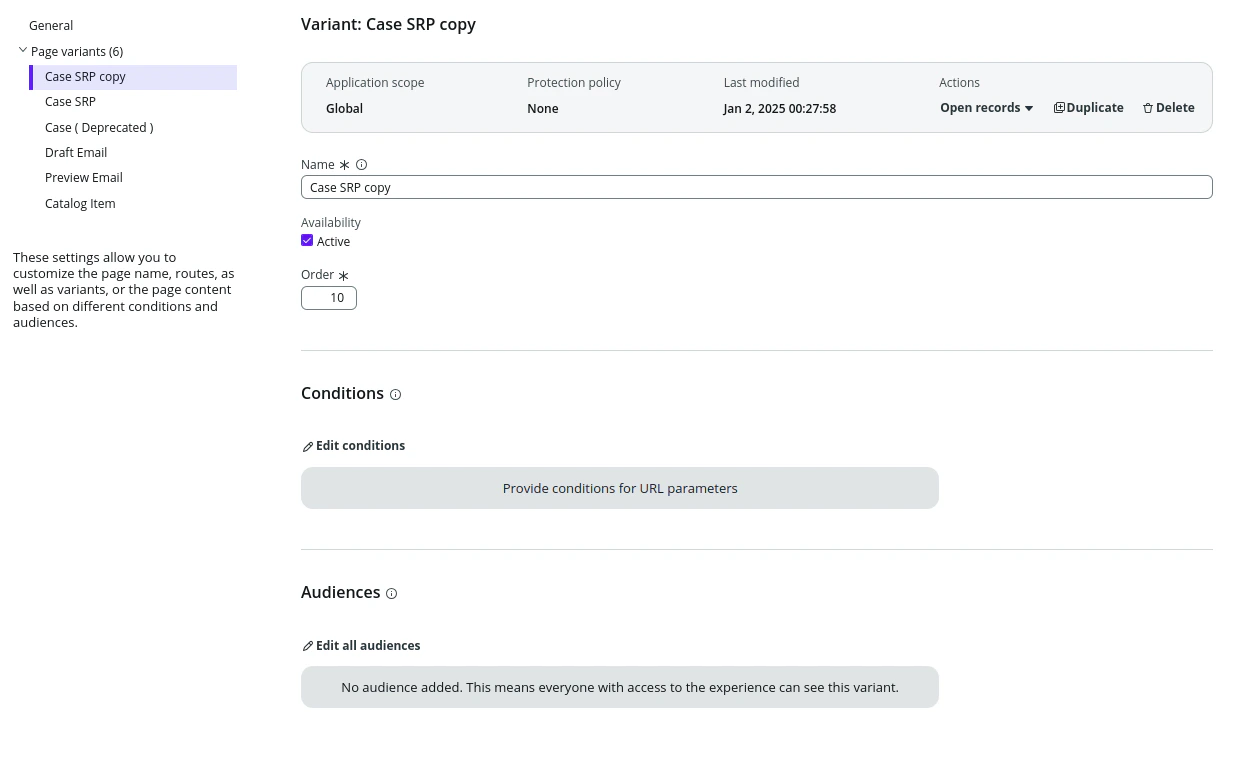
 7. Open the **settings** of **Case SRP copy** and change the value of **Order** to **10**.
 8. Open the editor for **Case SRP copy**, and add the **KoreaiWidget** component to the right sidebar. Follow these steps:
1. Go to **Body** > **Resizable panes** > **right** > **Tab sidebar**
2. **Add** a new tab (preferably, select **start from an empty container**).
8. Open the editor for **Case SRP copy**, and add the **KoreaiWidget** component to the right sidebar. Follow these steps:
1. Go to **Body** > **Resizable panes** > **right** > **Tab sidebar**
2. **Add** a new tab (preferably, select **start from an empty container**).
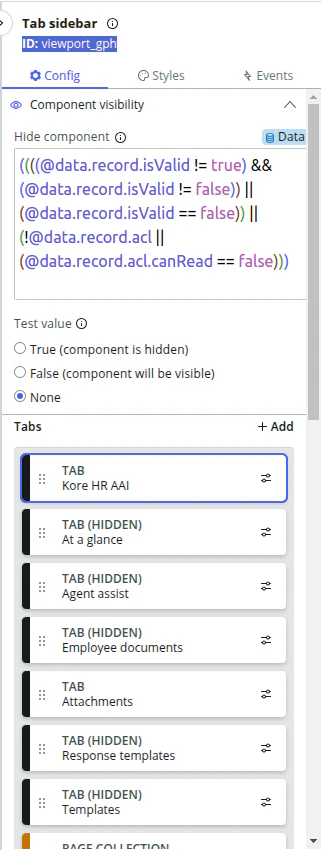 3. Drag that **TAB** to the top of the list.
4. Add **Kore AgentAI ui-component** to that TAB (search with **KoreaiWidget**).
5. Click that component to change its styles:
* Flex : Grow
* Alignment: Stretch
* Sizing (Width: 100%, Height: 100%, Min Height: 100%). Keep other properties empty.
3. Drag that **TAB** to the top of the list.
4. Add **Kore AgentAI ui-component** to that TAB (search with **KoreaiWidget**).
5. Click that component to change its styles:
* Flex : Grow
* Alignment: Stretch
* Sizing (Width: 100%, Height: 100%, Min Height: 100%). Keep other properties empty.
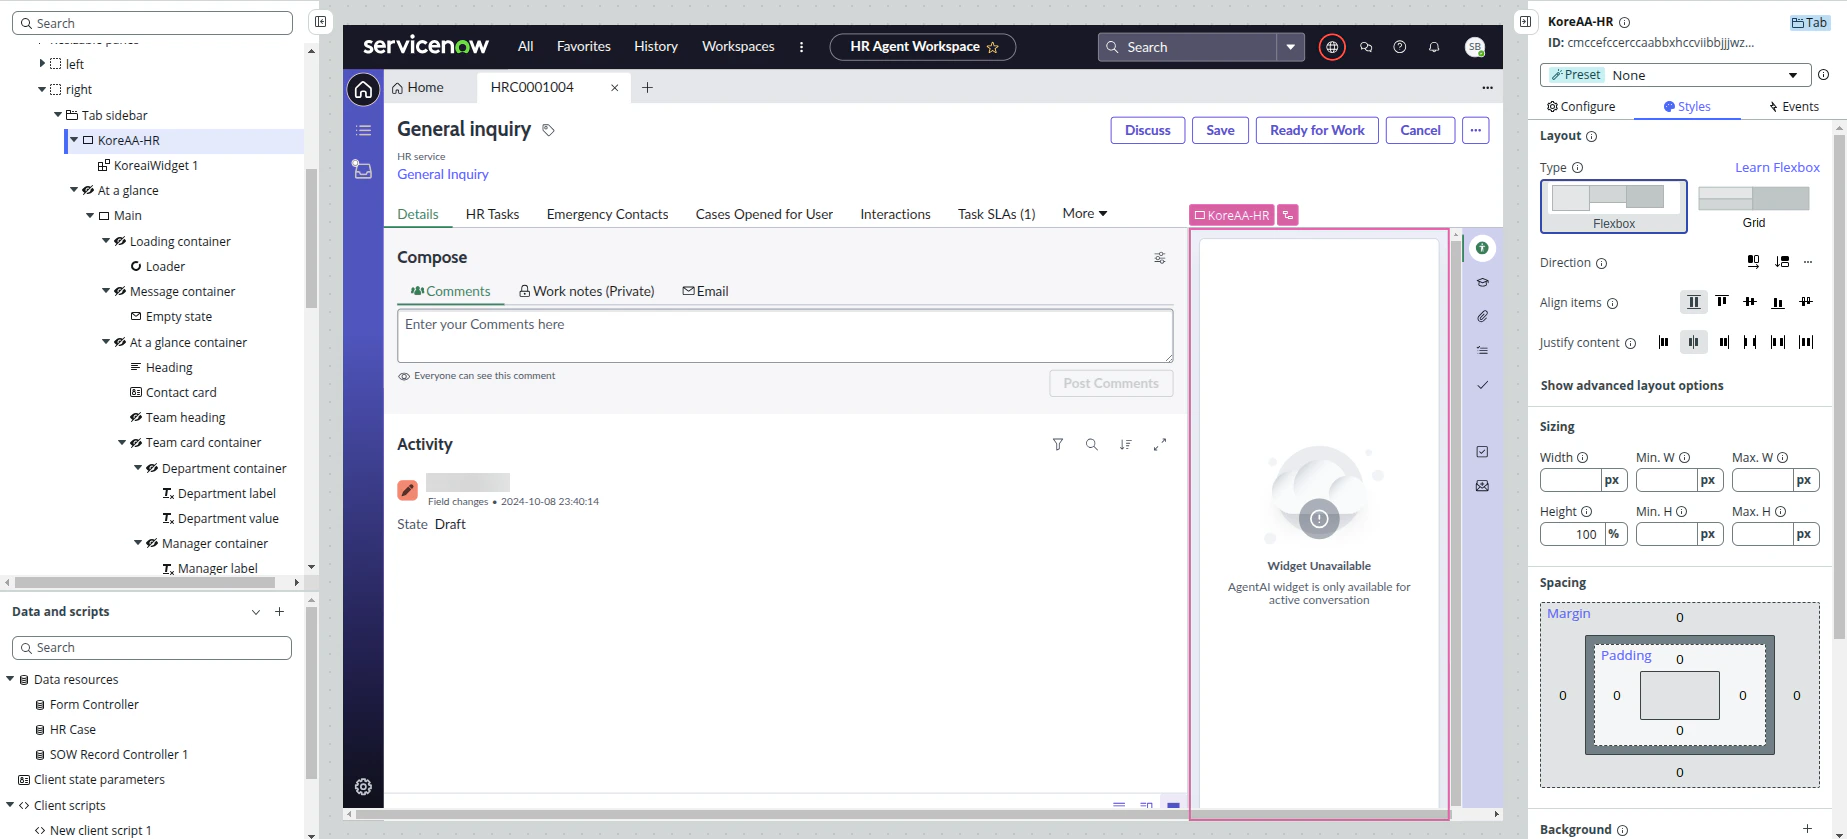
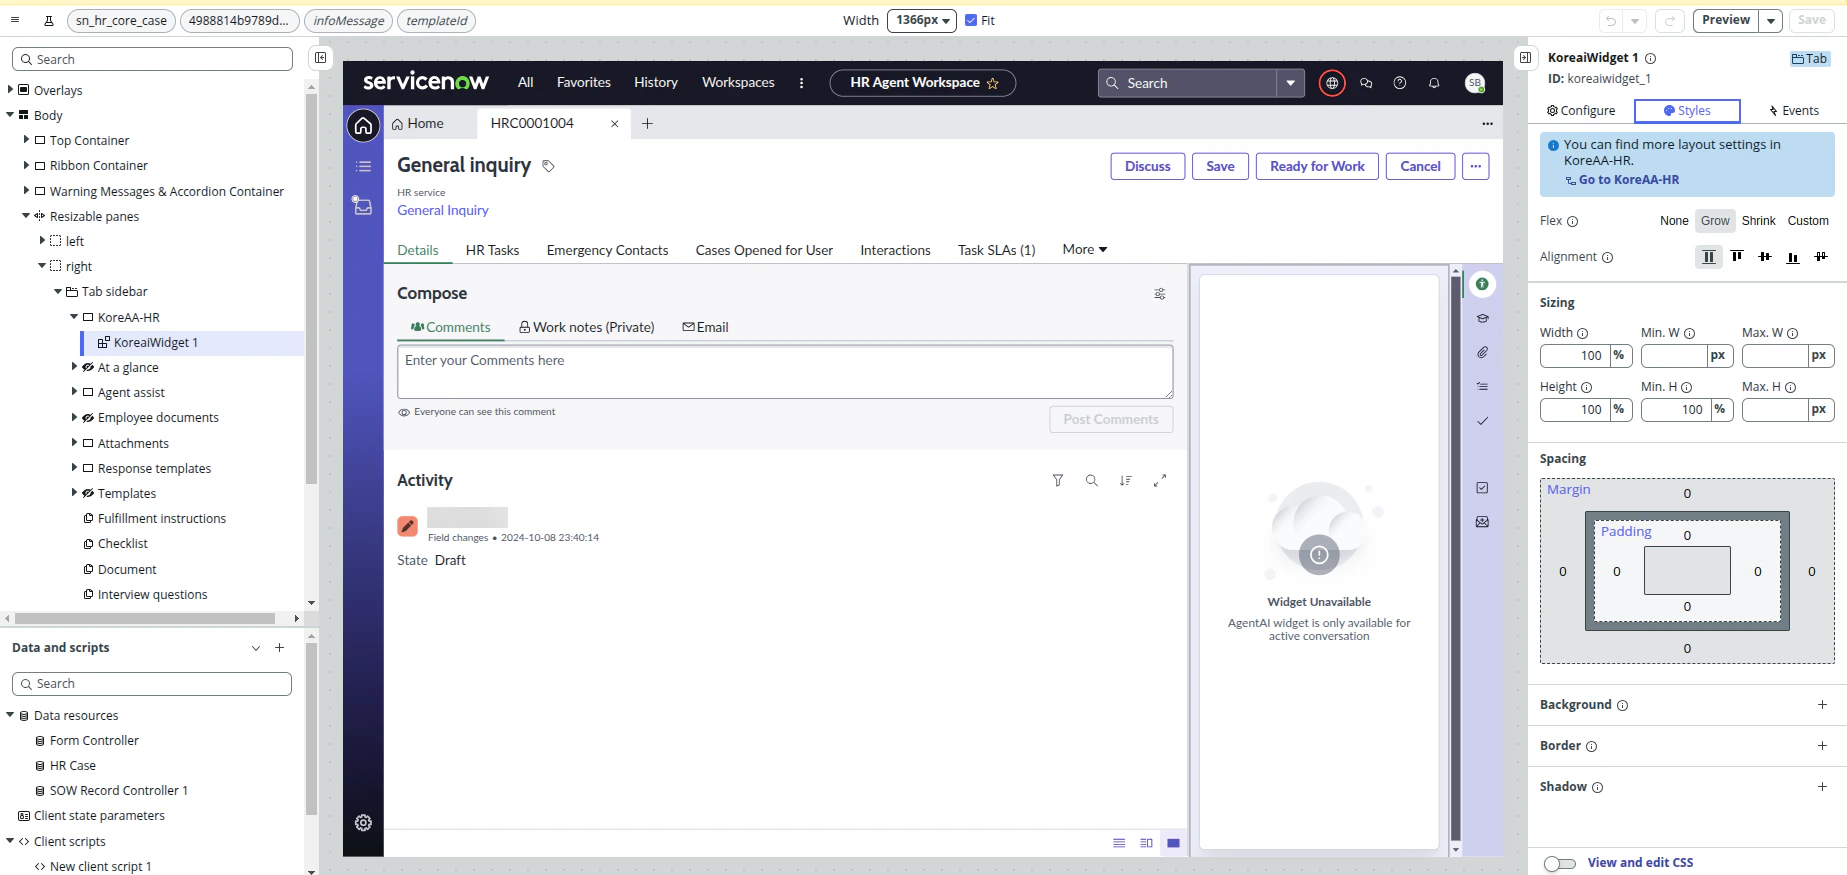 6. To render the widget vertically and take up the full height of the workspace, set the height of the parent TAB (Eg- KoreAA-HR) to 100%.
 7. Perform the following steps to proceed with Data Binding (sysId):
1. Select **KoreaiWidget** again.
2. Update **Config** > **sysId** as following:
* Change the input option to **Bind Data**.
* Type '@context.props.sysId' (you get an auto suggestion).
7. Perform the following steps to proceed with Data Binding (sysId):
1. Select **KoreaiWidget** again.
2. Update **Config** > **sysId** as following:
* Change the input option to **Bind Data**.
* Type '@context.props.sysId' (you get an auto suggestion).
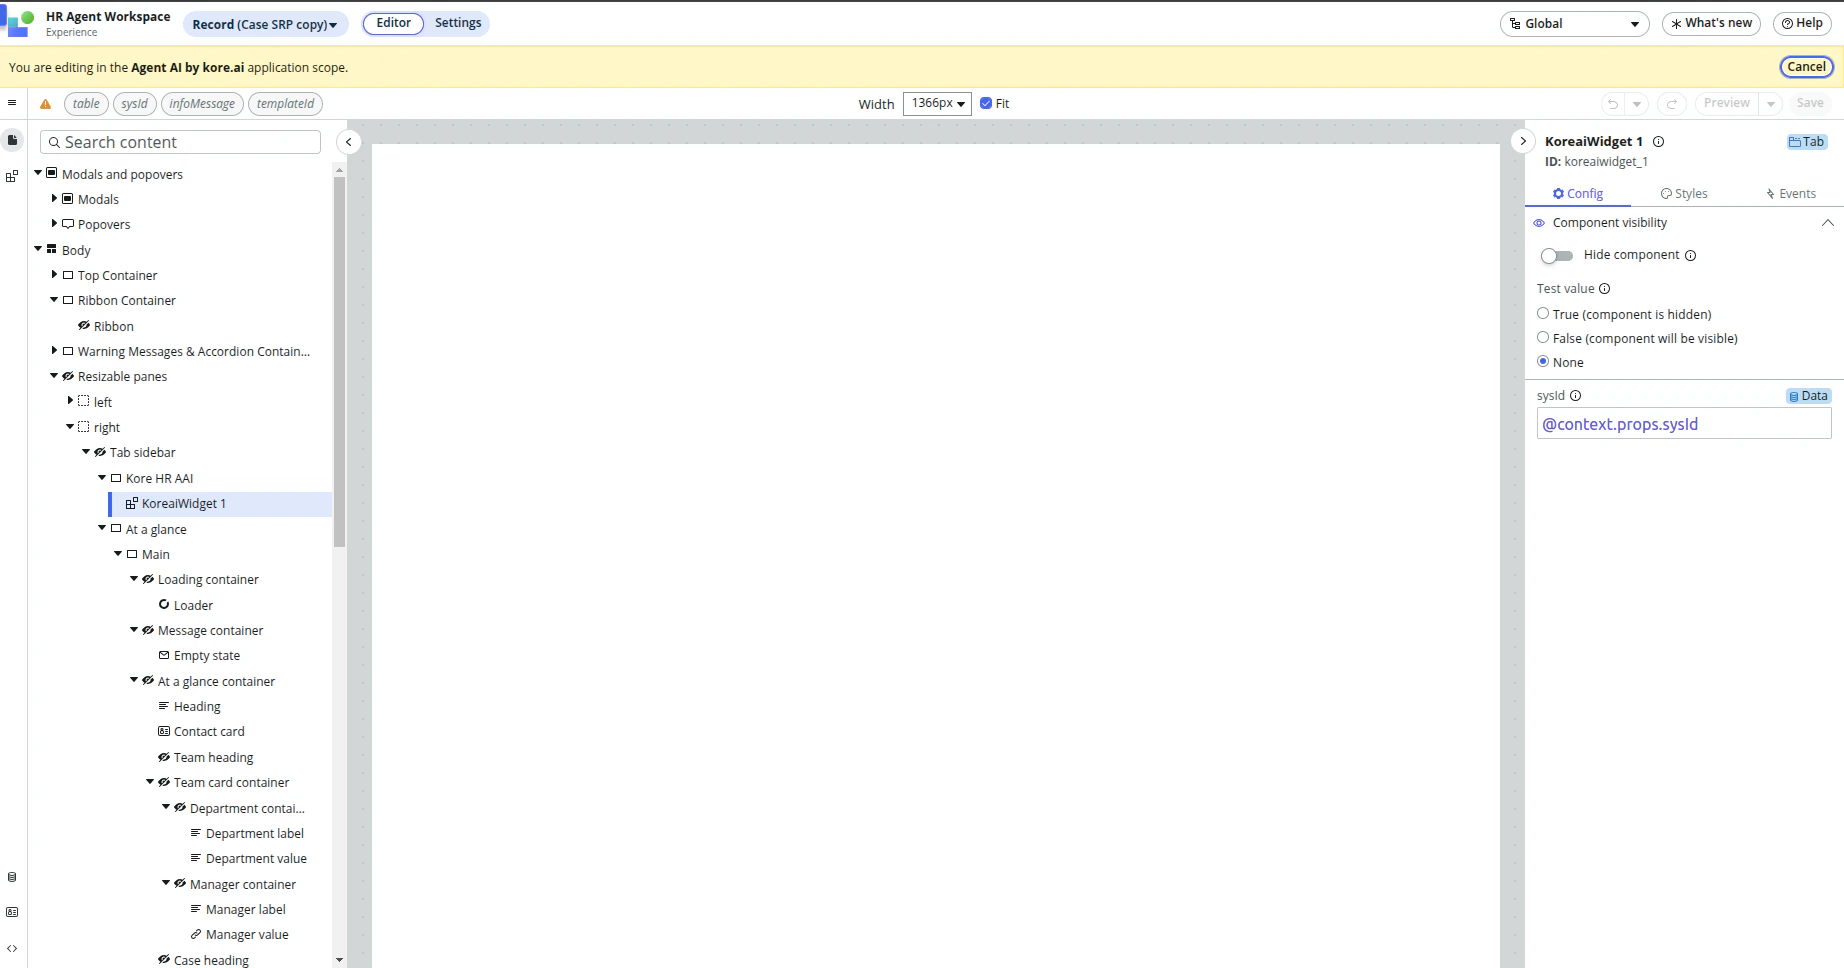 You must complete this step to dynamically send the **sysid** of the current interaction to the Agent AI UI component. Although the solution includes a fallback method, don't skip the Data Binding step. If you skip it, concurrent chats handled by a single agent can lose context during page reloads or network latency.
8. Select **Save**.
### Widget Configuration and Scope Requirements
* **Widget icon:** ServiceNow doesn't automatically add the widget icon. You must configure it manually due to a ServiceNow limitation.
* **Widget scope:** Use the **Agent AI by Kore.ai** scope to ensure safer upgrades. Although the **Global** scope works, it doesn't support long-term maintainability.
* **Per-workspace requirement:** Each workspace requires its own widget/icon configuration.
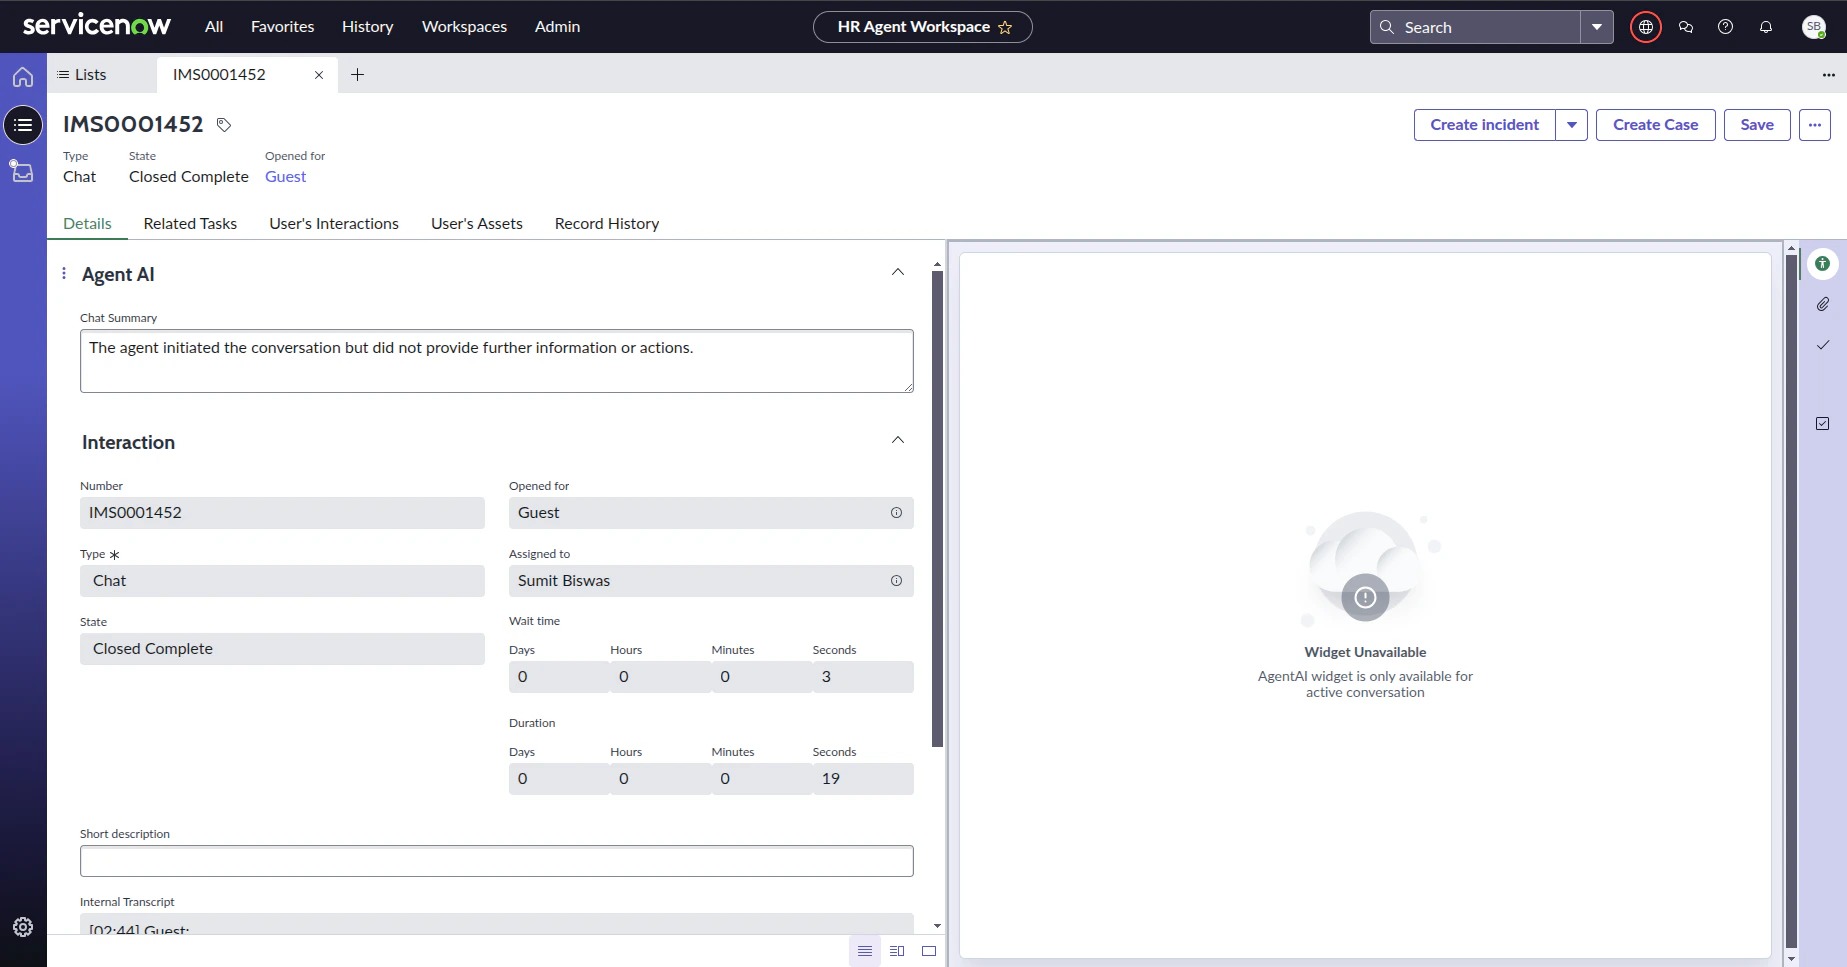
### No Widget for Inactive Conversation
The multibot solution includes an additional feature that hides the widget when no conversation is active. The following screen appears when there is no active conversation:
You must complete this step to dynamically send the **sysid** of the current interaction to the Agent AI UI component. Although the solution includes a fallback method, don't skip the Data Binding step. If you skip it, concurrent chats handled by a single agent can lose context during page reloads or network latency.
8. Select **Save**.
### Widget Configuration and Scope Requirements
* **Widget icon:** ServiceNow doesn't automatically add the widget icon. You must configure it manually due to a ServiceNow limitation.
* **Widget scope:** Use the **Agent AI by Kore.ai** scope to ensure safer upgrades. Although the **Global** scope works, it doesn't support long-term maintainability.
* **Per-workspace requirement:** Each workspace requires its own widget/icon configuration.
### No Widget for Inactive Conversation
The multibot solution includes an additional feature that hides the widget when no conversation is active. The following screen appears when there is no active conversation:
 ***
***