> ## Documentation Index
> Fetch the complete documentation index at: https://koreai.mintlify.site/llms.txt
> Use this file to discover all available pages before exploring further.
# Setting Up Authorization using Basic Auth
[Back to App Settings](/ai-for-service/app-settings)
When basic authorization is used for a task, the Platform automatically prompts the user for login credentials to access the web application or web service.
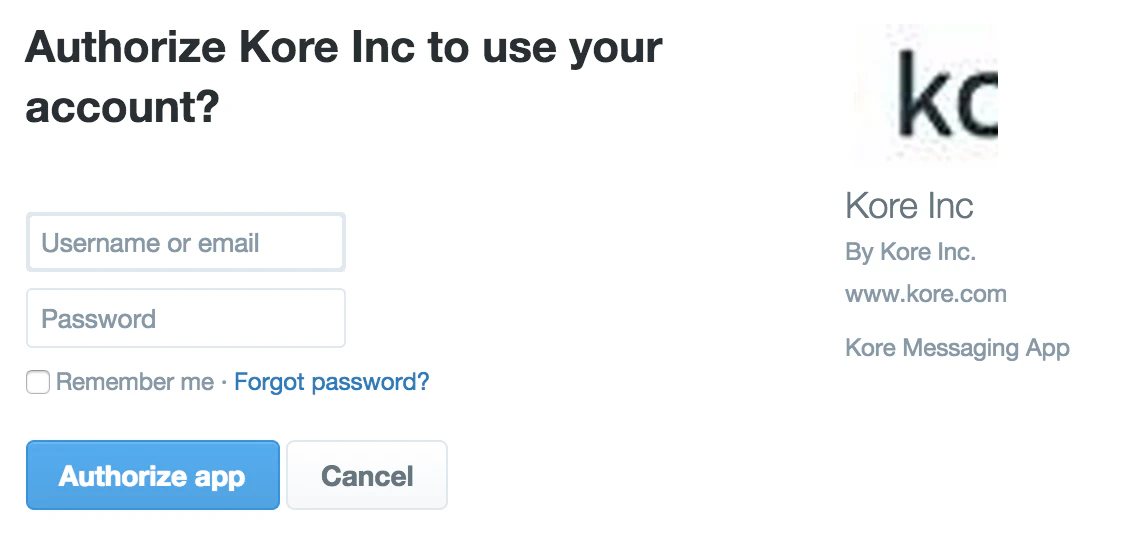 After the end-user is authorized, the settings are saved using the following naming syntax:
```
{{ First Name }} {{ Last Name }} {{ App Name }} {{ Account # }} {{ Sequence # }}
```
For example, John Doe's Twitter Account #1.
The Platform can access the web application or web service for all future task requests using this account. The end-user can also reuse the account for other tasks for the same AI Agent.
You need an account with the external application to authorize the Platform.
***
## Configuring Basic Authorization
1. Open the AI Agent for which you want to configure the Basic Authorization profile.
2. From the left menus, click **App Settings**, then select **Dev Tools > Authorization Profiles**.
3. Click **New** to open the **New Authorization Mechanism** dialog.
After the end-user is authorized, the settings are saved using the following naming syntax:
```
{{ First Name }} {{ Last Name }} {{ App Name }} {{ Account # }} {{ Sequence # }}
```
For example, John Doe's Twitter Account #1.
The Platform can access the web application or web service for all future task requests using this account. The end-user can also reuse the account for other tasks for the same AI Agent.
You need an account with the external application to authorize the Platform.
***
## Configuring Basic Authorization
1. Open the AI Agent for which you want to configure the Basic Authorization profile.
2. From the left menus, click **App Settings**, then select **Dev Tools > Authorization Profiles**.
3. Click **New** to open the **New Authorization Mechanism** dialog.
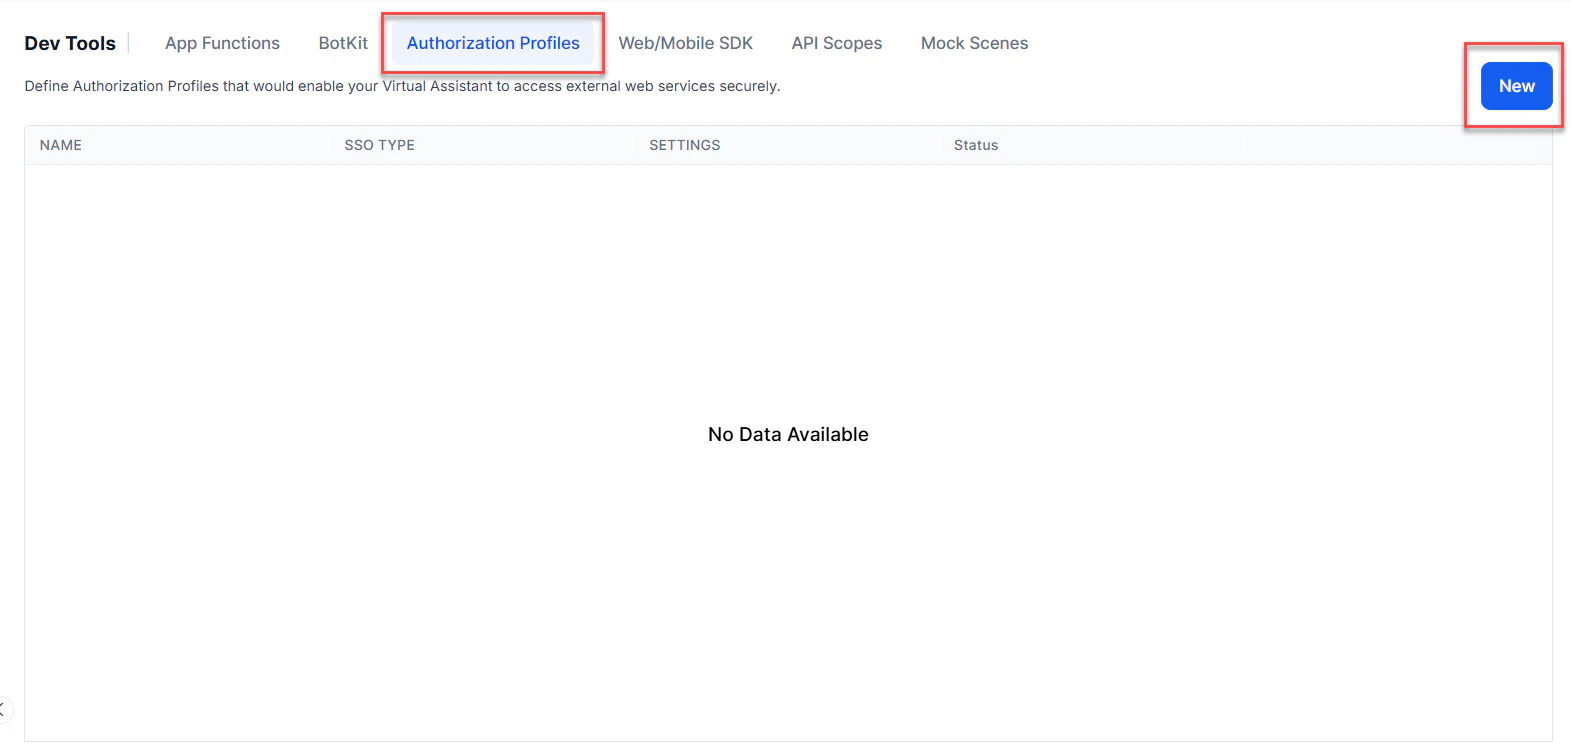 4. In the **Authorization Type** drop-down list, select **Basic Auth**.
5. In the **Name** field, enter the name for your **Basic Auth** type.
4. In the **Authorization Type** drop-down list, select **Basic Auth**.
5. In the **Name** field, enter the name for your **Basic Auth** type.
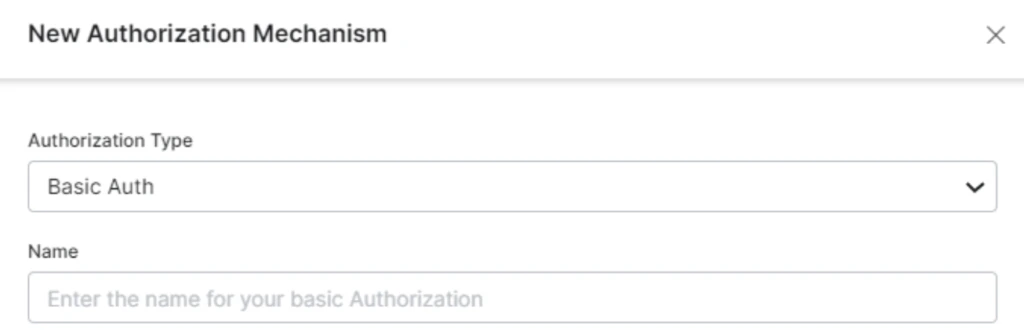 6. Enter the **Description** for the profile and select the API endpoint **Method** — either **GET** or **POST**.
 By default, the GET method is selected for existing apps.
7. Click **Save**.
***
## Defining Tenancy
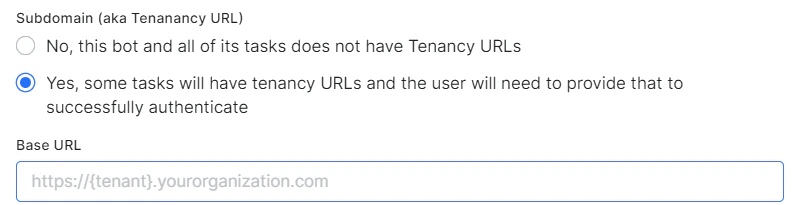
If required, in the **Subdomain** section, select **Yes** if the base URL for a web application or user interface uses a tenant name in the URL. For example, `platform` is the tenant organization for a web service that uses subdomain-based tenants, such as `www.platform.example.com`.
In the following example configuration, the tenancy URL contains the `{tenant}` organization placeholder.
By default, the GET method is selected for existing apps.
7. Click **Save**.
***
## Defining Tenancy
If required, in the **Subdomain** section, select **Yes** if the base URL for a web application or user interface uses a tenant name in the URL. For example, `platform` is the tenant organization for a web service that uses subdomain-based tenants, such as `www.platform.example.com`.
In the following example configuration, the tenancy URL contains the `{tenant}` organization placeholder.
 ***
## Adding Form Fields
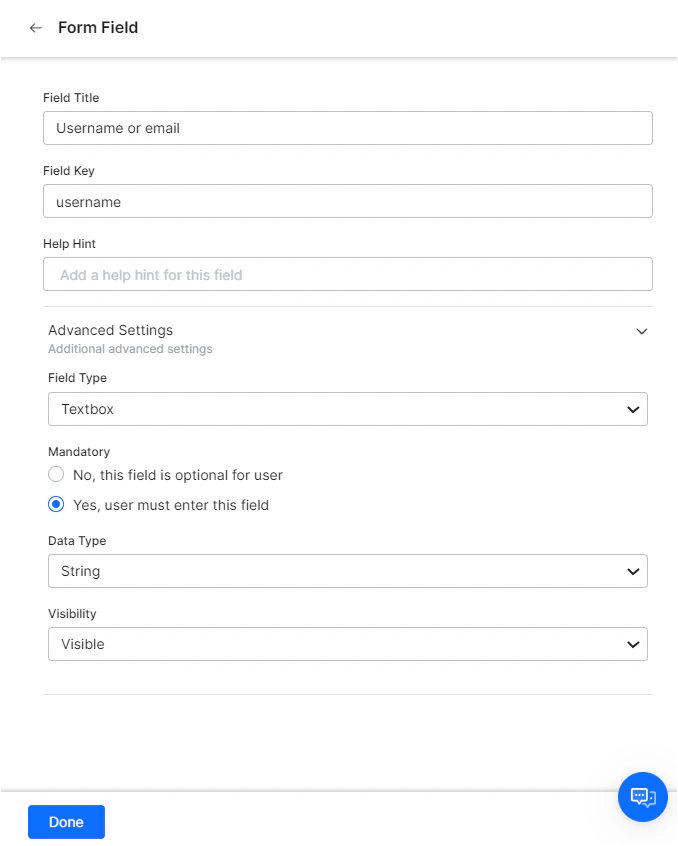
If the default username and password fields don't meet your authorization input needs, you can add custom fields displayed to the end-user by adding authorization IDP form fields. For example, add a PIN code field in addition to the **Username** and **Password** form fields.
***
## Adding Form Fields
If the default username and password fields don't meet your authorization input needs, you can add custom fields displayed to the end-user by adding authorization IDP form fields. For example, add a PIN code field in addition to the **Username** and **Password** form fields.
 ***
## Defining Configuration Fields
The following table describes the fields used to define an authorization IDP form field.
| FIELD NAME | DESCRIPTION |
| ----------- | ----------------------------------------------------------------------------------------------------------------------------------------------------------------------------------- |
| Field Title | Specify the name of the field displayed to the end-user in the authorization dialog. |
| Field Key | The value that represents the end-user input value to the authorizing service. |
| Help Hint | The help text displayed in the field to describe what should be entered. |
| Field Type | When **Advanced Options** is selected, specify the type of field displayed in the end-user interface to collect user input for the **Field Key**, one of: **Textbox**, **Password** |
| Mandatory | When **Advanced Options** is selected, select if the end-user must define this field to complete the authorization. |
| Data Type | When **Advanced Options** is selected, specify the type of data expected as input from the end-user, for example, **String**. |
| Visibility | When **Advanced Options** is selected, specify if the authorization field should be visible, hidden, or displayed as read-only. |
***
## Adding Authorization Fields
By default, authorization fields are configured as part of the header of the request message. If your request requires additional authorization fields or the expected authorization isn't part of the header (for example, social security number or PIN), click **Add Authorization Fields** and define the required fields.
***
## Defining Configuration Fields
The following table describes the fields used to define an authorization IDP form field.
| FIELD NAME | DESCRIPTION |
| ----------- | ----------------------------------------------------------------------------------------------------------------------------------------------------------------------------------- |
| Field Title | Specify the name of the field displayed to the end-user in the authorization dialog. |
| Field Key | The value that represents the end-user input value to the authorizing service. |
| Help Hint | The help text displayed in the field to describe what should be entered. |
| Field Type | When **Advanced Options** is selected, specify the type of field displayed in the end-user interface to collect user input for the **Field Key**, one of: **Textbox**, **Password** |
| Mandatory | When **Advanced Options** is selected, select if the end-user must define this field to complete the authorization. |
| Data Type | When **Advanced Options** is selected, specify the type of data expected as input from the end-user, for example, **String**. |
| Visibility | When **Advanced Options** is selected, specify if the authorization field should be visible, hidden, or displayed as read-only. |
***
## Adding Authorization Fields
By default, authorization fields are configured as part of the header of the request message. If your request requires additional authorization fields or the expected authorization isn't part of the header (for example, social security number or PIN), click **Add Authorization Fields** and define the required fields.
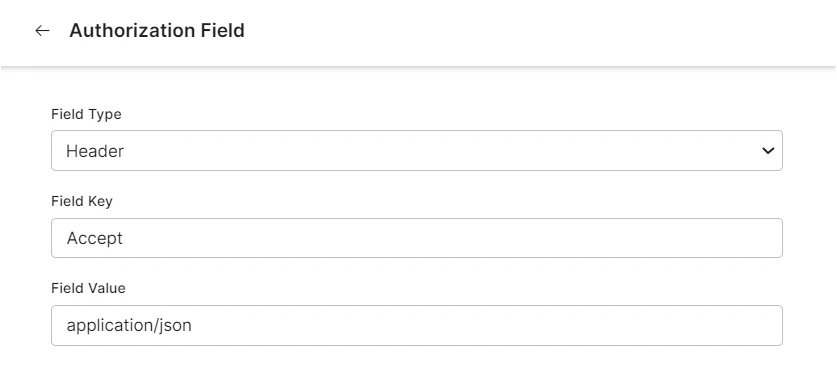 1. In the **Field Type** field, select one of the following depending on where in the request message the authorization fields are required:
* **Header**: The AI Agent looks for the authorization fields in the request header.
* **Payload**: The AI Agent looks for the authorization fields in the request body content.
* **Query String**: The AI Agent looks for the authorization fields as a query in the request body.
* **Path Param**: The AI Agent looks for the authorization fields in the request URL path.
2. In the **Field Key** field, enter the name of the field for the selected **Field Type**.
3. In the **Field Value** field, enter the value for the **Field Key** specified.
4. Click **Done**. The new authorization field is added in the **Authorization Fields** section.
***
## Authorization Check URL
In the **Authorization Check URL** field, optionally define a URL to test the authorization settings from the Platform before deploying the assistant. You can use dynamic fields, path parameter fields, query fields, and so forth, for example:
`https://platform.example.com/sap/opu/odata/sap/{{authfield1}}/?$format=json` or `https://{tenant}.service-now.com/api/now/v1/table/incident`
For more information, see [Using Session and Context Variables in Tasks](/ai-for-service/automation/agent-flows#session-management).
Click **Save** to save the authorization settings and close the **New Authorization Mechanism** dialog.
***
## Testing the Authorization
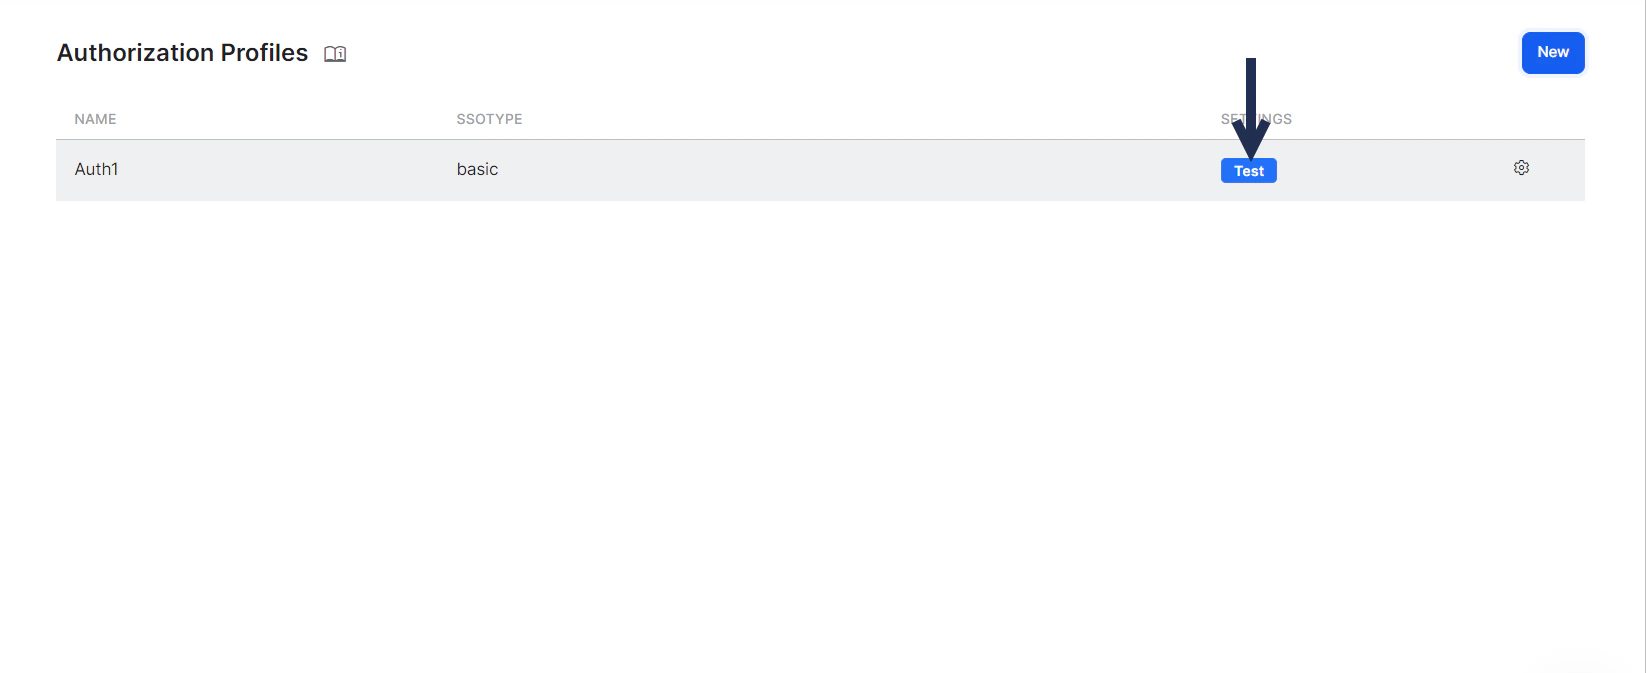
Once you save the authorization settings, test your authorization definition by clicking **Test** from the Authorization Profile page.
1. In the **Field Type** field, select one of the following depending on where in the request message the authorization fields are required:
* **Header**: The AI Agent looks for the authorization fields in the request header.
* **Payload**: The AI Agent looks for the authorization fields in the request body content.
* **Query String**: The AI Agent looks for the authorization fields as a query in the request body.
* **Path Param**: The AI Agent looks for the authorization fields in the request URL path.
2. In the **Field Key** field, enter the name of the field for the selected **Field Type**.
3. In the **Field Value** field, enter the value for the **Field Key** specified.
4. Click **Done**. The new authorization field is added in the **Authorization Fields** section.
***
## Authorization Check URL
In the **Authorization Check URL** field, optionally define a URL to test the authorization settings from the Platform before deploying the assistant. You can use dynamic fields, path parameter fields, query fields, and so forth, for example:
`https://platform.example.com/sap/opu/odata/sap/{{authfield1}}/?$format=json` or `https://{tenant}.service-now.com/api/now/v1/table/incident`
For more information, see [Using Session and Context Variables in Tasks](/ai-for-service/automation/agent-flows#session-management).
Click **Save** to save the authorization settings and close the **New Authorization Mechanism** dialog.
***
## Testing the Authorization
Once you save the authorization settings, test your authorization definition by clicking **Test** from the Authorization Profile page.
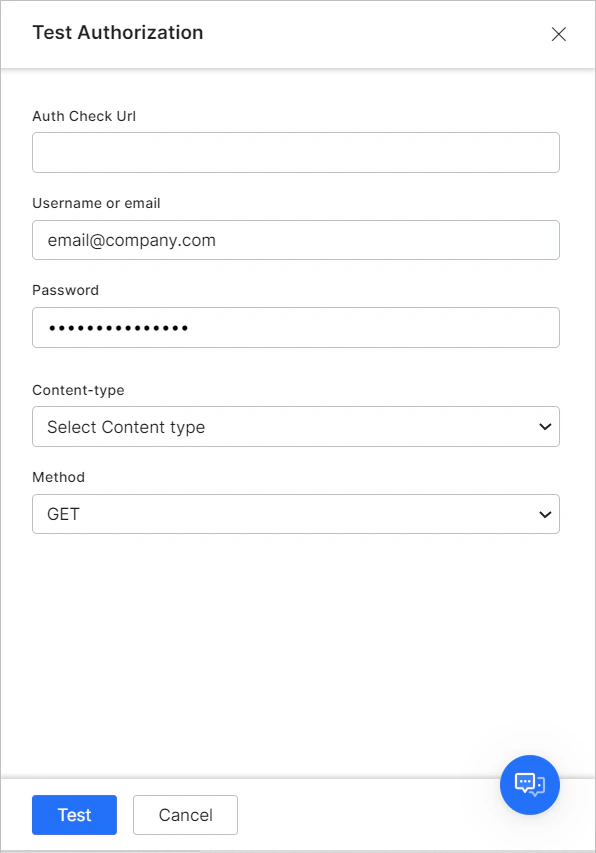
 To configure testing for Basic Auth:
1. In the **Auth Check URL** field, verify or enter the URL to test the authorization configuration.
2. If your assistant uses subdomains, the **Tenancy** field is displayed — specify the tenant.
3. Enter your **User Name** and **Password** for the web service.
4. Select the content type expected for the URL in the **Content-Type** field.
5. Select the **Method** for testing the URL — either **GET** or **POST**.
6. Click **Test** to begin the authorization test.
To configure testing for Basic Auth:
1. In the **Auth Check URL** field, verify or enter the URL to test the authorization configuration.
2. If your assistant uses subdomains, the **Tenancy** field is displayed — specify the tenant.
3. Enter your **User Name** and **Password** for the web service.
4. Select the content type expected for the URL in the **Content-Type** field.
5. Select the **Method** for testing the URL — either **GET** or **POST**.
6. Click **Test** to begin the authorization test.
 When validation completes, the **Test Authorization** dialog closes and the results — either success or failure — are displayed.
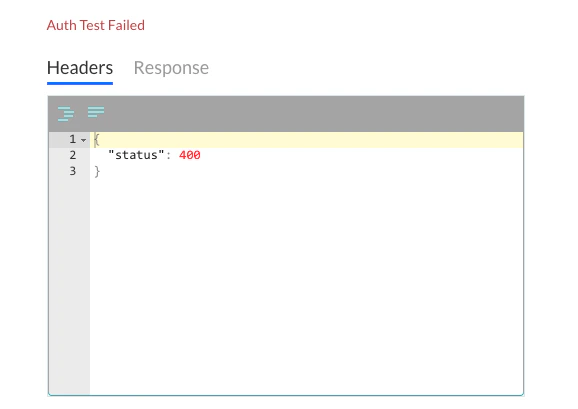
If the authorization fails, the Auth Test Failed message is displayed along with the **Headers** and **Response** tabs.
When validation completes, the **Test Authorization** dialog closes and the results — either success or failure — are displayed.
If the authorization fails, the Auth Test Failed message is displayed along with the **Headers** and **Response** tabs.
 ***
***