> ## Documentation Index
> Fetch the complete documentation index at: https://koreai.mintlify.site/llms.txt
> Use this file to discover all available pages before exploring further.
# Setting Up Authorization using OAuth v1
[Back to App Settings](/ai-for-service/app-settings)
OAuth v1 is an open protocol to allow secure authorization in a simple and standardized method from web, mobile, and desktop applications.
To use OAuth v1, you must first register an account with the web application — you will need the login credentials for that application to configure the authorization mechanism settings.
***
## How OAuth v1 Works
OAuth v1 authorization works as follows:
1. The Platform obtains an unauthorized request token from the web application.
2. The Platform redirects the user to a login dialog at the web application.
3. The user authorizes the request token, associating it with their account.
4. The web application redirects the user back to the Platform.
 5. The Platform exchanges the request token for an access token.
6. The access token allows the Platform to access a protected resource at the provider, on behalf of the user.
5. The Platform exchanges the request token for an access token.
6. The access token allows the Platform to access a protected resource at the provider, on behalf of the user.
 ***
## Configuring oAuth v1 Authorization
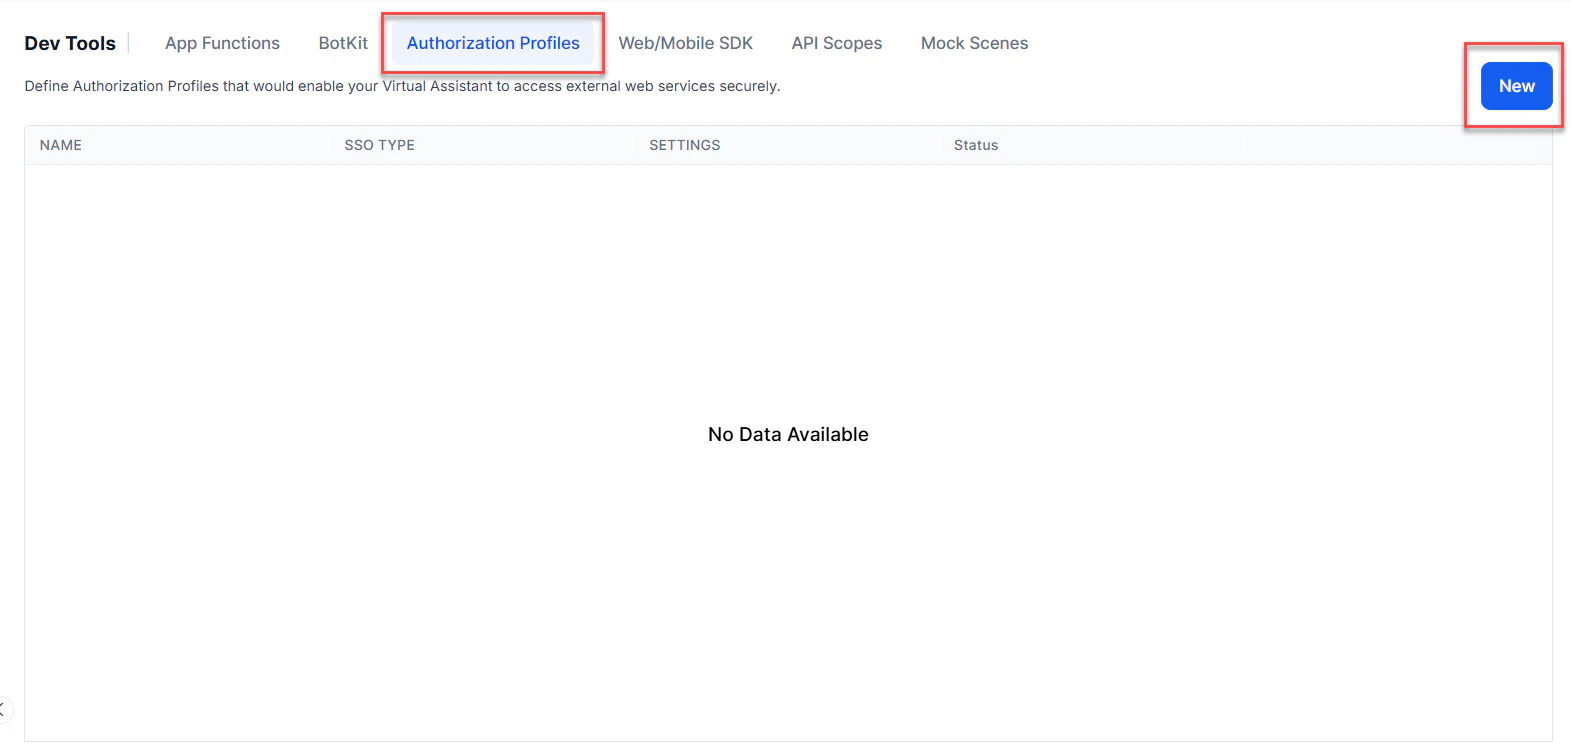
1. Open the assistant for which you want to configure an Authorization profile.
2. From the left menus, click **App Settings**, then select **Dev Tools > Authorization Profiles**.
3. Click **New** to open the **New Authorization Mechanism** dialog.
4. In the **Authorization Type** drop-down list, select **oAuth v1**.
***
## Defining Configuration Fields
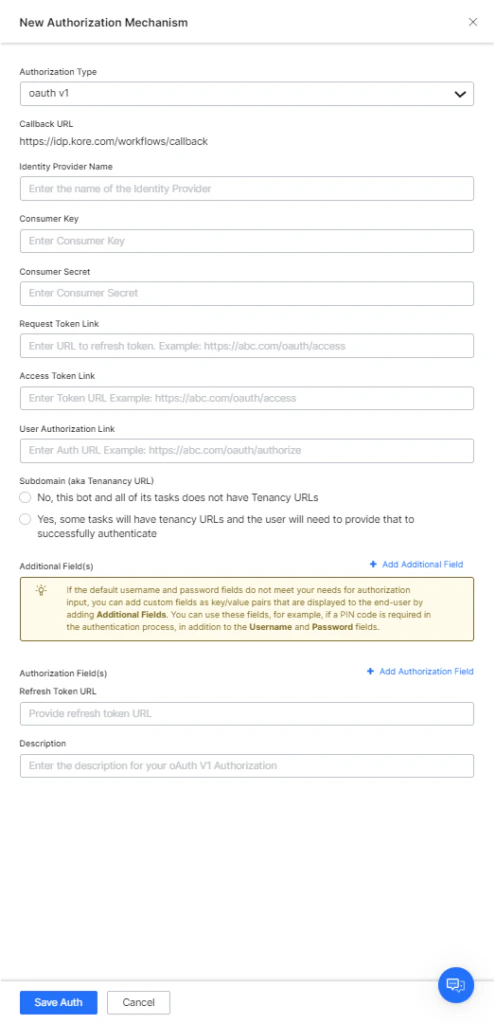
To define oAuth v1, configure the fields described in the following table.
| FIELD NAME | DESCRIPTION |
| ------------------------ | ----------------------------------------------------------------------------------------------------------------------------------------------------------------------------------------------------------------------------------------------------------------------------------------------------------------------------------------------------------------------------------------------------- |
| Authorization Type | Set to **oAuth v1**. |
| Callback URL | The URL used by the web application or web service to redirect the end-user after authorization is complete. The value `https://idp.kore.ai/workflows/callback/` is provided as a read-only value by the Platform when you define oAuth v1 settings. |
| Identity Provider Name | The name of the web application or web service, for example, Twitter. This field is required. This is the name under which the authorization profile displays within the Platform. |
| Consumer Key | The value provided as the Platform identification to the web application. This field is required. |
| Consumer Secret | The secret value provided by the Platform to establish ownership of the **Consumer Key**. This field is required. |
| Request Token Link | The URL used by the Platform to obtain an unauthorized request token. The request token is a value used by the Platform to obtain authorization from the end-user to obtain an access token. For example, `https://{tenant}.example.com/oauth/request_token`. After end-user authorization, an access token can be requested by the Platform. This field is required. |
| Access Token Link | The URL used to exchange the end-user authorized request token for an access token. The access token is the value used by the Platform to gain access to the web application or web service on behalf of the end-user, instead of using the end-user credentials. For example, `https://{tenant}.example.com/oauth/access_token`. This field is required. |
| User Authorization Link | The URL used to obtain end-user authorization for the Platform to access the web application or web service using the access token. This field is required. You can use dynamic fields, path parameter fields, query fields, and so forth, for example: `https://platform.example.com/sap/opu/odata/sap/{{authfield1}}/?$format=json` or `https://{tenant}.service-now.com/api/now/v1/table/incident` |
| Access Using a Connector | Select **Yes** to enable access for AI Agent using the Kore.ai Connector agent. This option is only visible if a Kore.ai Connector agent is configured and enabled in your enterprise on-premises network. |
| Refresh Token URL | A URL that lets the Platform get new access tokens without asking the user to log in again. |
| Description | Enter a description for your authorization task. |
For more information, see [Using Session and Context Variables](/ai-for-service/automation/agent-flows#session-management).
***
## Defining Tenancy
If required, in the **Subdomain** section, select **Yes** if the base URL for a web application or user interface uses a tenant name in the URL. For example, `platform` is the tenant organization for a web service that uses subdomain-based tenants, such as `www.platform.example.com`.
In the following example configuration, the tenancy URL contains the `{tenant}` organization placeholder.
***
## Configuring oAuth v1 Authorization
1. Open the assistant for which you want to configure an Authorization profile.
2. From the left menus, click **App Settings**, then select **Dev Tools > Authorization Profiles**.
3. Click **New** to open the **New Authorization Mechanism** dialog.
4. In the **Authorization Type** drop-down list, select **oAuth v1**.
***
## Defining Configuration Fields
To define oAuth v1, configure the fields described in the following table.
| FIELD NAME | DESCRIPTION |
| ------------------------ | ----------------------------------------------------------------------------------------------------------------------------------------------------------------------------------------------------------------------------------------------------------------------------------------------------------------------------------------------------------------------------------------------------- |
| Authorization Type | Set to **oAuth v1**. |
| Callback URL | The URL used by the web application or web service to redirect the end-user after authorization is complete. The value `https://idp.kore.ai/workflows/callback/` is provided as a read-only value by the Platform when you define oAuth v1 settings. |
| Identity Provider Name | The name of the web application or web service, for example, Twitter. This field is required. This is the name under which the authorization profile displays within the Platform. |
| Consumer Key | The value provided as the Platform identification to the web application. This field is required. |
| Consumer Secret | The secret value provided by the Platform to establish ownership of the **Consumer Key**. This field is required. |
| Request Token Link | The URL used by the Platform to obtain an unauthorized request token. The request token is a value used by the Platform to obtain authorization from the end-user to obtain an access token. For example, `https://{tenant}.example.com/oauth/request_token`. After end-user authorization, an access token can be requested by the Platform. This field is required. |
| Access Token Link | The URL used to exchange the end-user authorized request token for an access token. The access token is the value used by the Platform to gain access to the web application or web service on behalf of the end-user, instead of using the end-user credentials. For example, `https://{tenant}.example.com/oauth/access_token`. This field is required. |
| User Authorization Link | The URL used to obtain end-user authorization for the Platform to access the web application or web service using the access token. This field is required. You can use dynamic fields, path parameter fields, query fields, and so forth, for example: `https://platform.example.com/sap/opu/odata/sap/{{authfield1}}/?$format=json` or `https://{tenant}.service-now.com/api/now/v1/table/incident` |
| Access Using a Connector | Select **Yes** to enable access for AI Agent using the Kore.ai Connector agent. This option is only visible if a Kore.ai Connector agent is configured and enabled in your enterprise on-premises network. |
| Refresh Token URL | A URL that lets the Platform get new access tokens without asking the user to log in again. |
| Description | Enter a description for your authorization task. |
For more information, see [Using Session and Context Variables](/ai-for-service/automation/agent-flows#session-management).
***
## Defining Tenancy
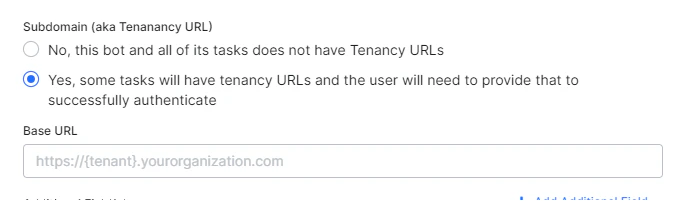
If required, in the **Subdomain** section, select **Yes** if the base URL for a web application or user interface uses a tenant name in the URL. For example, `platform` is the tenant organization for a web service that uses subdomain-based tenants, such as `www.platform.example.com`.
In the following example configuration, the tenancy URL contains the `{tenant}` organization placeholder.
 ***
## Adding Additional Fields
Click **Add Additional Fields** to open the **Additional Fields** dialog and enter one or more key/value pairs representing additional authorization input fields.
If the default username and password fields don't meet your authorization input needs, add custom fields as key/value pairs displayed to the end-user. For example, add a PIN code field in addition to the **Username** and **Password** fields.
***
## Adding Additional Fields
Click **Add Additional Fields** to open the **Additional Fields** dialog and enter one or more key/value pairs representing additional authorization input fields.
If the default username and password fields don't meet your authorization input needs, add custom fields as key/value pairs displayed to the end-user. For example, add a PIN code field in addition to the **Username** and **Password** fields.
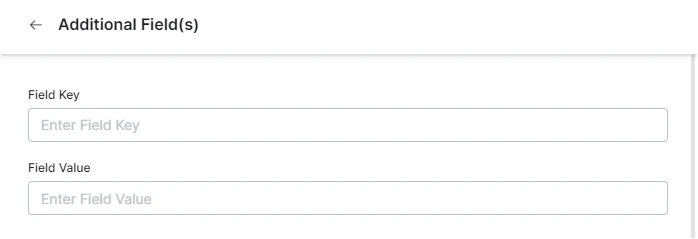 Specify the following fields:
* **Field Key**: The name of the custom field to specify for authorization.
* **Field Value**: The value for the custom field to specify for authorization.
* Click **Done** to save the **Additional Field**.
***
## Adding Authorization Fields
By default, no authorization fields are configured as part of the header of the request message. If your request requires authorization fields or the expected authorization isn't part of the header (for example, social security number or PIN), click **Add Authorization Fields** and define the fields.
Specify the following fields:
* **Field Key**: The name of the custom field to specify for authorization.
* **Field Value**: The value for the custom field to specify for authorization.
* Click **Done** to save the **Additional Field**.
***
## Adding Authorization Fields
By default, no authorization fields are configured as part of the header of the request message. If your request requires authorization fields or the expected authorization isn't part of the header (for example, social security number or PIN), click **Add Authorization Fields** and define the fields.
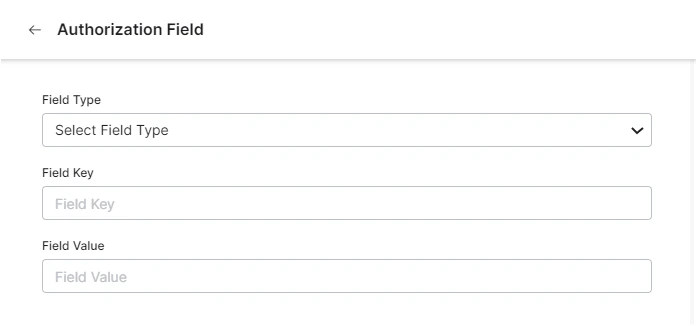 1. In the **Field Type** field, select one of the following depending on where in the request message the authorization fields are required:
* **Header**: The assistant expects the authorization fields as part of the header of the request.
* **Payload**: The assistant expects the authorization fields as part of the content of the body of the request.
* **Query String**: The assistant expects the authorization fields as a query in the body of the request.
* **Path Param**: The assistant expects the authorization fields as part of the URL path for the request.
2. In the **Field Key** field, enter the name of the field for the selected **Field Type**.
3. In the **Field Value** field, enter the value for the **Field Key** specified.
4. Click **Done**. The new authorization field is added in the **Authorization Fields** section.
***
## Testing the Authorization
After saving the authorization, test it on the **Authorization** page by clicking **Test** before continuing to develop the remaining steps of your assistant. The test is executed using the **authorization token URLs** and the **Consumer Key** and **Consumer Token**. If tenancy was defined, the **Test Authorization** dialog is displayed.
1. In the **Field Type** field, select one of the following depending on where in the request message the authorization fields are required:
* **Header**: The assistant expects the authorization fields as part of the header of the request.
* **Payload**: The assistant expects the authorization fields as part of the content of the body of the request.
* **Query String**: The assistant expects the authorization fields as a query in the body of the request.
* **Path Param**: The assistant expects the authorization fields as part of the URL path for the request.
2. In the **Field Key** field, enter the name of the field for the selected **Field Type**.
3. In the **Field Value** field, enter the value for the **Field Key** specified.
4. Click **Done**. The new authorization field is added in the **Authorization Fields** section.
***
## Testing the Authorization
After saving the authorization, test it on the **Authorization** page by clicking **Test** before continuing to develop the remaining steps of your assistant. The test is executed using the **authorization token URLs** and the **Consumer Key** and **Consumer Token**. If tenancy was defined, the **Test Authorization** dialog is displayed.
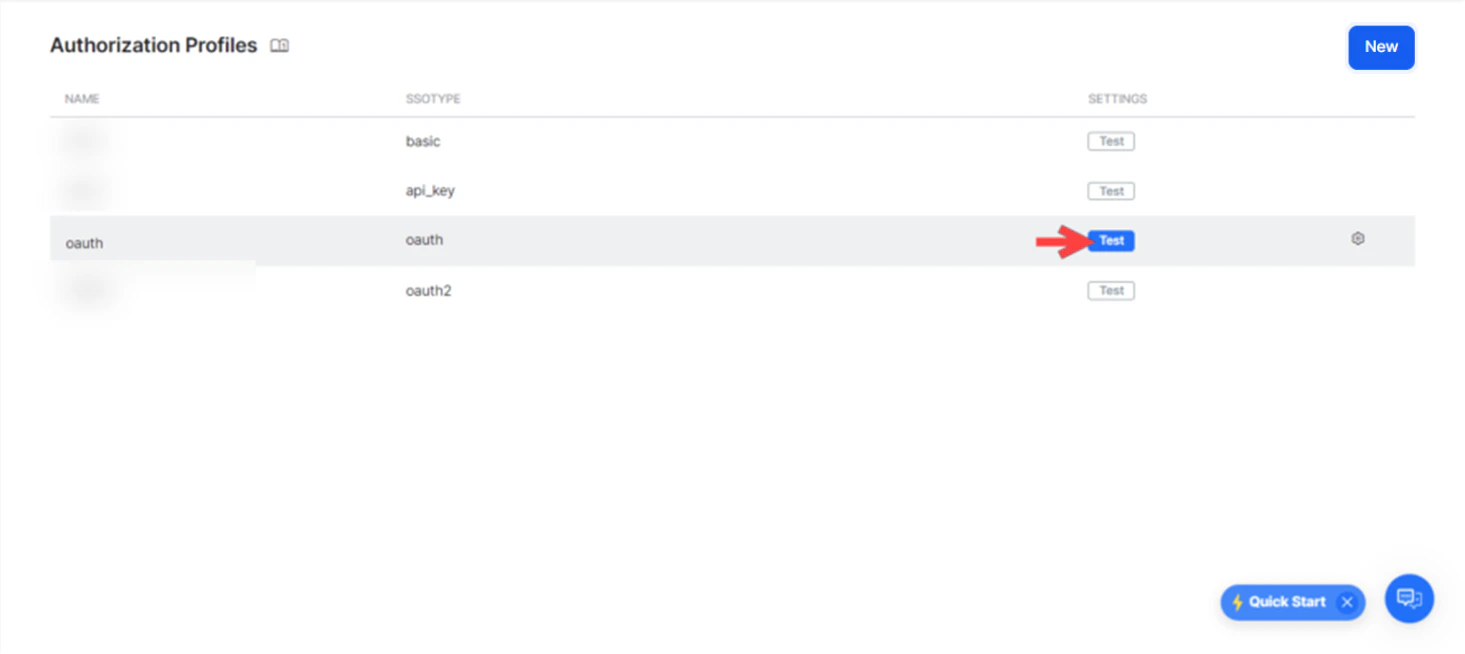 Click **Test** to begin the authorization test.
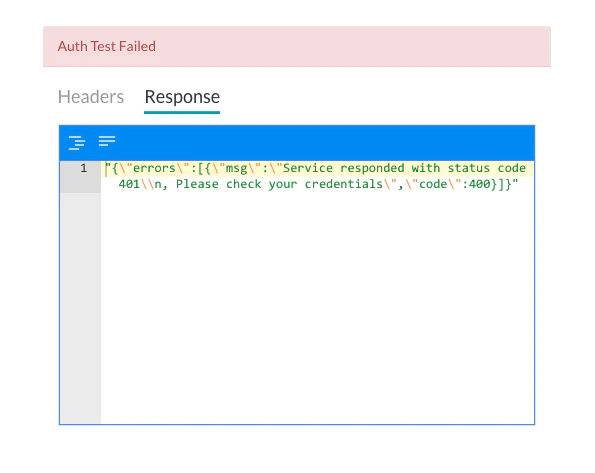
When validation completes, the **Test Authorization** dialog closes and the results — either success or failure — are displayed. If the authorization fails, the Auth Test Failed message is displayed along with the **Headers** and **Response** tabs.
Click **Test** to begin the authorization test.
When validation completes, the **Test Authorization** dialog closes and the results — either success or failure — are displayed. If the authorization fails, the Auth Test Failed message is displayed along with the **Headers** and **Response** tabs.
 ***
***