> ## Documentation Index
> Fetch the complete documentation index at: https://koreai.mintlify.site/llms.txt
> Use this file to discover all available pages before exploring further.
# Adding the Cisco Webex Teams
[Back to Available Channels](/ai-for-service/channels/adding-channels-to-your-bot#available-channels)
To add the Cisco Webex Teams (formerly Cisco Webex) channel to your AI Agent, the developer must create a dedicated AI Agent app and an integration app in Cisco Webex Teams.
Adding the Cisco Webex Teams channel to your AI Agent is a four-step process to allow end-users to interact with it using their Webex accounts.
## Step 1: Create an App with Cisco Webex Team
To create an App from within Cisco Webex Teams, please follow the steps below:
1. [Log in to the Cisco Webex Developer Portal](https://developer.webex.com/) and proceed to the **Start Building Apps** page or to the **My Webex Apps** page.
2. Click the **Create a New App** option and choose the **Create an App** option.
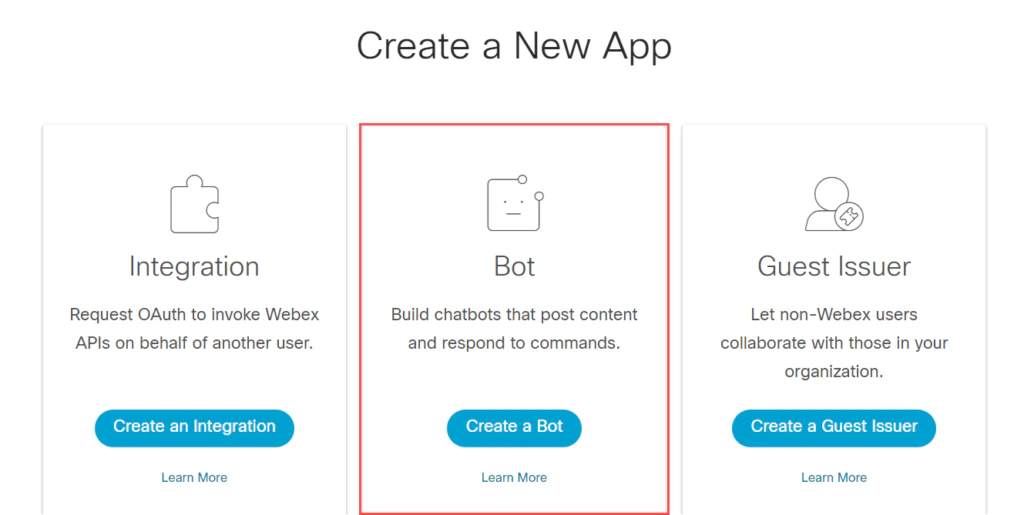 3. Provide all the required information to create the app and click on **Add Bot**.
4. This step will create a Bot User and an Access Token is also generated for accessing this app.
5. Make a note of the **Bot Username** and **Access Token** from this page.
3. Provide all the required information to create the app and click on **Add Bot**.
4. This step will create a Bot User and an Access Token is also generated for accessing this app.
5. Make a note of the **Bot Username** and **Access Token** from this page.
 ## Step 2: Enable the Cisco Webex Team channel from the Platform
1. In the Platform, select the assistant you want to add the channel to.
2. Go to **Channels & Flows** > **Channels** > **Digital** > **All**, and select **Cisco Webex Teams**. The channel window opens.
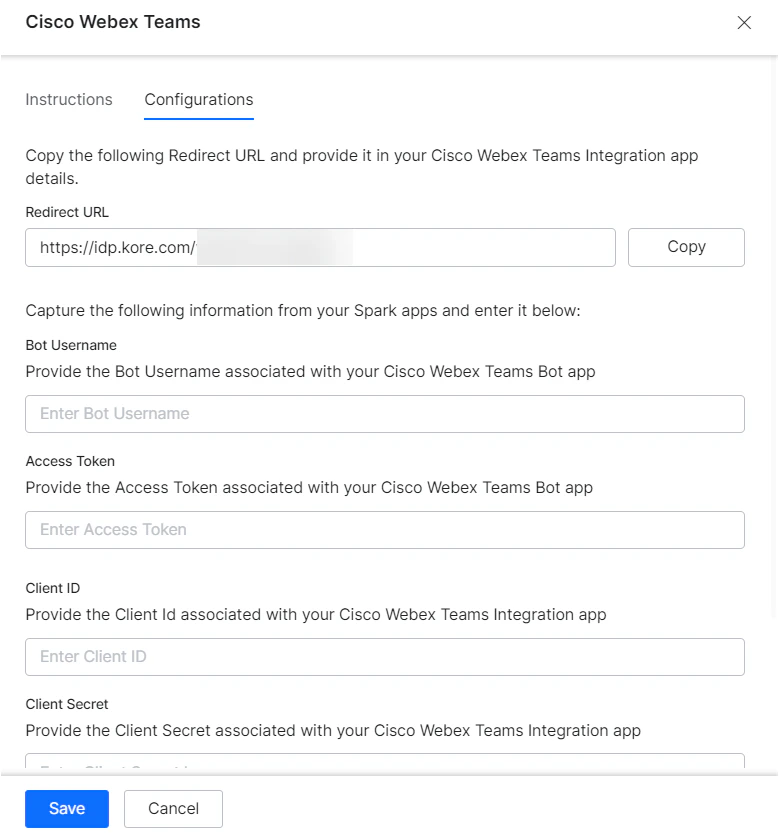
3. Enter the **Bot Username** and **Access Token** from the previous step.
4. Make a note of the **Redirect URL**.
## Step 3: Set Up an Integration with Cisco Webex Team
1. On the Cisco Webex Team Developer portal, click the **Profile** drop-down list on the top-right and go to the **My Webex Apps** page.
2. Click **Create a New App** and choose the **Create an Integration** option to add a new integration app for Webex.
3. Provide all the required details to create the integration like integration name, description, logo, etc. This information must be user-facing as this is displayed to end-users in the permissions dialog.
4. For **Redirect URI(s)**, paste the **Redirect URL** from the previous step.
5. Under **Scopes**, select **spark:all** for enabling app communication.
6. After providing all the required information, click the **Add Integration** to create the new integration app.
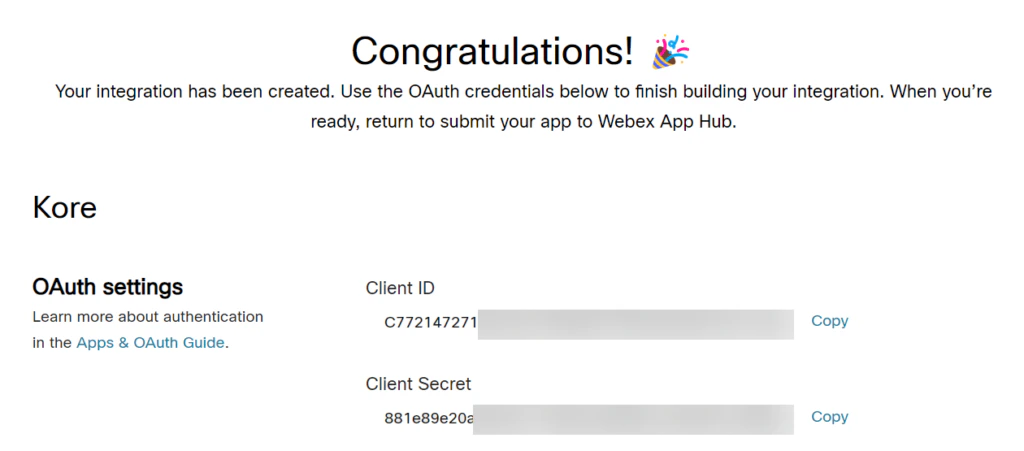
7. This step creates a new integration app and also generates the Client ID and Client Secret for this app.
8. Make a note of the **Client Id** and **Client Secret**.
For more information, read [Cisco’s documentation](https://developer.webex.com/docs/integrations)
## Step 2: Enable the Cisco Webex Team channel from the Platform
1. In the Platform, select the assistant you want to add the channel to.
2. Go to **Channels & Flows** > **Channels** > **Digital** > **All**, and select **Cisco Webex Teams**. The channel window opens.
3. Enter the **Bot Username** and **Access Token** from the previous step.
4. Make a note of the **Redirect URL**.
## Step 3: Set Up an Integration with Cisco Webex Team
1. On the Cisco Webex Team Developer portal, click the **Profile** drop-down list on the top-right and go to the **My Webex Apps** page.
2. Click **Create a New App** and choose the **Create an Integration** option to add a new integration app for Webex.
3. Provide all the required details to create the integration like integration name, description, logo, etc. This information must be user-facing as this is displayed to end-users in the permissions dialog.
4. For **Redirect URI(s)**, paste the **Redirect URL** from the previous step.
5. Under **Scopes**, select **spark:all** for enabling app communication.
6. After providing all the required information, click the **Add Integration** to create the new integration app.
7. This step creates a new integration app and also generates the Client ID and Client Secret for this app.
8. Make a note of the **Client Id** and **Client Secret**.
For more information, read [Cisco’s documentation](https://developer.webex.com/docs/integrations)
 The Redirect URI now includes the **streamid** in the API request to identify the AI Agent being accessed. When an incoming request is qualified with this identifier, it helps with traceability, troubleshooting, and remediation at the network level during anomalies like malicious calls or unusual app activity.
## Step 4: Complete Cisco Webex Team Channel Configuration from the Platform
1. In the Platform, on the Channel Configuration page, enter the Post URL where you want Webex **Client ID** and **Client Secret** noted in the previous step.
2. **Enable Channel** to complete the configuration.
3. **Save** the configuration.
The Redirect URI now includes the **streamid** in the API request to identify the AI Agent being accessed. When an incoming request is qualified with this identifier, it helps with traceability, troubleshooting, and remediation at the network level during anomalies like malicious calls or unusual app activity.
## Step 4: Complete Cisco Webex Team Channel Configuration from the Platform
1. In the Platform, on the Channel Configuration page, enter the Post URL where you want Webex **Client ID** and **Client Secret** noted in the previous step.
2. **Enable Channel** to complete the configuration.
3. **Save** the configuration.
 After enabling the channel and verifying all the configurations, you can optionally publish the app for the new channel. Learn more about [Publishing your App](/ai-for-service/deployment/publishing-app).