> ## Documentation Index
> Fetch the complete documentation index at: https://koreai.mintlify.site/llms.txt
> Use this file to discover all available pages before exploring further.
# Adding the Cisco Jabber Channel
[Back to Available Channels](/ai-for-service/channels/adding-channels-to-your-bot#available-channels)
Cisco Jabber is a platform that offers multiple communication methods, and which you can integrate with the assistants built with the Platform. Adding the Jabber channel to your AI Agent allows end-users to interact with it using their **Jabber** accounts. This article shows you how to add it as a Channel, where your AI Agent can communicate to end-users via Jabber. You must have or register for a developer account in the **Jabber** portal.
## Configuration
To add the Cisco Jabber channel, follow the below steps:
1. Select the assistant that you want to add the Jabber channel to.
2. Go to **Channels & Flows** > **Channels** > **Digital** > **All**.
3. Click the **Jabber** icon. The **Jabber Channel page** is displayed.
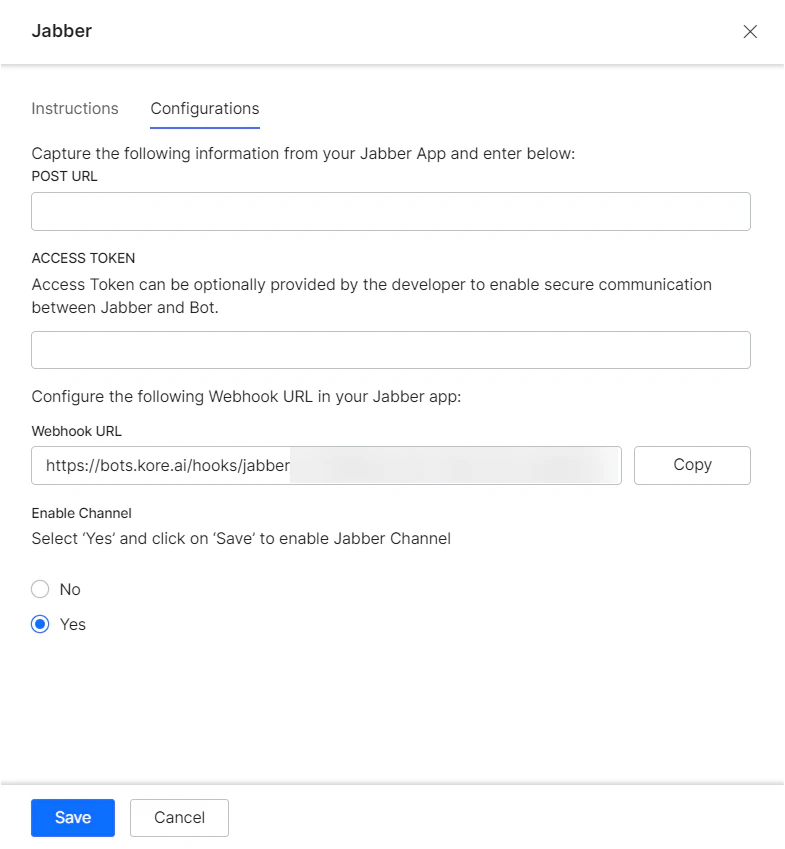
4. To enable a webhook integration on your Jabber application, log into your Jabber app. Copy the **Webhook URL** from the **Configurations** tab on the Jabber channel page and enter the **Webhook URL** field in the Jabber app for integration.
5. Go to the **Configurations** tab on the Jabber channel page to complete the channel setup.
6. Capture the **POST URL** details from your Jabber app and enter them in the **POST URL** field.
7. You can also optionally generate and capture the **Access Token** details from your Jabber integration and enter in the **Access Token field** to enable secure communication between Jabber and the AI Agent.
8. Select **Yes** and click **Save** to enable Jabber Channel.
 After enabling the channel and verifying all the configurations, you can optionally publish the app for the new channel. Learn more about [Publishing your App](/ai-for-service/deployment/publishing-app).
Following are code snippets of the payload formats for verifying the integration.
## Payload for Post URL
Below is the response message from the app that must be accepted by the POST URL that's registered in the **Configurations** tab.
```
{
"message": {
"text" : "Hi"
}
"to" : "",
"from" : ""
}
```
## Webhook Payload
Below is the Webhook payload format to post messages to the Platform from Jabber.
```
{
{
"message": {
"text" : "",
"attachments" : []
},
"from" : {
"id": "",
"userInfo" : {
"firstName" : "",
"lastName" : "",
"email" : ""
}
},
"to" : {
"id": ,
"groupInfo" : { //If message comes from a group/team/room conversations.
"id" : "",
"name": ""
}
}
}
```
After enabling the channel and verifying all the configurations, you can optionally publish the app for the new channel. Learn more about [Publishing your App](/ai-for-service/deployment/publishing-app).
Following are code snippets of the payload formats for verifying the integration.
## Payload for Post URL
Below is the response message from the app that must be accepted by the POST URL that's registered in the **Configurations** tab.
```
{
"message": {
"text" : "Hi"
}
"to" : "",
"from" : ""
}
```
## Webhook Payload
Below is the Webhook payload format to post messages to the Platform from Jabber.
```
{
{
"message": {
"text" : "",
"attachments" : []
},
"from" : {
"id": "",
"userInfo" : {
"firstName" : "",
"lastName" : "",
"email" : ""
}
},
"to" : {
"id": ,
"groupInfo" : { //If message comes from a group/team/room conversations.
"id" : "",
"name": ""
}
}
}
```