> ## Documentation Index
> Fetch the complete documentation index at: https://koreai.mintlify.site/llms.txt
> Use this file to discover all available pages before exploring further.
# Adding the Facebook Messenger Channel
[Back to Available Channels](/ai-for-service/channels/adding-channels-to-your-bot#available-channels)
To add the Facebook Messenger channel to your AI Agent, you need a **Facebook Developer** account. With this account, you can configure the connection between Facebook Messenger and Kore.ai. Enabling the Facebook Messenger Channel on the App Builder helps your users chat with the AI Agent using their **Facebook** accounts.
The steps to enable this channel are simple and summarized below:
1. [Create and set up a Facebook Messenger App](#step-1-create-and-set-up-a-facebook-messenger-app).
2. [Configure the Webhook or Callback URL to send and receive messages](#step-2-configure-the-webhook-or-callback-url).
3. [Subscribe to the app on the Facebook page using the Client ID and Client Secret](#step-3-set-up-app-id-and-secret).
4. [Submit the App for Approval.](#step-4-submit-the-app-for-approval)
5. [Enable the channel and complete the configuration on the Platform](#step-5-enable-the-channel).
## Step 1: Create and Set up a Facebook Messenger App
1. Log in to the [Facebook Developer Portal](https://developers.facebook.com/micro_site/url/?click_from_context_menu=true\&country=IN\&destination=https%3A%2F%2Fdevelopers.facebook.com%2Fdocs%2Fdevelopment%2Fregister\&event_type=click\&last_nav_impression_id=0pWTvRHj057BWQ868\&max_percent_page_viewed=65\&max_viewport_height_px=657\&max_viewport_width_px=1366\&orig_http_referrer=https%3A%2F%2Fdevelopers.facebook.com%2Fdocs%2Fdevelopment%2Fcreate-an-app%2F\&orig_request_uri=https%3A%2F%2Fdevelopers.facebook.com%2Fajax%2Fdocs%2Fnav%2F%3Fpath1%3Ddevelopment%26path2%3Dcreate-an-app\®ion=apac\&scrolled=true\&session_id=0lMcuYhMqR7uUNlDe\&site=developers) and click the **My Apps** top menu option.
 New users should [register](https://developers.facebook.com/micro_site/url/?click_from_context_menu=true\&country=IN\&destination=https%3A%2F%2Fdevelopers.facebook.com%2Fasync%2Fregistration\&event_type=click\&last_nav_impression_id=0z1et1xpn4nZpYCfR\&max_percent_page_viewed=30\&max_viewport_height_px=657\&max_viewport_width_px=1366\&orig_http_referrer=https%3A%2F%2Fdevelopers.facebook.com%2Fdocs%2Fdevelopment%2Fregister%2F\&orig_request_uri=https%3A%2F%2Fdevelopers.facebook.com%2Fajax%2Fdocs%2Fnav%2F%3Fpath1%3Ddevelopment%26path2%3Dregister\®ion=apac\&scrolled=false\&session_id=1SbEaGTlt1aWgLNff\&site=developers) on the **Facebook Developer Portal**. [Learn more](https://developers.facebook.com/docs/development/register).
2. In the **My Apps** section, click **Create App**.
New users should [register](https://developers.facebook.com/micro_site/url/?click_from_context_menu=true\&country=IN\&destination=https%3A%2F%2Fdevelopers.facebook.com%2Fasync%2Fregistration\&event_type=click\&last_nav_impression_id=0z1et1xpn4nZpYCfR\&max_percent_page_viewed=30\&max_viewport_height_px=657\&max_viewport_width_px=1366\&orig_http_referrer=https%3A%2F%2Fdevelopers.facebook.com%2Fdocs%2Fdevelopment%2Fregister%2F\&orig_request_uri=https%3A%2F%2Fdevelopers.facebook.com%2Fajax%2Fdocs%2Fnav%2F%3Fpath1%3Ddevelopment%26path2%3Dregister\®ion=apac\&scrolled=false\&session_id=1SbEaGTlt1aWgLNff\&site=developers) on the **Facebook Developer Portal**. [Learn more](https://developers.facebook.com/docs/development/register).
2. In the **My Apps** section, click **Create App**.
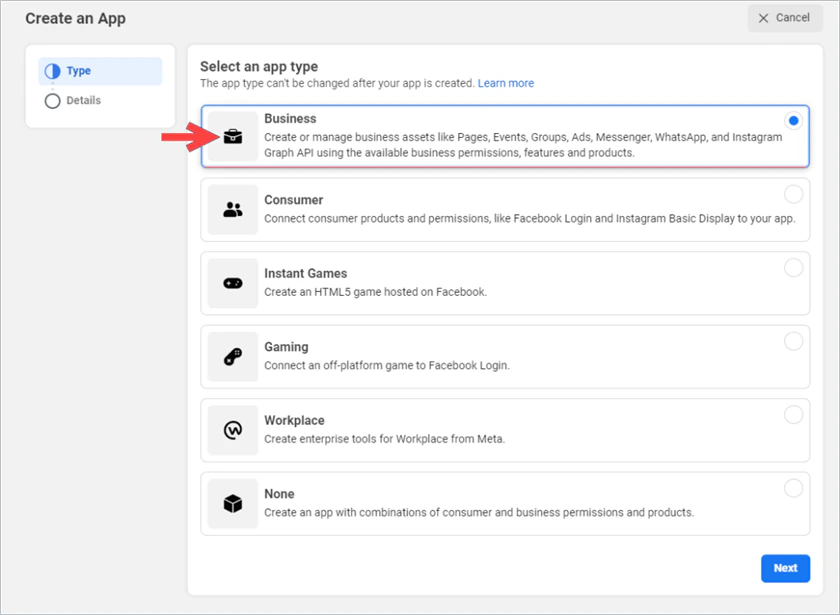
 3. In the **Select an App Type** window, select the **Business** tab, and click **Next**.
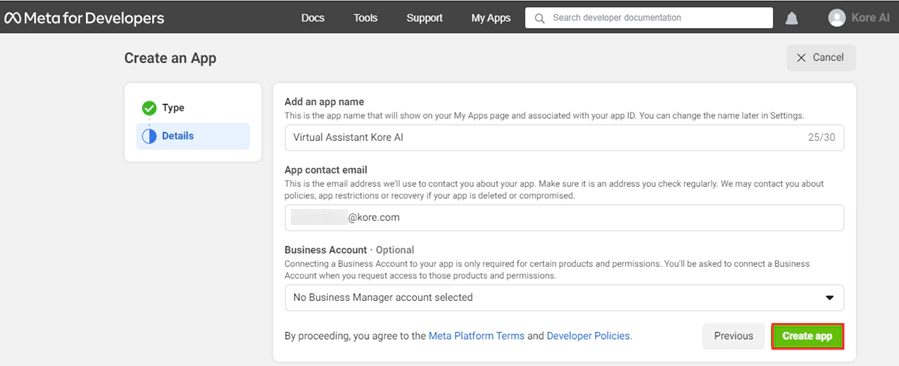
 4. In the **Details** section, enter the required details, and click **Create App**.
 5. Provide your account password in the **Please re-enter your password** window when prompted, and click **Submit**.
6. Your App is now created and you are redirected to the **Add products to your app** page.
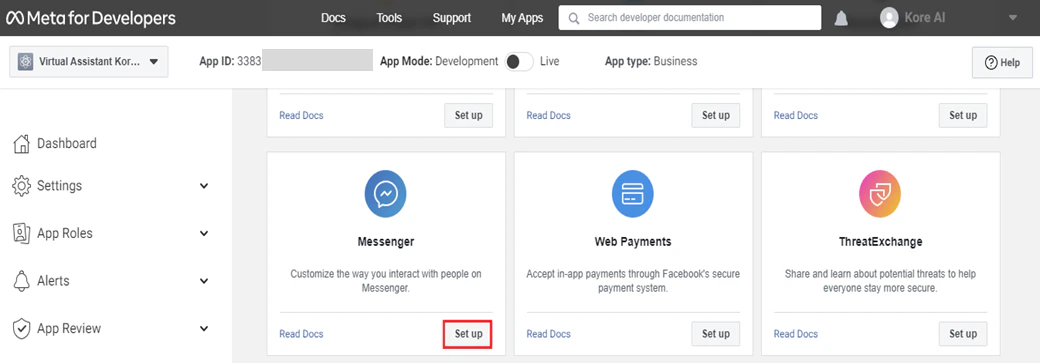
7. Click **Set Up** on the **Messenger** tab.
5. Provide your account password in the **Please re-enter your password** window when prompted, and click **Submit**.
6. Your App is now created and you are redirected to the **Add products to your app** page.
7. Click **Set Up** on the **Messenger** tab.
 8. You now need to associate a page with the app. If you don't have a page, click **Create New Page** in the **Access Tokens** panel.
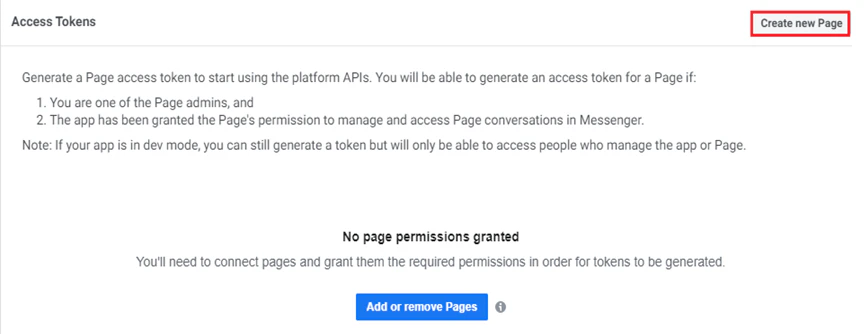 9. Click **Add or Remove Pages** and follow the instructions to add your page.
 10. Click **Generate Token**.
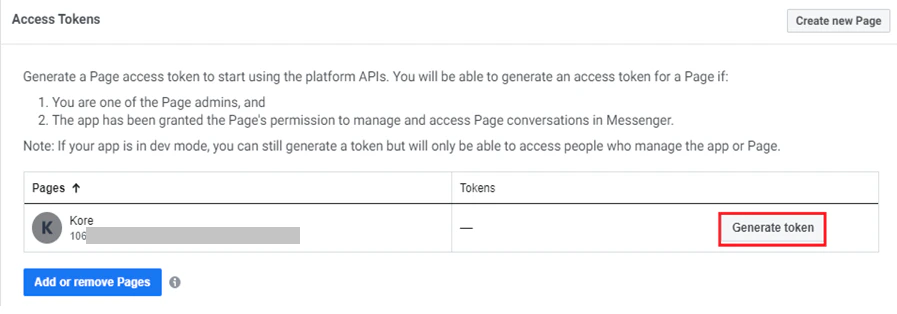 11. In the **Token Generated** window, select **I understand** and click **Copy** to copy the page Access Token.
  12. Click **Done**.
13. Copy the **Page ID** of the Facebook page.
12. Click **Done**.
13. Copy the **Page ID** of the Facebook page.  14. On the Platform, navigate to **Channels & Flows** > **Channels** > **Digital** > **All** > **Facebook Messenger**.
15. Click the **Configurations** tab, and paste the **Page Access Token** and **Page ID** values you’ve copied.
14. On the Platform, navigate to **Channels & Flows** > **Channels** > **Digital** > **All** > **Facebook Messenger**.
15. Click the **Configurations** tab, and paste the **Page Access Token** and **Page ID** values you’ve copied.  16. Navigate to **Settings** > **Basic** and configure the **Privacy Policy URL** and **Terms of Service URL** fields for the app.
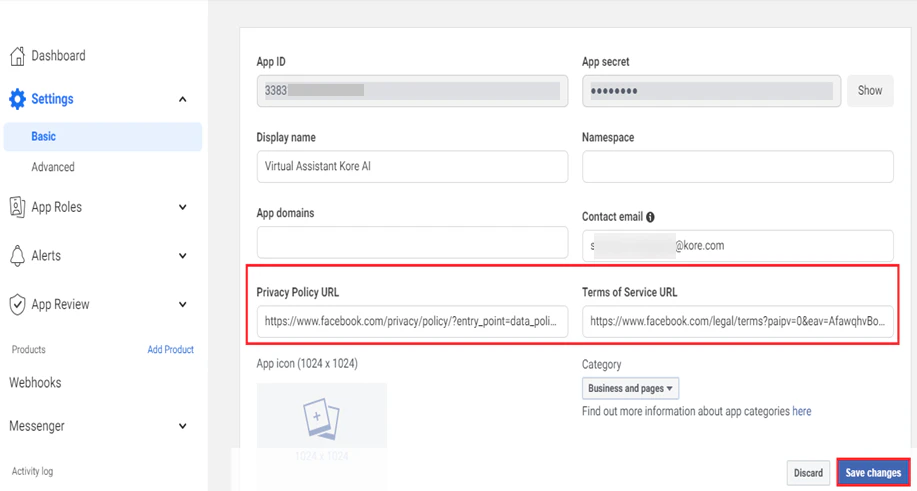 17. Click **Save Changes**.
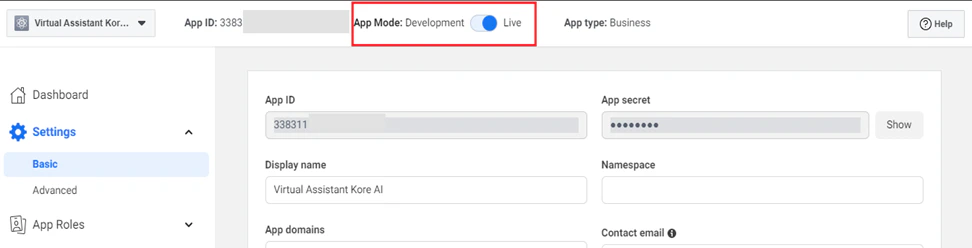
18. Enable the deployment of the app by changing **App Mode: Development** to **Live**.
17. Click **Save Changes**.
18. Enable the deployment of the app by changing **App Mode: Development** to **Live**.
 ## Step 2: Configure the Webhook or Callback URL
To set up the webhook URL, follow the steps below:
1. Copy the **Webhook URL** and **Verify Token** from the Platform’s channel configuration panel.
## Step 2: Configure the Webhook or Callback URL
To set up the webhook URL, follow the steps below:
1. Copy the **Webhook URL** and **Verify Token** from the Platform’s channel configuration panel.
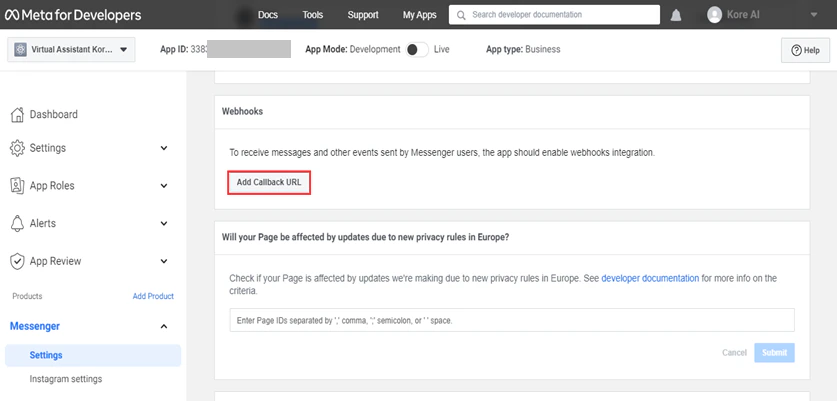
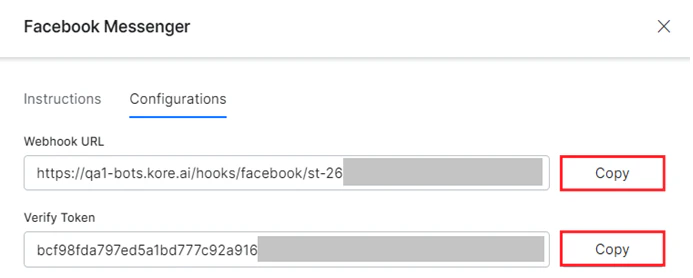 2. On the **Messenger Settings** page of the Facebook Developer Portal, click **Add Callback URL**.
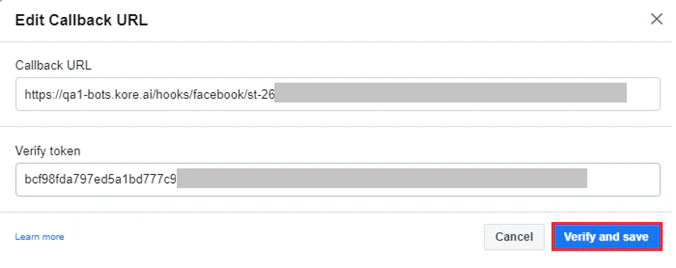
 3. Paste the copied values in the **Edit Callback URL** window, and click **Verify and Save**.
 4. The webhook URL is successfully set up.
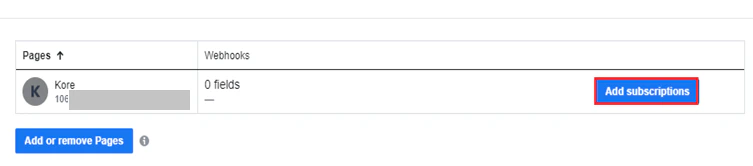
5. Click **Add Subscriptions**.
4. The webhook URL is successfully set up.
5. Click **Add Subscriptions**.
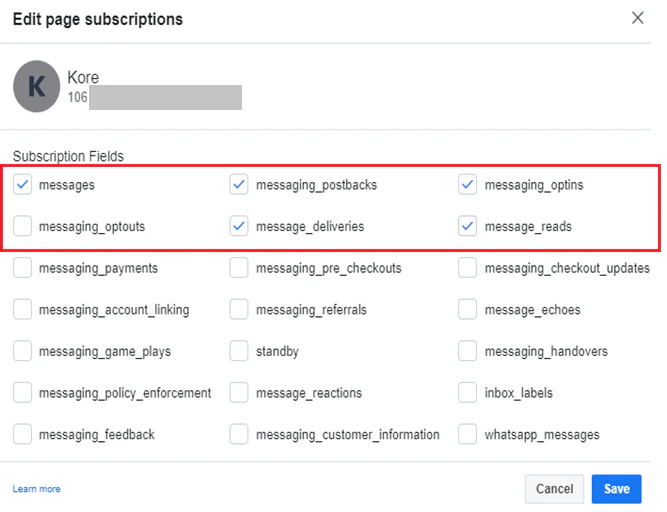
 6. Select **messages**, **messaging\_postbacks**, **messaging\_optins**, **message\_deliveries**, and **message\_reads** in the **Edit Page Subscriptions** window to select the webhook services.
 7. Click **Save**.
## Step 3: Set up App ID and Secret
To configure the **Client ID** and **Client Secret** for the app, follow the steps below:
1. On the **Facebook Messenger Developer Portal**, navigate to **Settings** > **Basic**.
2. Copy the **App ID** and **App Secret** values.
7. Click **Save**.
## Step 3: Set up App ID and Secret
To configure the **Client ID** and **Client Secret** for the app, follow the steps below:
1. On the **Facebook Messenger Developer Portal**, navigate to **Settings** > **Basic**.
2. Copy the **App ID** and **App Secret** values.
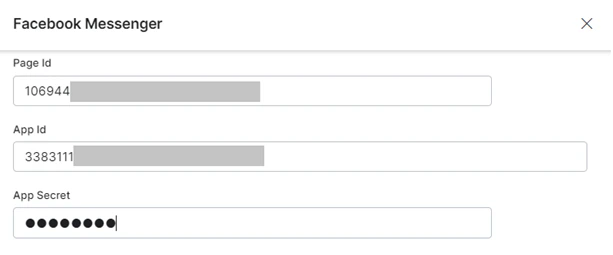
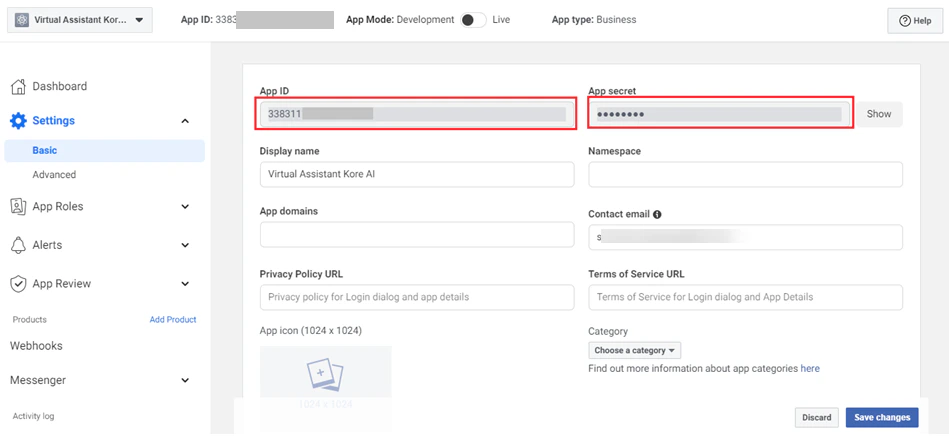 3. On the Kore.ai App Builder, navigate to the **Configurations** section of the Facebook Messenger channel and paste these values in their respective fields.
 ## Step 4: Submit the App for Approval
Configure any other settings that Facebook might require, then submit the app for approval. [Learn more](https://developers.facebook.com/docs/messenger-platform/app-review#submission).
Once approved, you can enable the **Facebook Messenger** channel for your assistant with the steps mentioned below.
## Step 5: Enable the Channel
On the Platform, enable the **Facebook Messenger** channel to complete the integration. To enable follow the steps below:
1. Navigate to **Channels & Flows** > **Channels** > **Digital** > **All** > **Facebook Messenger**.
2. Click the **Configurations** tab, and select **YES** for **Enable Channel**.
## Step 4: Submit the App for Approval
Configure any other settings that Facebook might require, then submit the app for approval. [Learn more](https://developers.facebook.com/docs/messenger-platform/app-review#submission).
Once approved, you can enable the **Facebook Messenger** channel for your assistant with the steps mentioned below.
## Step 5: Enable the Channel
On the Platform, enable the **Facebook Messenger** channel to complete the integration. To enable follow the steps below:
1. Navigate to **Channels & Flows** > **Channels** > **Digital** > **All** > **Facebook Messenger**.
2. Click the **Configurations** tab, and select **YES** for **Enable Channel**.  3. Click **Save**.
After enabling the channel and verifying all the configurations, you can optionally publish the app for the new channel. Learn more about [Publishing your App](/ai-for-service/deployment/publishing-app).
3. Click **Save**.
After enabling the channel and verifying all the configurations, you can optionally publish the app for the new channel. Learn more about [Publishing your App](/ai-for-service/deployment/publishing-app).