> ## Documentation Index
> Fetch the complete documentation index at: https://koreai.mintlify.site/llms.txt
> Use this file to discover all available pages before exploring further.
# Adding Genesys Cloud CX Messaging as a Channel
[Back to Available Channels](/ai-for-service/channels/adding-channels-to-your-bot#available-channels)
The Platform now allows you to add **Genesys Cloud CX Messaging** as a messaging channel for your AI Agent. Genesys Cloud CX Messaging integration helps instantly share your ideas with people inside your organization with the persistent chat history feature to start a conversation with your colleagues and continue it anywhere, anytime.
The platform supports two Genesys integration methods:
* [Bot Connector (v1)](https://developer.genesys.cloud/commdigital/textbots/botconnector-customer-api-spec)
* [Digital Bot Connector (v2)](https://developer.genesys.cloud/commdigital/textbots/digital-botconnector-customer-api-spec)
This integration works only with Genesys Cloud CX Messaging channel, not the older Genesys web chat.
With the **Genesys Cloud CX Messaging** integration on the Platform, you can achieve the following:
* Set up the REST API and authorization flow for events and conversations.
* Link the app to the Platform using the app’s credentials.
* Deploy the app and transfer conversations to the **Genesys Agent System**.
* Leverage various templates like Button, Quick Replies, and Bullets List provided by Genesys for message formatting.
* Accept any attachments in the chat messages that Genesys supports.
After the integration, you can do the following:
* Track AI Agent conversations.
* Listen to new messages from Genesys Cloud CX Messaging.
* Have Apps post and respond to messages in Genesys Cloud CX Messaging conversations.
* Have Apps handle incoming notifications from your apps into Genesys Cloud CX Messaging.
* Supports [rich messaging features](https://docs.genesys.com/Documentation/GWC/latest/Deployment/GWCRM), including media carousels, flow messages, documents, images, videos, buttons, and location sharing using Digital Bot Connector (v2).
To set up **Genesys Cloud CX Messaging** as a channel, use your account on the [Genesys Cloud](https://genesys.my.site.com/customercare/RequestAccount) Platform and enable a webhook for the platform to receive messages.
## Pre-requisites for Digital Bot Connector v2
Before you configure the integration, ensure that the following prerequisites are met:
* Ensure that the **Digital Bot Connector** is available in your Genesys Cloud organization. If the integration isnt visible, it may still be in Limited Availability (LA). Contact your Genesys Cloud Account Executive to enable it.
* Ensure that the user performing the configuration has the `Integration > BotConnector > View` and `Integration > BotConnector > Send` permissions, or is assigned the **Integration Admin** role.
## Step 1: Create a Bot Connector
A **Bot Connector integration** enables your bot to exchange messages with the Genesys Agent System configured on the Platform by using industry-standard REST and JSON over HTTPS.
1. Log in to the [Genesys Developer Portal](https://login.mypurecloud.com/).
2. Create a Bot Connector with the steps below:
3. **On the Genesys Cloud CX Admin portal**
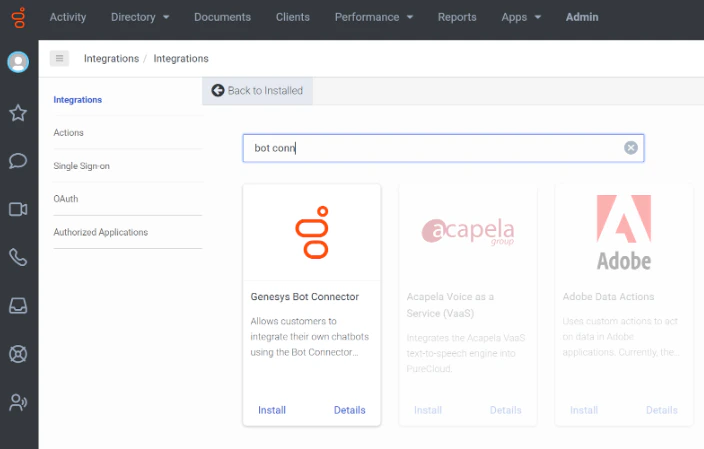
1. In the Genesys Cloud Admin portal, navigate to **Admin** > **Integrations**.
2. Use the **+ Integrations** button to find integration options.
3. Search for “bot connector” and find the **Genesys Bot Connector**. Install it to your instance.
 4. **On the Platform**
1. On the Platform, navigate to **Channels & Flows** > **Channels** > **Digital** > **All** > **Genesys Cloud CX Messaging**.
2. Copy the **Webhook URL** from the **Configurations** section of the Platform for the Genesys Cloud CX Messaging Channel screen.
5. **On the Genesys Cloud CX Admin portal**
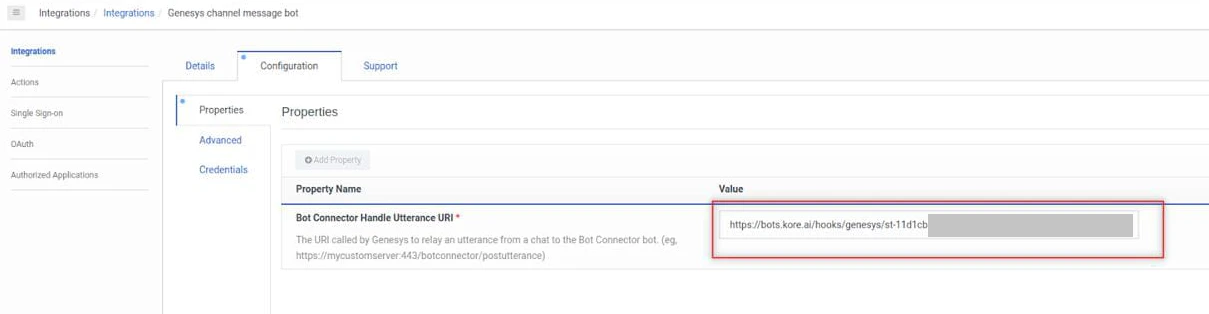
1. Go back to the Genesys Admin portal. In the **Properties** section under **Configuration** for the Bot Connector, paste the webhook in the **Value** field for **Bot Connector Handle Utterance URI**.
4. **On the Platform**
1. On the Platform, navigate to **Channels & Flows** > **Channels** > **Digital** > **All** > **Genesys Cloud CX Messaging**.
2. Copy the **Webhook URL** from the **Configurations** section of the Platform for the Genesys Cloud CX Messaging Channel screen.
5. **On the Genesys Cloud CX Admin portal**
1. Go back to the Genesys Admin portal. In the **Properties** section under **Configuration** for the Bot Connector, paste the webhook in the **Value** field for **Bot Connector Handle Utterance URI**.
 2. Leave this page open for additional configuration.
6. **On the Platform**
1. In the **Genesys Cloud login URL** field under **Configuration**, provide the URL of your Genesys AWS Region, which will allow the platform to route the conversation requests correctly. This is a **mandatory field.** You can find the URL of your region through the link provided in the field description on the screen.
2. Leave the **Genesys Cloud CX Messaging** channel configuration open for further configuration.
## Step 2: Create an App on the Platform
Create an app on the platform. A JWT Token is created with the **clientId** and **clientSecret** credentials. For more information, read[ Adding the Web/Mobile Client Channel](/ai-for-service/channels/add-web-mobile-client) article.
1. Click the **Create App** link under the **Configurations** section of the **Genesys Cloud CX Messaging** Channel.
2. Use the **Client ID** and **Client Secret** value of the new app to create a JWT token using the steps mentioned[ here](/ai-for-service/channels/add-wechat-channel).
3. Navigate back to the **Bot Connector** configuration screen in the Genesys Cloud Admin portal.
4. Navigate to the **Configuration** > **Credentials** section and click **Change**.
5. Create a new **Field Name** called **Authorization**.
6. Paste the following in the **Value** field on the **Change Credentials** window.
1. The word **bearer**
2. A space
3. The **JWT** created in before.
2. Leave this page open for additional configuration.
6. **On the Platform**
1. In the **Genesys Cloud login URL** field under **Configuration**, provide the URL of your Genesys AWS Region, which will allow the platform to route the conversation requests correctly. This is a **mandatory field.** You can find the URL of your region through the link provided in the field description on the screen.
2. Leave the **Genesys Cloud CX Messaging** channel configuration open for further configuration.
## Step 2: Create an App on the Platform
Create an app on the platform. A JWT Token is created with the **clientId** and **clientSecret** credentials. For more information, read[ Adding the Web/Mobile Client Channel](/ai-for-service/channels/add-web-mobile-client) article.
1. Click the **Create App** link under the **Configurations** section of the **Genesys Cloud CX Messaging** Channel.
2. Use the **Client ID** and **Client Secret** value of the new app to create a JWT token using the steps mentioned[ here](/ai-for-service/channels/add-wechat-channel).
3. Navigate back to the **Bot Connector** configuration screen in the Genesys Cloud Admin portal.
4. Navigate to the **Configuration** > **Credentials** section and click **Change**.
5. Create a new **Field Name** called **Authorization**.
6. Paste the following in the **Value** field on the **Change Credentials** window.
1. The word **bearer**
2. A space
3. The **JWT** created in before.
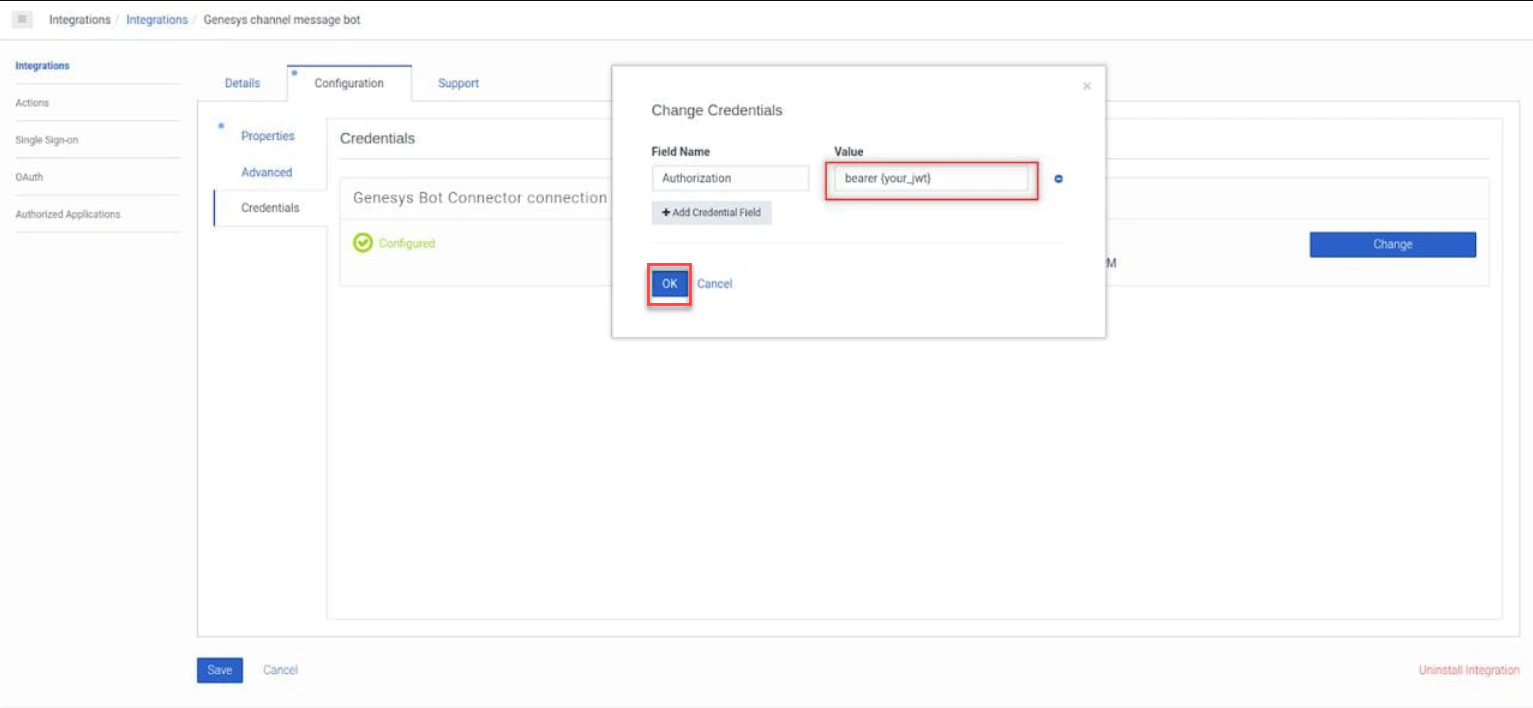 7. Click **Ok**.
Select HS256 for JWT Signing Algorithms Used For Client App Authentication.
## Step 3: Add OAuth Client
### For Bot Connector v1
Steps to create an app on the Genesys Developer Console:
1. Log in to the[ Genesys Developer Portal](https://login.mypurecloud.com/#/authenticate).
2. Navigate to **Admin > Integrations > OAuth**.
3. Click **Add Client** on the OAuth Screen.
4. Enter the **App Name** and **Description**.
5. Select the **Grant Types** as **Code Authorization**.
7. Click **Ok**.
Select HS256 for JWT Signing Algorithms Used For Client App Authentication.
## Step 3: Add OAuth Client
### For Bot Connector v1
Steps to create an app on the Genesys Developer Console:
1. Log in to the[ Genesys Developer Portal](https://login.mypurecloud.com/#/authenticate).
2. Navigate to **Admin > Integrations > OAuth**.
3. Click **Add Client** on the OAuth Screen.
4. Enter the **App Name** and **Description**.
5. Select the **Grant Types** as **Code Authorization**.
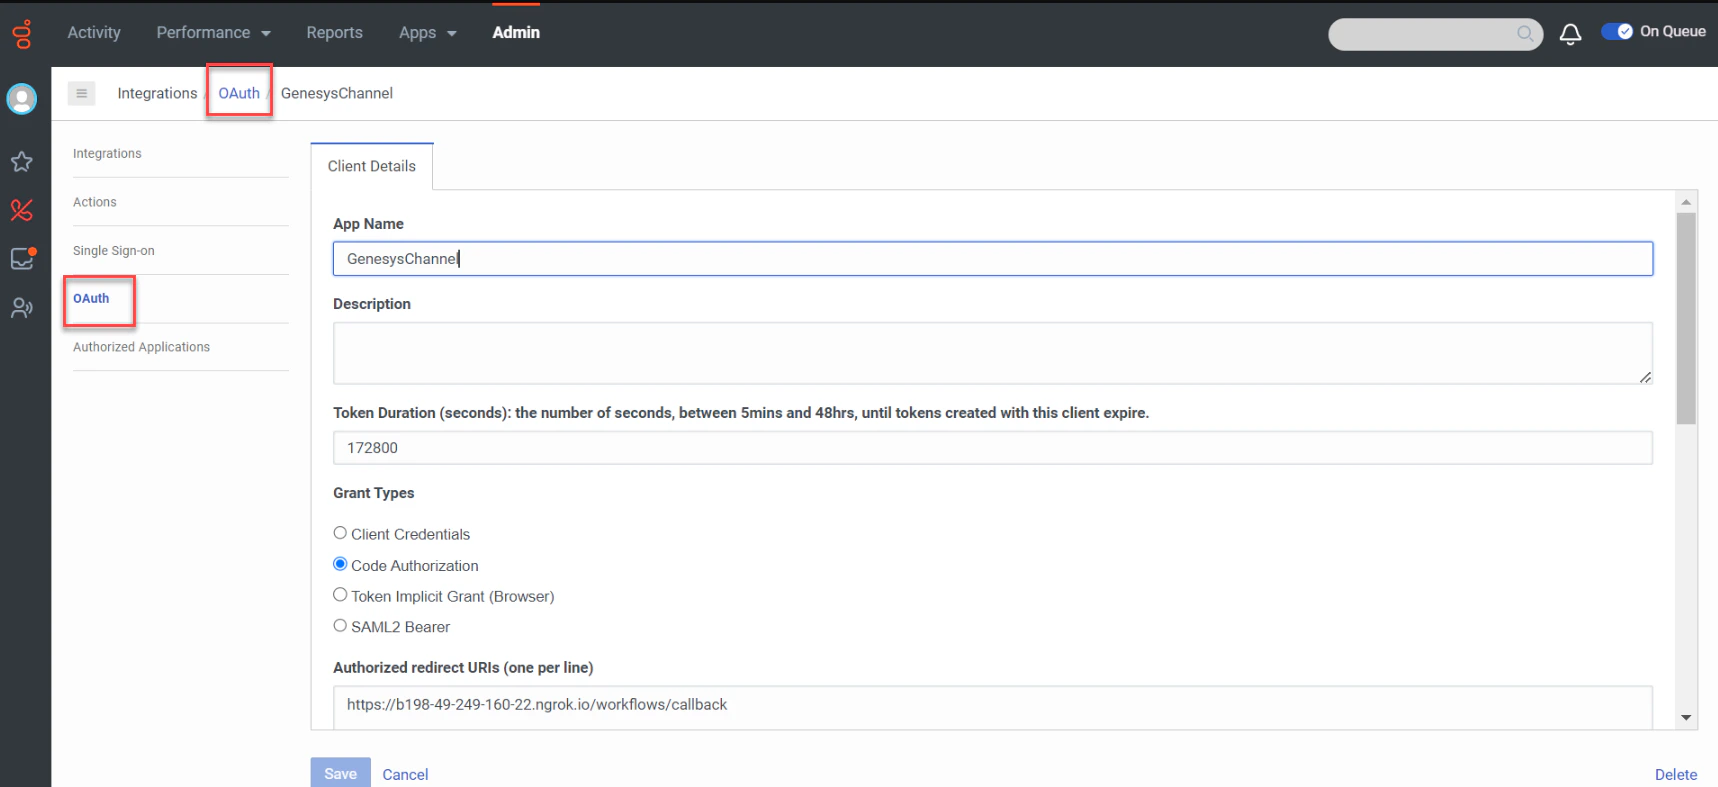 6. Copy the **Callback URL** from the **Configurations** tab of the Platform for Genesys Cloud CX Messaging channel.
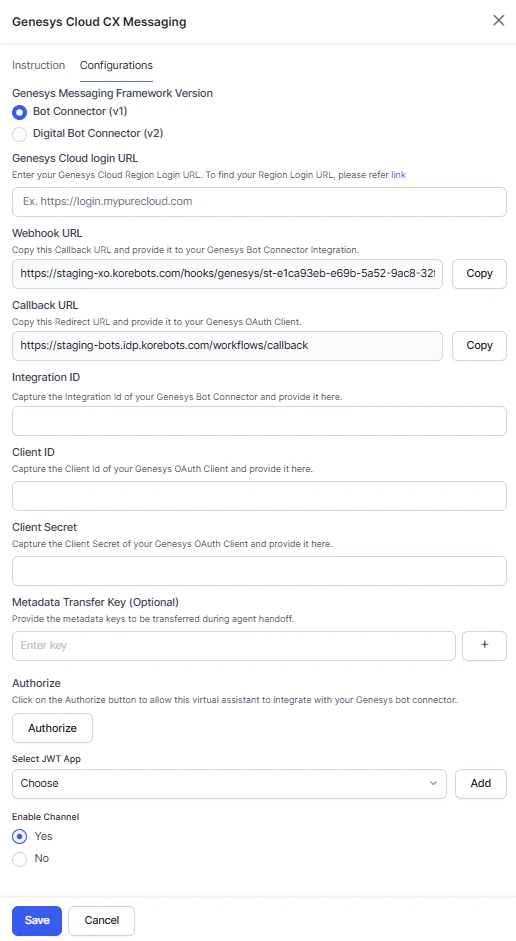 7. In the Genesys Console, go back to the **Integrations > OAuth** page and paste the **Callback URL** that you have copied in the **Authorized redirect URI** field.
8. Add the architect, integrations, and textbot scopes in the **Scopes** field.
7. In the Genesys Console, go back to the **Integrations > OAuth** page and paste the **Callback URL** that you have copied in the **Authorized redirect URI** field.
8. Add the architect, integrations, and textbot scopes in the **Scopes** field.
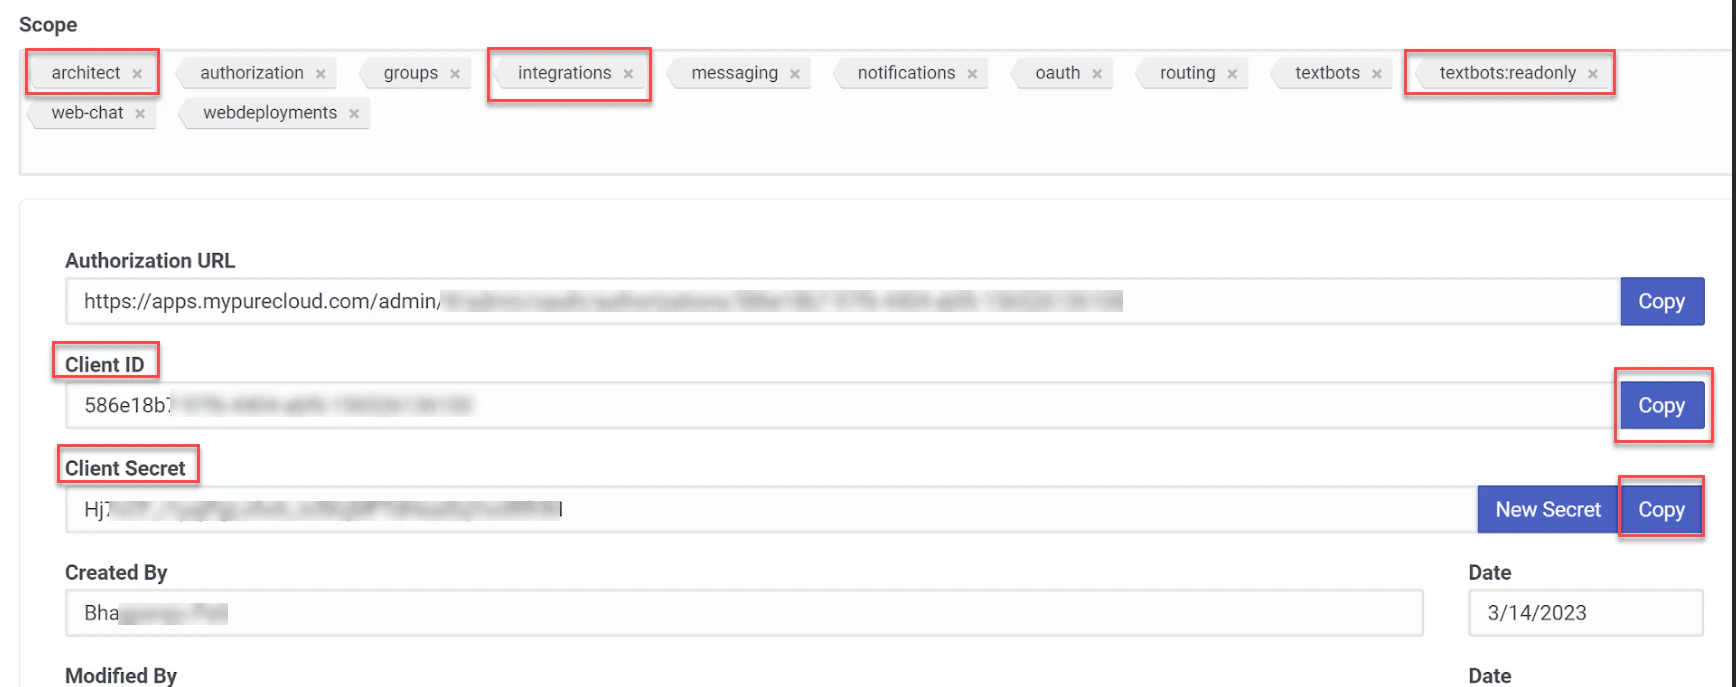 9. Click **Save** to update the OAuth Client configuration.
10. Copy the **Client ID** and **Client Secret** from the OAuth Client App page.
11. In the Platform, return to the **Channels & Flows** > **Channels** > **Digital** > **All** > **Genesys Cloud CX Messaging** > **Configurations** tab and paste the **Client ID** and **Client Secret** values.
12. (Optional) add the Metadata Transfer Key to be sent to Genesys Prebuild Agent Integration on the agent transfer. Refer to [Metadata Transfer to Genesys Prebuilt Agent Transfer](#metadata-transfer-to-genesys-prebuilt-agent-transfer).
13. Once you paste all the required credentials, click **Authorize** to validate the authorization.
14. If you are still logged into your Genesys Cloud instance, your current credentials are used. Otherwise, a login screen will open. Use valid credentials for the Genesys cloud instance you are configuring.
Your Bot Connector is created successfully!
### For Digital Bot Connector v2
Steps to create an app on the Genesys Developer Console:
1. Log in to the[ Genesys Developer Portal](https://login.mypurecloud.com/#/authenticate).
2. Navigate to **Admin > Integrations > OAuth**.
3. Click **Add Client** on the OAuth Screen.
4. Enter the **App Name** and **Description**.
5. Select the **Grant Types** as **Client Credentials**.
6. Copy the callback URL provided in the configurations tab of this page and paste it into the Authorized redirect URI field.
7. Add Architect and Integrations scopes in the scope field and save.
8. Copy the **Client ID** and **Client Secret** from the OAuth Client and paste them into the configurations tab of this page.
9. Click **Save** to update the OAuth Client configuration.
10. Copy the **Client ID** and **Client Secret** from the OAuth Client App page.
11. In the Platform, return to the **Channels & Flows** > **Channels** > **Digital** > **All** > **Genesys Cloud CX Messaging** > **Configurations** tab and paste the **Client ID** and **Client Secret** values.
12. (Optional) add the Metadata Transfer Key to be sent to Genesys Prebuild Agent Integration on the agent transfer. Refer to [Metadata Transfer to Genesys Prebuilt Agent Transfer](#metadata-transfer-to-genesys-prebuilt-agent-transfer).
13. Once you paste all the required credentials, click **Authorize** to validate the authorization.
14. If you are still logged into your Genesys Cloud instance, your current credentials are used. Otherwise, a login screen will open. Use valid credentials for the Genesys cloud instance you are configuring.
Your Bot Connector is created successfully!
### For Digital Bot Connector v2
Steps to create an app on the Genesys Developer Console:
1. Log in to the[ Genesys Developer Portal](https://login.mypurecloud.com/#/authenticate).
2. Navigate to **Admin > Integrations > OAuth**.
3. Click **Add Client** on the OAuth Screen.
4. Enter the **App Name** and **Description**.
5. Select the **Grant Types** as **Client Credentials**.
6. Copy the callback URL provided in the configurations tab of this page and paste it into the Authorized redirect URI field.
7. Add Architect and Integrations scopes in the scope field and save.
8. Copy the **Client ID** and **Client Secret** from the OAuth Client and paste them into the configurations tab of this page.
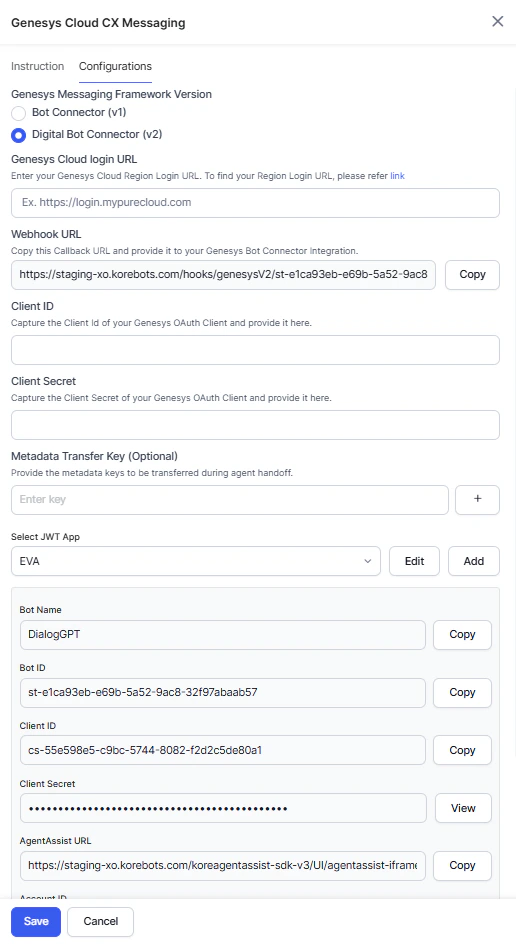 9. Click **Save**.
## Step 4: Create an Inbound Message Flow
To create an inbound message flow after connecting your AI Agent to the Connector, follow the steps below:
1. Navigate to **Admin** > **Architect** on the **Genesys Bot Connector** page.
2. Click the **Flows: Inbound Message** tab.
3. Click the Add button.
4. In the **Create Inbound Message Flow** dialog, enter the values for the required fields.
5. Click **Create Flow**.
6. After creating the Inbound Message Flow, follow the steps below:
* Click the flow you’ve created in the list.
* Click the **Initial State** icon on the top menu.
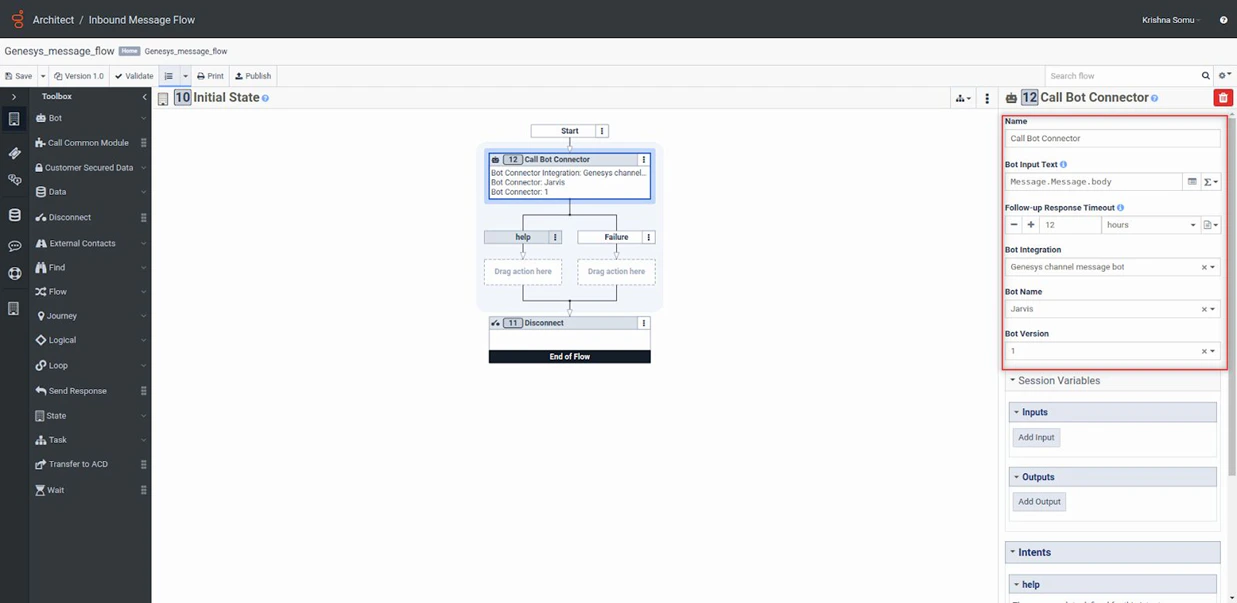
* Select the **Call Bot Connector** option by navigating to **Start** > **Toolbox** > **Bot**.
9. Click **Save**.
## Step 4: Create an Inbound Message Flow
To create an inbound message flow after connecting your AI Agent to the Connector, follow the steps below:
1. Navigate to **Admin** > **Architect** on the **Genesys Bot Connector** page.
2. Click the **Flows: Inbound Message** tab.
3. Click the Add button.
4. In the **Create Inbound Message Flow** dialog, enter the values for the required fields.
5. Click **Create Flow**.
6. After creating the Inbound Message Flow, follow the steps below:
* Click the flow you’ve created in the list.
* Click the **Initial State** icon on the top menu.
* Select the **Call Bot Connector** option by navigating to **Start** > **Toolbox** > **Bot**.
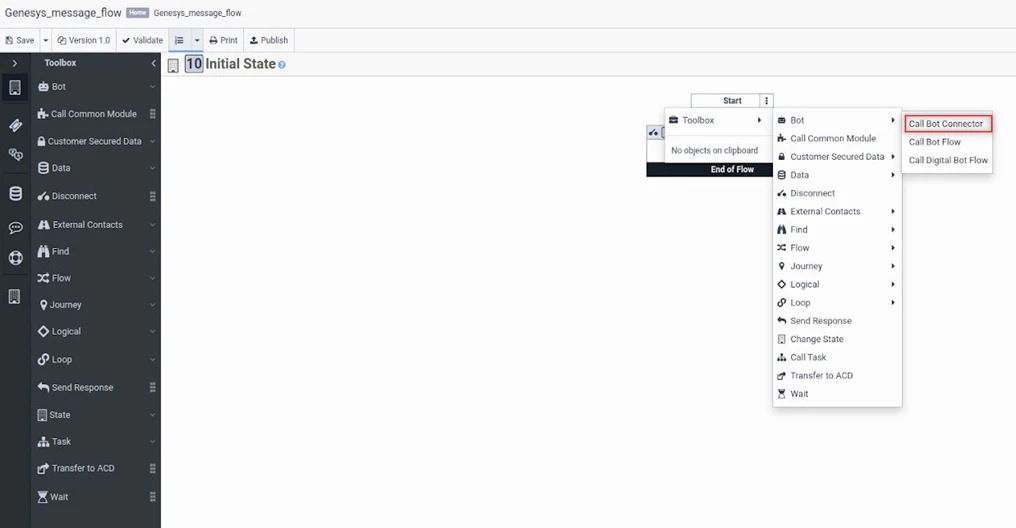 * Select the bot connector and the relevant App from the list.
* Enter values for the given fields.
* Select the bot connector and the relevant App from the list.
* Enter values for the given fields.
 7. Click **Publish** on the top panel.
## Step 5: Configure the Messenger SDK
After creating the inbound messaging flow, you should configure and deploy the messenger with the steps below:
1. In the Genesys Cloud CX Admin portal, navigate to **Admin** > **Message** > **Messenger Deployments**.
2. Enter the values for **Name** and **Description**.
3. Set **Status** to **Active**.
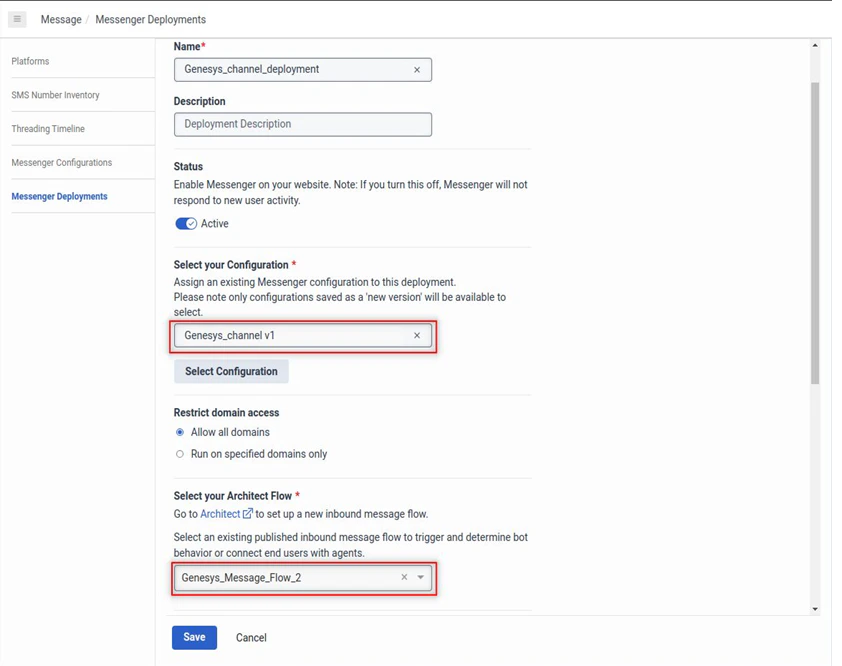
4. For **Select your Configuration**, select the **Messenger Configuration** to assign it to the deployment.
5. For **Restrict Domain Access**, select **Allow all domains**.
6. For **Select your Architect Flow**, select your Message Flow created in the previous step.
7. Click **Save**.
The system routes the message sent by the user via the **Genesys Messenger** to the message flow.
7. Click **Publish** on the top panel.
## Step 5: Configure the Messenger SDK
After creating the inbound messaging flow, you should configure and deploy the messenger with the steps below:
1. In the Genesys Cloud CX Admin portal, navigate to **Admin** > **Message** > **Messenger Deployments**.
2. Enter the values for **Name** and **Description**.
3. Set **Status** to **Active**.
4. For **Select your Configuration**, select the **Messenger Configuration** to assign it to the deployment.
5. For **Restrict Domain Access**, select **Allow all domains**.
6. For **Select your Architect Flow**, select your Message Flow created in the previous step.
7. Click **Save**.
The system routes the message sent by the user via the **Genesys Messenger** to the message flow.
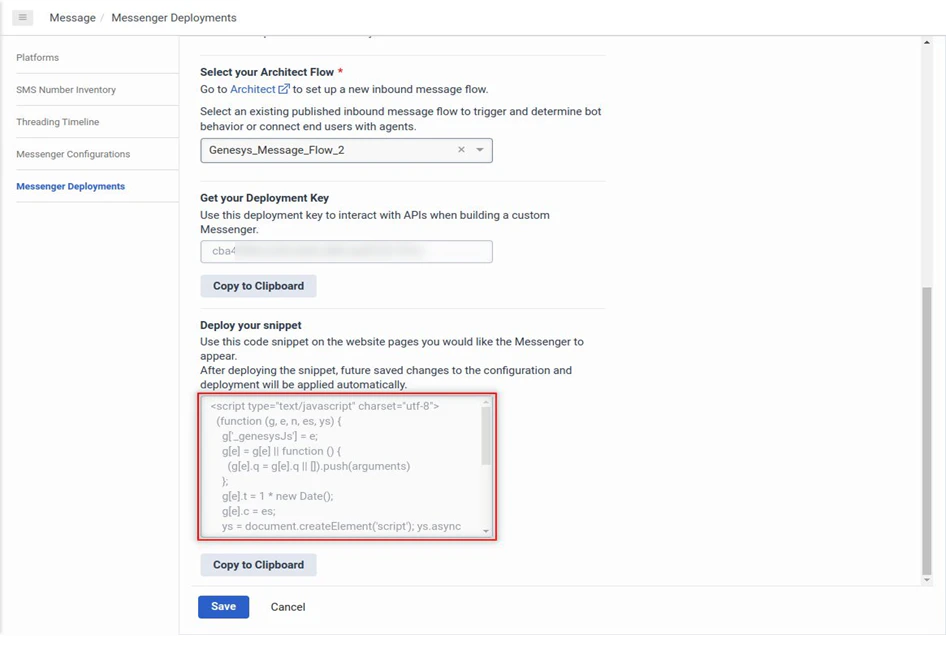
 8. Paste the script generated in the messenger deployment on the HTML page where you want to add the **Genesys Messenger**.
 ## Step 6: Configurations for Agent transfer
The bot designers should make sure that routing to the agent is properly configured in the Inbound Message flow once the agent transfer is initiated. Follow the steps:
1. Navigate to Admin > Architect > Flows > Inbound Message and select the enabled flow.
2. Add the “Transfer to ACD” node under Talk to Agent > Send Response flow.
3. Select the “Transfer to ACD” node and select the Queue to handle the agent transfer.
## Step 7: Enable the Channel
After you’ve configured the Genesys Messenger and deployed it for your AI Agent, you must enable the **Genesys Cloud CX Messaging** Channel by following the steps below:
1. Navigate to **Channels & Flows** > **Channels** > **Digital** > **All** > **Genesys Cloud CX Messaging** on the Platform.
2. Click the **Configurations** tab.
3. Select **YES** for **Enable Channel**.
4. Click **Save**.
## Step 8: Publish the App
After enabling the channel and verifying all the configurations, you can optionally publish the app for the new channel. Learn more about [Publishing your App](/ai-for-service/deployment/publishing-app).
## Additional Capabilities
### Metadata Transfer to Genesys Prebuilt Agent Transfer
The Platform supports metadata transfer from the Genesys Cloud CX Messaging channel to the Genesys Prebuilt Agent Transfer integration during agent handoff. This metadata can include customer details, conversation identifiers, account information, or any other bot slot values required in Genesys.
Use the `GenesysMetaData` object with `agentUtils.setMetaInfo` to pass context to agents during handoffs. This can be called anywhere the platform supports JavaScript.
Sample script (Script node):
```js theme={null}
let metaData = {
CustomerID: "C12345",
Intent: "BillingSupport",
Language: "en",
QueueName: "BillingQueue"
};
agentUtils.setMetaInfo("GenesysMetaData", JSON.stringify(metaData));
```
To enable metadata transfer successfully, configure and synchronize slot variables between the Platform and the Genesys Architect flow.
**Map slot variables in the Genesys Architect portal**
Whenever you add, remove, or rename slot variables (Metadata Transfer Key) in the Platform, complete the following steps:
1. Open the Genesys Architect flow in edit mode and keep the flow open.
2. In the Platform, navigate to the Genesys Cloud CX Messaging channel configuration.
3. Add or update the Metadata Transfer Keys (slot variables), and then save the configuration. When you save the configuration, the Platform publishes the updated Bot List Schema to Genesys. Example slot variables are`name` and `email`.
4. In the Genesys Architect portal, verify that the updated slots appear under the **Default Kore Agent Intent** action.
5. Map the slots to Architect flow variables. Example mappings are:
* `name` → `Flow.CustomerName`
* `email` → `Flow.CustomerEmail`
6. Update the **Set Participant Data** action to pass the mapped flow variables as Genesys Participant Data.
7. Publish the Architect flow after completing the slot mappings and Participant Data configuration.
8. Configure `agentUtils.setMetaInfo("GenesysMetaData", JSON.stringify(metaData));` in the script node, upon agentTransfer, metadata should reflect in participant details for a particular interaction in the Genesys portal.
## Step 6: Configurations for Agent transfer
The bot designers should make sure that routing to the agent is properly configured in the Inbound Message flow once the agent transfer is initiated. Follow the steps:
1. Navigate to Admin > Architect > Flows > Inbound Message and select the enabled flow.
2. Add the “Transfer to ACD” node under Talk to Agent > Send Response flow.
3. Select the “Transfer to ACD” node and select the Queue to handle the agent transfer.
## Step 7: Enable the Channel
After you’ve configured the Genesys Messenger and deployed it for your AI Agent, you must enable the **Genesys Cloud CX Messaging** Channel by following the steps below:
1. Navigate to **Channels & Flows** > **Channels** > **Digital** > **All** > **Genesys Cloud CX Messaging** on the Platform.
2. Click the **Configurations** tab.
3. Select **YES** for **Enable Channel**.
4. Click **Save**.
## Step 8: Publish the App
After enabling the channel and verifying all the configurations, you can optionally publish the app for the new channel. Learn more about [Publishing your App](/ai-for-service/deployment/publishing-app).
## Additional Capabilities
### Metadata Transfer to Genesys Prebuilt Agent Transfer
The Platform supports metadata transfer from the Genesys Cloud CX Messaging channel to the Genesys Prebuilt Agent Transfer integration during agent handoff. This metadata can include customer details, conversation identifiers, account information, or any other bot slot values required in Genesys.
Use the `GenesysMetaData` object with `agentUtils.setMetaInfo` to pass context to agents during handoffs. This can be called anywhere the platform supports JavaScript.
Sample script (Script node):
```js theme={null}
let metaData = {
CustomerID: "C12345",
Intent: "BillingSupport",
Language: "en",
QueueName: "BillingQueue"
};
agentUtils.setMetaInfo("GenesysMetaData", JSON.stringify(metaData));
```
To enable metadata transfer successfully, configure and synchronize slot variables between the Platform and the Genesys Architect flow.
**Map slot variables in the Genesys Architect portal**
Whenever you add, remove, or rename slot variables (Metadata Transfer Key) in the Platform, complete the following steps:
1. Open the Genesys Architect flow in edit mode and keep the flow open.
2. In the Platform, navigate to the Genesys Cloud CX Messaging channel configuration.
3. Add or update the Metadata Transfer Keys (slot variables), and then save the configuration. When you save the configuration, the Platform publishes the updated Bot List Schema to Genesys. Example slot variables are`name` and `email`.
4. In the Genesys Architect portal, verify that the updated slots appear under the **Default Kore Agent Intent** action.
5. Map the slots to Architect flow variables. Example mappings are:
* `name` → `Flow.CustomerName`
* `email` → `Flow.CustomerEmail`
6. Update the **Set Participant Data** action to pass the mapped flow variables as Genesys Participant Data.
7. Publish the Architect flow after completing the slot mappings and Participant Data configuration.
8. Configure `agentUtils.setMetaInfo("GenesysMetaData", JSON.stringify(metaData));` in the script node, upon agentTransfer, metadata should reflect in participant details for a particular interaction in the Genesys portal.