> ## Documentation Index
> Fetch the complete documentation index at: https://koreai.mintlify.site/llms.txt
> Use this file to discover all available pages before exploring further.
# Adding the Google Assistant channel
[Back to Available Channels](/ai-for-service/channels/adding-channels-to-your-bot#available-channels)
The Google Assistant Conversational Actions will be deprecated on June 13, 2023. For details, see [Conversational Actions sunset](https://developers.google.com/assistant/ca-sunset/).
## Requirements
Google Assistant as a channel should ideally be enabled for AI Agents that are specifically built to work on voice-based channels. Ensure to review the following before you enable Google Assistant as a channel:
* You have an account that allows you to build a project in Actions on Google, link it to an agent in dialog flow, configure actions, and enable fulfillment using webhook integration.
* Ensure that your dialog tasks contain the Message node as the last node only.
* Alert task notifications are currently not supported.
* Some of the Hold & Resume options with explicit messages to the user won't work.
* Task execution won't be automatically resumed when users provide authorization using web forms. After providing authorization, users have to re-initiate the task.
* Web form-based responses aren't supported for Action, Information, and Alert tasks. and enable fulfillment using a webhook integration.
## Step 1: Create a Google Actions Project
1. Log in to [Actions on Google Console](https://developers.google.com/actions/), click **Go To Actions Console**.
2. Click **Add/import project**. Provide all the details in the required fields and click **Create Project**.
3. After your project is created, you are redirected to the project’s **Get Started** page.
4. On this page, you must select a category for your project. Select the project category as **Custom** and click **Next**.
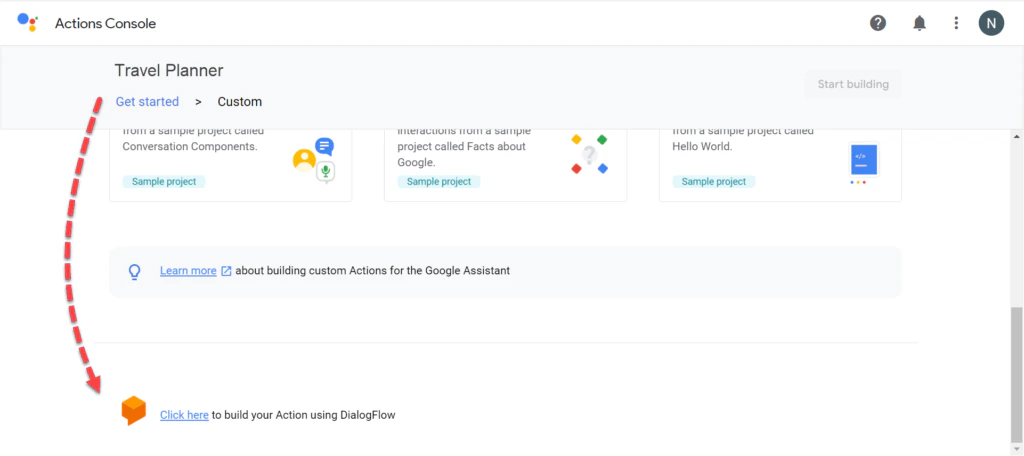
5. After your category is selected, you must select a project template. Scroll down to the bottom of the page and select **Click here to build your Action using DialogFlow**, this will redirect you to the project’s overview page.
 6. Click the **Modify languages in Settings** option to update the languages in which your actions are displayed.
7. Go back by clicking on the **Overview** tab on top of the page.
8. Now click **Decide how your Action is invoked** under the **Quick Setup**. This opens up the **Develop** tab.
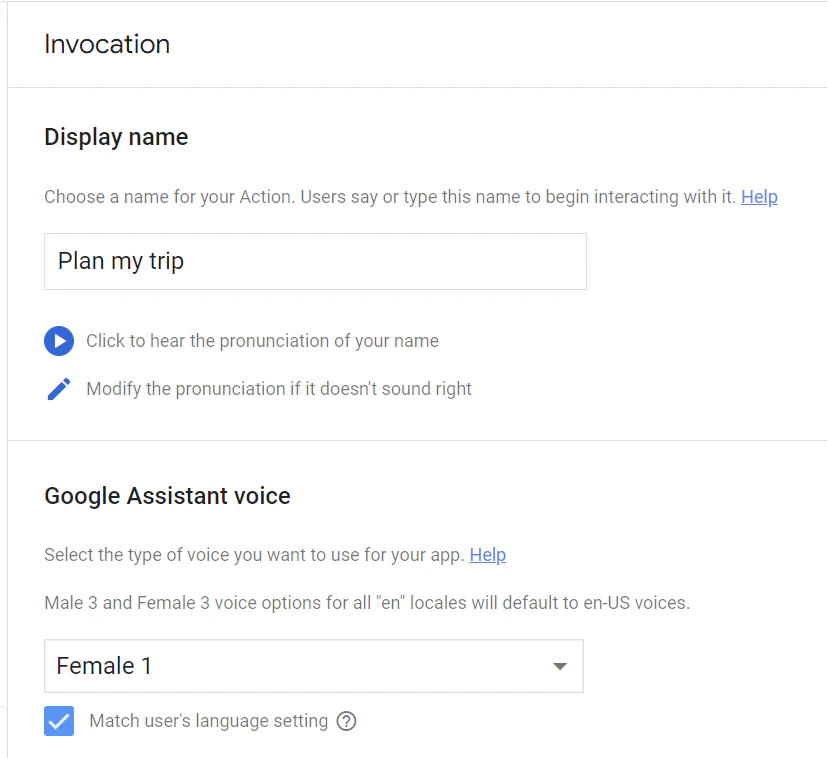
9. Now proceed to the **Invocation** option on the left pane. Provide a name that users use to invoke your actions.
10. Click **Save** on the top-left of the page. You may review other options available.
6. Click the **Modify languages in Settings** option to update the languages in which your actions are displayed.
7. Go back by clicking on the **Overview** tab on top of the page.
8. Now click **Decide how your Action is invoked** under the **Quick Setup**. This opens up the **Develop** tab.
9. Now proceed to the **Invocation** option on the left pane. Provide a name that users use to invoke your actions.
10. Click **Save** on the top-left of the page. You may review other options available.
 ## Step 2: Define Actions
1. Next, you must define Actions. Actions are the tasks that you intend your project to fulfill. Click **Actions** on the left pane and click **Add Your First Action**. A new window with options to either build a custom intent or to choose built-in intents is displayed. Choose an appropriate option as per your requirement.
2. **Actions on Google** will redirect you to the **Dialogflow** application for defining the action definition. If you are new to Dialogflow, you are requested to register on Dialogflow. Once your Dialogflow account is set up, you are redirected to the Console of Dialogflow to create a new Agent. Click **Create** to complete the creation of a new agent.
3. Once your agent is created, click **Intents** on the left pane. Dialogflow will add two intents by default viz. **Default Fallback Intent** and **Default Welcome Intent.**
* **Default Fallback Intent** is used to respond to any user input that doesn't match any of the other intents defined in the intent.
* **Default Welcome Intent** is used to respond to the user on the first input. If no other intent is created in Dialogflow, these two intents will be used to address all user inputs.
4. As you expect your AI Agent to fulfill all your user requests, you must turn on **Webhook Calls** for both these intents. Once enabled, Dialogflow will route all user requests reaching any of these two intents to your AI Agent.
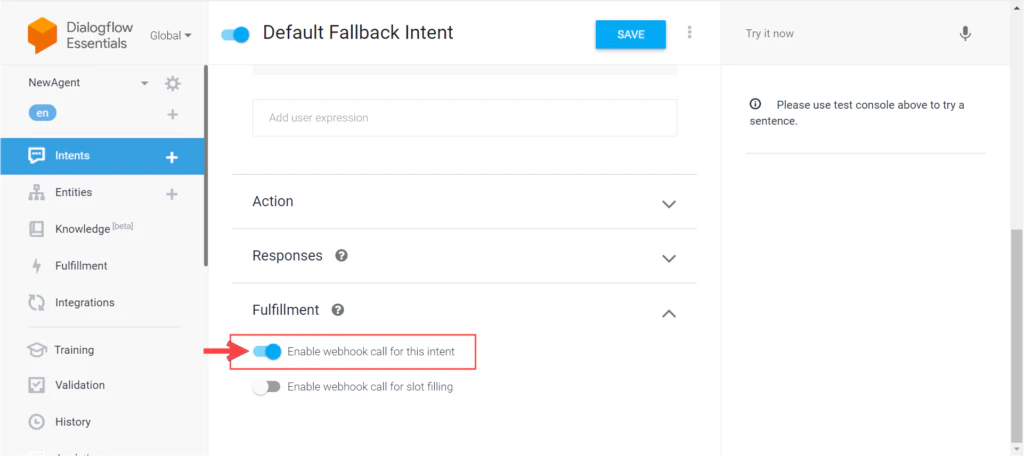
5. Select **Default Fallback Intent** to open the intent details and go to the end of the page. Under the **Fulfillment** section, turn on the toggle to **Enable webhook call for this intent** option. Click **Save** to update your changes.
6. Go back to the **Intents** on the left pane, select **Default Welcome Intent** to open the intent details, and go to the end of the page. Under the **Fulfillment** section, turn on the toggle to **Enable webhook call for this intent** option.
7. Click **Save** to update your changes.
## Step 2: Define Actions
1. Next, you must define Actions. Actions are the tasks that you intend your project to fulfill. Click **Actions** on the left pane and click **Add Your First Action**. A new window with options to either build a custom intent or to choose built-in intents is displayed. Choose an appropriate option as per your requirement.
2. **Actions on Google** will redirect you to the **Dialogflow** application for defining the action definition. If you are new to Dialogflow, you are requested to register on Dialogflow. Once your Dialogflow account is set up, you are redirected to the Console of Dialogflow to create a new Agent. Click **Create** to complete the creation of a new agent.
3. Once your agent is created, click **Intents** on the left pane. Dialogflow will add two intents by default viz. **Default Fallback Intent** and **Default Welcome Intent.**
* **Default Fallback Intent** is used to respond to any user input that doesn't match any of the other intents defined in the intent.
* **Default Welcome Intent** is used to respond to the user on the first input. If no other intent is created in Dialogflow, these two intents will be used to address all user inputs.
4. As you expect your AI Agent to fulfill all your user requests, you must turn on **Webhook Calls** for both these intents. Once enabled, Dialogflow will route all user requests reaching any of these two intents to your AI Agent.
5. Select **Default Fallback Intent** to open the intent details and go to the end of the page. Under the **Fulfillment** section, turn on the toggle to **Enable webhook call for this intent** option. Click **Save** to update your changes.
6. Go back to the **Intents** on the left pane, select **Default Welcome Intent** to open the intent details, and go to the end of the page. Under the **Fulfillment** section, turn on the toggle to **Enable webhook call for this intent** option.
7. Click **Save** to update your changes.
 ## Step 3: Enable Fulfillment
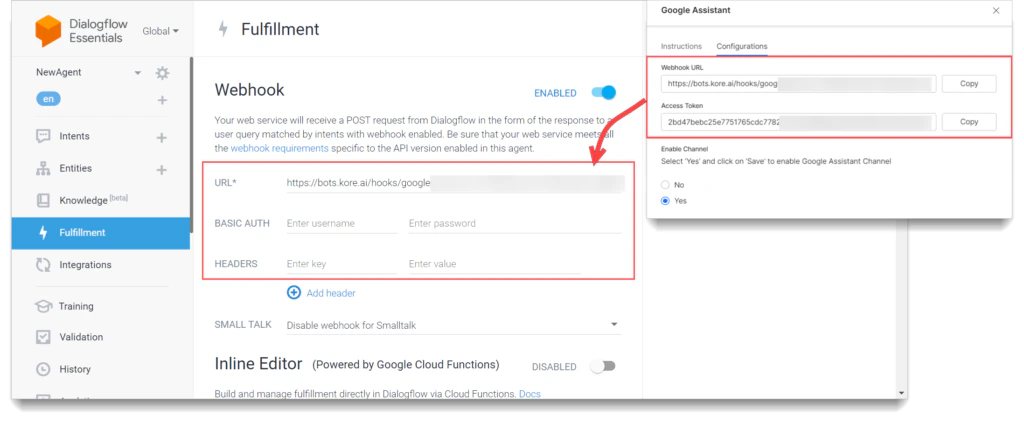
1. Next, Enable Fulfillment. To configure the webhook integration between your Dialogflow agent and AI Agent, click the **Fulfillment** option on the left pane and enable the **Webhook** toggle switch.
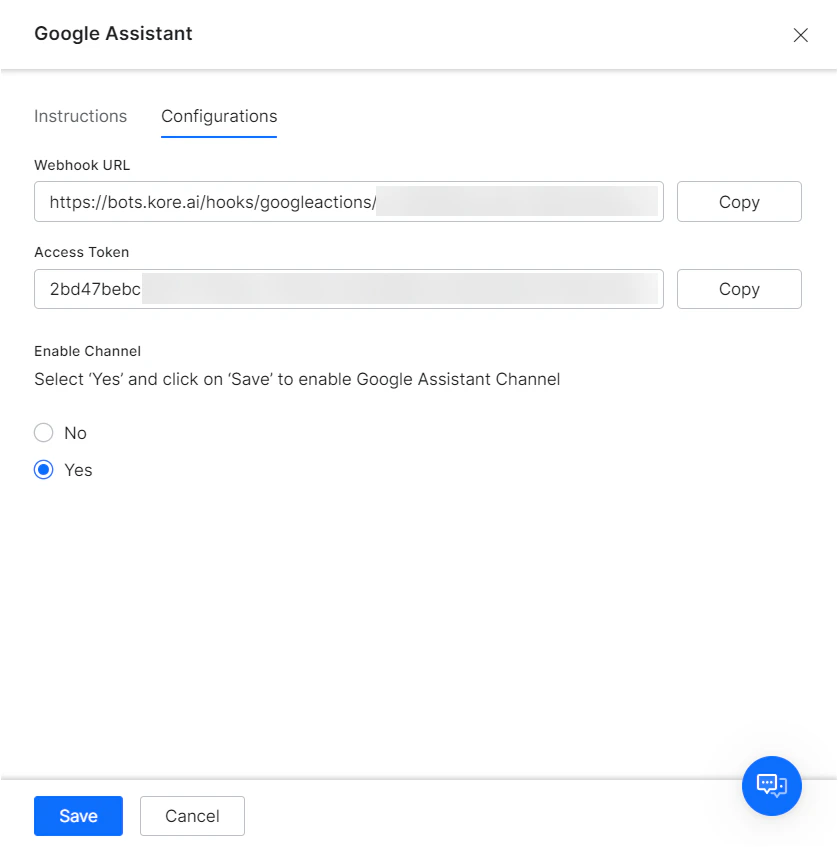
* Open the assistant in the Platform and access the **Channel Enablement** option and select the **Google Assistant** channel.
* Go to the **Configurations** tab and copy the **Webhook URL** provided there and update it in the **URL** field in the **Fulfillment** section of Dialogflow.
* From the **Configurations** tab of the Google Assistant channel page on the builder, copy the **Access Token**. This token must be added as a header key in the Dialogflow Fulfillment screen.
* Under the **Webhook** option of the **Fulfillment** section, add the key as **Access-token** and update the copied access token as the value for this key.
2. Go to the end of the page and click **Save**.
## Step 3: Enable Fulfillment
1. Next, Enable Fulfillment. To configure the webhook integration between your Dialogflow agent and AI Agent, click the **Fulfillment** option on the left pane and enable the **Webhook** toggle switch.
* Open the assistant in the Platform and access the **Channel Enablement** option and select the **Google Assistant** channel.
* Go to the **Configurations** tab and copy the **Webhook URL** provided there and update it in the **URL** field in the **Fulfillment** section of Dialogflow.
* From the **Configurations** tab of the Google Assistant channel page on the builder, copy the **Access Token**. This token must be added as a header key in the Dialogflow Fulfillment screen.
* Under the **Webhook** option of the **Fulfillment** section, add the key as **Access-token** and update the copied access token as the value for this key.
2. Go to the end of the page and click **Save**.
 ## Step 4: Test using Simulator
1. Your configurations to enable the channel are all set up now. **Actions on Google** provides a built-in simulator to test your assistant. For this, you must first enable few additional options of your Google account’s [Activity Controls](https://myaccount.google.com/activitycontrols) as per the details provided [here](https://developers.google.com/actions/dialogflow/first-app?hl=en#preview_the_app).
* After you have configured these controls, in the Dialogflow console, click **Integrations** on the left pane and then click the **Google Assistant**. A popup window with Google Assistant’s integration settings is displayed. Review the required settings and then click **Test** at the bottom of the window.
* This redirects you back to the Google Action Console and opens up the test tab. Now, you can start testing your assistant using Google’s in-built emulator.
2. Once you have configured the integration and tested your assistant, you must deploy your app for making it available to potential users. Proceed to the **Deploy** on the top and furnish all the required information and submit for release by clicking **Save** on the top-right of the page. Your action will be available on Google Assistant Explore only after your release submission is approved.
3. Proceed to the **Configurations** tab on the Google Assistant channel page to continue with the channel setup process.
## Step 5: Enable the channel
1. In the Platform, Go to **Channels & Flows** > **Channels** > **Digital** > **All** > **Google Assistant**.
2. Go to the **Configuration** tab, select Yes and Save your change to enable the channel.
## Step 4: Test using Simulator
1. Your configurations to enable the channel are all set up now. **Actions on Google** provides a built-in simulator to test your assistant. For this, you must first enable few additional options of your Google account’s [Activity Controls](https://myaccount.google.com/activitycontrols) as per the details provided [here](https://developers.google.com/actions/dialogflow/first-app?hl=en#preview_the_app).
* After you have configured these controls, in the Dialogflow console, click **Integrations** on the left pane and then click the **Google Assistant**. A popup window with Google Assistant’s integration settings is displayed. Review the required settings and then click **Test** at the bottom of the window.
* This redirects you back to the Google Action Console and opens up the test tab. Now, you can start testing your assistant using Google’s in-built emulator.
2. Once you have configured the integration and tested your assistant, you must deploy your app for making it available to potential users. Proceed to the **Deploy** on the top and furnish all the required information and submit for release by clicking **Save** on the top-right of the page. Your action will be available on Google Assistant Explore only after your release submission is approved.
3. Proceed to the **Configurations** tab on the Google Assistant channel page to continue with the channel setup process.
## Step 5: Enable the channel
1. In the Platform, Go to **Channels & Flows** > **Channels** > **Digital** > **All** > **Google Assistant**.
2. Go to the **Configuration** tab, select Yes and Save your change to enable the channel.
 After enabling the channel and verifying all the configurations, you can optionally publish the app for the new channel. Learn more about [Publishing your App](/ai-for-service/deployment/publishing-app).