> ## Documentation Index
> Fetch the complete documentation index at: https://koreai.mintlify.site/llms.txt
> Use this file to discover all available pages before exploring further.
# Adding Instagram Channel
[Back to Available Channels](/ai-for-service/channels/adding-channels-to-your-bot#available-channels)
You can set up the Instagram channel on the Platform to enable users to interact with your AI Agent using their Instagram accounts.
The setup process consists of the following steps:
1. [Step 1: Create an App on Meta for Developers](#step-1-create-an-app-on-meta-for-developers)
2. [Step 2: Associate the Facebook page with the Instagram Account](#step-2-associate-the-facebook-page-with-the-instagram-account)
3. [Step 3: Link the Facebook page and the Instagram Account to the App](#step-3-link-the-facebook-page-and-the-instagram-account-to-the-app)
4. [Step 4: Get Page Details](#step-4-get-page-details)
5. [Step 5: Setup Webhook](#step-5-setup-webhook)
6. [Step 6: Submit the App for Approval](#step-6-submit-the-app-for-approval)
**Prerequisites**
Before you begin, ensure you have:
* A [Facebook page](https://www.facebook.com/help/282489752085908/?helpref=popular_topics) linked to your Instagram account.
* Admin access to the Facebook page. (You can [create a new Page](https://en-gb.facebook.com/business/help/1199464373557428?id=418112142508425) from the Messenger Menu.)
* The Facebook page is connected (via the Messenger API) to the app you create on Meta for Developers.
## Step 1: Create an App on Meta for Developers
The app serves as the connection point between the Platform and Instagram.
Steps:
1. Log in to the [Meta for Developers](https://developers.facebook.com/) portal.
2. Navigate to the **My Apps** > **Create App** and select Add **Use Case**.
3. Under the “Looking for something else” section, choose **Other** and click **Next**. The Create an App Type page is displayed.
4. Choose **Business** and click **Next**. The Create an App Details page is displayed.
5. Enter the **App Name** and **App Contact Email**. In the **Business Portfolio** dropdown, select the **Business Manager account**.
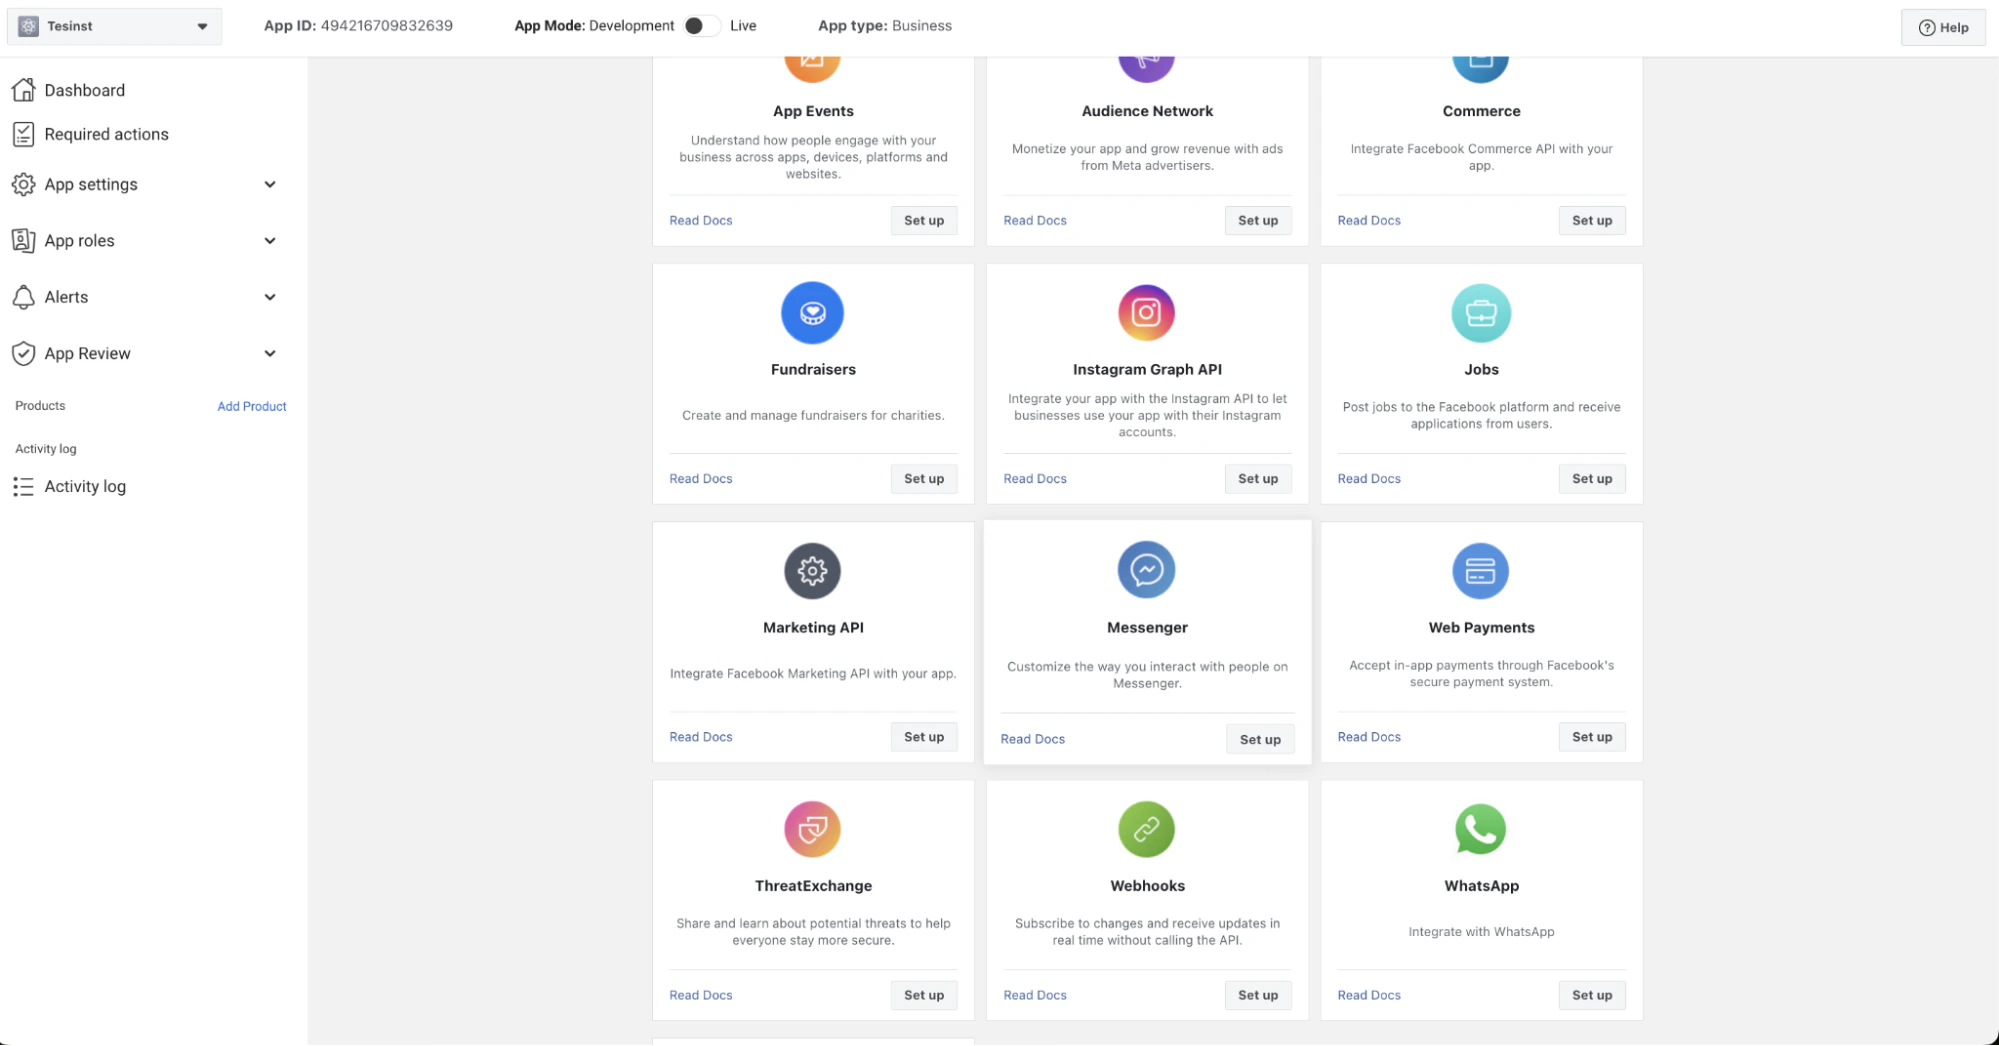
6. Click **Create App**. This might ask for your authentication. After authentication, the app is created, and the **Add Products to Your App** page is displayed.
 ## Step 2: Associate the Facebook page with the Instagram Account
The Facebook Page connects your Meta app to the Messenger API. This link enables message exchange through Instagram.
Steps:
1. Log in to the Facebook account.
2. Go to **Pages** and access the **Created Facebook Page**.
3. On the left side menu, in the **More tools**, click **Meta Business Suite**.
4. The Meta Business Suite page is displayed.
5. Next to the page name, click **Connect Instagram** and follow the steps. You might be asked to log in to your Instagram account. Once connected, the Connect Instagram option turns to Edit Instagram Profile.
## Step 3: Link the Facebook page and the Instagram Account to the App
Connect your Facebook page to the app you created on Meta for Developers, and link your Instagram account to the same app. The link lets your app interact with your Facebook page and Instagram account.
Steps:
1. Go to the **Add Products** **to** **Your** **App** page and click **Messenger** > **Setup** in the Meta for Developers portal.
2. Choose the **Messenger** product and click **Set Up** to add the product.
3. In the left navigation, go to **Products** > **Messenger** > **Instagram settings**.
4. In the Access Tokens section, click **Add or Remove Pages**.
5. You'll see a list of all the pages you admin.
6. Select at least one **Facebook page** and click **Continue**. The Instagram account selection page is displayed.
7. Select at least one **Instagram developer** account and click **Continue**. The Review Permissions page is displayed.
8. Review the Permissions and click **Save**. The App Connected page is displayed.
## Step 4: Get Page Details
The app's configuration settings from the Meta for Developers portal are used in the Platform.
1. After linking a page with an app, generate an Access Token from the Token Generation section in the Meta for Developers portal.
2. Click on the **Generate Token**. The Token Generated pop-up is displayed.
## Step 2: Associate the Facebook page with the Instagram Account
The Facebook Page connects your Meta app to the Messenger API. This link enables message exchange through Instagram.
Steps:
1. Log in to the Facebook account.
2. Go to **Pages** and access the **Created Facebook Page**.
3. On the left side menu, in the **More tools**, click **Meta Business Suite**.
4. The Meta Business Suite page is displayed.
5. Next to the page name, click **Connect Instagram** and follow the steps. You might be asked to log in to your Instagram account. Once connected, the Connect Instagram option turns to Edit Instagram Profile.
## Step 3: Link the Facebook page and the Instagram Account to the App
Connect your Facebook page to the app you created on Meta for Developers, and link your Instagram account to the same app. The link lets your app interact with your Facebook page and Instagram account.
Steps:
1. Go to the **Add Products** **to** **Your** **App** page and click **Messenger** > **Setup** in the Meta for Developers portal.
2. Choose the **Messenger** product and click **Set Up** to add the product.
3. In the left navigation, go to **Products** > **Messenger** > **Instagram settings**.
4. In the Access Tokens section, click **Add or Remove Pages**.
5. You'll see a list of all the pages you admin.
6. Select at least one **Facebook page** and click **Continue**. The Instagram account selection page is displayed.
7. Select at least one **Instagram developer** account and click **Continue**. The Review Permissions page is displayed.
8. Review the Permissions and click **Save**. The App Connected page is displayed.
## Step 4: Get Page Details
The app's configuration settings from the Meta for Developers portal are used in the Platform.
1. After linking a page with an app, generate an Access Token from the Token Generation section in the Meta for Developers portal.
2. Click on the **Generate Token**. The Token Generated pop-up is displayed.
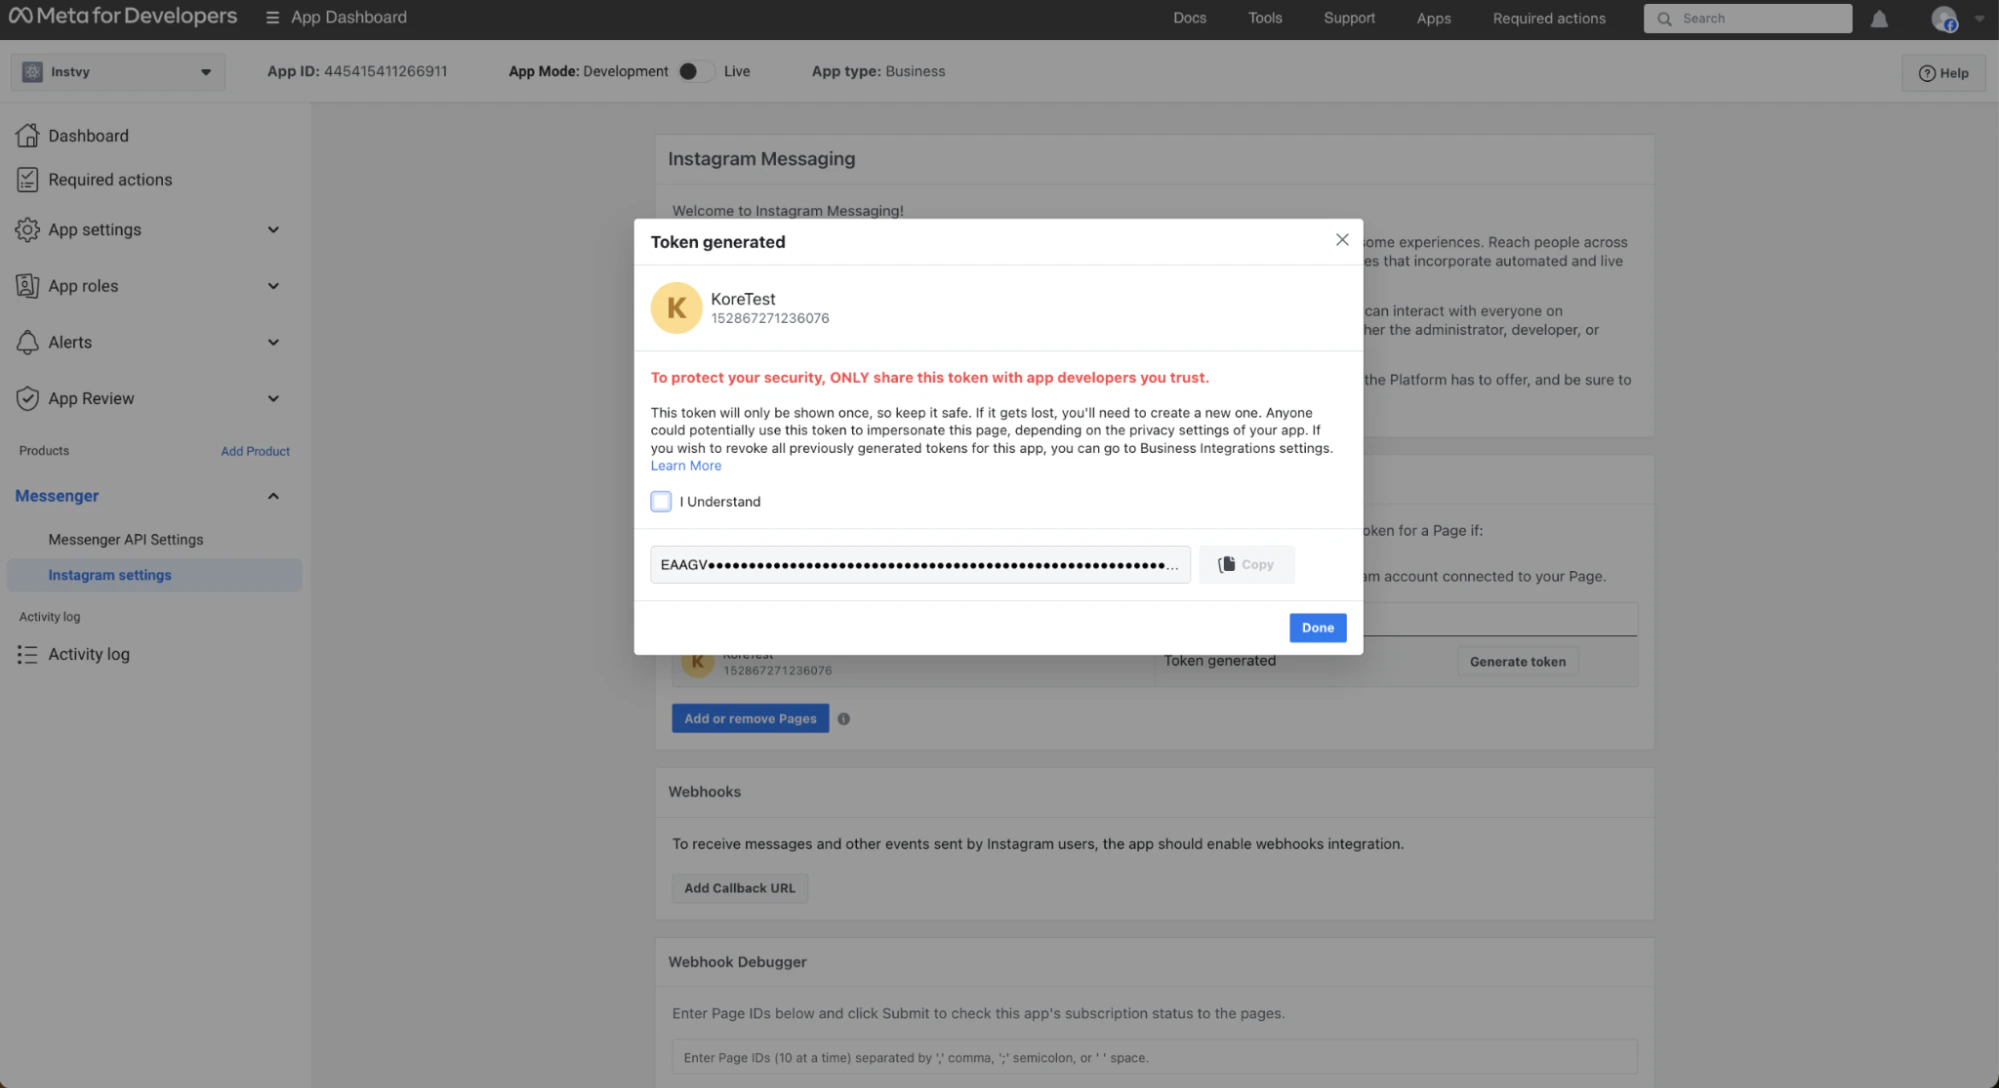 3. Select the I Understand checkbox. The token appears.
Copy the token as required while configuring the Messenger channel in the Platform.
4. Click **Done**.
5. Copy the following configuration settings from the Meta for Developers portal, as these are required in the Platform.
* **App Id**: Go to your **App** > **App Settings** > **Basic** > **App Id**.
* **App Secret**: Go to your **App** > **App Settings** > **Basic** > **App Secret**. Click **Show** next to view the app secret and the secret code.
* **Page ID**: Open the created Facebook page. Go to **About** > **Page Transparency** > **Page Id**.
## Step 5: Setup Webhook
Configure the Platform's Webhook callback URL in the Meta app. This allows the Platform to receive and respond to Instagram messages and interactions in real-time.
1. In the Meta Developer portal, navigate to your **My App** > **Created App** > **Products** > **Messenger** > **Instagram Settings**.
2. In the Webhooks section, click **Add CallBack URL**. The Edit Callback URL pop-up prompts for the information required to configure the Webhook between your app and the Platform.
3. In the Platform, select the assistant and go to **Channels & Flows** > **Channels** > **Digital** > **All** > **Instagram** > **Configurations tab**. Copy the “Webhook URL” and “Verify Token”.
4. In the Edit Callback URL pop-up, paste the Webhook URL in the Callback URL field and paste the Verify Token into the Verify Token field.
3. Select the I Understand checkbox. The token appears.
Copy the token as required while configuring the Messenger channel in the Platform.
4. Click **Done**.
5. Copy the following configuration settings from the Meta for Developers portal, as these are required in the Platform.
* **App Id**: Go to your **App** > **App Settings** > **Basic** > **App Id**.
* **App Secret**: Go to your **App** > **App Settings** > **Basic** > **App Secret**. Click **Show** next to view the app secret and the secret code.
* **Page ID**: Open the created Facebook page. Go to **About** > **Page Transparency** > **Page Id**.
## Step 5: Setup Webhook
Configure the Platform's Webhook callback URL in the Meta app. This allows the Platform to receive and respond to Instagram messages and interactions in real-time.
1. In the Meta Developer portal, navigate to your **My App** > **Created App** > **Products** > **Messenger** > **Instagram Settings**.
2. In the Webhooks section, click **Add CallBack URL**. The Edit Callback URL pop-up prompts for the information required to configure the Webhook between your app and the Platform.
3. In the Platform, select the assistant and go to **Channels & Flows** > **Channels** > **Digital** > **All** > **Instagram** > **Configurations tab**. Copy the “Webhook URL” and “Verify Token”.
4. In the Edit Callback URL pop-up, paste the Webhook URL in the Callback URL field and paste the Verify Token into the Verify Token field.
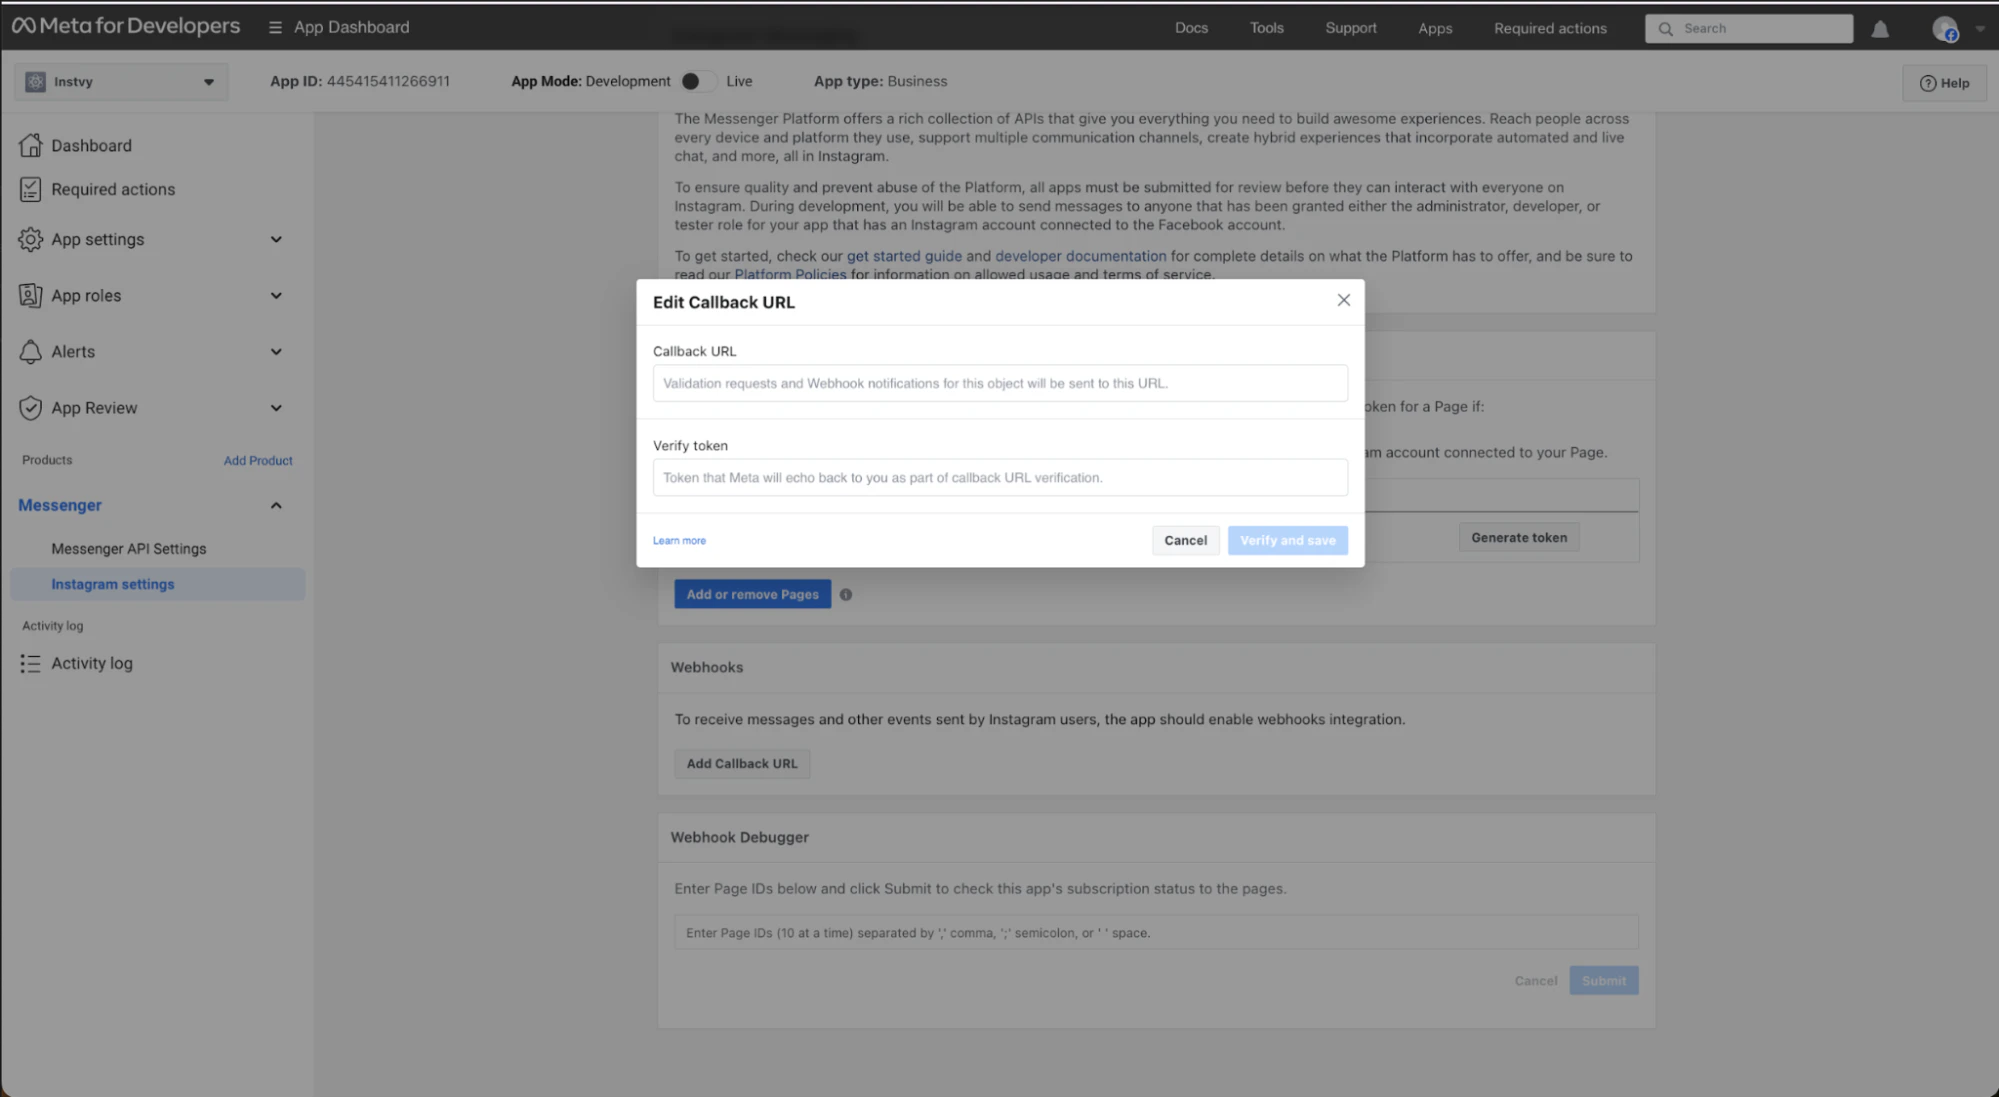 5. Click **Verify and Save**.
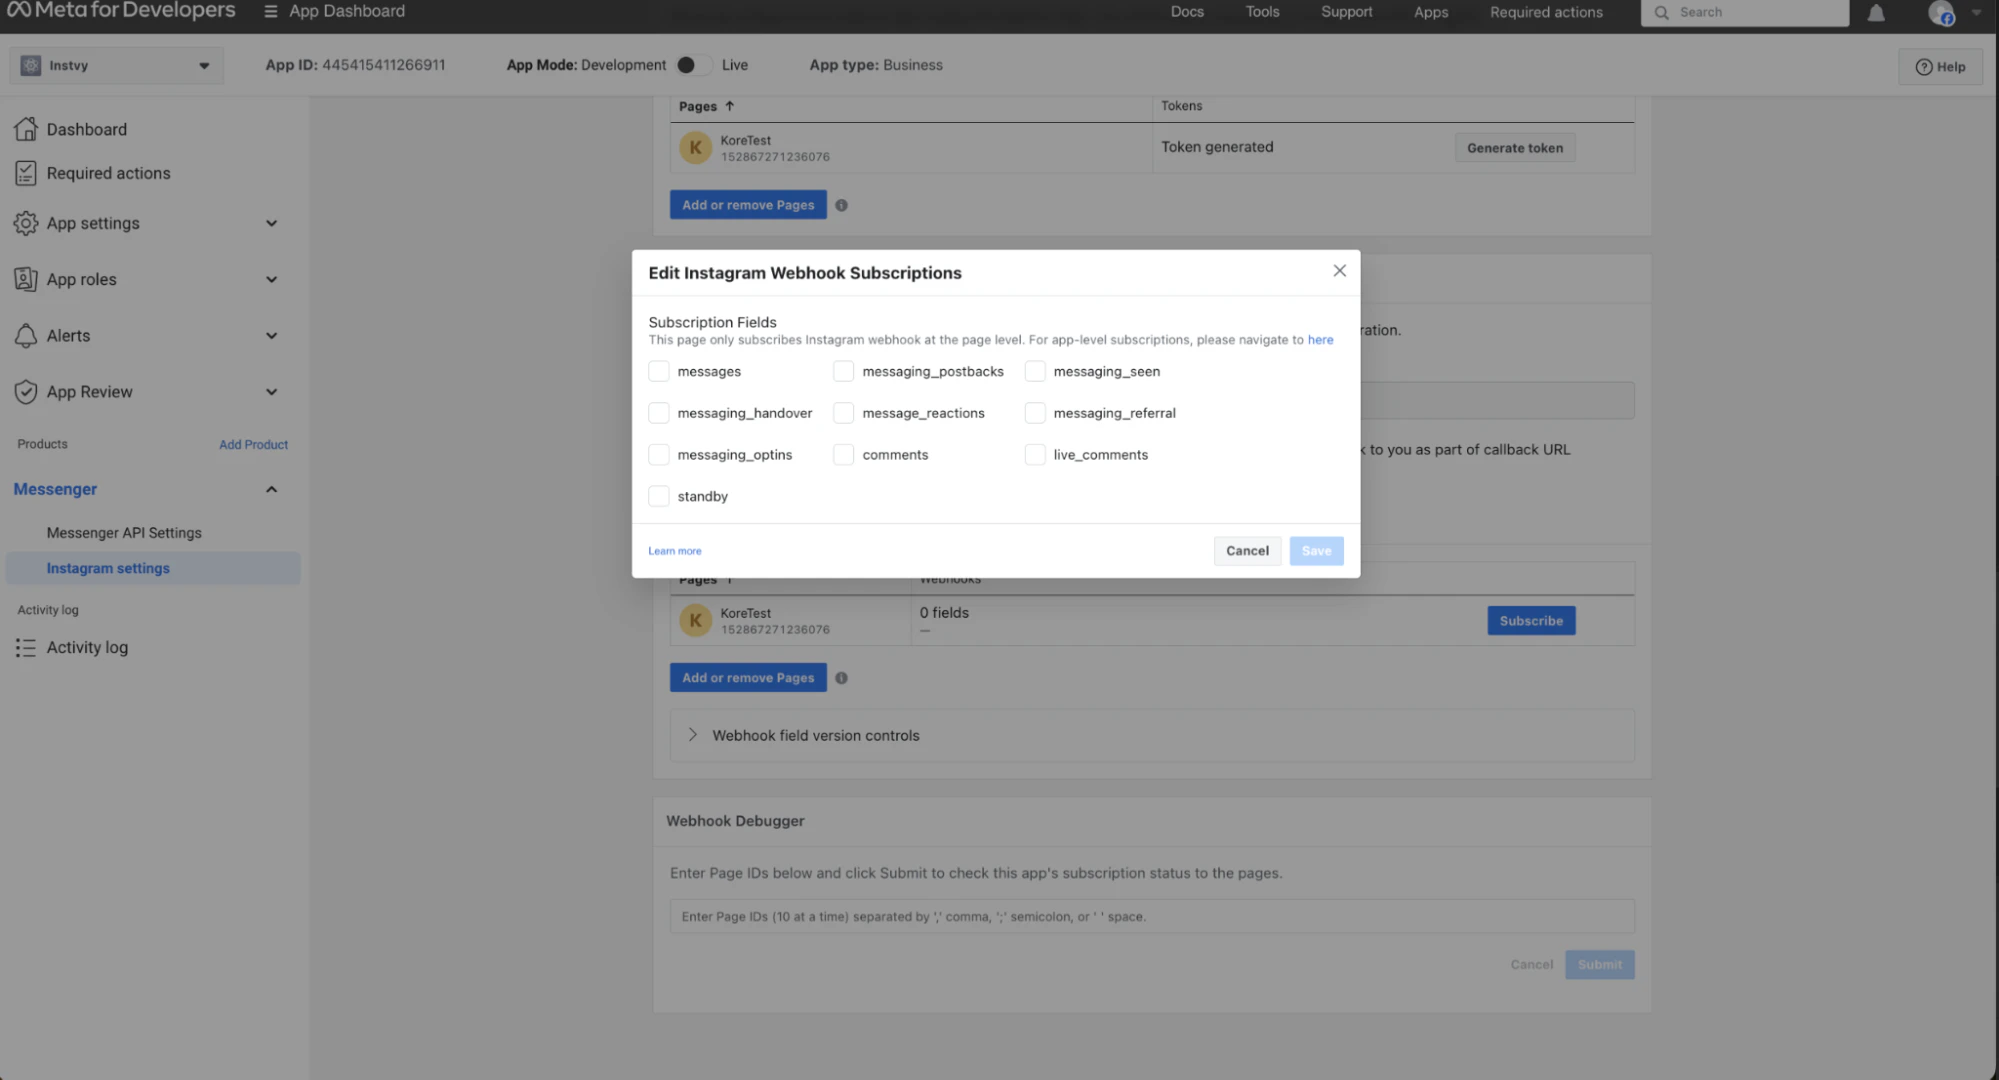
6. In the Webhooks section, click **Edit Subscriptions**. Select all the action fields and click **Save**. If the actions aren't subscribed after clicking on the save, click the **Webhooks** > **Subscribe button** displayed against the associated **Facebook Page**.
5. Click **Verify and Save**.
6. In the Webhooks section, click **Edit Subscriptions**. Select all the action fields and click **Save**. If the actions aren't subscribed after clicking on the save, click the **Webhooks** > **Subscribe button** displayed against the associated **Facebook Page**.
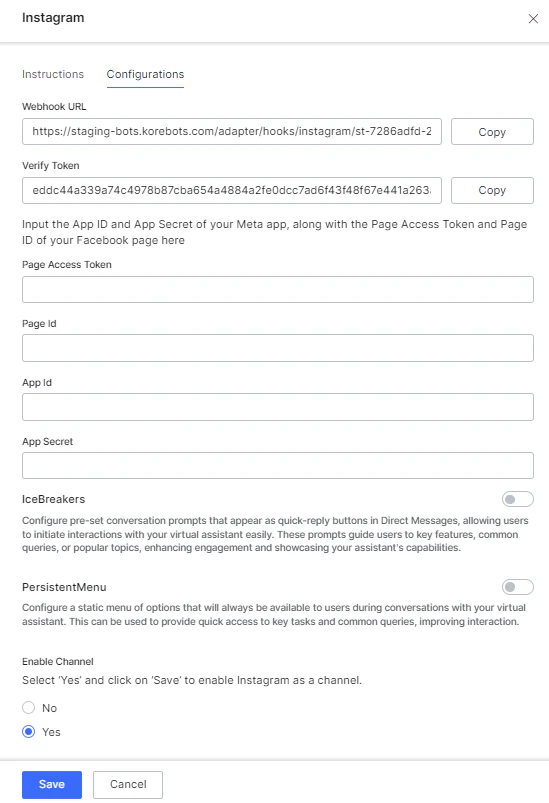 7. In the Platform, select the AI Agent and go to **Channels & Flows** > **Channels** > **Digital** > **All** > **Instagram** > **Configurations tab**.
 8. Enter **Page Access Token**, **Page Id**, **App Id**, and **App Secret.**
9. (Optional) Toggle the [IceBreaker](#icebreakers) and [PersistentMenu](#persistent-menu) if required.
1. If toggled, the sample JSON is displayed.
2. Edit the JSON as required.
10. Select **Yes** to enable the channel.
11. Click **Save**. The configuration saved message is displayed.
## Step 6: Submit the App for Approval
Submit the Meta Developer app for approval. See[ How to Submit Your App](https://developers.facebook.com/docs/messenger-platform/app-review#submission). Once approved, you can enable the Instagram channel for your AI Agent.
Add testers to test the Instagram channel before submitting the app for approval. To add, navigate to **App** > **App roles** > **Add People** > **Tester**.
After enabling the channel and verifying all the configurations, you can publish the app for the new channel. Learn more about [Publishing your App](/ai-for-service/deployment/publishing-app).
## Instagram Chat Features
### Icebreakers
Instagram [Icebreakers](https://developers.facebook.com/docs/messenger-platform/instagram/features/ice-breakers) are pre-set quick-reply options in Direct Messages that help users start conversations with your chatbot and explore its features.
### Persistent Menu
Configure a static [menu](https://developers.facebook.com/docs/messenger-platform/instagram/features/persistent-menu) of options that users can access anytime during conversations with your AI Agent. This menu provides quick access to key features and common queries, enhancing user interaction.
8. Enter **Page Access Token**, **Page Id**, **App Id**, and **App Secret.**
9. (Optional) Toggle the [IceBreaker](#icebreakers) and [PersistentMenu](#persistent-menu) if required.
1. If toggled, the sample JSON is displayed.
2. Edit the JSON as required.
10. Select **Yes** to enable the channel.
11. Click **Save**. The configuration saved message is displayed.
## Step 6: Submit the App for Approval
Submit the Meta Developer app for approval. See[ How to Submit Your App](https://developers.facebook.com/docs/messenger-platform/app-review#submission). Once approved, you can enable the Instagram channel for your AI Agent.
Add testers to test the Instagram channel before submitting the app for approval. To add, navigate to **App** > **App roles** > **Add People** > **Tester**.
After enabling the channel and verifying all the configurations, you can publish the app for the new channel. Learn more about [Publishing your App](/ai-for-service/deployment/publishing-app).
## Instagram Chat Features
### Icebreakers
Instagram [Icebreakers](https://developers.facebook.com/docs/messenger-platform/instagram/features/ice-breakers) are pre-set quick-reply options in Direct Messages that help users start conversations with your chatbot and explore its features.
### Persistent Menu
Configure a static [menu](https://developers.facebook.com/docs/messenger-platform/instagram/features/persistent-menu) of options that users can access anytime during conversations with your AI Agent. This menu provides quick access to key features and common queries, enhancing user interaction.