> ## Documentation Index
> Fetch the complete documentation index at: https://koreai.mintlify.site/llms.txt
> Use this file to discover all available pages before exploring further.
# Adding the LivePerson Channel
[Back to Available Channels](/ai-for-service/channels/adding-channels-to-your-bot#available-channels)
The Platform lets you easily connect with the LivePerson channel to quickly identify your customers’ intent and power your conversational experiences.
To add LivePerson as a channel to your AI Agent, you must add a app user in LivePerson and set up the integration. Adding the LivePerson channel to your AI Agent, allows end-users to interact with your assistant using their LivePerson account.
A LivePerson account with administrator credentials is required to complete this configuration.
Steps to enable the LivePerson channel:
## Step 1: Create A LivePerson Account
1. Go to the LivePerson account setup page and create a standard or an enterprise account. For more information, see [LivePerson documentation](https://developers.liveperson.com/get-started-with-automation.html#access-the-conversational-ai-applications).
2. On the Login page, log in with your admin account credentials as shown below.
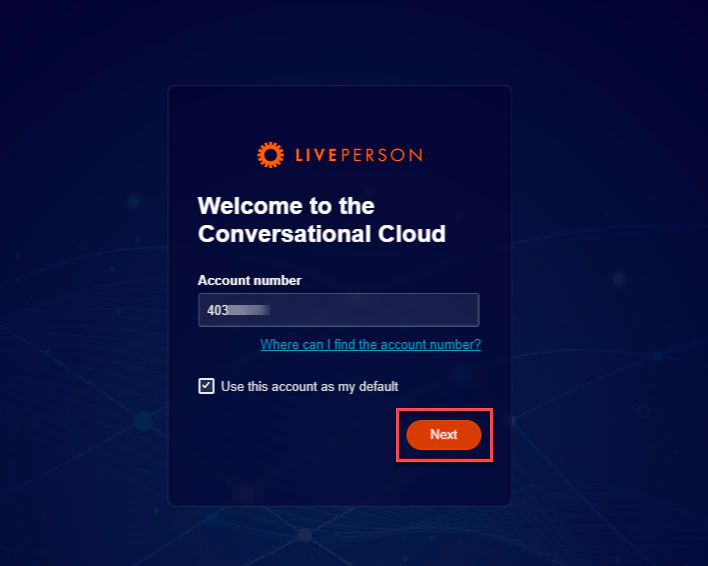 3. Click **Next** and enter your Login Name and password, then click Sign-in.
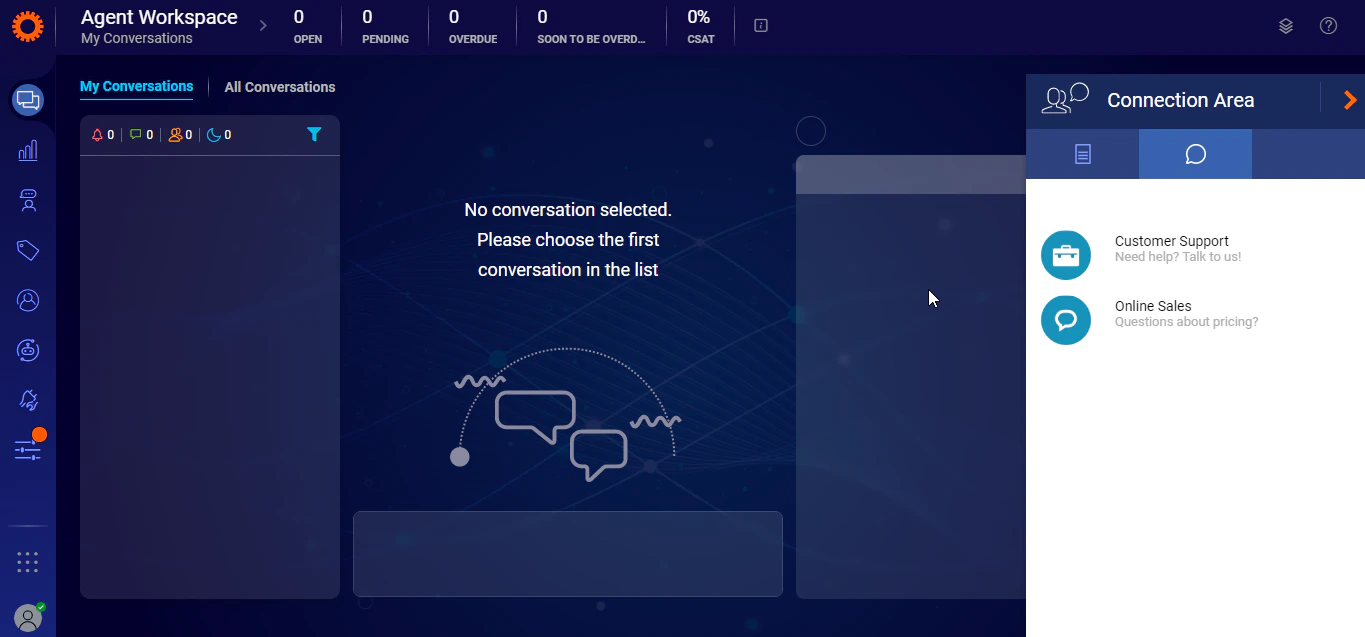
4. You are redirected to the Agent Workspace, as shown below.
3. Click **Next** and enter your Login Name and password, then click Sign-in.
4. You are redirected to the Agent Workspace, as shown below.
 ## Step 2: Add a skill in LivePerson
Once you have created an account, you must add a skill that you want to assign to an agent in LivePerson.
Steps to add a skill to an agent in LivePerson:
1. Sign in to your LivePerson account as an administrator and then select the **Manage Users** tab.
2. In the **Manage Users & Skills** tab, click **Add Skill** to create a new skill.
## Step 2: Add a skill in LivePerson
Once you have created an account, you must add a skill that you want to assign to an agent in LivePerson.
Steps to add a skill to an agent in LivePerson:
1. Sign in to your LivePerson account as an administrator and then select the **Manage Users** tab.
2. In the **Manage Users & Skills** tab, click **Add Skill** to create a new skill.
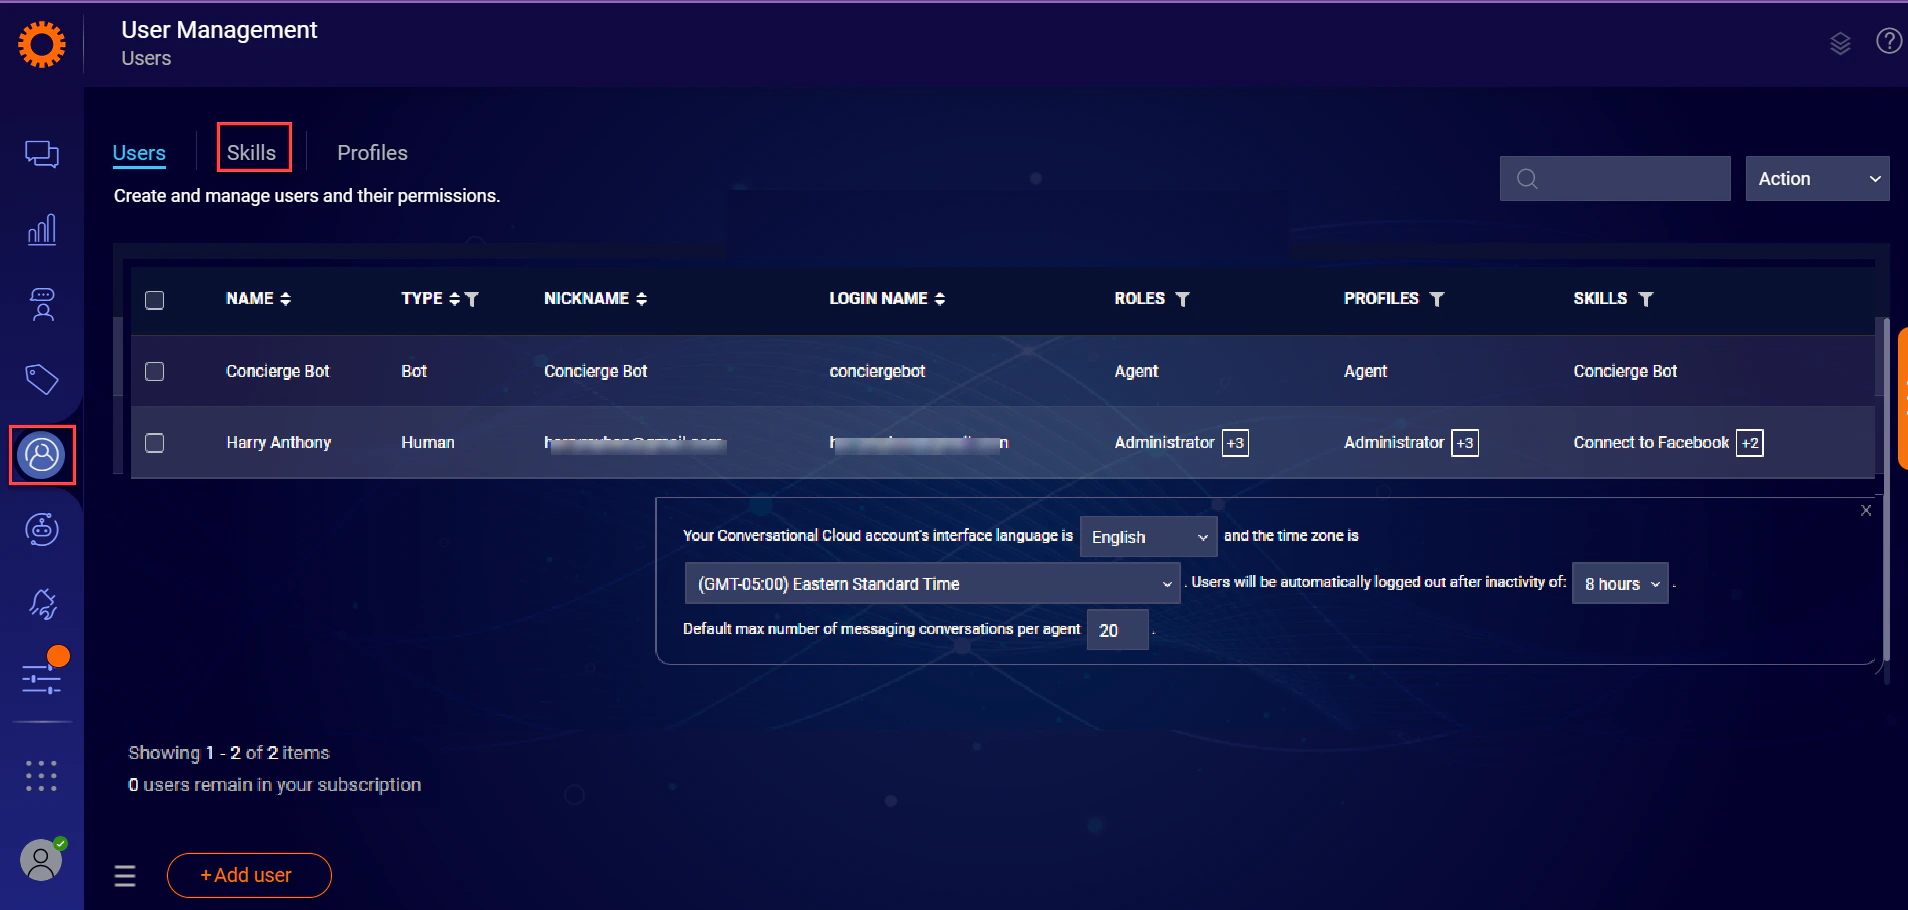 3. On the Skills page, click **+Add Skill** (at the bottom bar) and enter the details of the required skills.
4. Enter skill name as . For example, if your **AI Agent name** is **weather app**, then the skill name must be **weather\_skill**.
5. Enter a **Description** for the skill, and then unselect the check box - **Conversation assigned to skill can be transferred to other skills**.
6. Click **Save** to save the skill.
3. On the Skills page, click **+Add Skill** (at the bottom bar) and enter the details of the required skills.
4. Enter skill name as . For example, if your **AI Agent name** is **weather app**, then the skill name must be **weather\_skill**.
5. Enter a **Description** for the skill, and then unselect the check box - **Conversation assigned to skill can be transferred to other skills**.
6. Click **Save** to save the skill.
 7. Read more about [creating skills in LivePerson](https://knowledge.liveperson.com/admin-settings-skills-groups-connect-visitors-to-agents-by-skills.html/).
## Step 3: Add a user in LivePerson
Create a user and generate API keys that you can use to configure the LivePerson channel for this user.
Steps to add a user in LivePerson:
1. Sign in to the LivePerson admin account, and then go to **Manage Users & Skills** and click **Add User**.
2. On the Add User page, select the **User Type** as Bot.
3. Enter a Login Name, Email, Nickname, Employee ID, and Name. (The nickname and name are displayed on the screen in the user chat.)
7. Read more about [creating skills in LivePerson](https://knowledge.liveperson.com/admin-settings-skills-groups-connect-visitors-to-agents-by-skills.html/).
## Step 3: Add a user in LivePerson
Create a user and generate API keys that you can use to configure the LivePerson channel for this user.
Steps to add a user in LivePerson:
1. Sign in to the LivePerson admin account, and then go to **Manage Users & Skills** and click **Add User**.
2. On the Add User page, select the **User Type** as Bot.
3. Enter a Login Name, Email, Nickname, Employee ID, and Name. (The nickname and name are displayed on the screen in the user chat.)  4. Provide a **URL** for the app avatar.
5. Choose the Login method as **API Key**, and select the **Generate API Key** option from the **API key** drop-down list to generate a new API key.
4. Provide a **URL** for the app avatar.
5. Choose the Login method as **API Key**, and select the **Generate API Key** option from the **API key** drop-down list to generate a new API key.
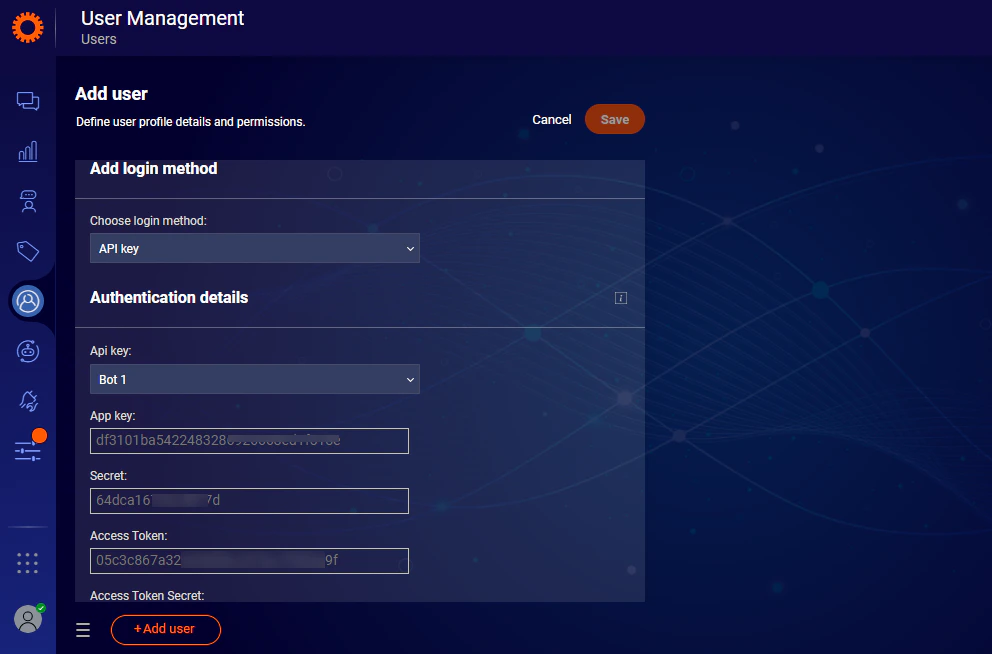 6. Copy the **App key**, **Secret**, **Access Token**, and **Access Token Secret**, and enter them in the kore.ai **Configurations** tab of the LivePerson Channel page. For more information, see [Step 4 - Configure the LivePerson Channel in the Platform section](#step-4-configure-the-channel-in-the-platform).
7. Select Agent from the **Assignment** drop-down list, set **Max no. live chats** as **Unlimited**, and then select the skill created in the previous step from the **Skills** drop-down list.
6. Copy the **App key**, **Secret**, **Access Token**, and **Access Token Secret**, and enter them in the kore.ai **Configurations** tab of the LivePerson Channel page. For more information, see [Step 4 - Configure the LivePerson Channel in the Platform section](#step-4-configure-the-channel-in-the-platform).
7. Select Agent from the **Assignment** drop-down list, set **Max no. live chats** as **Unlimited**, and then select the skill created in the previous step from the **Skills** drop-down list.
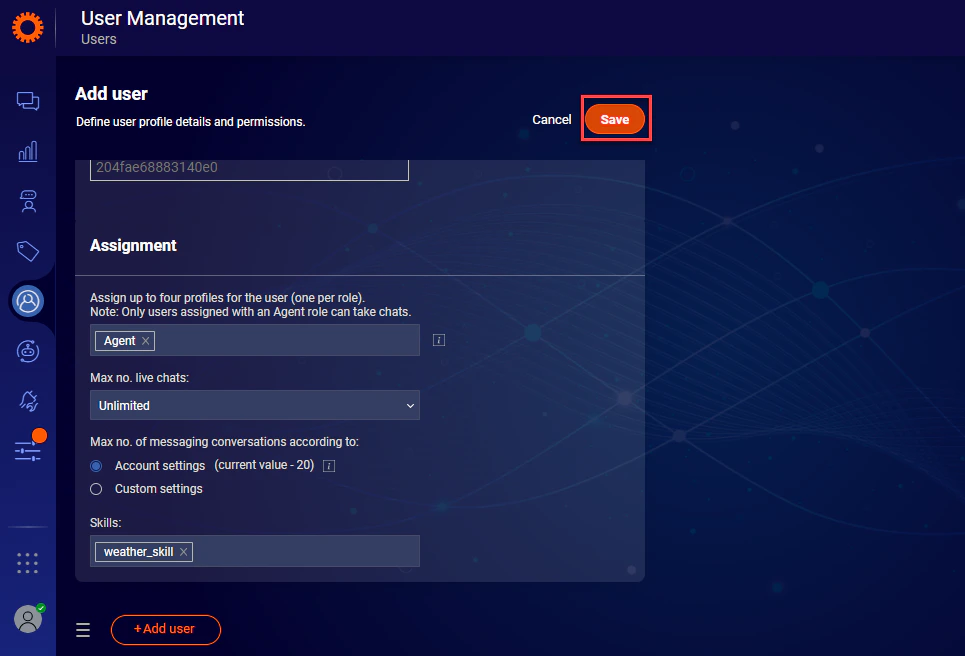 8. Click **Save**. For further information, see [Create and manage users](https://knowledge.liveperson.com/admin-settings-create-and-manage-users.html#Adding%20a%20user) and [Create a bot](https://developers.liveperson.com/tutorials-guides-getting-started-with-bot-building-deploy-the-bot.html#step-11-create-a-bot-user) user within LivePerson’s documentation.
## Step 4: Configure the Channel in the Platform
Configure the LivePerson channel to start communication with the Platform.
Steps to configure the LivePerson channel:
1. In the Platform, select the assistant you’re working with, then go to **Channels & Flows** > **Channels** > **Digital** > **All** > **LivePerson**.
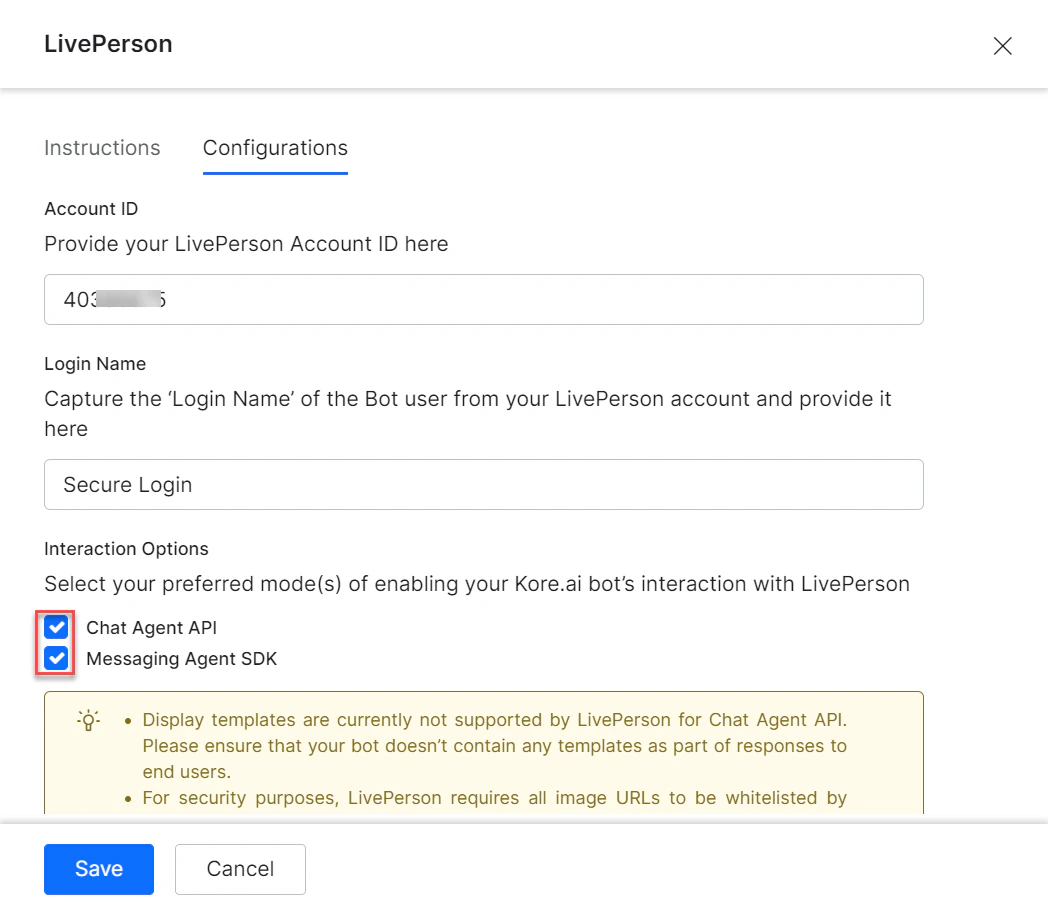
2. Go to the Configurations tab. In the **Account ID** field, enter your LivePerson account ID.
In the **Login Name** field, enter the Login Name of the app user from your LivePerson account.
3. Under **Interaction Options**, select how you would like the Platform to interact with LivePerson - via **Chat Agent API**, **Messaging Agent SDK**, or both.
8. Click **Save**. For further information, see [Create and manage users](https://knowledge.liveperson.com/admin-settings-create-and-manage-users.html#Adding%20a%20user) and [Create a bot](https://developers.liveperson.com/tutorials-guides-getting-started-with-bot-building-deploy-the-bot.html#step-11-create-a-bot-user) user within LivePerson’s documentation.
## Step 4: Configure the Channel in the Platform
Configure the LivePerson channel to start communication with the Platform.
Steps to configure the LivePerson channel:
1. In the Platform, select the assistant you’re working with, then go to **Channels & Flows** > **Channels** > **Digital** > **All** > **LivePerson**.
2. Go to the Configurations tab. In the **Account ID** field, enter your LivePerson account ID.
In the **Login Name** field, enter the Login Name of the app user from your LivePerson account.
3. Under **Interaction Options**, select how you would like the Platform to interact with LivePerson - via **Chat Agent API**, **Messaging Agent SDK**, or both.
 4. Enter the details of the **API Key**, **Secret**, **Access Token**, and **Access Token Secret** values of your LivePerson user account, which you copied in [Step 3](#step-3-add-a-user-in-liveperson).
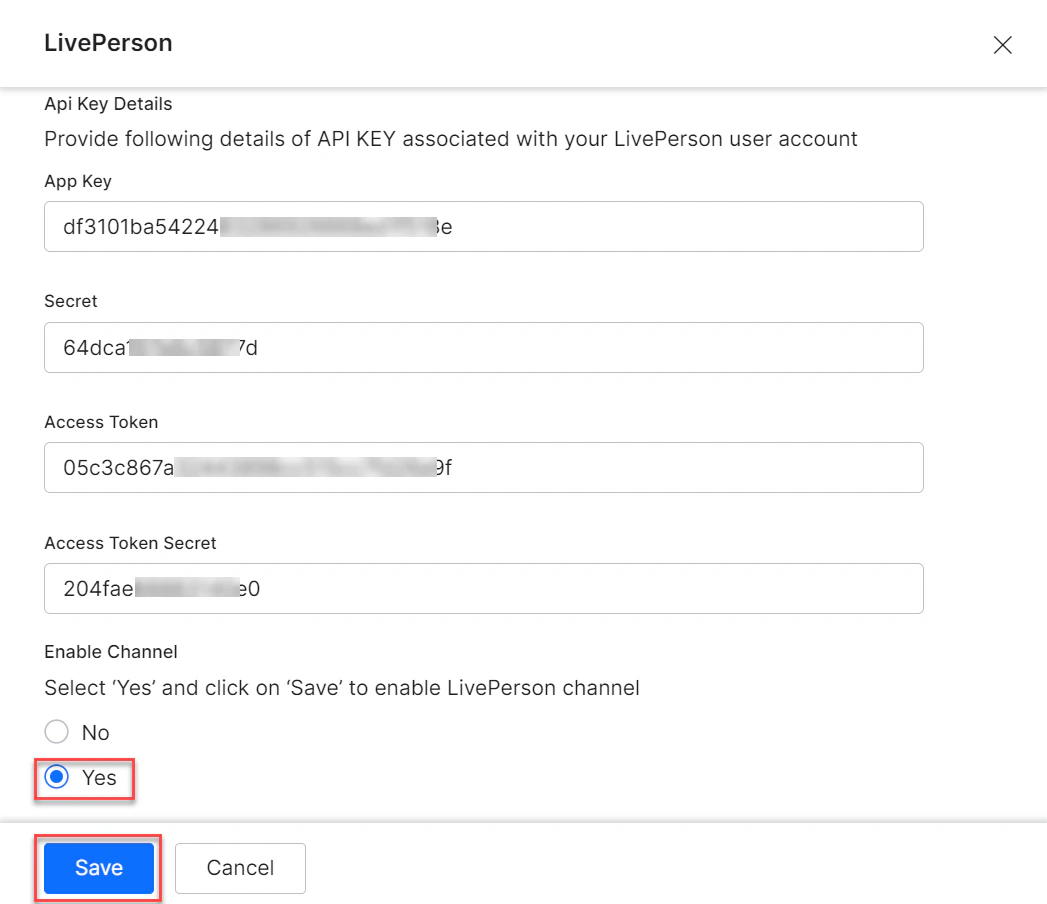 5. In the **Enable Channel** section, select **Yes** to activate the channel, and then click **Save** to complete the user creation process.
After enabling the channel and verifying all the configurations, you can optionally publish the app for the new channel. Learn more about [Publishing your App](/ai-for-service/deployment/publishing-app).
## Step 5: Verify the LivePerson Channel Integration
Once the LivePerson channel is enabled, you can verify the integration by publishing the campaign with the skills you created in LivePerson and embedding the LivePerson code snippet in the WebServer or Web Page where the Platform is hosted.
Steps to verify the LivePerson channel integration:
1. Sign in to the LivePerson account with your admin user credentials.
2. Go to the **Manage Campaigns and Engagements** page and click the **Live Messaging on your site** link, as shown below.
5. In the **Enable Channel** section, select **Yes** to activate the channel, and then click **Save** to complete the user creation process.
After enabling the channel and verifying all the configurations, you can optionally publish the app for the new channel. Learn more about [Publishing your App](/ai-for-service/deployment/publishing-app).
## Step 5: Verify the LivePerson Channel Integration
Once the LivePerson channel is enabled, you can verify the integration by publishing the campaign with the skills you created in LivePerson and embedding the LivePerson code snippet in the WebServer or Web Page where the Platform is hosted.
Steps to verify the LivePerson channel integration:
1. Sign in to the LivePerson account with your admin user credentials.
2. Go to the **Manage Campaigns and Engagements** page and click the **Live Messaging on your site** link, as shown below.
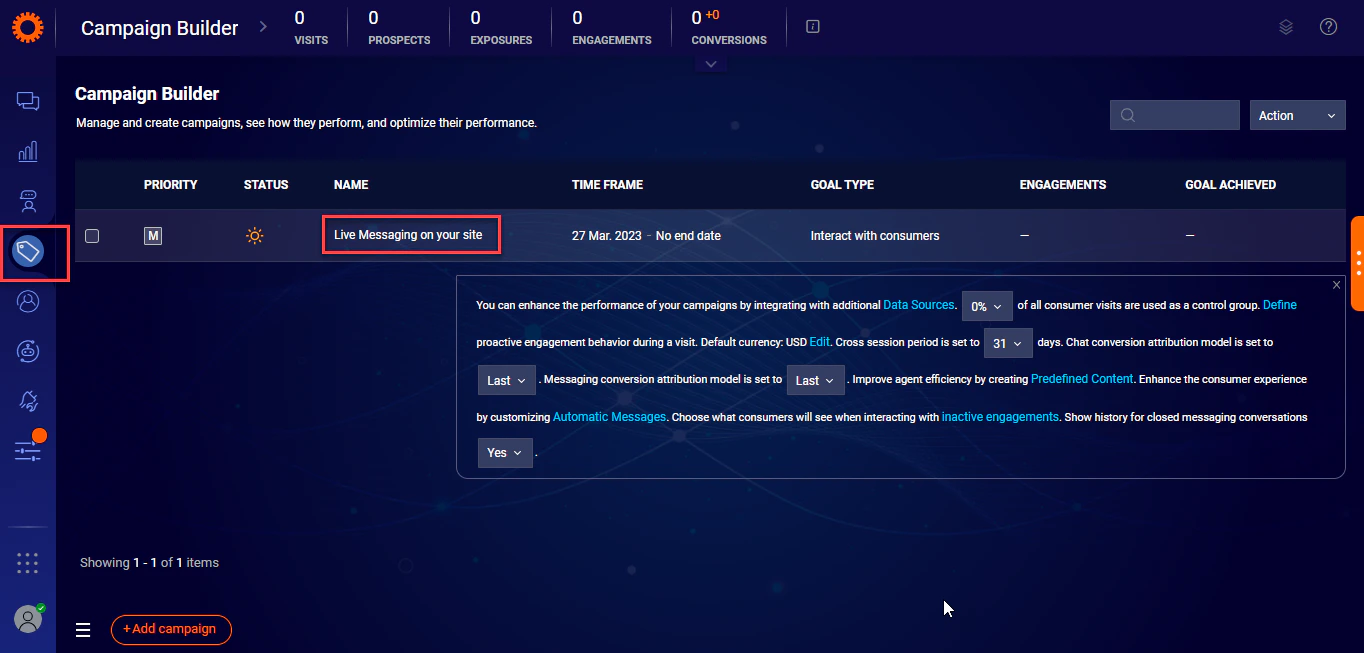 3. On the Live Messaging page, go to the **Engagement Settings** area, select the **Skill** you created in [step 2](#step-2-add-a-skill-in-liveperson), and then click **Next**.
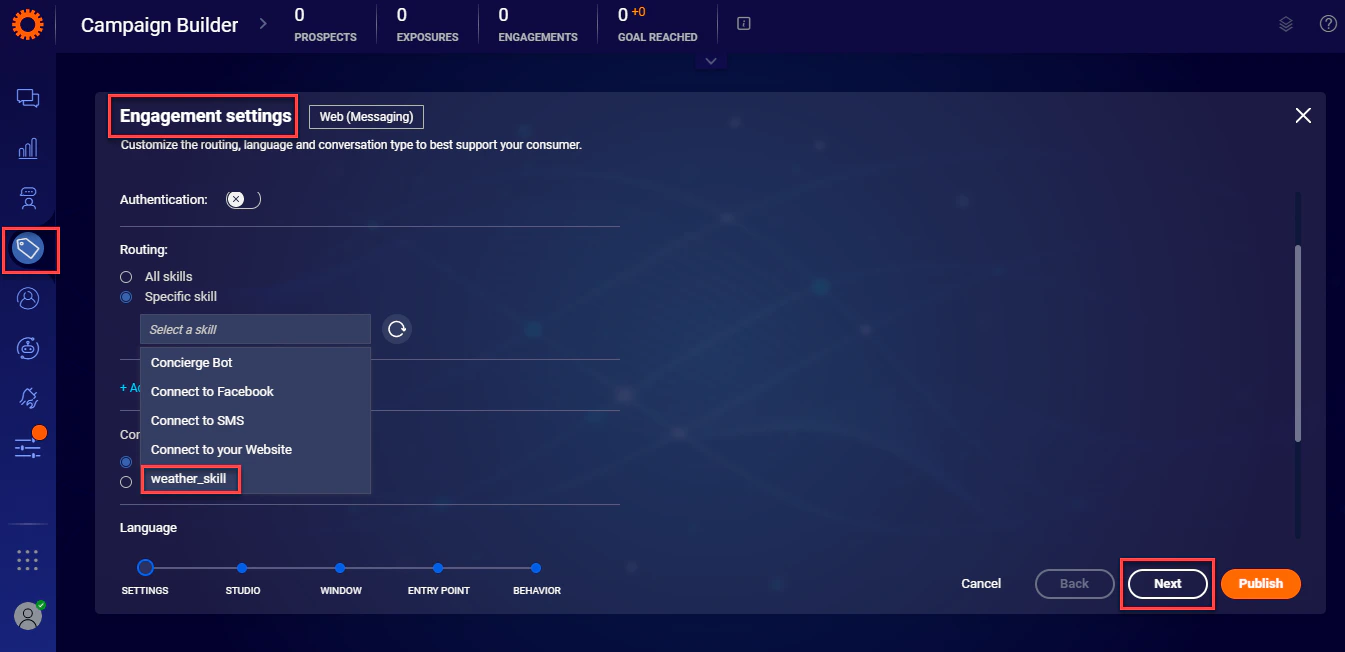 4. Click **Next** four times to select the **Engagement Studio**, **Theme**, **Entry points**, and **Behavioral targeting library** options, and then click Publish as shown below.
 5. Once the LivePerson campaign is published, go to **Manage Campaigns and Engagements > Campaign Builder > Data Sources**, as shown below.
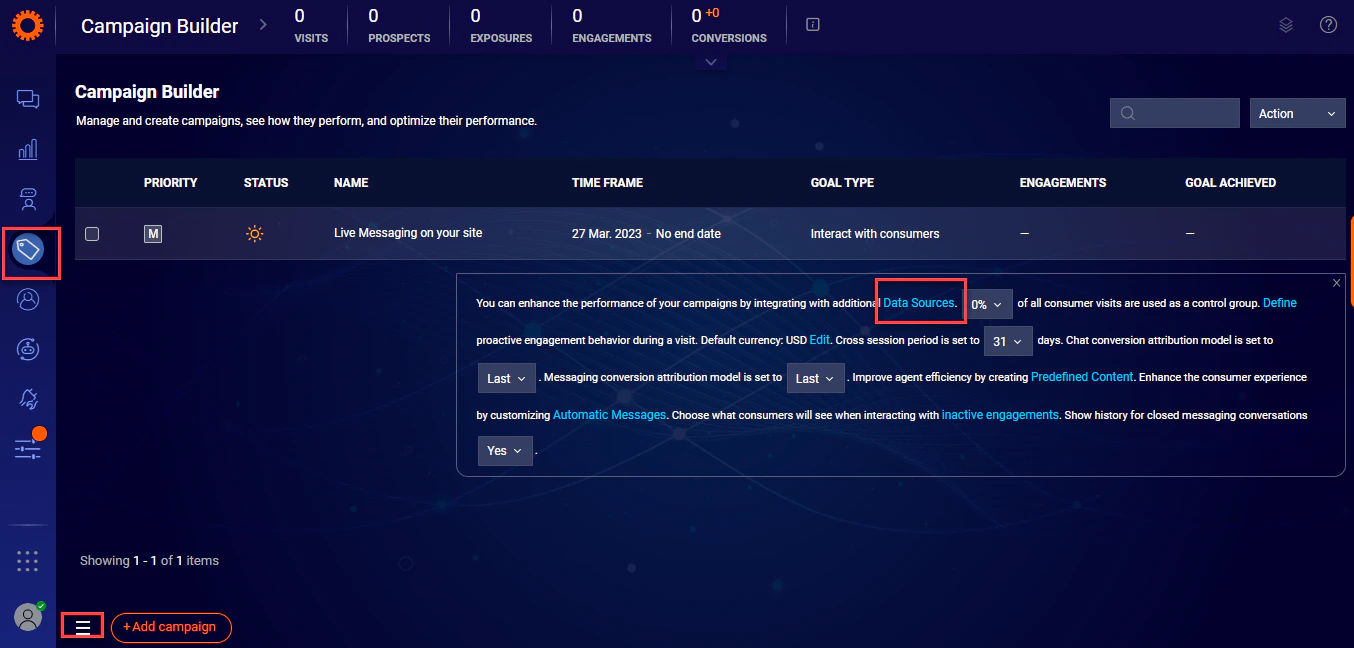 6. On the Data Sources page, select the **Web card** and click **Edit**.
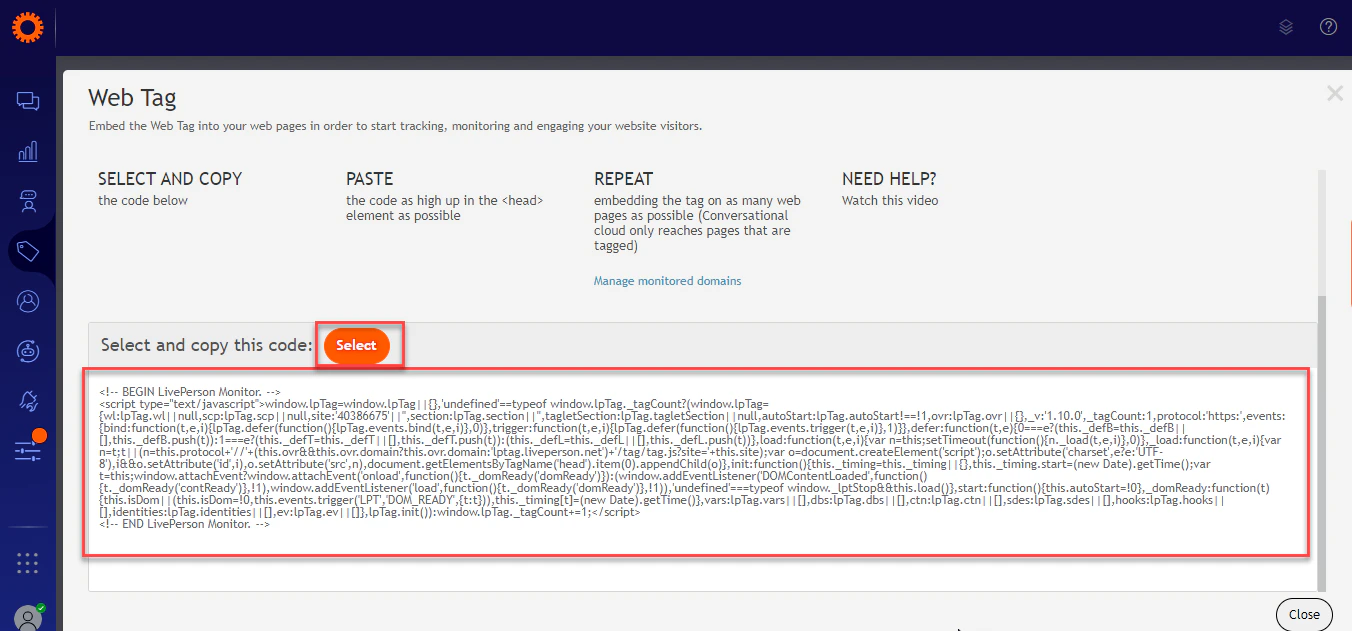
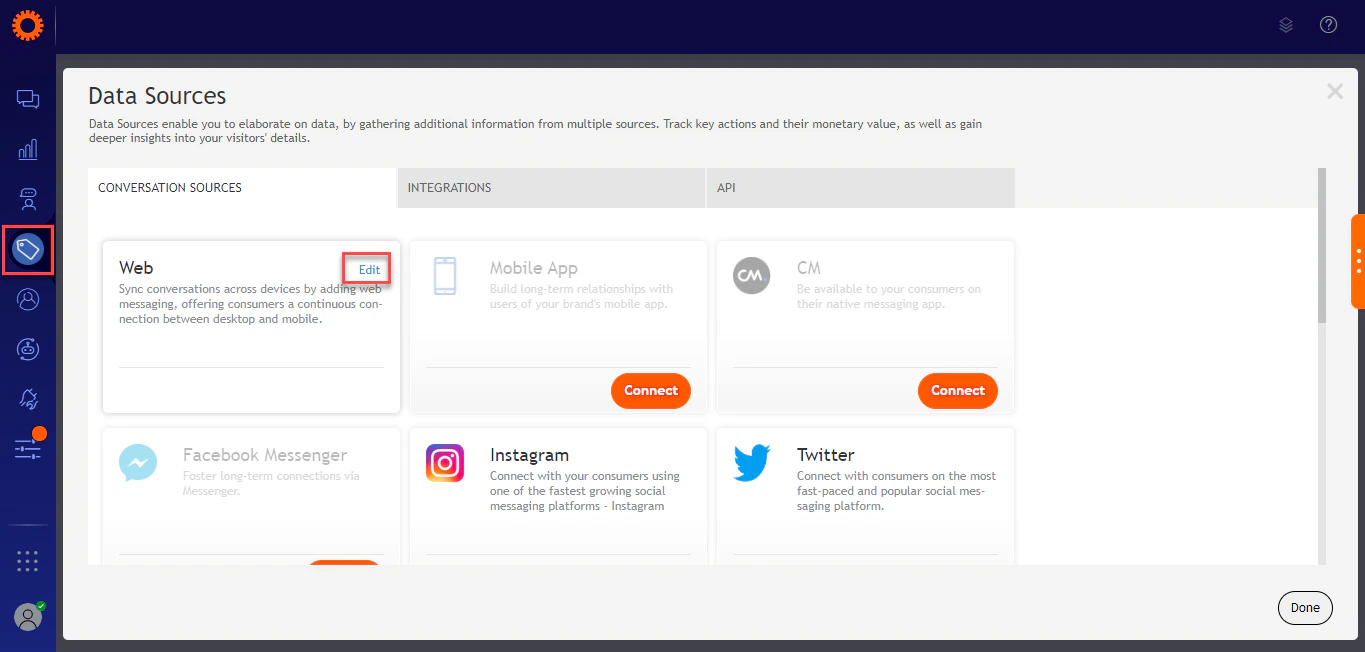 7. On the Web Tag page, copy the **embed code** and paste it into the html page you use to interact with the AI Agent.
 8. Send a message from the LivePerson Chat console to the AI Agent for which you have enabled the LivePerson channel.
9. In the Platform, once you receive a message from the **LivePerson Agent** console, you can send a response to start communication between the two systems, as shown below.
8. Send a message from the LivePerson Chat console to the AI Agent for which you have enabled the LivePerson channel.
9. In the Platform, once you receive a message from the **LivePerson Agent** console, you can send a response to start communication between the two systems, as shown below. 