> ## Documentation Index
> Fetch the complete documentation index at: https://koreai.mintlify.site/llms.txt
> Use this file to discover all available pages before exploring further.
# Adding the Yammer Channel
[Back to Available Channels](/ai-for-service/channels/adding-channels-to-your-bot#available-channels)
To add Yammer as a channel to your AI Agent, you must create an app in Yammer and enable the platform to receive messages. Adding the Yammer channel to your AI Agent allows end-users of your app to interact with your app using their Yammer accounts. To add the Yammer channel to your app, you must:
1. **Register an App**- To enable Yammer as a channel for your AI Agent, create an app on Yammer. Log in to your Yammer developer account to Register a New App. Initially, to enable the Yammer channel, you must create and register for a developer account in the Yammer Developer portal.
2. **Enter the Redirect URL** - Copy the Redirect URL provided in the **Configurations** tab of the Yammer channel page in the App Builder and enter it in the **Redirect URL** field to proceed with creating an app on Yammer.
3. **Get App Information**- Go to the App Details page to get and reserve the **Channel ID** and **Channel Secret** for your channel configuration.
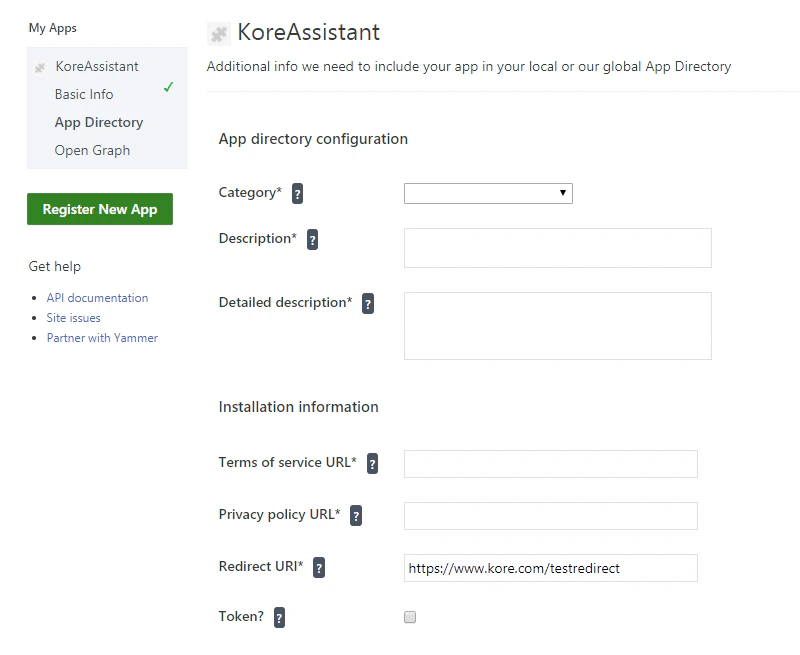
4. **Deploy App to your Enterprise**- To allow your enterprise users to discover the app in the App Directory, you can deploy the app by updating the **App Directory** section.
5. **Authorize**- You must Authorize the app from the **Configurations** tab on the Yammer Channel page in the app builder. This allows you to generate a developer access token to enable the AI Agent to access the app.
6. **Enable Channel**- After setting up the Yammer app and entering configuration data in App Builder, enable the channel.
The Callback/Redirect URL now includes the **streamid** in the API request to identify the AI Agent being accessed. When an incoming request is qualified with this identifier, it helps with traceability, troubleshooting, and remediation at the network level during anomalies like malicious calls or unusual app activity.
To add the Yammer channel, follow the below steps:
1. In the Platform, go to **Channels & Flows** > **Channels** > **Digital** > **All**.
2. Click the **Yammer**. The **Yammer Channel** page is displayed.
3. In a new browser tab, log in to your **Yammer Developer** account and go to the **My Apps** section to register a new app.
4. To create an app, click **Register New App**. Enter the required details in the listed fields.
5. Copy the Redirect URL from the **Configurations** tab of the Yammer Channel page and enter it in the **Redirect URL** field.
6. Click **Continue** to create the app.  7. After app creation, you are redirected to the **App Details** page. Capture the **Client ID** and **Client Secret** of your Yammer channel and provide them in the **Configurations** tab of LINE channel page.
  8. To deploy app to your enterprise, go to the **App Directory** section and enter the required information in the respective fields.
9. Click **Deploy** to deploy the app to your enterprise users.
8. To deploy app to your enterprise, go to the **App Directory** section and enter the required information in the respective fields.
9. Click **Deploy** to deploy the app to your enterprise users.
 10. Go to the **Configurations** tab on the Yammer channel page to complete the channel setup.
11. Click **Authorize** to generate a developer access token which enables platform to access the App. Enter all the details in other required fields. Select **Yes** and click **Save** to enable Yammer Channel.
## Edit Yammer Channel
To edit the Yammer channel, follow the below steps:
1. Hover over the channel and click to modify. You can make necessary updates to your channel configurations and save them.
2. You can also [disable or delete the channel](/ai-for-service/channels/adding-channels-to-your-bot#editing-testing-disabling-or-deleting-channels).
Select one of the following commands to modify the channel:
* **Disable/Enable** - Click **Disable** to temporarily disable the use of the Yammer channel for your app. To enable the use of the Yammer channel, Click **Enable**.
* **Delete** - Click **Delete**. On the **Delete Confirmation** dialog box, click **OK** to permanently delete the app channel configuration.
This operation is permanent and can't be undone.
10. Go to the **Configurations** tab on the Yammer channel page to complete the channel setup.
11. Click **Authorize** to generate a developer access token which enables platform to access the App. Enter all the details in other required fields. Select **Yes** and click **Save** to enable Yammer Channel.
## Edit Yammer Channel
To edit the Yammer channel, follow the below steps:
1. Hover over the channel and click to modify. You can make necessary updates to your channel configurations and save them.
2. You can also [disable or delete the channel](/ai-for-service/channels/adding-channels-to-your-bot#editing-testing-disabling-or-deleting-channels).
Select one of the following commands to modify the channel:
* **Disable/Enable** - Click **Disable** to temporarily disable the use of the Yammer channel for your app. To enable the use of the Yammer channel, Click **Enable**.
* **Delete** - Click **Delete**. On the **Delete Confirmation** dialog box, click **OK** to permanently delete the app channel configuration.
This operation is permanent and can't be undone.