> ## Documentation Index
> Fetch the complete documentation index at: https://koreai.mintlify.site/llms.txt
> Use this file to discover all available pages before exploring further.
# Adding Nice inContact as a Channel
[Back to Available Channels](/ai-for-service/channels/adding-channels-to-your-bot#available-channels)
The Platform supports Nice inContact as a channel to integrate an AI Agent with the NiceCXone Chat Automation platform for creating a rich and synchronous messaging experience for the users.
## Types of Nice inContact Channel
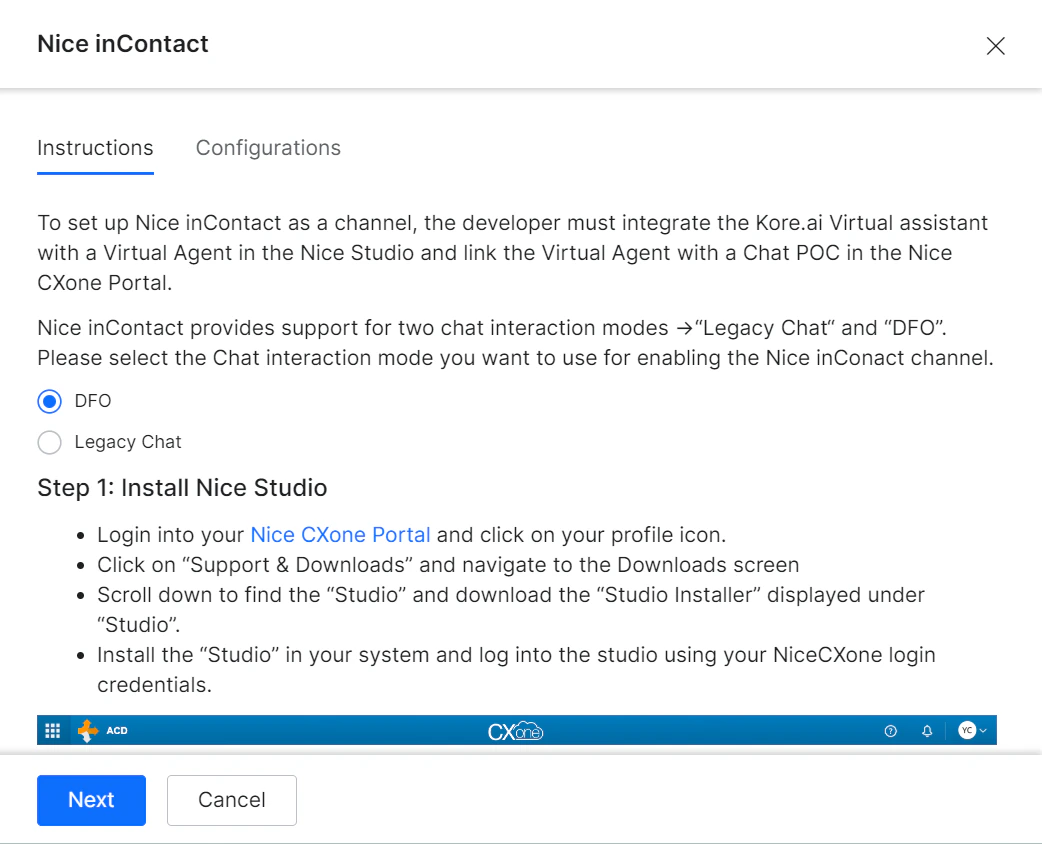
The Nice inContact channel supports the following two chat interaction modes:
* **DFO** supports plain text messages, digital forms, and rich text elements such as message formatting, links, and templates.
* **Legacy Chat** supports only plain text messages. Digital forms and rich text elements like message formatting, templates, and links aren't supported.
Select the chat interaction mode on the **Channels & Flows** > **Channels** > **Digital** > **All** > **Nice inContact** > **Instructions** tab. By default, DFO is selected.
 ## Prerequisites
The following are prerequisites for adding Nice inContact as a Channel on the Platform:
* Access to Nice CXone Portal.
* Access to the Platform.
* Enable Nice inContact as a channel in the Platform.
* Nice inContact Channel Studio Script.
* Webhook URL and Client ID value.
## Enable Nice inContact as a Channel on the Platform
Perform the following steps to enable Nice inContact as a channel, download the Studio Script, and get the Webhook URL and client ID from the Platform.
1. Login to the Platform and navigate to **Channels & Flows** > **Channels** > **Digital** > **All** > **Nice inContact** > **Configurations**.
## Prerequisites
The following are prerequisites for adding Nice inContact as a Channel on the Platform:
* Access to Nice CXone Portal.
* Access to the Platform.
* Enable Nice inContact as a channel in the Platform.
* Nice inContact Channel Studio Script.
* Webhook URL and Client ID value.
## Enable Nice inContact as a Channel on the Platform
Perform the following steps to enable Nice inContact as a channel, download the Studio Script, and get the Webhook URL and client ID from the Platform.
1. Login to the Platform and navigate to **Channels & Flows** > **Channels** > **Digital** > **All** > **Nice inContact** > **Configurations**.
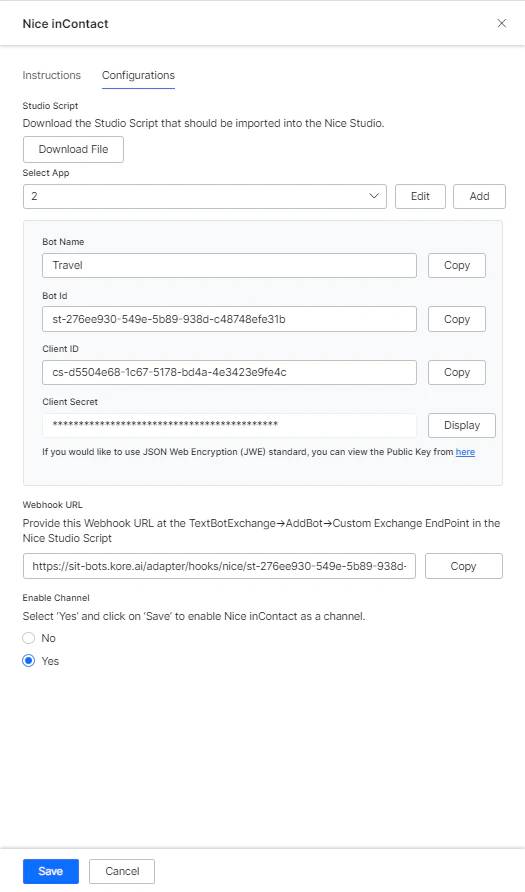 2. On the Configurations tab, Click **Download File** to download the Studio Script.
\* The downloaded studio script varies based on the selected chat mode. The Scripts aren't interchangeable between Legacy Chat and DFO modes. \* Avoid altering the downloaded script; it could affect the channel’s communication ability.
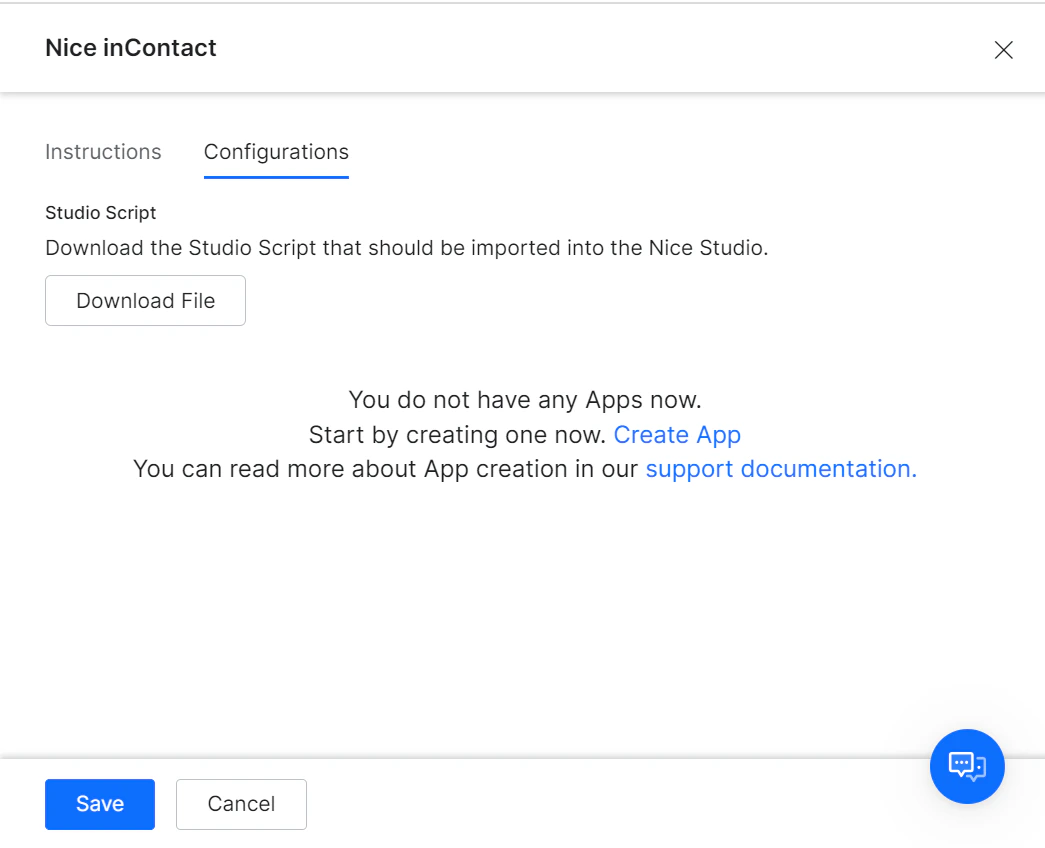
3. Select an application from the dropdown list to view the Client ID and other fields. If an application isn't available, Click **Create App** to create it. For more information, see the [Add Web/Mobile Client Channel](/ai-for-service/channels/add-web-mobile-client).
2. On the Configurations tab, Click **Download File** to download the Studio Script.
\* The downloaded studio script varies based on the selected chat mode. The Scripts aren't interchangeable between Legacy Chat and DFO modes. \* Avoid altering the downloaded script; it could affect the channel’s communication ability.
3. Select an application from the dropdown list to view the Client ID and other fields. If an application isn't available, Click **Create App** to create it. For more information, see the [Add Web/Mobile Client Channel](/ai-for-service/channels/add-web-mobile-client).
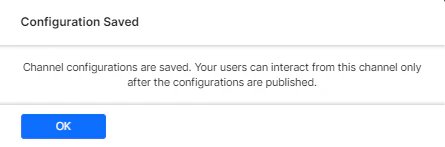
 4. In the Enable channel, select **Yes** and then click **Save**. The configuration saved success message is displayed.
 ## Configure Nice inContact for DFO
To configure Nice inContact for Legacy Chat, follow these steps.
### Install Nice Studio
1. Log into the [Nice CXone](https://na1.nice-incontact.com/login) Portal.
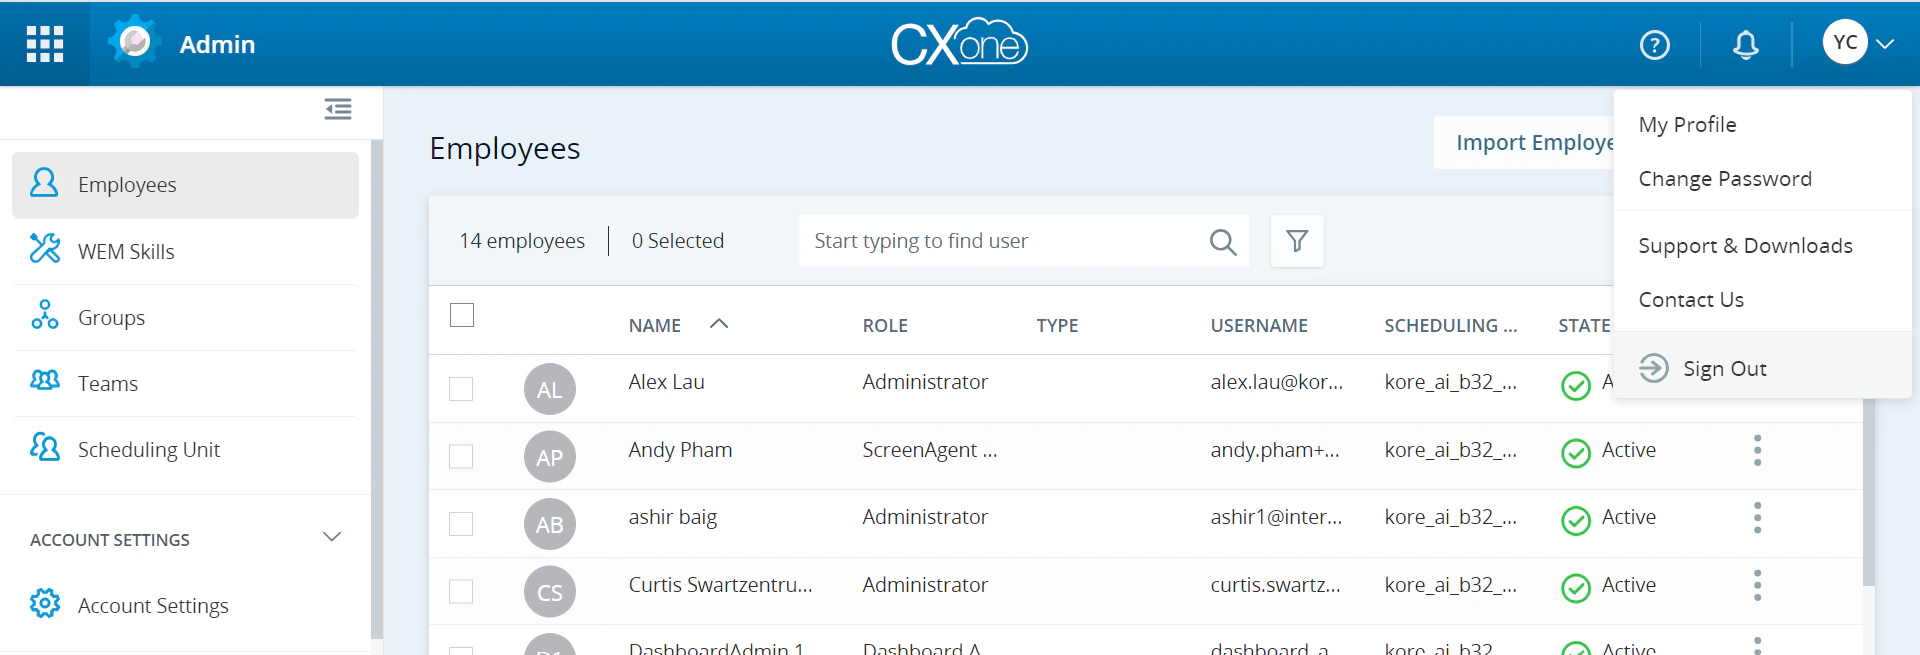
2. Click the **profile icon** in the top right corner and then click **Support & Downloads**. The download page is displayed.
## Configure Nice inContact for DFO
To configure Nice inContact for Legacy Chat, follow these steps.
### Install Nice Studio
1. Log into the [Nice CXone](https://na1.nice-incontact.com/login) Portal.
2. Click the **profile icon** in the top right corner and then click **Support & Downloads**. The download page is displayed.
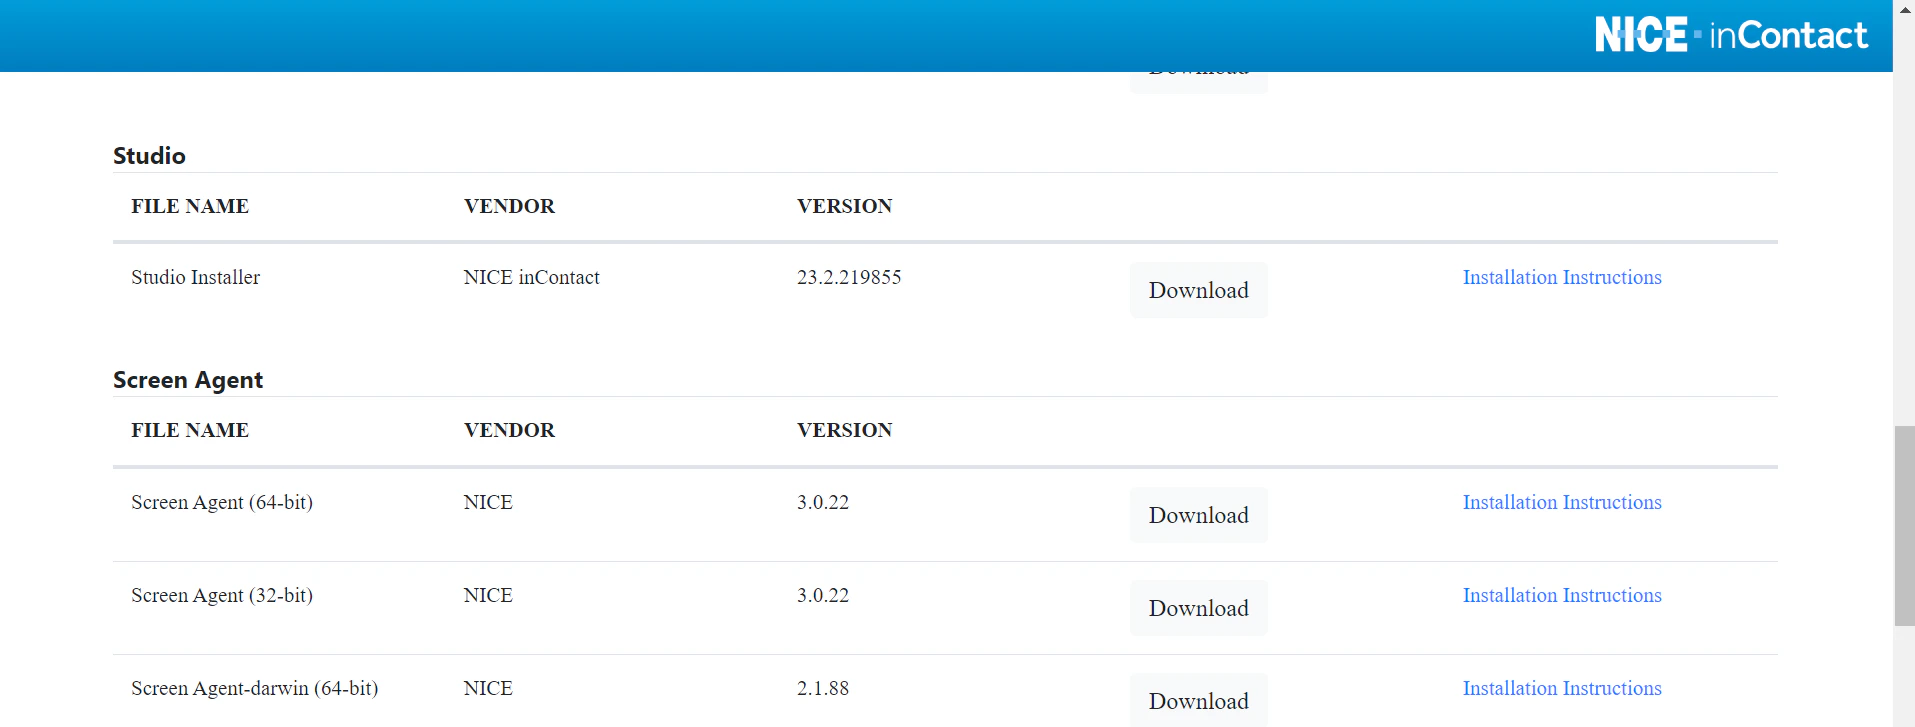
 3. In the **Studio** section, download **Studio Installer** to download the Nice inContact **StudioSetup.exe** file.
 4. Launch the **StudioSetup.exe** and install **Nice inContact Studio**. Log into **Nice inContact Studio** using NiceCXone portal login credentials.
### Import the Studio Script and Create a Custom Exchange EndPoint
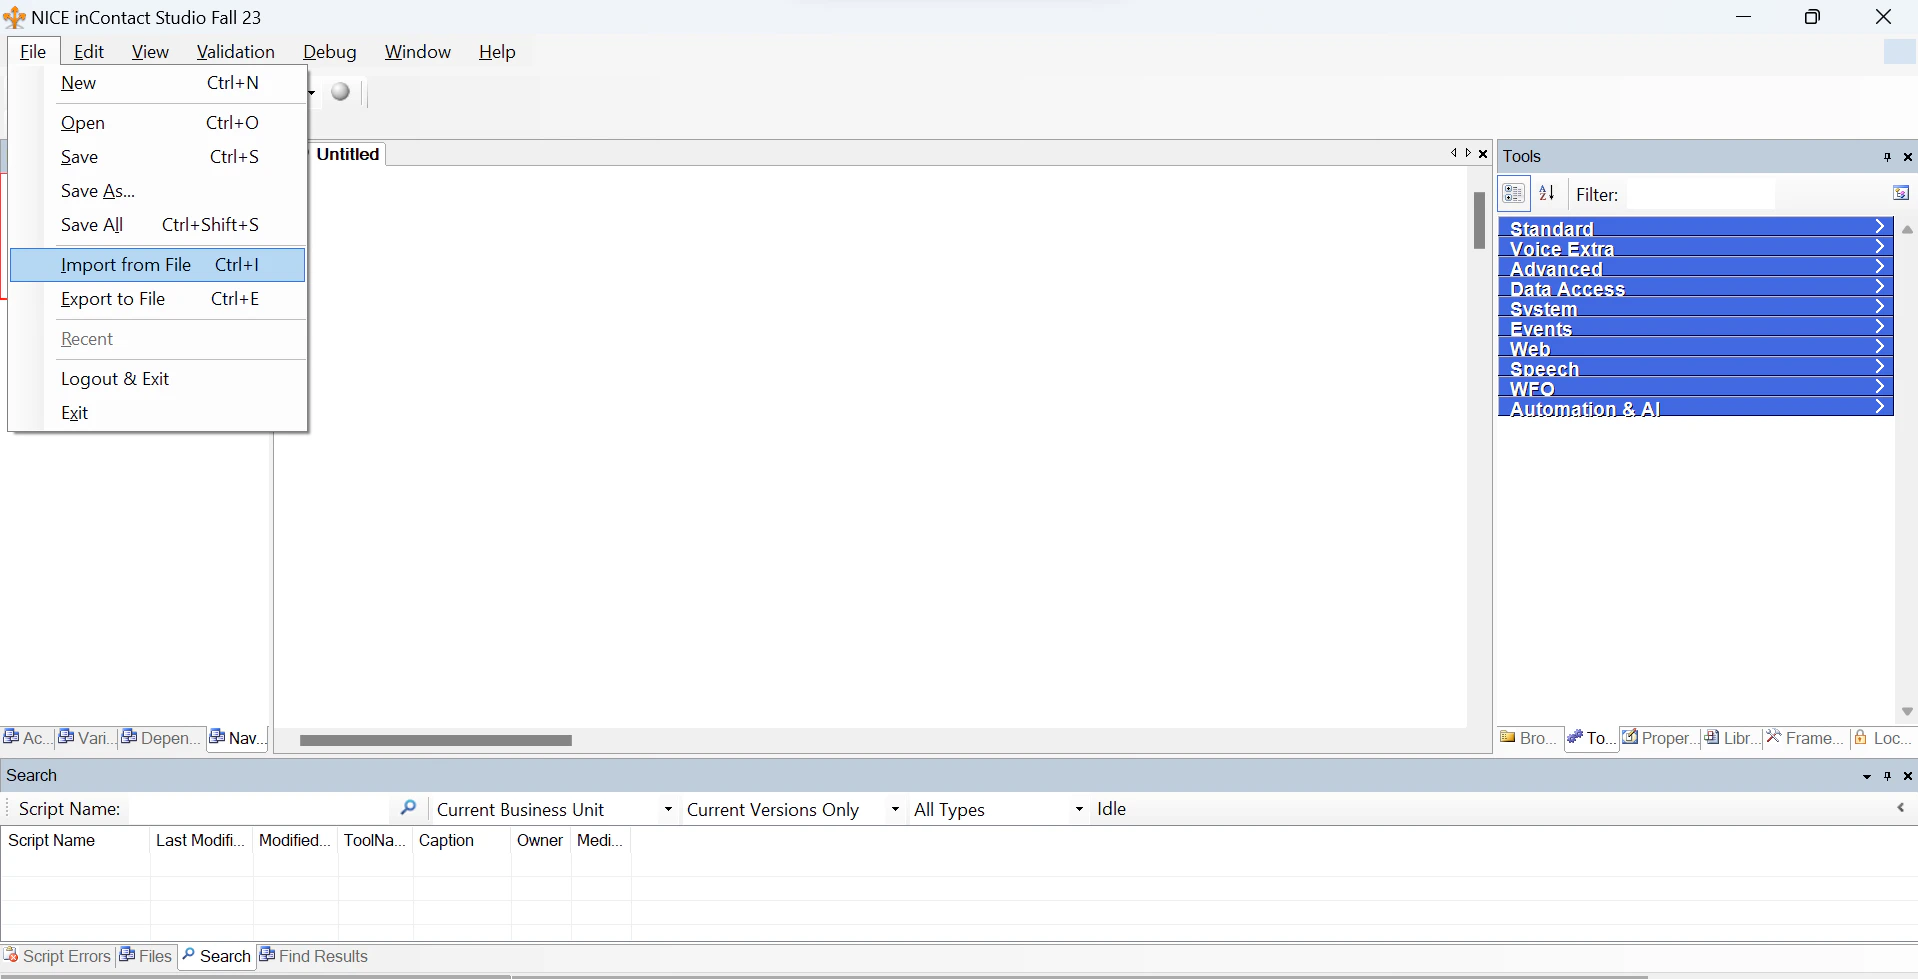
1. In the Nice Studio, click **File > Import from File**.
4. Launch the **StudioSetup.exe** and install **Nice inContact Studio**. Log into **Nice inContact Studio** using NiceCXone portal login credentials.
### Import the Studio Script and Create a Custom Exchange EndPoint
1. In the Nice Studio, click **File > Import from File**.
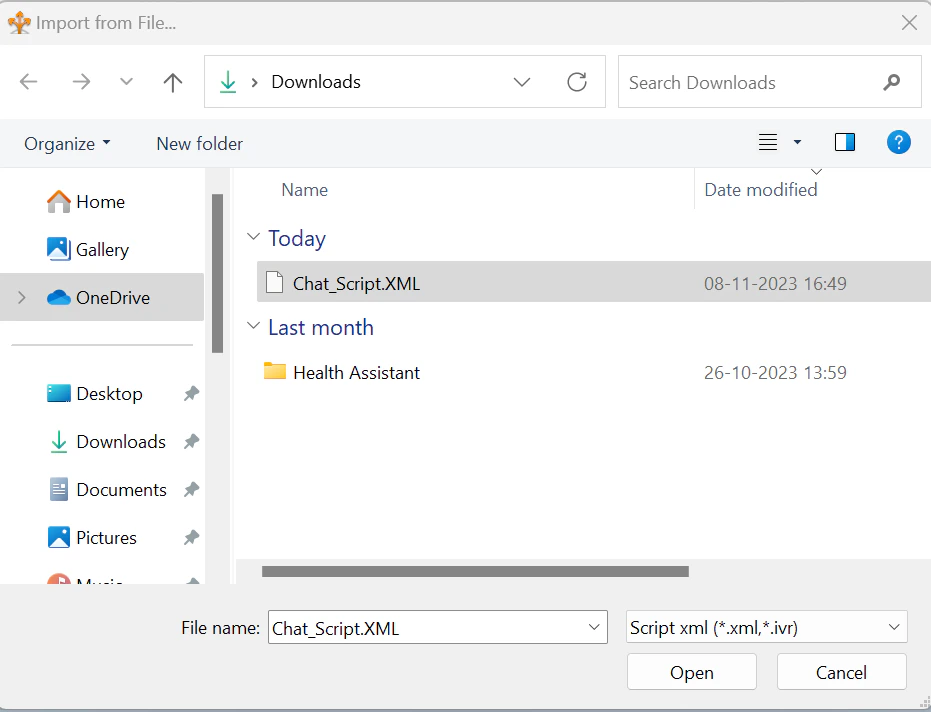
 2. Select the Studio Script downloaded from the Platform and then click **Open**. For example, **Chat\_Script.XML**.
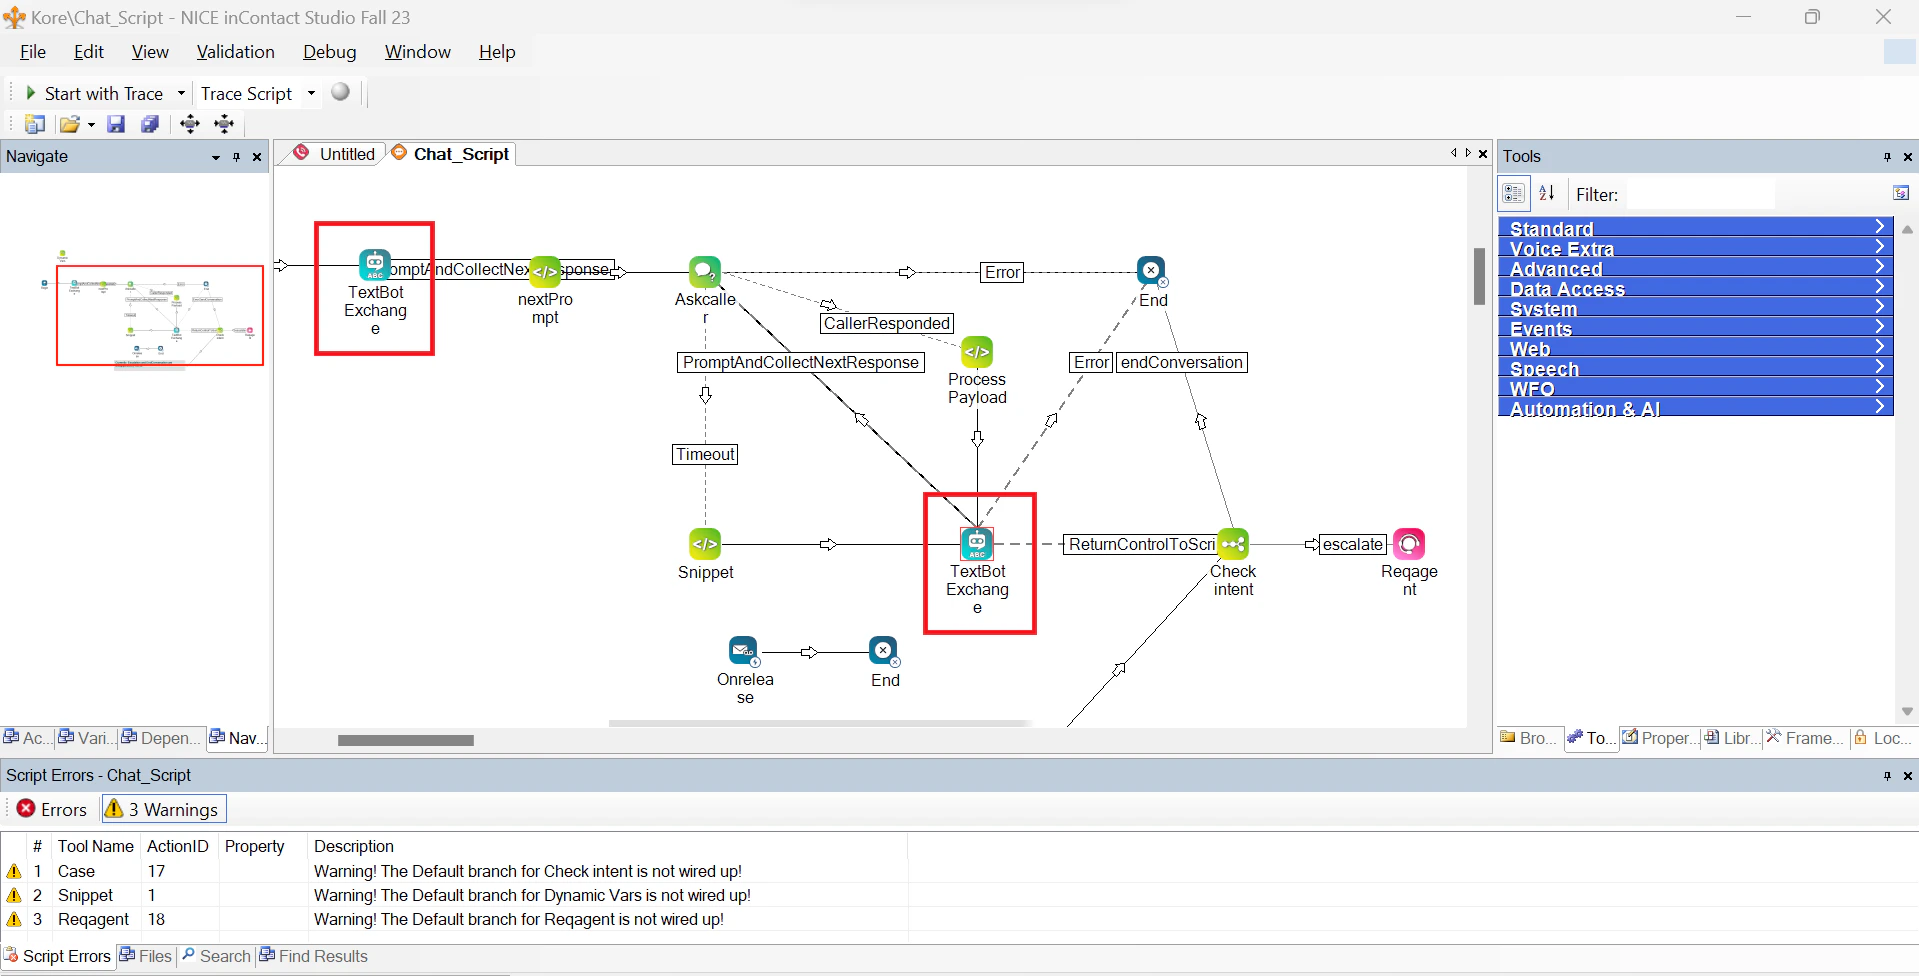
 3. In the displayed script, double-click either of the **Text Box Exchange**; For example, in the Chat\_Script, double-click Textbot Exchange.
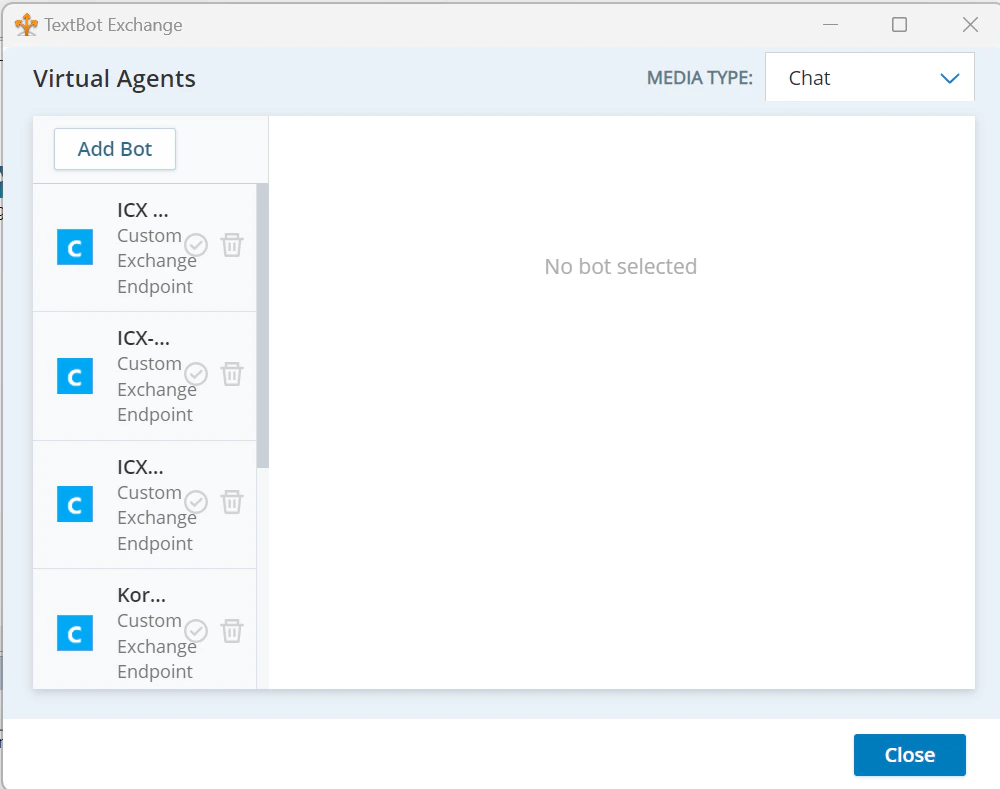
 4. The AI Agent page is displayed. Click **Add Bot**.
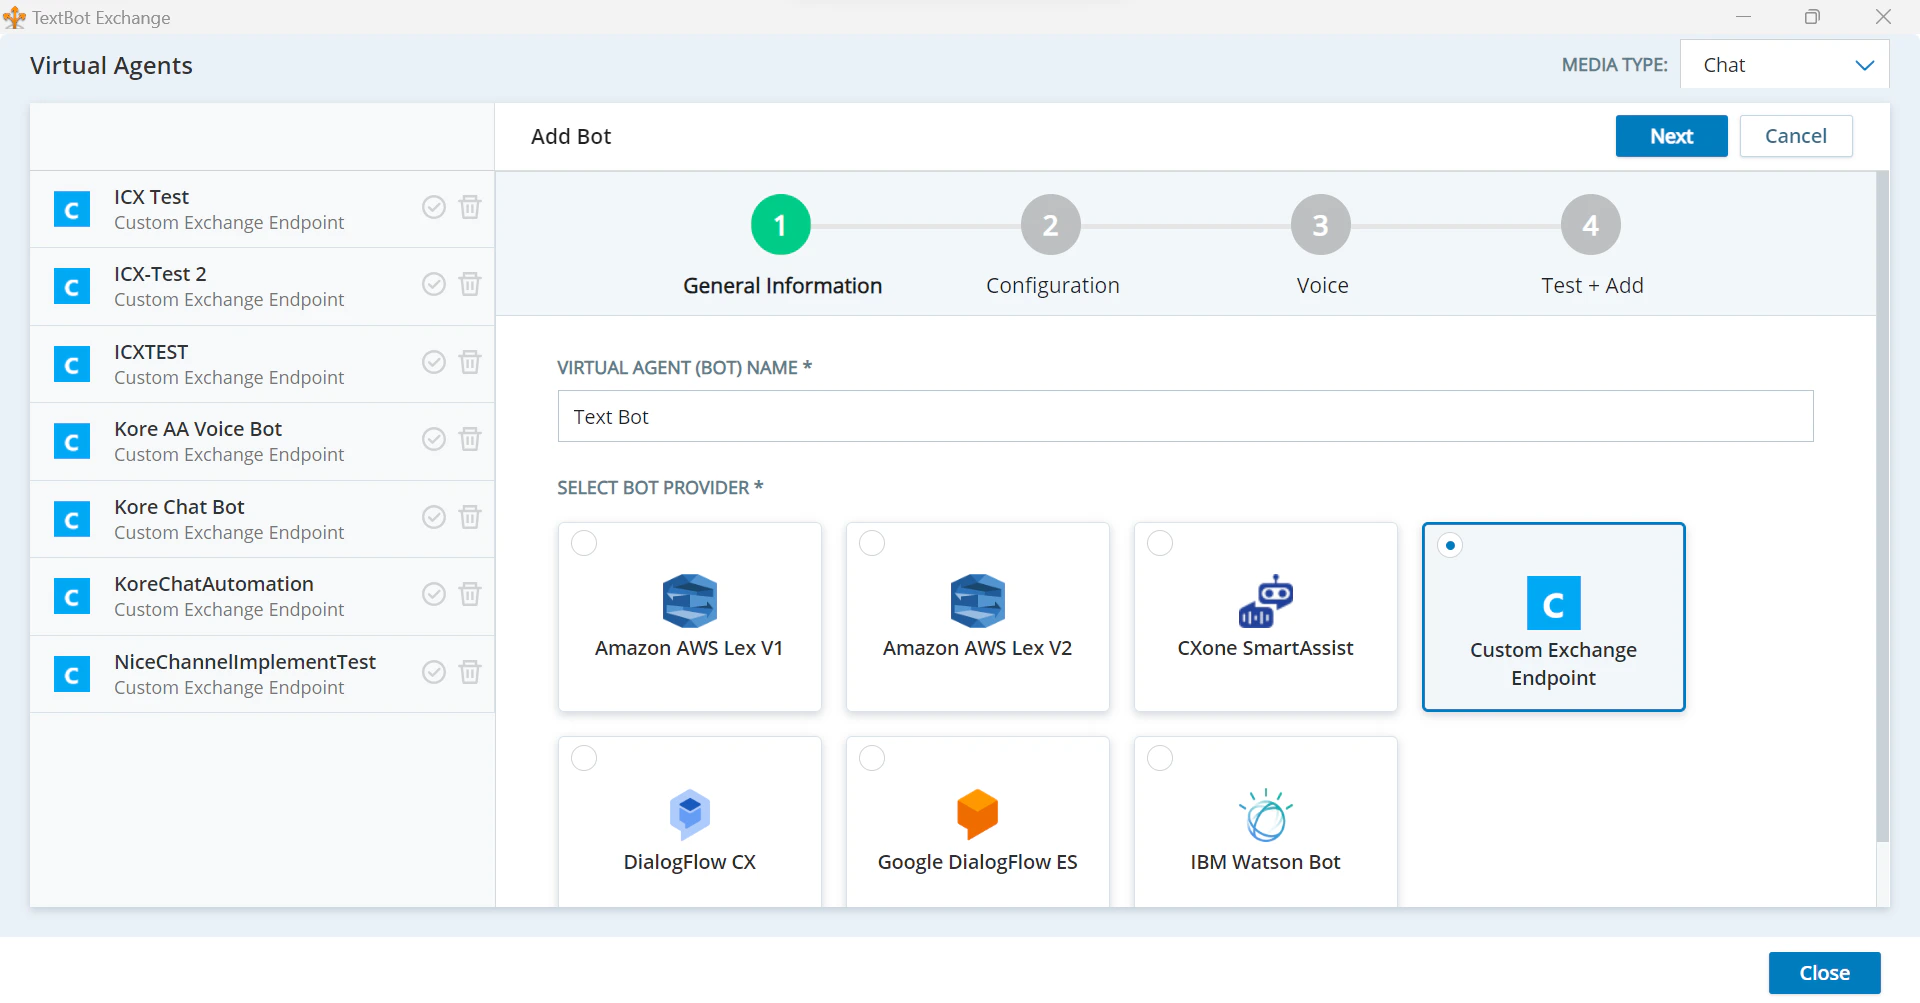
 5. On the General Information page, type in the bot name, select **Custom Exchange Endpoint**, and click **Next**.
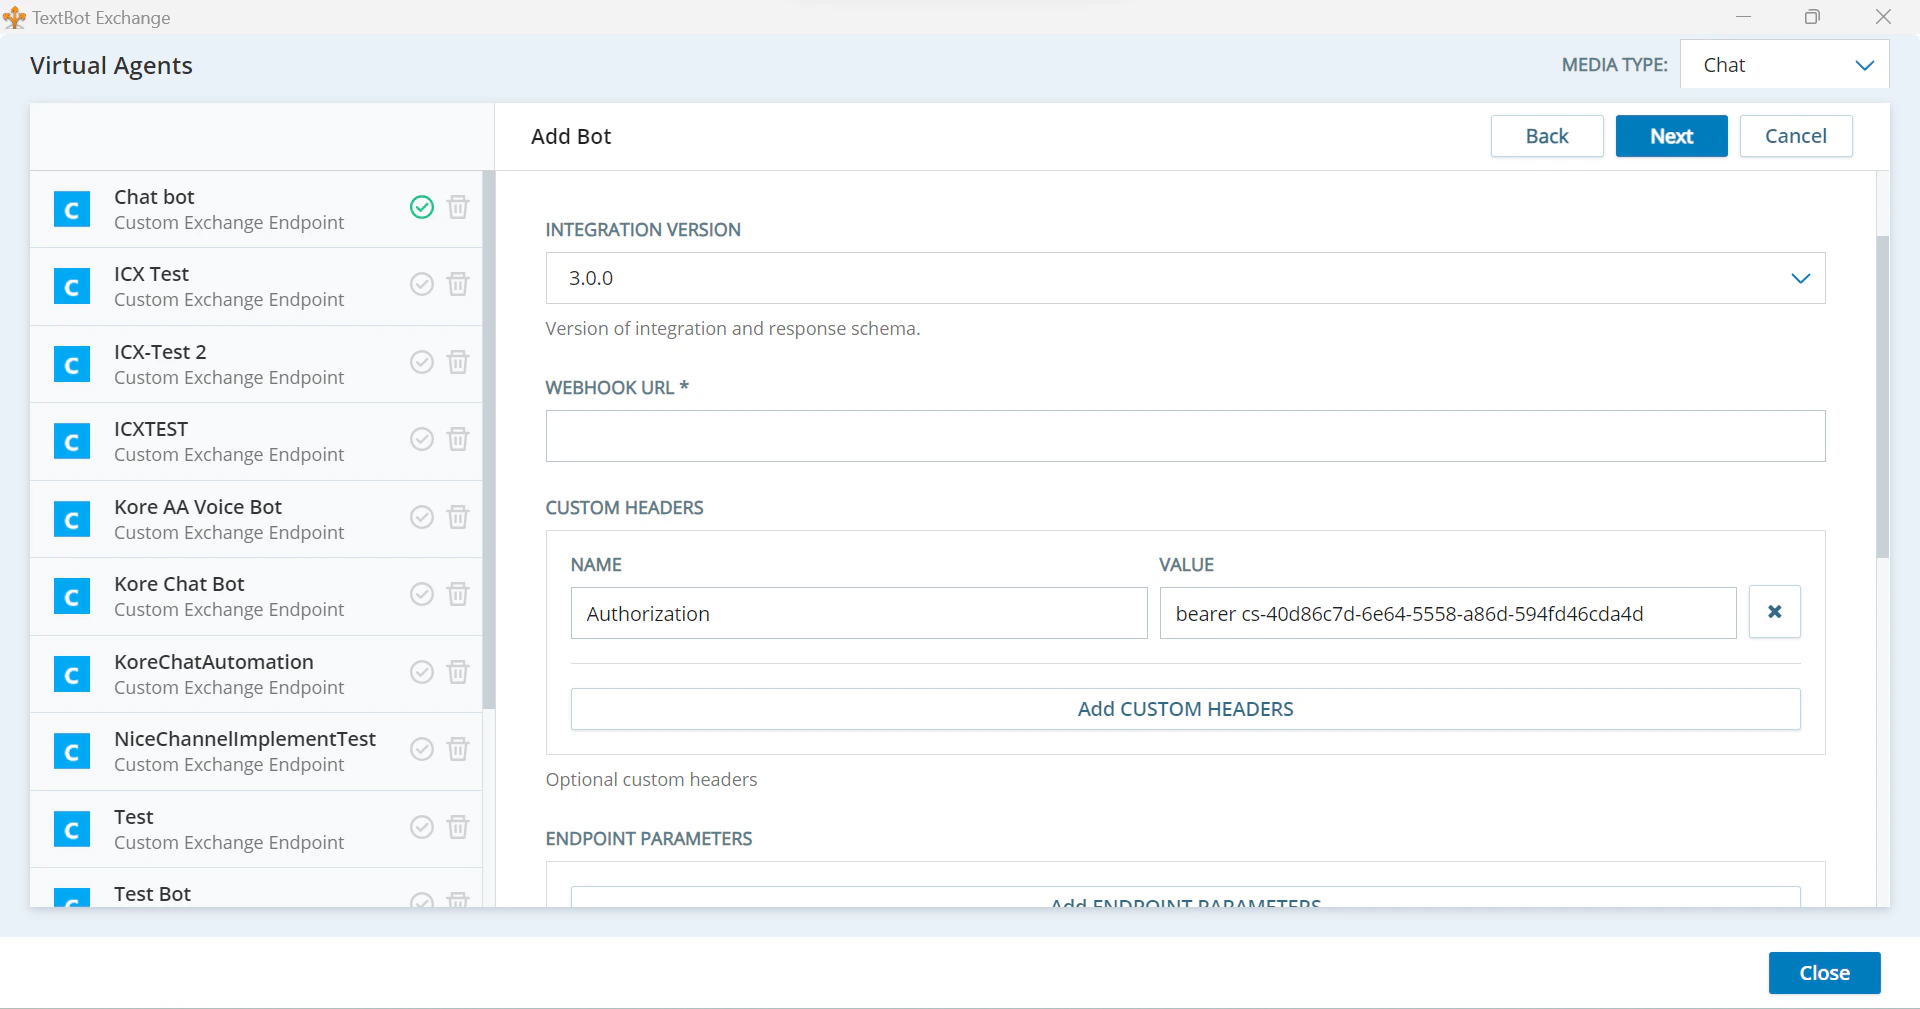
 6. On the Bot Configuration page, fill in the details as shown and then click **Next**.
1. Select the **Integration Version** as **3.0.0** from the dropdown list.
6. On the Bot Configuration page, fill in the details as shown and then click **Next**.
1. Select the **Integration Version** as **3.0.0** from the dropdown list.
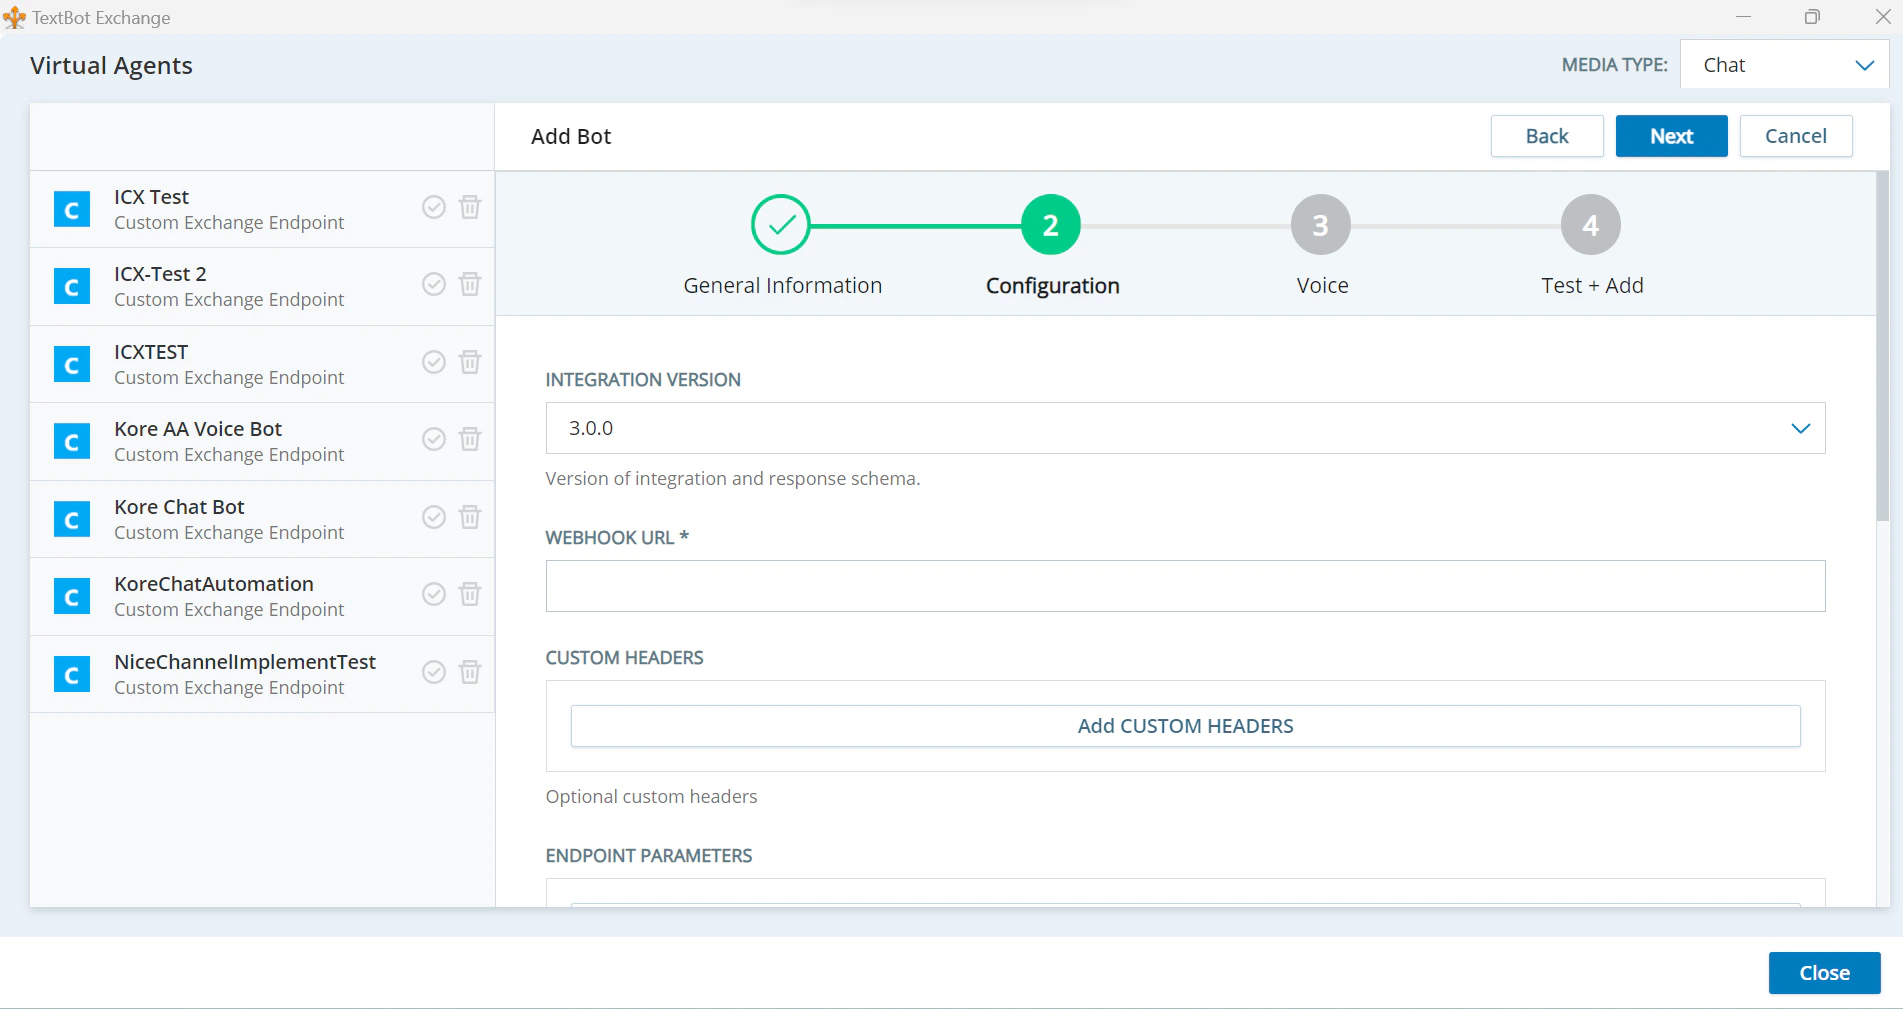 2. Paste the **Webhook URL**.
3. Under the Customer Headers, click **Add Custom Headers**.
4. Type “Authorization” in the Name field and “Bearer (client ID)” in the Value field.
2. Paste the **Webhook URL**.
3. Under the Customer Headers, click **Add Custom Headers**.
4. Type “Authorization” in the Name field and “Bearer (client ID)” in the Value field.
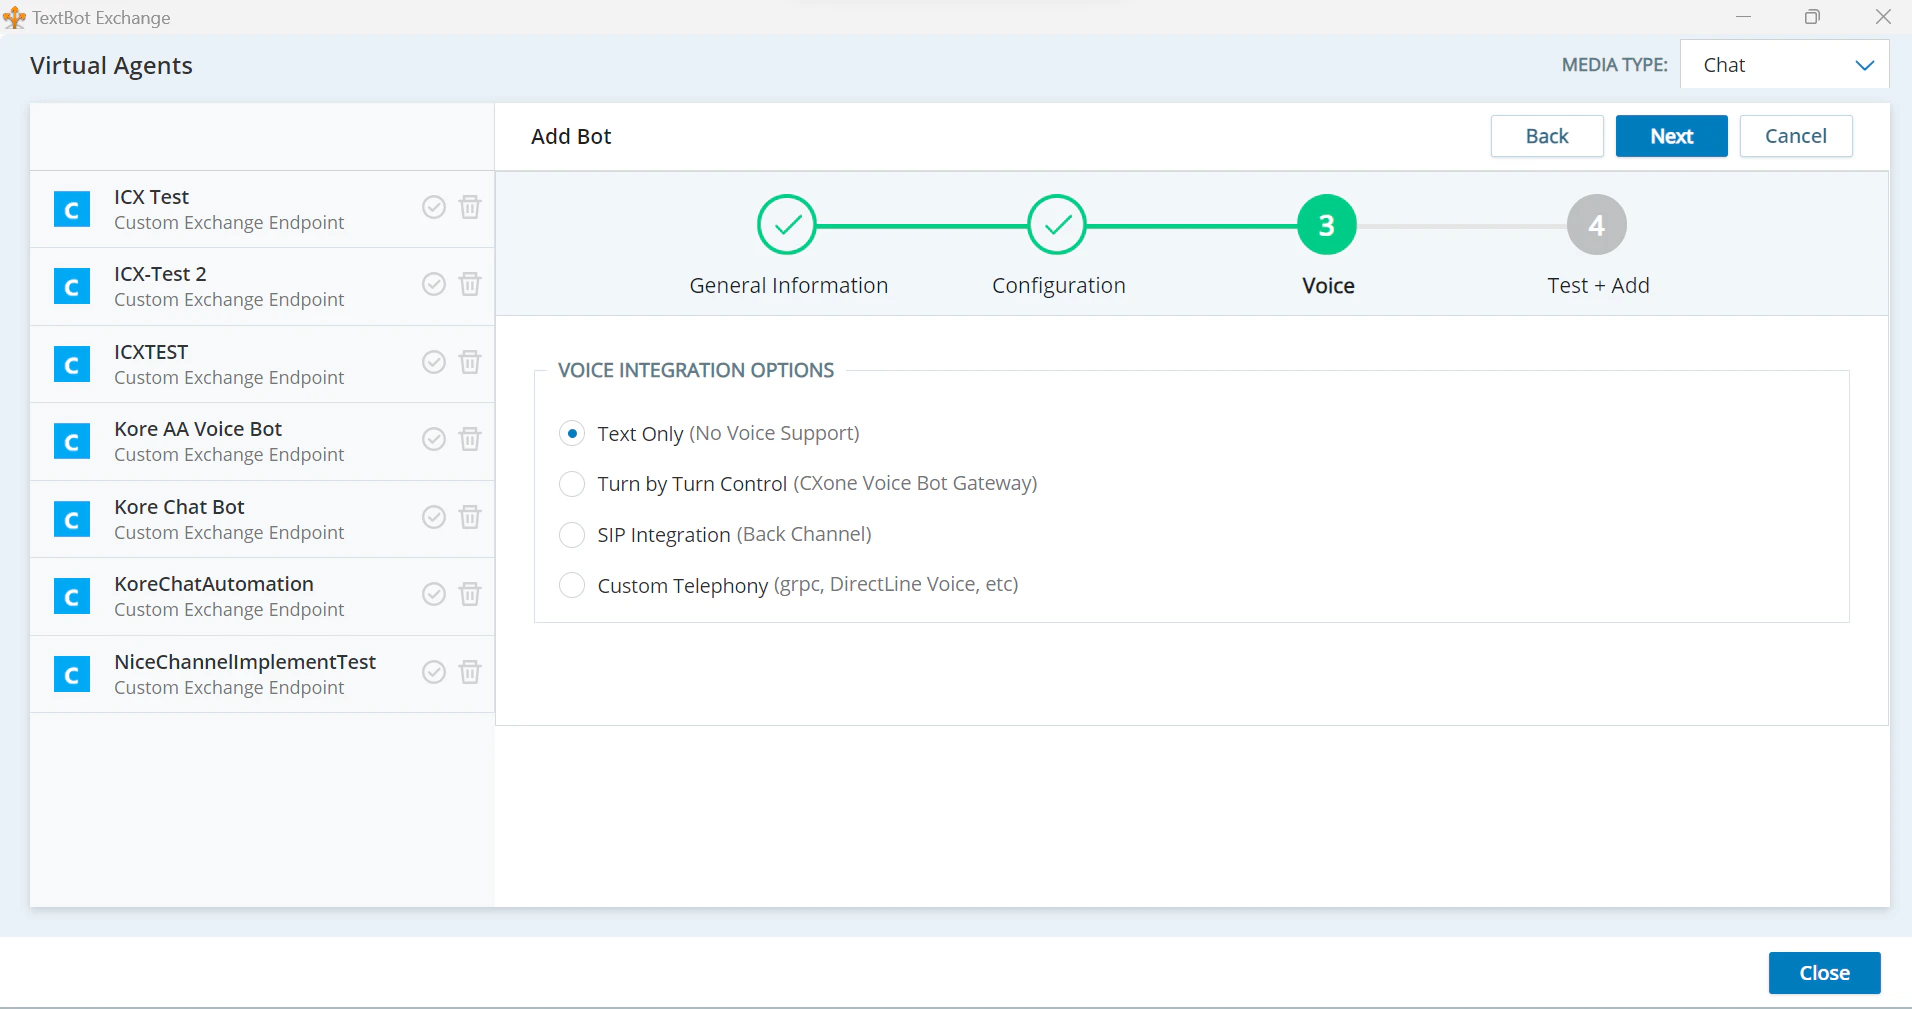
 7. On the Voice page, in the voice integration options, select **Text Only (No Voice Support)** and click **Next**.
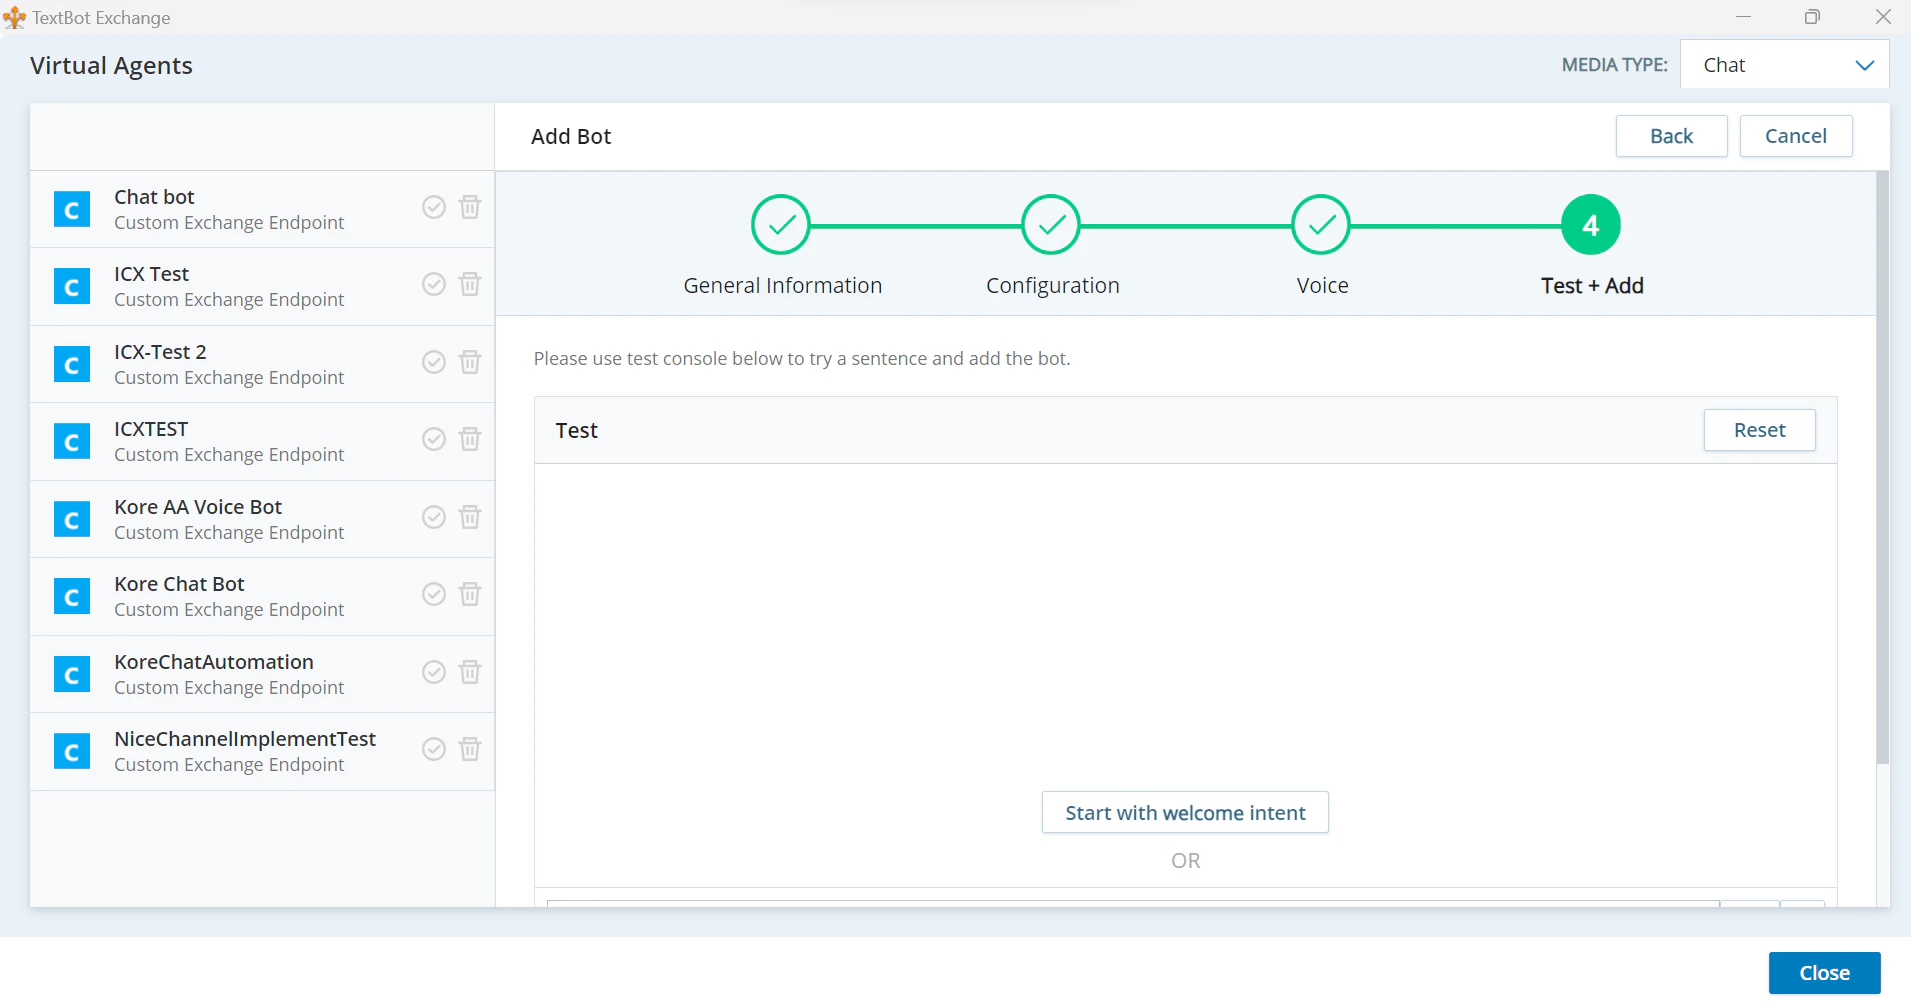
 8. On the **Test + Add** page, click **Add**.
 9. The bot saved success message is displayed.
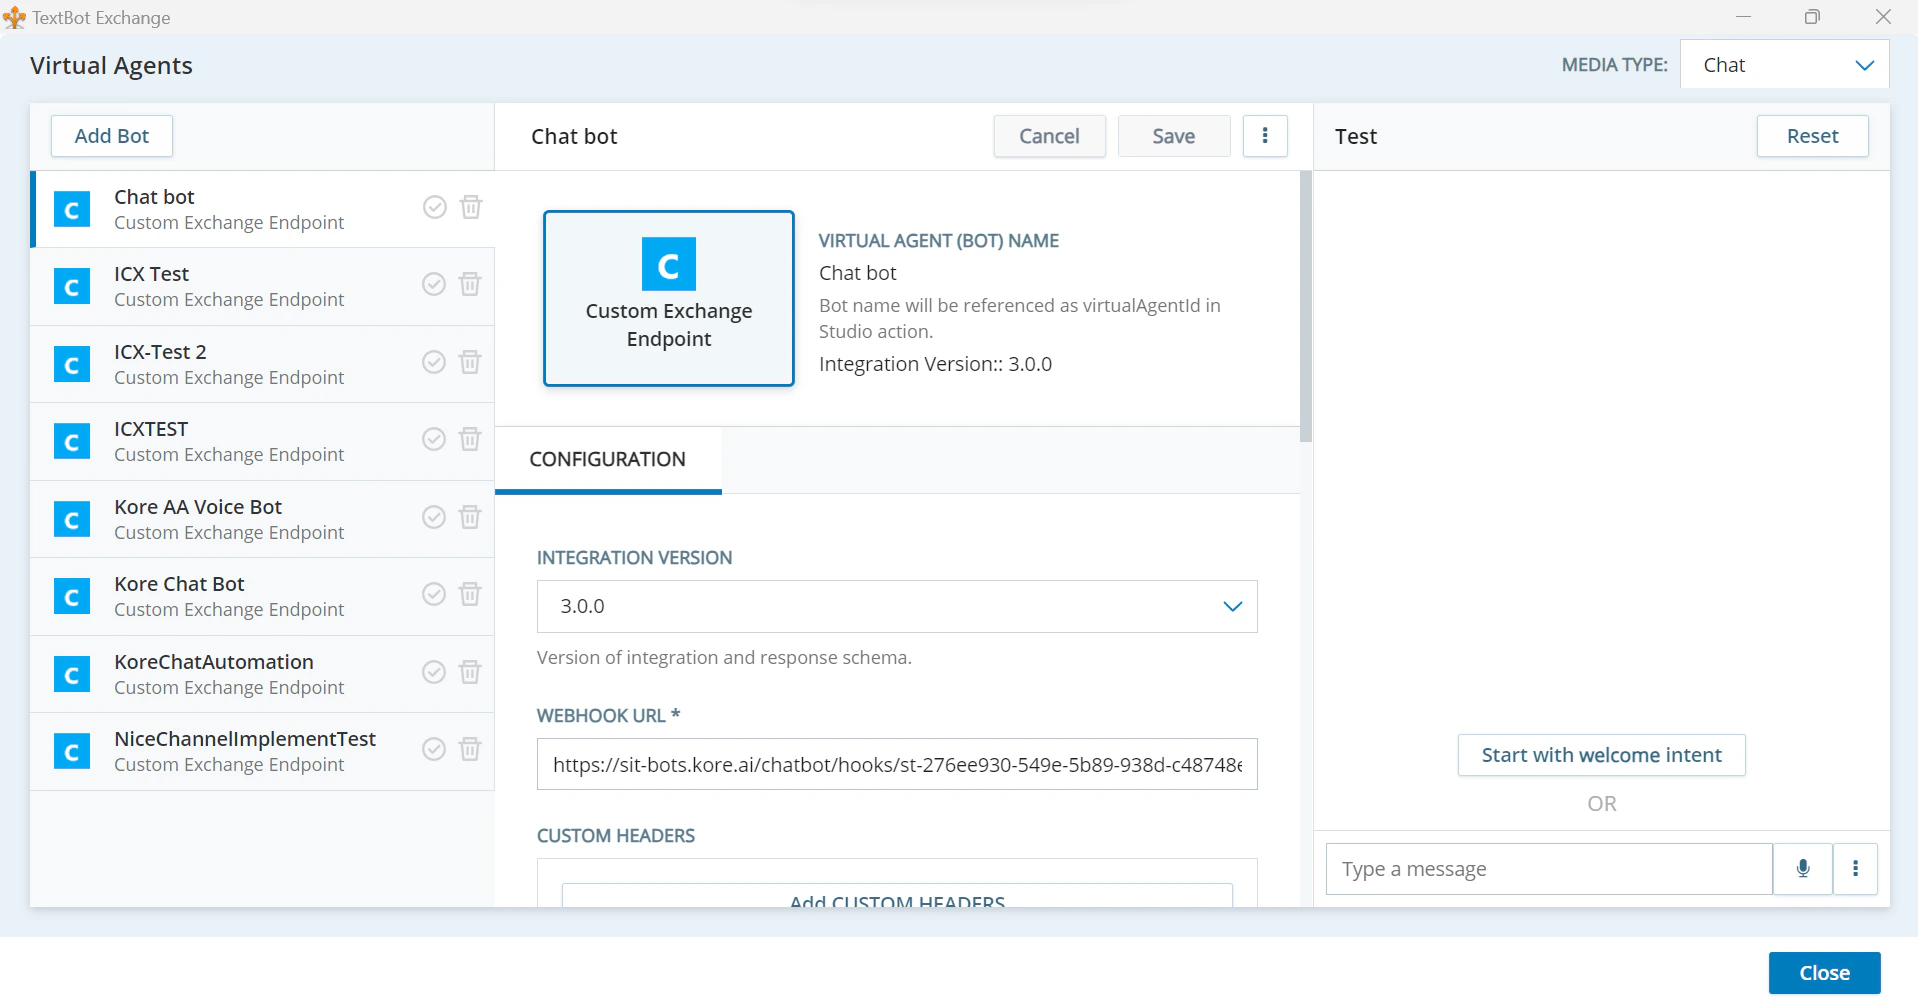 10. Click **Close**. The Nice inContact script is displayed.
11. Double-click the other **Text Bot Exchange Configuration**. The AI Agent page is displayed.
10. Click **Close**. The Nice inContact script is displayed.
11. Double-click the other **Text Bot Exchange Configuration**. The AI Agent page is displayed.
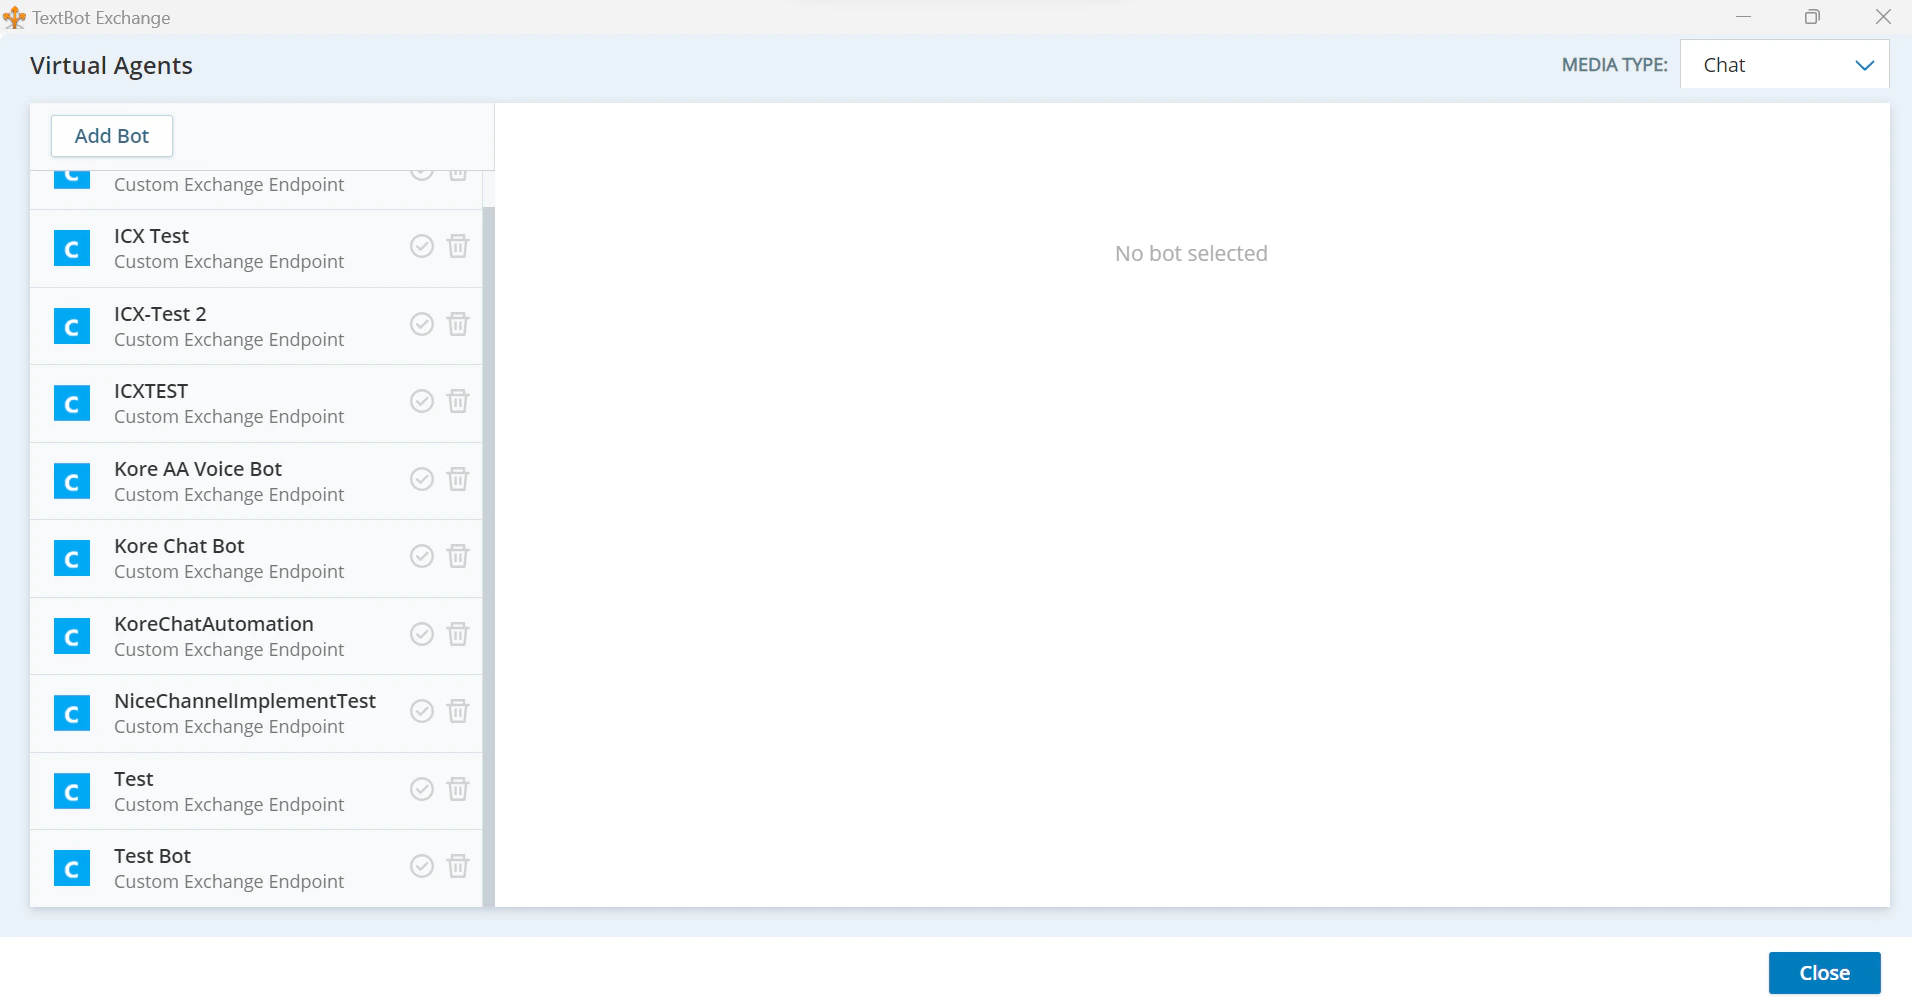 12. Click the right tick mark next to the created bot. The “Select this bot for this Studio action?” pop-up is displayed.
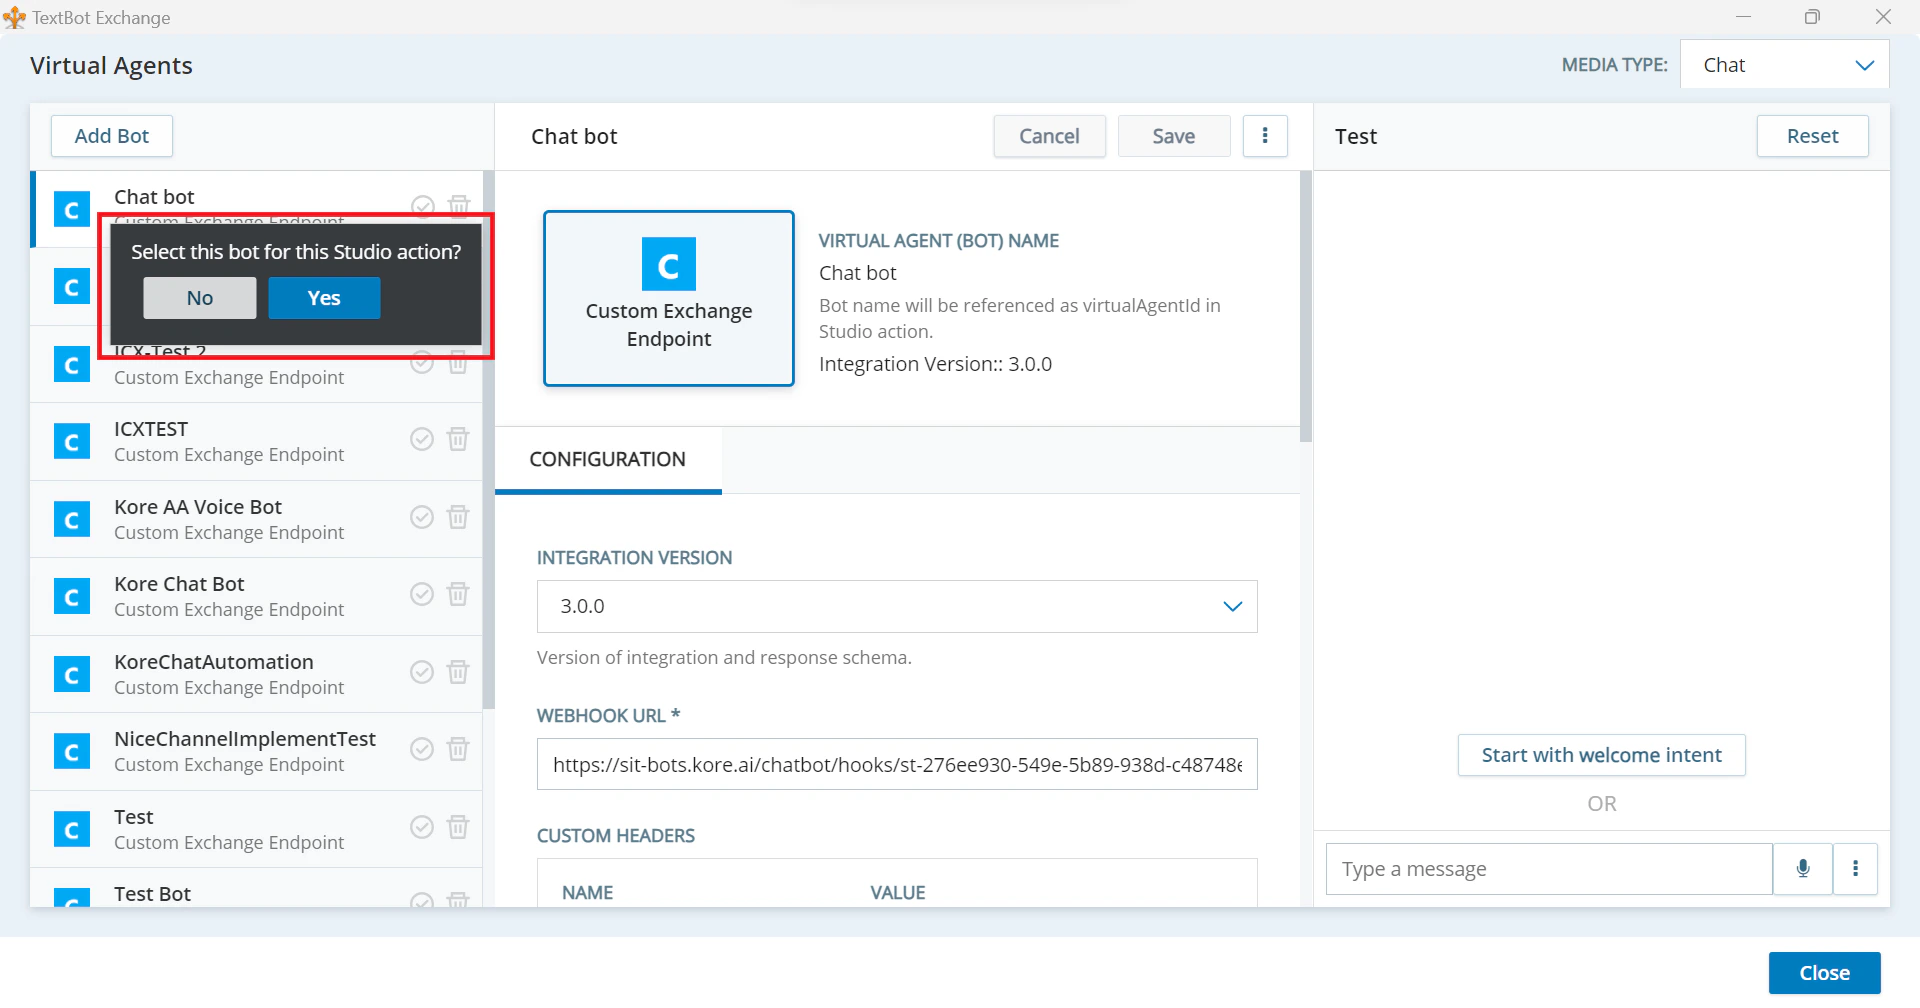 13. Click **Yes** and then click **Close**.
14. In the Nice inContact Studio, go to file and **Save** the script.
13. Click **Yes** and then click **Close**.
14. In the Nice inContact Studio, go to file and **Save** the script.
 ### Create the Chat Point of Contact
To Interact with the AI Agent in Nice Channel, create a chat POC.
1. Log into the [Nice CXone](https://na1.nice-incontact.com/login/#/logout?autoLogout=true) Portal.
2. Click the **Applications** icon in the top left corner. Under **Omnichannel Routing**, click **ACD**.
### Create the Chat Point of Contact
To Interact with the AI Agent in Nice Channel, create a chat POC.
1. Log into the [Nice CXone](https://na1.nice-incontact.com/login/#/logout?autoLogout=true) Portal.
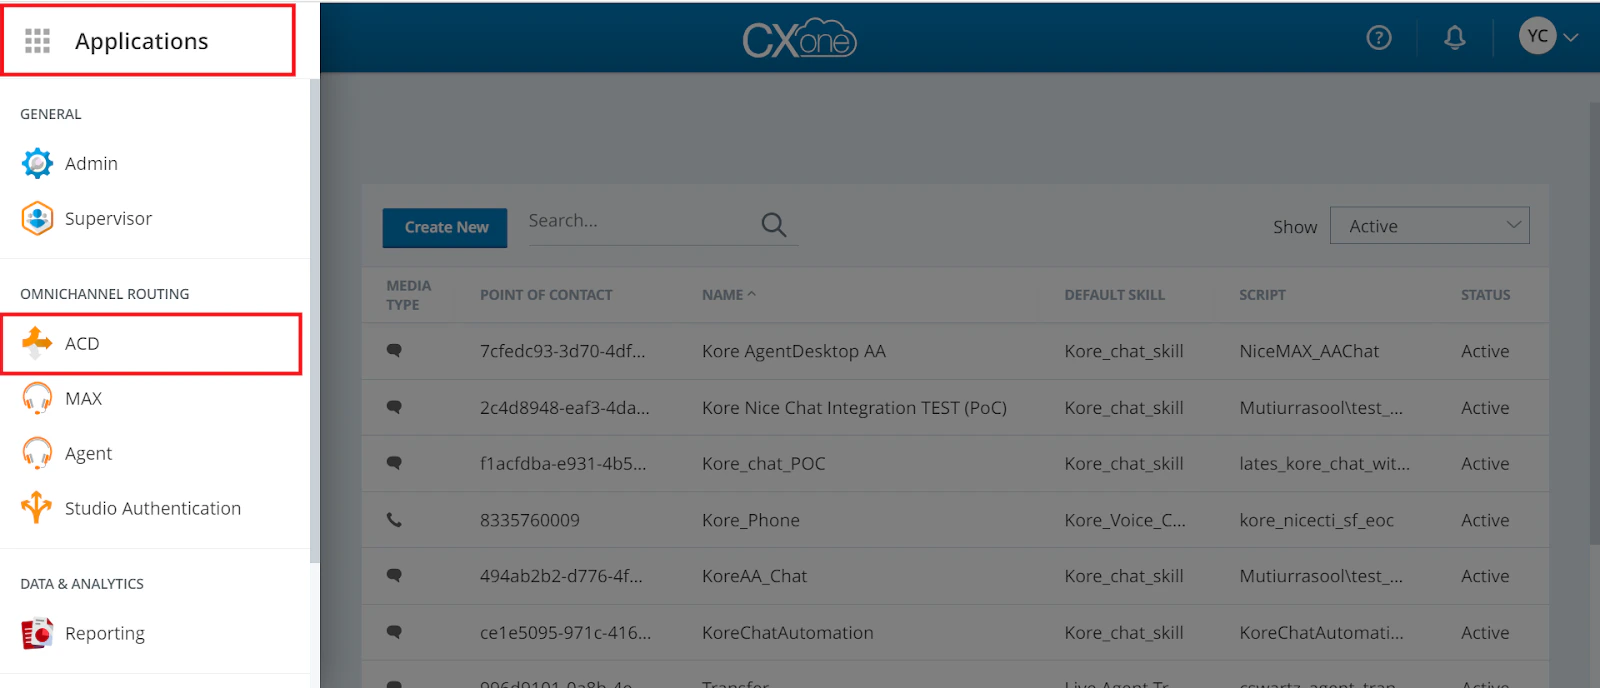
2. Click the **Applications** icon in the top left corner. Under **Omnichannel Routing**, click **ACD**.
 3. In the left-side vertical menu, under **DFO**, click **Point of Contact Digital**.
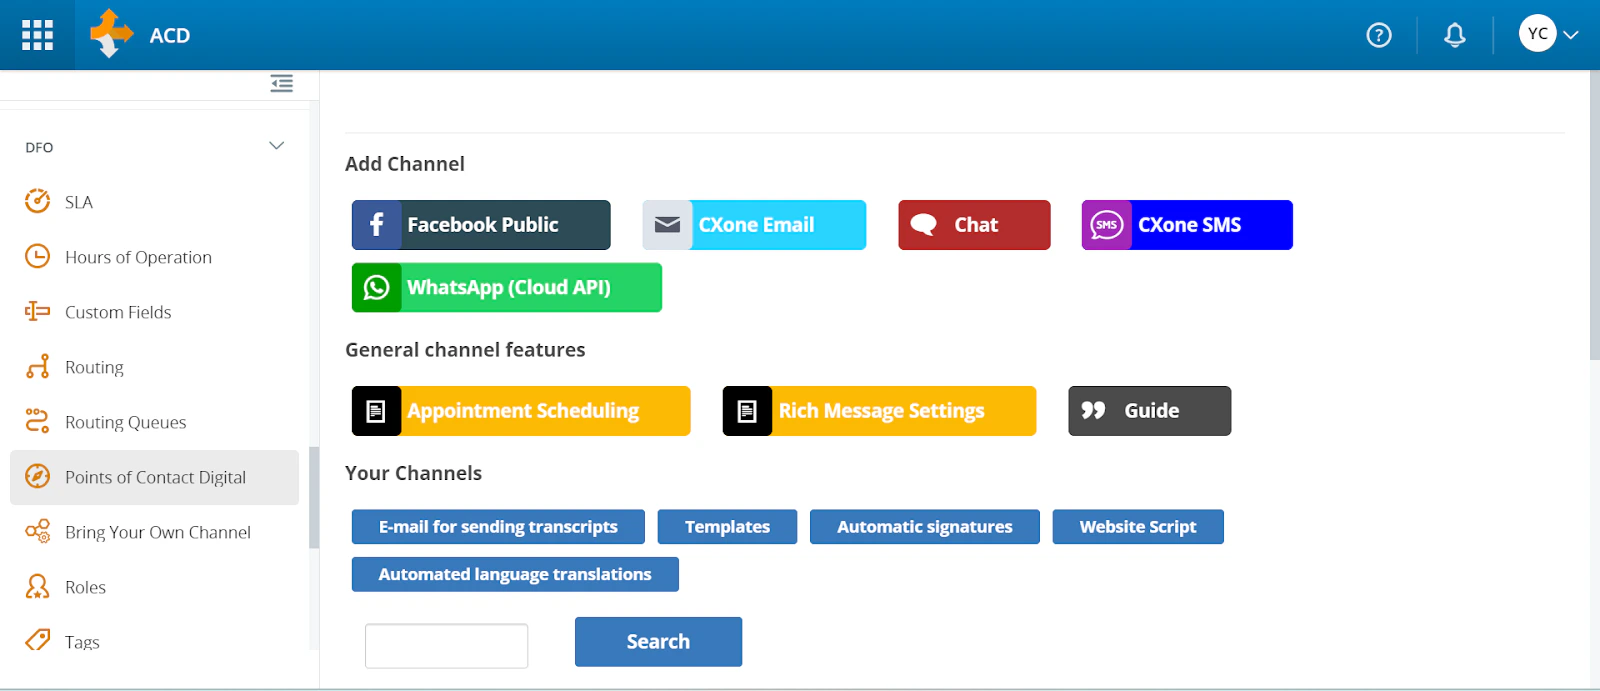 4. In the **Add Channel** section, click **Chat**. The My Channels page is displayed.
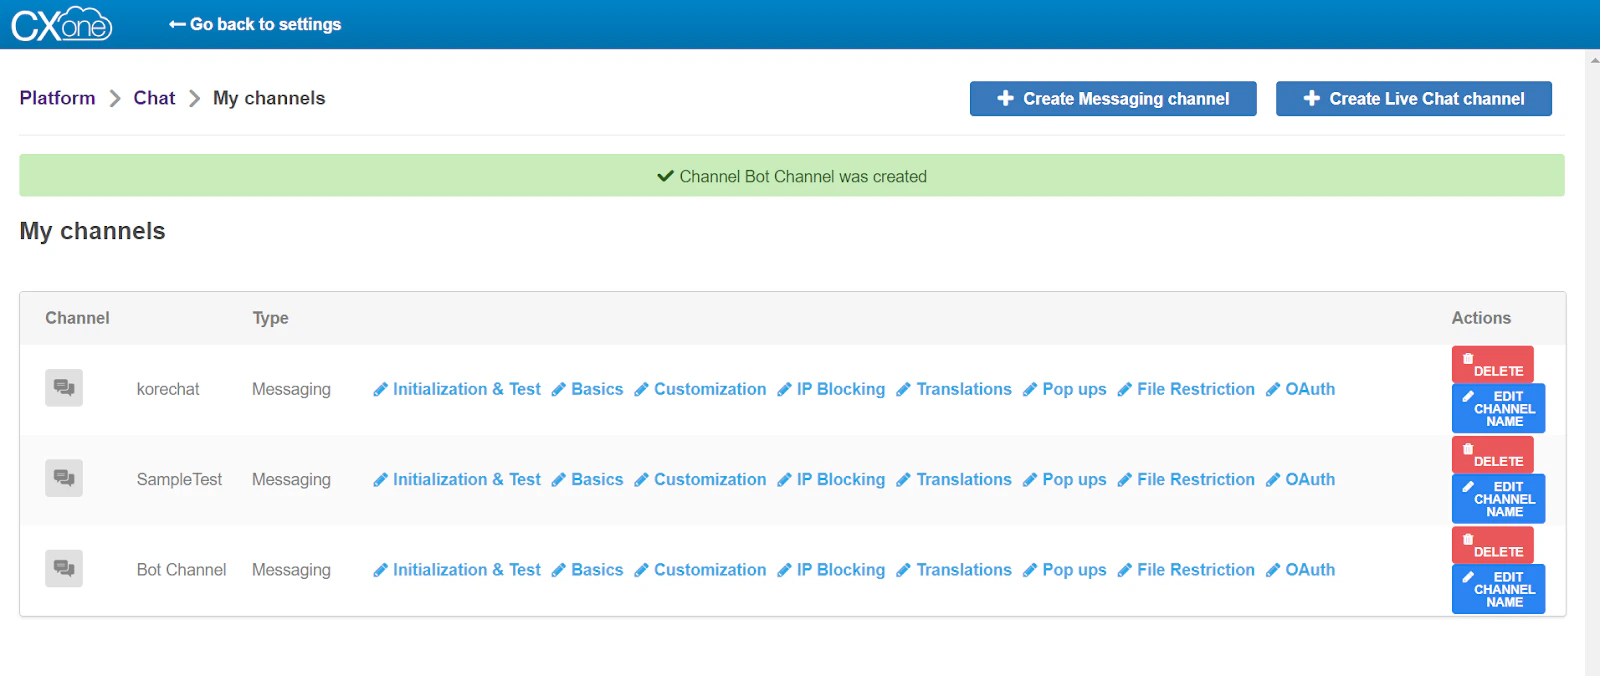
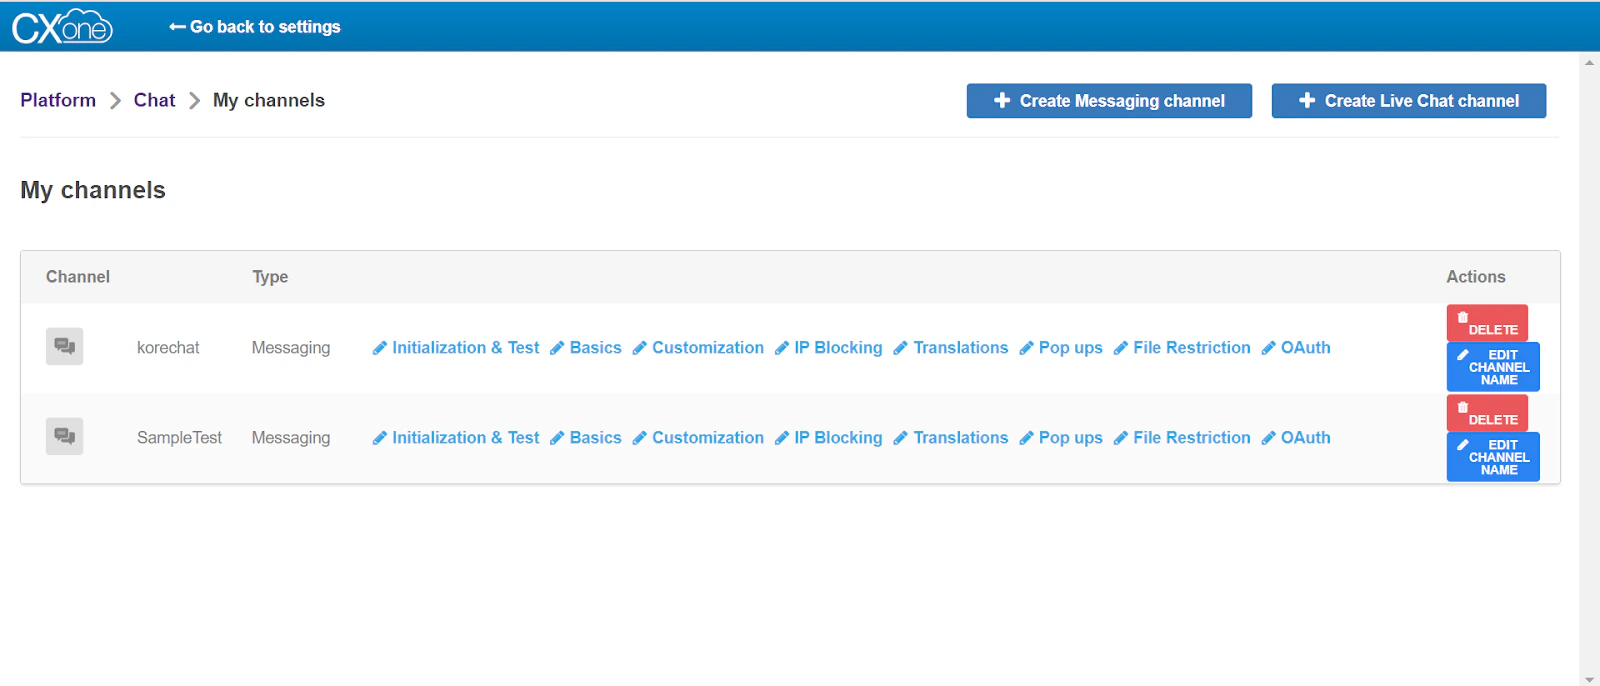 5. Click **Create Messaging Channel**, type in the channel name, and click **Create**.
 6. The created channel is displayed.
 ### Create the Digital Routing Queue for the Agent Transfer
1. Log into the [Nice CXone](https://na1.nice-incontact.com/login/#/logout?autoLogout=true) Portal.
2. In the left-side vertical menu, under **DFO**, click **Routing Queues**. All the available queues are displayed.
### Create the Digital Routing Queue for the Agent Transfer
1. Log into the [Nice CXone](https://na1.nice-incontact.com/login/#/logout?autoLogout=true) Portal.
2. In the left-side vertical menu, under **DFO**, click **Routing Queues**. All the available queues are displayed.
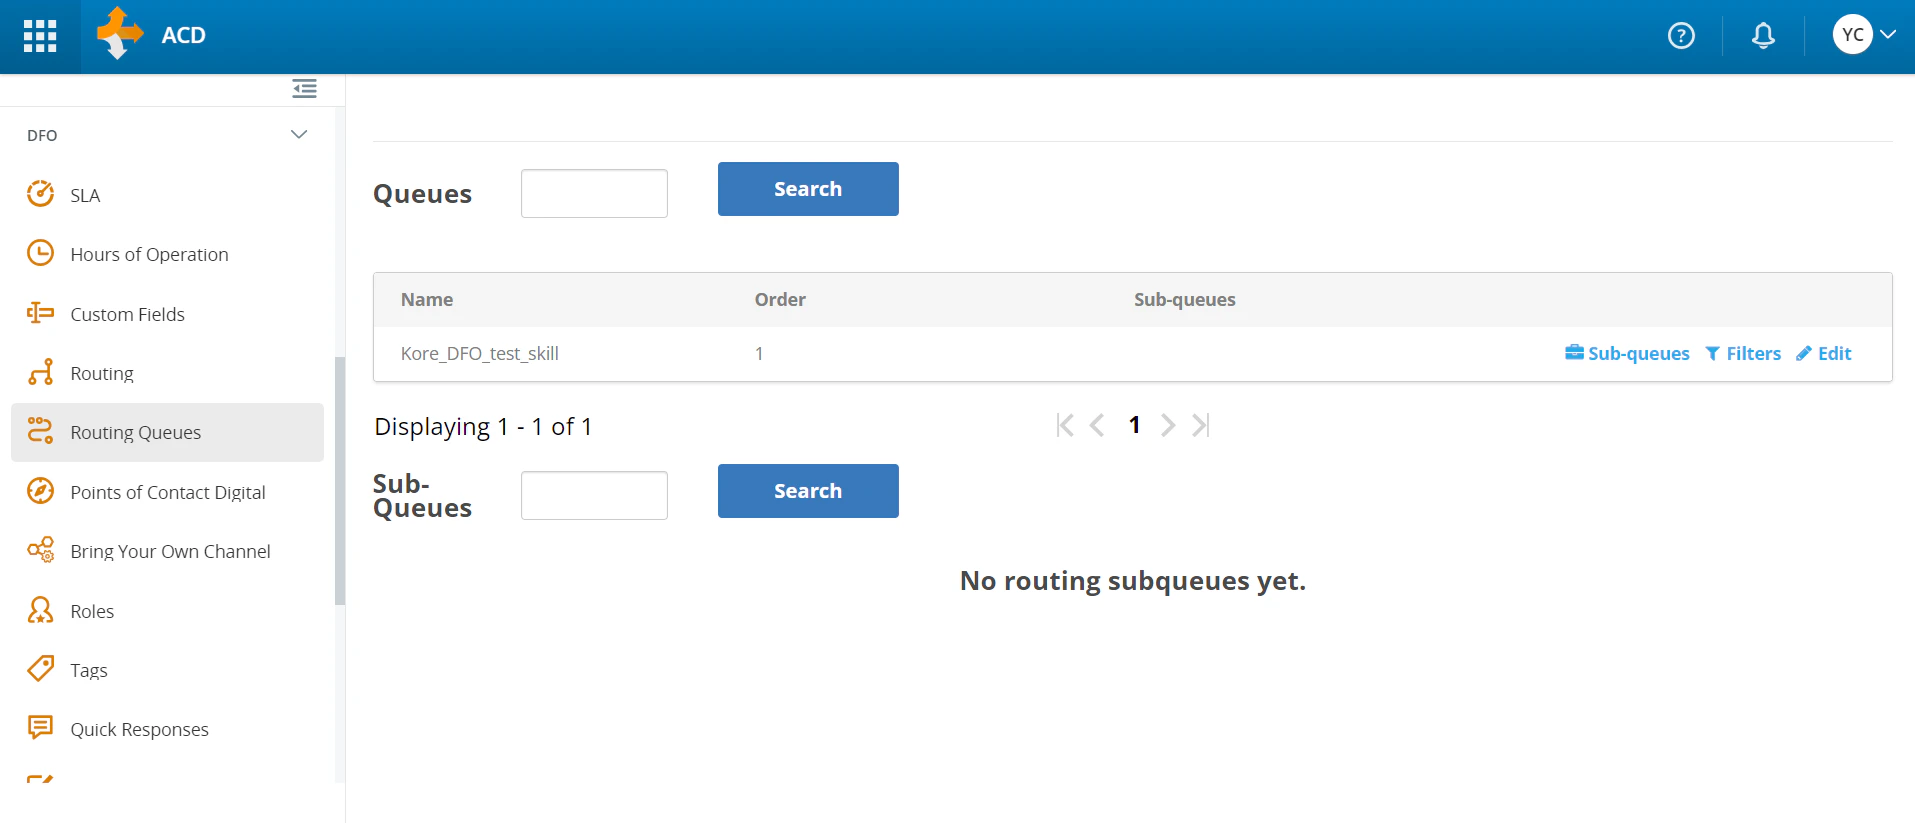 3. Click **Add Queue**, type in the queue name for the Routing Queue, and then click **Save**.
Depending on the account type and the number of queues created, the system can hide the **create queue** option.
4. Click **Filters** and then click **Add routing queue filter**.
3. Click **Add Queue**, type in the queue name for the Routing Queue, and then click **Save**.
Depending on the account type and the number of queues created, the system can hide the **create queue** option.
4. Click **Filters** and then click **Add routing queue filter**.
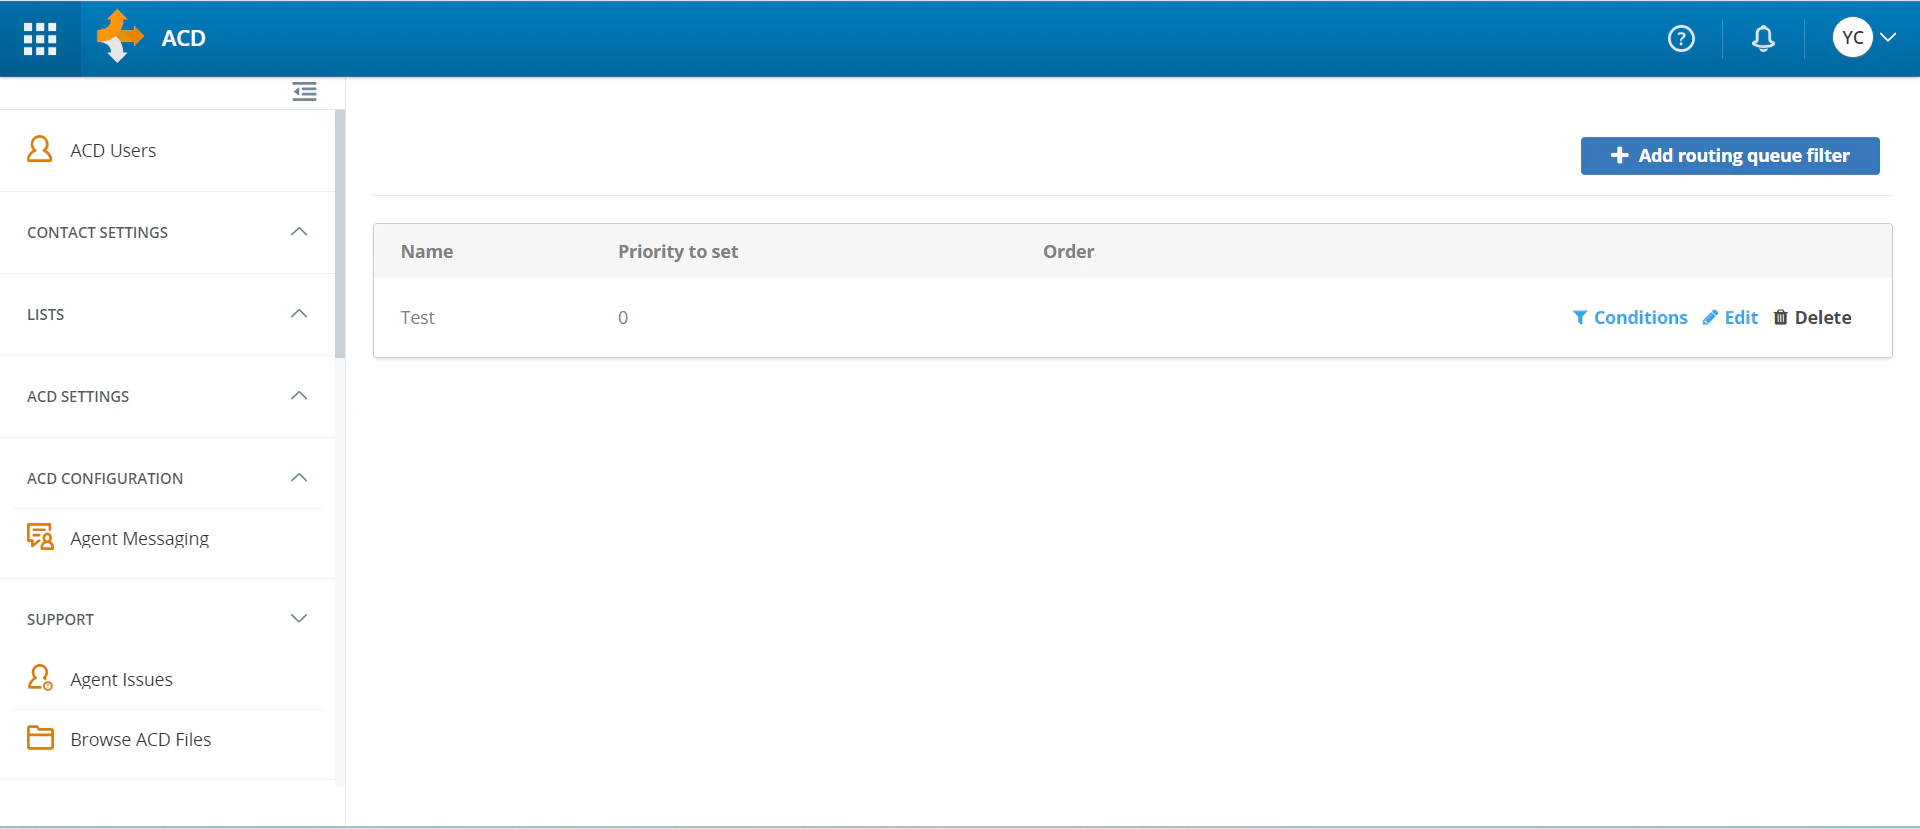 5. Type in the **Filter Name** and click **Save**.
 6. The Condition Type page is displayed.
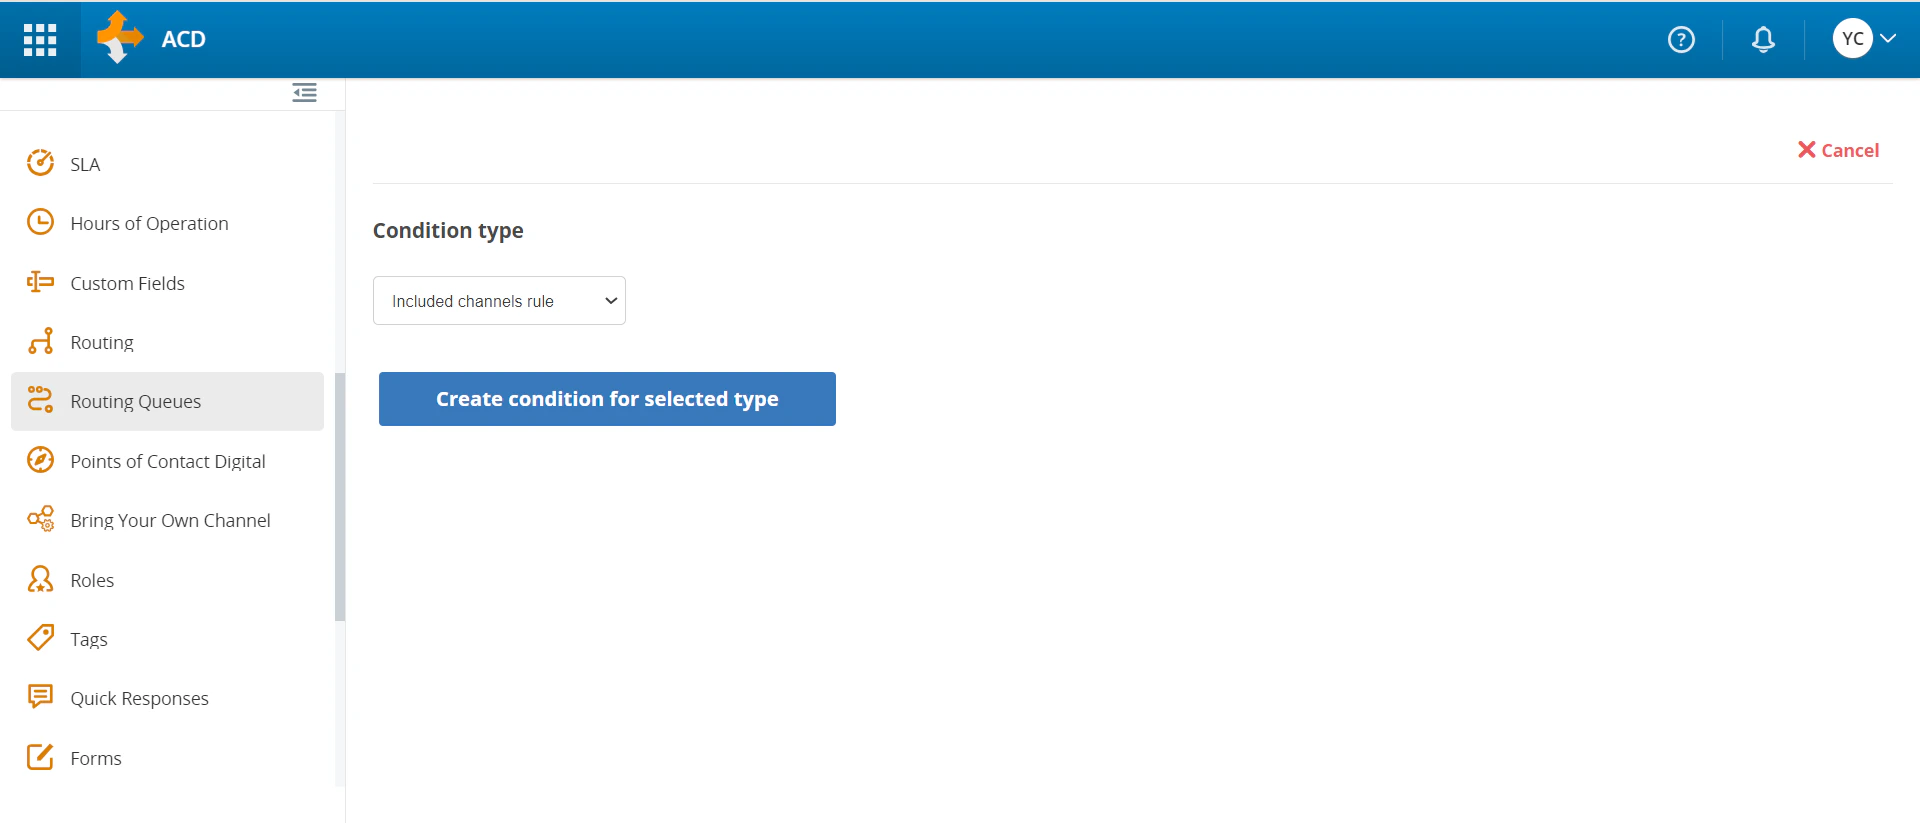 7. Click **Create condition for selected type**. All Channels page is displayed.
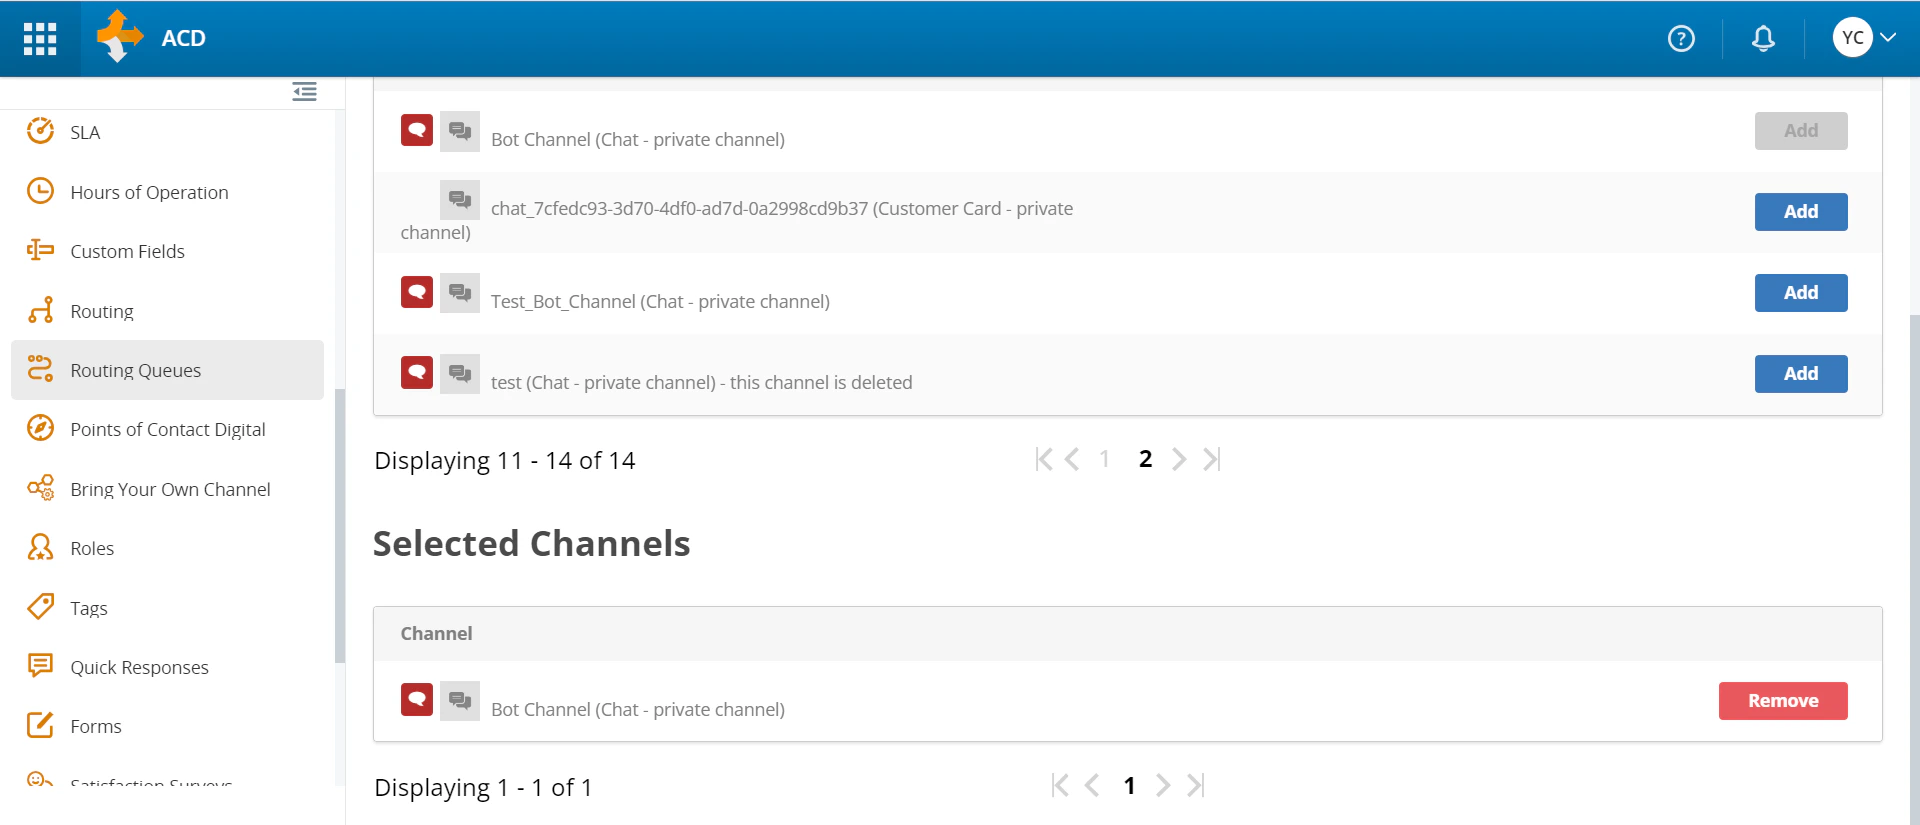
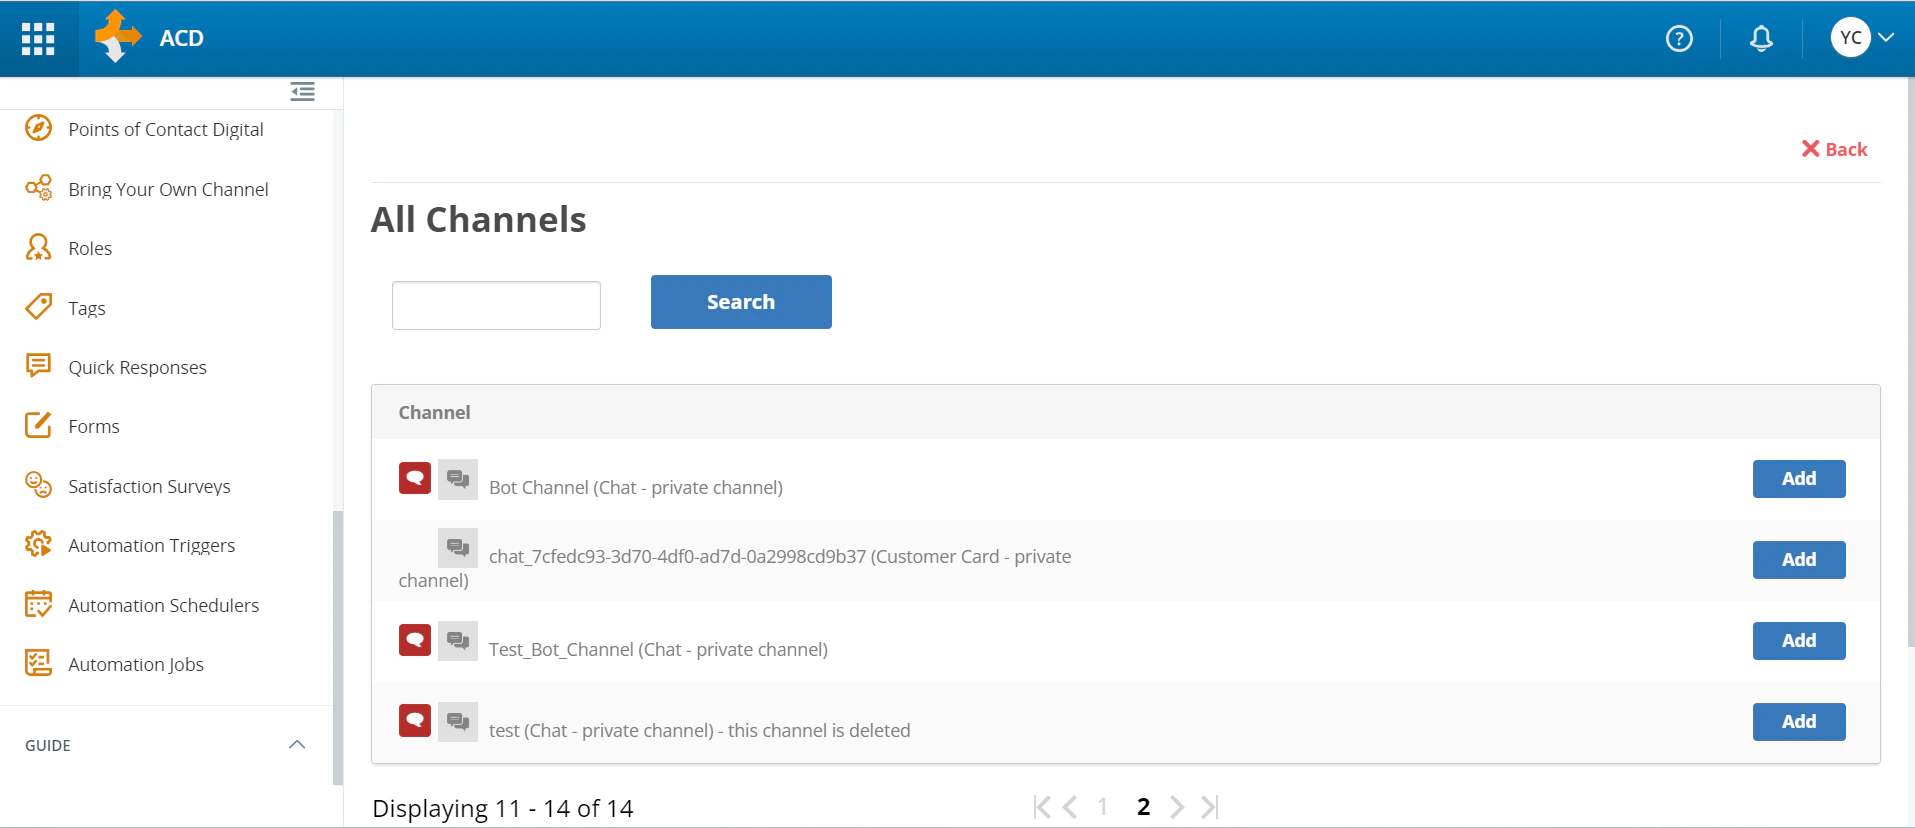 8. Search the **created channel** and click the respective **Add**, For example, Channel. The selected channel is displayed.
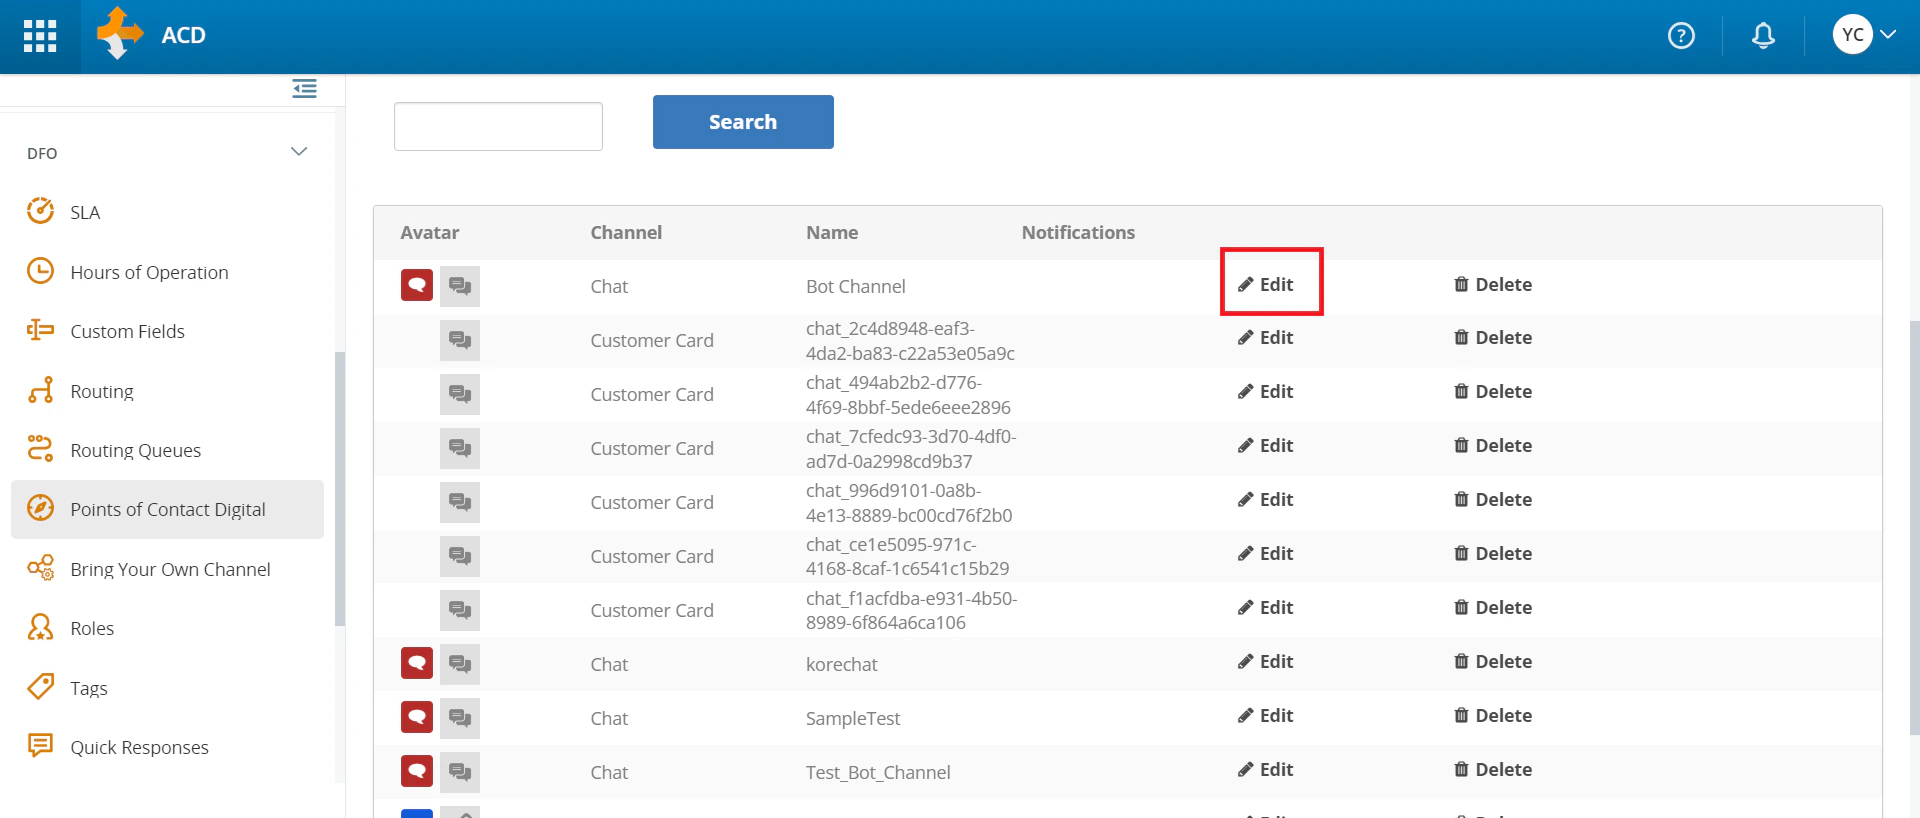
 9. In the left-side vertical menu, under **DFO**, click **Point of Contact Digital**.
10. Search the **created channel** and click the respective **Edit**.
9. In the left-side vertical menu, under **DFO**, click **Point of Contact Digital**.
10. Search the **created channel** and click the respective **Edit**.
 11. Select the created **Studio Script** from the **Select Studio Script** dropdown and **Skill** from the **Select Default Skills** dropdown.
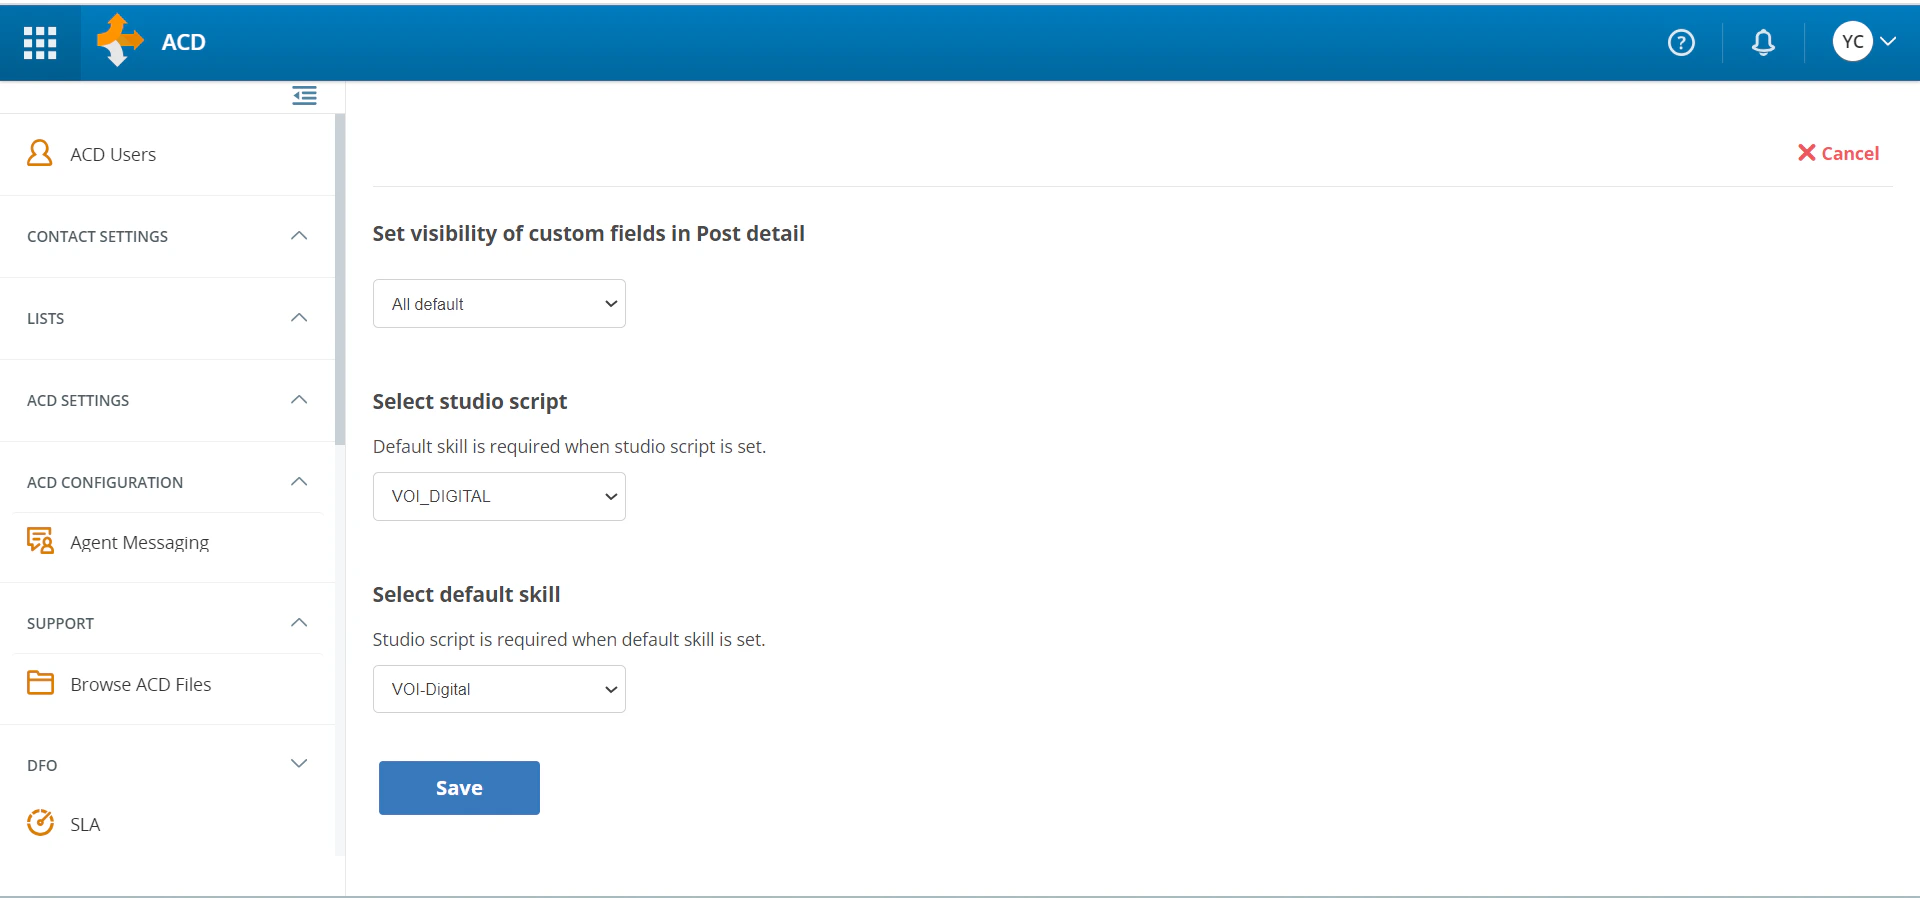 12. Click **Save**. The channel saved success message is displayed.
Go to **DFO > Point of Contact Digital > Chat > My Channels** and click **Initialization & Test** to test an AI Agent.
## Configure Nice inContact for Legacy Chat
To configure Nice inContact for Legacy Chat, follow these steps.
### Install Nice Studio
1. Log into the [Nice CXone](https://na1.nice-incontact.com/login) Portal.
2. Click the **profile icon** in the top right corner and then click **Support & Downloads**. The download page is displayed.
3. In the **Studio** section, download **Studio Installer** to download the Nice inContact **StudioSetup.exe** file.
4. Launch the **StudioSetup.exe** and install **Nice inContact Studio**. Log into **Nice inContact Studio** using NiceCXone portal login credentials.
### Import the Studio Script and Create a Custom Exchange EndPoint
1. In the Nice Studio, click **File > Import from File**.
2. Select the Studio Script downloaded from the Platform and then click **Open**. For example, **Chat\_Script.XML**.
3. In the displayed script, double-click either of the **Text Box Exchange**; For example, in the Chat\_Script, double-click Textbot Exchange.
4. The AI Agent page is displayed. Click **Add Bot**.
5. On the General Information page, type in the bot name, select **Custom Exchange Endpoint**, and click **Next**.
6. On the Bot Configuration page, fill in the details as shown and then click **Next**.
1. Select the **Integration Version** as **3.0.0** from the dropdown list.
2. Paste the **Webhook URL**.
3. Under the Customer Headers, click **Add Custom Headers**.
4. Type “Authorization” in the Name field and “Bearer (client ID)” in the Value field.
7. On the Voice page, in the voice integration options, select **Text Only (No Voice Support)** and click **Next**.
8. On the **Test + Add** page, click **Add**.
9. The bot saved success message is displayed.
10. Click **Close**. The Nice inContact script is displayed.
11. Double-click the other **Text Bot Exchange Configuration**. The AI Agent page is displayed.
12. Click the right tick mark next to the created bot. The “Select this bot for this Studio action?” pop-up is displayed.
13. Click **Yes** and then click **Close**.
14. In the Nice inContact Studio, go to file and **Save** the script.
### Create the Chat Point of Contact
To interact with the AI Agent in the Nice InChannel, the developer must create a Chat Skill and Chat Point of Contact. The Point of Contact triggers the Studio Script associated with the AI Agent.
1. Create a Campaign.
1. Log into the [Nice CXone](https://na1.nice-incontact.com/login/#/logout?autoLogout=true) Portal. In the **Applications** menu in the top left corner, under **Omnichannel Routing**, click **ACD** (Automatic Call Distribution).
12. Click **Save**. The channel saved success message is displayed.
Go to **DFO > Point of Contact Digital > Chat > My Channels** and click **Initialization & Test** to test an AI Agent.
## Configure Nice inContact for Legacy Chat
To configure Nice inContact for Legacy Chat, follow these steps.
### Install Nice Studio
1. Log into the [Nice CXone](https://na1.nice-incontact.com/login) Portal.
2. Click the **profile icon** in the top right corner and then click **Support & Downloads**. The download page is displayed.
3. In the **Studio** section, download **Studio Installer** to download the Nice inContact **StudioSetup.exe** file.
4. Launch the **StudioSetup.exe** and install **Nice inContact Studio**. Log into **Nice inContact Studio** using NiceCXone portal login credentials.
### Import the Studio Script and Create a Custom Exchange EndPoint
1. In the Nice Studio, click **File > Import from File**.
2. Select the Studio Script downloaded from the Platform and then click **Open**. For example, **Chat\_Script.XML**.
3. In the displayed script, double-click either of the **Text Box Exchange**; For example, in the Chat\_Script, double-click Textbot Exchange.
4. The AI Agent page is displayed. Click **Add Bot**.
5. On the General Information page, type in the bot name, select **Custom Exchange Endpoint**, and click **Next**.
6. On the Bot Configuration page, fill in the details as shown and then click **Next**.
1. Select the **Integration Version** as **3.0.0** from the dropdown list.
2. Paste the **Webhook URL**.
3. Under the Customer Headers, click **Add Custom Headers**.
4. Type “Authorization” in the Name field and “Bearer (client ID)” in the Value field.
7. On the Voice page, in the voice integration options, select **Text Only (No Voice Support)** and click **Next**.
8. On the **Test + Add** page, click **Add**.
9. The bot saved success message is displayed.
10. Click **Close**. The Nice inContact script is displayed.
11. Double-click the other **Text Bot Exchange Configuration**. The AI Agent page is displayed.
12. Click the right tick mark next to the created bot. The “Select this bot for this Studio action?” pop-up is displayed.
13. Click **Yes** and then click **Close**.
14. In the Nice inContact Studio, go to file and **Save** the script.
### Create the Chat Point of Contact
To interact with the AI Agent in the Nice InChannel, the developer must create a Chat Skill and Chat Point of Contact. The Point of Contact triggers the Studio Script associated with the AI Agent.
1. Create a Campaign.
1. Log into the [Nice CXone](https://na1.nice-incontact.com/login/#/logout?autoLogout=true) Portal. In the **Applications** menu in the top left corner, under **Omnichannel Routing**, click **ACD** (Automatic Call Distribution).
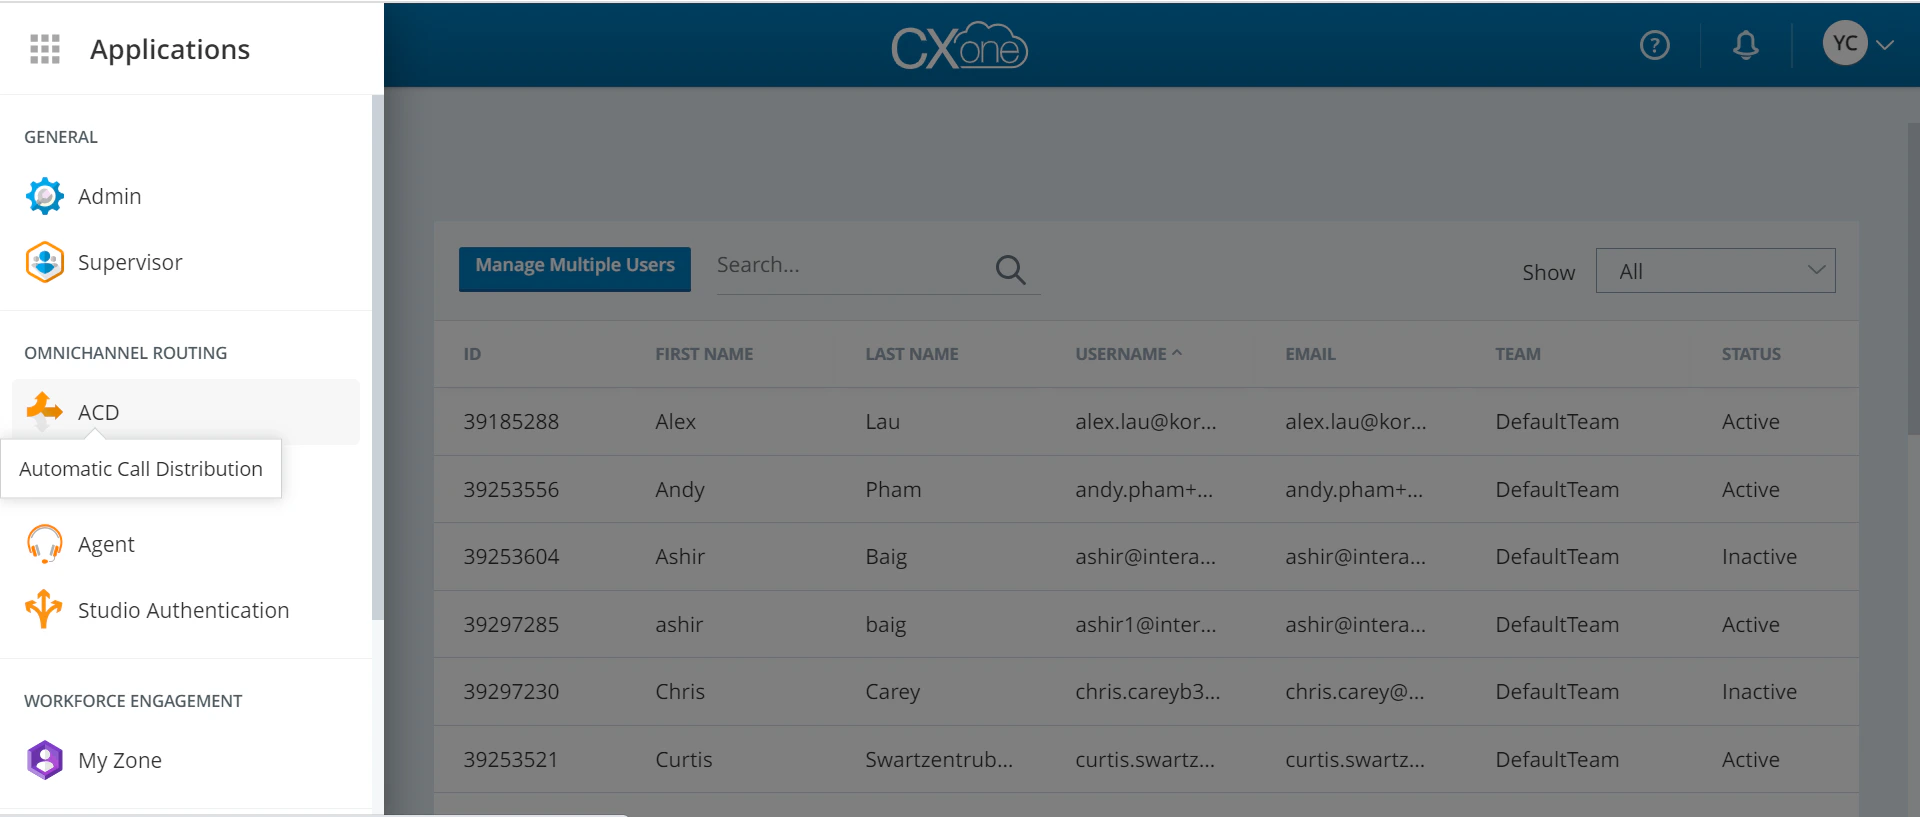 2. In the left-side vertical menu, click **Contact Settings** and then click **Campaigns.** The Campaigns page is displayed.
3. Click **Create New** to create a Campaign.
2. In the left-side vertical menu, click **Contact Settings** and then click **Campaigns.** The Campaigns page is displayed.
3. Click **Create New** to create a Campaign.
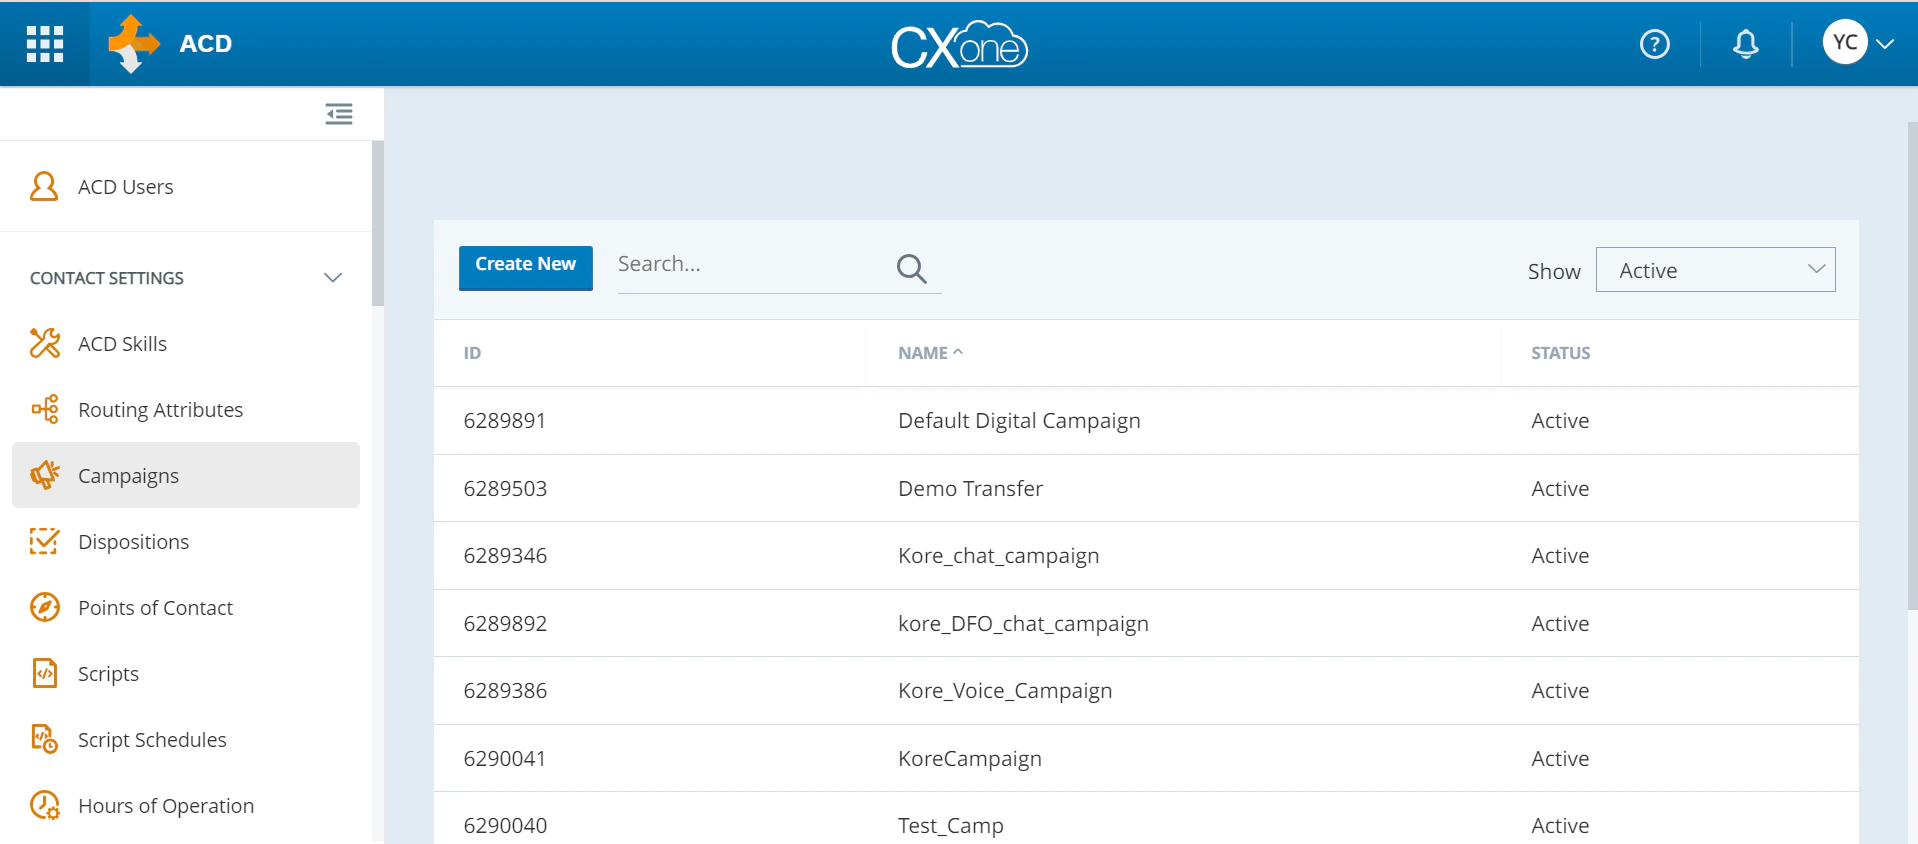 4. Type in the campaign name and click **Create Campaign**.
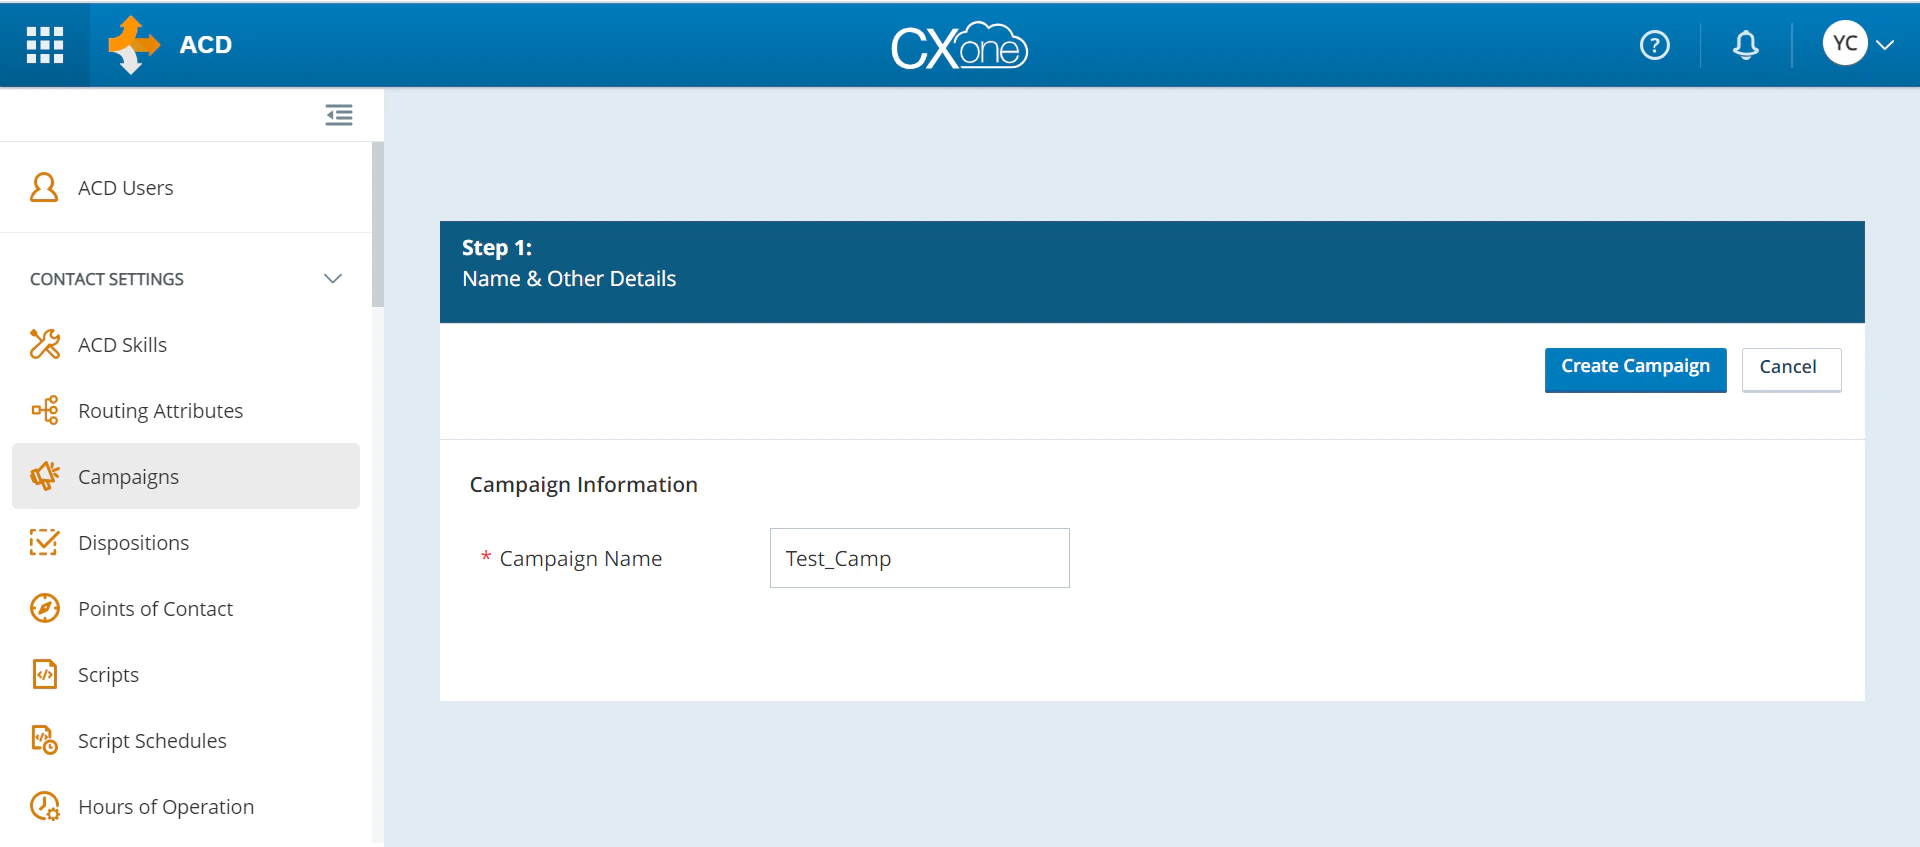 5. The success message is displayed.
2. Create A skills.
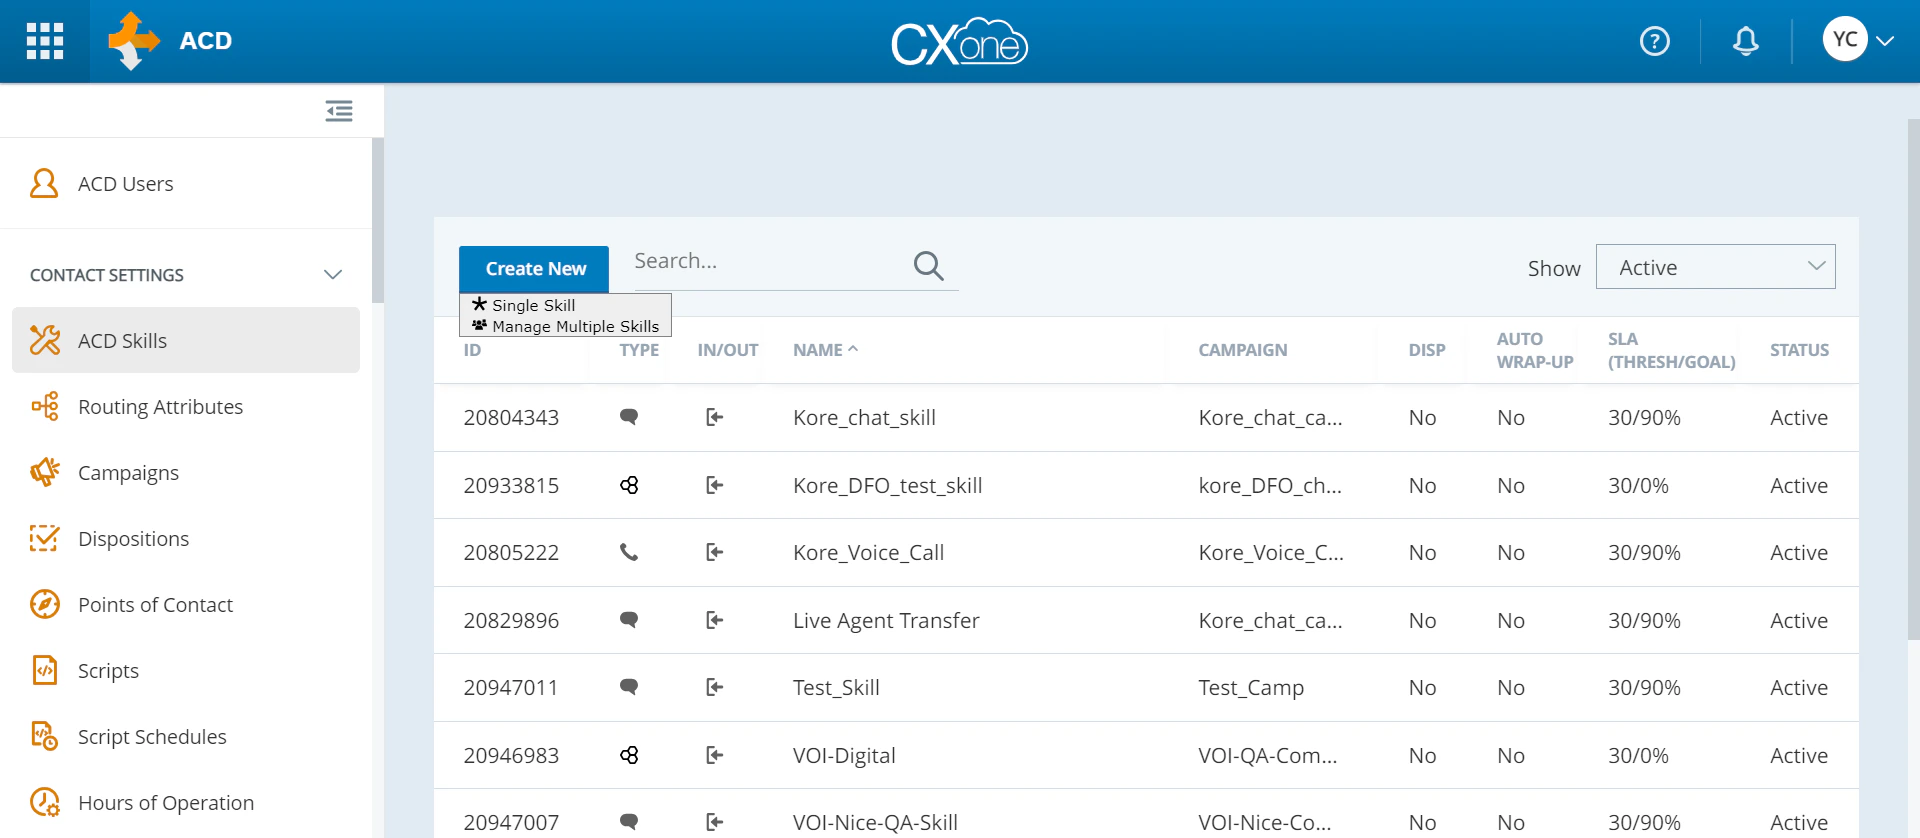
1. In the left side vertical menu, under **Contact Settings**, click **ACD Skills > Create New > Single Skill**.
5. The success message is displayed.
2. Create A skills.
1. In the left side vertical menu, under **Contact Settings**, click **ACD Skills > Create New > Single Skill**.
 2. In the Skill Information section, in the **Media Type** dropdown, select **Chat**.
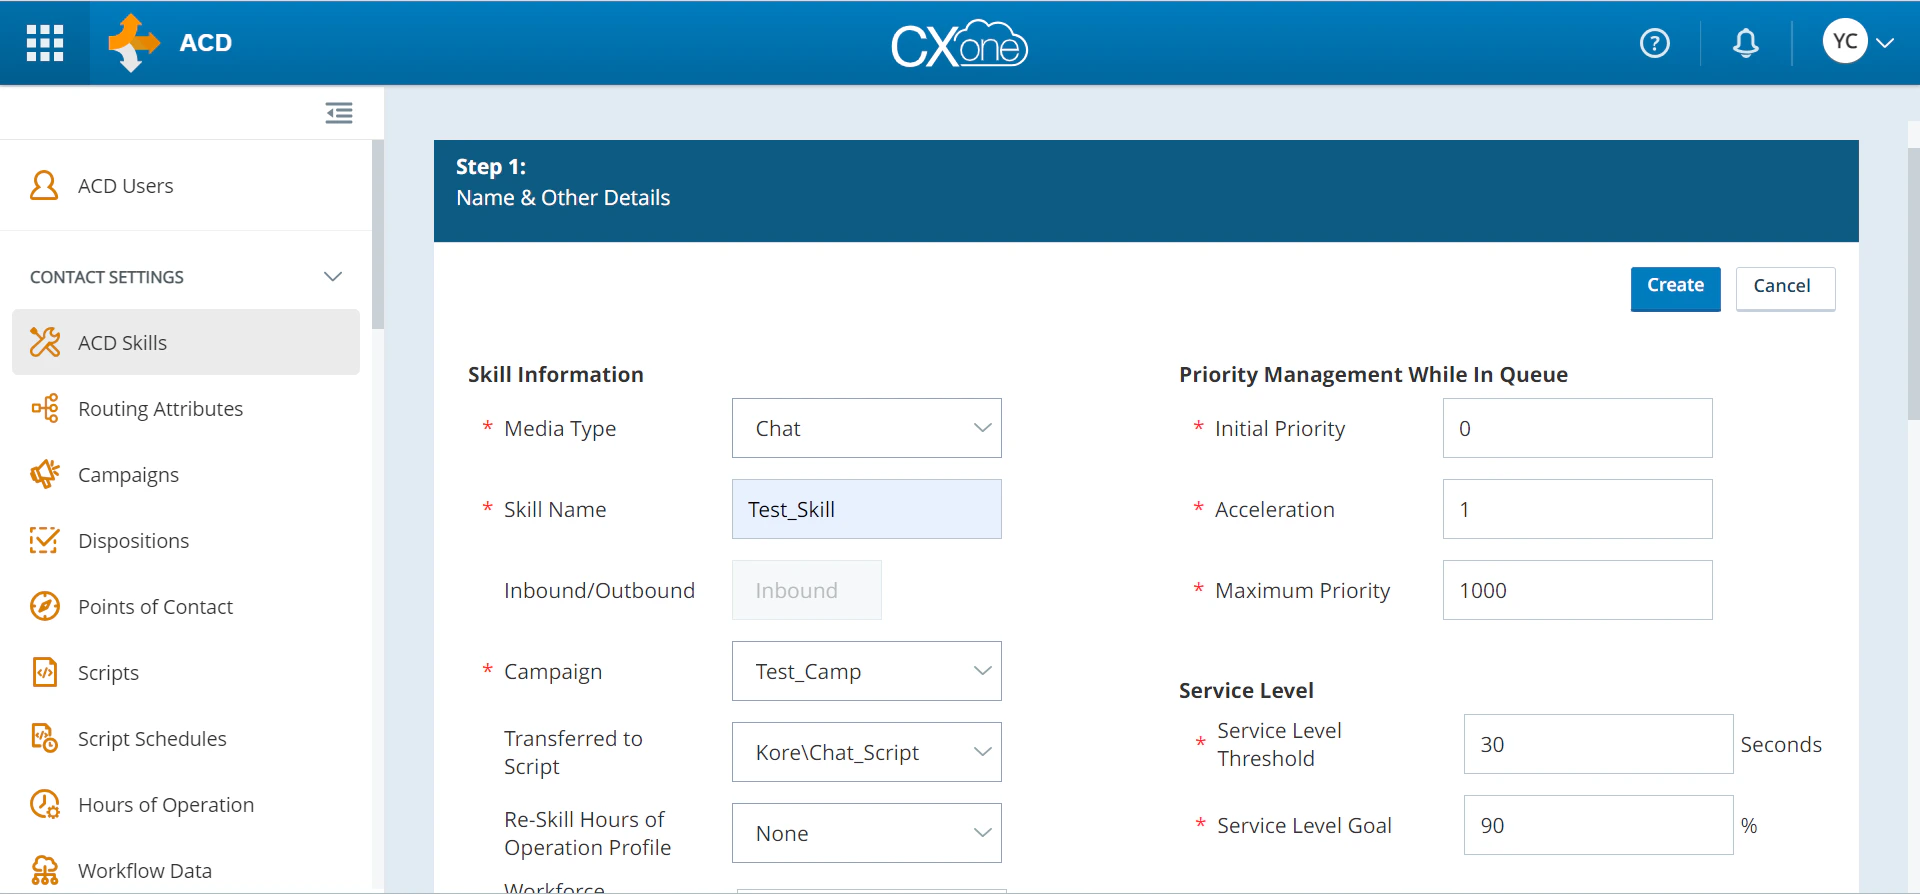 3. Type in the **Skill Name**, and select the created campaign from the **Campaign** dropdown.
4. In the **Transferred to Script** dropdown, select the script and click **Create**.
5. The skills created success message is displayed.
3. Create a Point of Contact.
1. In the left side vertical menu, under **Contact Settings**, click **Point of Contact > Create New > Single Point of Contact**.
2. Enter the Point of Contact Information.
3. Type in the **Skill Name**, and select the created campaign from the **Campaign** dropdown.
4. In the **Transferred to Script** dropdown, select the script and click **Create**.
5. The skills created success message is displayed.
3. Create a Point of Contact.
1. In the left side vertical menu, under **Contact Settings**, click **Point of Contact > Create New > Single Point of Contact**.
2. Enter the Point of Contact Information.
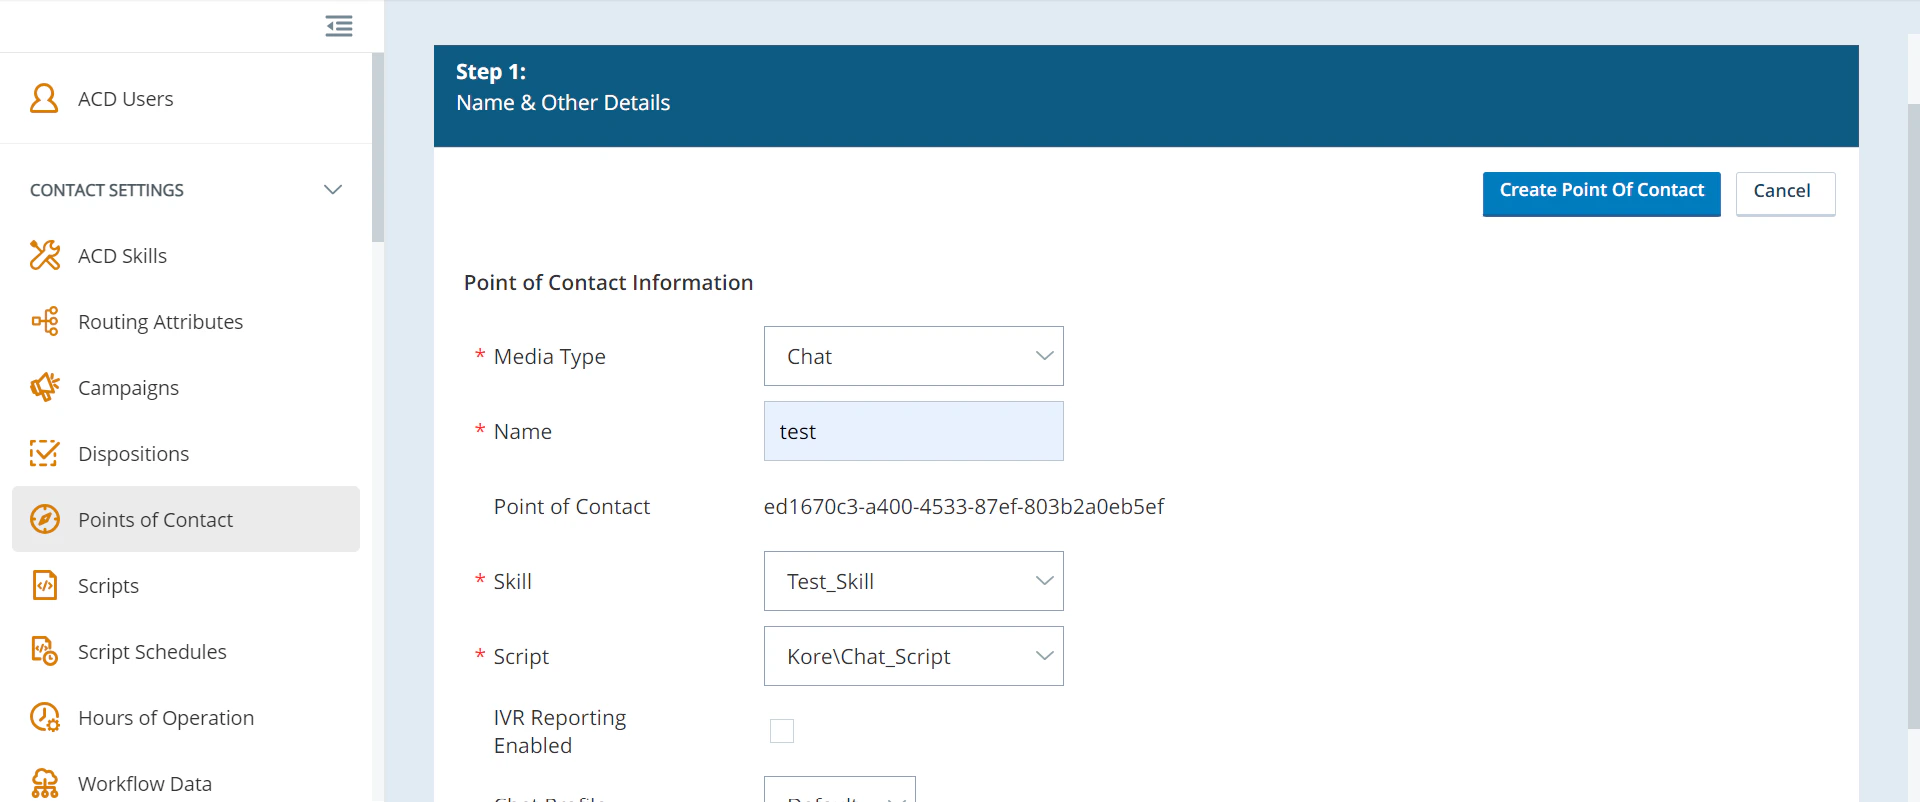 1. In the **Media Type** dropdown, select **Chat**.
2. Type in the **Point of Contact** name.
3. Select the created **Skill** and **Script** from the respective dropdown.
4. Click **Create Point of Contact**.
5. The success message is displayed.
1. In the **Media Type** dropdown, select **Chat**.
2. Type in the **Point of Contact** name.
3. Select the created **Skill** and **Script** from the respective dropdown.
4. Click **Create Point of Contact**.
5. The success message is displayed.
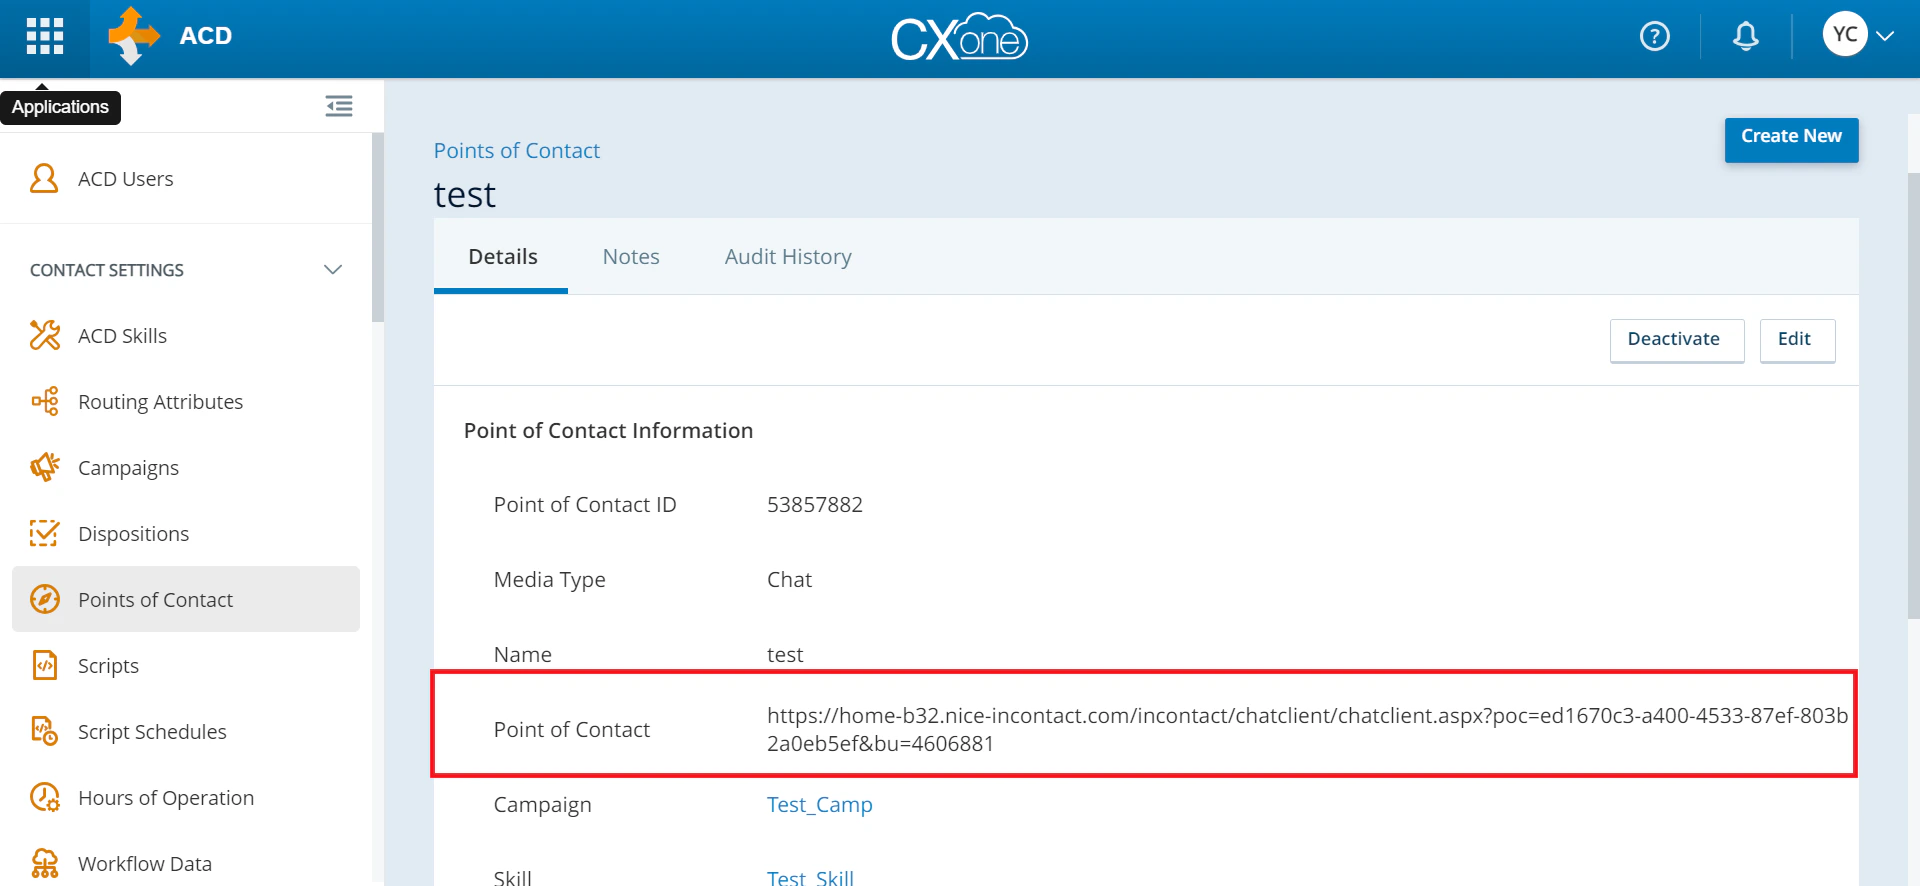 You can use the generated **Point of Contact** link to test the AI Agent.
### Enable the Agent Transfer
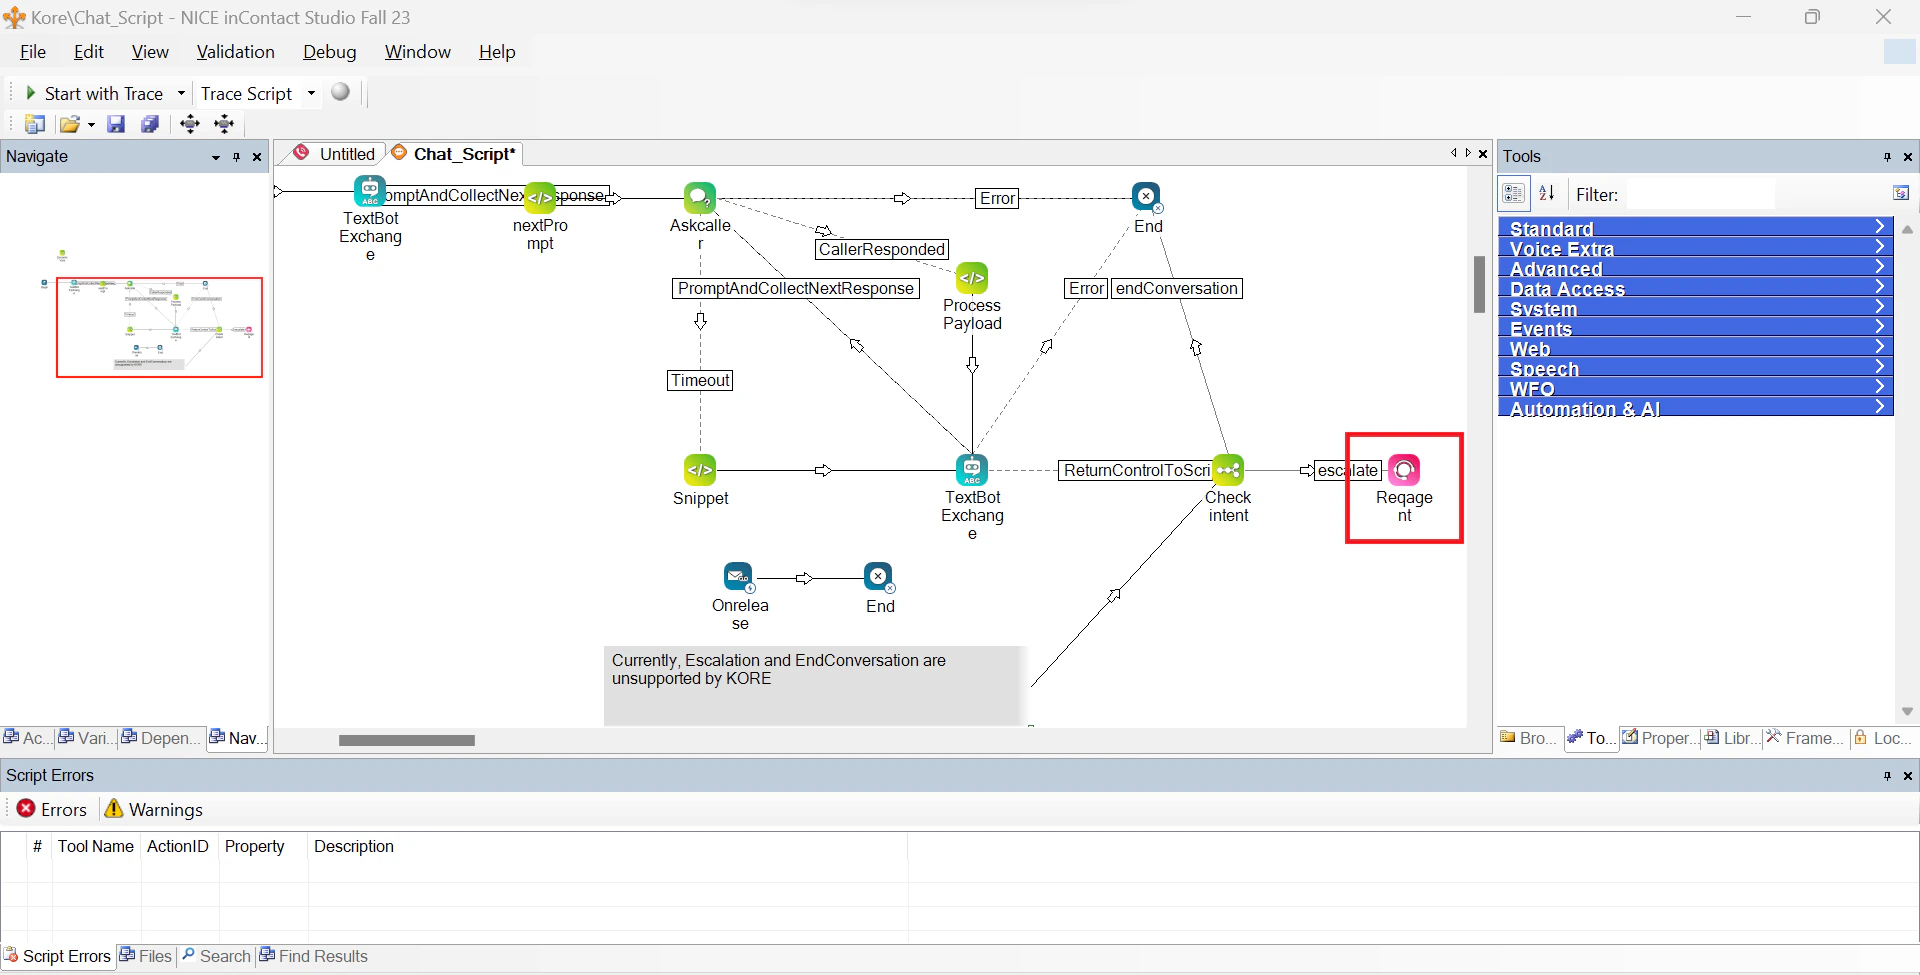
1. In the Nice Studio > Chat Script, right-click the **Reqagent** action.
You can use the generated **Point of Contact** link to test the AI Agent.
### Enable the Agent Transfer
1. In the Nice Studio > Chat Script, right-click the **Reqagent** action.
 2. Under the **Properties** section, in the **TargetAgent** dropdown, select the user/group to route the agent request.
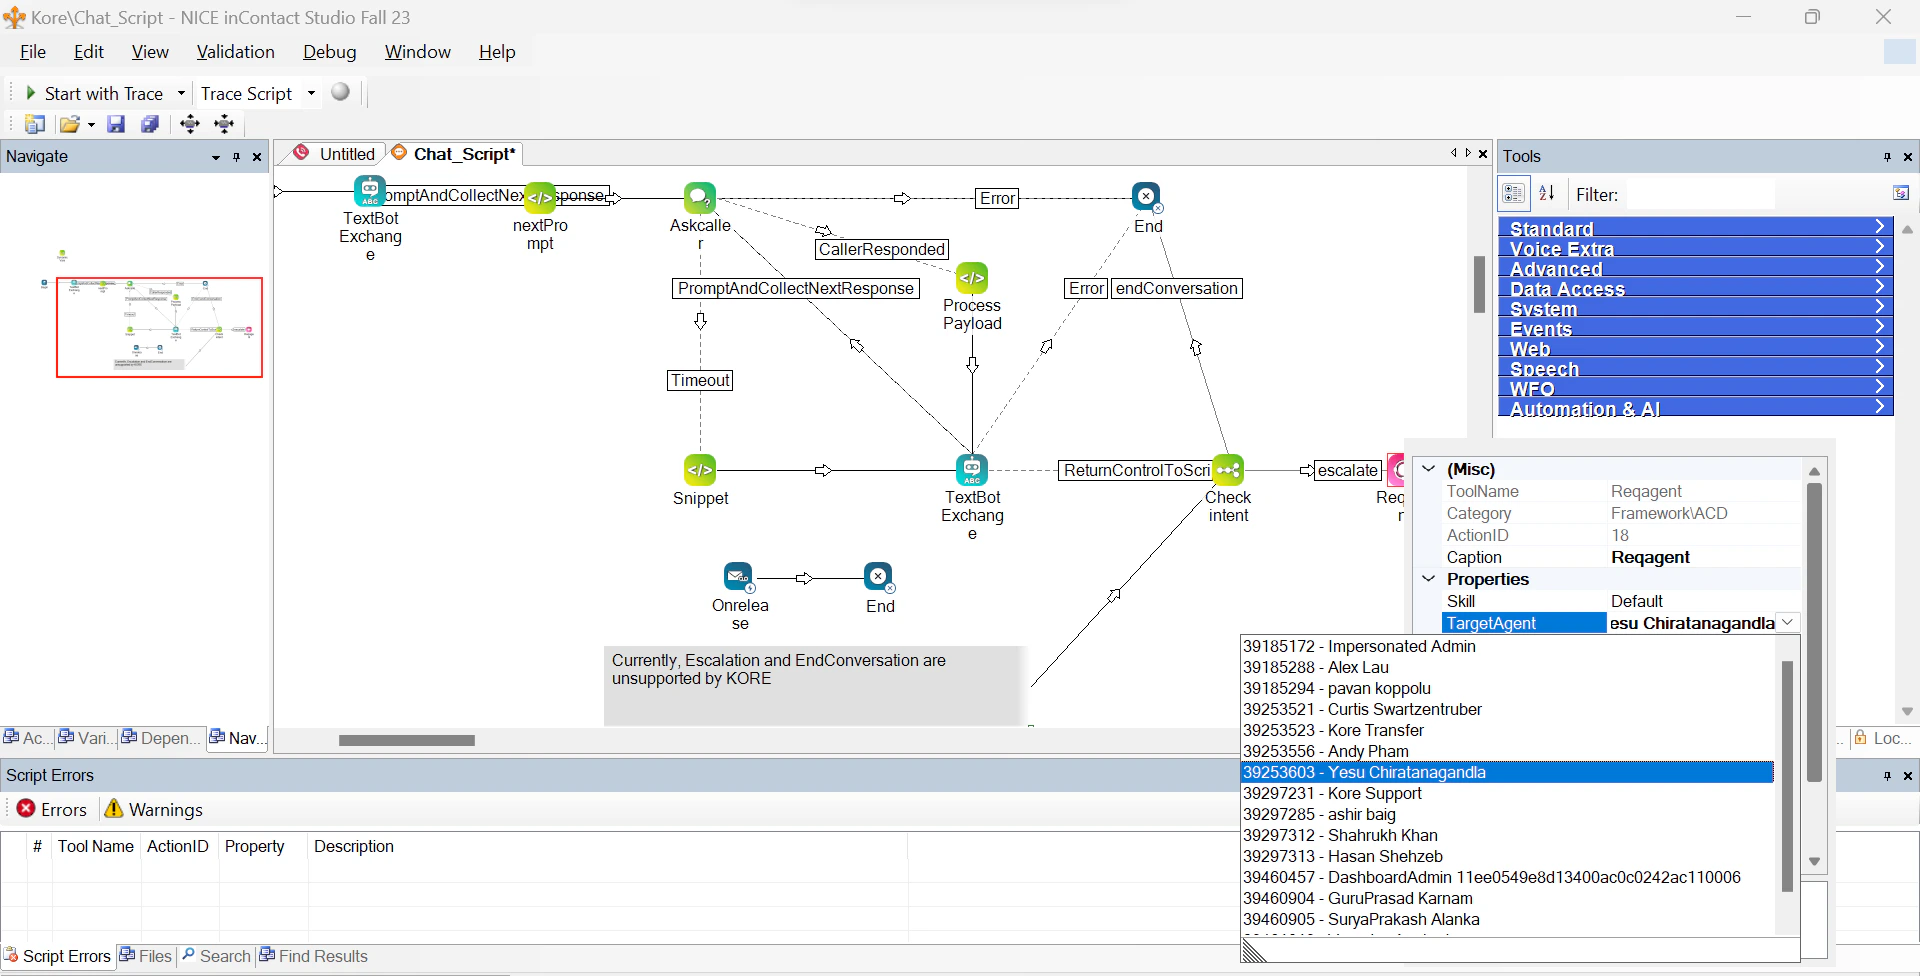 3. Save the script.