> ## Documentation Index
> Fetch the complete documentation index at: https://koreai.mintlify.site/llms.txt
> Use this file to discover all available pages before exploring further.
# Adding Glip by RingCentral as a Channel
[Back to Available Channels](/ai-for-service/channels/adding-channels-to-your-bot#available-channels)
The Platform now allows you to add **Glip by RingCentral** as a messaging channel to your AI Agents.
With the **Glip** integration, you can achieve the following:
* Configure the **Glip Sandbox** account for testing the integration.
* Set up the REST API and the authorization flow for events and conversations.
* Enable **Webhook Subscriptions**, **Read Accounts**, and **Team Messaging API** permissions.
* Link the app to the Platform using the app’s credentials.
* Authorize the AI Agent for the existing/new **Glip Sandbox** account user.
After the integration, you can do the following:
* Keep track of AI Agent conversations.
* Listen to new messages from Glip or other sources.
* Have AI Agents post and respond to messages in Glip conversations.
* Have AI Agents handle incoming notifications from your apps into Glip teams so you don’t have to check different sites for updates.
To start the integration, you must register an application on RingCentral to gain access to the API and to integrate RingCentral into the Platform. To set up **Glip** as a channel, you must create an app in [RingCentral’s Developer Portal](https://developers.ringcentral.com/) and enable a **webhook** for the platform to receive messages.
The steps to add the channel are summarized below:
1. [Create a RingCentral App](#step-1-create-a-ringcentral-app)
2. [App Set Up on the Platform using the Application Key and App secret](#step-2-application-set-up-on-the-platform)
3. [Authorize a valid extension (user) of your RingCentral account to generate the developer access token, access the Glip APIs, and enable the channel](#step-3-authorize-extension-user-of-your-ringcentral-sandbox-account)
4. [Test the integration](#step-4-test-the-integration)
5. [(Recommended) Apply for Production](#recommended-step-5-apply-for-production)
## Step 1: Create a RingCentral App
To enable Glip as a channel for your AI Agent, you must create an application in the Sandbox environment (using a sandbox account) with the steps below:
**For New Users**
1. Log in to the **RingCentral Developer Console**.
2. On the left menu, click **Setup Wizard** under **Getting Started**.
3. In the **Get started to create your first app** panel, click **Create your First App**.
**For Existing Users**
1. Log in to the **RingCentral Developer Console**.
2. Click the **Console** button on the top left.
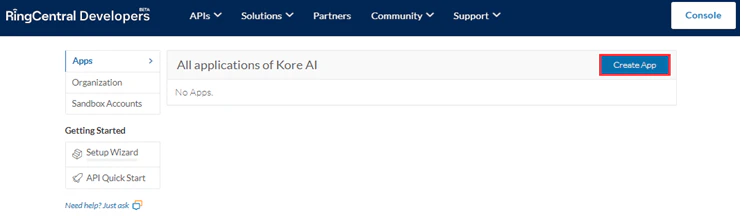
3. In the **Apps** section, click **Create App**.
 4. Select **REST API App** under **App Type** to call the **RingCentral REST API**.
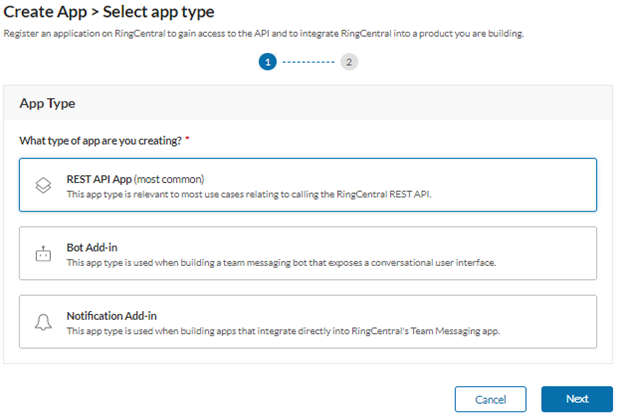 5. Click **Next**.
6. Enter all the required details on the **Create App - REST API App Settings** page and click **Next**.
7. Enter the values to the following fields on the **App Properties (internal-use only)** page:
* App Name
* App Description (optional)
* Primary Contact
* Select the relevant option for **Do you intend to promote this app in the RingCentral App Gallery?**
8. (Optional) In the **App Card panel**, enter the values for the given fields to configure how your application will be presented within our App Gallery.
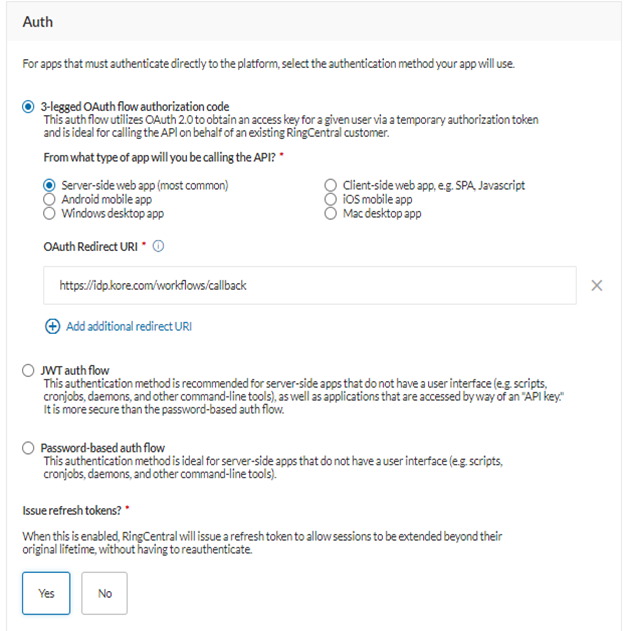
9. In the **Auth** panel, enter the values for the following fields to select the authentication method your app will use:
* Select **3-legged OAuth flow authorization code**.
* Select **Server-side web app (most common)** or **Client-side web app** based on your app type for **From what type of app will you be calling the API?**
5. Click **Next**.
6. Enter all the required details on the **Create App - REST API App Settings** page and click **Next**.
7. Enter the values to the following fields on the **App Properties (internal-use only)** page:
* App Name
* App Description (optional)
* Primary Contact
* Select the relevant option for **Do you intend to promote this app in the RingCentral App Gallery?**
8. (Optional) In the **App Card panel**, enter the values for the given fields to configure how your application will be presented within our App Gallery.
9. In the **Auth** panel, enter the values for the following fields to select the authentication method your app will use:
* Select **3-legged OAuth flow authorization code**.
* Select **Server-side web app (most common)** or **Client-side web app** based on your app type for **From what type of app will you be calling the API?**
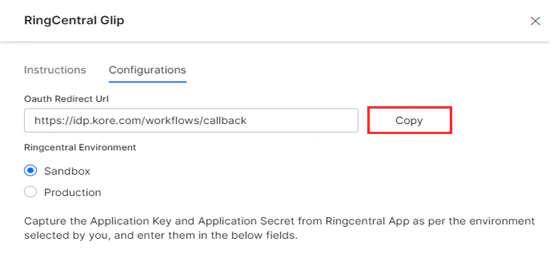
 * On the Platform, copy the **OAuth Redirect URI** under the **Configurations** tab in the **RingCentral Glip** window.
 * Paste the copied **OAuth Redirect URI** link in the **Auth** panel.
The OAuth Redirect URI now includes the streamid in the API request to identify the AI Agent being accessed. When an incoming request is qualified with this identifier, it helps with traceability, troubleshooting, and remediation at the network level during anomalies like malicious calls or unusual app activity.
* Select **Yes** for **Issue refresh tokens?**
10. In the Security panel, to define the permissions to associate with the app, follow the steps below:
11. Select the **Webhook Subscriptions**, **Read Accounts**, and **Team Messaging** permissions from the dropdown list.
* Paste the copied **OAuth Redirect URI** link in the **Auth** panel.
The OAuth Redirect URI now includes the streamid in the API request to identify the AI Agent being accessed. When an incoming request is qualified with this identifier, it helps with traceability, troubleshooting, and remediation at the network level during anomalies like malicious calls or unusual app activity.
* Select **Yes** for **Issue refresh tokens?**
10. In the Security panel, to define the permissions to associate with the app, follow the steps below:
11. Select the **Webhook Subscriptions**, **Read Accounts**, and **Team Messaging** permissions from the dropdown list.
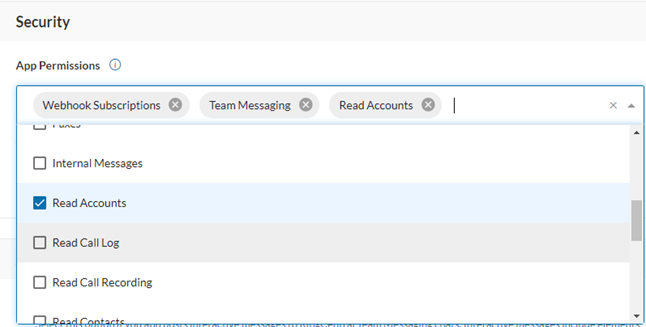 12. Click Create. Your App is created successfully and the system redirects to the **App Dashboard** page.
If you don't have a **Sandbox Account** to test your app in the Sandbox environment, follow the steps below:
* In the following dialog window, click **Next**.
12. Click Create. Your App is created successfully and the system redirects to the **App Dashboard** page.
If you don't have a **Sandbox Account** to test your app in the Sandbox environment, follow the steps below:
* In the following dialog window, click **Next**.
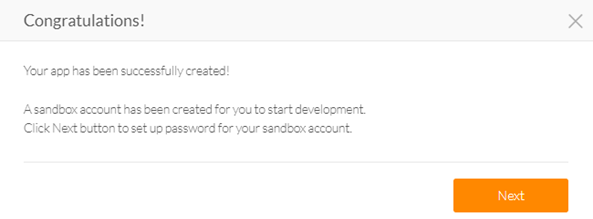 * Setup the Password for your **Sandbox** Account.
The OAuth Redirect URI now includes the **streamid** in the API request to identify the AI Agent being accessed. When an incoming request is qualified with this identifier, it helps with traceability, troubleshooting, and remediation at the network level during anomalies like malicious calls or unusual app activity.
## Step 2: Application Set up on the Platform
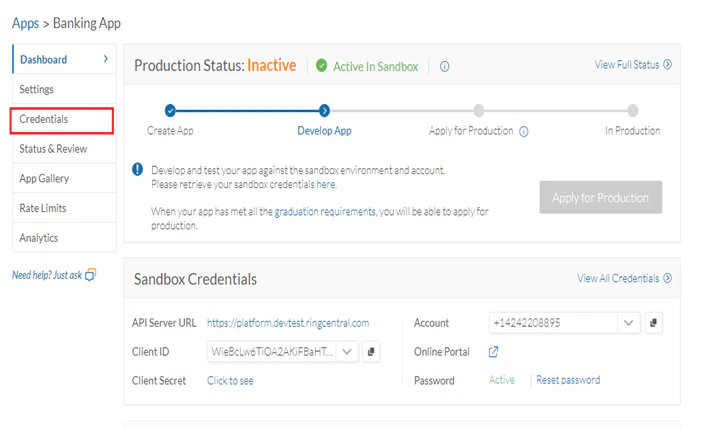
After creating the app for the Sandbox/Production environment, you need to configure the app’s credentials on the Platform using the **Client ID** and **Client Secret** from the **RingCentral Glip Application Dashboard** to link the app. To set the credentials, follow the steps below:
1. On the **RingCentral Developer Application** Dashboard, click **Credentials** on the left menu.
* Setup the Password for your **Sandbox** Account.
The OAuth Redirect URI now includes the **streamid** in the API request to identify the AI Agent being accessed. When an incoming request is qualified with this identifier, it helps with traceability, troubleshooting, and remediation at the network level during anomalies like malicious calls or unusual app activity.
## Step 2: Application Set up on the Platform
After creating the app for the Sandbox/Production environment, you need to configure the app’s credentials on the Platform using the **Client ID** and **Client Secret** from the **RingCentral Glip Application Dashboard** to link the app. To set the credentials, follow the steps below:
1. On the **RingCentral Developer Application** Dashboard, click **Credentials** on the left menu.
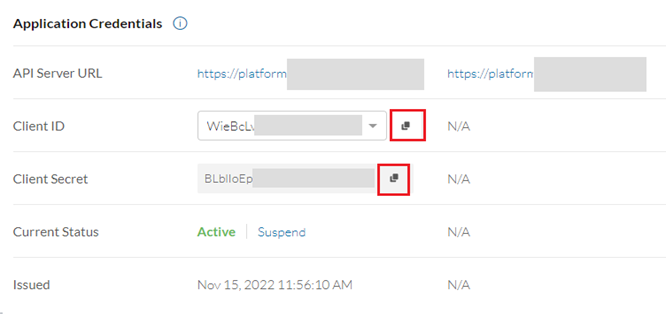
 2. Under **Application Credentials**, click the copy icons for the **Client ID** and **Client Secret** (tap on click to see first) fields.
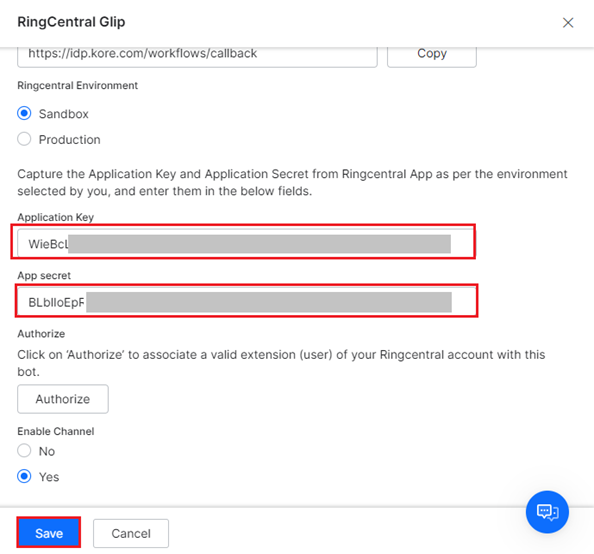
 3. On the Platform, navigate to **Channels & Flows** > **Channels** > **Digital** > **All** and click **RingCentral Glip**.
4. In the **RingCentral Glip** window, click the **Configurations** tab.
5. Paste the copied **Client ID** to the **Application Key** input field, and the **Client Secret** to the **Application Secret** input field.
6. Click **Save**.
3. On the Platform, navigate to **Channels & Flows** > **Channels** > **Digital** > **All** and click **RingCentral Glip**.
4. In the **RingCentral Glip** window, click the **Configurations** tab.
5. Paste the copied **Client ID** to the **Application Key** input field, and the **Client Secret** to the **Application Secret** input field.
6. Click **Save**.
 ## Step 3: Authorize Extension (user) of your RingCentral Sandbox Account
The AI Agent on the Platform must be associated with the extension (user) on your RingCentral account to access the **Glip API** via the developer access token. To enable this, you should authorize the AI Agent with an existing or new extension user’s credentials. To add a new (non-admin) user, follow the steps below:
1. Log in to your RingCentral Sandbox account.
2. Click the **Users** tab.
3. Click **Users with Extension** on the left menu.
4. Click **+Add User**.
## Step 3: Authorize Extension (user) of your RingCentral Sandbox Account
The AI Agent on the Platform must be associated with the extension (user) on your RingCentral account to access the **Glip API** via the developer access token. To enable this, you should authorize the AI Agent with an existing or new extension user’s credentials. To add a new (non-admin) user, follow the steps below:
1. Log in to your RingCentral Sandbox account.
2. Click the **Users** tab.
3. Click **Users with Extension** on the left menu.
4. Click **+Add User**. 5. On the **Add Users and Phones** dialog box, select **Add Users without Phone**, and follow the instructions on the page.
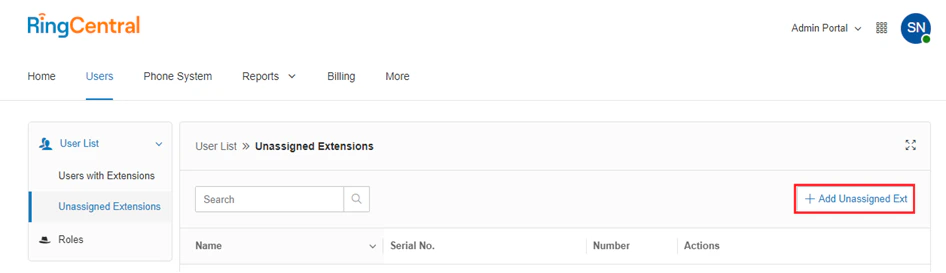
6. Click **Unassigned Extensions** on the left menu.
7. Click **Add Unassigned Ext**.
5. On the **Add Users and Phones** dialog box, select **Add Users without Phone**, and follow the instructions on the page.
6. Click **Unassigned Extensions** on the left menu.
7. Click **Add Unassigned Ext**.
 8. On the **user profile information** page, enter all the required information.
Please provide a meaningful name like Travel App or HR Assistant to the AI Agent inside **Teams Messaging**.
9. Click **Save & Enable** to enable the extension.
If you receive an account activation email on your registered email address, please note the username and password to authorize the AI Agent on the Platform.
Alternatively, select the “pre-assigned credentials” option and just provide/save the password.
### Step 3(a): Test the Validation
To access the admin portal from the Sandbox account screen and test the validation, follow the steps below:
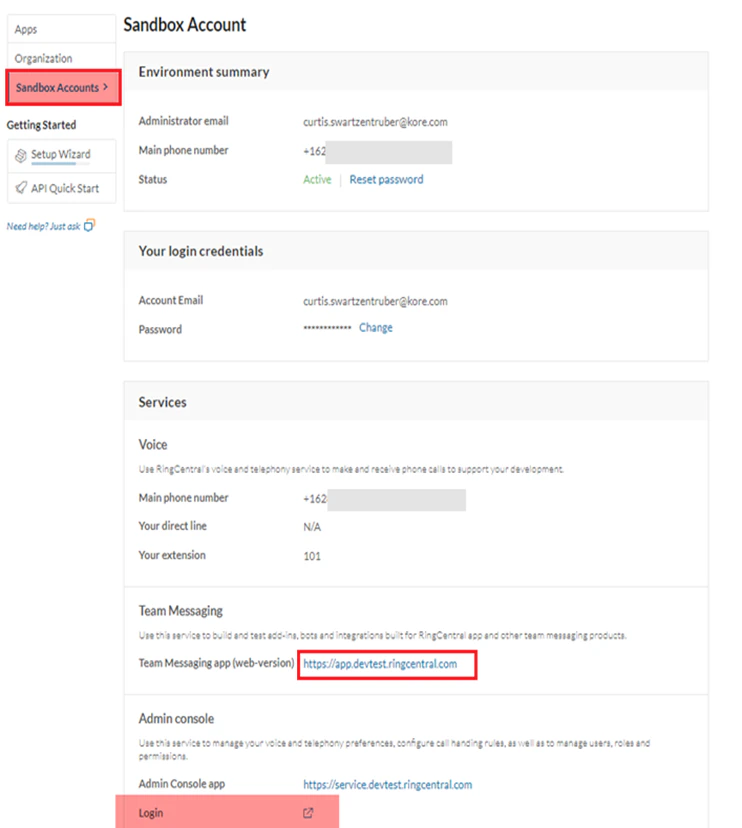
1. Go to the **Sandbox Account** section and click the [link](https://app.ringcentral.com/) in the **Team Messaging** section.
8. On the **user profile information** page, enter all the required information.
Please provide a meaningful name like Travel App or HR Assistant to the AI Agent inside **Teams Messaging**.
9. Click **Save & Enable** to enable the extension.
If you receive an account activation email on your registered email address, please note the username and password to authorize the AI Agent on the Platform.
Alternatively, select the “pre-assigned credentials” option and just provide/save the password.
### Step 3(a): Test the Validation
To access the admin portal from the Sandbox account screen and test the validation, follow the steps below:
1. Go to the **Sandbox Account** section and click the [link](https://app.ringcentral.com/) in the **Team Messaging** section.
 2. Navigate to **Messages** on the left menu.
3. In the **Direct Messages** section, click the **+** icon to start a new DM with the AI Agent.
4. Find the AI Agent using either the name or email address you used in **Step 3**.
5. Send the AI Agent an opening message, such as “Hello” or “good afternoon”. The AI Agent should respond based on the default behavior configured for **Dialog Tasks**.
### Step 3(b): Channel Setup on the Platform
On the Platform, navigate to **RingCentral Glip** > **Configurations** and follow the steps below:
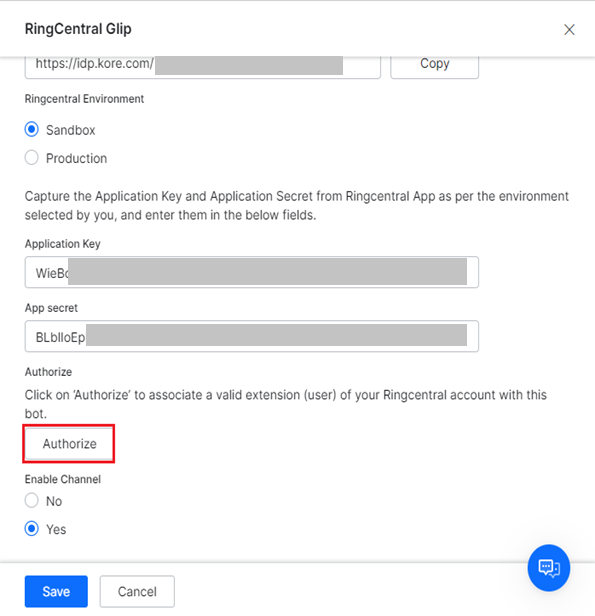
1. In the **RingCentral Glip** window, click the **Authorize** button.
2. Navigate to **Messages** on the left menu.
3. In the **Direct Messages** section, click the **+** icon to start a new DM with the AI Agent.
4. Find the AI Agent using either the name or email address you used in **Step 3**.
5. Send the AI Agent an opening message, such as “Hello” or “good afternoon”. The AI Agent should respond based on the default behavior configured for **Dialog Tasks**.
### Step 3(b): Channel Setup on the Platform
On the Platform, navigate to **RingCentral Glip** > **Configurations** and follow the steps below:
1. In the **RingCentral Glip** window, click the **Authorize** button.
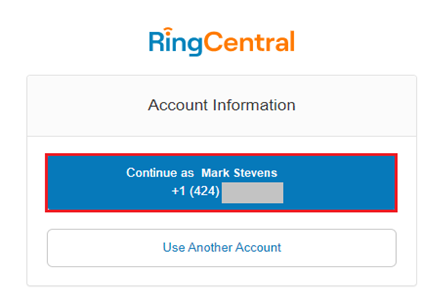
 2. In the **Sign-in** window, click **Continue as** to sign in with the existing user’s account, or click **Use Another Account**.
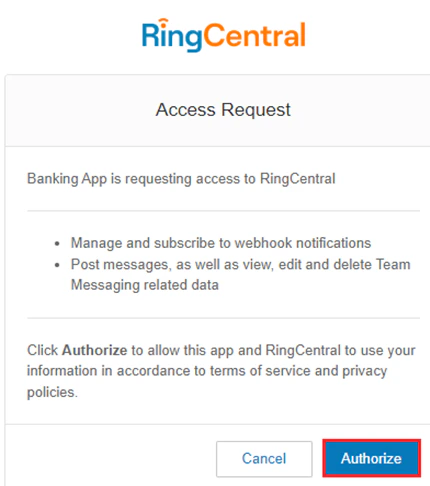
 3. Click **Authorize** on the **Access Request** page.
4. Once the access token is obtained successfully, authorization is complete.
3. Click **Authorize** on the **Access Request** page.
4. Once the access token is obtained successfully, authorization is complete.
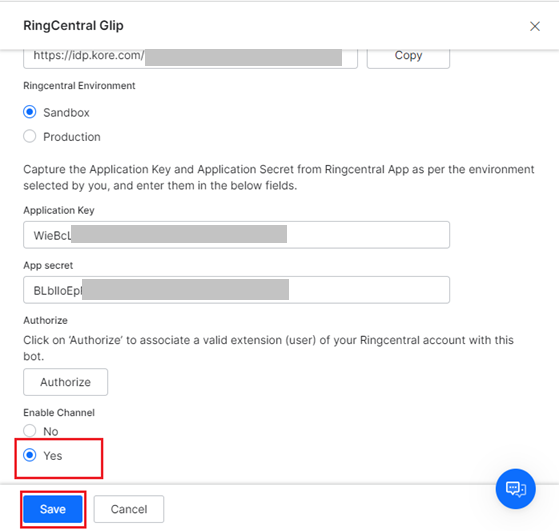
 5. On the Platform, select **Yes** for the **Enable Channel** option under the **RingCentral Glip** > **Configurations** tab.
6. Click **Save** to enable the channel and publish the app. [Publishing your App](/ai-for-service/deployment/publishing-app).
5. On the Platform, select **Yes** for the **Enable Channel** option under the **RingCentral Glip** > **Configurations** tab.
6. Click **Save** to enable the channel and publish the app. [Publishing your App](/ai-for-service/deployment/publishing-app).
 ## Step 4: Test the Integration
Please follow the steps given [here](https://developers.ringcentral.com/guide/team-messaging/bots/walkthrough#step-5-send-your-first-message-to-the-bot) to test the integration.
## (Recommended) Step 5: Apply for Production
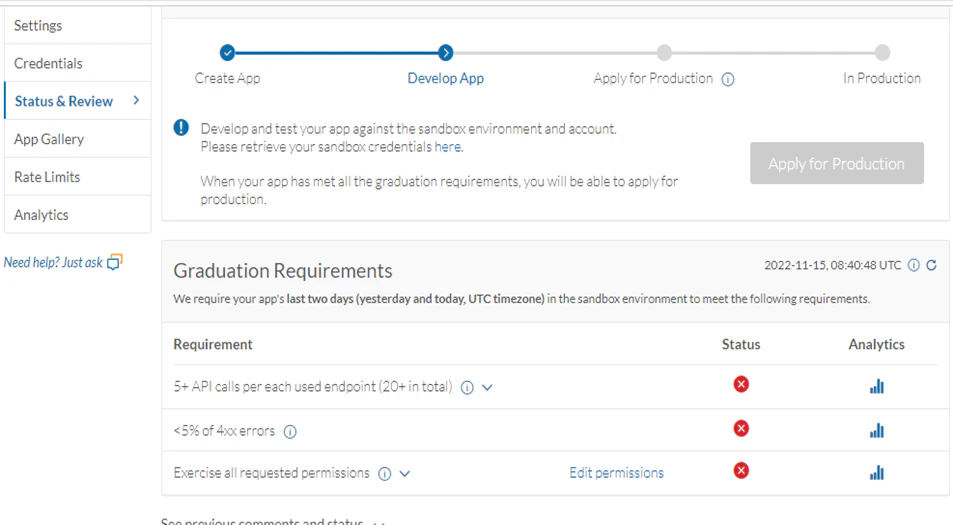
Once your app is tested in the Sandbox environment and ready for production, follow the RingCentral app graduation process mentioned [here](https://developer.ringcentral.com/library/getting-started.html#ApplyForProduction) to apply for production after meeting all the graduation requirements for your app as shown below:
## Step 4: Test the Integration
Please follow the steps given [here](https://developers.ringcentral.com/guide/team-messaging/bots/walkthrough#step-5-send-your-first-message-to-the-bot) to test the integration.
## (Recommended) Step 5: Apply for Production
Once your app is tested in the Sandbox environment and ready for production, follow the RingCentral app graduation process mentioned [here](https://developer.ringcentral.com/library/getting-started.html#ApplyForProduction) to apply for production after meeting all the graduation requirements for your app as shown below:
 Once your app is production ready, follow the steps below on the Platform:
1. Navigate to **Channels & Flows** > **Channels** > **Digital** > **All** > **RingCentral Glip**.
2. Under the **Configurations** tab, select **Production for Ringcentral Environment**.
3. Follow [these](#step-3-b--channel-setup-on-the-platform) steps to complete the configuration.
Once your app is production ready, follow the steps below on the Platform:
1. Navigate to **Channels & Flows** > **Channels** > **Digital** > **All** > **RingCentral Glip**.
2. Under the **Configurations** tab, select **Production for Ringcentral Environment**.
3. Follow [these](#step-3-b--channel-setup-on-the-platform) steps to complete the configuration.