> ## Documentation Index
> Fetch the complete documentation index at: https://koreai.mintlify.site/llms.txt
> Use this file to discover all available pages before exploring further.
# Adding the Sinch Channel
[Back to Available Channels](/ai-for-service/channels/adding-channels-to-your-bot#available-channels)
AI Agents built on the Platform can be deployed on the **Sinch Conversation API** platform.
The **Sinch Conversation API** allows developers to create robust omnichannel messaging experiences across multiple interaction channels.
**Why Sinch Conversation API?**
* Provides support for message sending, conversation management, user authentication, and rich message formatting, empowering developers to deliver seamless and engaging user communication experiences.
* Offers built-in transcoding for smooth conversations across all supported channels, with optional full control over channel-specific features.
* Consolidates all conversation details into a single callback, streamlining integration with the Platform.
**Prerequisites**
* Enabling the Sinch Conversation API requires [signing up](https://dashboard.sinch.com/signup)on the Sinch developer dashboard.
To set up the channel, you must associate the AI Agent with a Sinch app and set up the required delivery channel. The steps to complete the channel enablement are summarized below:
1. [Capture the Sinch Project Access keys for Authentication](#step-1-capture-the-sinch-project-access-keys-for-authentication).
2. [Create an App](#step-2-create-an-app).
3. [Configure the Webhook URL](#step-3-configure-the-webhook-url).
4. [Configure the delivery channel](#step-4-configure-the-delivery-channel).
5. [Enable the Channel on the Platform](#step-5-enable-the-channel-on-the-platform).
## Step 1: Capture the Sinch Project Access keys for Authentication
Once you create an account and log in, accept the terms and conditions and create your access key.
The Conversation API uses OAuth2 tokens for authentication, which can be obtained from an OAuth2 token endpoint. To authenticate, a `client_id` (or **KEY ID**) and `client_secret` (or **KEY SECRET**) are used. You can generate new Access Keys, each with a new **KEY ID** and **KEY SECRET**, at any time.
To create an access key, follow the steps below:
1. [Log in](https://dashboard.sinch.com/login) to your Sinch account and navigate to the developer dashboard.
2. Select **Settings** in the left menu and navigate to the **General Settings** screen.
3. Select **Access Keys** under **Settings** and navigate to the **Access Keys** screen.
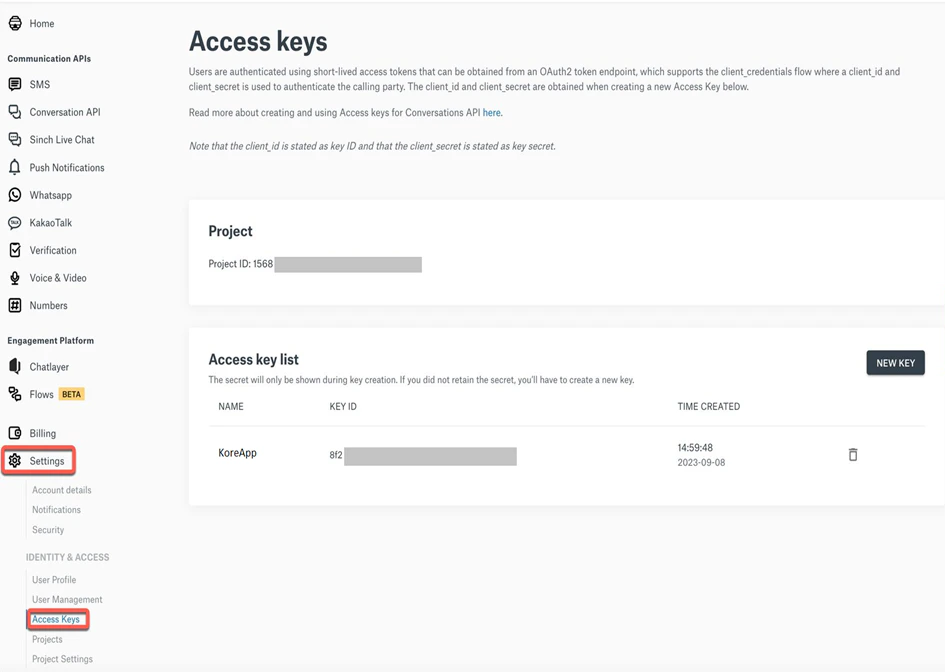 This page shows your project(s) and corresponding Project ID(s) and a list of your Access keys and the corresponding KEY IDs.
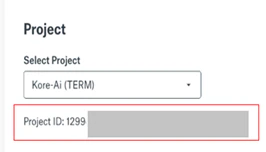
In the top left corner of your screen, next to the Sinch logo, select the desired project from the **Project** dropdown.
Copy and save the **Project ID** of your project. Paste it into the relevant field on the Platform’s Sinch **Configurations** page.
This page shows your project(s) and corresponding Project ID(s) and a list of your Access keys and the corresponding KEY IDs.
In the top left corner of your screen, next to the Sinch logo, select the desired project from the **Project** dropdown.
Copy and save the **Project ID** of your project. Paste it into the relevant field on the Platform’s Sinch **Configurations** page.
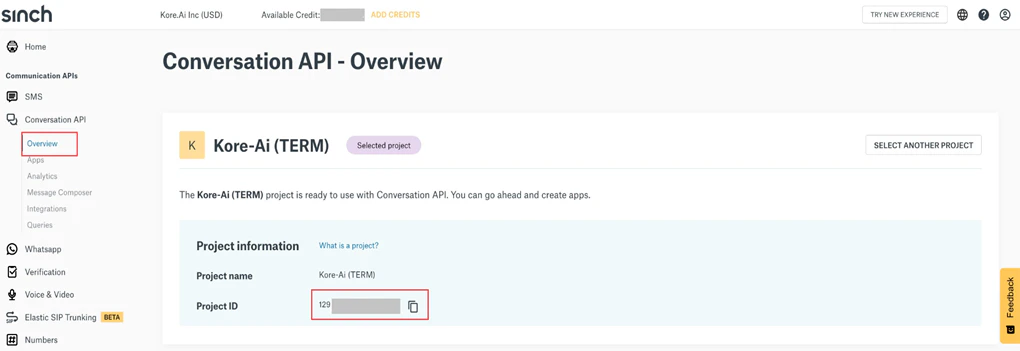
 You can also copy the **Project ID** by clicking **Conversation API** > **Overview** on the left menu.
 When you sign up for a Sinch account, a default project is created for you. Conversation API uses this project to group contacts and apps together. To create additional projects, contact your Sinch account manager for assistance.
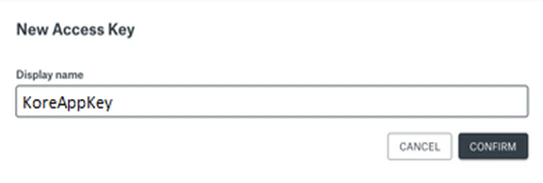
Click the **New Key** or **Create Access Key** button in the **Access Keys List** section.
Provide a display name for your access key in the **New Access Key** window, and click **Confirm**.
When you sign up for a Sinch account, a default project is created for you. Conversation API uses this project to group contacts and apps together. To create additional projects, contact your Sinch account manager for assistance.
Click the **New Key** or **Create Access Key** button in the **Access Keys List** section.
Provide a display name for your access key in the **New Access Key** window, and click **Confirm**.
 The **Key** is created, and the `Key ID` & `Key Secret` are generated as shown in the form below.
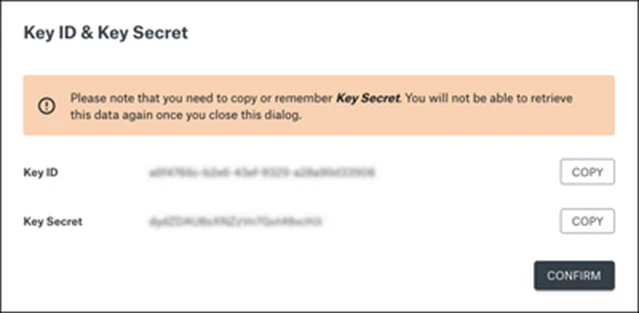 Copy the **Key ID** and **Key Secret** and paste them into the relevant field on the Platform’s **Sinch Configurations** page.
**Important**
You must copy and store the generated **Key Secret**. You can't retrieve it again once you’ve created the key.
Click **Confirm**.
You are returned to the **Access Keys** page, where your new key is displayed in the **Access key list** section.
The **KEY SECRET** is only displayed when a new *Access key* is created.
## Step 2: Create An App
The next step is to create and configure a **Conversation API** app to enable the channel.
Follow the steps below to create an app. Alternatively, you can use [API calls](https://developers.sinch.com/docs/conversation/api-reference/conversation/tag/App/#tag/App/operation/App_CreateApp) to create an app.
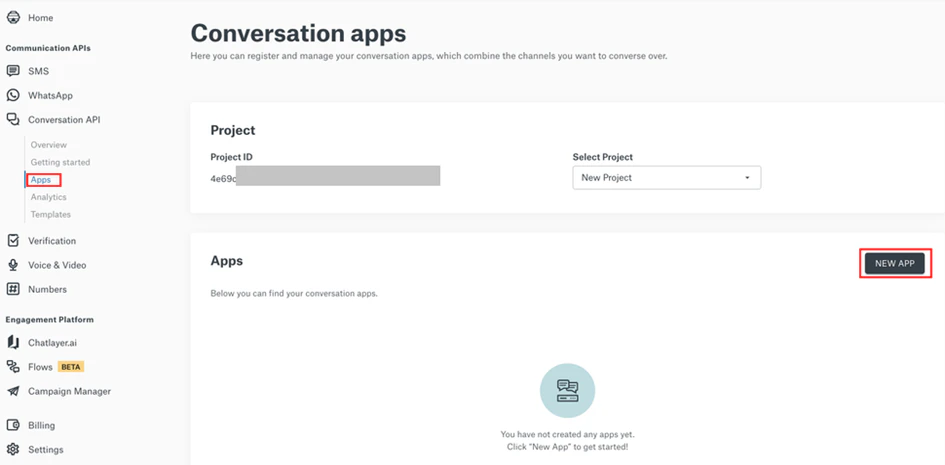
1. Select **Conversation API** > **Apps** on the left menu.
2. On the **Conversation Apps** page, click the **NewApp** button in the **Apps** section.
Copy the **Key ID** and **Key Secret** and paste them into the relevant field on the Platform’s **Sinch Configurations** page.
**Important**
You must copy and store the generated **Key Secret**. You can't retrieve it again once you’ve created the key.
Click **Confirm**.
You are returned to the **Access Keys** page, where your new key is displayed in the **Access key list** section.
The **KEY SECRET** is only displayed when a new *Access key* is created.
## Step 2: Create An App
The next step is to create and configure a **Conversation API** app to enable the channel.
Follow the steps below to create an app. Alternatively, you can use [API calls](https://developers.sinch.com/docs/conversation/api-reference/conversation/tag/App/#tag/App/operation/App_CreateApp) to create an app.
1. Select **Conversation API** > **Apps** on the left menu.
2. On the **Conversation Apps** page, click the **NewApp** button in the **Apps** section.
 3. In the **New App** form. Provide the app’s **Display Name** and select the region from the dropdown menu.
The region you select determines where your Conversation API app is hosted and where its associated data is stored. Once a region is chosen for your app, it can't be changed.
Based on the region selected, capture the **Sinch region Base URL** and provide it in the configuration tab of this page. [See](https://developers.sinch.com/docs/conversation/api-reference#base-url) the list of Sinch region URLs.
3. In the **New App** form. Provide the app’s **Display Name** and select the region from the dropdown menu.
The region you select determines where your Conversation API app is hosted and where its associated data is stored. Once a region is chosen for your app, it can't be changed.
Based on the region selected, capture the **Sinch region Base URL** and provide it in the configuration tab of this page. [See](https://developers.sinch.com/docs/conversation/api-reference#base-url) the list of Sinch region URLs.
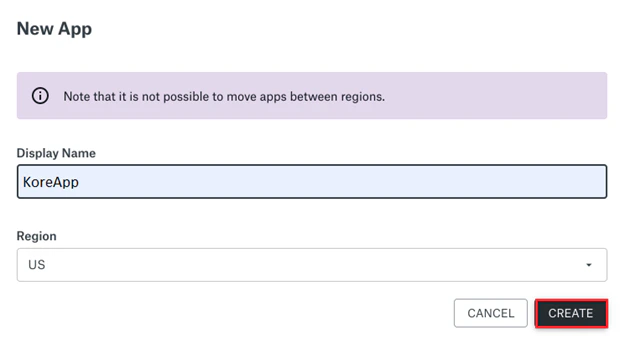 Click **Create**.
The newly created APP is displayed in the **Apps** section.
Click **Create**.
The newly created APP is displayed in the **Apps** section.
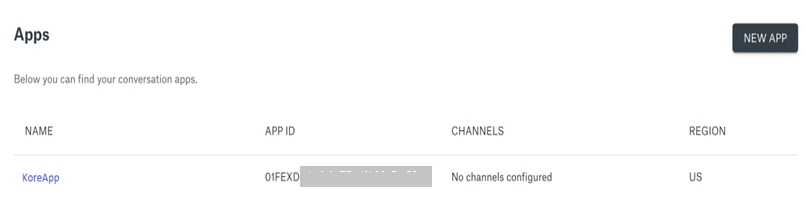 Click the **App Name** and go to the **App Details** screen.
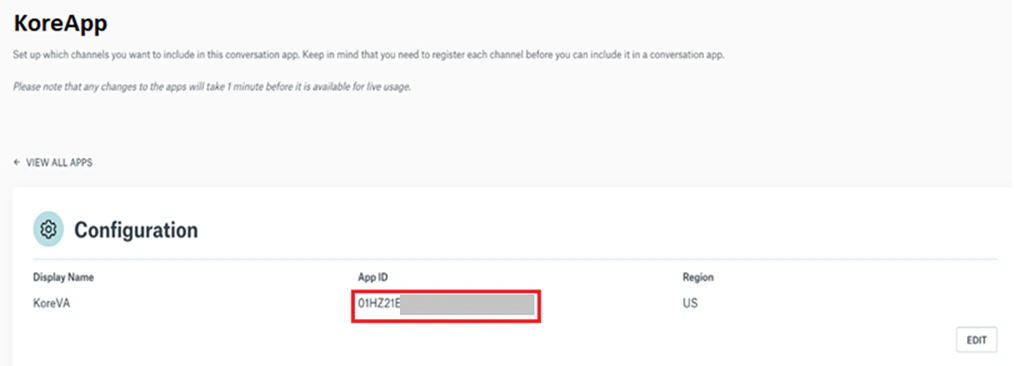
Copy and save the **App ID** displayed in the **Configuration** section. Paste it into the relevant field on the Platform’s **Sinch Configurations** page.
Click the **App Name** and go to the **App Details** screen.
Copy and save the **App ID** displayed in the **Configuration** section. Paste it into the relevant field on the Platform’s **Sinch Configurations** page.
 ## Step 3: Configure the Webhook URL
To send and receive messages, you need to configure at least one channel using a webhook URL for your app. To configure, follow the steps below:
1. Select the App created by you on the **Apps** page.
2. Scroll down to the **Webhooks** section and click **Add Webhook**.
## Step 3: Configure the Webhook URL
To send and receive messages, you need to configure at least one channel using a webhook URL for your app. To configure, follow the steps below:
1. Select the App created by you on the **Apps** page.
2. Scroll down to the **Webhooks** section and click **Add Webhook**.
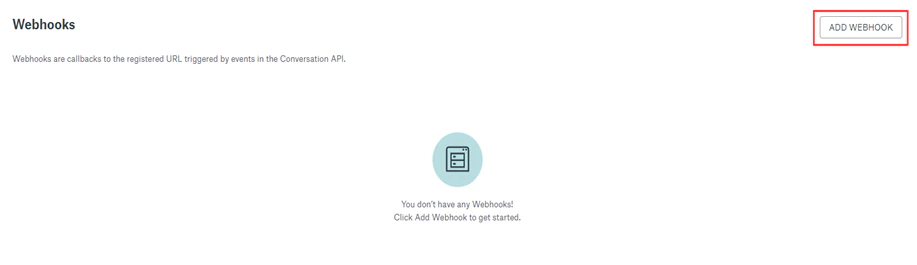 The **New webhook** form is displayed.
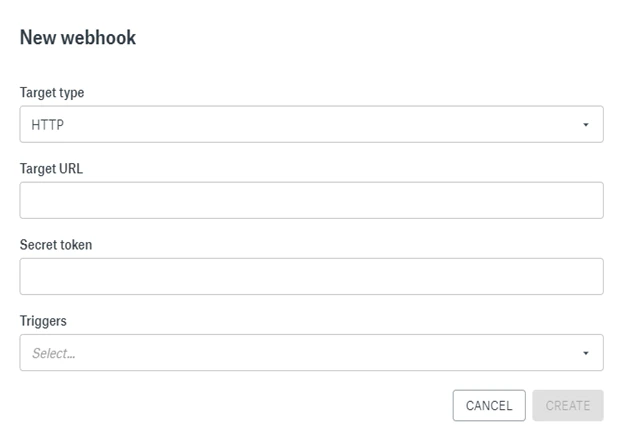 In the **Target type** dropdown, select *HTTP*.
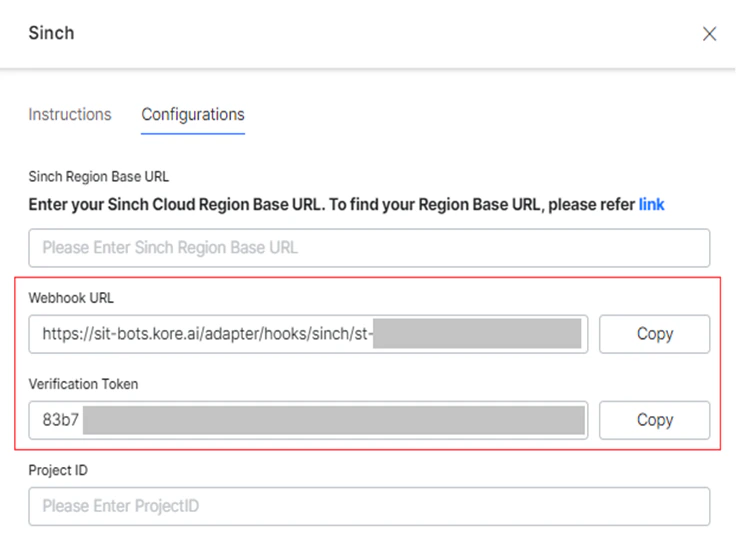
In the **Target URL** field, copy and paste the **WebHook URL** value from the Platform’s **Channels** > **Sinch** > **Configurations** section.
In the **Secret token** field, copy and paste the value for **Verify Token** from the Platform’s **Channels** > **Sinch** > **Configurations** section. This token enables the webhook to validate against your chosen endpoint.
In the **Target type** dropdown, select *HTTP*.
In the **Target URL** field, copy and paste the **WebHook URL** value from the Platform’s **Channels** > **Sinch** > **Configurations** section.
In the **Secret token** field, copy and paste the value for **Verify Token** from the Platform’s **Channels** > **Sinch** > **Configurations** section. This token enables the webhook to validate against your chosen endpoint.
 In the **Triggers** dropdown, select all the triggers you want to add to the webhook.
Click **Create**.
In the **Triggers** dropdown, select all the triggers you want to add to the webhook.
Click **Create**.
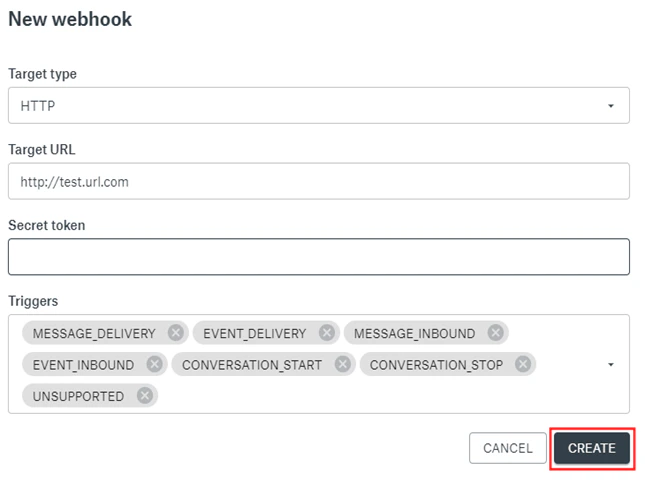 The webhook is created and displayed in the **Webhooks** section of the app page.
 ## Step 4: Configure the Delivery Channel
Next, you must configure the delivery channel for the conversations with the steps given below:
1. Select the app you’ve created on the **Apps** page.
2. Scroll down to the **Setup Channels** section.
## Step 4: Configure the Delivery Channel
Next, you must configure the delivery channel for the conversations with the steps given below:
1. Select the app you’ve created on the **Apps** page.
2. Scroll down to the **Setup Channels** section.
 3. Select the delivery channel you want to configure.
4. To set up the required channel, click the channel listing [here](https://developers.sinch.com/docs/conversation/channel-support/).
## Step 5: Enable the Channel on the Platform
To enable the channel on the Platform, follow the steps below:
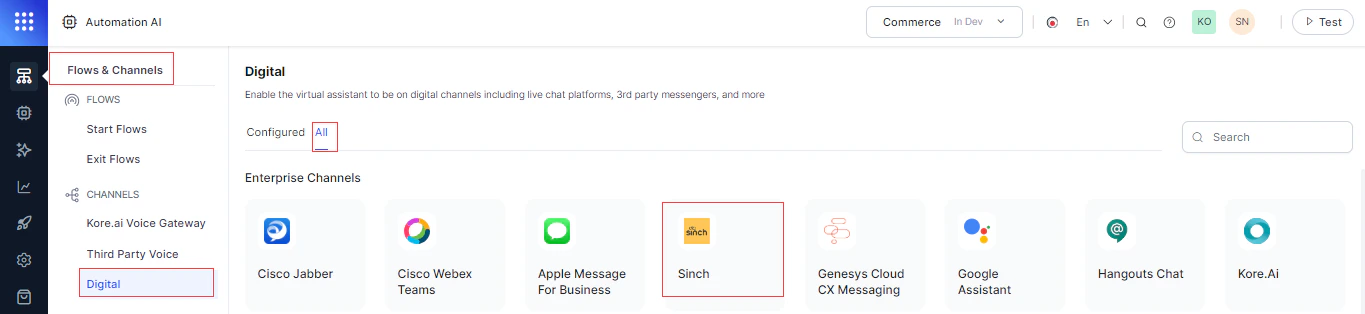
Go to **Automation AI** > **Flows & Channels** on the left navigation menu.
Select **Digital** under **Channels**.
Click the **All** tab, and select **Sinch** in the **Enterprise Channels** section.
3. Select the delivery channel you want to configure.
4. To set up the required channel, click the channel listing [here](https://developers.sinch.com/docs/conversation/channel-support/).
## Step 5: Enable the Channel on the Platform
To enable the channel on the Platform, follow the steps below:
Go to **Automation AI** > **Flows & Channels** on the left navigation menu.
Select **Digital** under **Channels**.
Click the **All** tab, and select **Sinch** in the **Enterprise Channels** section.
 Click the **Configurations** tab.
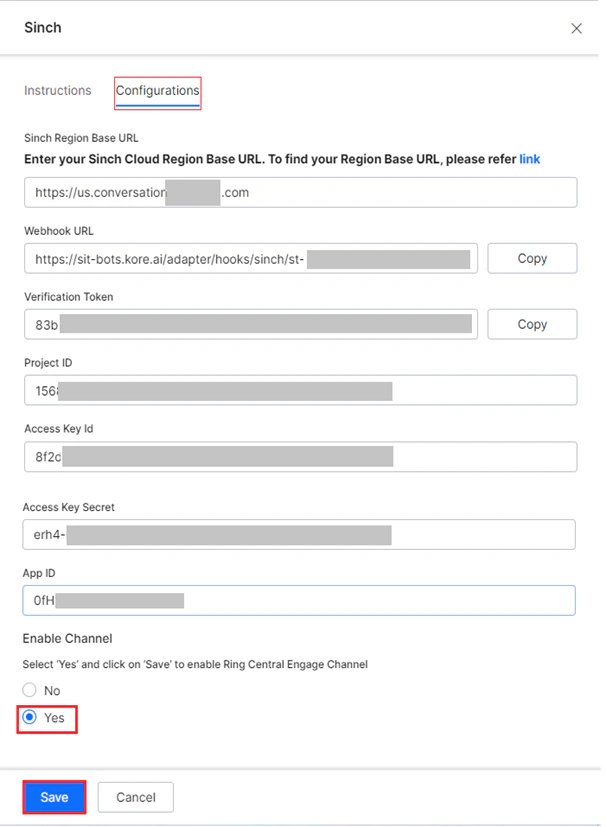
Copy the relevant field values from your **Sinch Conversation API** app and paste them into the relevant fields as follows:
* **Sinch Region Base URL**: Copied in Step 3 [here](#step-2-create-an-app).
* **Project ID**: Copied in Step 5 [here](#step-1-capture-the-sinch-project-access-keys-for-authentication).
* **Access Key Id** and **Access Key Secret**: Copied in Step 8 [here](#step-1-capture-the-sinch-project-access-keys-for-authentication).
* **App ID**: Copied in Step 6 [here](#step-2-create-an-app).
Select '**Yes**’ for **Enable Channel**.
Click **Save**.
Click the **Configurations** tab.
Copy the relevant field values from your **Sinch Conversation API** app and paste them into the relevant fields as follows:
* **Sinch Region Base URL**: Copied in Step 3 [here](#step-2-create-an-app).
* **Project ID**: Copied in Step 5 [here](#step-1-capture-the-sinch-project-access-keys-for-authentication).
* **Access Key Id** and **Access Key Secret**: Copied in Step 8 [here](#step-1-capture-the-sinch-project-access-keys-for-authentication).
* **App ID**: Copied in Step 6 [here](#step-2-create-an-app).
Select '**Yes**’ for **Enable Channel**.
Click **Save**.
 After enabling the channel and verifying all the configurations, you can test the new channel integration by publishing your app. [Publishing your App](/ai-for-service/deployment/publishing-app).
## Message Types
Conversation API uses generic message types to send the same message to multiple channels. In cases where the channel doesn’t natively support the message type, the message will be transcoded. The supported message types include:
* [Text](https://developers.sinch.com/docs/conversation/message-types/text-message/)
* [Media](https://developers.sinch.com/docs/conversation/message-types/media-message/)
* [Choice](https://developers.sinch.com/docs/conversation/message-types/choice-message/)
* [Card](https://developers.sinch.com/docs/conversation/message-types/card-message/)
* [Carousel](https://developers.sinch.com/docs/conversation/message-types/carousel-message/)
* [Location](https://developers.sinch.com/docs/conversation/message-types/location-message/)
* [List](https://developers.sinch.com/docs/conversation/message-types/list-message/)
## Message Templates
Sinch message templates are predefined, structured formats for sending recurring or standardized messages across channels like WhatsApp, SMS, and other supported platforms.
These templates ensure compliance with the channel’s messaging policies, especially for platforms like WhatsApp that require pre-approved templates for certain messages, such as notifications or service updates. Message templates can be used during AI Agent conversations to structure the messages. The default template types include:
* [Text](https://developers.sinch.com/docs/conversation/channel-support/whatsapp/template-support/#text-template)
* [Media (Document, Video, and Image)](https://developers.sinch.com/docs/conversation/channel-support/whatsapp/template-support/#media-template)
* [Location](https://developers.sinch.com/docs/conversation/channel-support/whatsapp/template-support/#location-template)
* [Interactive (Quick Reply and Call-to-action)](https://developers.sinch.com/docs/conversation/channel-support/whatsapp/template-support/#interactive-template)
* [Authentication](https://developers.sinch.com/docs/conversation/channel-support/whatsapp/template-support/#authentication-template)
* [Carousel](https://developers.sinch.com/docs/conversation/channel-support/whatsapp/template-support/#carousel-template)
For additional assistance with using Message Templates and Types for your Sinch channel on the Platform, please [contact](https://kore.ai/support/) our developer support team.
To learn more about working with messaging channels within the Platform, please [Publishing your App](/ai-for-service/deployment/publishing-app).
After enabling the channel and verifying all the configurations, you can test the new channel integration by publishing your app. [Publishing your App](/ai-for-service/deployment/publishing-app).
## Message Types
Conversation API uses generic message types to send the same message to multiple channels. In cases where the channel doesn’t natively support the message type, the message will be transcoded. The supported message types include:
* [Text](https://developers.sinch.com/docs/conversation/message-types/text-message/)
* [Media](https://developers.sinch.com/docs/conversation/message-types/media-message/)
* [Choice](https://developers.sinch.com/docs/conversation/message-types/choice-message/)
* [Card](https://developers.sinch.com/docs/conversation/message-types/card-message/)
* [Carousel](https://developers.sinch.com/docs/conversation/message-types/carousel-message/)
* [Location](https://developers.sinch.com/docs/conversation/message-types/location-message/)
* [List](https://developers.sinch.com/docs/conversation/message-types/list-message/)
## Message Templates
Sinch message templates are predefined, structured formats for sending recurring or standardized messages across channels like WhatsApp, SMS, and other supported platforms.
These templates ensure compliance with the channel’s messaging policies, especially for platforms like WhatsApp that require pre-approved templates for certain messages, such as notifications or service updates. Message templates can be used during AI Agent conversations to structure the messages. The default template types include:
* [Text](https://developers.sinch.com/docs/conversation/channel-support/whatsapp/template-support/#text-template)
* [Media (Document, Video, and Image)](https://developers.sinch.com/docs/conversation/channel-support/whatsapp/template-support/#media-template)
* [Location](https://developers.sinch.com/docs/conversation/channel-support/whatsapp/template-support/#location-template)
* [Interactive (Quick Reply and Call-to-action)](https://developers.sinch.com/docs/conversation/channel-support/whatsapp/template-support/#interactive-template)
* [Authentication](https://developers.sinch.com/docs/conversation/channel-support/whatsapp/template-support/#authentication-template)
* [Carousel](https://developers.sinch.com/docs/conversation/channel-support/whatsapp/template-support/#carousel-template)
For additional assistance with using Message Templates and Types for your Sinch channel on the Platform, please [contact](https://kore.ai/support/) our developer support team.
To learn more about working with messaging channels within the Platform, please [Publishing your App](/ai-for-service/deployment/publishing-app).