> ## Documentation Index
> Fetch the complete documentation index at: https://koreai.mintlify.site/llms.txt
> Use this file to discover all available pages before exploring further.
# Adding the Twitter Channel
[Back to Available Channels](/ai-for-service/channels/adding-channels-to-your-bot#available-channels)
To set up Twitter as a channel, you must associate the bot with a Twitter account, define a Twitter app, and enable the integration. To add Twitter as a channel, follow the below steps:
1. **Create Twitter App** - Log in to Twitter. In **Twitter App Management** Console, create an app to provide authorization for communication between Twitter and your AI Agent.
2. **Setup Keys and Tokens** - Generate the authentication keys and tokens for the Twitter app to communicate with the Platform, and then copy those keys and tokens to Kore.ai App Builder.
3. **Update Permissions** - To use Twitter as a channel for your AI Agent, you must define the Twitter app permissions used to interact with the Platform.
4. **Enable Channel** - After setting up the Twitter app and entering configuration data in App Builder, you must enable the channel.
## Add Twitter Channel
To complete this procedure, you must create a Twitter account if you don't have one already.
The steps are modified in v7.1 of the platform in sync with changes to the channel requirements.
The Callback URL now includes the `streamid` in the API request to identify the AI Agent being accessed. When an incoming request is qualified with this identifier, it helps with traceability, troubleshooting, and remediation at the network level during anomalies like malicious calls or unusual app activity.
### Create App
1. To create a Twitter app, you need a Callback URL. To find the Callback URL, follow the below steps:
* In the Bots section of the App Builder, click the app you want to add the Twitter channel to.
* On the Channels tab, click the **Twitter** icon. The Twitter Channel page is displayed.
* Use the **Callback URL** from the **Configurations** tab of Twitter channel page.
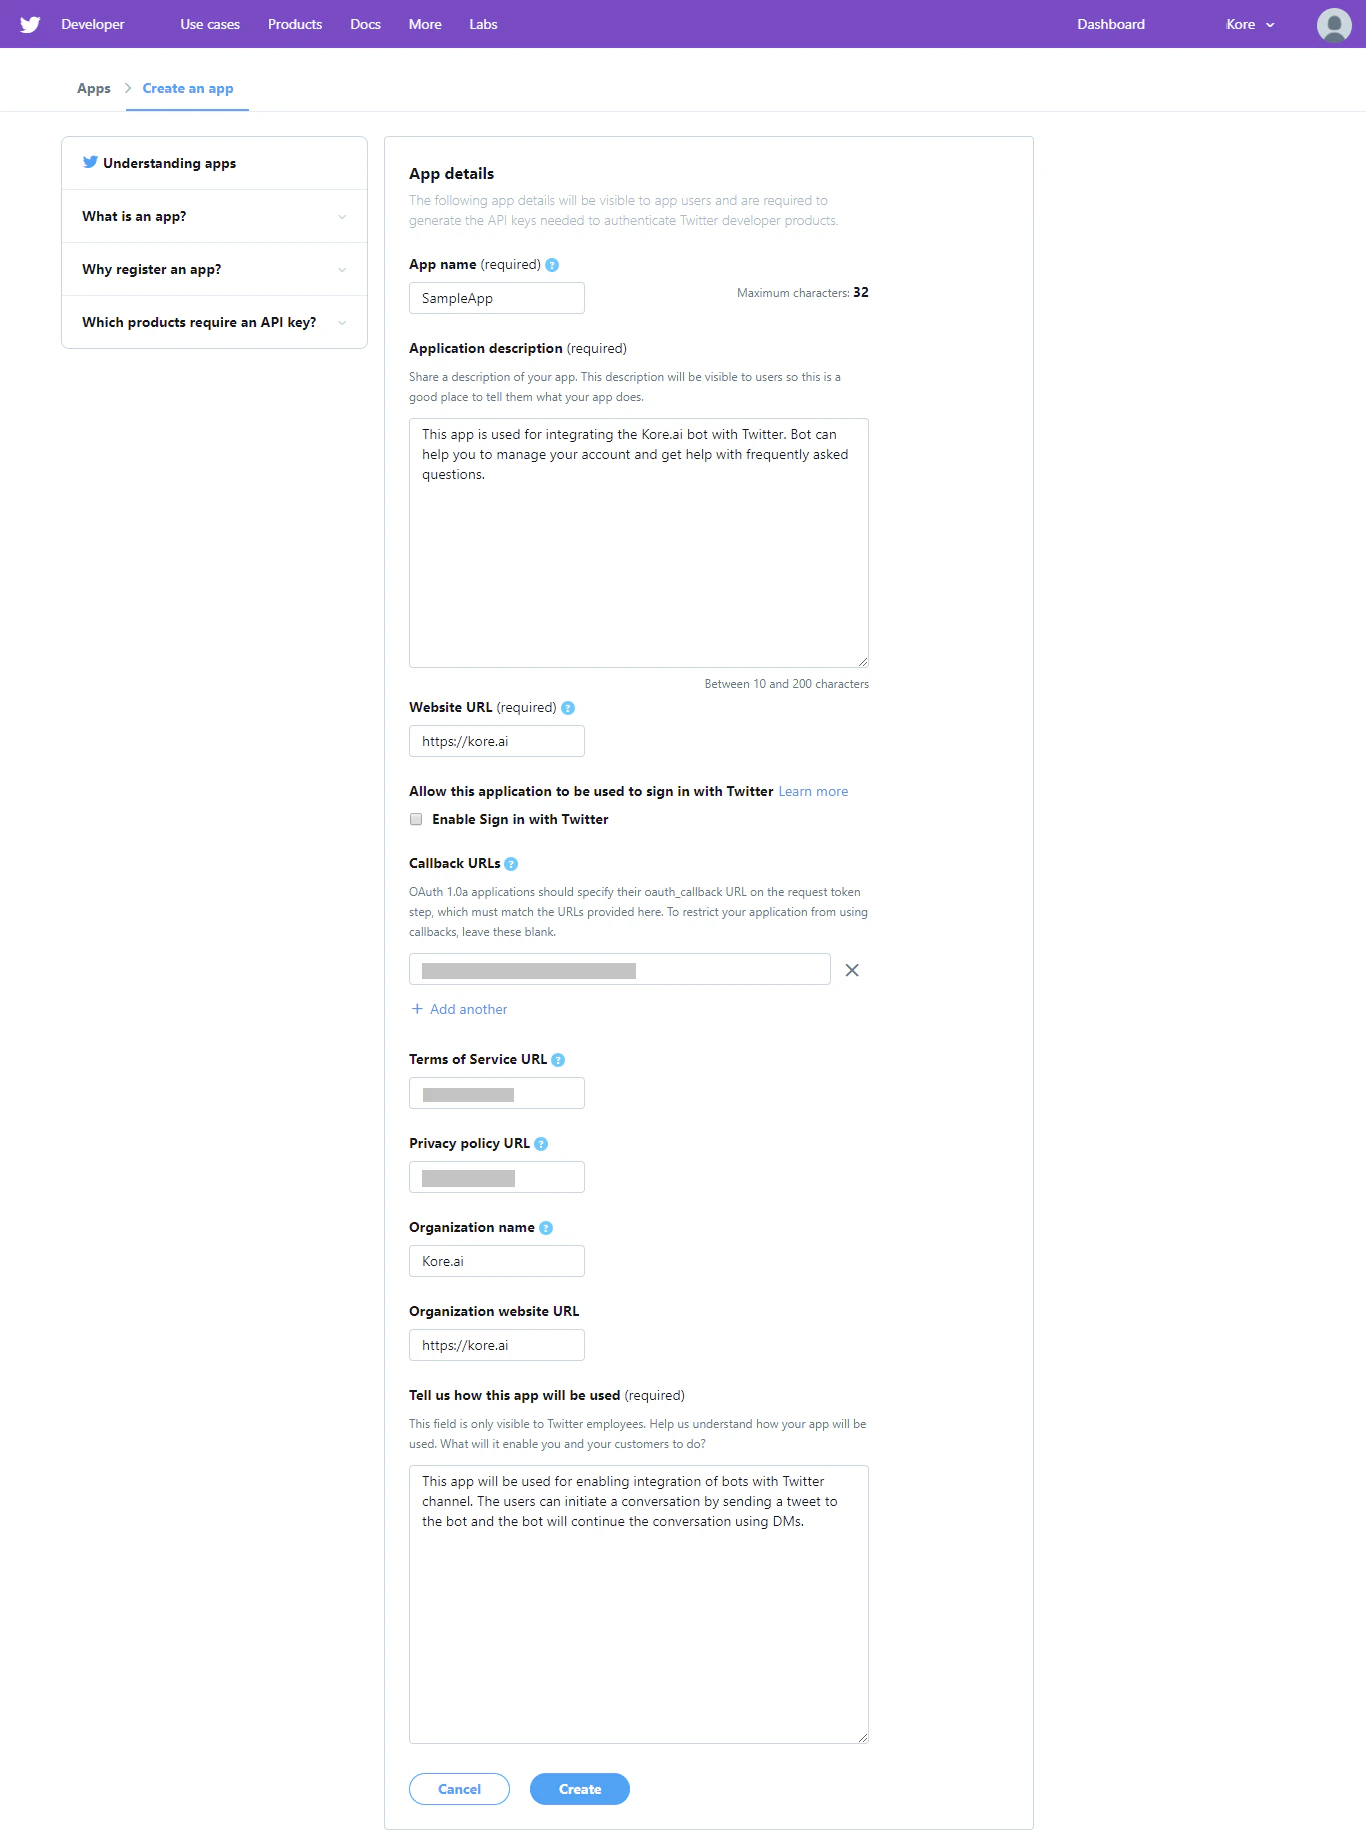
2. [Log in](https://apps.twitter.com/) to Twitter apps portal and select **Create New App**.
3. Provide all the required information, and click **Create your Twitter application** to create your new app.
 ### Keys and Tokens
After the application is created:
1. Go to the **Keys and tokens** tab.
2. Under the **Access token & access token secret** section, click **Create**. This action generates the Access Token and Access Token Secret.
### Keys and Tokens
After the application is created:
1. Go to the **Keys and tokens** tab.
2. Under the **Access token & access token secret** section, click **Create**. This action generates the Access Token and Access Token Secret.
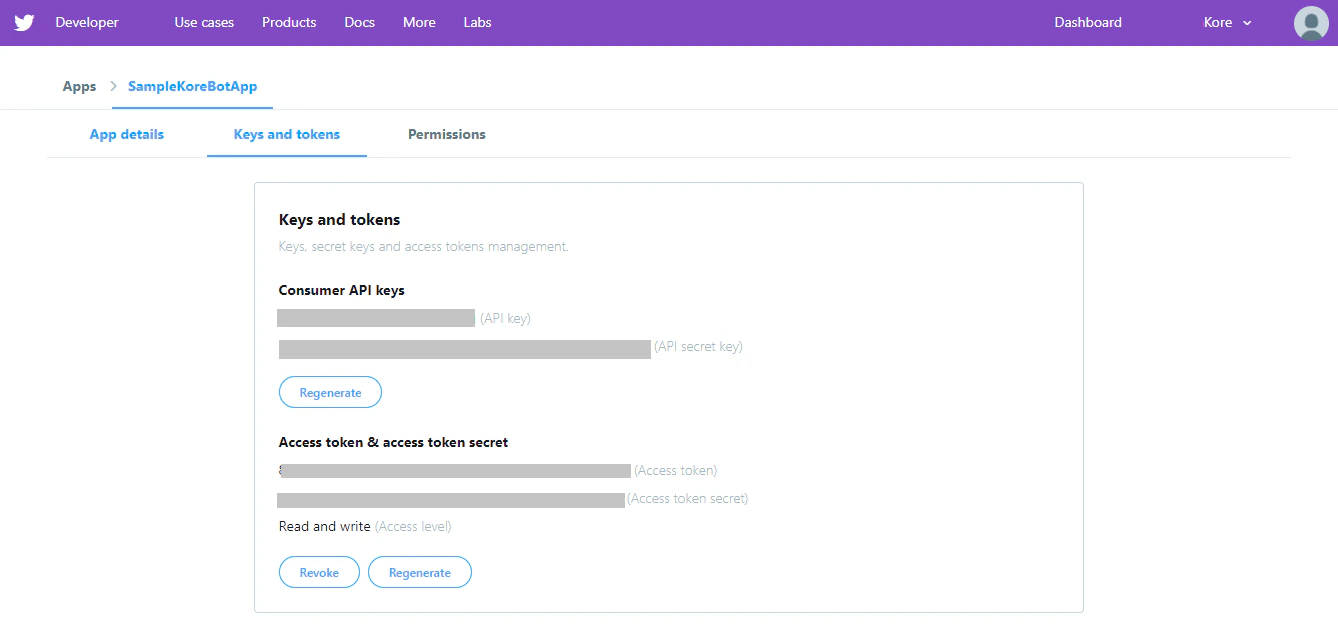 3. Copy the values of **API Key**, **API Secret Key**, **Access Token**, and **Access Token Secret** fields. You must provide them while configuring the Twitter channel from the App Builder for the respective app.
### Permissions
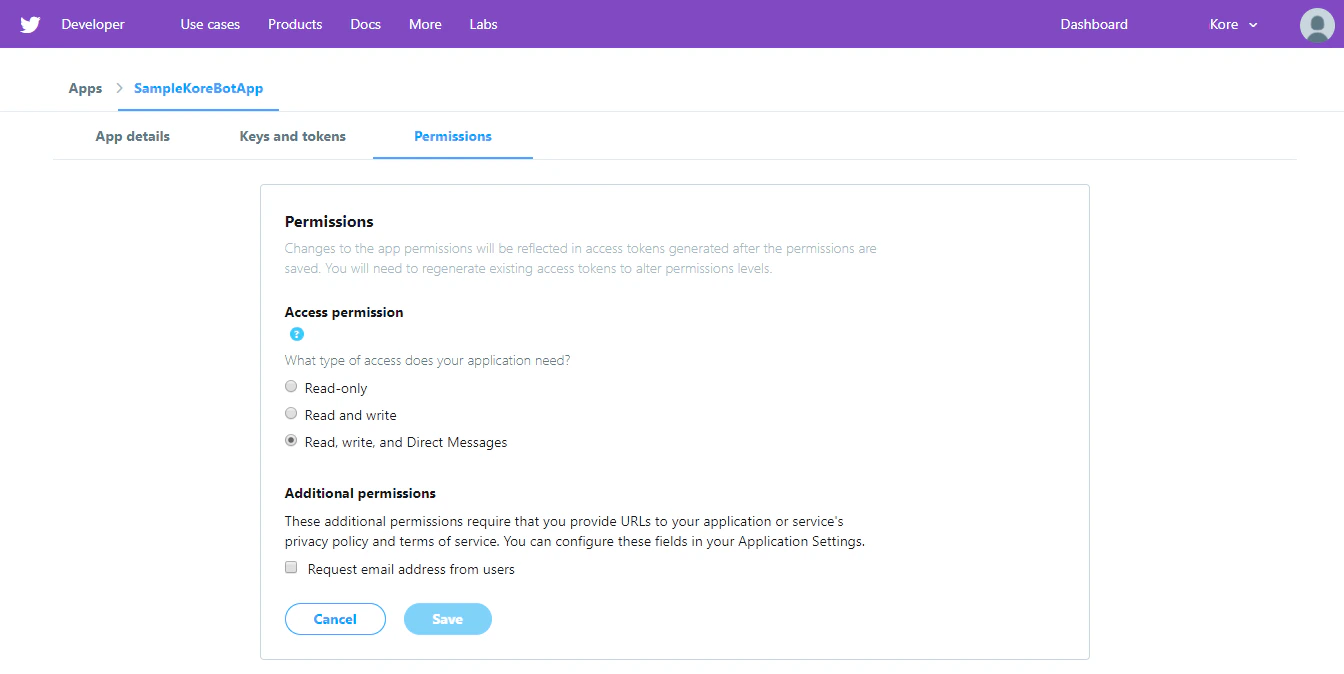
1. Go to the Permissions tab; click the **Edit** and set the **Access Permission** to Read, Write, and Direct Messages.
2. Click **Save**.
3. Copy the values of **API Key**, **API Secret Key**, **Access Token**, and **Access Token Secret** fields. You must provide them while configuring the Twitter channel from the App Builder for the respective app.
### Permissions
1. Go to the Permissions tab; click the **Edit** and set the **Access Permission** to Read, Write, and Direct Messages.
2. Click **Save**.
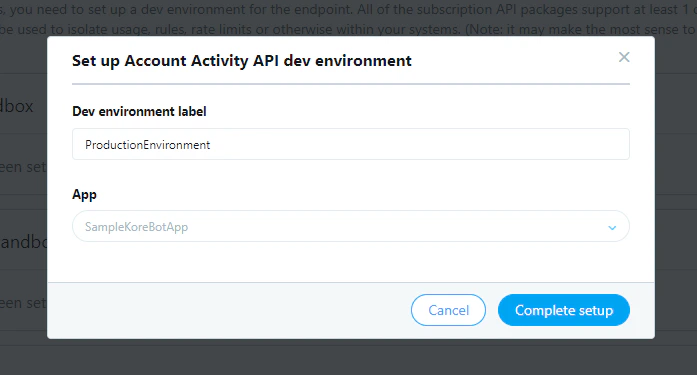
 3. Go to the **Dev environments** page and set up the environment for your app.
4. Click **Set up dev environment** under the **Account Activity API** section. Provide a value for the **Dev environment label**, say `ProductionEnvironment`, and choose your app.
5. Select **Complete setup**.
3. Go to the **Dev environments** page and set up the environment for your app.
4. Click **Set up dev environment** under the **Account Activity API** section. Provide a value for the **Dev environment label**, say `ProductionEnvironment`, and choose your app.
5. Select **Complete setup**.
 ## Enable Channel
1. In the **Bots** section of the App Builder, click the app you want to add the Twitter channel to.
2. On the **Channels** tab, click the **Twitter** icon. The **Twitter Channel** page is displayed.
3. Go to the Configurations tab.
4. Enter the **API key**, **API Secret Key**, **Access Token**, and **Access Token Secret** obtained from the [Keys and Tokens](#keys-and-tokens) tab of your Twitter app.
5. Enter the **Environment Label** as set up in the [Permissions](#permissions) section of the Twitter app.
6. Click **Authorize** to register a webhook with your Twitter app and to subscribe to realtime activities.
7. **Enable Channel** and **Save**.
8. Your Twitter channel is set up and ready for [Publishing your App](/ai-for-service/deployment/publishing-app).
## Edit Twitter Channel
To edit the Twitter channel, follow the below steps:
1. Hover over the channel and click to modify.
2. You can make necessary updates to your channel configurations and save them.
3. You can also disable or delete the channel. [Learn more](/ai-for-service/channels/adding-channels-to-your-bot#editing-testing-disabling-or-deleting-channels)
4. Select one of the following commands to modify the channel:
* **Disable/Enable** - Click **Disable** to temporarily disable the use of the Twitter channel for your app. To enable use of Twitter, click **Enable**.
* **Delete** - Click **Delete**. On the **Delete Confirmation** dialog box, click **OK** to permanently delete the app channel configuration.
This operation is permanent, and can't be undone.
## Enable Channel
1. In the **Bots** section of the App Builder, click the app you want to add the Twitter channel to.
2. On the **Channels** tab, click the **Twitter** icon. The **Twitter Channel** page is displayed.
3. Go to the Configurations tab.
4. Enter the **API key**, **API Secret Key**, **Access Token**, and **Access Token Secret** obtained from the [Keys and Tokens](#keys-and-tokens) tab of your Twitter app.
5. Enter the **Environment Label** as set up in the [Permissions](#permissions) section of the Twitter app.
6. Click **Authorize** to register a webhook with your Twitter app and to subscribe to realtime activities.
7. **Enable Channel** and **Save**.
8. Your Twitter channel is set up and ready for [Publishing your App](/ai-for-service/deployment/publishing-app).
## Edit Twitter Channel
To edit the Twitter channel, follow the below steps:
1. Hover over the channel and click to modify.
2. You can make necessary updates to your channel configurations and save them.
3. You can also disable or delete the channel. [Learn more](/ai-for-service/channels/adding-channels-to-your-bot#editing-testing-disabling-or-deleting-channels)
4. Select one of the following commands to modify the channel:
* **Disable/Enable** - Click **Disable** to temporarily disable the use of the Twitter channel for your app. To enable use of Twitter, click **Enable**.
* **Delete** - Click **Delete**. On the **Delete Confirmation** dialog box, click **OK** to permanently delete the app channel configuration.
This operation is permanent, and can't be undone.