> ## Documentation Index
> Fetch the complete documentation index at: https://koreai.mintlify.site/llms.txt
> Use this file to discover all available pages before exploring further.
# Adding the Zoom Contact Center Channel
[Back to Available Channels](/ai-for-service/channels/adding-channels-to-your-bot#available-channels)
**Zoom Contact Center (ZCC)** is an automation solution for enterprises to manage customer interactions across voice and chat channels. It enables chat automation through Asynchronous Webhook Integration. The **Platform** now supports the Zoom Contact Center channel to integrate AI Agents for rich and asynchronous messaging experiences.
This integration streamlines customer support, automates responses, and improves overall operational efficiency, leading to enhanced customer experiences and increased productivity.
## How it Works
Here’s a general overview of how AI Agent interactions work on the Zoom Contact Center Channel:
* **Setup and Configuration**: Kore.ai sets up and configures the integration between their AI Agent and ZCC. This involves installing specific connectors provided by Zoom and configuring the settings to establish a connection.
* **Channel Integration**: Once the integration is set up, the AI Agents on the Platform can be configured to use ZCC as one of its communication channels. This means that incoming customer inquiries can be handled through Zoom’s communication platform, which may include voice calls and chat messages.
* **Routing and Distribution**: When a customer initiates contact through ZCC, the Platform’s routing system directs the interaction to an available agent based on predefined rules and criteria.
* **Agent Interaction**: The agent receives the customer interaction and responds to the customer using ZCC’s communication features, such as answering voice calls or chat messages.
## Prerequisites
Please ensure you have the following before enabling this channel:
1. A Zoom App Marketplace Developer account. Don’t have an account? Sign up [here](https://marketplace.zoom.us/).
2. Developer access to the Platform. Need Developer Access? [Contact us](https://kore.ai/contact-us/).
## Setting up Zoom Contact Center
The important steps to set up the ZCC channel are summarized below:
1. [Associate an App to the channel](#step-1-associate-an-app).
2. [Create a Bot Connector instance](#step-2-add-kore-ai-chatbot-connector-instance) on [Zoom App Marketplace](https://marketplace.zoom.us/apps) to associate an AI Agent.
3. [Authorize the connector by configuring the required parameters](#step-3-authorize-the-connector).
4. [Enable the channel on the Platform](#step-4-enable-the-channel).
### Step 1: Associate an App
As a first step to enable the channel, associate an app on the Platform by selecting an app from the list or creating a new one.
To create an app, follow the steps below:
1. Navigate to **Channels & Flows** > **Channels** > **Digital** > **All**.
2. Select **Zoom Contact Center**.
3. Click the **Configurations** tab.
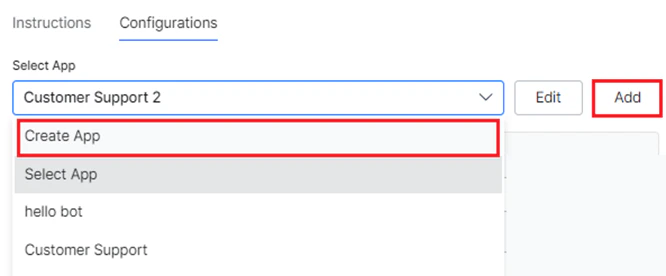
4. If you’re creating an app for the first time, click the **Create App** link. Otherwise, select **Create App** from the dropdown list or click **Add**.
 5. In the **Create New Client App** window, follow the steps below:
* In the **Name** field, enter the name for the app registration used in App Builder,. For example, My App Registration.
* Select one of these scopes for the app:
* **Allow anonymous users to chat with the AI Agent**: Enables anonymous users to interact with the AI Agent.
* **Auto register new users on Platform**: Select to control the auto-user registration in Kore.ai if the user assertion is unknown.
* In the **JWT Signing** **Algorithms Used For Client App Authentication** drop-down list, select one of the following security algorithms:
* **RS256/RS512**: Select to enable the **Public Key**. The Private key, used for encryption, is provided by the user, and the Public key, used for decryption, is provided by the Platform. Both the keys have to be used for generating the token. The Public Key is used by the Platform to authenticate the client application.
* **HS256/HS512**: Select to generate a **Secret Key** and a **Client ID**. The **Client ID** is required for app initialization, and the **Secret Key** is used by the Platform to authenticate the client application.
* (Optional) In the **Push Notifications** section, click **Enable** and then specify a URL to send the notifications.
5. In the **Create New Client App** window, follow the steps below:
* In the **Name** field, enter the name for the app registration used in App Builder,. For example, My App Registration.
* Select one of these scopes for the app:
* **Allow anonymous users to chat with the AI Agent**: Enables anonymous users to interact with the AI Agent.
* **Auto register new users on Platform**: Select to control the auto-user registration in Kore.ai if the user assertion is unknown.
* In the **JWT Signing** **Algorithms Used For Client App Authentication** drop-down list, select one of the following security algorithms:
* **RS256/RS512**: Select to enable the **Public Key**. The Private key, used for encryption, is provided by the user, and the Public key, used for decryption, is provided by the Platform. Both the keys have to be used for generating the token. The Public Key is used by the Platform to authenticate the client application.
* **HS256/HS512**: Select to generate a **Secret Key** and a **Client ID**. The **Client ID** is required for app initialization, and the **Secret Key** is used by the Platform to authenticate the client application.
* (Optional) In the **Push Notifications** section, click **Enable** and then specify a URL to send the notifications.
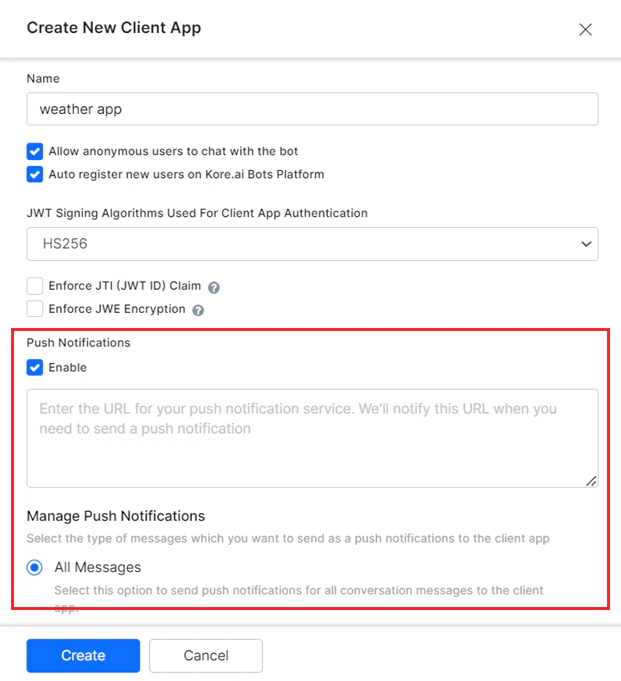 * When you Enable the Push Notifications, you can select one of the following options to manage the notifications:
* **All Messages** - Sends push notifications for all conversation messages to the client app.
* **Message Delivery Failures** - Sends push notifications for failure scenarios such as WebSocket Disconnected, App is Killed, and Message Delivery Failure.
* When you Enable the Push Notifications, you can select one of the following options to manage the notifications:
* **All Messages** - Sends push notifications for all conversation messages to the client app.
* **Message Delivery Failures** - Sends push notifications for failure scenarios such as WebSocket Disconnected, App is Killed, and Message Delivery Failure.
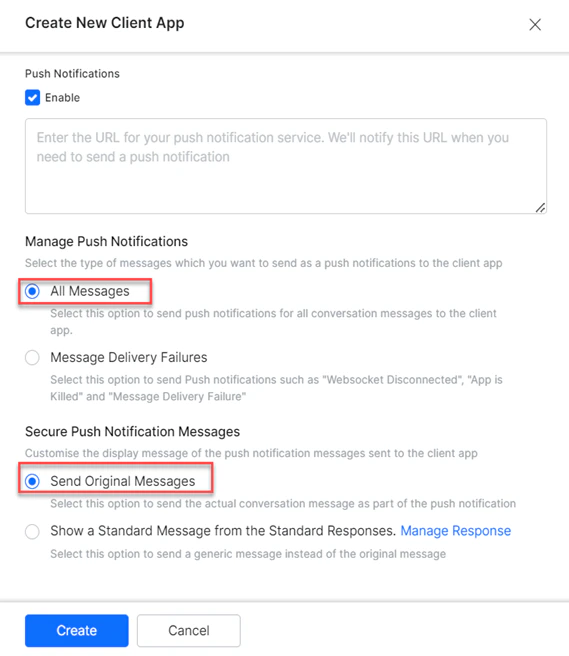 * To customize the display messages for the push notifications messages sent to the client app, select one of the following options:
* **Send Original Messages** - Sends the actual conversation message as part of the push notification.
* **Show a standard message from standard responses** - Sends a generic message instead of the original message.
* To customize the display messages for the push notifications messages sent to the client app, select one of the following options:
* **Send Original Messages** - Sends the actual conversation message as part of the push notification.
* **Show a standard message from standard responses** - Sends a generic message instead of the original message.
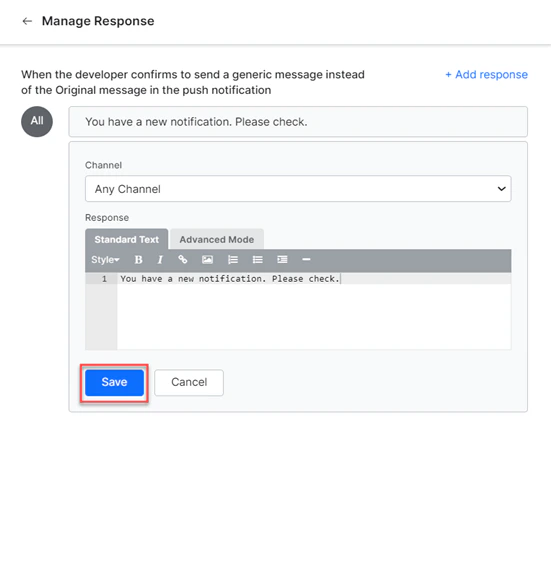
 * Click **Manage Responses** to add custom messages in the push notification. To learn more about adding responses, read articles [Default Standard Responses](/ai-for-service/automation/intelligence/conversation-management#standard-responses) and [Default Conversations](/ai-for-service/automation/intelligence/conversation-management/default-conversations).
* Click **Save** and then, click **Create**.
* Click **Manage Responses** to add custom messages in the push notification. To learn more about adding responses, read articles [Default Standard Responses](/ai-for-service/automation/intelligence/conversation-management#standard-responses) and [Default Conversations](/ai-for-service/automation/intelligence/conversation-management/default-conversations).
* Click **Save** and then, click **Create**.
 ### Step 2: Add Kore.ai Chatbot Connector Instance
To set up **Zoom Contact Center** as a channel, the AI Agent has to be associated with the instance of the Kore.ai Chat bot connector available in the Zoom app marketplace. To create a Chatbot Connector, follow the steps below:
1. Log in to the [Zoom App Marketplace](https://marketplace.zoom.us/apps).
2. Select **App Types** > **Connectors** on the left navigation menu.
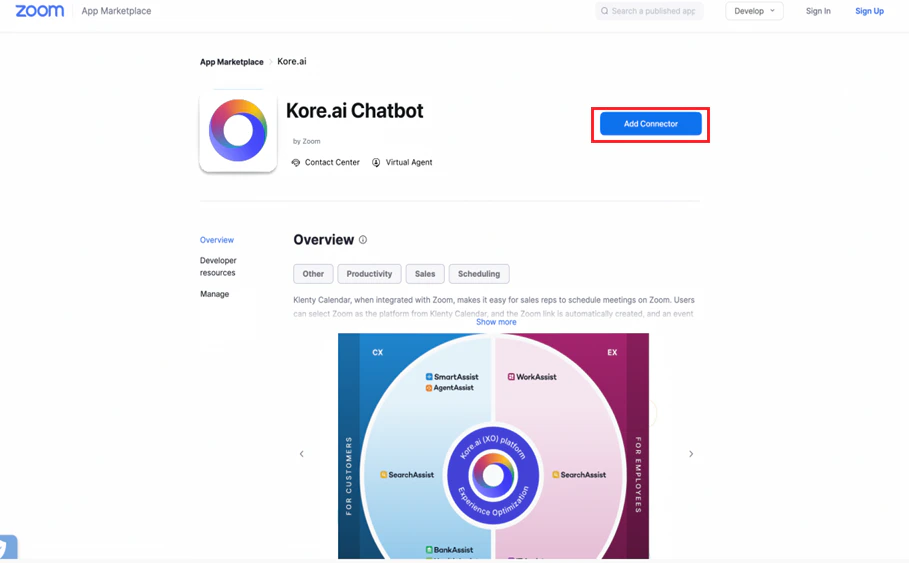
3. On the **Connectors** page, select the **Kore.ai Chatbot** option.
4. On the **Overview** page, click **Add Connector**.
### Step 2: Add Kore.ai Chatbot Connector Instance
To set up **Zoom Contact Center** as a channel, the AI Agent has to be associated with the instance of the Kore.ai Chat bot connector available in the Zoom app marketplace. To create a Chatbot Connector, follow the steps below:
1. Log in to the [Zoom App Marketplace](https://marketplace.zoom.us/apps).
2. Select **App Types** > **Connectors** on the left navigation menu.
3. On the **Connectors** page, select the **Kore.ai Chatbot** option.
4. On the **Overview** page, click **Add Connector**.
 ### Step 3: Authorize the Connector
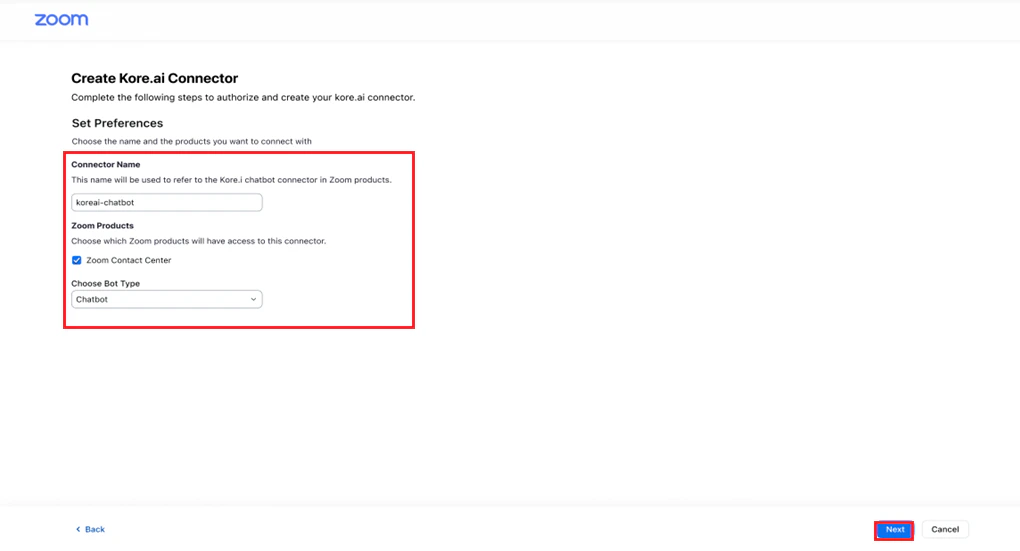
The next step after creating a connector is to authorize it on the **Create Kore.ai Connector** page of the **Zoom App Marketplace** portal. To configure, follow the steps below:
1. Provide the following information for **Set Preferences**:
* **Connector Name**.
* Select **Zoom Contact Center**.
* Select **Chatbot** from the dropdown for **Choose Bot Type**.
* Click **Next**.
### Step 3: Authorize the Connector
The next step after creating a connector is to authorize it on the **Create Kore.ai Connector** page of the **Zoom App Marketplace** portal. To configure, follow the steps below:
1. Provide the following information for **Set Preferences**:
* **Connector Name**.
* Select **Zoom Contact Center**.
* Select **Chatbot** from the dropdown for **Choose Bot Type**.
* Click **Next**.
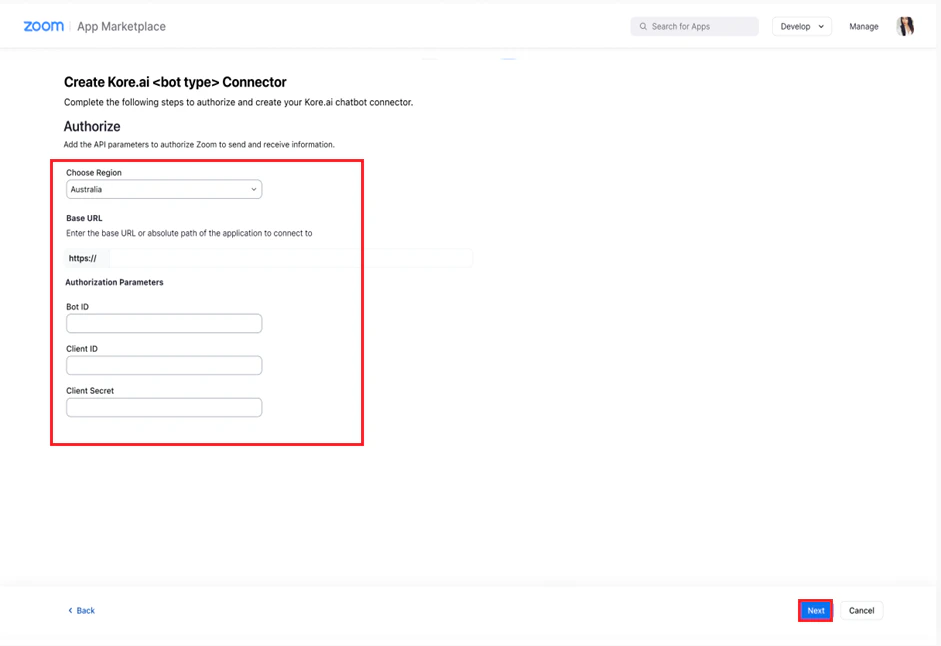
 2. Provide the following information in the **Authorize** section:
* Select the region you want the chatbot to be available from the dropdown.
* The **Base URL** of the Platform to connect to the app. For example, the base URL for Kore.ai is `platform.kore.ai`.
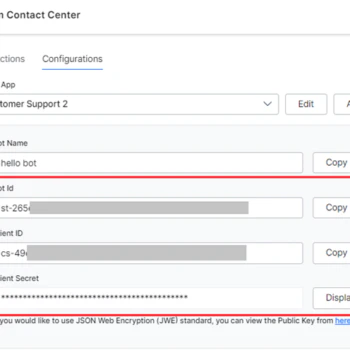
* Copy and paste the **Bot ID**, **Client ID**, and **Client Secret** values from the **Channels & Flows** > **Channels** > **Digital** > **All** > **Configured** section of the Platform (shown below) for **Authorization Parameters**.
2. Provide the following information in the **Authorize** section:
* Select the region you want the chatbot to be available from the dropdown.
* The **Base URL** of the Platform to connect to the app. For example, the base URL for Kore.ai is `platform.kore.ai`.
* Copy and paste the **Bot ID**, **Client ID**, and **Client Secret** values from the **Channels & Flows** > **Channels** > **Digital** > **All** > **Configured** section of the Platform (shown below) for **Authorization Parameters**.
 3. Click **Next**.
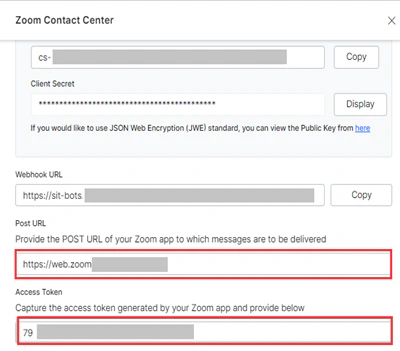
 4. Copy the **Post URL** and **Access Token** values from the **Create Kore.ai Chatbot Connector** page.
  5. Paste to the relevant fields on the Platform in the **Zoom Contact Center** > **Configurations** section.
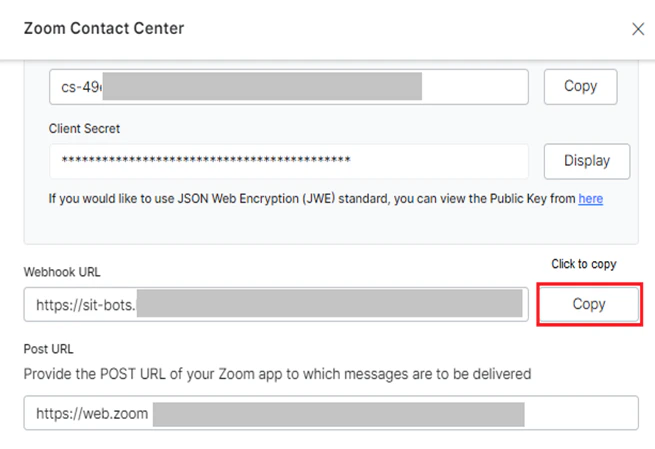
 6. Copy the **Webhook URL** from the **Zoom Contact Center** > **Configurations** section of the Platform.
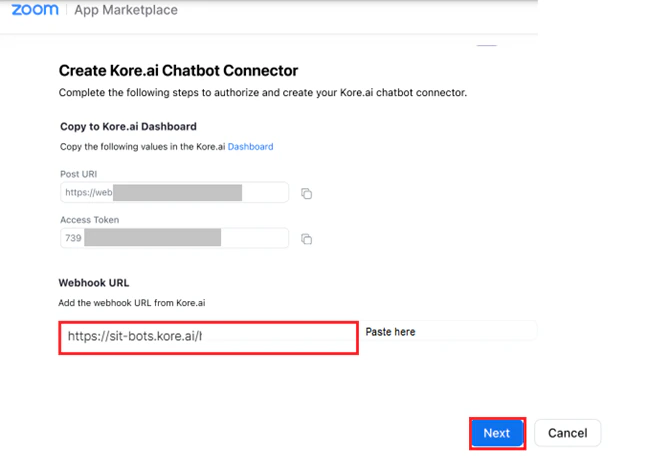
 7. Paste on the **Create Kore.ai Chatbot Connector** page, and click **Next**.
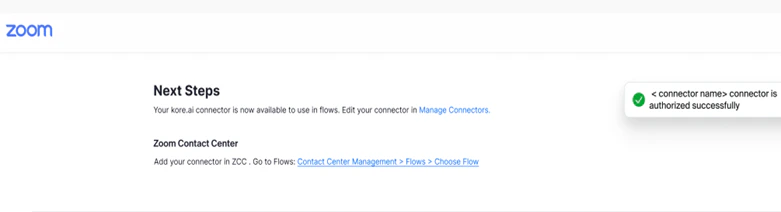
 The following message appears once the Kore.ai Chatbot connector is authorized successfully.
 ### Step 4: Enable the Channel
The final step in the setup is to enable the channel on the Platform. To enable, follow the steps below:
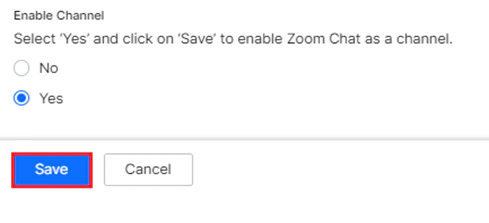
1. On the Platform, under **Zoom Contact Center** > **Configurations**, select **Yes** for **Enable Channel**.
2. Click **Save**.
### Step 4: Enable the Channel
The final step in the setup is to enable the channel on the Platform. To enable, follow the steps below:
1. On the Platform, under **Zoom Contact Center** > **Configurations**, select **Yes** for **Enable Channel**.
2. Click **Save**.
 You’re now ready to test the new channel integration by [Publishing your App](/ai-for-service/deployment/publishing-app).