> ## Documentation Index
> Fetch the complete documentation index at: https://koreai.mintlify.site/llms.txt
> Use this file to discover all available pages before exploring further.
# System and Advanced Settings
Settings lets administrators and supervisors control system-wide behavior—from agent session management and email handling to AI-powered summarization and real-time sentiment analysis.
Settings are organized into two groups:
| Group | What it controls |
| :-------------------------------------- | :------------------------------------------------------------------------------------------ |
| [System Settings](#system-settings) | Core operational behavior: co-browse, notifications, email, queues, and agent status. |
| [Advanced Settings](#advanced-settings) | AI and integration features: WFM, summarization, translation, sentiment, and call handling. |
## System Settings
### Co-Browse
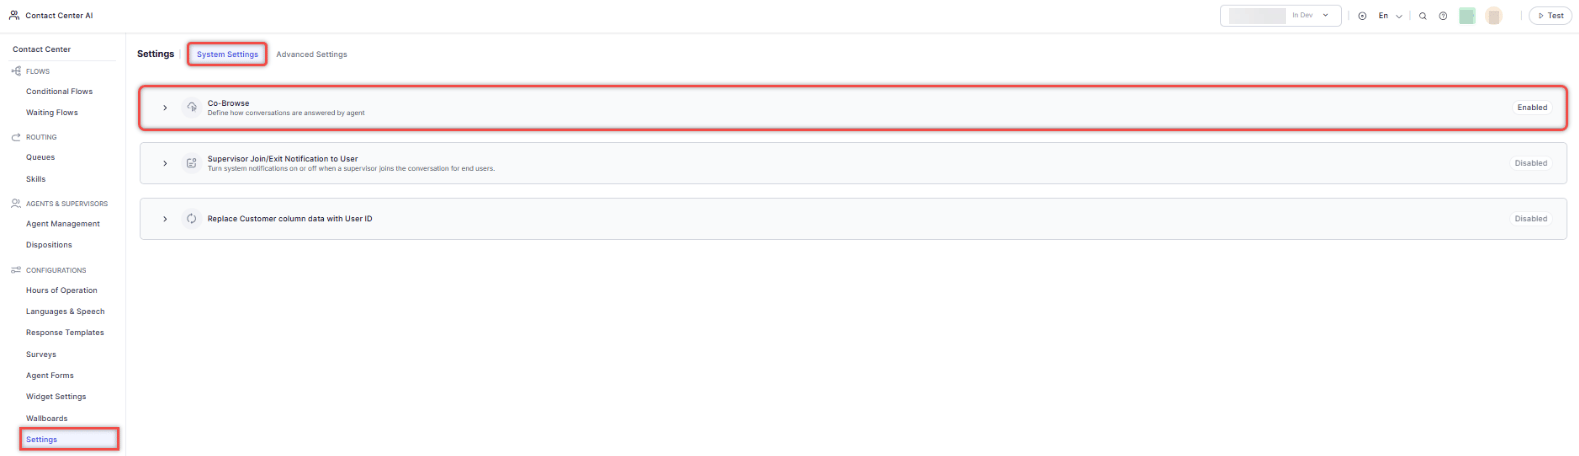
Co-Browse lets agents navigate the same web page simultaneously with a customer. You can mask sensitive fields so agents can't see confidential data during a session.
**To configure Co-Browse:**
1. Go to **Contact Center AI** > **CONFIGURATIONS** > **Settings** > **System Settings** > **Co-Browse**.
2. Turn on **Enable Co-Browse**. Agents see the co-browse option in their compose bar for supported channels.
3. Enter **Allowed Domains** (comma-separated)—the domains permitted to run co-browse sessions.
4. Enter **Mask Patterns** (regular expressions, semicolon-separated)—values that must be hidden from the agent's view.
5. Enter **Mask CSS Classes**-known CSS classes whose content must be hidden from the agent's view.
6. Select **Save**.
 ***
### Supervisor Join/Exit Notification to User
By default, customers receive a system message when a supervisor joins or exits a chat. This setting lets you suppress those notifications to support silent supervision or internal monitoring.
**To configure:**
1. Go to **Contact Center AI** > **CONFIGURATIONS** > **Settings** > **System Settings** > **Supervisor Join Notification to User**.
***
### Supervisor Join/Exit Notification to User
By default, customers receive a system message when a supervisor joins or exits a chat. This setting lets you suppress those notifications to support silent supervision or internal monitoring.
**To configure:**
1. Go to **Contact Center AI** > **CONFIGURATIONS** > **Settings** > **System Settings** > **Supervisor Join Notification to User**.
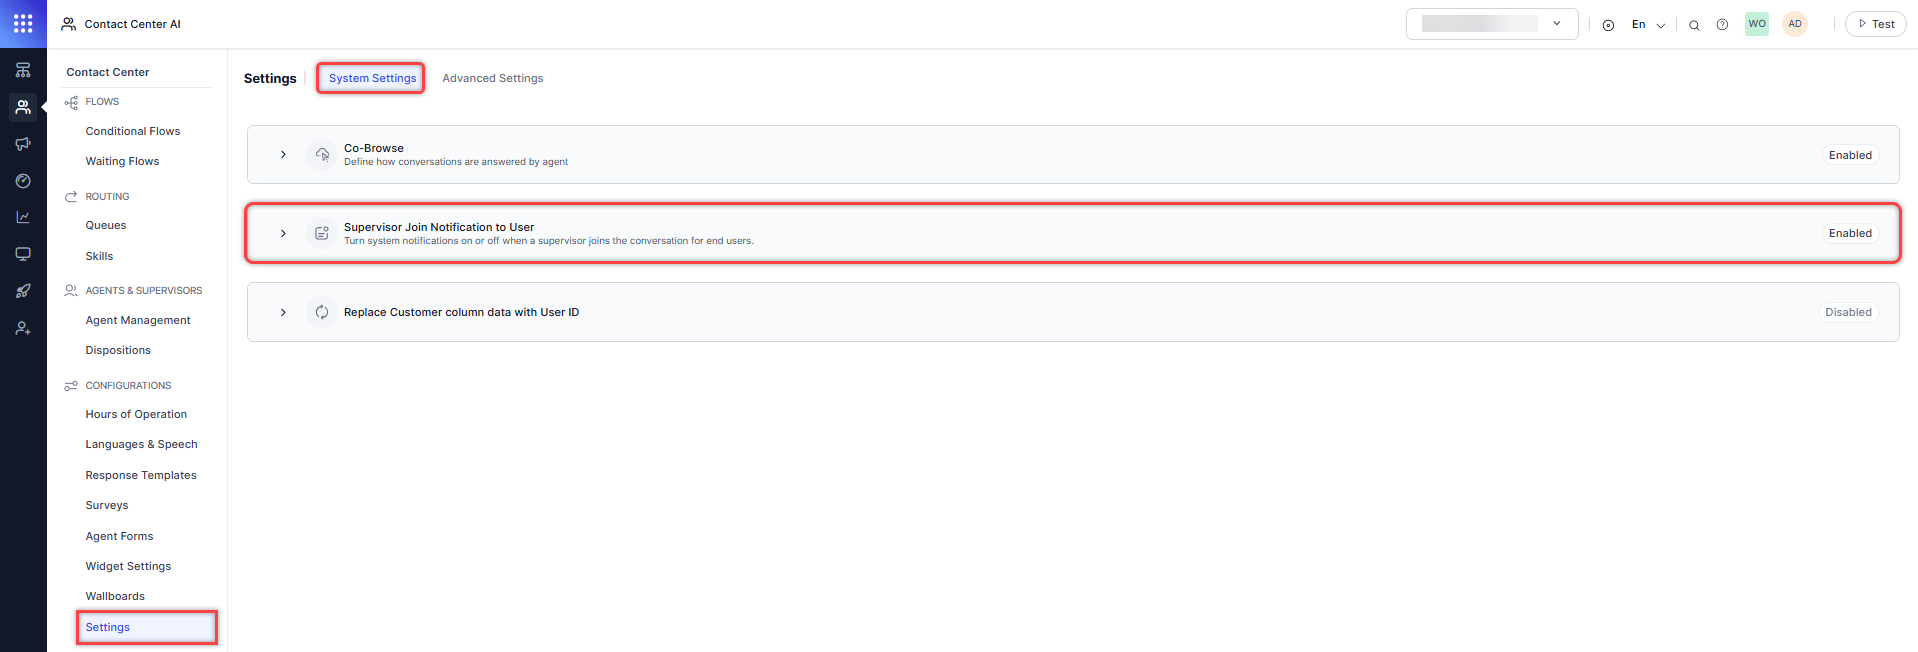 2. The setting is **enabled by default**. To disable it, click the arrow to turn off the toggle.
 **Behavior:**
| Setting State | Behavior |
| --------------------- | -------------------------------------------------------------------------------------------------------------------------------------- |
| **Enabled** (default) | Customers see "Supervisor Joined the Chat" and "Supervisor Exited the Chat" messages. |
| **Disabled** | Customers receive no visual indication when a supervisor joins or exits. The change applies in real time and persists across sessions. |
All changes are recorded in [Audit logs](/ai-for-service/administration/audit-logs) for traceability.
***
### Automatic Away Status for Agent Inactivity
When enabled, the system automatically sets an agent's status to `Away` if the configured **Agent Inactivity Wait Time** is exceeded after a conversation becomes overdue. This prevents inactive agents from receiving new interactions and keeps routing accurate.
**Behavior:**
| Setting State | Behavior |
| ------------- | --------------------------------------------------------------------------------------------------------------- |
| **Enabled** | Sets status to `Away` when inactivity timer is breached; blocks new interactions; updates Supervisor dashboard. |
| **Disabled** | Agent status remains unchanged when the inactivity timer is breached. |
**To configure:**
1. Go to **Contact Center AI** > **Settings** > **System Settings** > **Automatic Away Status for Agent Inactivity**.
**Behavior:**
| Setting State | Behavior |
| --------------------- | -------------------------------------------------------------------------------------------------------------------------------------- |
| **Enabled** (default) | Customers see "Supervisor Joined the Chat" and "Supervisor Exited the Chat" messages. |
| **Disabled** | Customers receive no visual indication when a supervisor joins or exits. The change applies in real time and persists across sessions. |
All changes are recorded in [Audit logs](/ai-for-service/administration/audit-logs) for traceability.
***
### Automatic Away Status for Agent Inactivity
When enabled, the system automatically sets an agent's status to `Away` if the configured **Agent Inactivity Wait Time** is exceeded after a conversation becomes overdue. This prevents inactive agents from receiving new interactions and keeps routing accurate.
**Behavior:**
| Setting State | Behavior |
| ------------- | --------------------------------------------------------------------------------------------------------------- |
| **Enabled** | Sets status to `Away` when inactivity timer is breached; blocks new interactions; updates Supervisor dashboard. |
| **Disabled** | Agent status remains unchanged when the inactivity timer is breached. |
**To configure:**
1. Go to **Contact Center AI** > **Settings** > **System Settings** > **Automatic Away Status for Agent Inactivity**.
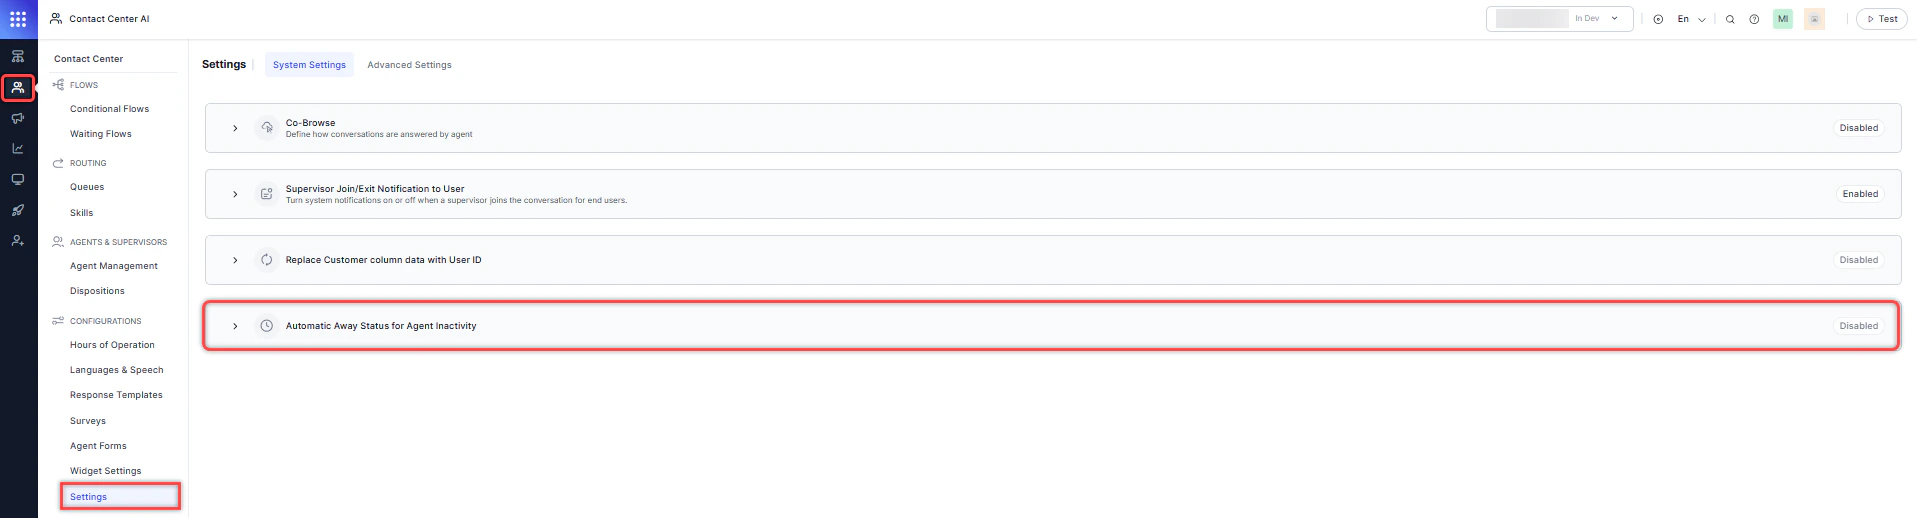 2. Turn on the toggle to enable the feature.
 ***
### Obscure Customer Info in Analytics—Interactions
Administrators can hide customer Email IDs and Phone Numbers in the Interactions dashboard, the Details slider, and export files—replacing them with an internal User ID.
**To configure:**
1. Go to **Contact Center AI** > **Configurations** > **Settings** > **System Settings** > **Obscure Customer Info in Analytics - Interactions**.
***
### Obscure Customer Info in Analytics—Interactions
Administrators can hide customer Email IDs and Phone Numbers in the Interactions dashboard, the Details slider, and export files—replacing them with an internal User ID.
**To configure:**
1. Go to **Contact Center AI** > **Configurations** > **Settings** > **System Settings** > **Obscure Customer Info in Analytics - Interactions**.
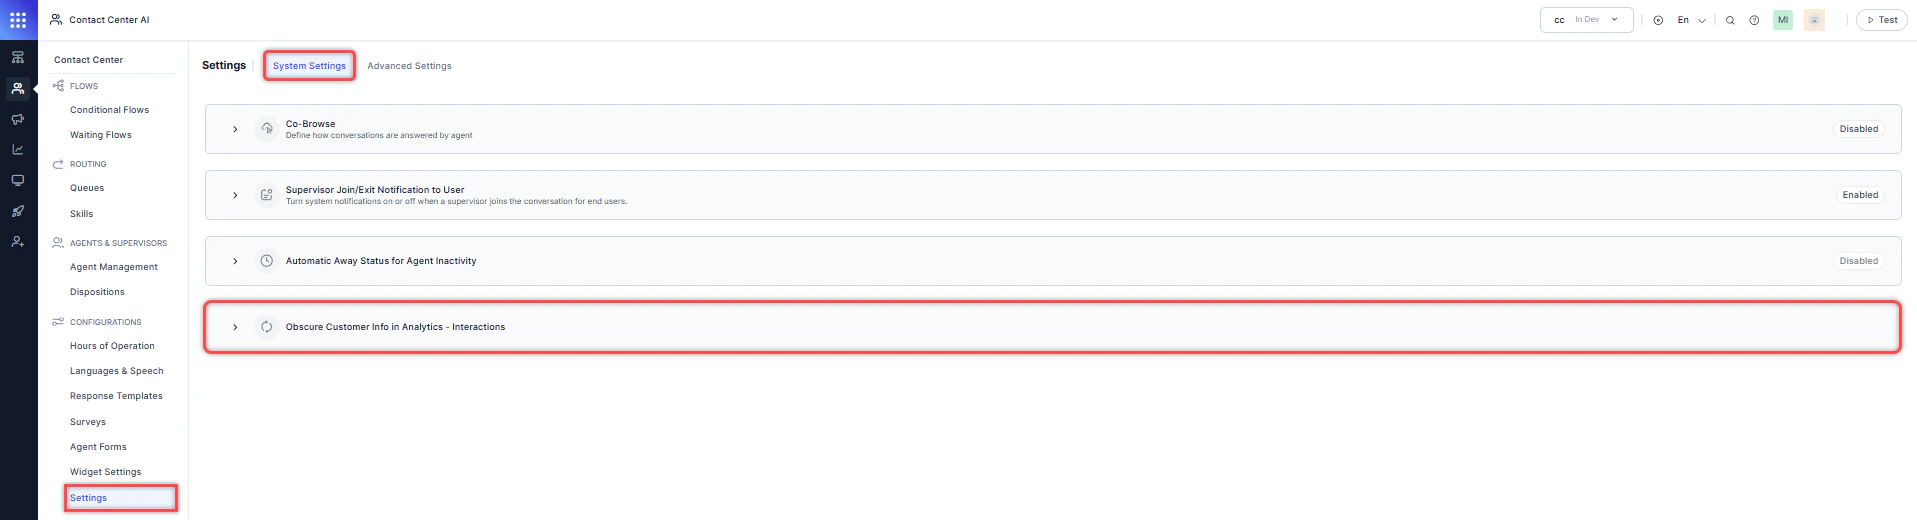 2. Enable the options you need:
| Option | Effect |
| ------------------------------------------------------- | ----------------------------------------------------------------------------------- |
| **Replace Customer Column with User ID on main page** | Displays User ID instead of Email ID or Phone Number in the Interactions dashboard. |
| **Disable Userinfo tab in Details slider** | Hides the Userinfo tab from the Details slider. |
| **Replace Customer Column with User ID in export file** | Displays User ID instead of Email ID or Phone Number in the export file. |
| **Show Customer and Agent Names in Transcript** | Adds a `NameOfUser` column to the transcript export file. |
2. Enable the options you need:
| Option | Effect |
| ------------------------------------------------------- | ----------------------------------------------------------------------------------- |
| **Replace Customer Column with User ID on main page** | Displays User ID instead of Email ID or Phone Number in the Interactions dashboard. |
| **Disable Userinfo tab in Details slider** | Hides the Userinfo tab from the Details slider. |
| **Replace Customer Column with User ID in export file** | Displays User ID instead of Email ID or Phone Number in the export file. |
| **Show Customer and Agent Names in Transcript** | Adds a `NameOfUser` column to the transcript export file. |
 All settings are optional and **off by default**. You can enable one or more independently. If none are enabled, the system displays customer information as Email ID or Phone Number.
**Related:** [Conversations](/ai-for-service/analytics/overview/conversations)
***
### Email Settings
Email Settings control how agents handle email distribution fields, contact suggestions, send confirmations, work bins, and outbound email access.
**To access:** Go to **Contact Center AI** > **Configurations** > **Settings** > **System Settings** > **Email Settings**.
All settings are optional and **off by default**. You can enable one or more independently. If none are enabled, the system displays customer information as Email ID or Phone Number.
**Related:** [Conversations](/ai-for-service/analytics/overview/conversations)
***
### Email Settings
Email Settings control how agents handle email distribution fields, contact suggestions, send confirmations, work bins, and outbound email access.
**To access:** Go to **Contact Center AI** > **Configurations** > **Settings** > **System Settings** > **Email Settings**.
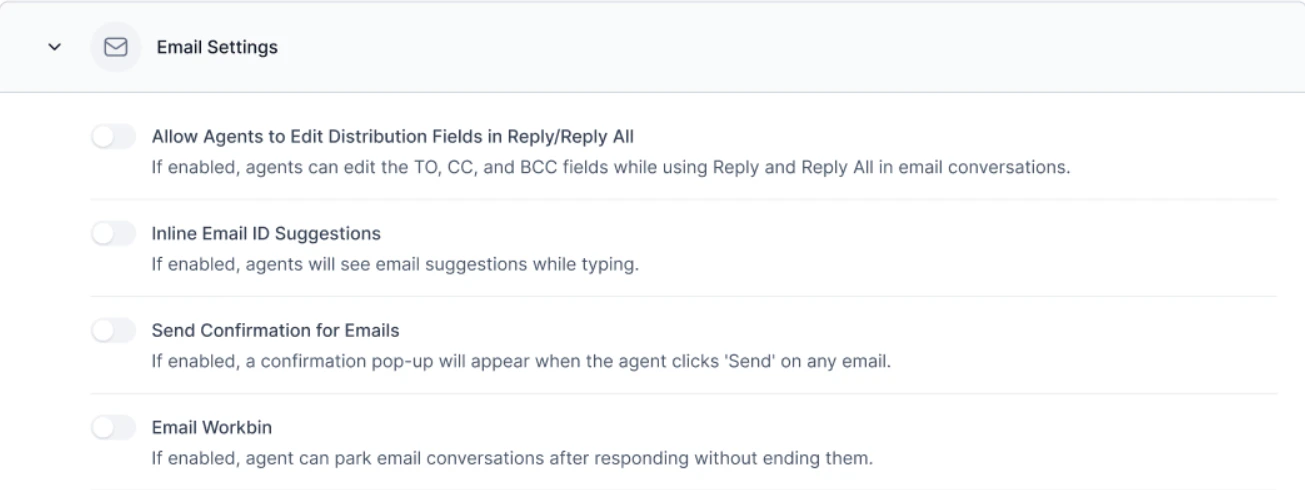 **Available settings:**
| Setting | Description |
| ------------------------------------------------------------------ | ------------------------------------------------------------------------------------- |
| **Allow Agents to Edit Distribution Fields in Reply or Reply All** | Lets agents modify `To`, `CC`, and `BCC` fields when replying to email conversations. |
| **Inline Email ID Suggestions** | Displays contact suggestions as agents type. |
| **Send Confirmation for Emails** | Shows a confirmation pop-up when agents select Send. |
| **Email Work Bin** | Lets agents park email conversations and resume them later without ending them. |
This is an account-level setting, enabled by default for all agents. Disable it to prevent agents from modifying distribution lists.
#### Configure Inline Email ID Suggestions
1. Select **Bulk Upload**.
2. Upload or drag a CSV file with these columns: **Contact Name**, **Email Address**, **Tags** (optional).
3. Map the CSV fields to system fields and select **Validate**.
4. Review validation results and select **Save**.
#### Configure Email Work Bin
**Available settings:**
| Setting | Description |
| ------------------------------------------------------------------ | ------------------------------------------------------------------------------------- |
| **Allow Agents to Edit Distribution Fields in Reply or Reply All** | Lets agents modify `To`, `CC`, and `BCC` fields when replying to email conversations. |
| **Inline Email ID Suggestions** | Displays contact suggestions as agents type. |
| **Send Confirmation for Emails** | Shows a confirmation pop-up when agents select Send. |
| **Email Work Bin** | Lets agents park email conversations and resume them later without ending them. |
This is an account-level setting, enabled by default for all agents. Disable it to prevent agents from modifying distribution lists.
#### Configure Inline Email ID Suggestions
1. Select **Bulk Upload**.
2. Upload or drag a CSV file with these columns: **Contact Name**, **Email Address**, **Tags** (optional).
3. Map the CSV fields to system fields and select **Validate**.
4. Review validation results and select **Save**.
#### Configure Email Work Bin
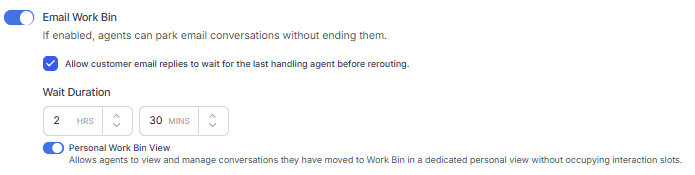 * Enable the option to hold customer replies for the last handling agent before rerouting.
* Set the wait duration before standard queue routing applies.
* Turn on the **Personal Work Bin View** toggle to let agents manage conversations moved to their work bin without occupying interaction slots.
#### Delete Contacts
1. Select a contact and select the **Bin** icon.
2. Select **Delete** to confirm.
**Related:** [Email Interactions](/ai-for-service/contact-center/agent-console#email-interactions)
***
### Active Console Configuration
Active Console Configuration prevents agents from running concurrent sessions across multiple tabs, devices, or browsers. When an agent opens the console in a new location, the system prompts them to transfer the active session. All transfer actions are logged in audit reports.
**To configure:**
1. Go to **Contact Center AI** > **Settings** > **System Settings** > **Active Console Configuration**.
* Enable the option to hold customer replies for the last handling agent before rerouting.
* Set the wait duration before standard queue routing applies.
* Turn on the **Personal Work Bin View** toggle to let agents manage conversations moved to their work bin without occupying interaction slots.
#### Delete Contacts
1. Select a contact and select the **Bin** icon.
2. Select **Delete** to confirm.
**Related:** [Email Interactions](/ai-for-service/contact-center/agent-console#email-interactions)
***
### Active Console Configuration
Active Console Configuration prevents agents from running concurrent sessions across multiple tabs, devices, or browsers. When an agent opens the console in a new location, the system prompts them to transfer the active session. All transfer actions are logged in audit reports.
**To configure:**
1. Go to **Contact Center AI** > **Settings** > **System Settings** > **Active Console Configuration**.
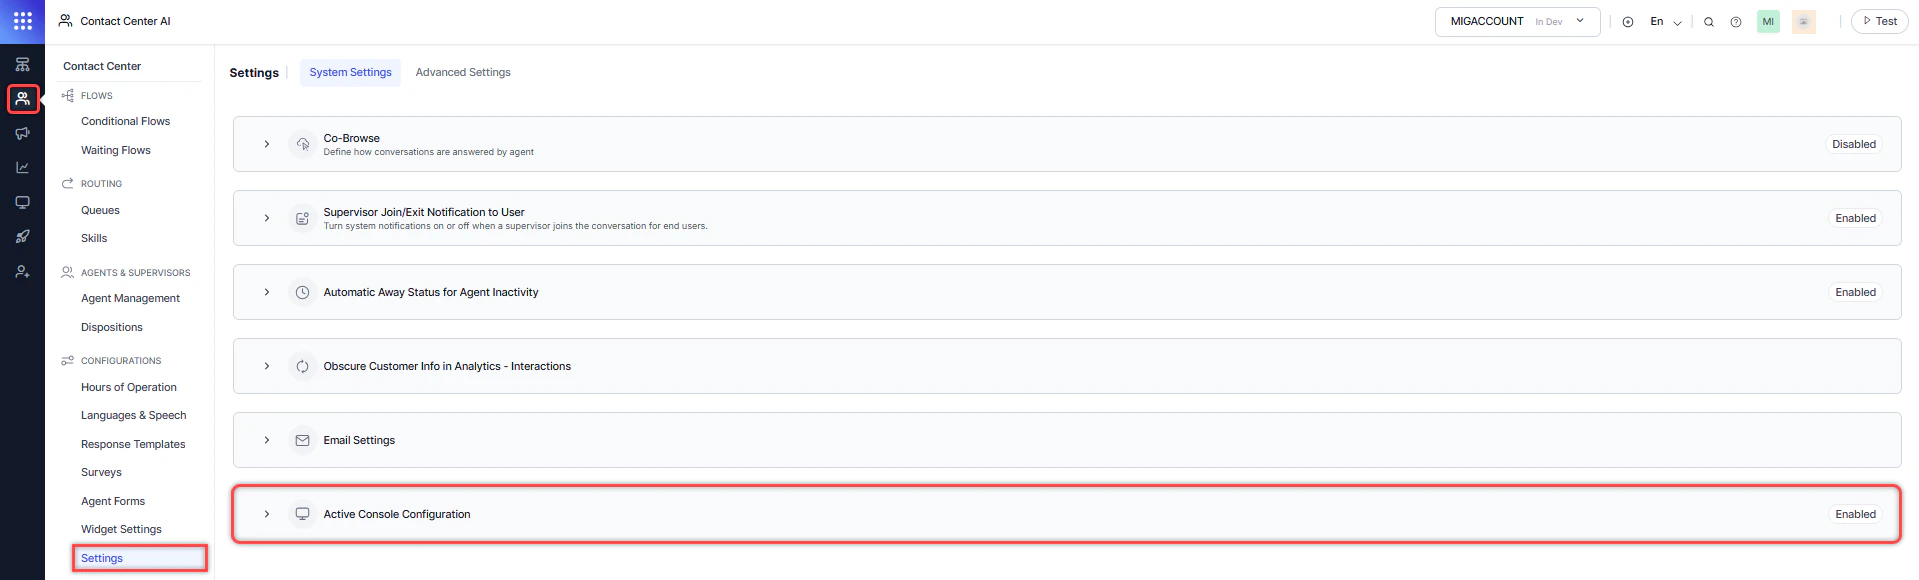 2. The setting is enabled by default. Turn off the toggle to disable it.
***
### Queue-Level Settings
Queue-Level Settings control outbound options, conversation routing during non-business hours, and dynamic queue prioritization.
**To access:** Go to **Contact Center AI** > **Configurations** > **Settings** > **System Settings** > **Queue-level Settings**.
2. The setting is enabled by default. Turn off the toggle to disable it.
***
### Queue-Level Settings
Queue-Level Settings control outbound options, conversation routing during non-business hours, and dynamic queue prioritization.
**To access:** Go to **Contact Center AI** > **Configurations** > **Settings** > **System Settings** > **Queue-level Settings**.
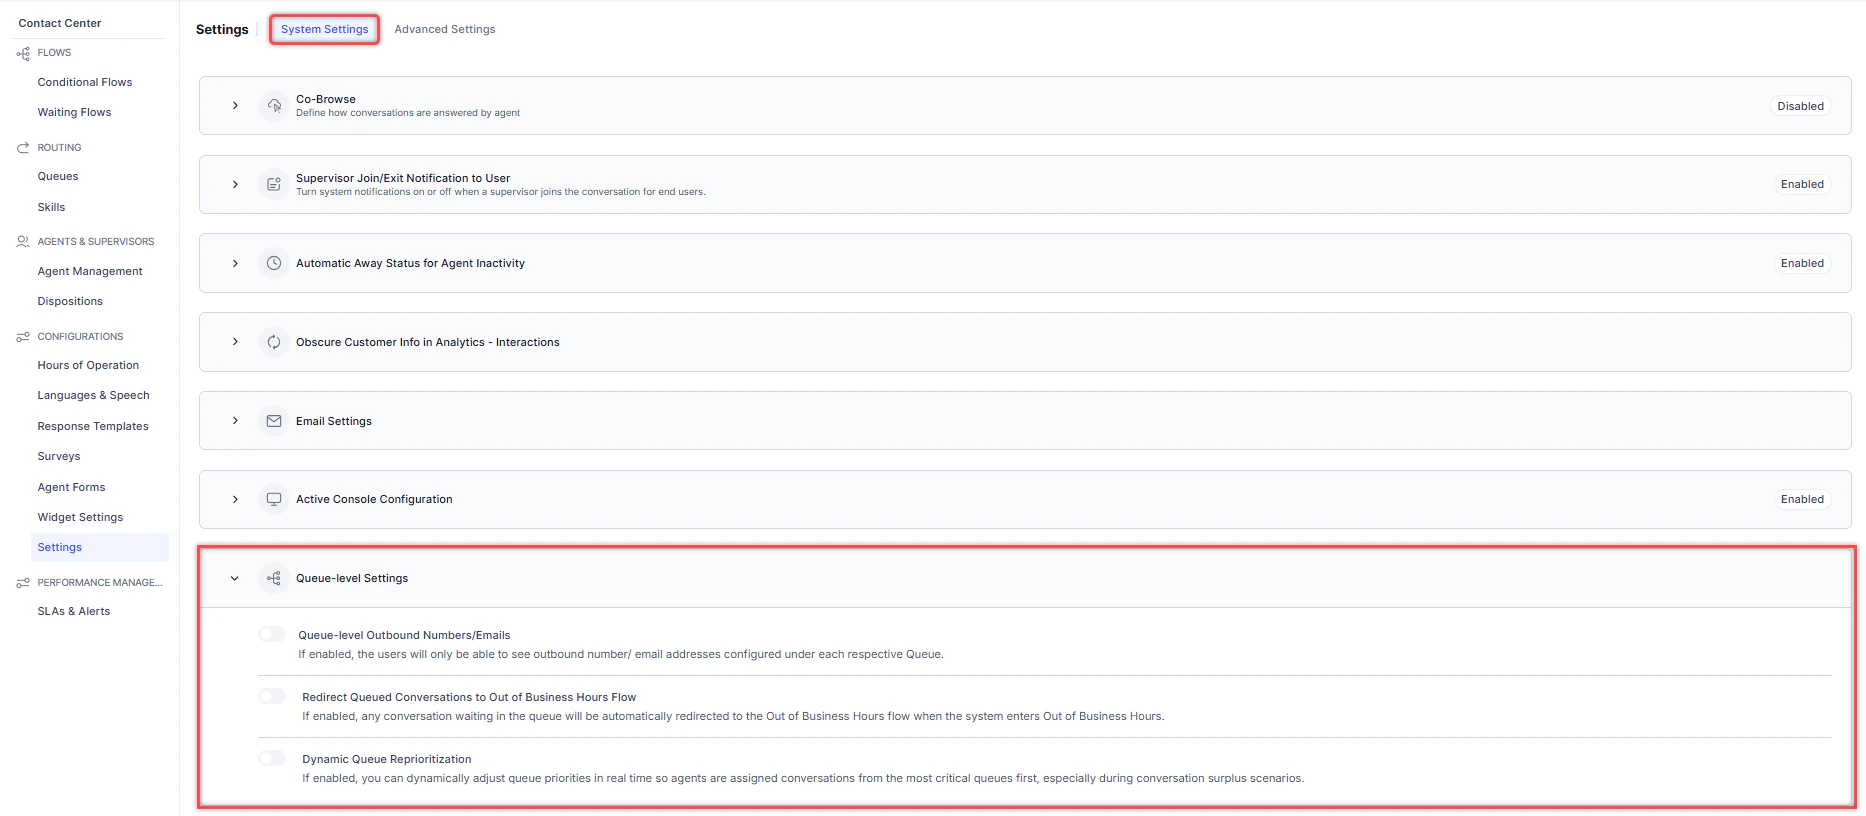 | Setting | Description |
| --------------------------------------------------------------- | -------------------------------------------------------------------------------------------------------------------------------------------- |
| **Queue-level Outbound Numbers/Emails** | When on, agents see only the outbound phone numbers and email addresses configured for their queue. |
| **Redirect Queued Conversations to Out of Business Hours Flow** | When on, conversations waiting in queue are automatically redirected to the Out of Business Hours flow when operating hours end. |
| **Dynamic Queue Reprioritization** | When on, administrators can adjust queue priorities in real time so agents handle the most critical queues first during high-volume periods. |
#### Configure Dynamic Queue Reprioritization
1. Turn on the **Dynamic Queue Reprioritization** toggle.
2. Select a queue priority from 1 (highest) to 10 (lowest), then click **Save**.
| Setting | Description |
| --------------------------------------------------------------- | -------------------------------------------------------------------------------------------------------------------------------------------- |
| **Queue-level Outbound Numbers/Emails** | When on, agents see only the outbound phone numbers and email addresses configured for their queue. |
| **Redirect Queued Conversations to Out of Business Hours Flow** | When on, conversations waiting in queue are automatically redirected to the Out of Business Hours flow when operating hours end. |
| **Dynamic Queue Reprioritization** | When on, administrators can adjust queue priorities in real time so agents handle the most critical queues first during high-volume periods. |
#### Configure Dynamic Queue Reprioritization
1. Turn on the **Dynamic Queue Reprioritization** toggle.
2. Select a queue priority from 1 (highest) to 10 (lowest), then click **Save**.
 **How Hours of Operation (HOP) Config IDs work with queues:**
* Every interaction is assigned a HOP Config ID when it enters a queue. This ID governs the Hours of Operation rules for that conversation's entire lifecycle.
* The system doesn't automatically update the HOP Config ID after assignment.
* Changing a queue's HOP configuration doesn't affect interactions already active or waiting in that queue.
> **Recommended:** Instead of switching a queue's HOP configuration while interactions are active, update the timings within the existing HOP configuration.
**Related:** [Queues-Optional Configuration](/ai-for-service/contact-center/routing-queues-skills#optional-configuration)
***
## Advanced Settings
### Community WFM \[Beta]
Community WFM integrates natively with Contact Center AI to provide workforce management capabilities including forecasting, scheduling, attendance tracking, and reporting.
This feature is in Beta. Contact support to share feedback.
**Features:**
| Feature | Capabilities |
| ------------------------------------------------ | ------------------------------------------------------------------------------------------------------------------------------------------------ |
| **Forecasting** | Skill-based omnichannel forecasting; supports time-of-day and day-of-week shrinkage and service objectives; unlimited forecast ranges. |
| **Scheduling** | Fixed, floating, and rotating schedule optimization; intraday re-optimization; automated end-to-end schedule bidding. |
| **ASAM** (Automated Schedule Attendance Monitor) | Integrates with phone systems and agent mobile apps to track agent arrival; provides an Arrival Detail Console for managing exceptions. |
| **ASAP** (Automated Schedule Adjustment Plans) | Create and reuse customizable staffing strategies to increase, decrease, or refine staffing levels on demand. |
| **Reporting** | Pre-built and custom reports: Contact Volume, Published Forecast, Published Schedule, Intraday Analysis, Schedule Adherence, and Administrative. |
#### Prerequisites
Obtain the following from your Community WFM Purchase Order agreement before configuring:
* Base URL
* Account ID
* API key
#### Configure and Enable Community WFM
1. Go to **CONFIGURATIONS** > **Settings** > **Advanced Settings** > **Community WFM \[Beta]**.
**How Hours of Operation (HOP) Config IDs work with queues:**
* Every interaction is assigned a HOP Config ID when it enters a queue. This ID governs the Hours of Operation rules for that conversation's entire lifecycle.
* The system doesn't automatically update the HOP Config ID after assignment.
* Changing a queue's HOP configuration doesn't affect interactions already active or waiting in that queue.
> **Recommended:** Instead of switching a queue's HOP configuration while interactions are active, update the timings within the existing HOP configuration.
**Related:** [Queues-Optional Configuration](/ai-for-service/contact-center/routing-queues-skills#optional-configuration)
***
## Advanced Settings
### Community WFM \[Beta]
Community WFM integrates natively with Contact Center AI to provide workforce management capabilities including forecasting, scheduling, attendance tracking, and reporting.
This feature is in Beta. Contact support to share feedback.
**Features:**
| Feature | Capabilities |
| ------------------------------------------------ | ------------------------------------------------------------------------------------------------------------------------------------------------ |
| **Forecasting** | Skill-based omnichannel forecasting; supports time-of-day and day-of-week shrinkage and service objectives; unlimited forecast ranges. |
| **Scheduling** | Fixed, floating, and rotating schedule optimization; intraday re-optimization; automated end-to-end schedule bidding. |
| **ASAM** (Automated Schedule Attendance Monitor) | Integrates with phone systems and agent mobile apps to track agent arrival; provides an Arrival Detail Console for managing exceptions. |
| **ASAP** (Automated Schedule Adjustment Plans) | Create and reuse customizable staffing strategies to increase, decrease, or refine staffing levels on demand. |
| **Reporting** | Pre-built and custom reports: Contact Volume, Published Forecast, Published Schedule, Intraday Analysis, Schedule Adherence, and Administrative. |
#### Prerequisites
Obtain the following from your Community WFM Purchase Order agreement before configuring:
* Base URL
* Account ID
* API key
#### Configure and Enable Community WFM
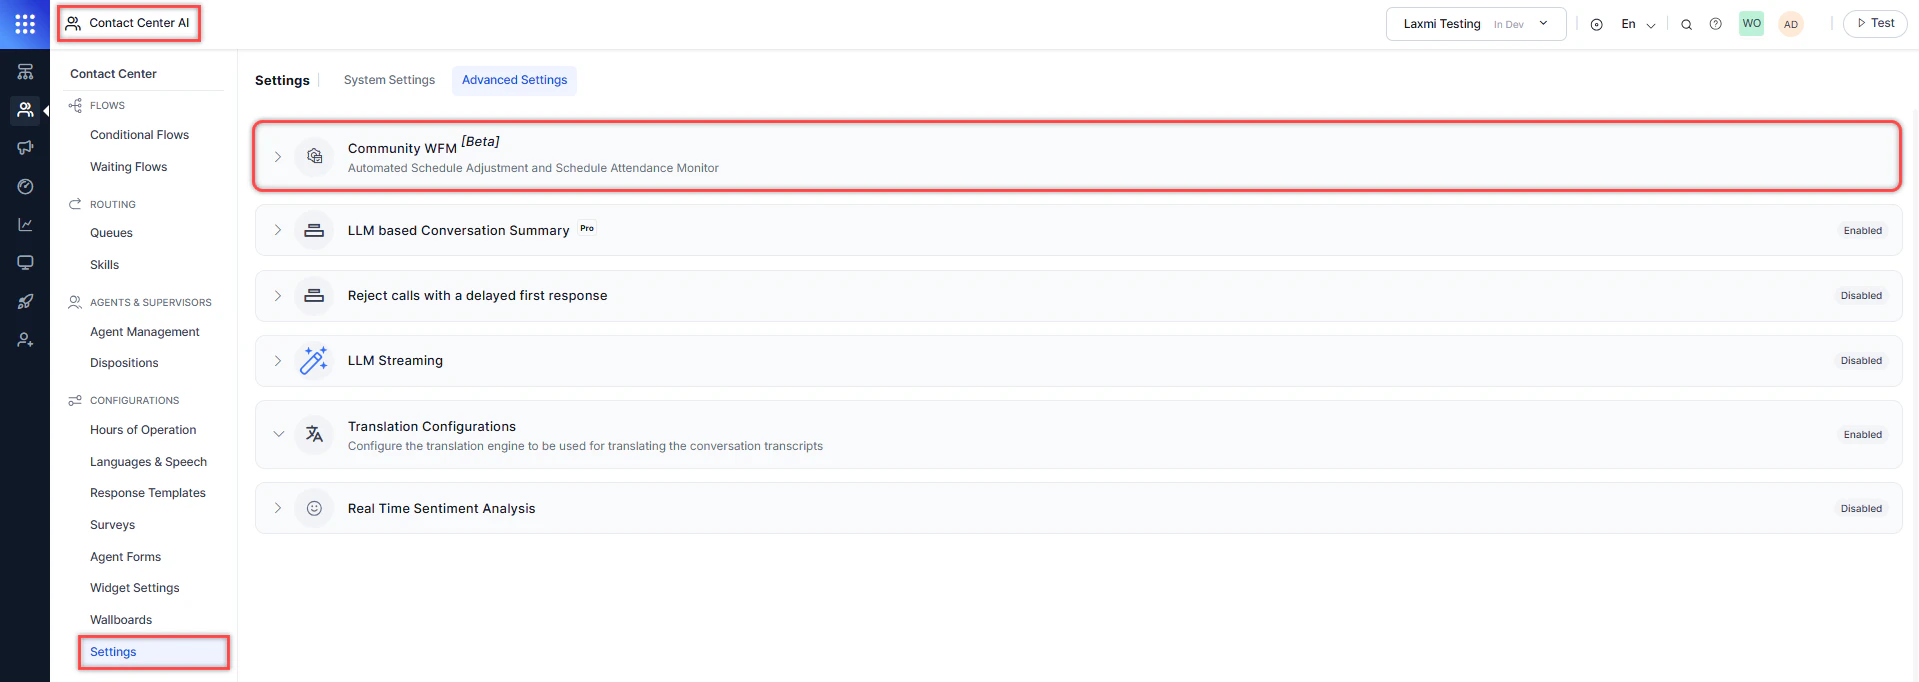
1. Go to **CONFIGURATIONS** > **Settings** > **Advanced Settings** > **Community WFM \[Beta]**.
 2. Enter the **Base URL**, **Account ID**, and **API key**.
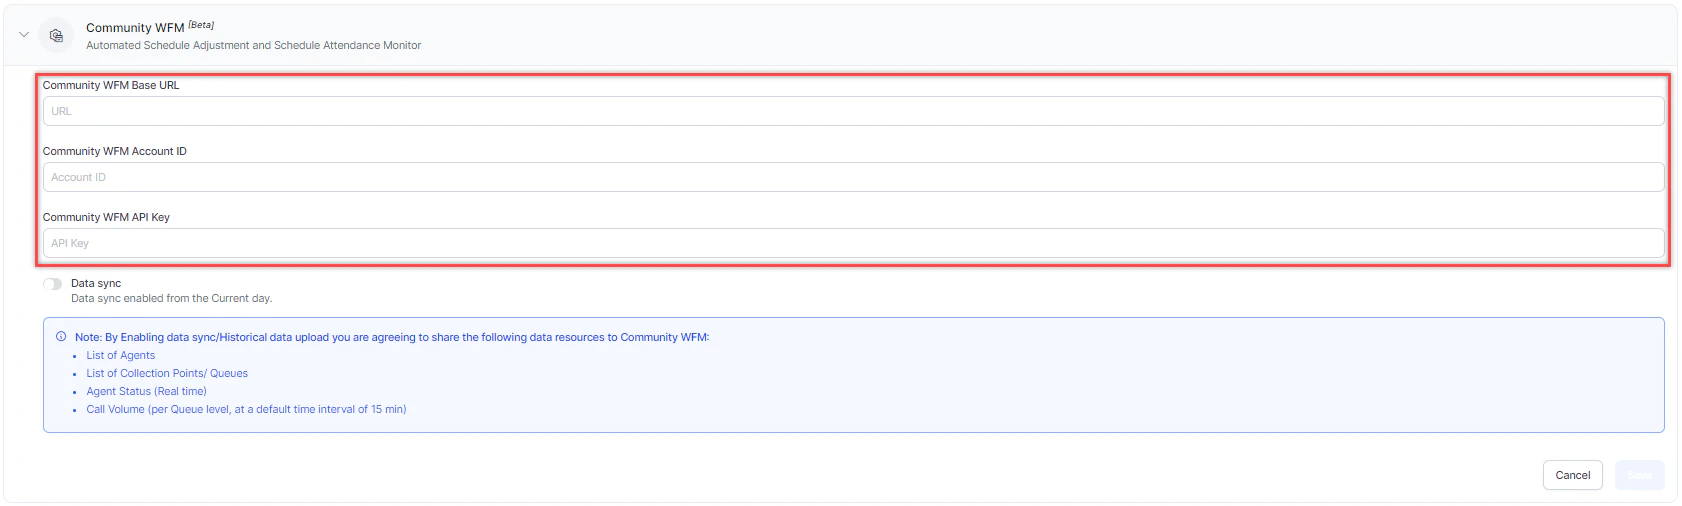 3. (Optional) Turn on **Data sync** to enable data sharing from Contact Center AI to Community WFM for ML-based call volume forecasting.
 > Data sync starts from the current day and doesn't include historical data.
4. Select **Save**.
#### Stop Data Sharing
Turn off the **Data sync** toggle and confirm. Data exchange between Contact Center AI and Community WFM stops immediately.
For more information, visit [Community WFM](https://www.communitywfm.com/).
***
### LLM-Based Conversation Summary
This feature lets administrators integrate external Gen AI models to power conversation summarization-extending language support and enabling custom summarization prompts beyond out-of-the-box capabilities.
**Benefits:**
| Audience | Benefit |
| :------------- | :---------------------------------------------------------------------------- |
| Administrators | Configure external models and custom prompts; extend language support. |
| Agents | Receive more flexible, language-aware, and customized conversation summaries. |
#### Prerequisites
* Access to AI for Service (Platform) with administrative privileges
* A Gen AI connector provided by the platform team
* A configured external Gen AI model
#### Enable LLM-Based Summarization
1. Go to **Contact Center AI** > **CONFIGURATIONS** > **Settings** > **Advanced Settings** > **LLM based Conversation Summary**.
> Data sync starts from the current day and doesn't include historical data.
4. Select **Save**.
#### Stop Data Sharing
Turn off the **Data sync** toggle and confirm. Data exchange between Contact Center AI and Community WFM stops immediately.
For more information, visit [Community WFM](https://www.communitywfm.com/).
***
### LLM-Based Conversation Summary
This feature lets administrators integrate external Gen AI models to power conversation summarization-extending language support and enabling custom summarization prompts beyond out-of-the-box capabilities.
**Benefits:**
| Audience | Benefit |
| :------------- | :---------------------------------------------------------------------------- |
| Administrators | Configure external models and custom prompts; extend language support. |
| Agents | Receive more flexible, language-aware, and customized conversation summaries. |
#### Prerequisites
* Access to AI for Service (Platform) with administrative privileges
* A Gen AI connector provided by the platform team
* A configured external Gen AI model
#### Enable LLM-Based Summarization
1. Go to **Contact Center AI** > **CONFIGURATIONS** > **Settings** > **Advanced Settings** > **LLM based Conversation Summary**.
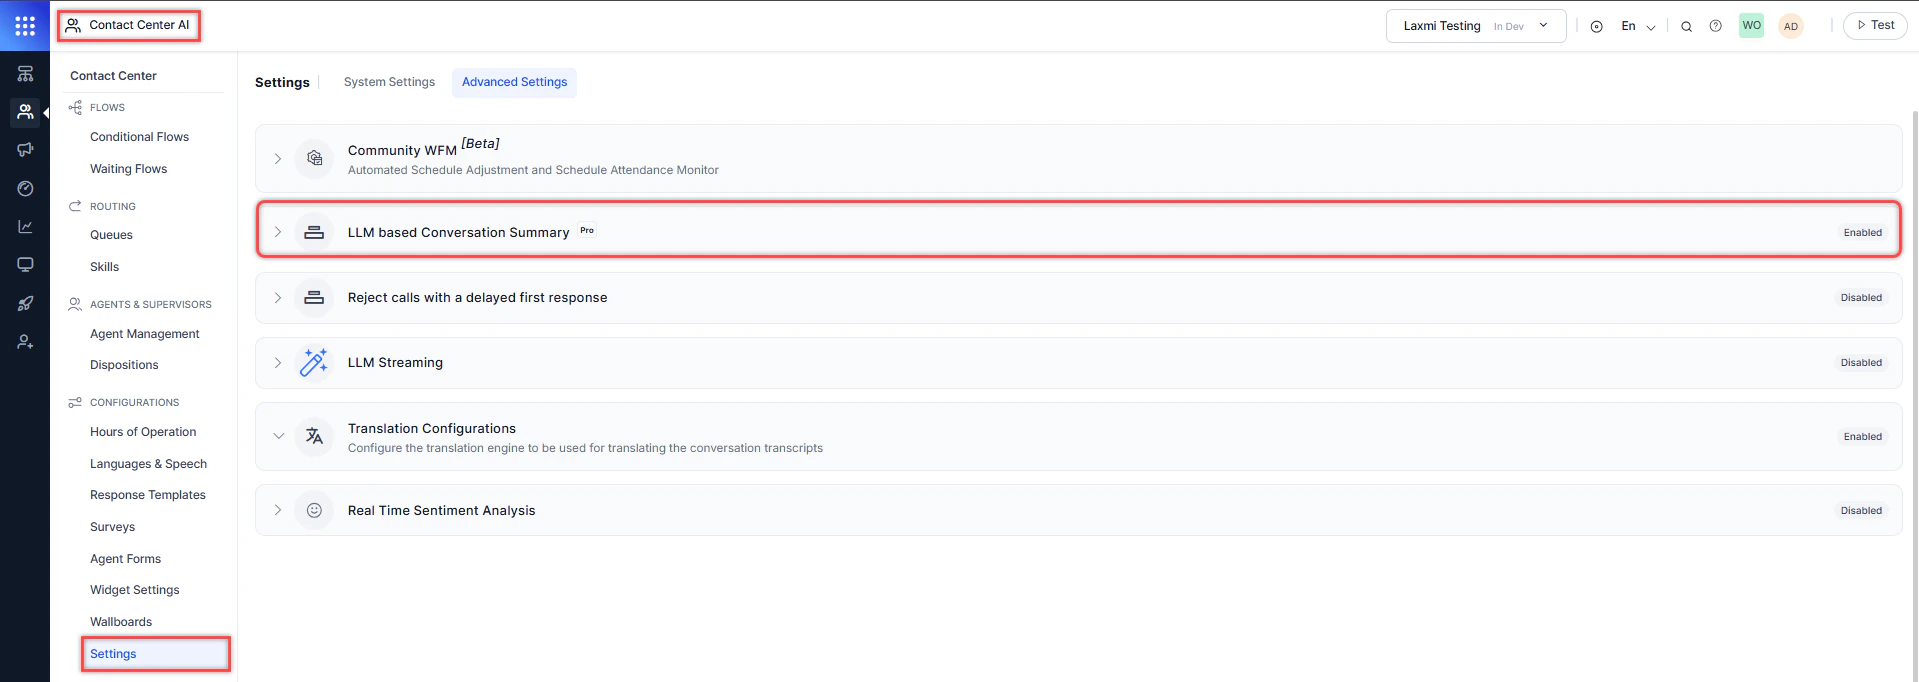 2. Turn on the **LLM based Conversation Summary** toggle.
3. Select a summarization method:
* **OOTB Kore Summarization** (default)
* **Using the model configured in the GenAI framework**
2. Turn on the **LLM based Conversation Summary** toggle.
3. Select a summarization method:
* **OOTB Kore Summarization** (default)
* **Using the model configured in the GenAI framework**
 > The GenAI framework option is disabled until a valid model is configured.
#### Configure a Custom Model
1. Open **GenAI & LLM** in AI for Service.
2. Configure your external Gen AI model. [Learn more](/ai-for-service/generative-ai-tools/genai-features-automationai).
3. Define custom prompts for your summarization needs.
**How it works:** The system captures the conversation transcript, sends it to the configured Gen AI model, applies the custom prompt, and displays the summarized output to agents.
***
### Reject Calls with a Delayed First Response
This setting controls when a call is considered "connected." When enabled, a call is connected only after the platform sends its first message (first volley). If no initial response is generated within **10 seconds**, the call is rejected and returned to the source-preventing customers from experiencing dead air.
**When to use:** Enable this when transferring calls from an existing telephony provider to Voice Gateway (VG) and rare delays in response generation are causing dead air.
**To enable:**
Go to **Contact Center AI** > **CONFIGURATIONS** > **Settings** > **Advanced Settings** > **Reject calls with a delayed first response** and turn on the toggle.
> The GenAI framework option is disabled until a valid model is configured.
#### Configure a Custom Model
1. Open **GenAI & LLM** in AI for Service.
2. Configure your external Gen AI model. [Learn more](/ai-for-service/generative-ai-tools/genai-features-automationai).
3. Define custom prompts for your summarization needs.
**How it works:** The system captures the conversation transcript, sends it to the configured Gen AI model, applies the custom prompt, and displays the summarized output to agents.
***
### Reject Calls with a Delayed First Response
This setting controls when a call is considered "connected." When enabled, a call is connected only after the platform sends its first message (first volley). If no initial response is generated within **10 seconds**, the call is rejected and returned to the source-preventing customers from experiencing dead air.
**When to use:** Enable this when transferring calls from an existing telephony provider to Voice Gateway (VG) and rare delays in response generation are causing dead air.
**To enable:**
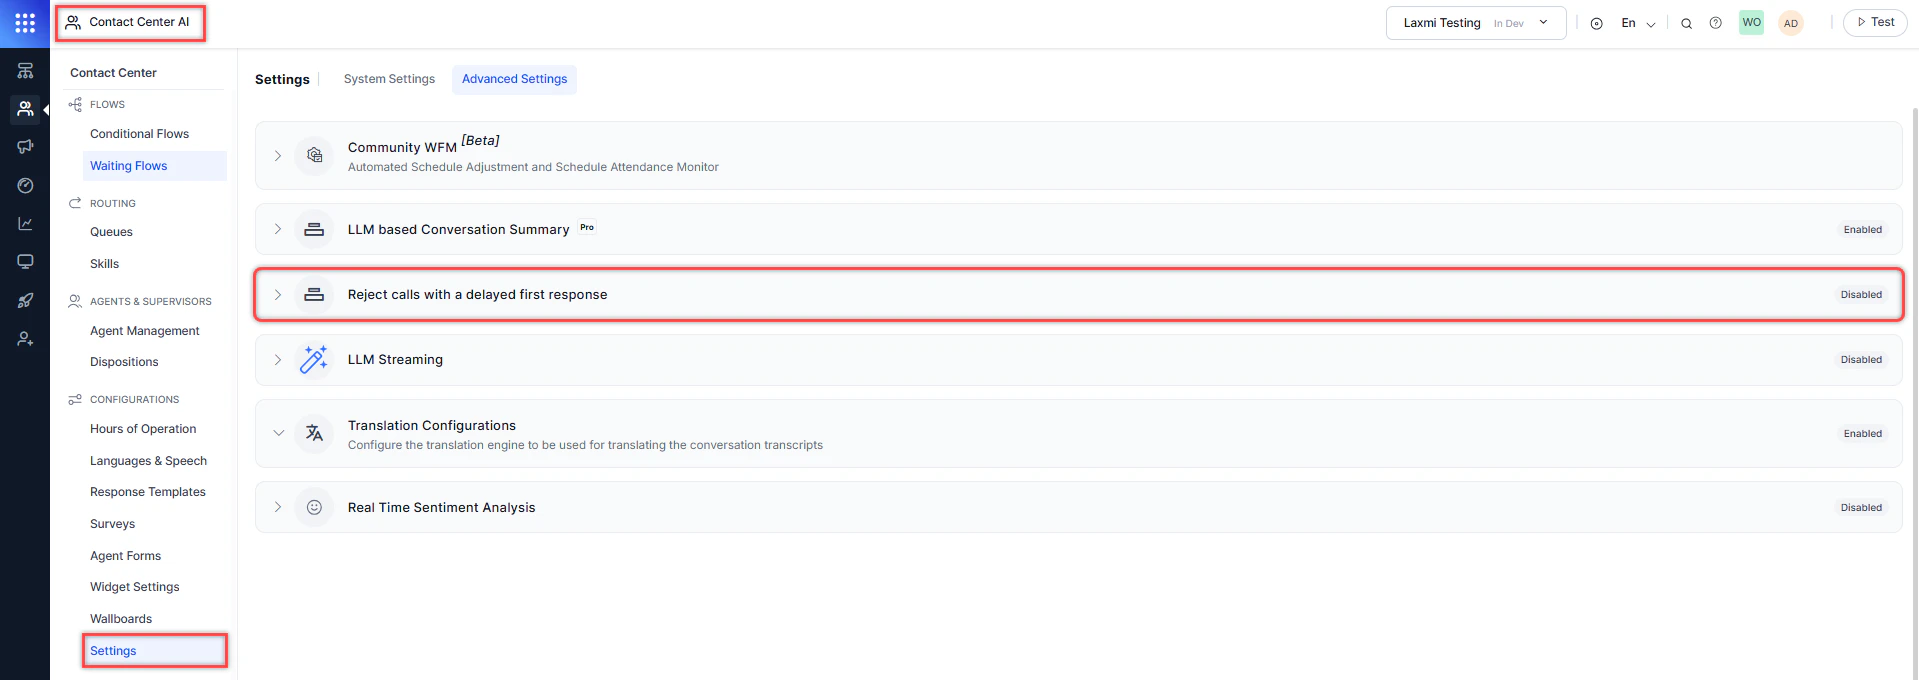
Go to **Contact Center AI** > **CONFIGURATIONS** > **Settings** > **Advanced Settings** > **Reject calls with a delayed first response** and turn on the toggle.
 ***
### Translation Configurations
Translation Configurations enable real-time translation so agents can engage customers in their preferred language. The system translates agent content, including search responses, Dialog Tasks, text-only templates, and conversation transcripts, into the selected language.
To configure:
1. Go to **Contact Center AI** > **CONFIGURATIONS** > **Settings** > **Advanced Settings** > **Translation Configurations**.
2. Turn on the translation toggle, then select a provider:
| Provider | What to enter |
| :------------------- | :------------------------------------------------------------------------------------------------------------------------------------------------------------------------ |
| Google Translator | Access key |
| Microsoft Translator | Access key |
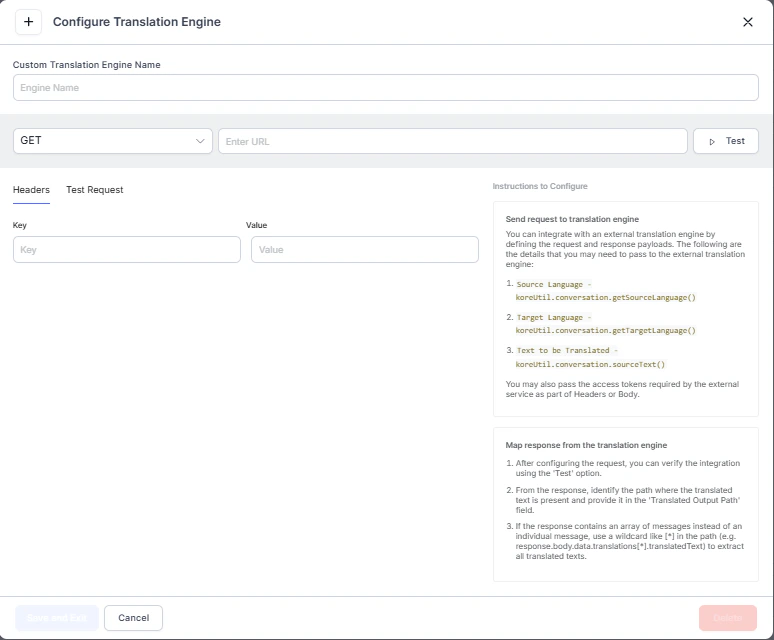
| Custom | Select **Add Custom Engine** to configure an endpoint. See [Manage Translation Services](/ai-for-service/app-settings/language-management/managing-translation-services). |
3. Select the locations to activate translation.
***
### Translation Configurations
Translation Configurations enable real-time translation so agents can engage customers in their preferred language. The system translates agent content, including search responses, Dialog Tasks, text-only templates, and conversation transcripts, into the selected language.
To configure:
1. Go to **Contact Center AI** > **CONFIGURATIONS** > **Settings** > **Advanced Settings** > **Translation Configurations**.
2. Turn on the translation toggle, then select a provider:
| Provider | What to enter |
| :------------------- | :------------------------------------------------------------------------------------------------------------------------------------------------------------------------ |
| Google Translator | Access key |
| Microsoft Translator | Access key |
| Custom | Select **Add Custom Engine** to configure an endpoint. See [Manage Translation Services](/ai-for-service/app-settings/language-management/managing-translation-services). |
3. Select the locations to activate translation.
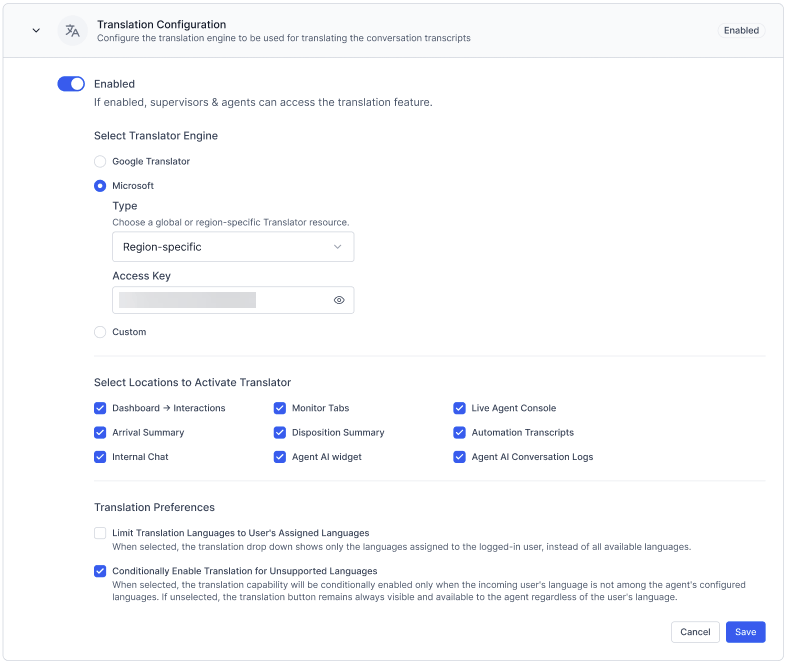
 4. (Optional) Limit Translation Languages to User's Assigned Languages: When enabled, the translation dropdown displays only the languages assigned to the logged-in user, rather than all available languages.
5. (Optional) Conditionally Enable Translation for Unsupported Languages: When enabled, the translation option is displayed or hidden based on whether the user's language is within the agent's configured languages.
6. Select **Save**.
Template messages aren't translated in conversation transcripts.
#### Conditional Translation Enablement
When the Conditionally Enable Translation for Unsupported Languages setting is turned on, the system automatically controls the visibility of the translation option based on language compatibility between the user and the agent.
The translation option behavior is as follows:
* If the user's language is within the agent's configured languages, the translation option is disabled or hidden.
* If the user's language isn't within the agent's configured languages, the translation option is enabled.
* If the user's language can't be determined, the translation option is enabled by default.
When conditional translation is enabled, translation is disabled for both the user and the agent. Messages aren't translated, even if the agent writes in a different language. Conditional translation is based on the user's language set at the time of agent transfer. It doesn't respond to language changes or multilingual conversations at runtime. This behavior applies only in the agent console live interaction pane.
#### Language Selection in the Console
Agents can switch languages directly from the console:
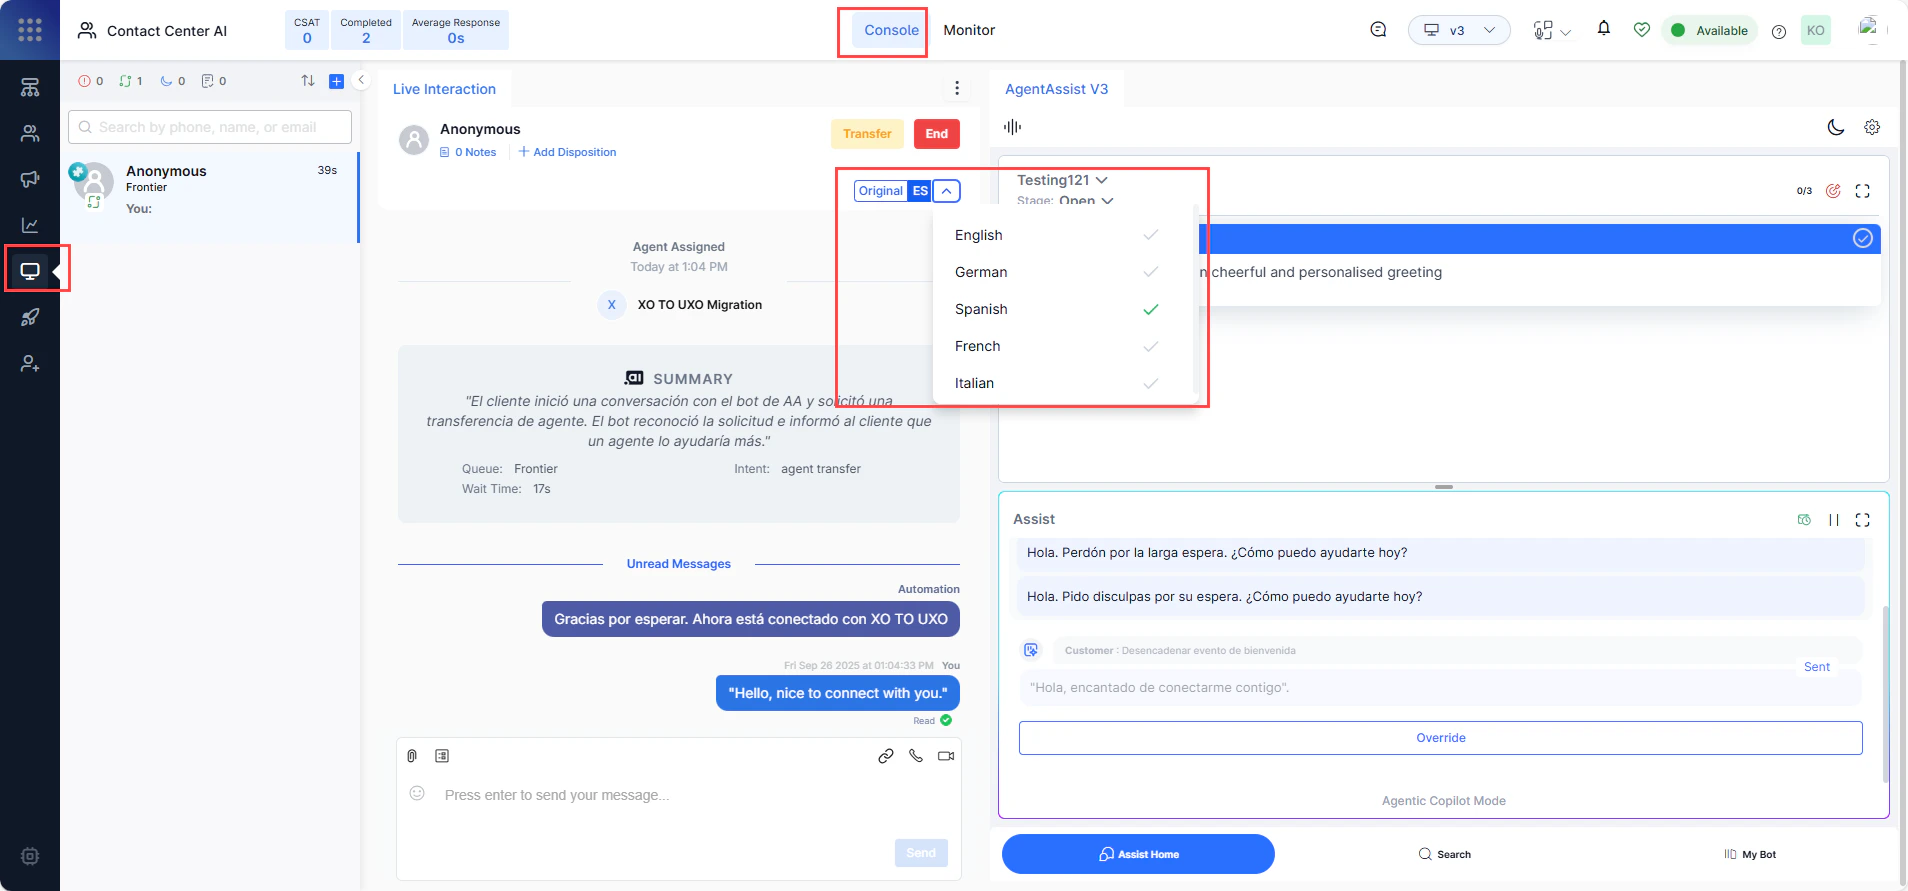
1. Go to **Contact Center AI** > **Console** and select a language from the **language** dropdown.
4. (Optional) Limit Translation Languages to User's Assigned Languages: When enabled, the translation dropdown displays only the languages assigned to the logged-in user, rather than all available languages.
5. (Optional) Conditionally Enable Translation for Unsupported Languages: When enabled, the translation option is displayed or hidden based on whether the user's language is within the agent's configured languages.
6. Select **Save**.
Template messages aren't translated in conversation transcripts.
#### Conditional Translation Enablement
When the Conditionally Enable Translation for Unsupported Languages setting is turned on, the system automatically controls the visibility of the translation option based on language compatibility between the user and the agent.
The translation option behavior is as follows:
* If the user's language is within the agent's configured languages, the translation option is disabled or hidden.
* If the user's language isn't within the agent's configured languages, the translation option is enabled.
* If the user's language can't be determined, the translation option is enabled by default.
When conditional translation is enabled, translation is disabled for both the user and the agent. Messages aren't translated, even if the agent writes in a different language. Conditional translation is based on the user's language set at the time of agent transfer. It doesn't respond to language changes or multilingual conversations at runtime. This behavior applies only in the agent console live interaction pane.
#### Language Selection in the Console
Agents can switch languages directly from the console:
1. Go to **Contact Center AI** > **Console** and select a language from the **language** dropdown.
 2. Select **Mark as Default** to set a language as the default for that agent.
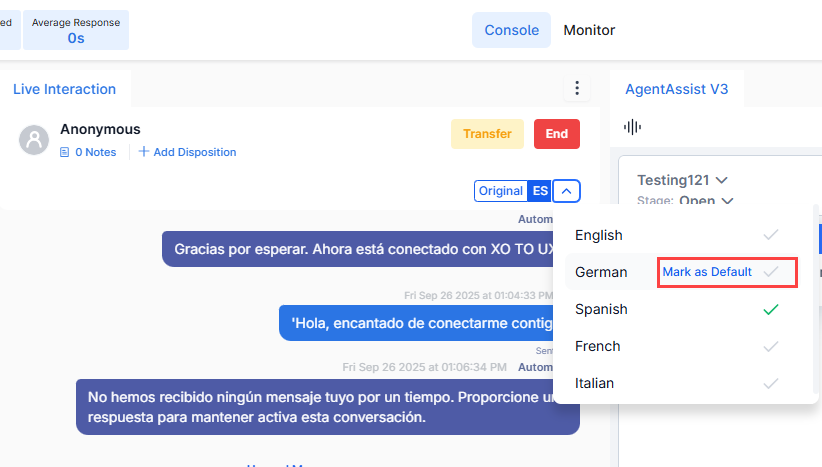 3. Chat messages, Assist, Search, and My Bot tab content are translated into the selected language.
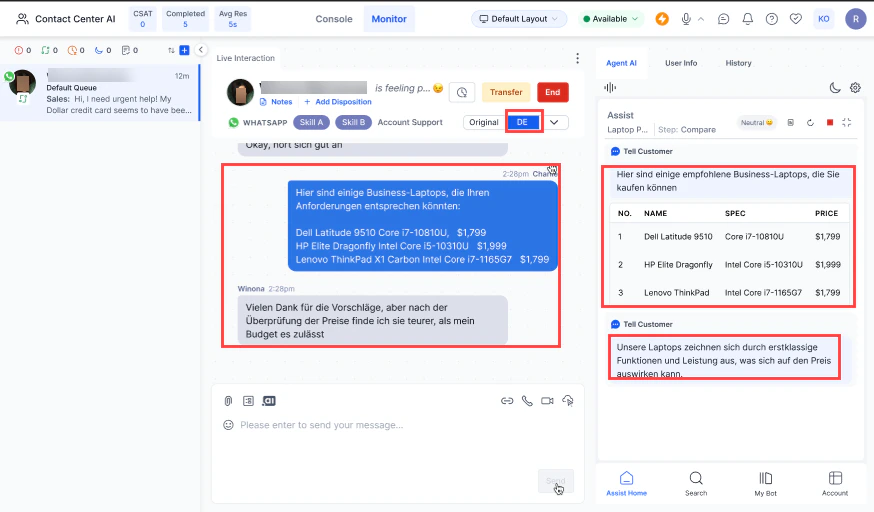 **Preferred Language Setting:** During automation, the system can detect the user's language and set it as the preferred translation language. See [Utils—Set Preferred Language for Translation](/ai-for-service/flows/node-types/utils#set-preferred-language-for-translation).
**On-Connect and Waiting Message Language Configuration**
On-Connect and Waiting messages use app-level languages for configuration. All languages configured at the app level are available in the multi-language message configuration dropdown.
#### Conversation Logs Language
When **Agent AI Conversation Logs** is enabled, the Conversation Logs section includes a language dropdown with options to view the original, translated, or dual-language view.
1. Go to **Contact Center AI** > **Analytics** > **Agent AI Logs**.
2. Select a **Conversation ID**.
3. Select **Original** to view both original and translated content side by side.
**Preferred Language Setting:** During automation, the system can detect the user's language and set it as the preferred translation language. See [Utils—Set Preferred Language for Translation](/ai-for-service/flows/node-types/utils#set-preferred-language-for-translation).
**On-Connect and Waiting Message Language Configuration**
On-Connect and Waiting messages use app-level languages for configuration. All languages configured at the app level are available in the multi-language message configuration dropdown.
#### Conversation Logs Language
When **Agent AI Conversation Logs** is enabled, the Conversation Logs section includes a language dropdown with options to view the original, translated, or dual-language view.
1. Go to **Contact Center AI** > **Analytics** > **Agent AI Logs**.
2. Select a **Conversation ID**.
3. Select **Original** to view both original and translated content side by side.
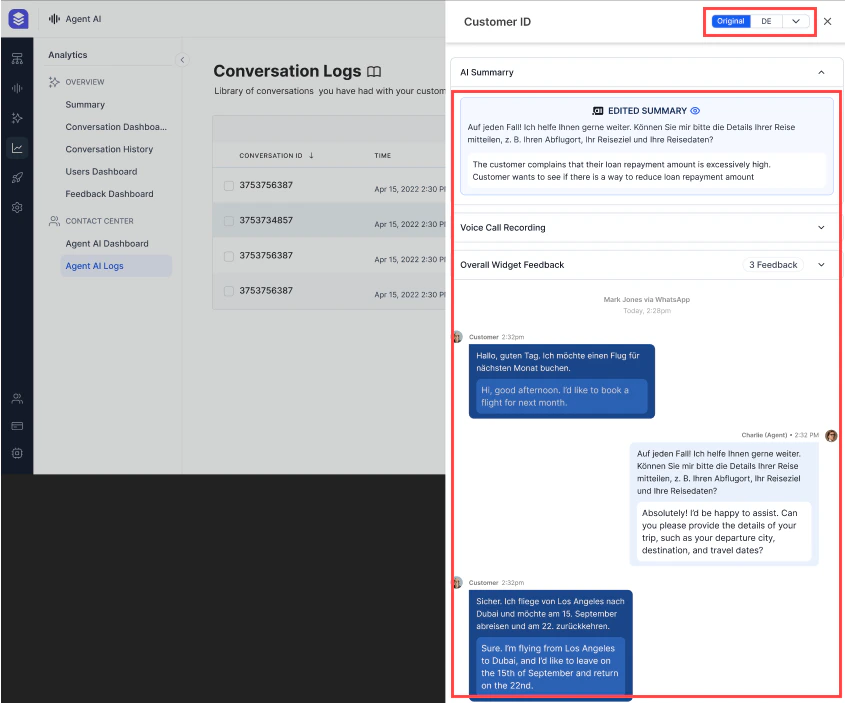 4. Select the **abbreviated language name** to view only the translated content.
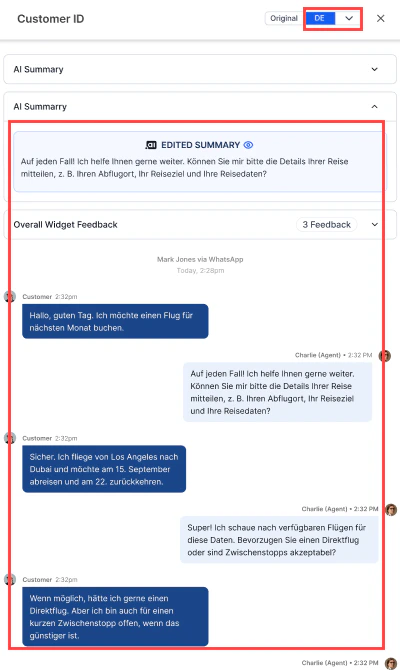 5. Select another language from the dropdown to retranslate the content.
**Related:** [Translate Internal Chats](/ai-for-service/contact-center/agent-console#internal-chat)
***
### Real-Time Sentiment Analysis
Real-Time Sentiment Analysis displays a live sentiment indicator during active chat conversations, updating dynamically as the conversation progresses.
Sentiment data is available only for interactions after deployment of release v3.13.0, provided this setting is enabled. Sentiment capture is unavailable for messages sent during configuration disruptions.
**Benefits:**
* Gives agents real-time visibility into customer sentiment.
* Enables more empathetic, emotionally aware responses.
* Helps agents tailor responses based on sentiment shifts.
* Provides interactive visual analysis of emotional trends.
**To enable:**
1. Go to **Contact Center AI** > **CONFIGURATIONS** > **Settings** > **Advanced Settings** > **Real Time Sentiment Analysis**.
5. Select another language from the dropdown to retranslate the content.
**Related:** [Translate Internal Chats](/ai-for-service/contact-center/agent-console#internal-chat)
***
### Real-Time Sentiment Analysis
Real-Time Sentiment Analysis displays a live sentiment indicator during active chat conversations, updating dynamically as the conversation progresses.
Sentiment data is available only for interactions after deployment of release v3.13.0, provided this setting is enabled. Sentiment capture is unavailable for messages sent during configuration disruptions.
**Benefits:**
* Gives agents real-time visibility into customer sentiment.
* Enables more empathetic, emotionally aware responses.
* Helps agents tailor responses based on sentiment shifts.
* Provides interactive visual analysis of emotional trends.
**To enable:**
1. Go to **Contact Center AI** > **CONFIGURATIONS** > **Settings** > **Advanced Settings** > **Real Time Sentiment Analysis**.
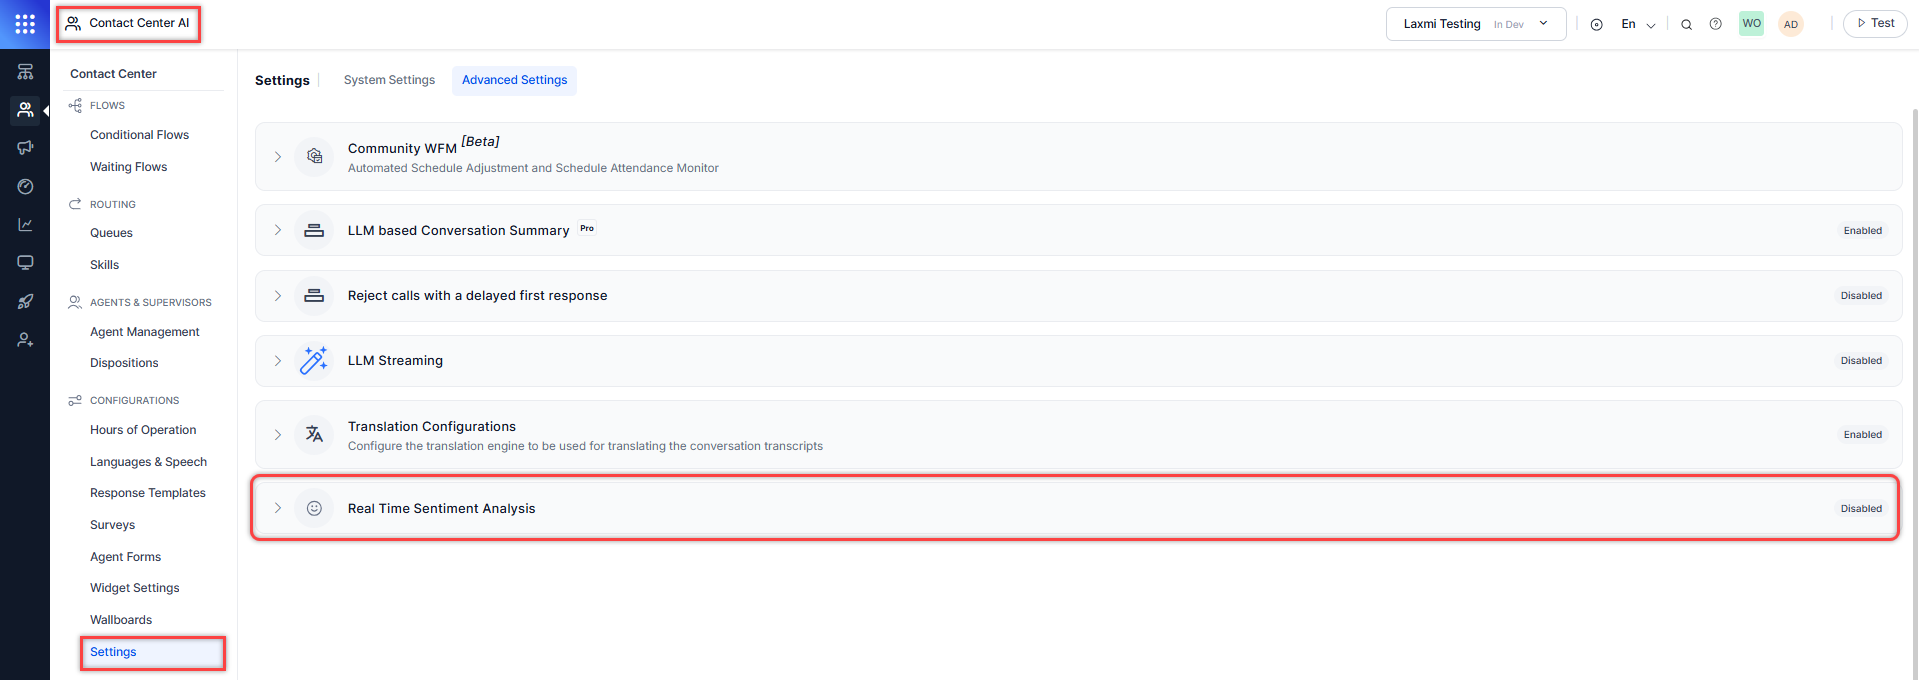 2. Turn on the toggle. This feature is **disabled by default**.
> **Required:** You must configure a custom model and enable the appropriate prompt in GenAI Tools.
2. Turn on the toggle. This feature is **disabled by default**.
> **Required:** You must configure a custom model and enable the appropriate prompt in GenAI Tools.
 **Related:**
* [Customer Sentiment](/ai-for-service/contact-center/agent-console#customer-sentiment)
* [Real-Time Sentiment](/ai-for-service/contact-center/agent-console#real-time-sentiment)
***
### Wrap-Up Code Prediction
Wrap-Up Code Prediction uses GenAI (LLM) to automatically suggest disposition codes during conversation wrap-up, based on the conversation transcript and predefined disposition metadata. This reduces manual tagging effort and improves reporting accuracy.
**To enable:**
1. Go to **Contact Center AI** > **Configurations** > **Settings** > **Advanced Settings** > **Wrap-up Code Prediction**.
**Related:**
* [Customer Sentiment](/ai-for-service/contact-center/agent-console#customer-sentiment)
* [Real-Time Sentiment](/ai-for-service/contact-center/agent-console#real-time-sentiment)
***
### Wrap-Up Code Prediction
Wrap-Up Code Prediction uses GenAI (LLM) to automatically suggest disposition codes during conversation wrap-up, based on the conversation transcript and predefined disposition metadata. This reduces manual tagging effort and improves reporting accuracy.
**To enable:**
1. Go to **Contact Center AI** > **Configurations** > **Settings** > **Advanced Settings** > **Wrap-up Code Prediction**.
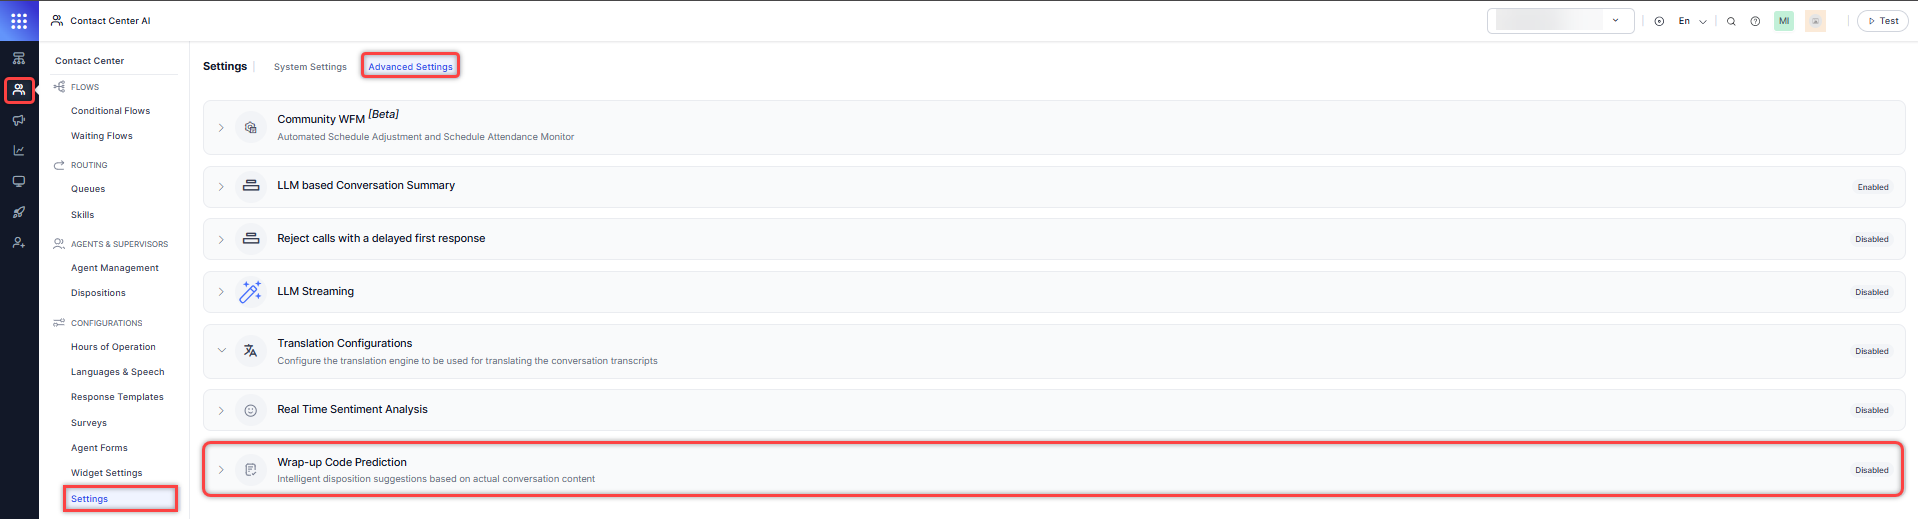 2. Turn on the toggle to activate the feature.
 Once enabled, the system generates intelligent disposition suggestions based on actual conversation content.
**Related:** [Intelligent Disposition Code Suggestions](/ai-for-service/contact-center/agent-console#dispositions)
***
Once enabled, the system generates intelligent disposition suggestions based on actual conversation content.
**Related:** [Intelligent Disposition Code Suggestions](/ai-for-service/contact-center/agent-console#dispositions)
***