> ## Documentation Index
> Fetch the complete documentation index at: https://koreai.mintlify.site/llms.txt
> Use this file to discover all available pages before exploring further.
# LLM Integration
Connect large language models (LLMs) to power your AI Agent's generative AI capabilities.
You can use pre-built integrations, bring your own model, or deploy Kore.ai's fine-tuned XO GPT models.
***
## Integration Options
| Option | Description |
| --------------------------------------------------------------- | ---------------------------------------------------------------------------------------------------------------------------------------------------------------- |
| [**Pre-built Integrations**](#configure-pre-built-integrations) | Direct connections to Azure OpenAI, OpenAI, Anthropic, Google Gemini, and Amazon Bedrock with out-of-the-box support and pre-configured prompt templates. |
| [**Custom LLM (BYO)**](#configure-custom-llm-integration) | Connect any externally hosted or enterprise-hosted model. Works with the Platform's Auth Profiles module so you can use your preferred authentication mechanism. |
| [**Kore.ai XO GPT**](#configure-kore-ai-xo-gpt) | Fine-tuned models for enterprise conversational AI—includes conversation summarization, query rephrasing, and dialog orchestration. |
## Authorization
Authorization establishes a secure connection between the Platform and your LLM provider. Each provider requires different credentials.
| Provider | Required Fields | Notes |
| ------------------ | -------------------------------------------------- | ----------------------------------------------------------------------------------------------------------------------------------- |
| **Azure OpenAI** | API Key, Sub-Domain, Deployment ID | API Key authenticates your account; Sub-Domain identifies your Azure resource endpoint; Deployment ID specifies the deployed model. |
| **OpenAI** | API Key | Authenticates your OpenAI account. |
| **Anthropic** | API Key | Authenticates your Anthropic account. |
| **Amazon Bedrock** | Access Key ID, Secret Access Key, Region, Model ID | Access keys authenticate your AWS account; Region identifies the service region; Model ID specifies the Bedrock model. |
| **Google Gemini** | API Key | Authenticates your Google Gemini account and grants access to models. |
| **Custom LLM** | Endpoint, Authorization, Headers | Endpoint is the API URL; Authorization defines the authentication method or credentials; Headers are additional key-value pairs. |
### Dynamic Variables
Use variables instead of static credential values to keep secrets secure and reusable across environments. The Platform substitutes actual values at runtime, preventing exposure of sensitive information and simplifying credential updates.
**Benefits:**
* Prevent API key exposure by using secure environment variables.
* Simplify key rotation—update variables in one place without reconfiguring integrations.
Set up all required variables before configuring the LLM. See [App Variables](/ai-for-service/app-settings/variables/using-bot-variables).
> **Variable access by feature type:**
>
> * Runtime features: content and environment variables.
> * Designtime features: content, context, and environment variables.
The following fields support variables per provider:
| Provider | Variable-Supported Fields |
| ------------------ | -------------------------------------------------------------------------------------- |
| **Azure OpenAI** | API Key, Sub-Domain, Model Deployment IDs |
| **OpenAI** | API Key |
| **Anthropic** | API Key |
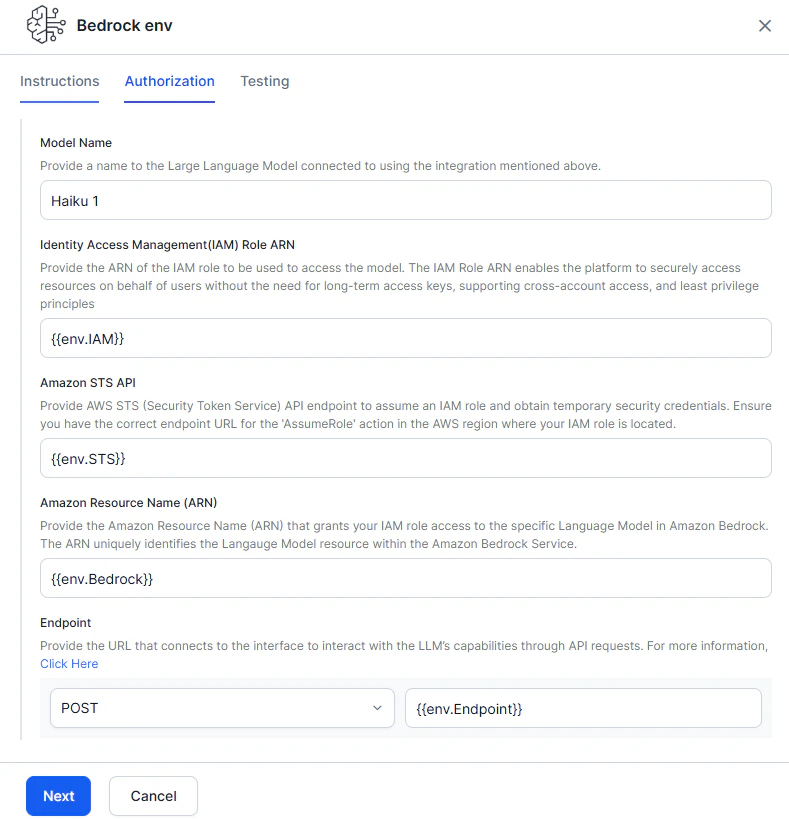
| **Amazon Bedrock** | IAM Role ARN, Amazon STS API, Amazon Resource Name (ARN), Endpoint, Headers (optional) |
| **Google Gemini** | API Key |
| **Custom LLM** | Endpoint, Authorization, Headers |
**Variable configuration examples:**
*Pre-built LLM (Azure OpenAI):*
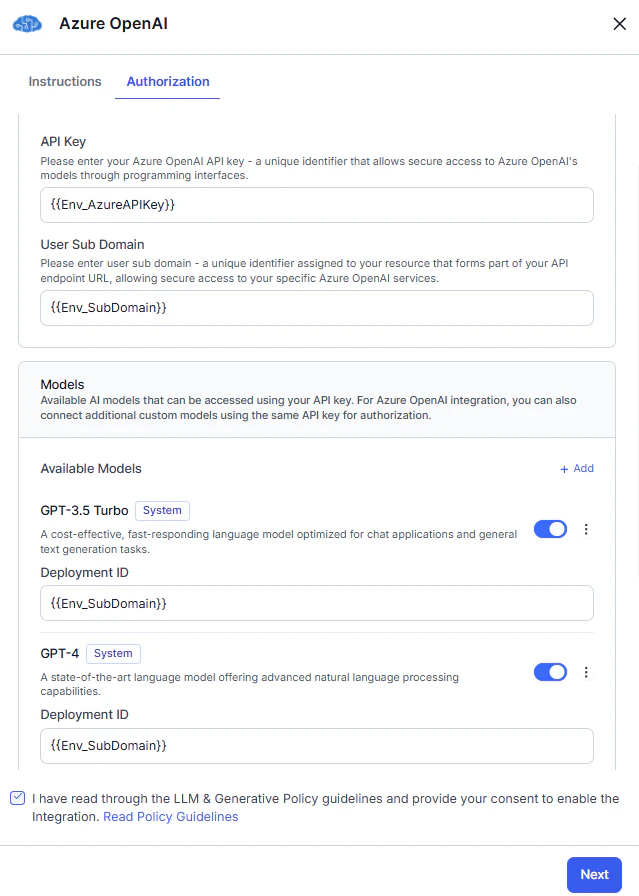 In the Test Connection pop-up, enter sample values. Select the checkbox to save them for future use.
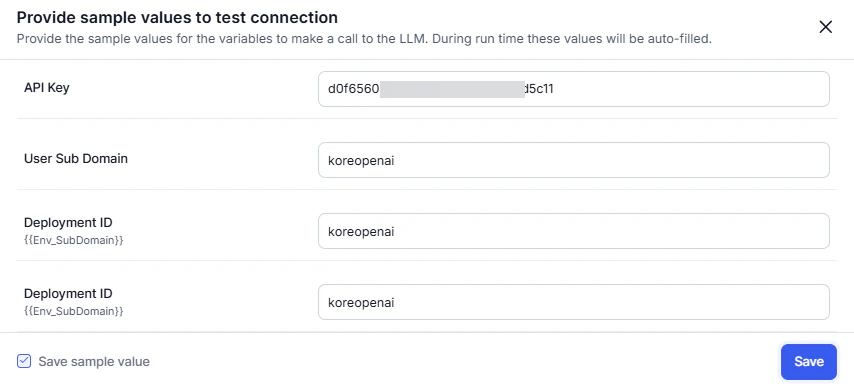 *Provider's New LLM (Azure OpenAI):*
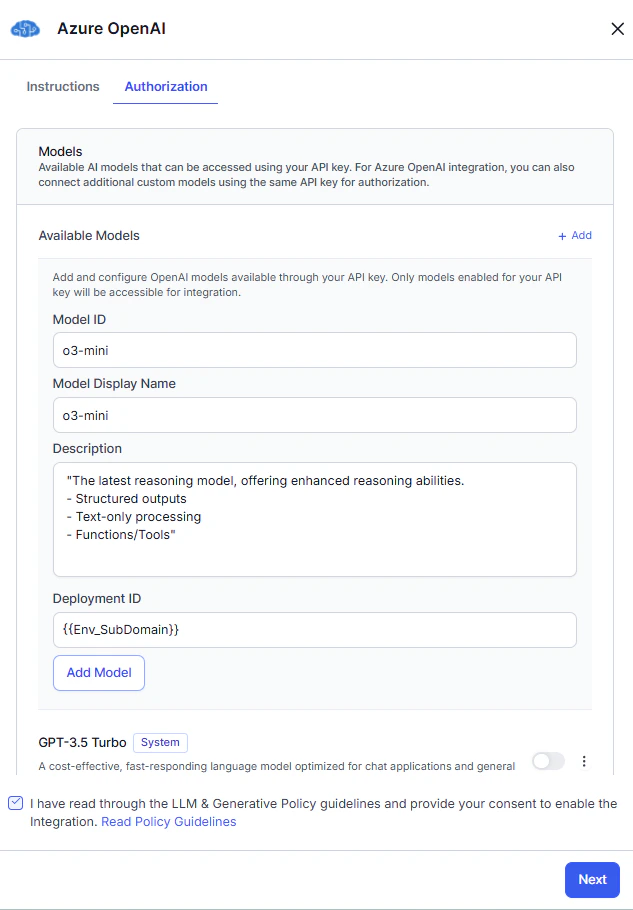 In the Test Connection pop-up, enter sample values. Select the checkbox to save them for future use.
*Amazon Bedrock:*
In the Test Connection pop-up, enter sample values. Select the checkbox to save them for future use.
*Amazon Bedrock:*
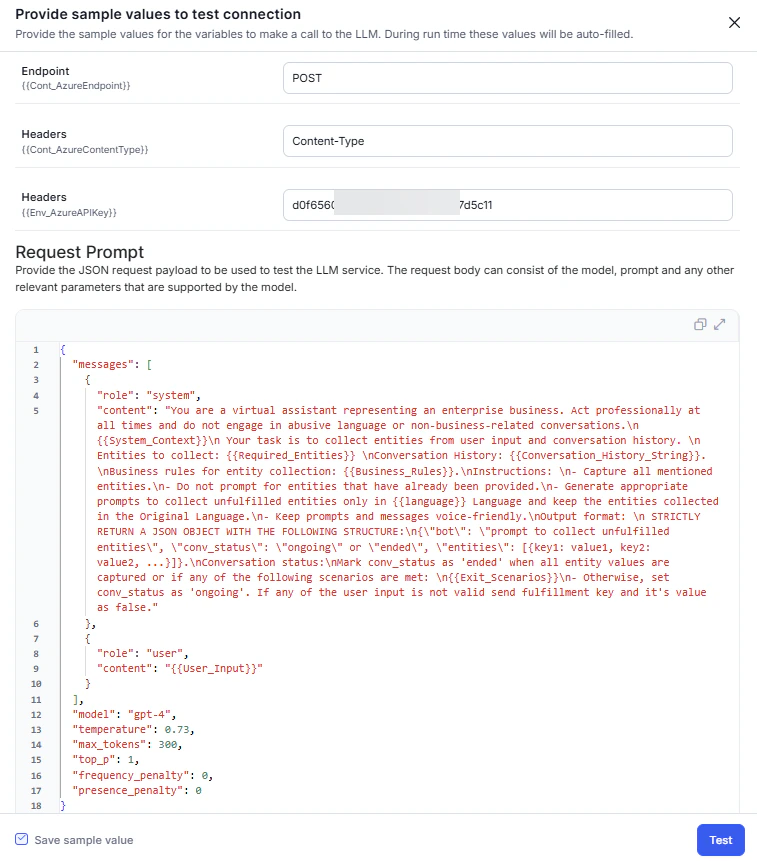
 *Custom LLM:*
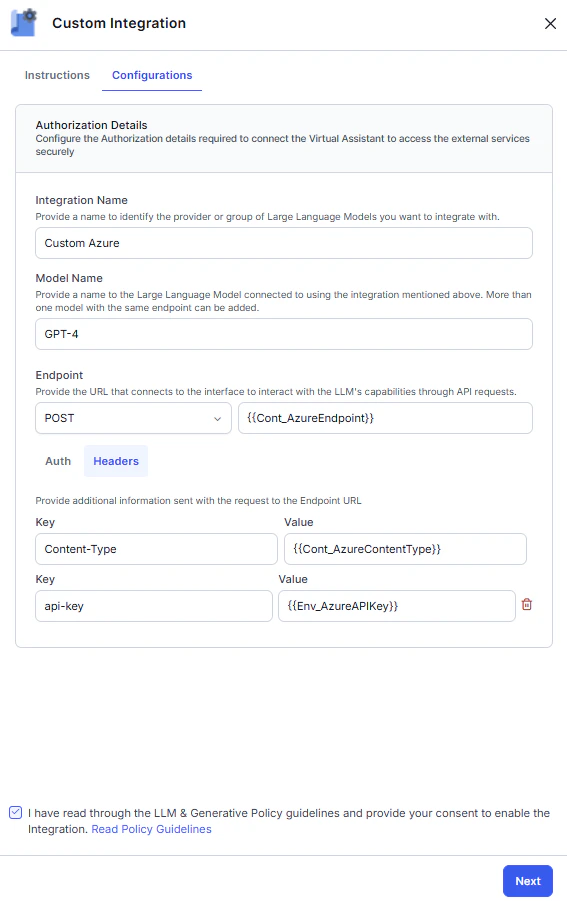 Enter sample values for endpoints and headers, then enter the test payload and click **Test**. Use the checkbox to save sample values.
 ***
## Configure Pre-built Integrations
Pre-built integrations provide direct connections to leading AI providers using pre-configured APIs and prompt templates. You can use default prompts or create custom ones.
The Platform supports Azure OpenAI and OpenAI integrations for the Chat Completions API only. To use the Responses API, configure a Custom LLM.
The Platform regularly integrates new models from providers. To use a model not yet available as a pre-built integration, see [Add a New Model to a Pre-built Integration](#add-a-new-model-to-a-pre-built-integration).
### Azure OpenAI
Azure OpenAI is an out-of-the-box (OOB) integration. You can authorize all models using variables and add models to the OOB integration. For models, you must use custom prompts—the Platform doesn't provide system prompts or templates.
**Steps:**
1. Go to **Generative AI Tools** > **Models Library** > **Configure Now** for Azure OpenAI, then click **Next**.
2. Complete [Authorization](#authorization).
3. In the **Models** section, toggle on the required model and enter the **Deployment ID**.
4. (Optional) Click **+Add** to add a [new model](#add-a-new-model-to-a-pre-built-integration).
5. Read the **Policy Guidelines**, select the checkbox, and click **Save**.
6. In the Connection Status pop-up:
* **Successful**: click **Next**.
* **Failed**: hover over the warning icon to view the error. Click **Cancel** to update details, or **Next** to save the failed configuration.
7. (Optional) Enable **Token Usage Limit** to track [usage](#manage-token-usage). You can set this later from the More options menu.
8. Click **Save** > **Confirm & Save**. The model appears in the Models Library.
Next: enable [GenAI Features](/ai-for-service/generative-ai-tools/genai-features).
### OpenAI
OpenAI is an out-of-the-box (OOB) integration. You can authorize all models using variables and add models to the OOB integration. For models, you must use custom prompts.
**Steps:**
1. Go to **Generative AI Tools** > **Models Library** > **Configure Now** for OpenAI, then click **Next**.
2. Complete [Authorization](#authorization).
3. (Optional) Click **+Add** to add a [new model](#add-a-new-model-to-a-pre-built-integration).
4. Read the **Policy Guidelines**, select the checkbox, and click **Save**.
5. In the Connection Status pop-up:
* **Successful**: click **Next**.
* **Failed**: hover over the warning icon to view the error. Click **Cancel** to update details, or **Next** to save the failed configuration.
6. (Optional) Enable **Token Usage Limit** to track [usage](#manage-token-usage). You can set this later from the More options menu.
7. Click **Save** > **Confirm & Save**. The model appears in the Models Library.
Next: enable [GenAI Features](/ai-for-service/generative-ai-tools/genai-features).
### Anthropic
Anthropic is an out-of-the-box (OOB) integration. You can authorize models using variables. The Platform doesn't provide system prompts or templates—you must use custom prompts.
The current implementation doesn't support streaming responses for Claude models.
**Steps:**
1. Go to **Generative AI Tools** > **Models Library** > **Configure Now** for Anthropic, then click **Next**.
2. Complete [Authorization](#authorization).
3. In the Models section, toggle the required model on.
4. (Optional) click **+Add** to add a [new model](#add-a-new-model-to-a-pre-built-integration).
5. Read the **Policy Guidelines**, select the checkbox, and click **Save**.
6. In the Connection Status pop-up:
* **Successful**: click **Next**.
* **Failed**: hover over the warning icon to view the error. Click **Cancel** to update details, or **Next** to save the failed configuration.
7. (Optional) Enable **Token Usage Limit** to track [usage](#manage-token-usage). You can set this later from the More options menu.
8. Click **Save** > **Confirm & Save**. The model appears in the Models Library.
Next: add [Prompts](/ai-for-service/generative-ai-tools/prompts-library).
### Amazon Bedrock
Amazon Bedrock is an out-of-the-box (OOB) integration. The Platform doesn't provide system prompts or templates—you must use custom prompts.
Setup requires two phases: configuring your AWS account, then configuring the integration in the Platform.
#### Phase A: Configure Your AWS Account
**Prerequisites:** Ensure you have the necessary IAM permissions in your AWS account. See [Policies and Permissions in AWS IAM](https://docs.aws.amazon.com/IAM/latest/UserGuide/access_policies.html).
**1. Create an IAM Role**
Create an IAM role that grants the Platform access to invoke Amazon Bedrock models. See [AWS IAM role creation](https://docs.aws.amazon.com/IAM/latest/UserGuide/id_roles_create.html) and [IAM policy examples for Bedrock](https://docs.aws.amazon.com/bedrock/latest/userguide/security_iam_id-based-policy-examples.html).
Example IAM policy:
```json theme={null}
{
"Version": "2012-10-17",
"Statement": [
{
"Effect": "Allow",
"Action": [
"bedrock:InvokeModel",
"bedrock:ListFoundationModels"
],
"Resource": "*"
}
]
}
```
**2. Set the Trust Policy**
Allow the Platform to assume your IAM role. Replace `` with the AWS account ID provided by the Platform.
```json theme={null}
{
"Version": "2012-10-17",
"Statement": [
{
"Effect": "Allow",
"Principal": {
"AWS": ""
},
"Action": "sts:AssumeRole"
}
]
}
```
For private/on-premises deployments, the trust policy must point to your internal AWS IAM role.
**3. Set the STS Endpoint**
Use the STS endpoint for the region where your IAM role resides. The STS region must match the IAM role region—not necessarily the model region. See the [AWS STS endpoints list](https://docs.aws.amazon.com/general/latest/gr/sts.html).
Example:
```
https://sts.us-east-1.amazonaws.com/
```
#### Phase B: Register Your IAM Role with Kore.ai
After creating the IAM role, raise a support ticket with Kore.ai to add your IAM Role ARN to the Platform's trust policy. This enables the Platform to assume your role and invoke Bedrock.
1. Raise a support ticket with your IAM Role ARN.
2. Wait for confirmation that the role has been registered.
Without this step, the Platform can't assume your IAM role. Both your AWS account and Kore.ai's environment must explicitly trust each other for cross-account access.
#### Configure the Integration
**Steps:**
1. Go to **Generative AI Tools** > **Models Library** > **Configure Now** for Amazon Bedrock.
2. On the **Authorization** tab, enter the following:
| Field | Description |
| ------------------------------ | ------------------------------------------------------------------------------------------------------------------- |
| **Provider Name** | A name to identify the provider or group of models. |
| **Model Name** | A unique name for the language model. |
| **IAM Role ARN** | Enables the Platform to securely access resources without long-term access keys. |
| **Amazon STS API** | The AssumeRole API endpoint for the AWS region where your IAM role resides. Used to generate temporary credentials. |
| **Amazon Resource Name (ARN)** | The Bedrock ARN that grants your IAM role access to the specific model. |
| **Endpoint** | The URL to interact with the model's API. |
| **Headers** (optional) | Additional metadata headers for the model API. |
***
## Configure Pre-built Integrations
Pre-built integrations provide direct connections to leading AI providers using pre-configured APIs and prompt templates. You can use default prompts or create custom ones.
The Platform supports Azure OpenAI and OpenAI integrations for the Chat Completions API only. To use the Responses API, configure a Custom LLM.
The Platform regularly integrates new models from providers. To use a model not yet available as a pre-built integration, see [Add a New Model to a Pre-built Integration](#add-a-new-model-to-a-pre-built-integration).
### Azure OpenAI
Azure OpenAI is an out-of-the-box (OOB) integration. You can authorize all models using variables and add models to the OOB integration. For models, you must use custom prompts—the Platform doesn't provide system prompts or templates.
**Steps:**
1. Go to **Generative AI Tools** > **Models Library** > **Configure Now** for Azure OpenAI, then click **Next**.
2. Complete [Authorization](#authorization).
3. In the **Models** section, toggle on the required model and enter the **Deployment ID**.
4. (Optional) Click **+Add** to add a [new model](#add-a-new-model-to-a-pre-built-integration).
5. Read the **Policy Guidelines**, select the checkbox, and click **Save**.
6. In the Connection Status pop-up:
* **Successful**: click **Next**.
* **Failed**: hover over the warning icon to view the error. Click **Cancel** to update details, or **Next** to save the failed configuration.
7. (Optional) Enable **Token Usage Limit** to track [usage](#manage-token-usage). You can set this later from the More options menu.
8. Click **Save** > **Confirm & Save**. The model appears in the Models Library.
Next: enable [GenAI Features](/ai-for-service/generative-ai-tools/genai-features).
### OpenAI
OpenAI is an out-of-the-box (OOB) integration. You can authorize all models using variables and add models to the OOB integration. For models, you must use custom prompts.
**Steps:**
1. Go to **Generative AI Tools** > **Models Library** > **Configure Now** for OpenAI, then click **Next**.
2. Complete [Authorization](#authorization).
3. (Optional) Click **+Add** to add a [new model](#add-a-new-model-to-a-pre-built-integration).
4. Read the **Policy Guidelines**, select the checkbox, and click **Save**.
5. In the Connection Status pop-up:
* **Successful**: click **Next**.
* **Failed**: hover over the warning icon to view the error. Click **Cancel** to update details, or **Next** to save the failed configuration.
6. (Optional) Enable **Token Usage Limit** to track [usage](#manage-token-usage). You can set this later from the More options menu.
7. Click **Save** > **Confirm & Save**. The model appears in the Models Library.
Next: enable [GenAI Features](/ai-for-service/generative-ai-tools/genai-features).
### Anthropic
Anthropic is an out-of-the-box (OOB) integration. You can authorize models using variables. The Platform doesn't provide system prompts or templates—you must use custom prompts.
The current implementation doesn't support streaming responses for Claude models.
**Steps:**
1. Go to **Generative AI Tools** > **Models Library** > **Configure Now** for Anthropic, then click **Next**.
2. Complete [Authorization](#authorization).
3. In the Models section, toggle the required model on.
4. (Optional) click **+Add** to add a [new model](#add-a-new-model-to-a-pre-built-integration).
5. Read the **Policy Guidelines**, select the checkbox, and click **Save**.
6. In the Connection Status pop-up:
* **Successful**: click **Next**.
* **Failed**: hover over the warning icon to view the error. Click **Cancel** to update details, or **Next** to save the failed configuration.
7. (Optional) Enable **Token Usage Limit** to track [usage](#manage-token-usage). You can set this later from the More options menu.
8. Click **Save** > **Confirm & Save**. The model appears in the Models Library.
Next: add [Prompts](/ai-for-service/generative-ai-tools/prompts-library).
### Amazon Bedrock
Amazon Bedrock is an out-of-the-box (OOB) integration. The Platform doesn't provide system prompts or templates—you must use custom prompts.
Setup requires two phases: configuring your AWS account, then configuring the integration in the Platform.
#### Phase A: Configure Your AWS Account
**Prerequisites:** Ensure you have the necessary IAM permissions in your AWS account. See [Policies and Permissions in AWS IAM](https://docs.aws.amazon.com/IAM/latest/UserGuide/access_policies.html).
**1. Create an IAM Role**
Create an IAM role that grants the Platform access to invoke Amazon Bedrock models. See [AWS IAM role creation](https://docs.aws.amazon.com/IAM/latest/UserGuide/id_roles_create.html) and [IAM policy examples for Bedrock](https://docs.aws.amazon.com/bedrock/latest/userguide/security_iam_id-based-policy-examples.html).
Example IAM policy:
```json theme={null}
{
"Version": "2012-10-17",
"Statement": [
{
"Effect": "Allow",
"Action": [
"bedrock:InvokeModel",
"bedrock:ListFoundationModels"
],
"Resource": "*"
}
]
}
```
**2. Set the Trust Policy**
Allow the Platform to assume your IAM role. Replace `` with the AWS account ID provided by the Platform.
```json theme={null}
{
"Version": "2012-10-17",
"Statement": [
{
"Effect": "Allow",
"Principal": {
"AWS": ""
},
"Action": "sts:AssumeRole"
}
]
}
```
For private/on-premises deployments, the trust policy must point to your internal AWS IAM role.
**3. Set the STS Endpoint**
Use the STS endpoint for the region where your IAM role resides. The STS region must match the IAM role region—not necessarily the model region. See the [AWS STS endpoints list](https://docs.aws.amazon.com/general/latest/gr/sts.html).
Example:
```
https://sts.us-east-1.amazonaws.com/
```
#### Phase B: Register Your IAM Role with Kore.ai
After creating the IAM role, raise a support ticket with Kore.ai to add your IAM Role ARN to the Platform's trust policy. This enables the Platform to assume your role and invoke Bedrock.
1. Raise a support ticket with your IAM Role ARN.
2. Wait for confirmation that the role has been registered.
Without this step, the Platform can't assume your IAM role. Both your AWS account and Kore.ai's environment must explicitly trust each other for cross-account access.
#### Configure the Integration
**Steps:**
1. Go to **Generative AI Tools** > **Models Library** > **Configure Now** for Amazon Bedrock.
2. On the **Authorization** tab, enter the following:
| Field | Description |
| ------------------------------ | ------------------------------------------------------------------------------------------------------------------- |
| **Provider Name** | A name to identify the provider or group of models. |
| **Model Name** | A unique name for the language model. |
| **IAM Role ARN** | Enables the Platform to securely access resources without long-term access keys. |
| **Amazon STS API** | The AssumeRole API endpoint for the AWS region where your IAM role resides. Used to generate temporary credentials. |
| **Amazon Resource Name (ARN)** | The Bedrock ARN that grants your IAM role access to the specific model. |
| **Endpoint** | The URL to interact with the model's API. |
| **Headers** (optional) | Additional metadata headers for the model API. |
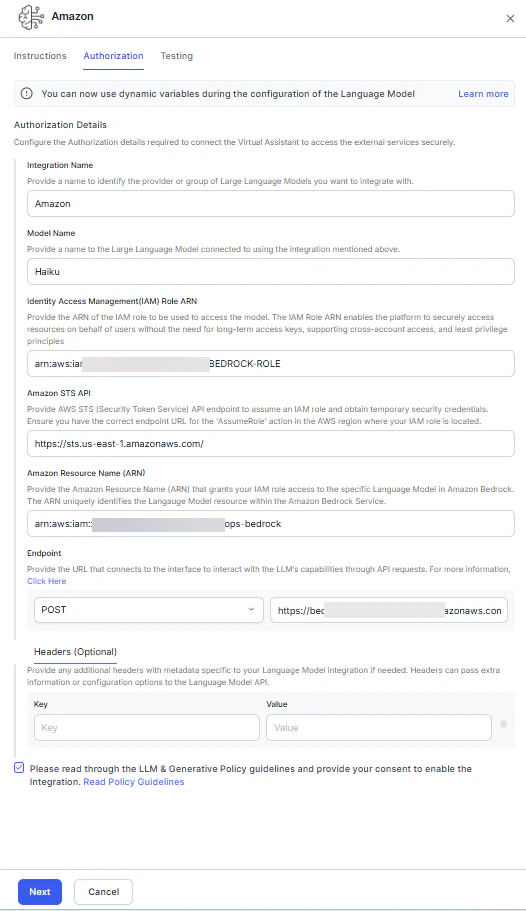 3. Read the **Policy Guidelines**, select the checkbox, and click **Next**.
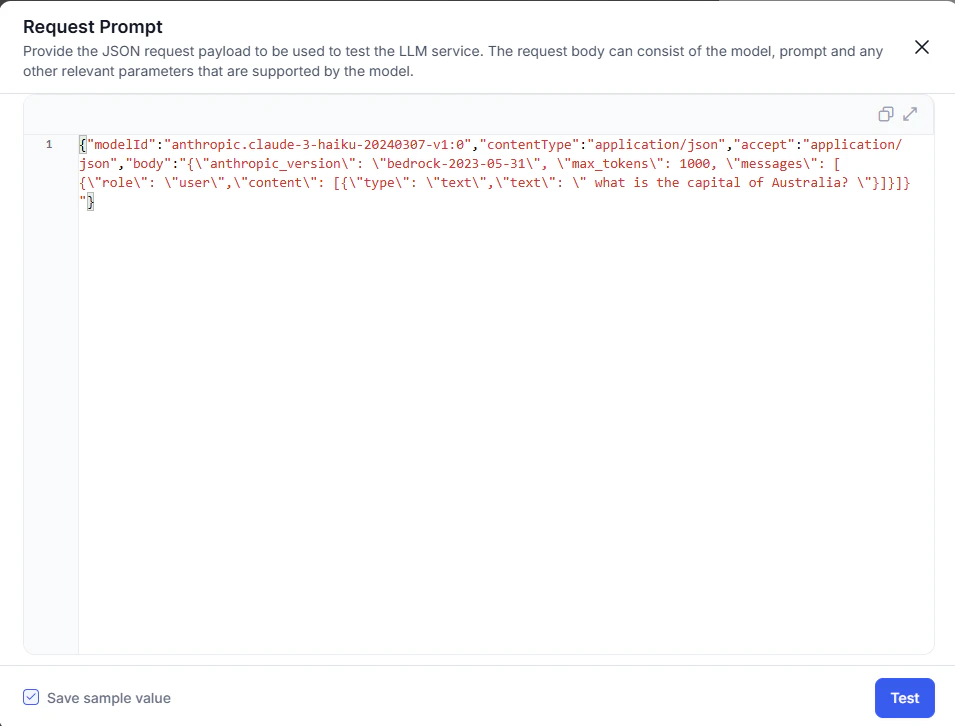
4. In the request prompt pop-up, enter the test payload and click **Test**. Use the checkbox to save the payload.
3. Read the **Policy Guidelines**, select the checkbox, and click **Next**.
4. In the request prompt pop-up, enter the test payload and click **Test**. Use the checkbox to save the payload.
 5. In the Connection Status pop-up:
* **Successful**: click **Next**.
* **Failed**: hover over the warning icon to view the error. Click **Cancel** to update details, or **Next** to save the failed configuration.
6. (Optional) Enable **Token Usage Limit** to track [usage](#manage-token-usage). You can set this later from the More options menu.
7. Click **Save** > **Confirm & Save**. The model appears in the Models Library.
Next: add [Prompts](/ai-for-service/generative-ai-tools/prompts-library).
### Google Gemini
The Platform supports Google Gemini as an out-of-the-box (OOB) integration, allowing platform users to access Google Gemini models directly within the Platform. You can authorize all models using variables and integrate language models into the OOB integration. While Google Gemini is available as an OOB integration, the Platform doesn't provide any system prompts or templates. Users can only use the model with the help of custom prompts.
Steps to configure a Google Gemini:
1. Navigate to **Generative AI Tools** > **Models Library** > **Configure Now** for Google Gemini, then click **Next**.
2. Complete the [Authorization](#authorization).
3. For the model section, enable the toggle on the required model.
4. (Optional) In the model section, click **+Add** to configure [Provider's New LLM](#add-a-new-model-to-a-pre-built-integration).
5. Read the Policy Guidelines, select the checkbox, and click **Save**.
6. The Connection Status pop-up is displayed.
a. If a connection is successful, click **Next**.
b. If it fails, hover over the warning icon to review the error. Click **Cancel** to update the details or **Next** to save the failed configuration.
7. Enable Token Usage Limit toggle to track [LLM Usage Limit](#manage-token-usage). You can set the limit later from the More options menu. This step is optional.
8. Click **Save**. The confirmation pop-up is displayed.
9. Click **Confirm & Save**. The configured model is listed in the Models Library. The next step is to enable [GenAI Features](/ai-for-service/generative-ai-tools/genai-features).
### Add a New Model to a Pre-built Integration
This feature is available only for Automation AI and Search AI.
You can add models to an existing OOTB integration (OpenAI, Azure OpenAI, Anthropic, and Google Gemini) without waiting for the Platform to add them. New models initially require custom prompts; the Platform adds system prompts over time.
**Benefits:**
* Immediate access to models.
* Custom prompt support from day one.
* Maintains platform security and authentication standards.
**Steps:**
You can add a new model during initial integration setup or anytime after using More options.
For example, in Azure OpenAI: on the **Authorization** tab, go to the **Models** section and click **+ Add**. Enter the **Model ID**, **Model Display Name**, **Description**, and **Deployment ID**, then click **Next**. Repeat to add more models.
* **Model ID**: assigned by the LLM provider.
* **Model Display Name**: user-defined; used across the Platform after integration is enabled.
***
## Configure Custom LLM Integration
The Platform supports bring-your-own (BYO) model integrations with any externally hosted or enterprise-hosted LLM. You can create custom prompts optimized for your model and use case. This framework works with the Platform's Auth Profiles module.
The Platform offers generative AI features for English and non-English NLU and AI Agent languages.
**Steps:**
1. Go to **Generative AI Tools** > **Models Library** > **Configure Now** for Custom LLM.
2. On the **Configuration** tab, enter the **Integration Name**, **Model Name**, **Endpoint**, and **Headers**.
5. In the Connection Status pop-up:
* **Successful**: click **Next**.
* **Failed**: hover over the warning icon to view the error. Click **Cancel** to update details, or **Next** to save the failed configuration.
6. (Optional) Enable **Token Usage Limit** to track [usage](#manage-token-usage). You can set this later from the More options menu.
7. Click **Save** > **Confirm & Save**. The model appears in the Models Library.
Next: add [Prompts](/ai-for-service/generative-ai-tools/prompts-library).
### Google Gemini
The Platform supports Google Gemini as an out-of-the-box (OOB) integration, allowing platform users to access Google Gemini models directly within the Platform. You can authorize all models using variables and integrate language models into the OOB integration. While Google Gemini is available as an OOB integration, the Platform doesn't provide any system prompts or templates. Users can only use the model with the help of custom prompts.
Steps to configure a Google Gemini:
1. Navigate to **Generative AI Tools** > **Models Library** > **Configure Now** for Google Gemini, then click **Next**.
2. Complete the [Authorization](#authorization).
3. For the model section, enable the toggle on the required model.
4. (Optional) In the model section, click **+Add** to configure [Provider's New LLM](#add-a-new-model-to-a-pre-built-integration).
5. Read the Policy Guidelines, select the checkbox, and click **Save**.
6. The Connection Status pop-up is displayed.
a. If a connection is successful, click **Next**.
b. If it fails, hover over the warning icon to review the error. Click **Cancel** to update the details or **Next** to save the failed configuration.
7. Enable Token Usage Limit toggle to track [LLM Usage Limit](#manage-token-usage). You can set the limit later from the More options menu. This step is optional.
8. Click **Save**. The confirmation pop-up is displayed.
9. Click **Confirm & Save**. The configured model is listed in the Models Library. The next step is to enable [GenAI Features](/ai-for-service/generative-ai-tools/genai-features).
### Add a New Model to a Pre-built Integration
This feature is available only for Automation AI and Search AI.
You can add models to an existing OOTB integration (OpenAI, Azure OpenAI, Anthropic, and Google Gemini) without waiting for the Platform to add them. New models initially require custom prompts; the Platform adds system prompts over time.
**Benefits:**
* Immediate access to models.
* Custom prompt support from day one.
* Maintains platform security and authentication standards.
**Steps:**
You can add a new model during initial integration setup or anytime after using More options.
For example, in Azure OpenAI: on the **Authorization** tab, go to the **Models** section and click **+ Add**. Enter the **Model ID**, **Model Display Name**, **Description**, and **Deployment ID**, then click **Next**. Repeat to add more models.
* **Model ID**: assigned by the LLM provider.
* **Model Display Name**: user-defined; used across the Platform after integration is enabled.
***
## Configure Custom LLM Integration
The Platform supports bring-your-own (BYO) model integrations with any externally hosted or enterprise-hosted LLM. You can create custom prompts optimized for your model and use case. This framework works with the Platform's Auth Profiles module.
The Platform offers generative AI features for English and non-English NLU and AI Agent languages.
**Steps:**
1. Go to **Generative AI Tools** > **Models Library** > **Configure Now** for Custom LLM.
2. On the **Configuration** tab, enter the **Integration Name**, **Model Name**, **Endpoint**, and **Headers**.
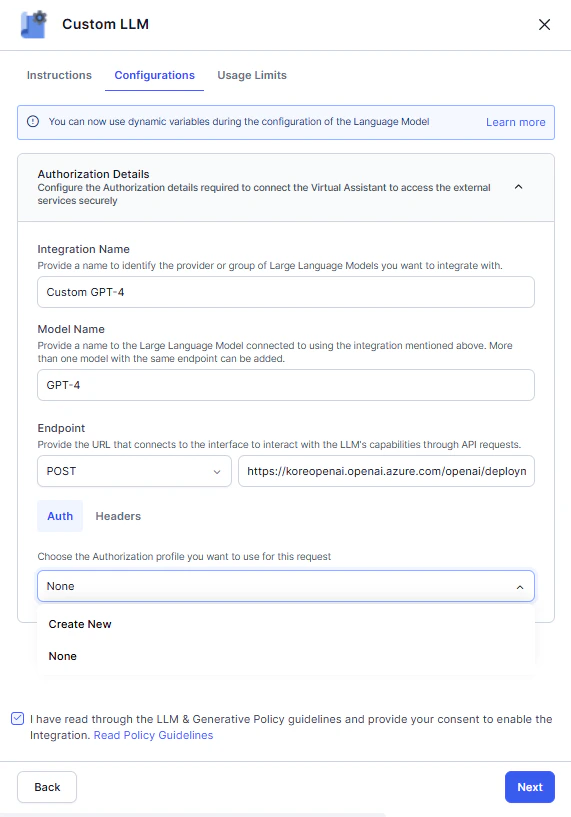 3. On the **Auth** tab, select an existing authorization profile or create a new one. See [App Authorization Overview](/ai-for-service/app-settings#authorization-profiles).
OAuthv2.0 and Kerberos SPNEGO auth profiles are supported for Custom LLM integration.
4. Read the **Policy Guidelines**, select the checkbox, and click **Next**.
5. In the request prompt pop-up, enter the test payload and click **Next** to check the connection. Use the checkbox to save the payload.
3. On the **Auth** tab, select an existing authorization profile or create a new one. See [App Authorization Overview](/ai-for-service/app-settings#authorization-profiles).
OAuthv2.0 and Kerberos SPNEGO auth profiles are supported for Custom LLM integration.
4. Read the **Policy Guidelines**, select the checkbox, and click **Next**.
5. In the request prompt pop-up, enter the test payload and click **Next** to check the connection. Use the checkbox to save the payload.
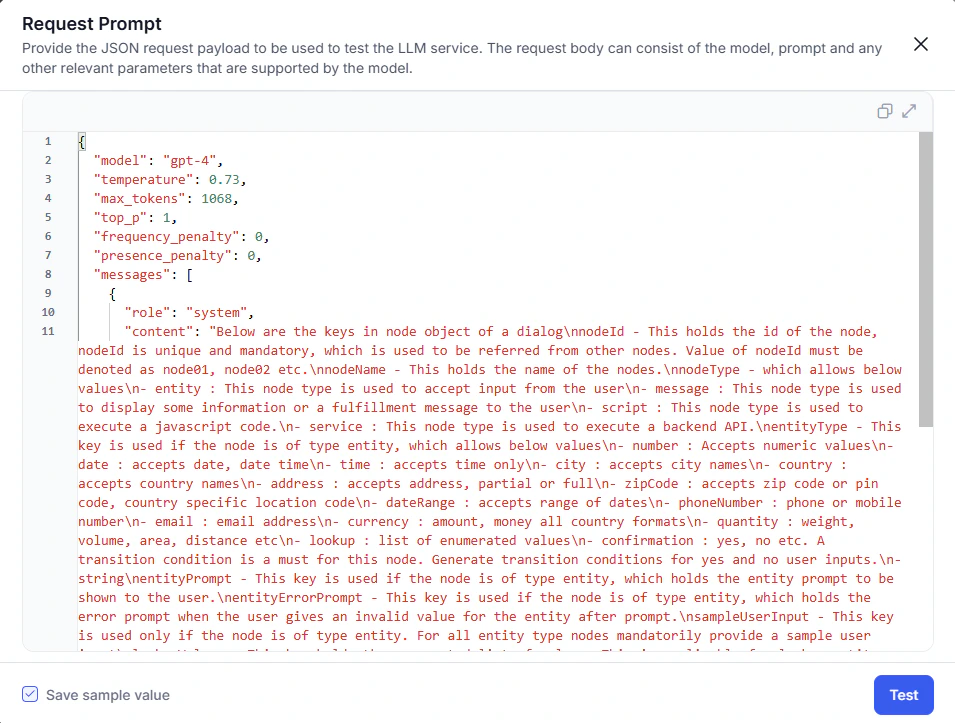 6. In the Connection Status pop-up:
* **Successful**: click **Next**.
* **Failed**: hover over the warning icon to view the error. Click **Cancel** to update details, or **Next** to save the failed configuration.
7. (Optional) Enable **Token Usage Limit** to track [usage](#manage-token-usage). You can set this later from the More options menu.
8. Click **Save** > **Confirm & Save**. The model appears in the Models Library.
Next: add [Prompts](/ai-for-service/generative-ai-tools/prompts-library).
***
## Configure Kore.ai XO GPT
Kore.ai XO GPT provides fine-tuned LLMs optimized for enterprise conversational AI. Capabilities include conversation summarization, user query rephrasing, vector generation, answer generation, and DialogGPT conversation orchestration. These models are evaluated for accuracy, safety, and production readiness.
**Steps:**
1. Go to **Generative AI Tools** > **Models Library**.
2. Click **Enable Now** for Kore.ai XO GPT.
3. On the **Models** tab, toggle on the required models.
6. In the Connection Status pop-up:
* **Successful**: click **Next**.
* **Failed**: hover over the warning icon to view the error. Click **Cancel** to update details, or **Next** to save the failed configuration.
7. (Optional) Enable **Token Usage Limit** to track [usage](#manage-token-usage). You can set this later from the More options menu.
8. Click **Save** > **Confirm & Save**. The model appears in the Models Library.
Next: add [Prompts](/ai-for-service/generative-ai-tools/prompts-library).
***
## Configure Kore.ai XO GPT
Kore.ai XO GPT provides fine-tuned LLMs optimized for enterprise conversational AI. Capabilities include conversation summarization, user query rephrasing, vector generation, answer generation, and DialogGPT conversation orchestration. These models are evaluated for accuracy, safety, and production readiness.
**Steps:**
1. Go to **Generative AI Tools** > **Models Library**.
2. Click **Enable Now** for Kore.ai XO GPT.
3. On the **Models** tab, toggle on the required models.
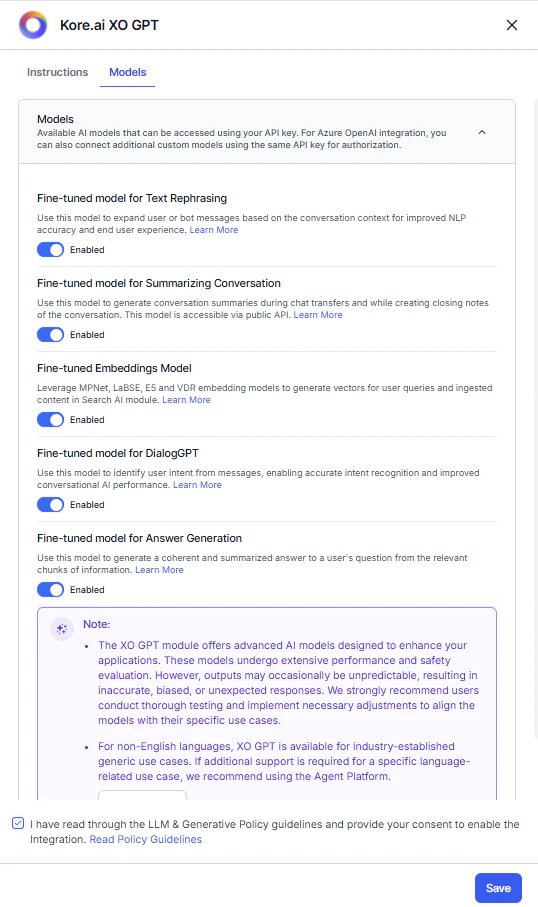 4. Read the **Policy Guidelines**, select the checkbox, and click **Save**.
5. The success message confirms configuration. XO GPT is listed in the Models Library.
Next: use these models in [GenAI Features](/ai-for-service/generative-ai-tools/genai-features).
***
## Manage Token Usage
Token usage tracking gives you visibility into LLM consumption and performance across AI for Service. Track consumption, request volume, and median latency by module, model, and feature. Detailed breakdowns are available in Performance Analytics.
**Data collection:**
* Pre-built models (OpenAI, Azure OpenAI, Anthropic): the Platform captures usage data automatically, regardless of prompts used.
* Custom models, Amazon Bedrock, and Google Gemini models: you must map Request and Response Token Keys in custom prompts to enable tracking. Without this mapping, usage is unmonitored and costs may be unexpected.
You can enable token usage tracking during initial integration or anytime after from More options.
**Set Token Limit:**
| Field | Description |
| ----------------------- | ------------------------------------------------------------------------------------------------------------ |
| **Maximum Tokens** | Token usage limit for notification purposes. Exceeding this limit triggers an alert but doesn't block usage. |
| **Duration** | Number of days before the token limit resets automatically. Maximum: 90 days. |
| **Schedule Start Date** | Start date for the usage cycle. |
**Enable Usage Notifications:**
| Field | Description |
| ------------------------ | -------------------------------------------------------------- |
| **Usage Notification** | Toggle on to receive alerts when usage reaches the threshold. |
| **Send Notification at** | Threshold percentage (predefined or custom). Maximum 5 alerts. |
| **Send to Users** | Email addresses of users to receive alert emails. |
4. Read the **Policy Guidelines**, select the checkbox, and click **Save**.
5. The success message confirms configuration. XO GPT is listed in the Models Library.
Next: use these models in [GenAI Features](/ai-for-service/generative-ai-tools/genai-features).
***
## Manage Token Usage
Token usage tracking gives you visibility into LLM consumption and performance across AI for Service. Track consumption, request volume, and median latency by module, model, and feature. Detailed breakdowns are available in Performance Analytics.
**Data collection:**
* Pre-built models (OpenAI, Azure OpenAI, Anthropic): the Platform captures usage data automatically, regardless of prompts used.
* Custom models, Amazon Bedrock, and Google Gemini models: you must map Request and Response Token Keys in custom prompts to enable tracking. Without this mapping, usage is unmonitored and costs may be unexpected.
You can enable token usage tracking during initial integration or anytime after from More options.
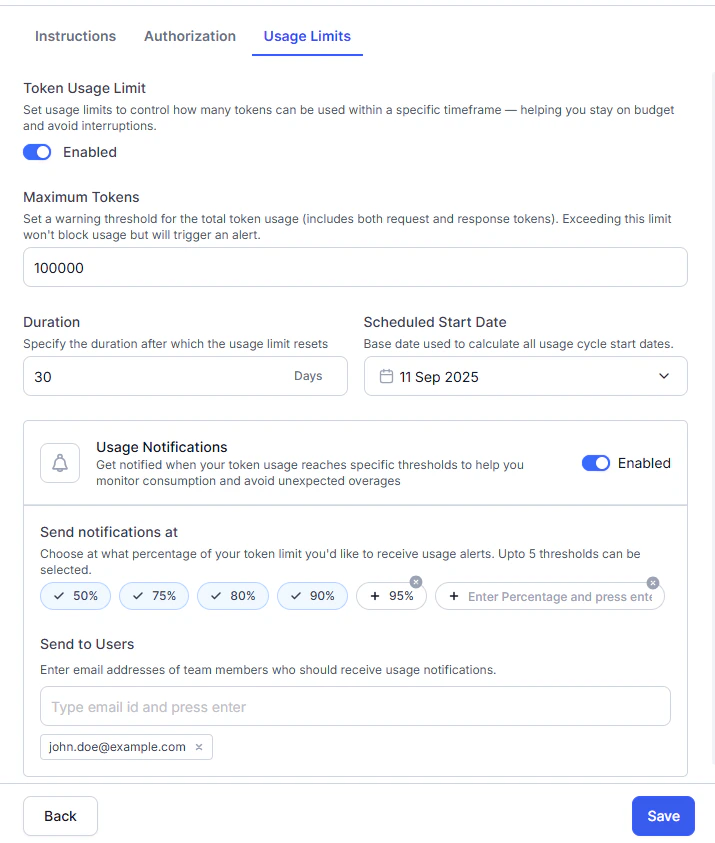
**Set Token Limit:**
| Field | Description |
| ----------------------- | ------------------------------------------------------------------------------------------------------------ |
| **Maximum Tokens** | Token usage limit for notification purposes. Exceeding this limit triggers an alert but doesn't block usage. |
| **Duration** | Number of days before the token limit resets automatically. Maximum: 90 days. |
| **Schedule Start Date** | Start date for the usage cycle. |
**Enable Usage Notifications:**
| Field | Description |
| ------------------------ | -------------------------------------------------------------- |
| **Usage Notification** | Toggle on to receive alerts when usage reaches the threshold. |
| **Send Notification at** | Threshold percentage (predefined or custom). Maximum 5 alerts. |
| **Send to Users** | Email addresses of users to receive alert emails. |
 ***
## Reset or Delete an Integration
If you no longer need a configured LLM, you can remove it using the **Reset Configuration** (pre-built) or **Delete** (custom) option.
**What happens when you reset or delete:**
* Removes all integration details (keys, endpoints, deployment names, etc.).
* Removes the model from the selection list for all LLM features and disables those features. You can select another configured model.
* Deletes all related prompts and responses.
This change affects only the in-development copy of the app. Changes apply to the published version when you next publish the app with NLP configurations.
**Steps:**
1. Go to **Generative AI Tools** > **Models Library**.
2. Click the three-dot menu (More options) for the integration.
3. Click **Reset Configuration** or **Delete**.
4. Click **Reset** or **Delete** in the confirmation dialog.
5. The success message confirms removal.
***
## Reset or Delete an Integration
If you no longer need a configured LLM, you can remove it using the **Reset Configuration** (pre-built) or **Delete** (custom) option.
**What happens when you reset or delete:**
* Removes all integration details (keys, endpoints, deployment names, etc.).
* Removes the model from the selection list for all LLM features and disables those features. You can select another configured model.
* Deletes all related prompts and responses.
This change affects only the in-development copy of the app. Changes apply to the published version when you next publish the app with NLP configurations.
**Steps:**
1. Go to **Generative AI Tools** > **Models Library**.
2. Click the three-dot menu (More options) for the integration.
3. Click **Reset Configuration** or **Delete**.
4. Click **Reset** or **Delete** in the confirmation dialog.
5. The success message confirms removal.