> ## Documentation Index
> Fetch the complete documentation index at: https://koreai.mintlify.site/llms.txt
> Use this file to discover all available pages before exploring further.
# Configuring the Salesforce Agent
[Back to Agent Transfer Integrations](/ai-for-service/integrations/overview#agent-transfer)
The Salesforce Agent integration allows you to hand off AI Agent conversations to live agents on Salesforce. The AI Agent acts as an intermediary between users and Salesforce agents.
The platform supports two Salesforce integration methods:
* **Live Chat (Legacy)**: Salesforce's traditional live chat interface for real-time messaging between AI Agent and human agents.
* **Messaging for In-App and Web (MIAW)**: Salesforce's latest messaging service for persistent, seamless conversations across in-app and web channels. Recommended for new integrations.
**Prerequisite**: Users must have the **Service Cloud User** license enabled to see all options in the Salesforce customize section.
***
## Configure Live Chat
### Step 1: Set Up a Salesforce Live Agent
1. Log in to your Salesforce account.
2. Navigate to **Setup > Customize > Chat Agent > Settings**.
Switch to **Classic view** — Live Agent settings don't appear in Lightning Experience. See [Salesforce Live Agent setup guide](https://help.salesforce.com/s/articleView?language=en_US\&id=live_agent_intro.htm).
3. Navigate to **Build > Customize > Chat > Chat Agent Configurations**.
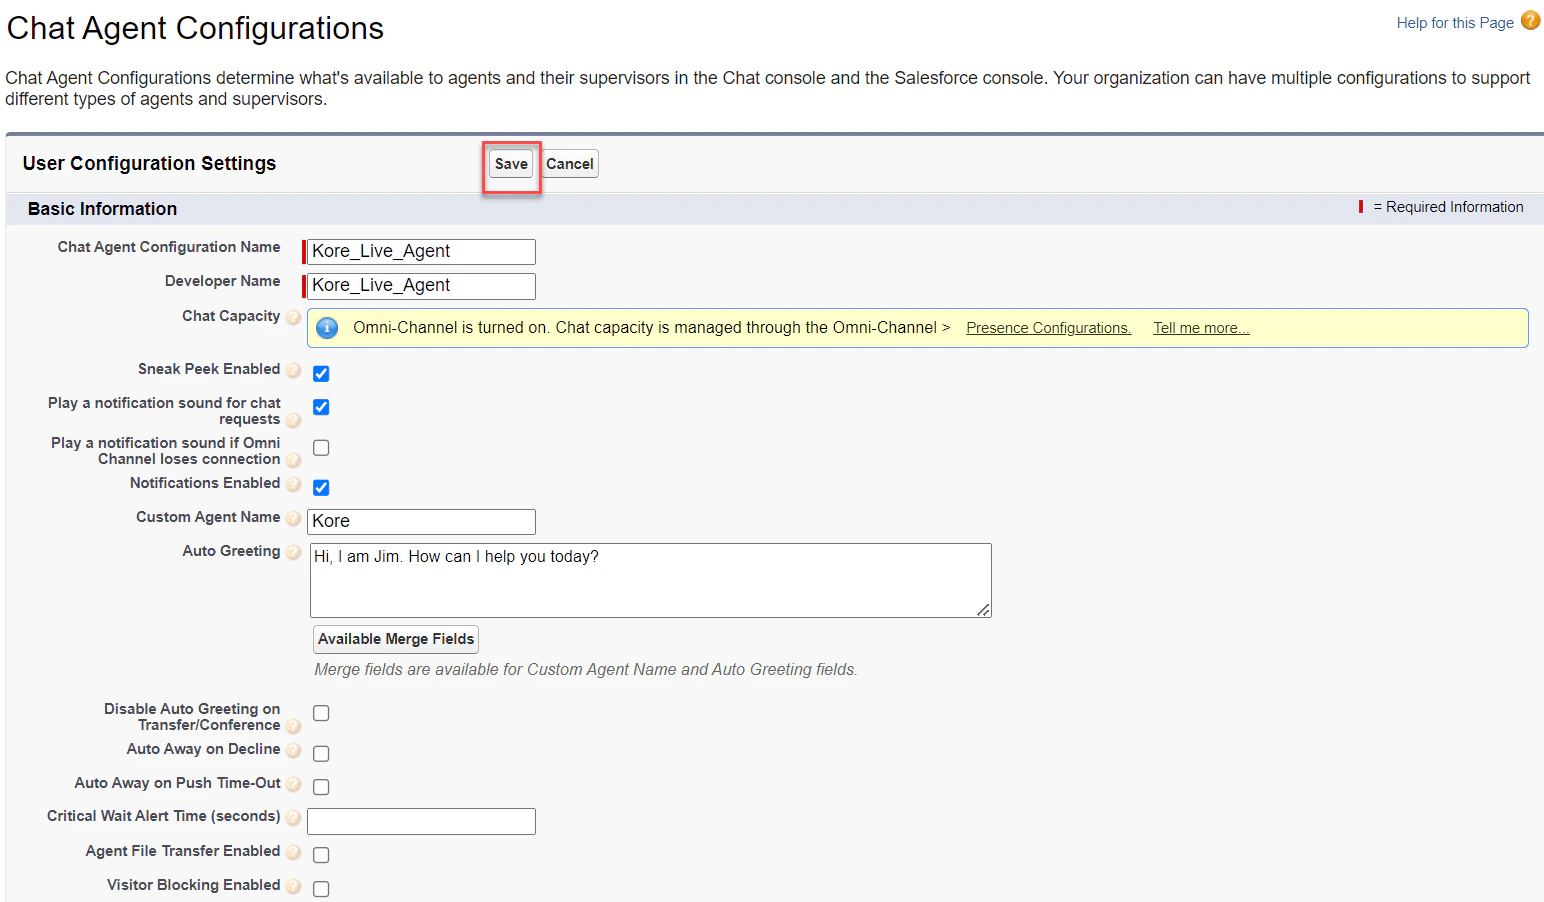
 4. Click **New**, fill in the configuration name and description, and click **Save**.
 ### Step 2: Retrieve the Live Agent URL
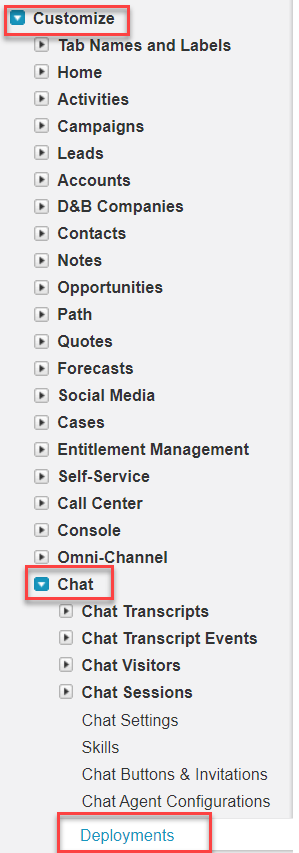
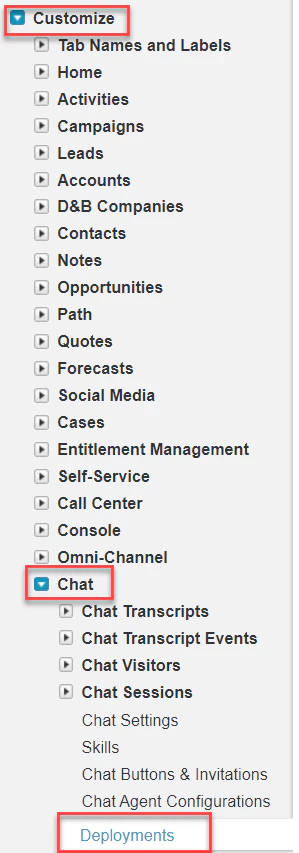
1. Navigate to **Setup > Customize > Chats > Chat Sessions > Deployments**.
### Step 2: Retrieve the Live Agent URL
1. Navigate to **Setup > Customize > Chats > Chat Sessions > Deployments**.
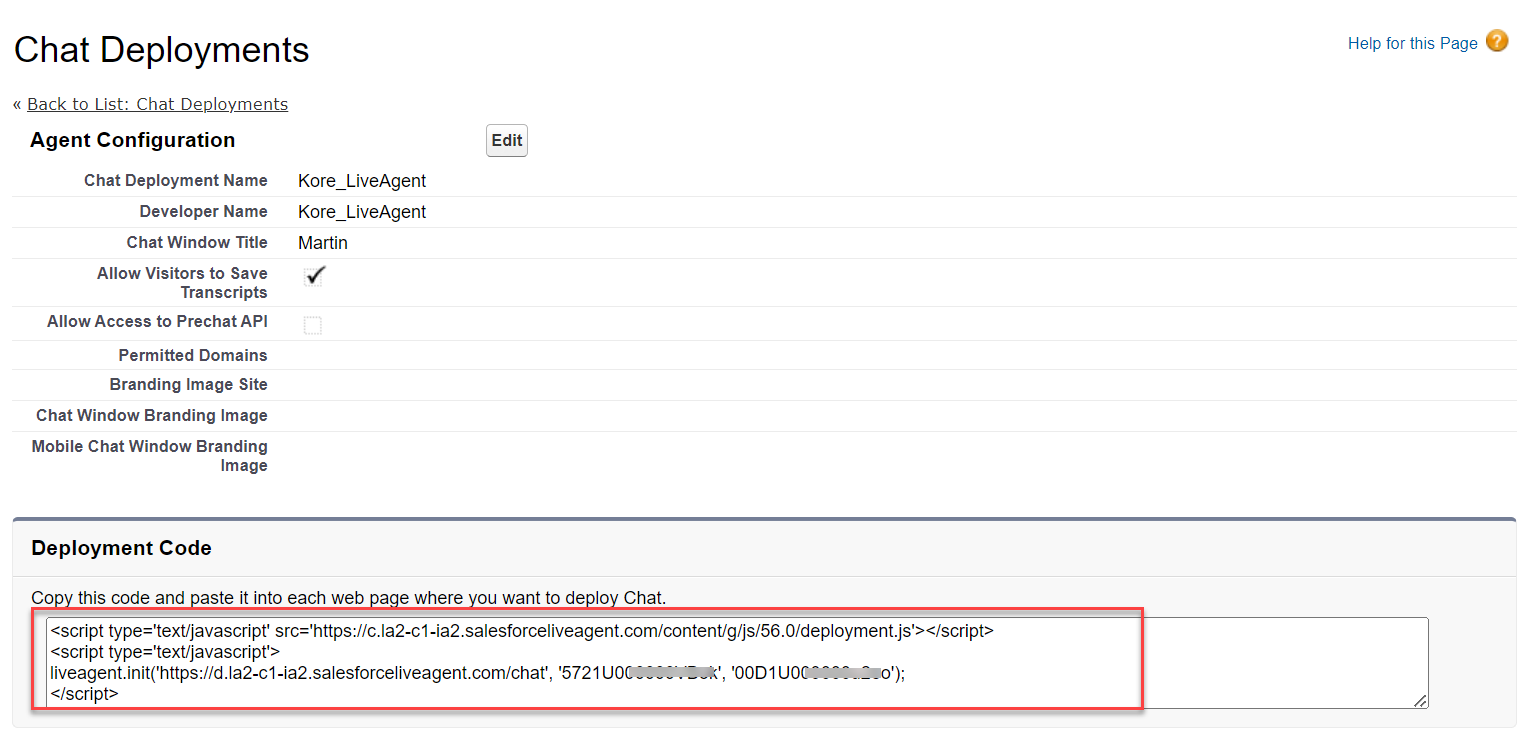
 2. Click the deployment you want to use.
3. In the **Deployment Code** region, find the Live Agent URL in the **Code** field.
2. Click the deployment you want to use.
3. In the **Deployment Code** region, find the Live Agent URL in the **Code** field.
 ### Step 3: Retrieve the Organization ID
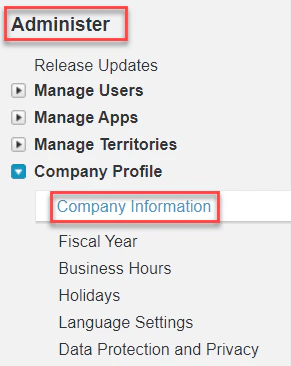
1. Navigate to **Administer > Company Settings > Company Information**.
### Step 3: Retrieve the Organization ID
1. Navigate to **Administer > Company Settings > Company Information**.
 2. Find the **Salesforce.com Organization ID** field.
 The Organization ID is a unique identifier for your Salesforce org.
3. Copy and save it.
### Step 4: Retrieve the Deployment ID
1. Navigate to **Setup > Customize > Chats > Chat Sessions > Deployments**.
The Organization ID is a unique identifier for your Salesforce org.
3. Copy and save it.
### Step 4: Retrieve the Deployment ID
1. Navigate to **Setup > Customize > Chats > Chat Sessions > Deployments**.
 2. In the **Deployment Code** region, find the **Deployment ID** in the **Code** field.
 3. Copy and save it.
### Step 5: Retrieve the Button ID
1. Navigate to **Customize > Chats > Chat Sessions > Chat Buttons & Invitations** and click the button you want to use.
2. In the **Deployment Code** region, find the Button ID in the **Code** field.
3. Copy and save it.
### Step 5: Retrieve the Button ID
1. Navigate to **Customize > Chats > Chat Sessions > Chat Buttons & Invitations** and click the button you want to use.
2. In the **Deployment Code** region, find the Button ID in the **Code** field.
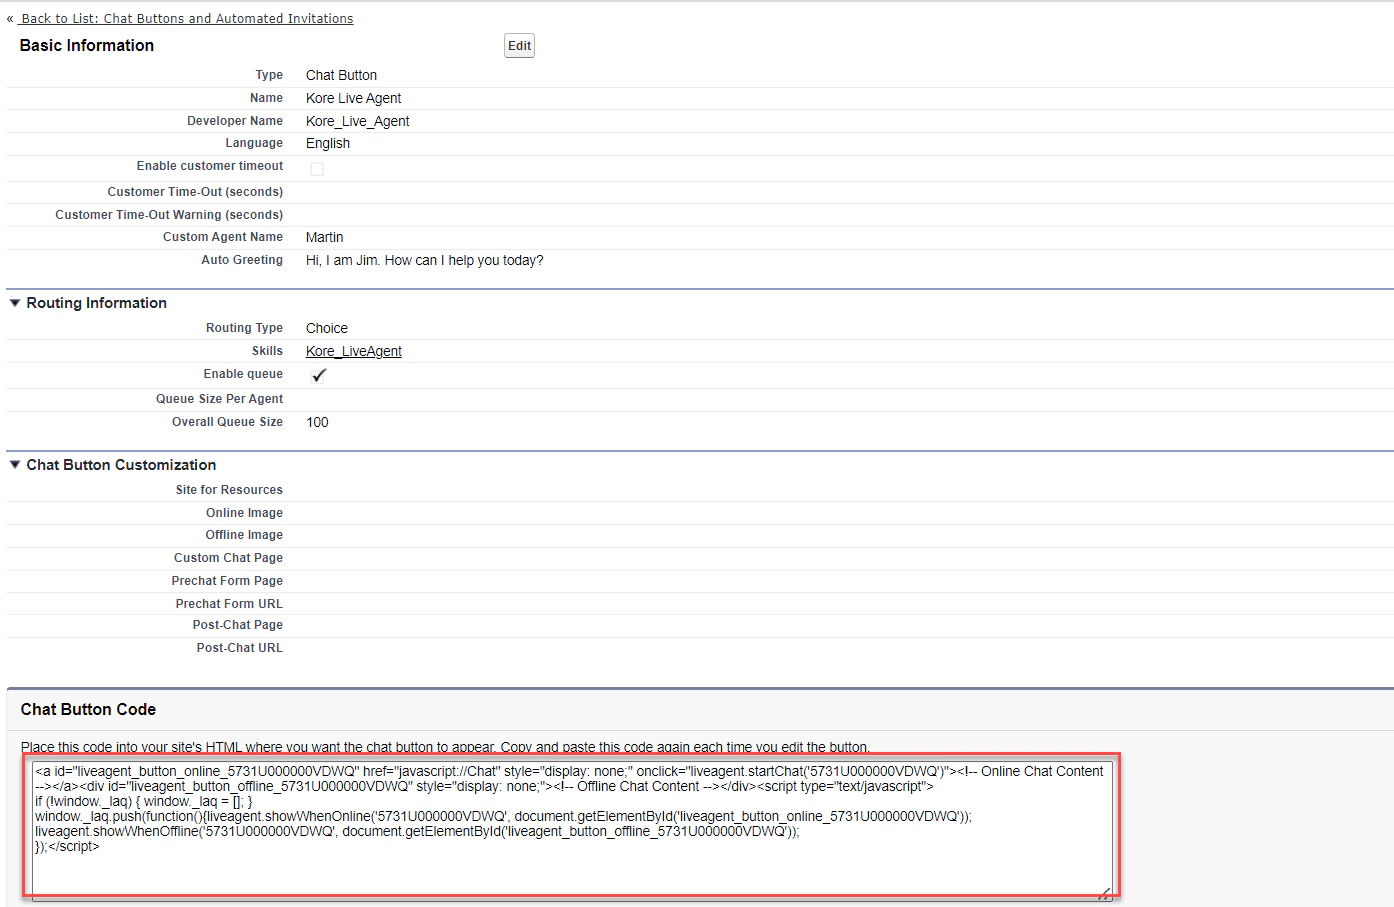 The Button ID is the string after the last `/` in the URL (for example, `5731I000000PL9G` from `https://meya-dev-ed.my.salesforce.com/5731I000000PL9G`).
3. Copy and save it.
### Step 6: Enable the Salesforce Agent
1. Log in to the Platform.
2. Select the AI Agent to configure.
3. Navigate to **App Settings > Integrations > Agent Transfer > Chat** and click **Salesforce**.
4. On the **Configurations** tab, enter:
| Field | Description |
| --------------- | ------------------------------------- |
| Live Agent URL | Live agent API endpoint (from Step 2) |
| Organization ID | Salesforce org ID (from Step 3) |
| Deployment ID | Deployment ID (from Step 4) |
| Button ID | Button ID (from Step 5) |
The Button ID is the string after the last `/` in the URL (for example, `5731I000000PL9G` from `https://meya-dev-ed.my.salesforce.com/5731I000000PL9G`).
3. Copy and save it.
### Step 6: Enable the Salesforce Agent
1. Log in to the Platform.
2. Select the AI Agent to configure.
3. Navigate to **App Settings > Integrations > Agent Transfer > Chat** and click **Salesforce**.
4. On the **Configurations** tab, enter:
| Field | Description |
| --------------- | ------------------------------------- |
| Live Agent URL | Live agent API endpoint (from Step 2) |
| Organization ID | Salesforce org ID (from Step 3) |
| Deployment ID | Deployment ID (from Step 4) |
| Button ID | Button ID (from Step 5) |
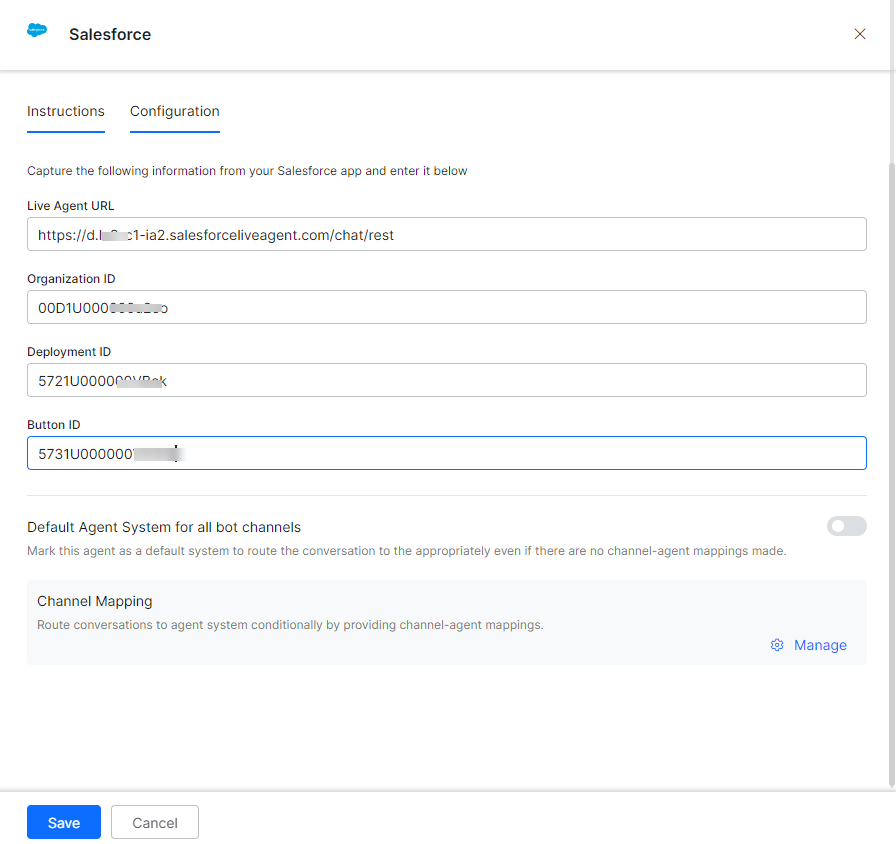 5. To make Salesforce the default agent, enable **Default Agent System for all bot channels**.
This option is only available when multiple agents are configured.
6. Click **Manage** to map channels.
5. To make Salesforce the default agent, enable **Default Agent System for all bot channels**.
This option is only available when multiple agents are configured.
6. Click **Manage** to map channels.
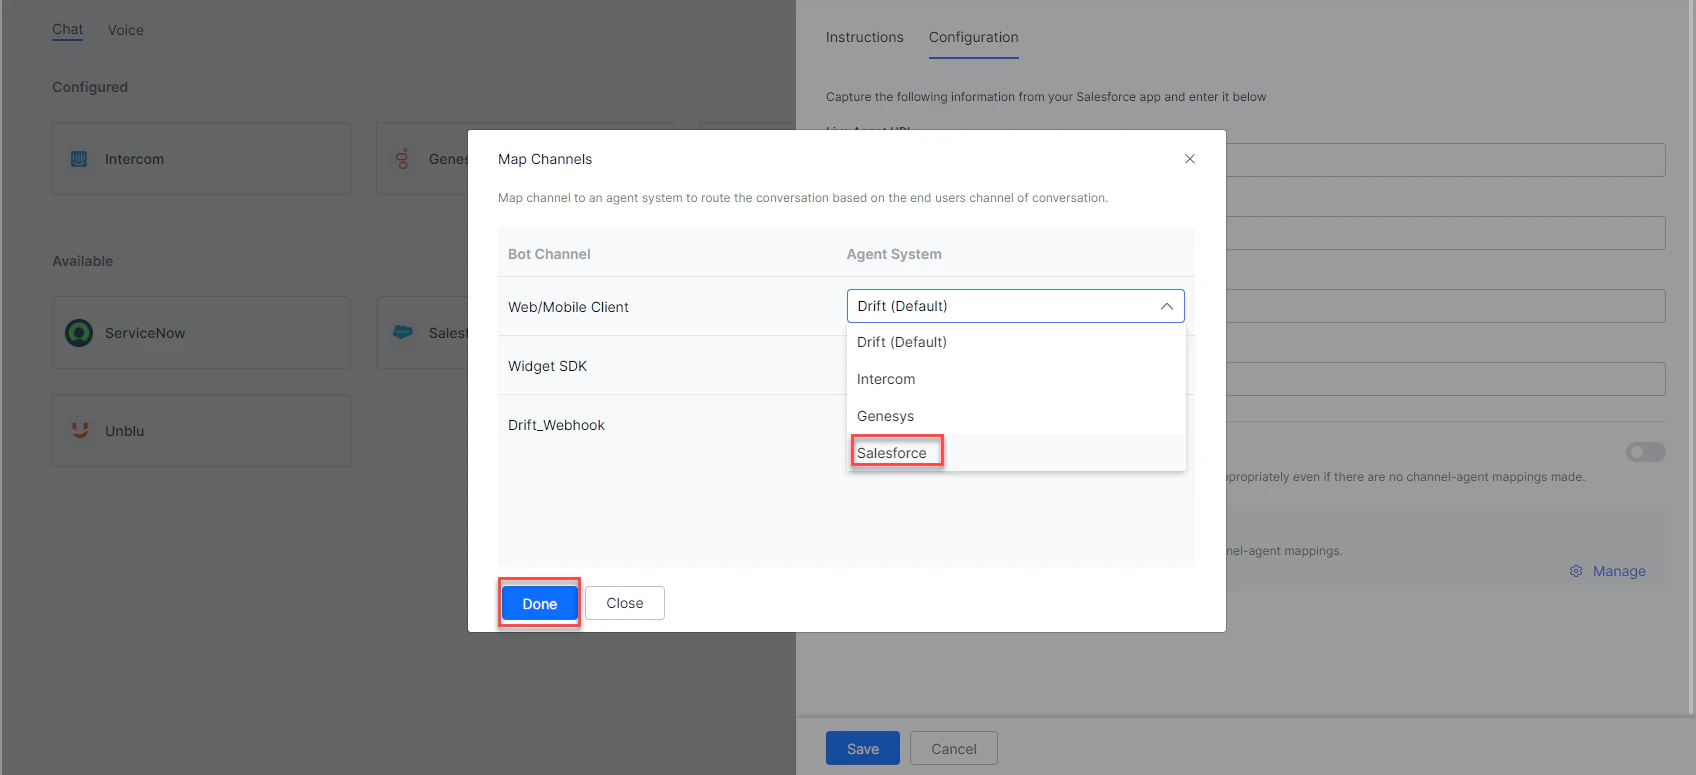 7. Click **Done**, then **Save**.
8. Publish the app. See [Publishing your App](/ai-for-service/deployment/publishing-app).
### Verify Live Chat Integration
1. Open the Salesforce Chat Console and launch the Live Agent from Step 1.
The Chat Console URL is unique to your region and company. Contact your Salesforce System Administrator for the URL.
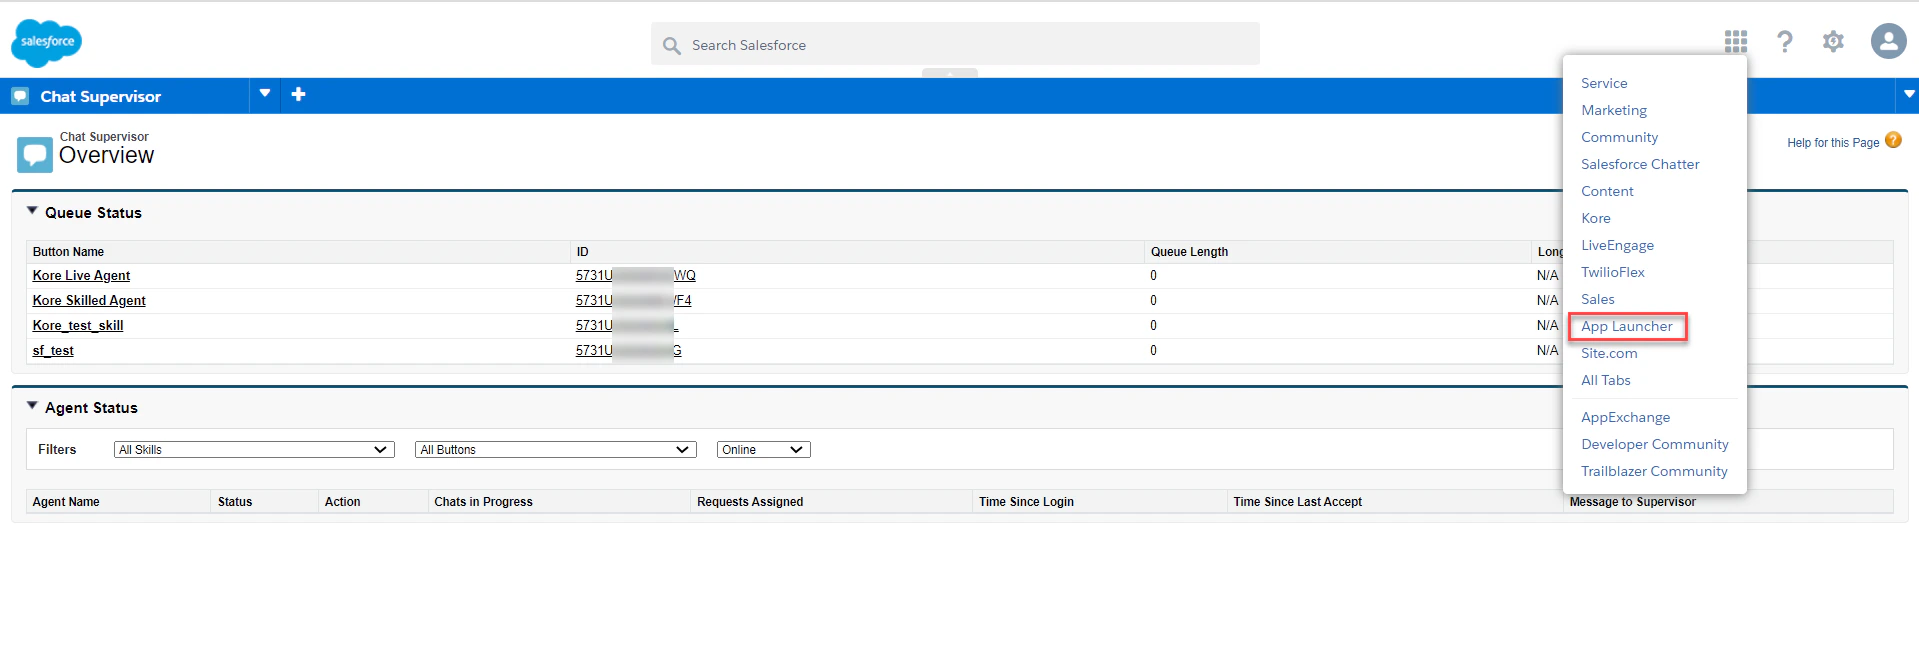
2. In Salesforce Classic Chat view, click **Apps** and select **App Launcher**.
7. Click **Done**, then **Save**.
8. Publish the app. See [Publishing your App](/ai-for-service/deployment/publishing-app).
### Verify Live Chat Integration
1. Open the Salesforce Chat Console and launch the Live Agent from Step 1.
The Chat Console URL is unique to your region and company. Contact your Salesforce System Administrator for the URL.
2. In Salesforce Classic Chat view, click **Apps** and select **App Launcher**.
 3. Click **Live Agent** to open the chat console.
 4. Open the AI Agent with Salesforce enabled.
5. Create an Agent Transfer Node task (for example, **Talk to Live Agent** with a **LiveChats** node configured to use Salesforce). See [Agent Transfer Node](/ai-for-service/automation/dialogs/node-types/agent-transfer-node).
4. Open the AI Agent with Salesforce enabled.
5. Create an Agent Transfer Node task (for example, **Talk to Live Agent** with a **LiveChats** node configured to use Salesforce). See [Agent Transfer Node](/ai-for-service/automation/dialogs/node-types/agent-transfer-node).
 6. Click **Talk to Bot** and enter **Help**.
7. When the transfer dialog is invoked, the Salesforce Chat Console receives a notification and the connection is established.
6. Click **Talk to Bot** and enter **Help**.
7. When the transfer dialog is invoked, the Salesforce Chat Console receives a notification and the connection is established.
 ***
## Configure Messaging for In-App and Web (MIAW)
### Step 1: Publish a Deployment
1. Complete the [Salesforce org preparation steps](https://help.salesforce.com/s/articleView?id=service.miaw_prepare_org_1.htm\&type=5):
* Configure Omni-Channel
* Create an Omni-Channel flow to route messages
* Create a Messaging for In-App and Web channel on the Messaging Settings page
* Configure the Service Console for messaging
2. In Setup, search for **Embedded Service Deployments** and select it.
3. Click **New Deployment > Messaging for In-App and Web > Next**.
4. Click **Custom Client > Next**.
5. Name the deployment and customize the API name if needed.
6. Select the Messaging channel you created earlier.
7. Click **Save** and wait for the deployment to publish. Don't navigate away.
### Step 2: Retrieve Organization ID, Base URL, and Developer Name
1. Log in to your Salesforce account.
2. Click your profile icon and select **Setup**.
3. Search for **Embedded Service Deployments** and select the Messaging Channel. Then select **Code Snippet**.
***
## Configure Messaging for In-App and Web (MIAW)
### Step 1: Publish a Deployment
1. Complete the [Salesforce org preparation steps](https://help.salesforce.com/s/articleView?id=service.miaw_prepare_org_1.htm\&type=5):
* Configure Omni-Channel
* Create an Omni-Channel flow to route messages
* Create a Messaging for In-App and Web channel on the Messaging Settings page
* Configure the Service Console for messaging
2. In Setup, search for **Embedded Service Deployments** and select it.
3. Click **New Deployment > Messaging for In-App and Web > Next**.
4. Click **Custom Client > Next**.
5. Name the deployment and customize the API name if needed.
6. Select the Messaging channel you created earlier.
7. Click **Save** and wait for the deployment to publish. Don't navigate away.
### Step 2: Retrieve Organization ID, Base URL, and Developer Name
1. Log in to your Salesforce account.
2. Click your profile icon and select **Setup**.
3. Search for **Embedded Service Deployments** and select the Messaging Channel. Then select **Code Snippet**.
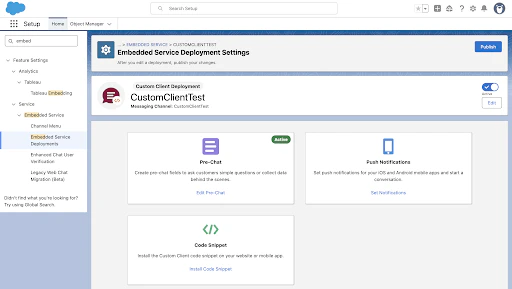 4. Copy the **Organization ID**, **Organization Base URL**, and **Developer Name** from the Code Snippet.
 ### Step 3: Enable the Salesforce Agent (MIAW)
1. Log in to the Platform.
2. Select the AI Agent to configure.
3. Navigate to **App Settings > Integrations > Agent Transfer > Chat** and click **Salesforce**.
4. On the **Configurations** tab, select **Messaging for In-App and Web (MIAW)** and enter:
| Field | Description |
| --------------------- | ------------------------------- |
| Organization ID | Salesforce org ID (from Step 2) |
| Organization Base URL | Base URL (from Step 2) |
| Developer Name | Developer name (from Step 2) |
### Step 3: Enable the Salesforce Agent (MIAW)
1. Log in to the Platform.
2. Select the AI Agent to configure.
3. Navigate to **App Settings > Integrations > Agent Transfer > Chat** and click **Salesforce**.
4. On the **Configurations** tab, select **Messaging for In-App and Web (MIAW)** and enter:
| Field | Description |
| --------------------- | ------------------------------- |
| Organization ID | Salesforce org ID (from Step 2) |
| Organization Base URL | Base URL (from Step 2) |
| Developer Name | Developer name (from Step 2) |
 5. To make Salesforce the default agent, enable **Default Agent System for all bot channels**.
This option is only available when multiple agents are configured.
6. Click **Manage** to map channels.
5. To make Salesforce the default agent, enable **Default Agent System for all bot channels**.
This option is only available when multiple agents are configured.
6. Click **Manage** to map channels.
 7. Click **Done**, then **Save**.
8. Publish the app. See [Publishing your App](/ai-for-service/deployment/publishing-app).
***
## Additional Capabilities (MIAW)
### Internal Agent Transfer and Conference Handling
* **Session Continuity**: Chat sessions remain active as long as at least one agent or the customer is engaged, decoupled from individual agent disconnections.
* **Seamless Transitions**: Uses Salesforce Server-Sent Events (SSE) to handle agent transfers, joins, and exits.
* **Transparent Communication**: Users receive real-time system messages during transfers and conferences.
### Agent Name Display
Salesforce automatically displays the human agent's name in the chat once they join.
### Read Receipts
Real-time read receipts are shown for both agent and user messages. Salesforce triggers agent-to-user read receipts through events.
### Inactivity Session Closure
Configure automatic session end after a specified user inactivity duration. See [Automatically Mark Messaging Sessions Inactive](https://help.salesforce.com/s/articleView?id=release-notes.rn_miaw_automatic_inactive.htm\&release=244\&type=5).
### Configurable Standard Responses
Configure system messages displayed during agent handoffs and live chat sessions (wait time alerts, agent join messages, session closure prompts). See [Auto-Response Components](https://help.salesforce.com/s/articleView?id=service.messaging_components_auto_response.htm\&type=5).
### Conversation Stop Word Configuration
Configure a keyword that allows end-users to end live agent sessions from the Salesforce console. See [Customize the Messaging](https://help.salesforce.com/s/articleView?id=service.messaging_consent_status.htm\&type=5).
### Salesforce MIAW Conversation ID
The Salesforce MIAW conversation ID is available in the bot user context during agent transfer:
```
context.session.BotUserSession.agentHandoffMeta.conversationId
```
Use this in Message, Script, and Call Flow nodes, or external integrations, for tracking, correlation, and conditional logic.
### Real-Time Queue Position
End users waiting for a live agent can see their current position in the Salesforce MIAW queue directly in the chat window. The position updates automatically as the queue moves, helping users track their wait and reducing drop-off.
To set up queue position in Salesforce, see [Show Customers Their Queue Position in the Messaging Window](https://help.salesforce.com/s/articleView?id=service.miaw_show_queue_position.htm\&type=5).
### Pass Metadata to the Salesforce Agent
The platform automatically transfers user context to Salesforce agents during handoffs. Customize which metadata is passed using a Script node before the Agent Transfer node.
**Sample script:**
```json theme={null}
let miawMetaInfo = {};
miawMetaInfo.preChatInfo = {
"Pincode": "50xxxx",
"City": "Hyderabad",
"Country": "India"
};
context.session.BotUserSession.miawMetaInfo = miawMetaInfo;
```
To populate metadata on the Salesforce dashboard, complete these steps in order:
#### Step 1: Configure Salesforce Agent in AI for Service
1. Navigate to **App Settings > Integrations > Agent Transfer > Chat > Salesforce**.
2. Select **Messaging for In-App and Web (MIAW)** and enter:
* **Organization ID**
* **Organization Base URL**
If your base URL is `example.my.salesforce.com`, enter it as `https://example.my.salesforce-srct.com`.
* **Developer Name**
3. Click **Save**.
4. In Dialogflow, insert a **Script Node** before the Agent Transfer Node.
5. Use the sample script above to configure metadata as key-value pairs.
#### Step 2: Update Messaging Session Object in Salesforce
1. Log in to your Salesforce account.
2. Navigate to **Object Manager > Messaging Session > Fields & Relationships**.
3. Click **New** to create a custom field.
4. Select the data type and click **Next**.
5. Enter **Field Label**, **Length**, and **Field Name**. Click **Next**.
7. Click **Done**, then **Save**.
8. Publish the app. See [Publishing your App](/ai-for-service/deployment/publishing-app).
***
## Additional Capabilities (MIAW)
### Internal Agent Transfer and Conference Handling
* **Session Continuity**: Chat sessions remain active as long as at least one agent or the customer is engaged, decoupled from individual agent disconnections.
* **Seamless Transitions**: Uses Salesforce Server-Sent Events (SSE) to handle agent transfers, joins, and exits.
* **Transparent Communication**: Users receive real-time system messages during transfers and conferences.
### Agent Name Display
Salesforce automatically displays the human agent's name in the chat once they join.
### Read Receipts
Real-time read receipts are shown for both agent and user messages. Salesforce triggers agent-to-user read receipts through events.
### Inactivity Session Closure
Configure automatic session end after a specified user inactivity duration. See [Automatically Mark Messaging Sessions Inactive](https://help.salesforce.com/s/articleView?id=release-notes.rn_miaw_automatic_inactive.htm\&release=244\&type=5).
### Configurable Standard Responses
Configure system messages displayed during agent handoffs and live chat sessions (wait time alerts, agent join messages, session closure prompts). See [Auto-Response Components](https://help.salesforce.com/s/articleView?id=service.messaging_components_auto_response.htm\&type=5).
### Conversation Stop Word Configuration
Configure a keyword that allows end-users to end live agent sessions from the Salesforce console. See [Customize the Messaging](https://help.salesforce.com/s/articleView?id=service.messaging_consent_status.htm\&type=5).
### Salesforce MIAW Conversation ID
The Salesforce MIAW conversation ID is available in the bot user context during agent transfer:
```
context.session.BotUserSession.agentHandoffMeta.conversationId
```
Use this in Message, Script, and Call Flow nodes, or external integrations, for tracking, correlation, and conditional logic.
### Real-Time Queue Position
End users waiting for a live agent can see their current position in the Salesforce MIAW queue directly in the chat window. The position updates automatically as the queue moves, helping users track their wait and reducing drop-off.
To set up queue position in Salesforce, see [Show Customers Their Queue Position in the Messaging Window](https://help.salesforce.com/s/articleView?id=service.miaw_show_queue_position.htm\&type=5).
### Pass Metadata to the Salesforce Agent
The platform automatically transfers user context to Salesforce agents during handoffs. Customize which metadata is passed using a Script node before the Agent Transfer node.
**Sample script:**
```json theme={null}
let miawMetaInfo = {};
miawMetaInfo.preChatInfo = {
"Pincode": "50xxxx",
"City": "Hyderabad",
"Country": "India"
};
context.session.BotUserSession.miawMetaInfo = miawMetaInfo;
```
To populate metadata on the Salesforce dashboard, complete these steps in order:
#### Step 1: Configure Salesforce Agent in AI for Service
1. Navigate to **App Settings > Integrations > Agent Transfer > Chat > Salesforce**.
2. Select **Messaging for In-App and Web (MIAW)** and enter:
* **Organization ID**
* **Organization Base URL**
If your base URL is `example.my.salesforce.com`, enter it as `https://example.my.salesforce-srct.com`.
* **Developer Name**
3. Click **Save**.
4. In Dialogflow, insert a **Script Node** before the Agent Transfer Node.
5. Use the sample script above to configure metadata as key-value pairs.
#### Step 2: Update Messaging Session Object in Salesforce
1. Log in to your Salesforce account.
2. Navigate to **Object Manager > Messaging Session > Fields & Relationships**.
3. Click **New** to create a custom field.
4. Select the data type and click **Next**.
5. Enter **Field Label**, **Length**, and **Field Name**. Click **Next**.
 6. Set visibility and read-only options as needed. Click **Next**.
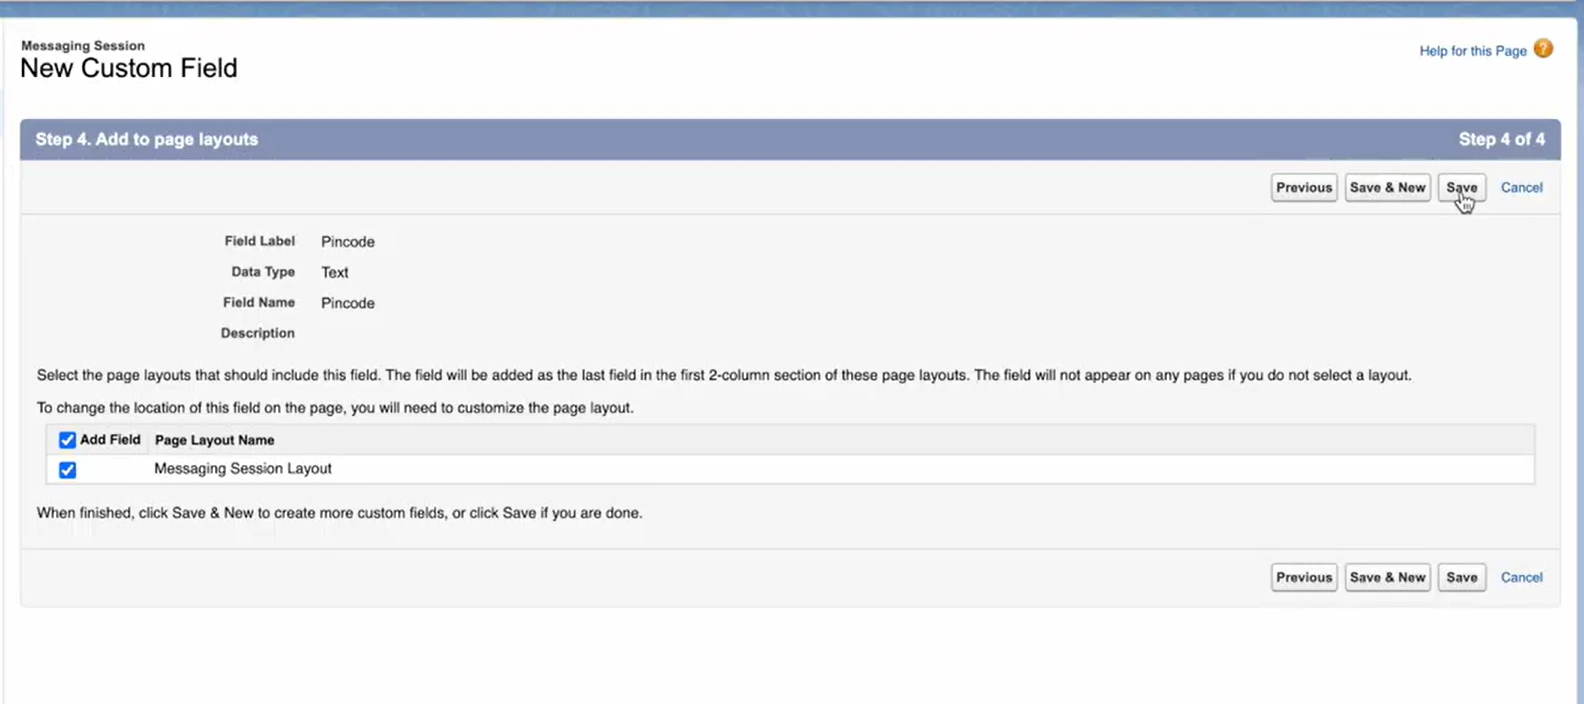
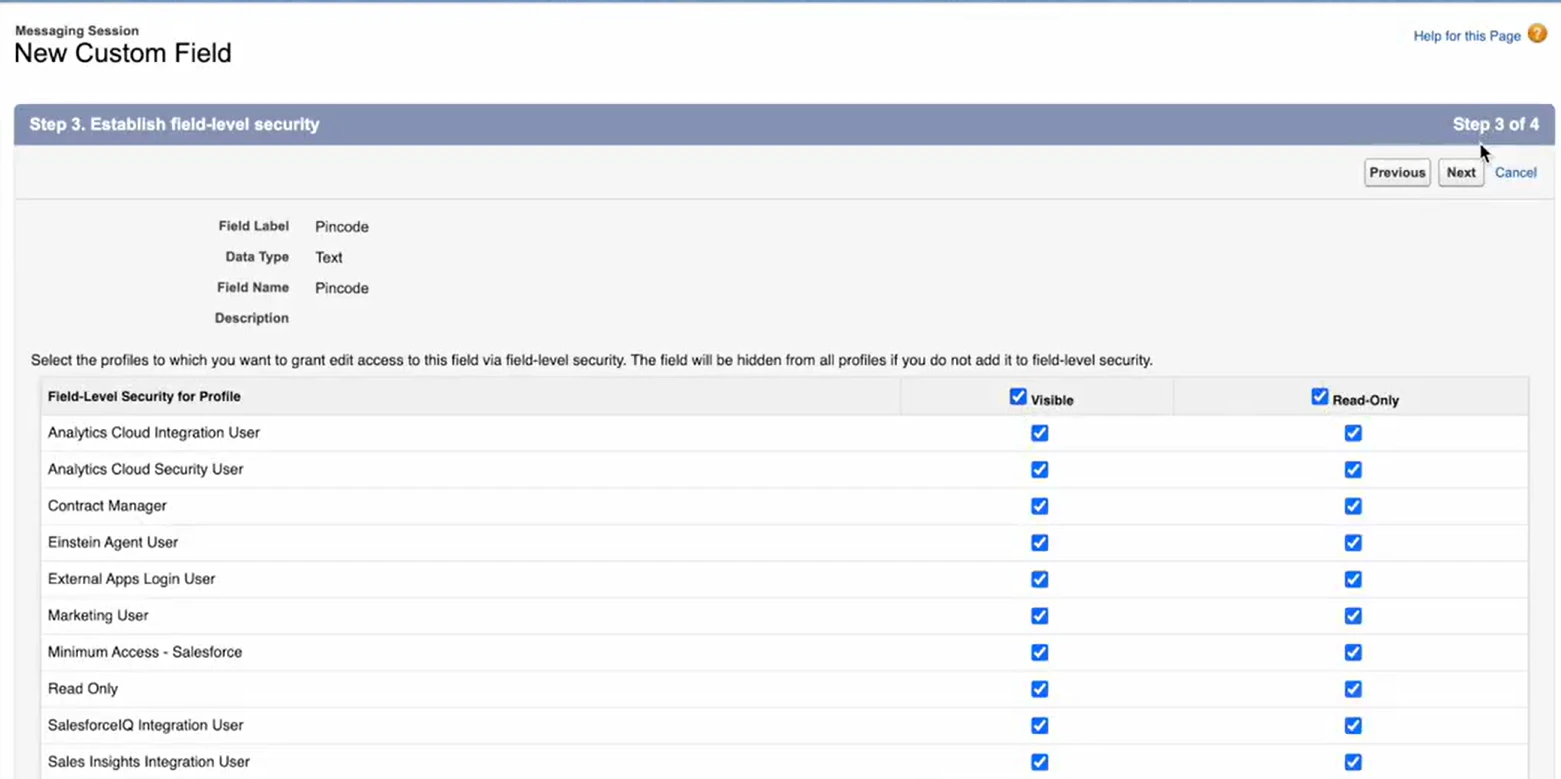 7. Click **Save**. Repeat for each metadata field.
 #### Step 3: Map Custom Parameter in Salesforce
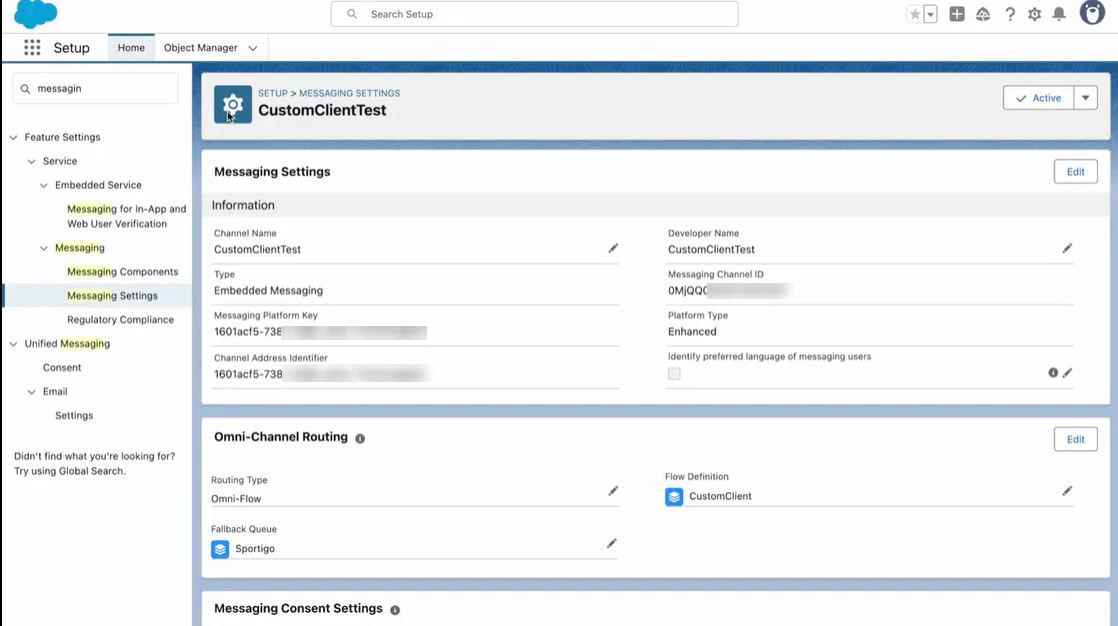
1. Navigate to **Feature Settings > Service > Messaging > Messaging Settings**.
2. Select the Messaging Channel to configure (for example, `CustomClientTest`).
#### Step 3: Map Custom Parameter in Salesforce
1. Navigate to **Feature Settings > Service > Messaging > Messaging Settings**.
2. Select the Messaging Channel to configure (for example, `CustomClientTest`).
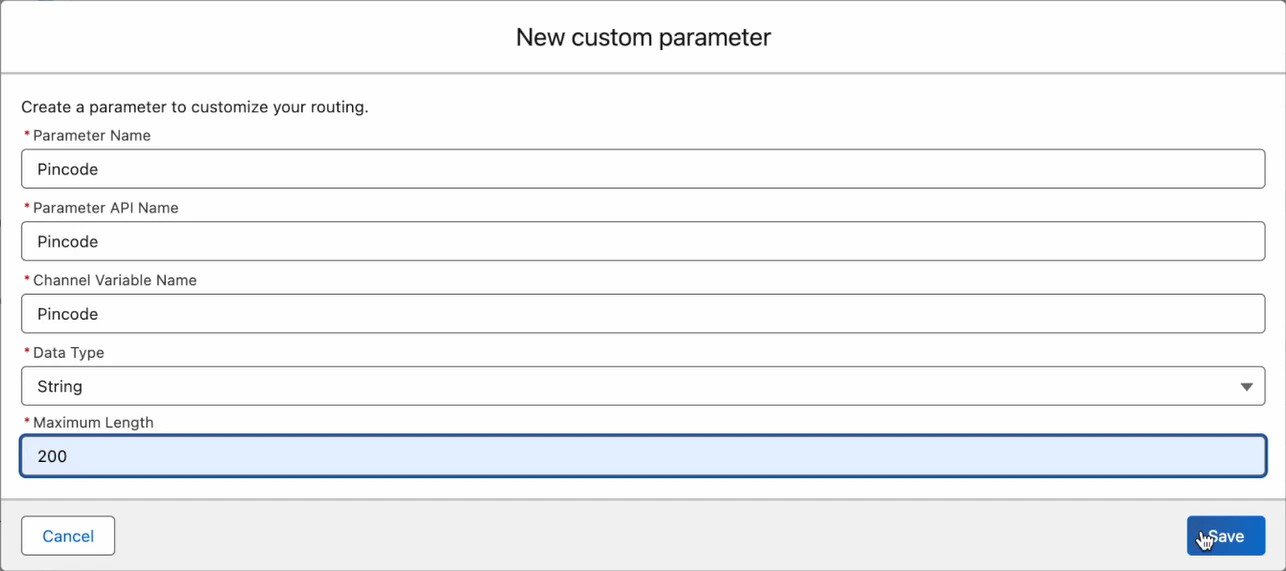
 3. Under **Custom Parameter**, click **New map parameter**.
4. Enter **Parameter Name**, **Parameter API Name**, **Channel Variable Name**, **Data Type**, and **Maximum Length**. Click **Save**.
3. Under **Custom Parameter**, click **New map parameter**.
4. Enter **Parameter Name**, **Parameter API Name**, **Channel Variable Name**, **Data Type**, and **Maximum Length**. Click **Save**.
 5. Under **Parameter Mappings**, click **New** to add the parameter to a flow or agent task.
6. Enter the **Parameter** and **Flow Variable Name**. Click **Save**.
5. Under **Parameter Mappings**, click **New** to add the parameter to a flow or agent task.
6. Enter the **Parameter** and **Flow Variable Name**. Click **Save**.
 7. Scroll to the top and click **Active**.
#### Step 4: Add Pre-Chat Field in Embedded Service Deployment
1. Navigate to **Feature Settings > Service > Embedded Service > Embedded Service Deployments**.
2. Click the Messaging Channel and then **Edit Pre-Chat**.
7. Scroll to the top and click **Active**.
#### Step 4: Add Pre-Chat Field in Embedded Service Deployment
1. Navigate to **Feature Settings > Service > Embedded Service > Embedded Service Deployments**.
2. Click the Messaging Channel and then **Edit Pre-Chat**.
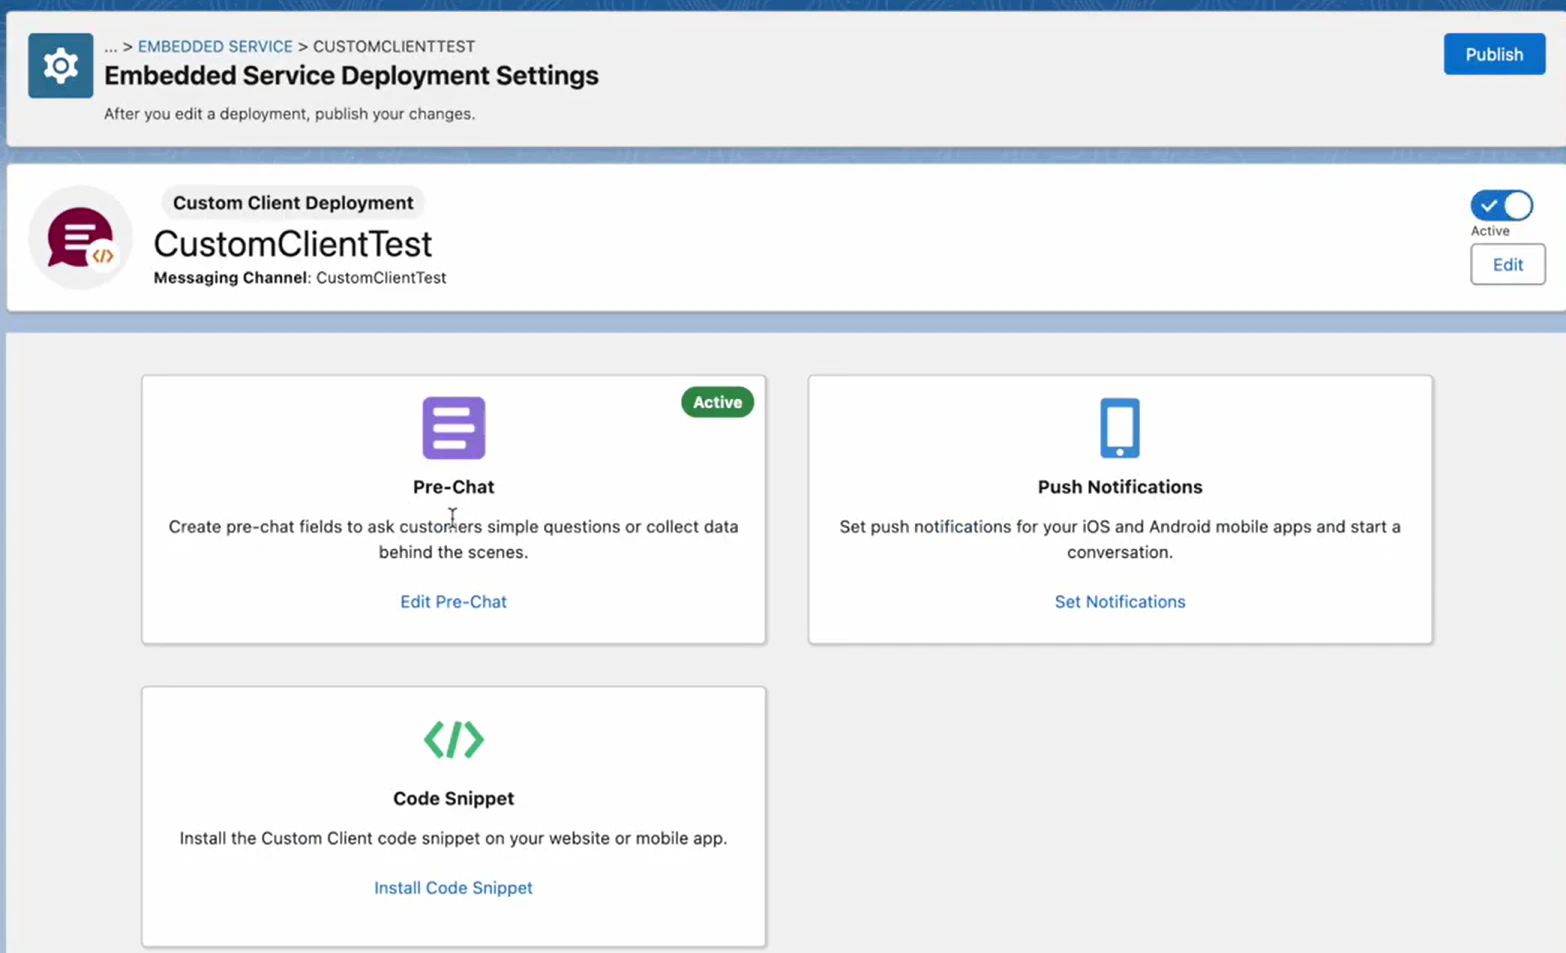 3. In the **Visible Pre-Chat Fields** section, click **Add**. Select the field type to add the custom field from the Hidden Pre-Chat Fields section.
 4. Select the **Field Type** and **Channel Variable Name**. Click **Save**.
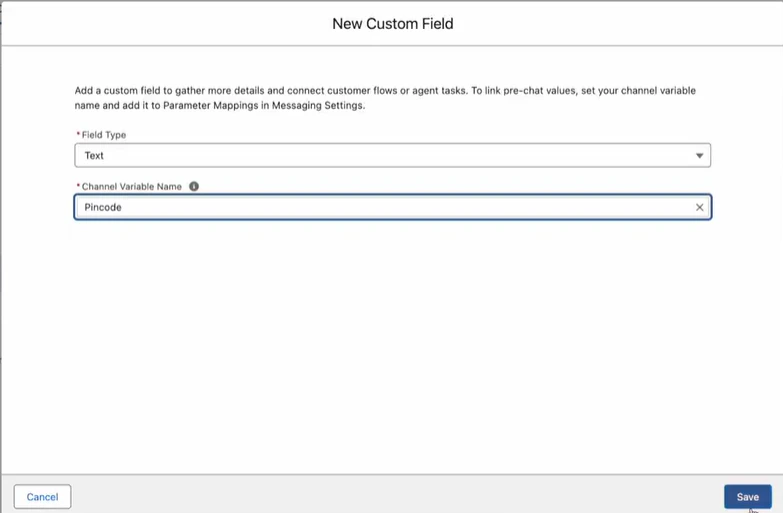 5. Optionally mark the field as required. Click **Save**.
6. Click **Publish** in the top-right corner.
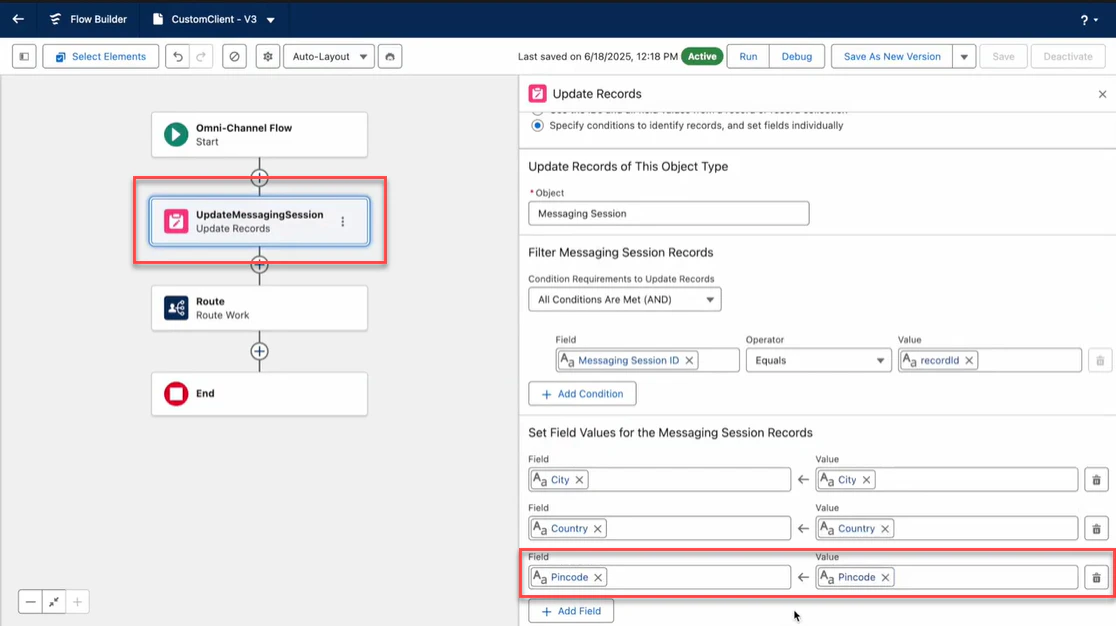
#### Step 5: Create a Flow to Update Messaging Session
1. Navigate to **Process Automation > Flows**.
2. Select the configured flow for the Messaging Channel or create a new one.
5. Optionally mark the field as required. Click **Save**.
6. Click **Publish** in the top-right corner.
#### Step 5: Create a Flow to Update Messaging Session
1. Navigate to **Process Automation > Flows**.
2. Select the configured flow for the Messaging Channel or create a new one.
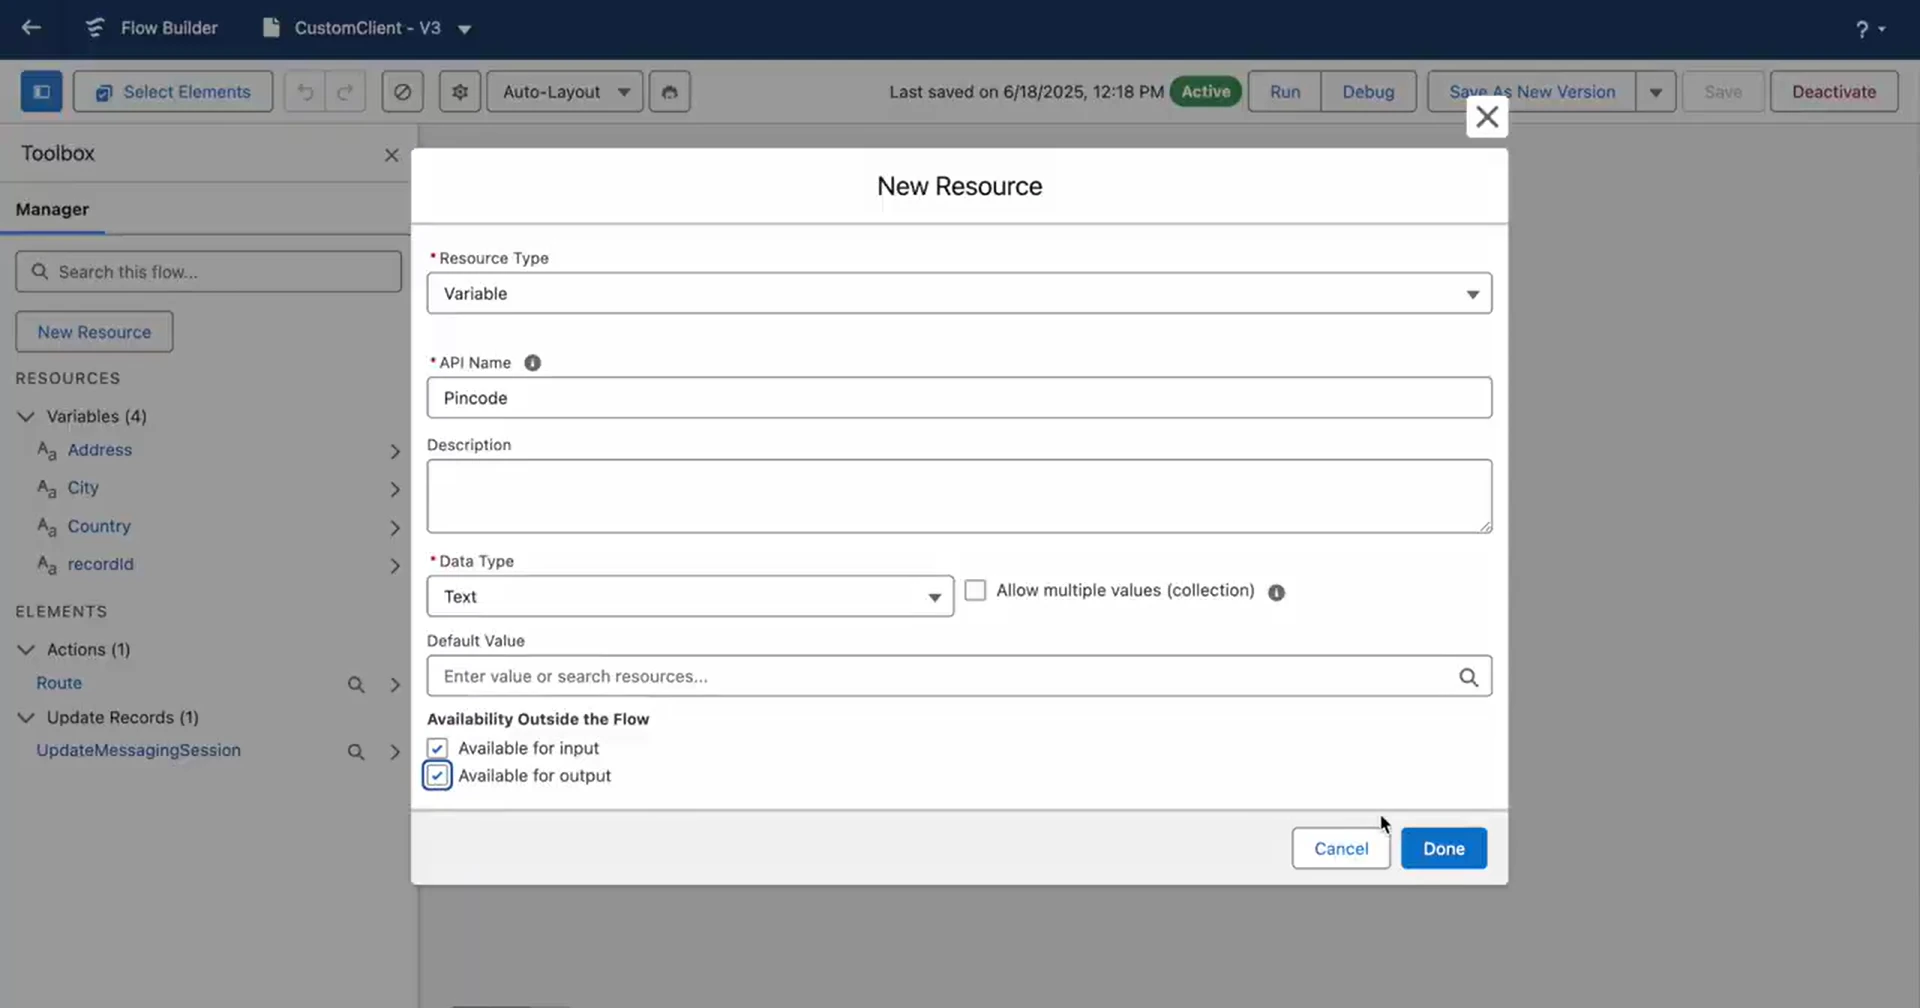 3. In the Toolbox, click **New Resource**. Select **Resource Type**, **API Name**, **Data Type**, and **Availability Flow**. Click **Done**.
Ensure the flow variable matches the API name of your custom Messaging Session field. This enables seamless metadata transfer from the platform to Salesforce.
4. Click **Update Records** and set the field values for the messaging session records.
3. In the Toolbox, click **New Resource**. Select **Resource Type**, **API Name**, **Data Type**, and **Availability Flow**. Click **Done**.
Ensure the flow variable matches the API name of your custom Messaging Session field. This enables seamless metadata transfer from the platform to Salesforce.
4. Click **Update Records** and set the field values for the messaging session records.
 5. Save as a **New version** and click **Activate**.