> ## Documentation Index
> Fetch the complete documentation index at: https://koreai.mintlify.site/llms.txt
> Use this file to discover all available pages before exploring further.
# BotKit SDK Tutorial — Agent Transfer
This tutorial walks through setting up and running the BotKit SDK with live agent transfer using LiveChat. You will install the Airlines Travel Planning sample assistant, configure agent transfer, and test the full flow.
This tutorial may require a newer version of the BotKit SDK. If the downloaded files don't include `LiveChat.js` and `LiveChatAPI.js`, contact support.
***
## Prerequisites
| Prerequisite | Notes |
| -------------------- | ------------------------------------------------------------ |
| **LiveChat account** | Free 30-day trial is available. You need the license number. |
| **ngrok** | Simulates your callback server on localhost. |
| **Node.js** | Version 10 or above. Required to run the BotKit SDK. |
Install the `url-template` and `node-schedule` Node modules (and any other modules referenced in the LiveChat JS files).
### Get Your LiveChat License ID
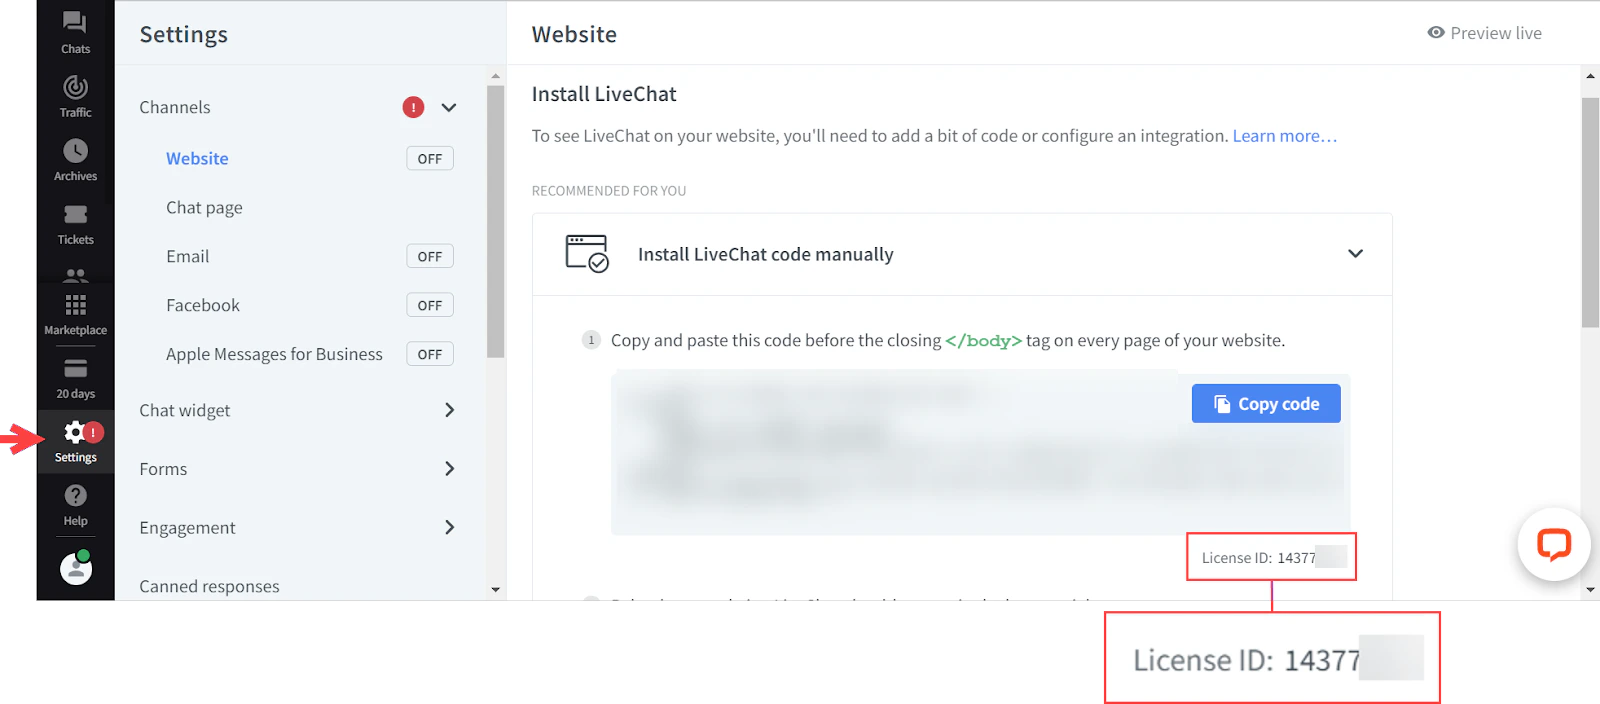
1. Log into your LiveChat account and open **Settings**.
2. On the **Website Channel Settings** page, find the **License ID** under the manual install section.
 ### Install and Run ngrok
1. Download ngrok from [ngrok.com/download](https://ngrok.com/download).
2. Start ngrok on port 8003:
```bash theme={null}
ngrok http 8003
```
### Install and Run ngrok
1. Download ngrok from [ngrok.com/download](https://ngrok.com/download).
2. Start ngrok on port 8003:
```bash theme={null}
ngrok http 8003
```
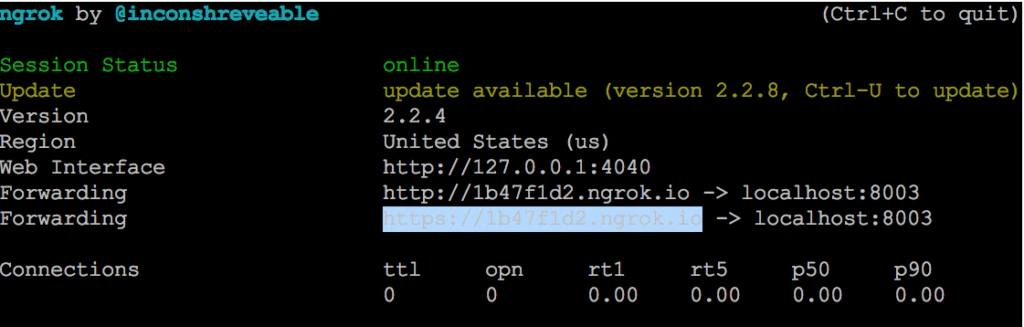 3. Copy the HTTPS **Forwarding URL** (for example, `https://1b47f1d2.ngrok.io`). Leave ngrok running.
### Install Node.js
1. Download from [nodejs.org/en/download](https://nodejs.org/en/download/).
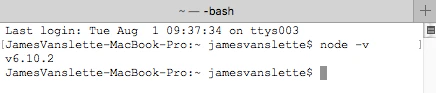
2. Verify the installation:
```bash theme={null}
node -v
```
3. Copy the HTTPS **Forwarding URL** (for example, `https://1b47f1d2.ngrok.io`). Leave ngrok running.
### Install Node.js
1. Download from [nodejs.org/en/download](https://nodejs.org/en/download/).
2. Verify the installation:
```bash theme={null}
node -v
```
 ***
## Configure the Assistant
### Install the Airlines Travel Planning Assistant
1. Log into XO Platform and click **New Bot > Start from the Store**.
2. Find **Airlines Travel Planning** and click **Install**.
3. After installation, create an **Agent Transfer** dialog task. See [Dialog Builder](/ai-for-service/automation/agent-flows#dialog-tasks) and [Agent Transfer Node](/ai-for-service/automation/dialogs/node-types/agent-transfer-node).
### Register Your App and Generate Credentials
1. In the XO Platform, go to **Build > Integrations > BotKit**.
RS256 and RS512 JWT signing algorithms aren't supported for BotKit.
2. Click **Add** next to the **App name** dropdown, enter a name, and click **Next**.
3. Copy the **Client ID** and **Client Secret**. Click **Done**.
4. In **Callback URL**, paste the ngrok Forwarding URL (for example, `https://1bXXXXd2.ngrok.io`).
Each ngrok session generates a new URL. Update the Callback URL field whenever you restart ngrok.
5. In **Events**, select:
* **OnMessage** — Triggered when a user message is received.
* **OnAgentTransferNode** — Triggered when an Agent Transfer node is reached.
6. Click **Save**. The Successfully subscribed message appears.
***
## Publish the Assistant
Publishing is required to share the assistant with other users. For testing only, skip to [Configure the BotKit SDK](#configure-the-botkit-sdk).
For publishing steps, see [Publishing your App](/ai-for-service/deployment/publishing-app).
**After publishing, deploy in the Admin Console:**
* **Enterprise Users** — Go to **Bots Management > Enterprise Bots**, click **Ellipses > Manage bot tasks**, select all tasks, and assign the bot to users via **Bot & task assignments**.
* **General Public** — Go to **Bots Management > Consumer Bots**, click **Ellipses > Manage bot tasks**, and select all tasks.
***
## Configure the BotKit SDK
1. Download and extract the BotKit SDK from [github.com/Koredotcom/BotKit](https://github.com/Koredotcom/BotKit). Verify that `LiveChat.js` and `LiveChatAPI.js` are included.
2. Edit `config.json` with your credentials:
```json theme={null}
{
"server": { "port": 8003 },
"app": {
"apiPrefix": "",
"url": ""
},
"credentials": {
"apikey": "",
"appId": ""
},
"redis": { "options": { "host": "localhost", "port": 6379 }, "available": false },
"examples": { "mockServicesHost": "https://localhost:8004" },
"liveagentlicense": ""
}
```
3. In both `LiveChat.js` and `LiveChatAPI.js`, update the following variables with your assistant's **Bot Name** and **Bot ID** (found in **Configurations > General Settings**):
```javascript theme={null}
var botId = "st-26cfae3a-XXXX-XXXX-991a-376b7fe579d5";
var botName = "Airlines Travel Planning_KORE ADMIN_10";
```
***
## Start and Test
1. In a Terminal window, navigate to your BotKit SDK folder and run:
```bash theme={null}
node app.js
```
Expected output: `app listening at https://:::8003`
2. **Testing checklist:**
* ngrok running: `ngrok http 8003`
* Node.js running: `node app.js`
* LiveChat: logged in, **Chat** page open
* XO Platform: click **Talk to Bot** (bottom-right corner of any page)
3. After the Agent Transfer dialog triggers, messages are exchanged between LiveChat and the BotKit SDK.
***
## Next Steps
For production use, replace the ngrok Callback URL with your actual server URL. Have your Enterprise Admin publish and deploy the assistant to users.
***
***
## Configure the Assistant
### Install the Airlines Travel Planning Assistant
1. Log into XO Platform and click **New Bot > Start from the Store**.
2. Find **Airlines Travel Planning** and click **Install**.
3. After installation, create an **Agent Transfer** dialog task. See [Dialog Builder](/ai-for-service/automation/agent-flows#dialog-tasks) and [Agent Transfer Node](/ai-for-service/automation/dialogs/node-types/agent-transfer-node).
### Register Your App and Generate Credentials
1. In the XO Platform, go to **Build > Integrations > BotKit**.
RS256 and RS512 JWT signing algorithms aren't supported for BotKit.
2. Click **Add** next to the **App name** dropdown, enter a name, and click **Next**.
3. Copy the **Client ID** and **Client Secret**. Click **Done**.
4. In **Callback URL**, paste the ngrok Forwarding URL (for example, `https://1bXXXXd2.ngrok.io`).
Each ngrok session generates a new URL. Update the Callback URL field whenever you restart ngrok.
5. In **Events**, select:
* **OnMessage** — Triggered when a user message is received.
* **OnAgentTransferNode** — Triggered when an Agent Transfer node is reached.
6. Click **Save**. The Successfully subscribed message appears.
***
## Publish the Assistant
Publishing is required to share the assistant with other users. For testing only, skip to [Configure the BotKit SDK](#configure-the-botkit-sdk).
For publishing steps, see [Publishing your App](/ai-for-service/deployment/publishing-app).
**After publishing, deploy in the Admin Console:**
* **Enterprise Users** — Go to **Bots Management > Enterprise Bots**, click **Ellipses > Manage bot tasks**, select all tasks, and assign the bot to users via **Bot & task assignments**.
* **General Public** — Go to **Bots Management > Consumer Bots**, click **Ellipses > Manage bot tasks**, and select all tasks.
***
## Configure the BotKit SDK
1. Download and extract the BotKit SDK from [github.com/Koredotcom/BotKit](https://github.com/Koredotcom/BotKit). Verify that `LiveChat.js` and `LiveChatAPI.js` are included.
2. Edit `config.json` with your credentials:
```json theme={null}
{
"server": { "port": 8003 },
"app": {
"apiPrefix": "",
"url": ""
},
"credentials": {
"apikey": "",
"appId": ""
},
"redis": { "options": { "host": "localhost", "port": 6379 }, "available": false },
"examples": { "mockServicesHost": "https://localhost:8004" },
"liveagentlicense": ""
}
```
3. In both `LiveChat.js` and `LiveChatAPI.js`, update the following variables with your assistant's **Bot Name** and **Bot ID** (found in **Configurations > General Settings**):
```javascript theme={null}
var botId = "st-26cfae3a-XXXX-XXXX-991a-376b7fe579d5";
var botName = "Airlines Travel Planning_KORE ADMIN_10";
```
***
## Start and Test
1. In a Terminal window, navigate to your BotKit SDK folder and run:
```bash theme={null}
node app.js
```
Expected output: `app listening at https://:::8003`
2. **Testing checklist:**
* ngrok running: `ngrok http 8003`
* Node.js running: `node app.js`
* LiveChat: logged in, **Chat** page open
* XO Platform: click **Talk to Bot** (bottom-right corner of any page)
3. After the Agent Transfer dialog triggers, messages are exchanged between LiveChat and the BotKit SDK.
***
## Next Steps
For production use, replace the ngrok Callback URL with your actual server URL. Have your Enterprise Admin publish and deploy the assistant to users.
***