> ## Documentation Index
> Fetch the complete documentation index at: https://koreai.mintlify.site/llms.txt
> Use this file to discover all available pages before exploring further.
# Web SDK Tutorial
[Back to Web SDK Overview](/ai-for-service/sdk/web-sdk)
This tutorial walks through setting up the Kore.ai Web SDK in a React application with a local JWT server. By the end, you will have a working chat window on your localhost connected to a Platform bot.
***
## Overview
**Steps:**
1. Create a bot on the Platform.
2. Configure the Web/Mobile Client channel and create a Client JWT App.
3. Publish the bot.
4. Install Node.js and set up the JWT generation service.
5. Create a React application and install the Web SDK.
6. Configure and launch the SDK.
***
## Step 1 — Create and Configure the Bot
1. Log into the Platform and click **New App** to create a bot.
2. Go to **Flows & Channels > Digital > Web/Mobile Client**. See [Web/Mobile Client channel setup](/ai-for-service/channels/add-web-mobile-client#add-webmobile-client-channel) for full details.
3. Click **JWT App Details > Add**. The **Create New Client JWT App** dialog opens.
4. Enter a name (for example, `My SDK Client App`) and select **HS256** as the JWT signing algorithm. Click **Create**.
5. Select the newly created app in the **Select JWT App** dropdown and click **Save**.
By default, the bot's Target Audience is **Enterprise Users**. You can change this to **General Public** before publishing — it can't be changed after.
6. Return to **Web/Mobile Client > JWT App Details** and note:
* Bot Name
* Bot ID
* Client ID
* Client Secret
***
## Step 2 — Publish the Bot
1. Go to **Deploy > Deploy Management > Publish**.
2. Select all tasks, click **Proceed**, enter a comment, and **Confirm**.
3. If your deployment is managed by an Enterprise Admin, ask them to approve the request in the Admin Console under **Apps Management > Deployment requests**.
***
## Step 3 — Set Up the JWT Server
1. Install [Node.js](https://nodejs.org/en/download/) and verify:
```bash theme={null}
node -v
```
2. Download and extract the [SDKApp](https://s3.amazonaws.com/static-kore/downloads/SDKApp.zip) JWT server.
3. In `routes/users.js`, configure the Client ID and Client Secret from the Web/Mobile Client channel:
```json theme={null}
router.post('/', function(req, res, next) {
let identity = req.body.identity;
let clientId = process.env.CLIENT_ID;
let clientSecret = process.env.CLIENT_SECRET;
let isAnonymous = req.body.isAnonymous || false;
let aud = req.body.aud || "https://idproxy.kore.com/authorize";
let options = {
"iat": new Date().getTime(),
"exp": new Date(new Date().getTime() + 24 * 60 * 60 * 1000).getTime(),
"aud": aud,
"iss": clientId,
"sub": identity,
"isAnonymous": isAnonymous
};
let token = jwt.sign(options, clientSecret);
res.send({"jwt": token});
});
```
4. Start the JWT server:
```bash theme={null}
node startServer
```
***
## Step 4 — Integrate the Web SDK in React
1. Create a React app following the [Official React Docs](https://react.dev/learn/creating-a-react-app).
2. Install the Kore Web SDK from npm:
```bash theme={null}
npm i kore-web-sdk
```
3. In `App.js` or `page.tsx`, import and configure the SDK:
```javascript theme={null}
import { chatConfig, chatWindow } from "kore-web-sdk";
let chatWindowInstance = new chatWindow();
let botOptions = chatConfig.botOptions;
botOptions.koreAPIUrl = "https://platform.kore.ai/api/";
botOptions.userIdentity = "user@example.com"; // unique identifier
botOptions.botInfo = { name: "Sample App Name", "_id": "st-xxxxx-xxx-xxxx-xxxx-xxxxxxxxx" };
```
4. Set up the JWT assertion function:
```javascript theme={null}
chatConfig.JWTAsertion = function(commitJWT) {
let payload = { "identity": "user@example.com" };
fetch('http://localhost:7000/api/users/sts/', {
headers: { "content-type": "application/json" },
body: JSON.stringify(payload),
method: "POST"
})
.then(res => res.ok ? res.json() : Promise.reject(new Error('JWT request failed')))
.then(res => {
chatWindowInstance.setJWT(res.jwt); // JWT from your server
commitJWT(); // Required callback
})
.catch(err => console.log(err));
};
```
The URL above points to your local JWT server. In production, replace it with your server's API endpoint.
5. Configure optional SDK settings:
```javascript theme={null}
chatConfig.history.recent.batchSize = 15;
```
6. Launch the chat window:
```javascript theme={null}
chatWindowInstance.show(chatConfig);
```
7. Start the React app:
```bash theme={null}
npm start
```
8. Open `http://localhost:3000` in a browser. The Web SDK chat window loads.
***
## Passing Custom Data
Pass additional user data (phone number, address, etc.) via `customData`:
```javascript theme={null}
botOptions.botInfo.customData = {
"name": "John",
"age": 30,
"cars": { "car1": "Ford", "car2": "BMW", "car3": "Fiat" }
};
```
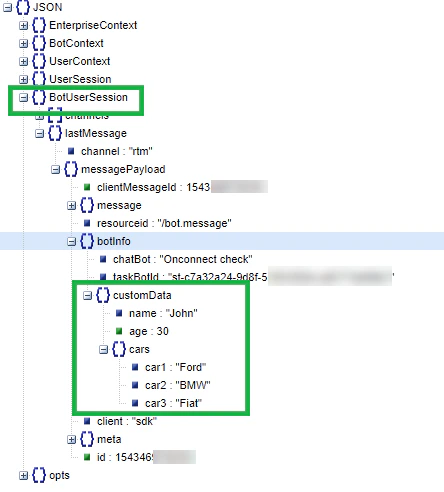 `customData` is accessible in the dialog context at `lastMessage` under `BotUserSession`. It persists for the user session.
***
## Passing Mapped Identities
Use `identityToMerge` in the JWT payload when a user transitions from anonymous to known (for example, after logging in). The Platform merges conversation history under the new identity.
```json theme={null}
{
"iat": 1611810186883,
"exp": 1611813786.883,
"aud": "https://idproxy.kore.com/authorize",
"iss": "cs-d3042d3e-7da4-55da-a94d-78334927xxxx",
"sub": "john.doe@example.com",
"isAnonymous": "false",
"identityToMerge": "john.doe@example.com"
}
```
**Identity merge behavior:**
| Scenario | Result |
| ------------------------------------- | --------------------------------------------------------------------------------------------------------------- |
| Neither identity exists | New identity created; new conversation started |
| New identity exists, merged doesn't | Conversation started/continued with new identity |
| Merged identity exists, new doesn't | New identity created; conversation continues; merged identity removed |
| Both exist, new has no active session | Conversation continues with new identity; merged identity removed |
| Both exist, both have active sessions | Merged identity's conversation continues under new identity; new identity's active session closed as "Drop-off" |
**Side effects of merging:**
* Analytics and chat history are updated to associate merged identity sessions with the new identity.
* Billing session tracking updates to the new identity.
***
## Custom Meta Tags
Add session, user, and message-level meta tags from the Web SDK (available since v8.0):
```javascript theme={null}
botOptions.botInfo = {
name: "",
"_id": "",
customData: { "name": "John" },
"metaTags": {
"messageLevelTags": [{ "name": "tag1", "value": "message" }],
"sessionLevelTags": [{ "name": "tag2", "value": "session" }],
"userLevelTags": [{ "name": "tag3", "value": "user" }]
}
};
```
***
## Troubleshooting
* Verify that the **Client ID** and **Client Secret** in the JWT server match the values from the Web/Mobile Client channel.
* Ensure all required JWT payload fields are included when generating the token.
***
## Next Steps
For full configuration options, customizations, standard templates and plugins, and alternative integration methods (CDN, SharePoint, ServiceNow), see the [Kore Web SDK GitHub repo](https://github.com/Koredotcom/web-kore-sdk) and [npm package](https://www.npmjs.com/package/kore-web-sdk/).
***
`customData` is accessible in the dialog context at `lastMessage` under `BotUserSession`. It persists for the user session.
***
## Passing Mapped Identities
Use `identityToMerge` in the JWT payload when a user transitions from anonymous to known (for example, after logging in). The Platform merges conversation history under the new identity.
```json theme={null}
{
"iat": 1611810186883,
"exp": 1611813786.883,
"aud": "https://idproxy.kore.com/authorize",
"iss": "cs-d3042d3e-7da4-55da-a94d-78334927xxxx",
"sub": "john.doe@example.com",
"isAnonymous": "false",
"identityToMerge": "john.doe@example.com"
}
```
**Identity merge behavior:**
| Scenario | Result |
| ------------------------------------- | --------------------------------------------------------------------------------------------------------------- |
| Neither identity exists | New identity created; new conversation started |
| New identity exists, merged doesn't | Conversation started/continued with new identity |
| Merged identity exists, new doesn't | New identity created; conversation continues; merged identity removed |
| Both exist, new has no active session | Conversation continues with new identity; merged identity removed |
| Both exist, both have active sessions | Merged identity's conversation continues under new identity; new identity's active session closed as "Drop-off" |
**Side effects of merging:**
* Analytics and chat history are updated to associate merged identity sessions with the new identity.
* Billing session tracking updates to the new identity.
***
## Custom Meta Tags
Add session, user, and message-level meta tags from the Web SDK (available since v8.0):
```javascript theme={null}
botOptions.botInfo = {
name: "",
"_id": "",
customData: { "name": "John" },
"metaTags": {
"messageLevelTags": [{ "name": "tag1", "value": "message" }],
"sessionLevelTags": [{ "name": "tag2", "value": "session" }],
"userLevelTags": [{ "name": "tag3", "value": "user" }]
}
};
```
***
## Troubleshooting
* Verify that the **Client ID** and **Client Secret** in the JWT server match the values from the Web/Mobile Client channel.
* Ensure all required JWT payload fields are included when generating the token.
***
## Next Steps
For full configuration options, customizations, standard templates and plugins, and alternative integration methods (CDN, SharePoint, ServiceNow), see the [Kore Web SDK GitHub repo](https://github.com/Koredotcom/web-kore-sdk) and [npm package](https://www.npmjs.com/package/kore-web-sdk/).
***