> ## Documentation Index
> Fetch the complete documentation index at: https://koreai.mintlify.site/llms.txt
> Use this file to discover all available pages before exploring further.
# BitBucket Connector
[Back to Search AI connectors list](/ai-for-service/searchai/content-sources#supported-connectors)
Bitbucket is a web-based version control hosting service for source code management and team collaboration. The BitBucket connector enables Search AI to search across pull requests and their comments across all repositories in a workspace.
## Specifications
| Specification | Details |
| ----------------- | ------------- |
| Repository type | Cloud |
| Supported content | Pull Requests |
| RACL support | Yes |
| Content filtering | No |
## Prerequisites
Create an **OAuth Consumer** in BitBucket. The client credentials generated for the consumer are used to configure the connector in Search AI.
## Set Up an OAuth Consumer in BitBucket
OAuth Consumers are workspace-specific. To [create a new consumer](https://support.atlassian.com/bitbucket-cloud/docs/use-oauth-on-bitbucket-cloud/#Create-a-consumer):
1. Select the **Settings** icon in the top navigation bar.
2. Select **Workspace settings** from the Settings dropdown.
3. Under **Apps and Features**, select **OAuth consumers**.
4. Click **Add consumer** and provide the following:
* **Name**: A unique display name for the consumer.
* **Description**: Optional description.
* **Callback URL**: Use the URL matching your region or deployment.
| Region | Callback URL |
| ------ | ------------------------------------------------ |
| JP | `https://jp-bots-idp.kore.ai/workflows/callback` |
| DE | `https://de-bots-idp.kore.ai/workflows/callback` |
| Prod | `https://idp.kore.com/workflows/callback` |
5. Under **Permissions**, enable the required permissions as shown below.
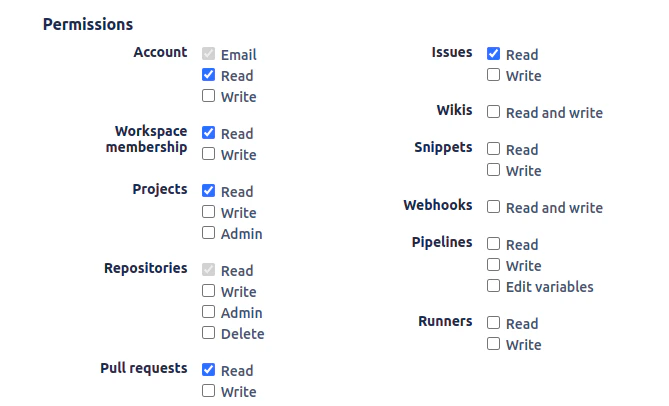 6. Click **Save**. BitBucket generates a key and secret.
## Configure the BitBucket Connector in Search AI
1. Navigate to the **Connectors** page in Search AI.
2. Click **Add Connector** and select **BitBucket**.
3. Provide the following configuration details.
| Field | Value |
| ---------------------- | ---------------------------------------------- |
| **Name** | Unique name for the connector |
| **Authorization Type** | OAuth 2.0 |
| **Grant Type** | Client Credentials |
| **Client ID** | Key generated for the OAuth Consumer |
| **Client Secret** | Secret generated for the OAuth Consumer |
| **Workspace Name** | Name of the Bitbucket workspace to ingest from |
4. Click **Connect** to authenticate and establish the connection.
## Content Ingestion
After connecting, go to the **Configuration** tab to set up content synchronization.
* **Sync Now**: Immediately sync content.
* **Schedule Sync**: Set up automatic sync at a future time or regular interval.
Upon sync, Search AI ingests all pull requests and their comments from every repository across all projects in the workspace.
Only content added or updated in the last 90 days is ingested during sync. Existing content in Search AI remains unchanged.
## RACL Support
Search AI uses the **Project ID** from Bitbucket to enforce user access control. All pull requests associated with a project are tagged with that project's ID in the `sys_racl` field.
```
"sys_racl": ["54321"]
```
This value is stored as a permission entity in the Search AI index. To enforce access control, associate users with this permission entity using the [Permission Entity APIs](/ai-for-service/apis/searchai/permission-entity-apis).
6. Click **Save**. BitBucket generates a key and secret.
## Configure the BitBucket Connector in Search AI
1. Navigate to the **Connectors** page in Search AI.
2. Click **Add Connector** and select **BitBucket**.
3. Provide the following configuration details.
| Field | Value |
| ---------------------- | ---------------------------------------------- |
| **Name** | Unique name for the connector |
| **Authorization Type** | OAuth 2.0 |
| **Grant Type** | Client Credentials |
| **Client ID** | Key generated for the OAuth Consumer |
| **Client Secret** | Secret generated for the OAuth Consumer |
| **Workspace Name** | Name of the Bitbucket workspace to ingest from |
4. Click **Connect** to authenticate and establish the connection.
## Content Ingestion
After connecting, go to the **Configuration** tab to set up content synchronization.
* **Sync Now**: Immediately sync content.
* **Schedule Sync**: Set up automatic sync at a future time or regular interval.
Upon sync, Search AI ingests all pull requests and their comments from every repository across all projects in the workspace.
Only content added or updated in the last 90 days is ingested during sync. Existing content in Search AI remains unchanged.
## RACL Support
Search AI uses the **Project ID** from Bitbucket to enforce user access control. All pull requests associated with a project are tagged with that project's ID in the `sys_racl` field.
```
"sys_racl": ["54321"]
```
This value is stored as a permission entity in the Search AI index. To enforce access control, associate users with this permission entity using the [Permission Entity APIs](/ai-for-service/apis/searchai/permission-entity-apis).