> ## Documentation Index
> Fetch the complete documentation index at: https://koreai.mintlify.site/llms.txt
> Use this file to discover all available pages before exploring further.
# Custom Content Connector
[Back to Search AI connectors list](/ai-for-service/searchai/content-sources#supported-connectors)
The Custom Content Connector enables Search AI to index content from applications that do not have a pre-built connector. It acts as a middleware between Search AI and a third-party application, retrieving content via REST APIs and converting it into an indexable format.
A reference implementation of the connector service is available for download and serves as a template for integration. The current implementation supports basic authentication.
## Setup
### 1. Download the Service
Obtain the skeleton custom connector service from the [SearchAssist Toolkit on GitHub](https://github.com/Koredotcom/SearchAssist-Toolkit/tree/master/Utilities/customConnectorService).
### 2. Configure the Service
* Modify `config.json` to include the application configuration details and content fields.
* Set the authorization password in the `.env` file in the root folder. Rename the existing `.env.sample` file to `.env` and add your auth value to the `Authorization` key.
### 3. Implement Changes (if needed)
Modify the service implementation as required. Refer to the [readme file](https://github.com/Koredotcom/SearchAssist-Toolkit/blob/master/Utilities/customConnectorService/readme.md) for details.
### 4. Host the Service
Host the configured service on your preferred platform.
## Configure the Custom Connector in Search AI
1. Go to **Content > Connectors** and select **Custom Connector**.
2. Configure the following fields:
| Field | Description |
| ------------ | -------------------------------------------------------------------------------------------------------------- |
| **Name** | Unique name for the connector |
| **Endpoint** | URL and HTTP method of the hosted service. For the default implementation: `GET https:///getContent` |
| **Headers** | Key-value pairs sent as request headers |
3. For default implementation, under **Headers**, add the authorization headers as shown below:
* **Key:** `Authorization`
* **Value:** `` (the value set in the service's `.env` file)
The encoding format for a header can be set to `base64` (value is encoded before sending) or `none` (value is sent as plain text). The default for newly added headers is `base64`.
4. If your service is secured using OAuth 2.0 Client Credentials authentication, create an authorization profile in **App Settings** > **Dev Tools** > **Authorization Profiles** and associate it with the connector. Search AI uses the configured profile to obtain and manage access tokens automatically when connecting to the service.
Only the OAuth 2.0 Client Credentials grant type is currently supported for Custom Content Connectors.
5. Click **Connect** to complete the setup.
## Content Synchronization
1. Go to the **Configurations** tab of the custom connector configuration page.
2. Click **Sync Now**.
The service retrieves batches of 30 documents from the third-party application and sends them to Search AI. Search AI processes each batch and indexes the content. Synchronization is complete when all batches are processed.
## Access Control
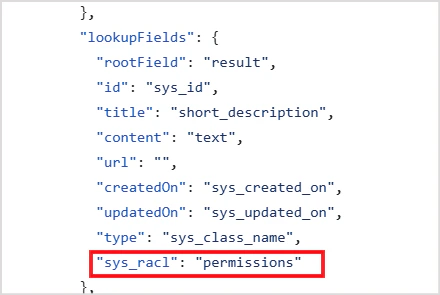
Search AI supports RACL on content ingested via the custom connector. The `sys_racl` field in the connector service `config.json` specifies which field in your source data holds permission information. The data fetched from that field is saved as a permission entity.
For example, if access information is stored in a `permissions` field in your content, set the `sys_racl` field in the connector service config accordingly:
 A permission entity is created for every value fetched from the specified field. Use the **Permission Entity APIs** to add users to each permission entity. Only users added to a permission entity can access the content associated with it.
To enable RACL, go to the **Permissions and Security** tab and select **Permission Aware**. If **Public Access** is selected, all ingested content is available to all users.
A permission entity is created for every value fetched from the specified field. Use the **Permission Entity APIs** to add users to each permission entity. Only users added to a permission entity can access the content associated with it.
To enable RACL, go to the **Permissions and Security** tab and select **Permission Aware**. If **Public Access** is selected, all ingested content is available to all users.