> ## Documentation Index
> Fetch the complete documentation index at: https://koreai.mintlify.site/llms.txt
> Use this file to discover all available pages before exploring further.
# SharePoint Connector
[Back to Search AI connectors list](/ai-for-service/searchai/content-sources#supported-connectors)
Configure the SharePoint connector to make content managed in SharePoint searchable through Search AI.
| Specification | Details |
| -------------------------- | ------------------------------------------------------------------------------------------------- |
| Repository type | Cloud |
| Supported content | Articles (.aspx), Pages, and files in .doc, .docx, .ppt, .pptx, .html, .xhtml, .txt, .pdf formats |
| RACL support | Yes |
| Content filtering | Yes |
| Auto permission resolution | Yes |
Searching through attachments is not supported.
## Prerequisites
* Access to the [Azure Portal](https://portal.azure.com/#home) with permissions to register applications.
* A multi-tenant app registered in Azure Active Directory (see below).
## Authorization Support
Search AI supports two OAuth 2.0 authentication mechanisms for SharePoint:
* **Authorization Code Grant Type** — The app acts on behalf of the user using Delegated Permissions. Requires explicit user consent.
* **Client Credentials Grant Type** — The app acts as itself using Application Permissions. No user interaction required.
## Register a Multi-Tenant App in SharePoint
App registration establishes trust between Search AI and the Microsoft identity platform.
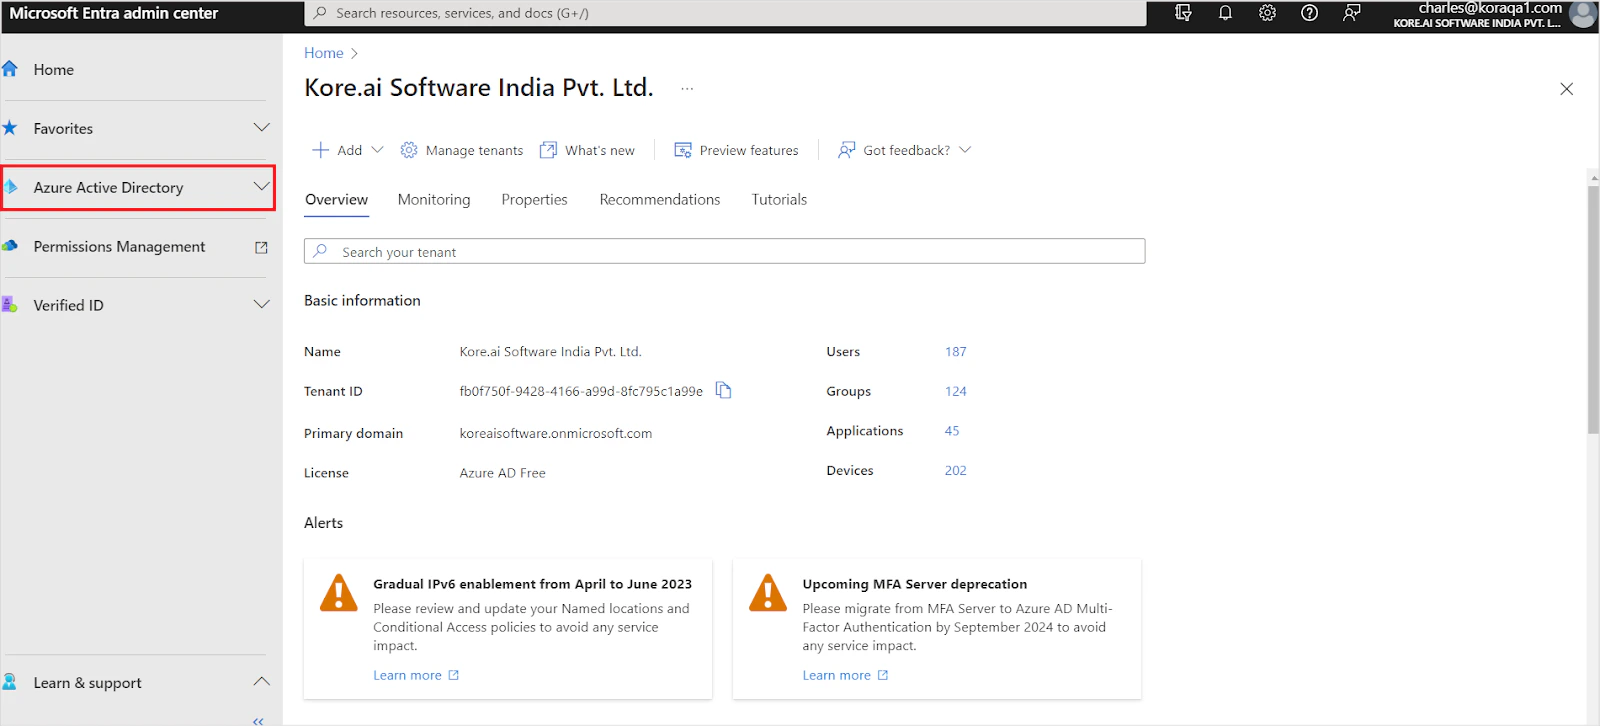
1. Log in to the [Azure Portal](https://portal.azure.com/#home) and go to **Azure Active Directory**.
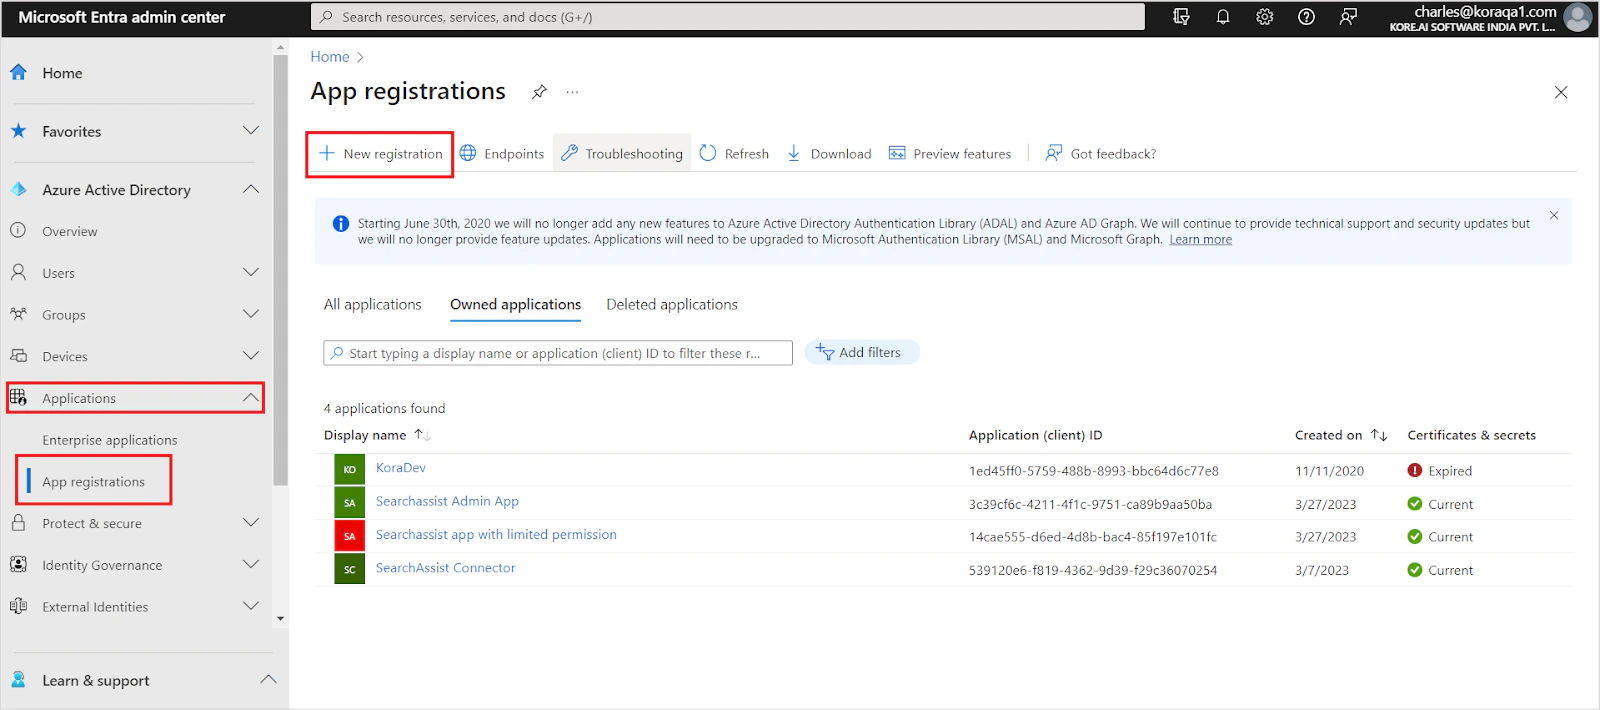
 2. Go to **App Registrations** under **Applications** and click **New Registration**.
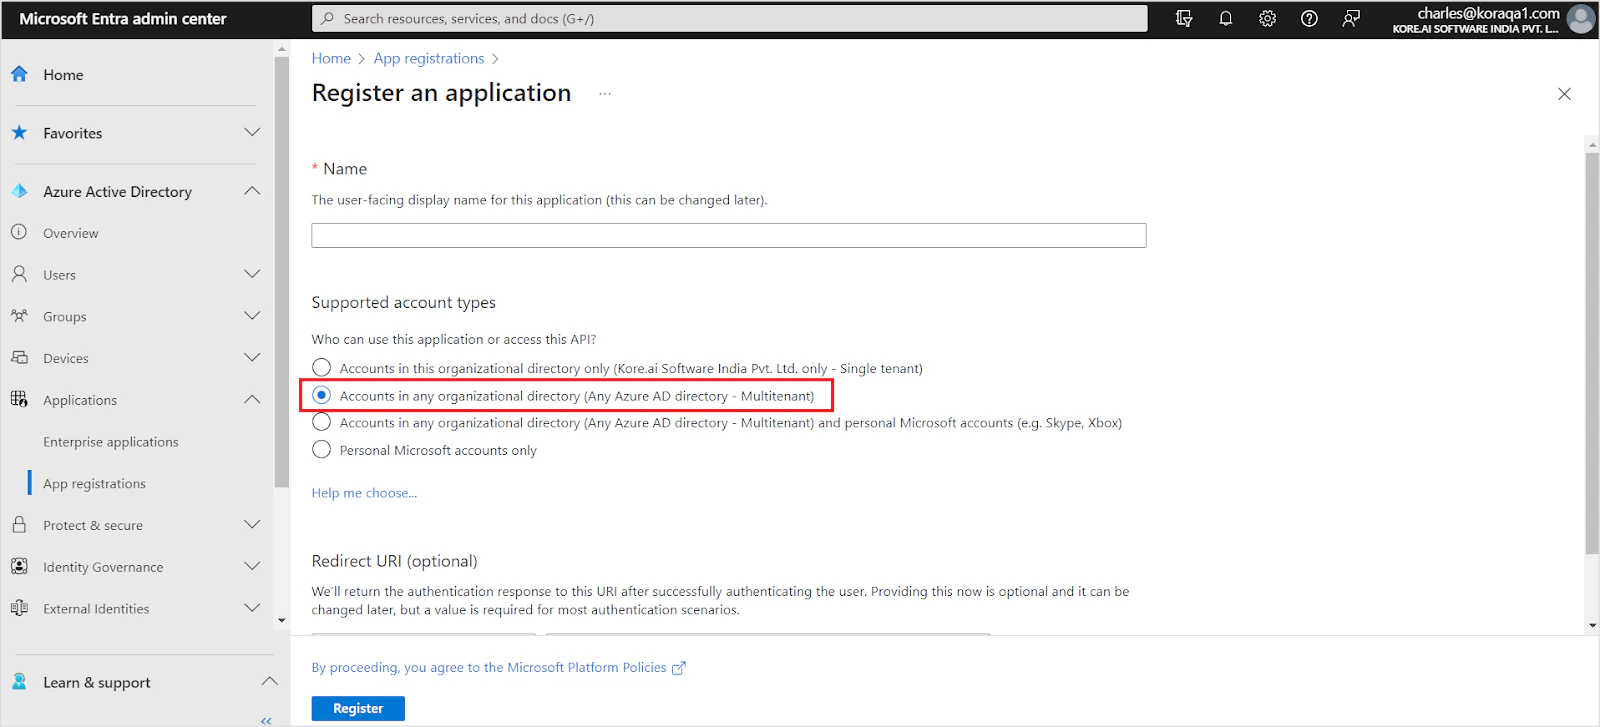
 3. Enter the application name. Set the account type to **Accounts in any organization directory** (multi-tenant). Set the Redirect URL for your region and click **Register**.
* JP Region: `https://jp-bots-idp.kore.ai/workflows/callback`
* DE Region: `https://de-bots-idp.kore.ai/workflows/callback`
* Production: `https://idp.kore.com/workflows/callback`
3. Enter the application name. Set the account type to **Accounts in any organization directory** (multi-tenant). Set the Redirect URL for your region and click **Register**.
* JP Region: `https://jp-bots-idp.kore.ai/workflows/callback`
* DE Region: `https://de-bots-idp.kore.ai/workflows/callback`
* Production: `https://idp.kore.com/workflows/callback`
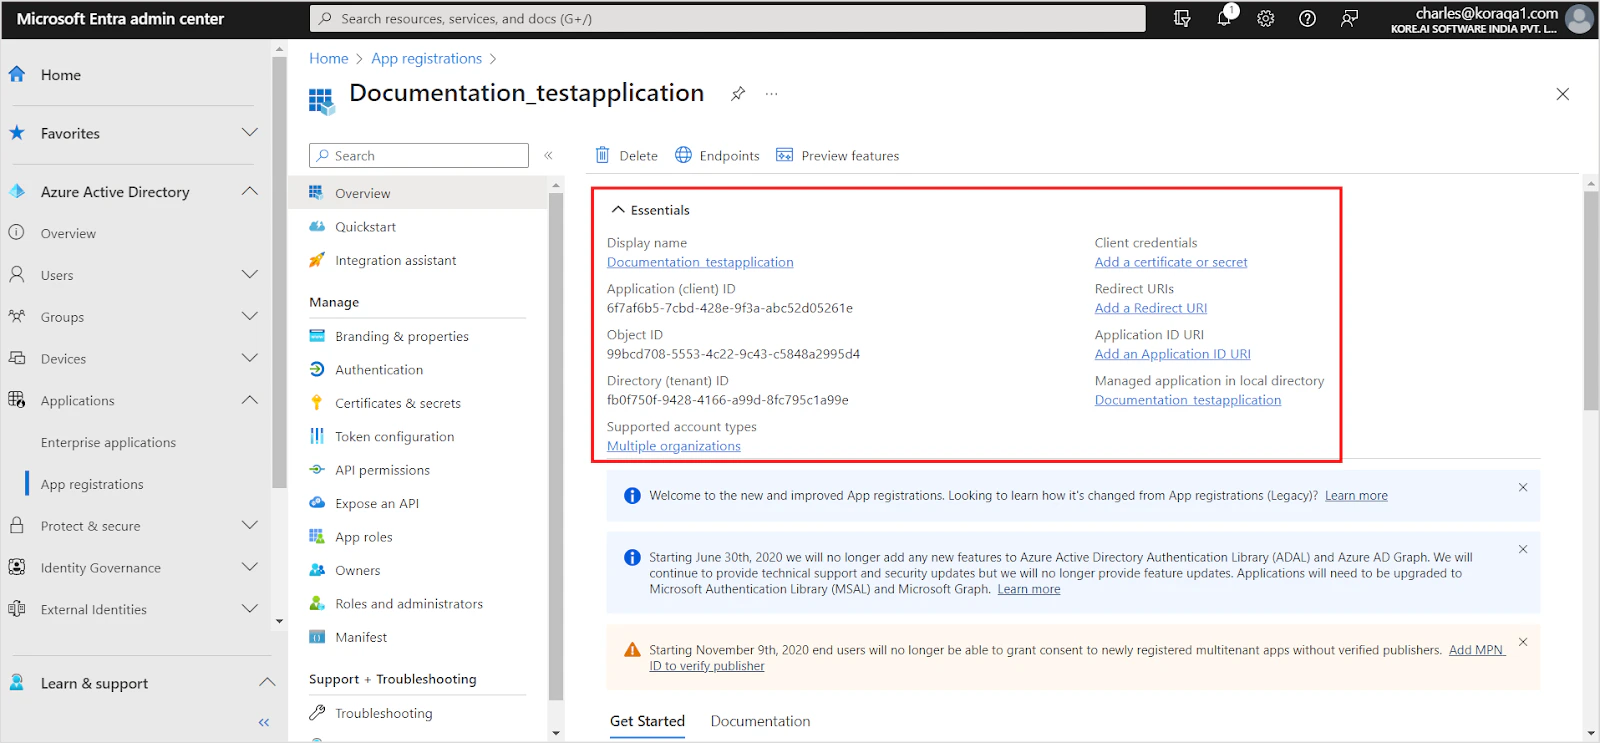
 4. Save the **Client ID** and **Tenant ID** from the **Overview** section.
 5. Go to **Certificates and Secrets** and [generate a client secret](https://learn.microsoft.com/en-us/azure/active-directory/develop/quickstart-register-app#add-a-client-secret).
 6. Enter a description, set the expiration to 24 months, and click **Add**.
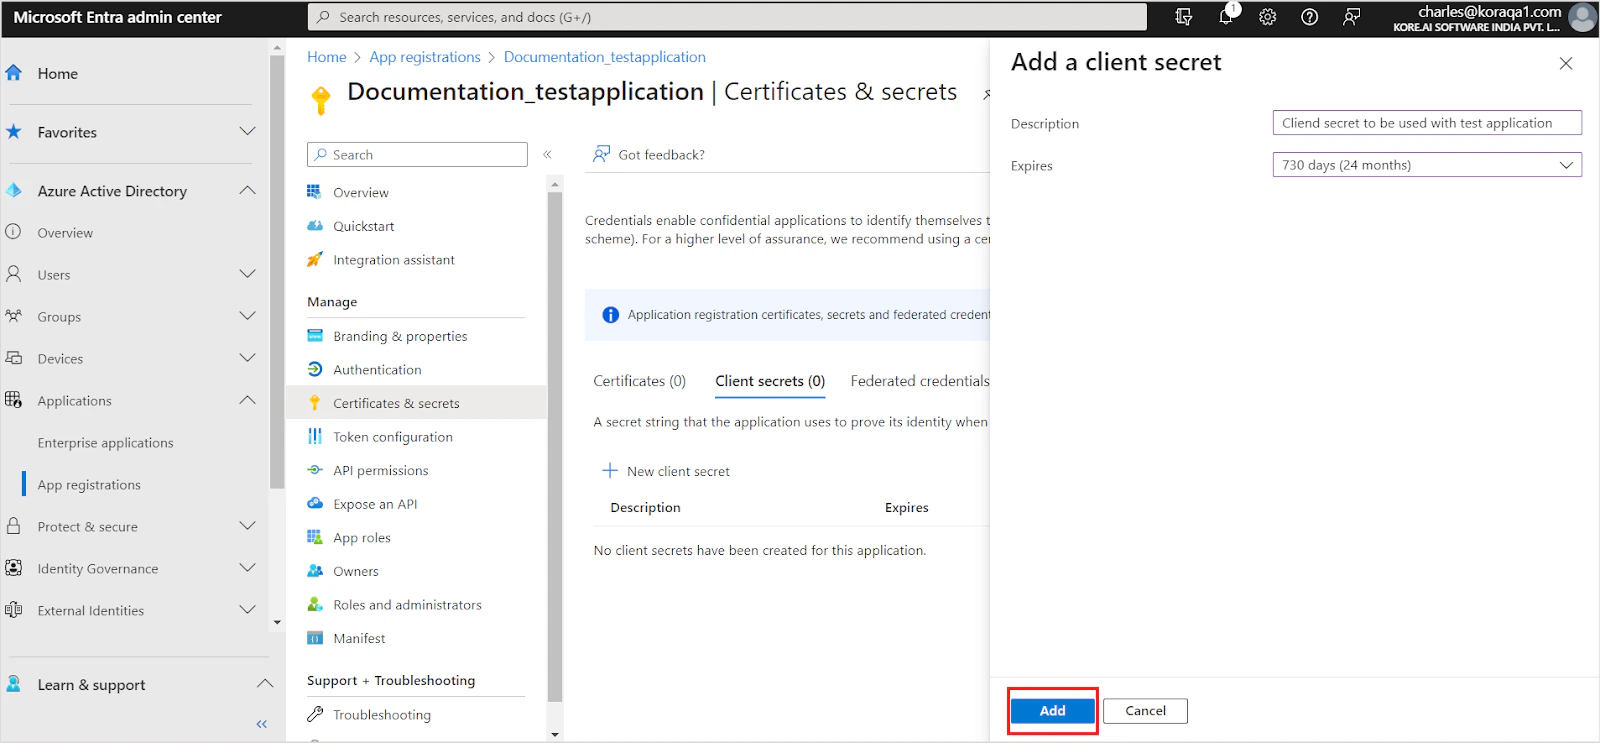 7. Save the client secret immediately — it cannot be viewed again after leaving the page.
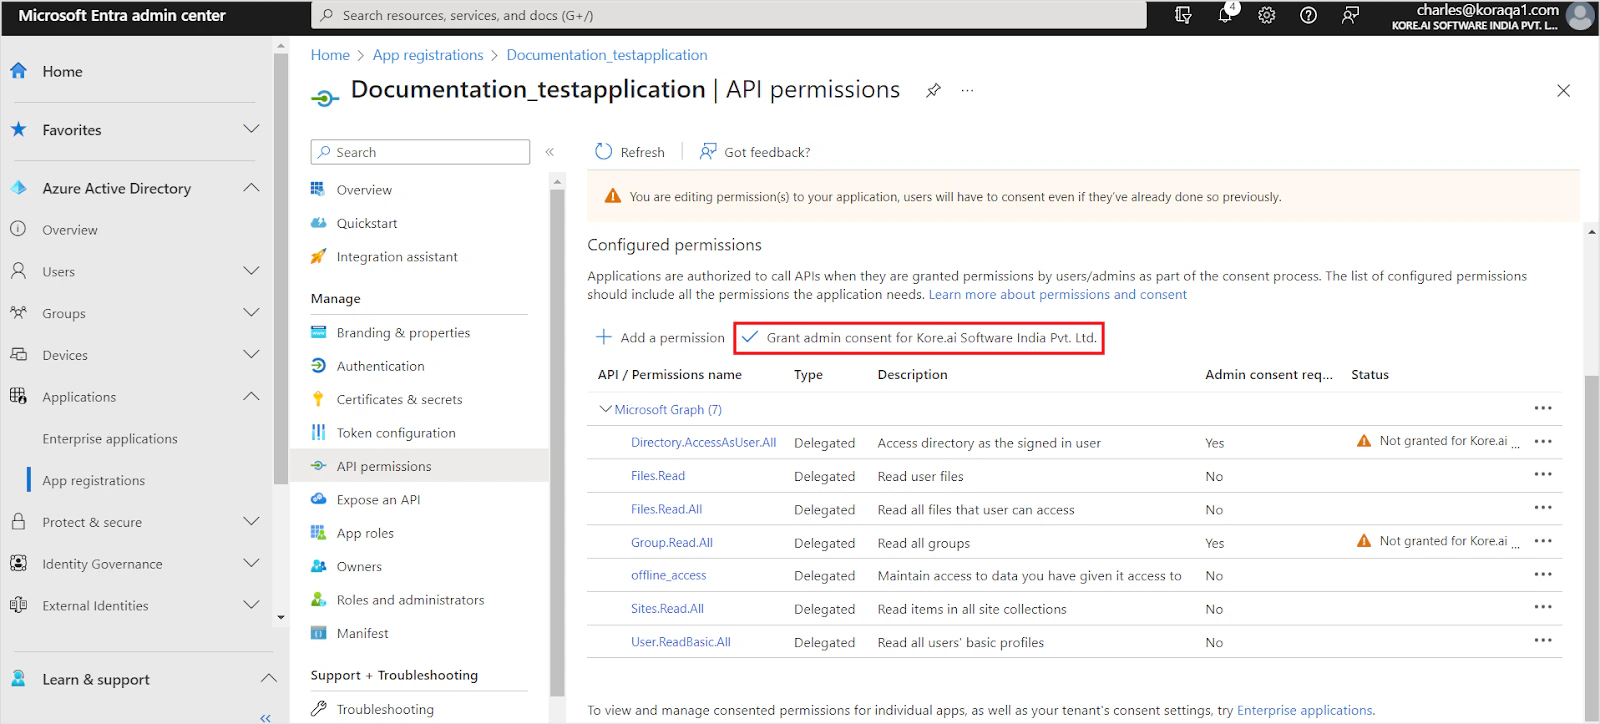
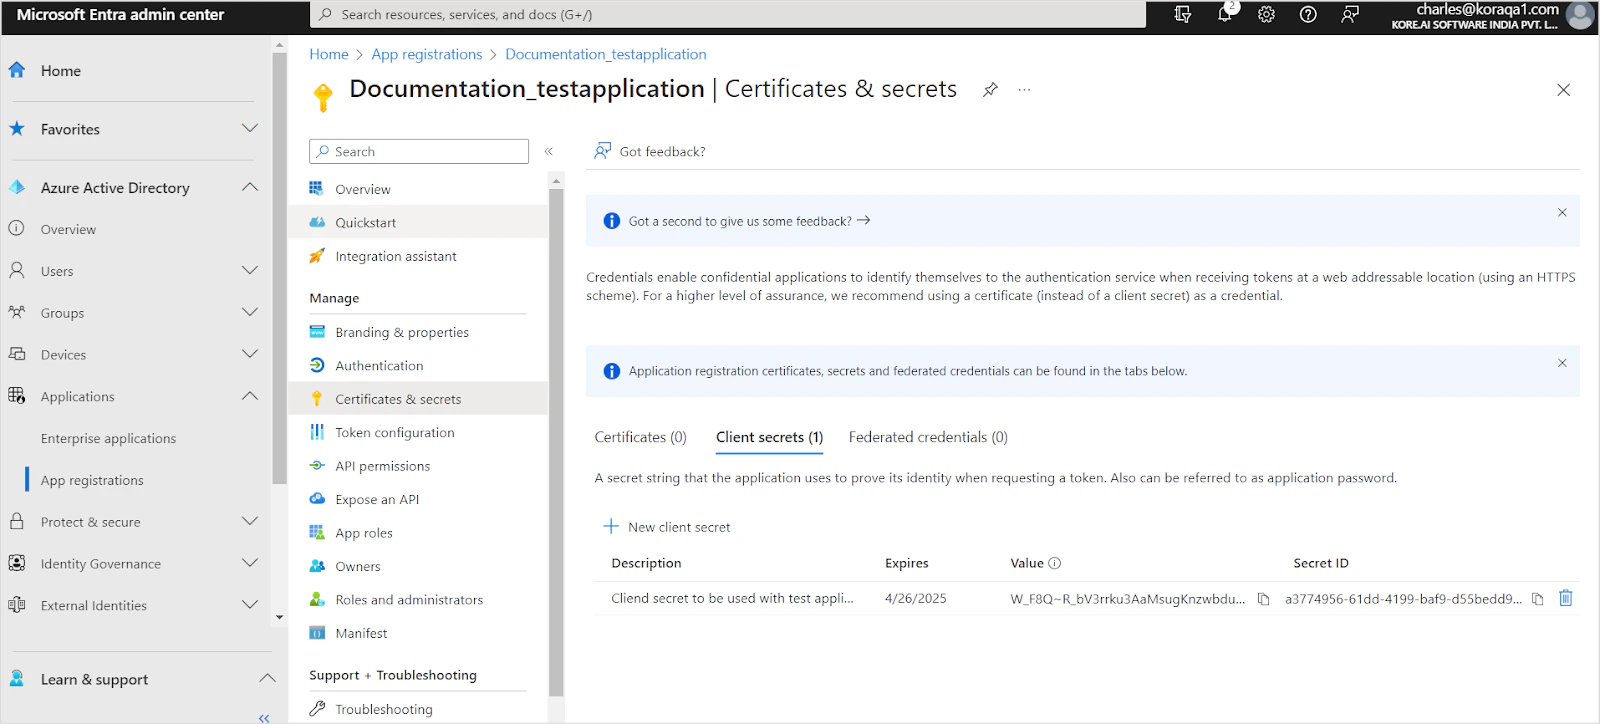 8. Go to **API Permissions** and click **Add a permission**.
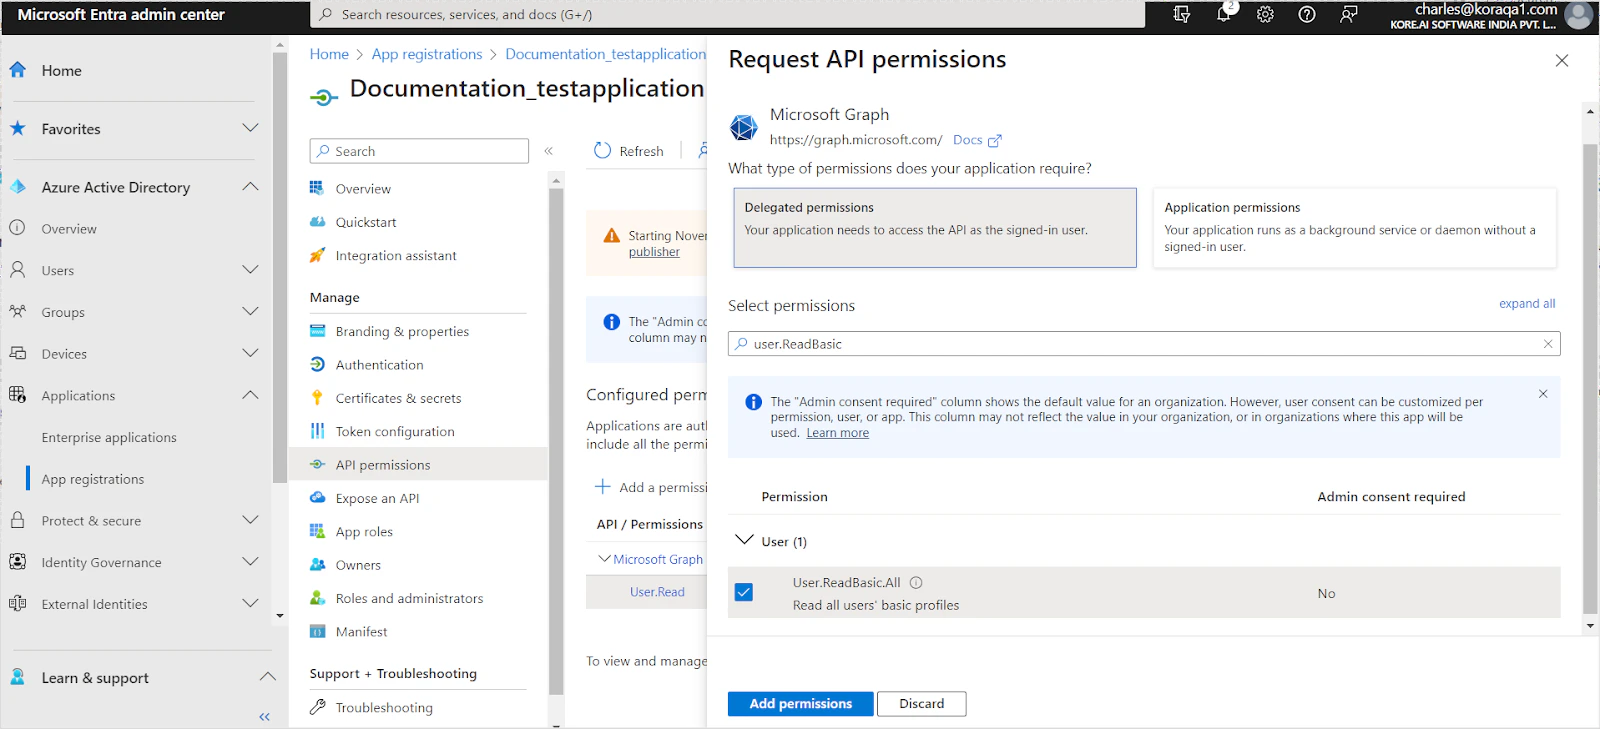
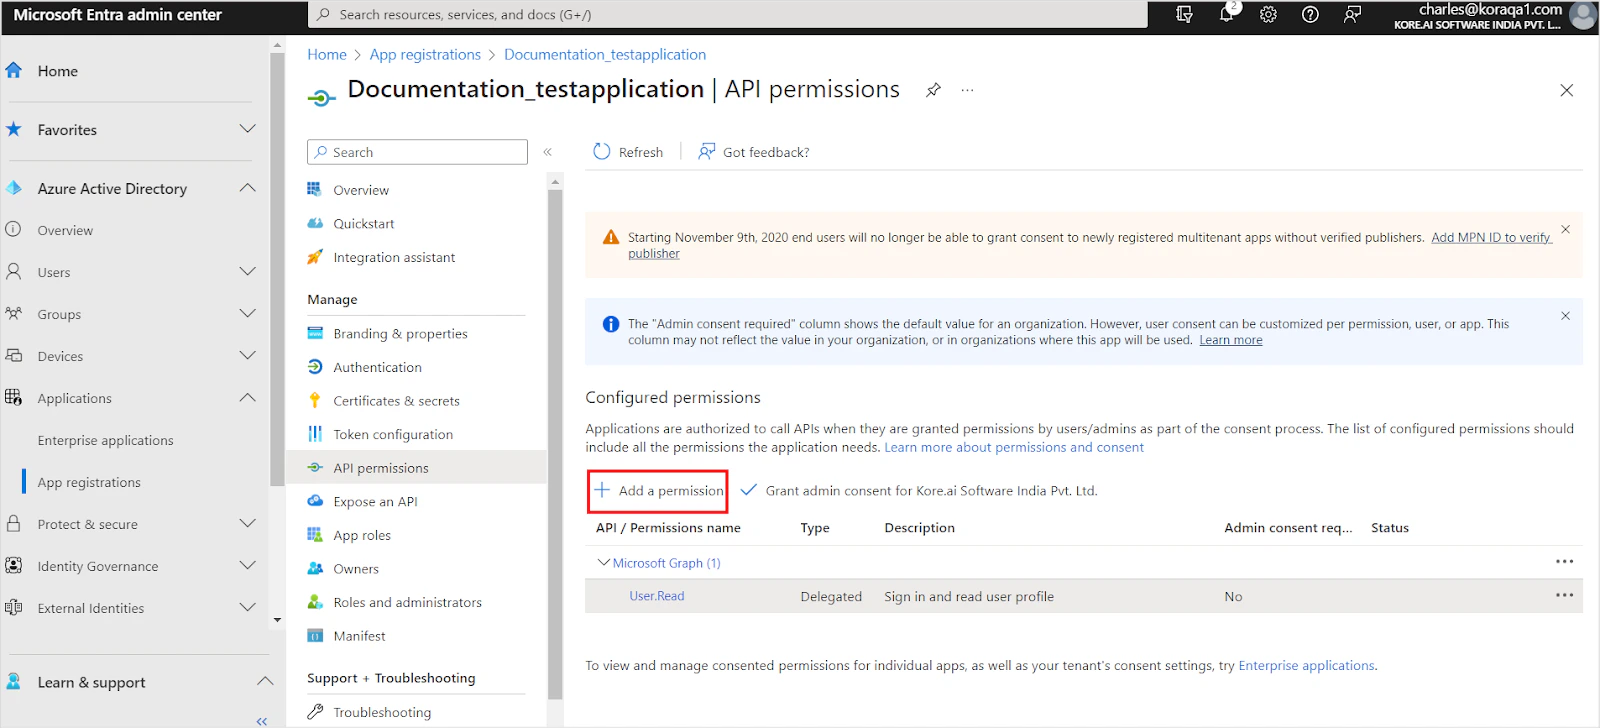 9. Add the following permissions under **Microsoft Graph**:
**Delegated Permissions** (for Authorization Code Grant Type):
* `User.ReadBasic.All`
* `Group.Read.All`
* `Directory.AccessAsUser.All`
* `Files.Read`
* `Files.Read.All`
* `Sites.Read.All`
* `Offline_access`
* `GroupMember.Read.All` — required only if RACL is enabled
* `Organization.Read.All` — required only if RACL is enabled
9. Add the following permissions under **Microsoft Graph**:
**Delegated Permissions** (for Authorization Code Grant Type):
* `User.ReadBasic.All`
* `Group.Read.All`
* `Directory.AccessAsUser.All`
* `Files.Read`
* `Files.Read.All`
* `Sites.Read.All`
* `Offline_access`
* `GroupMember.Read.All` — required only if RACL is enabled
* `Organization.Read.All` — required only if RACL is enabled
 **Application Permissions** (for Client Credentials Grant Type):
* `Sites.Selected`
* `GroupMember.Read.All` — required only if RACL is enabled
* `Organization.Read.All` — required only if RACL is enabled
* `SensitivityLabels.Read.All` — required to extract Microsoft Purview sensitivity label metadata during sync
10. Click **Grant Admin Consent** to apply the permissions.
**Application Permissions** (for Client Credentials Grant Type):
* `Sites.Selected`
* `GroupMember.Read.All` — required only if RACL is enabled
* `Organization.Read.All` — required only if RACL is enabled
* `SensitivityLabels.Read.All` — required to extract Microsoft Purview sensitivity label metadata during sync
10. Click **Grant Admin Consent** to apply the permissions.
 ## Configure the SharePoint Connector in Search AI
1. Go to **Content > Connectors** and select **SharePoint**.
2. On the **Authorization** page, provide the following details:
| Field | Description |
| ---------------------- | ------------------------------------------------- |
| **Name** | Unique name for the connector |
| **Authorization Type** | OAuth 2.0 |
| **Grant Type** | Authorization Code or Client Credentials |
| **Client ID** | Client ID from the Azure app registration |
| **Client Secret** | Client secret from the Azure app registration |
| **Tenant ID** | Directory (Tenant) ID from your Azure AD instance |
| **Content Type** | All, Articles, or Files |
3. Click **Connect** to authenticate.
## Content Ingestion
After authentication, select the SharePoint sites to ingest content from.
Configuration steps vary depending on the grant type selected.
### Authorization Code Grant Type
1. Go to the **Configuration** section.
2. Under **Sync Specific Content**, click **Select Content**.
3. Choose the SharePoint sites to ingest content from.
4. Click **Save**.
## Configure the SharePoint Connector in Search AI
1. Go to **Content > Connectors** and select **SharePoint**.
2. On the **Authorization** page, provide the following details:
| Field | Description |
| ---------------------- | ------------------------------------------------- |
| **Name** | Unique name for the connector |
| **Authorization Type** | OAuth 2.0 |
| **Grant Type** | Authorization Code or Client Credentials |
| **Client ID** | Client ID from the Azure app registration |
| **Client Secret** | Client secret from the Azure app registration |
| **Tenant ID** | Directory (Tenant) ID from your Azure AD instance |
| **Content Type** | All, Articles, or Files |
3. Click **Connect** to authenticate.
## Content Ingestion
After authentication, select the SharePoint sites to ingest content from.
Configuration steps vary depending on the grant type selected.
### Authorization Code Grant Type
1. Go to the **Configuration** section.
2. Under **Sync Specific Content**, click **Select Content**.
3. Choose the SharePoint sites to ingest content from.
4. Click **Save**.
 ### Client Credentials Grant Type
1. Go to the **Configuration** section.
2. Under **Sync Specific Content**, click **Configure**.
3. Enter one or more Site IDs. The Azure AD app must have access to all sites listed here.
4. Select the content type: **Articles** or **Files**.
5. Optionally apply filters to narrow the content ingested.
### Client Credentials Grant Type
1. Go to the **Configuration** section.
2. Under **Sync Specific Content**, click **Configure**.
3. Enter one or more Site IDs. The Azure AD app must have access to all sites listed here.
4. Select the content type: **Articles** or **Files**.
5. Optionally apply filters to narrow the content ingested.
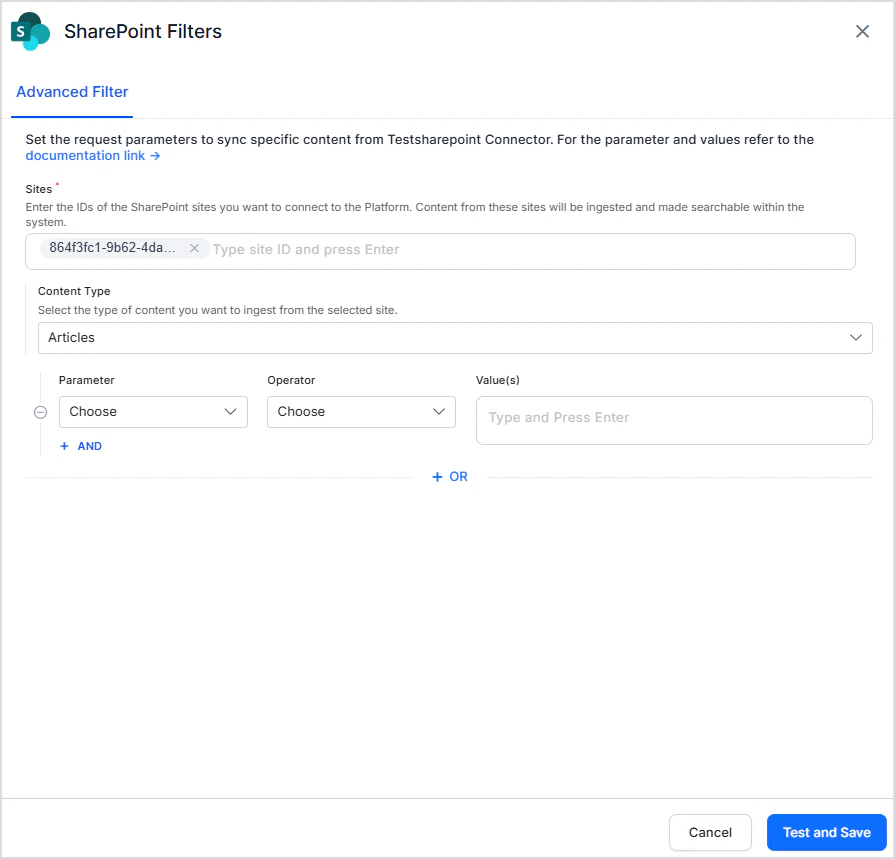 Only Articles or Files can be selected individually as content types. To ingest both, create a filter with two conditions joined by the OR operator:
> * Condition 1: Content Type = Articles
> * Condition 2: Content Type = Files
## Sync Content
Click **Sync Now** to start ingestion immediately, or configure **Schedule Sync** in the **Configuration** page for automatic ingestion.
## Advanced Content Filtering
In addition to selecting sites, Search AI allows you to apply custom filtering rules to selectively ingest content. To configure filters, navigate to the Advanced Filter tab and define your rules using the following fields.
* Site — Select the site on which filtering is to be applied.
* Content Type — Select the type of content: All, Articles, or Files.
Use the following fields to set up conditions for each filtering rule.
* Parameter — The attribute of the content on which the filter condition is applied. Select from the dropdown or add a custom parameter using +Add. Ensure custom parameter names match exactly with the field names in SharePoint.
* Operator — Defines how the condition is evaluated (for example, Equals, Contains, Greater Than).
* Value — The value the parameter must meet according to the chosen operator.
Filter conditions are optional. If no conditions are defined, all content matching the selected Content Type from the chosen site is ingested.
**Filter Rule Behavior**
* Multiple rules — Content that satisfies any one of the defined rules is selected for ingestion (logical OR between rules).
* Multiple conditions within a rule — All conditions in a rule must be satisfied for the content to be selected (logical AND within a rule).
**Supported Parameters for Articles**
| Parameter | Description | Supported Operators |
| ----------------- | -------------------------------- | ------------------- |
| `Article Id` | Unique identifier of the article | Equals |
| `Article Name` | Name of the article | Equals |
| `Article Web URL` | Web URL of the article | Equals |
| `Article Title` | Title of the article | Equals |
**Supported Parameters for Files**
When Content Type is set to Files, the following folder-related parameters are available in addition to the standard file parameters.
| Parameter | Description | Supported Operators |
| ------------ | --------------------------------------------- | ------------------- |
| `FolderPath` | Path of the folder within the SharePoint site | In |
Folder paths must be constructed in the following format: `/Folder Name/Sub Folder Name`
For example, to ingest files from a specific folder, set up a filter with **Content Type = Files**, **Parameter = FolderPath**, **Operator = In**, and **Value = /Documents/Reports**.
## Microsoft Purview Sensitivity Labels
The SharePoint connector supports indexing sensitivity label metadata from documents classified using [Microsoft Purview Information Protection](https://learn.microsoft.com/en-us/purview/information-protection). During each sync, sensitivity labels (such as Confidential, Internal Only, or Public) are extracted from SharePoint documents and stored as searchable metadata fields, enabling users to filter search results by document classification.
**How It Works**
At the start of each sync (full or incremental), the connector fetches all sensitivity labels defined in your tenant using the [Microsoft Graph](https://learn.microsoft.com/en-us/graph/api/tenantdatasecurityandgovernance-list-sensitivitylabels?view=graph-rest-1.0\&tabs=http) and builds an in-memory label map for the duration of the sync. For each document ingested, the connector calls the [Extract Sensitivity Labels](https://learn.microsoft.com/en-us/graph/api/driveitem-extractsensitivitylabels?view=graph-rest-1.0\&tabs=http) to retrieve the label assigned to that document and resolves the human-readable display name from the cached map.
The following metadata fields are stored on each indexed document:
| Field | Description |
| ---------------------- | ------------------------------------------------------------------------------ |
| `sensitivityLabelId` | Unique identifier of the sensitivity label |
| `sensitivityLabelName` | Human-readable display name (for example: "Confidential," "Internal Only") |
| `tenantId` | Tenant identifier, used to scope labels correctly in multi-tenant environments |
Documents with no sensitivity label assigned are stored with the sensitivity label field unset and appear under an Unlabeled option in the filter.
If the tenant-level label fetch fails at the start of a sync, the sync is aborted. Document-level label resolution is not possible without the label map.
**Prerequisites**
To enable sensitivity label extraction, the Azure AD app registration must include the following application permission under Microsoft Graph:
* `SensitivityLabels.Read.All`
Grant admin consent for this permission before running a sync.
**Filtering by Sensitivity Label**
Once sensitivity label metadata is indexed, users can filter search results by label using the Sensitivity Label filter in the advanced filters panel.
* Operator: Equals
* Selection: Multi-select - select one or more labels to restrict results to documents carrying any of the selected labels.
## Access Control
### Understanding Permissions in SharePoint
SharePoint permissions include site-level permissions and individual file permissions.
### Site-Level Permissions
SharePoint uses two membership group types:
* **Office 365 Groups** — Grant site access to members.
* **SharePoint Security Groups** — Control site access at three default permission levels: Site Visitors, Site Members, and Site Owners.
Only Articles or Files can be selected individually as content types. To ingest both, create a filter with two conditions joined by the OR operator:
> * Condition 1: Content Type = Articles
> * Condition 2: Content Type = Files
## Sync Content
Click **Sync Now** to start ingestion immediately, or configure **Schedule Sync** in the **Configuration** page for automatic ingestion.
## Advanced Content Filtering
In addition to selecting sites, Search AI allows you to apply custom filtering rules to selectively ingest content. To configure filters, navigate to the Advanced Filter tab and define your rules using the following fields.
* Site — Select the site on which filtering is to be applied.
* Content Type — Select the type of content: All, Articles, or Files.
Use the following fields to set up conditions for each filtering rule.
* Parameter — The attribute of the content on which the filter condition is applied. Select from the dropdown or add a custom parameter using +Add. Ensure custom parameter names match exactly with the field names in SharePoint.
* Operator — Defines how the condition is evaluated (for example, Equals, Contains, Greater Than).
* Value — The value the parameter must meet according to the chosen operator.
Filter conditions are optional. If no conditions are defined, all content matching the selected Content Type from the chosen site is ingested.
**Filter Rule Behavior**
* Multiple rules — Content that satisfies any one of the defined rules is selected for ingestion (logical OR between rules).
* Multiple conditions within a rule — All conditions in a rule must be satisfied for the content to be selected (logical AND within a rule).
**Supported Parameters for Articles**
| Parameter | Description | Supported Operators |
| ----------------- | -------------------------------- | ------------------- |
| `Article Id` | Unique identifier of the article | Equals |
| `Article Name` | Name of the article | Equals |
| `Article Web URL` | Web URL of the article | Equals |
| `Article Title` | Title of the article | Equals |
**Supported Parameters for Files**
When Content Type is set to Files, the following folder-related parameters are available in addition to the standard file parameters.
| Parameter | Description | Supported Operators |
| ------------ | --------------------------------------------- | ------------------- |
| `FolderPath` | Path of the folder within the SharePoint site | In |
Folder paths must be constructed in the following format: `/Folder Name/Sub Folder Name`
For example, to ingest files from a specific folder, set up a filter with **Content Type = Files**, **Parameter = FolderPath**, **Operator = In**, and **Value = /Documents/Reports**.
## Microsoft Purview Sensitivity Labels
The SharePoint connector supports indexing sensitivity label metadata from documents classified using [Microsoft Purview Information Protection](https://learn.microsoft.com/en-us/purview/information-protection). During each sync, sensitivity labels (such as Confidential, Internal Only, or Public) are extracted from SharePoint documents and stored as searchable metadata fields, enabling users to filter search results by document classification.
**How It Works**
At the start of each sync (full or incremental), the connector fetches all sensitivity labels defined in your tenant using the [Microsoft Graph](https://learn.microsoft.com/en-us/graph/api/tenantdatasecurityandgovernance-list-sensitivitylabels?view=graph-rest-1.0\&tabs=http) and builds an in-memory label map for the duration of the sync. For each document ingested, the connector calls the [Extract Sensitivity Labels](https://learn.microsoft.com/en-us/graph/api/driveitem-extractsensitivitylabels?view=graph-rest-1.0\&tabs=http) to retrieve the label assigned to that document and resolves the human-readable display name from the cached map.
The following metadata fields are stored on each indexed document:
| Field | Description |
| ---------------------- | ------------------------------------------------------------------------------ |
| `sensitivityLabelId` | Unique identifier of the sensitivity label |
| `sensitivityLabelName` | Human-readable display name (for example: "Confidential," "Internal Only") |
| `tenantId` | Tenant identifier, used to scope labels correctly in multi-tenant environments |
Documents with no sensitivity label assigned are stored with the sensitivity label field unset and appear under an Unlabeled option in the filter.
If the tenant-level label fetch fails at the start of a sync, the sync is aborted. Document-level label resolution is not possible without the label map.
**Prerequisites**
To enable sensitivity label extraction, the Azure AD app registration must include the following application permission under Microsoft Graph:
* `SensitivityLabels.Read.All`
Grant admin consent for this permission before running a sync.
**Filtering by Sensitivity Label**
Once sensitivity label metadata is indexed, users can filter search results by label using the Sensitivity Label filter in the advanced filters panel.
* Operator: Equals
* Selection: Multi-select - select one or more labels to restrict results to documents carrying any of the selected labels.
## Access Control
### Understanding Permissions in SharePoint
SharePoint permissions include site-level permissions and individual file permissions.
### Site-Level Permissions
SharePoint uses two membership group types:
* **Office 365 Groups** — Grant site access to members.
* **SharePoint Security Groups** — Control site access at three default permission levels: Site Visitors, Site Members, and Site Owners.
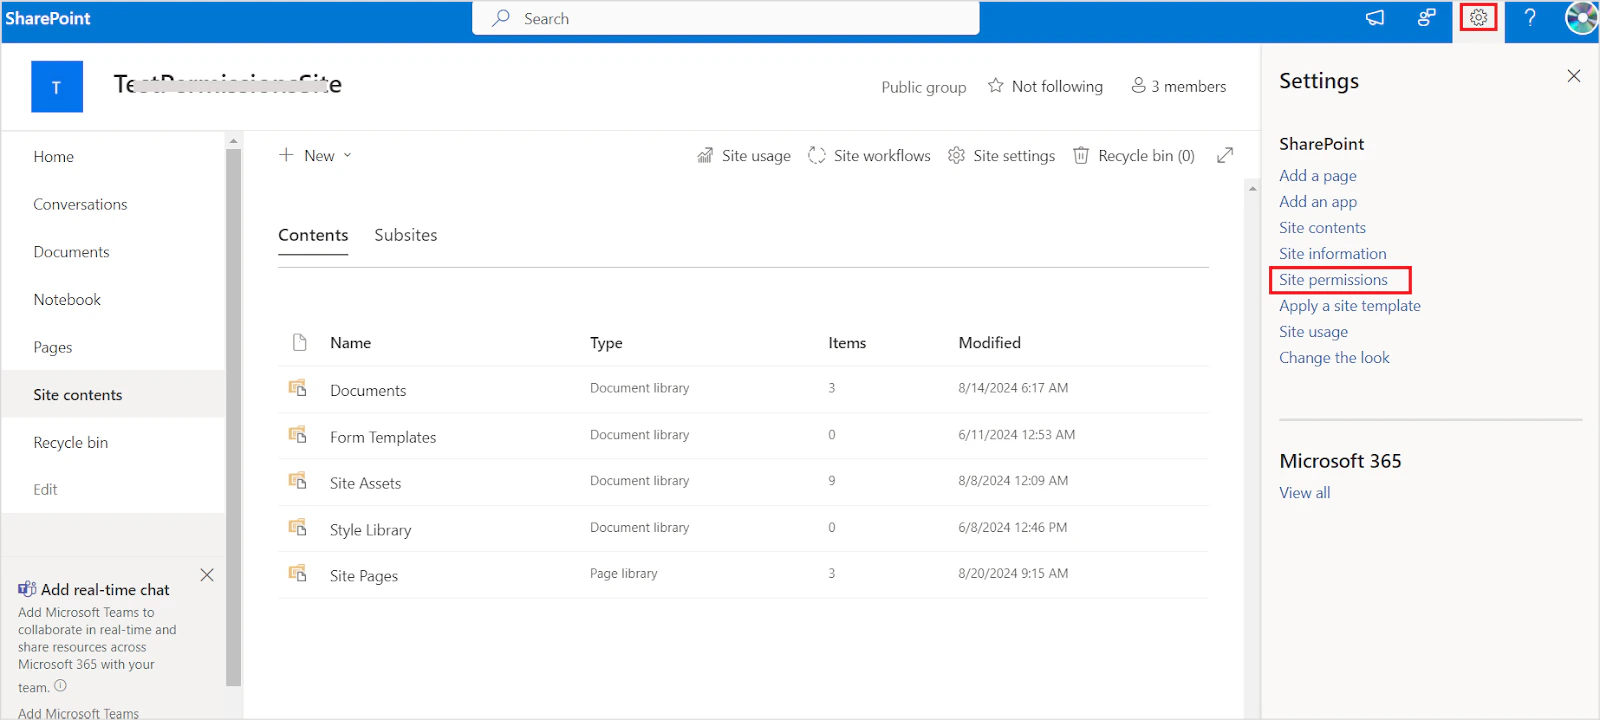
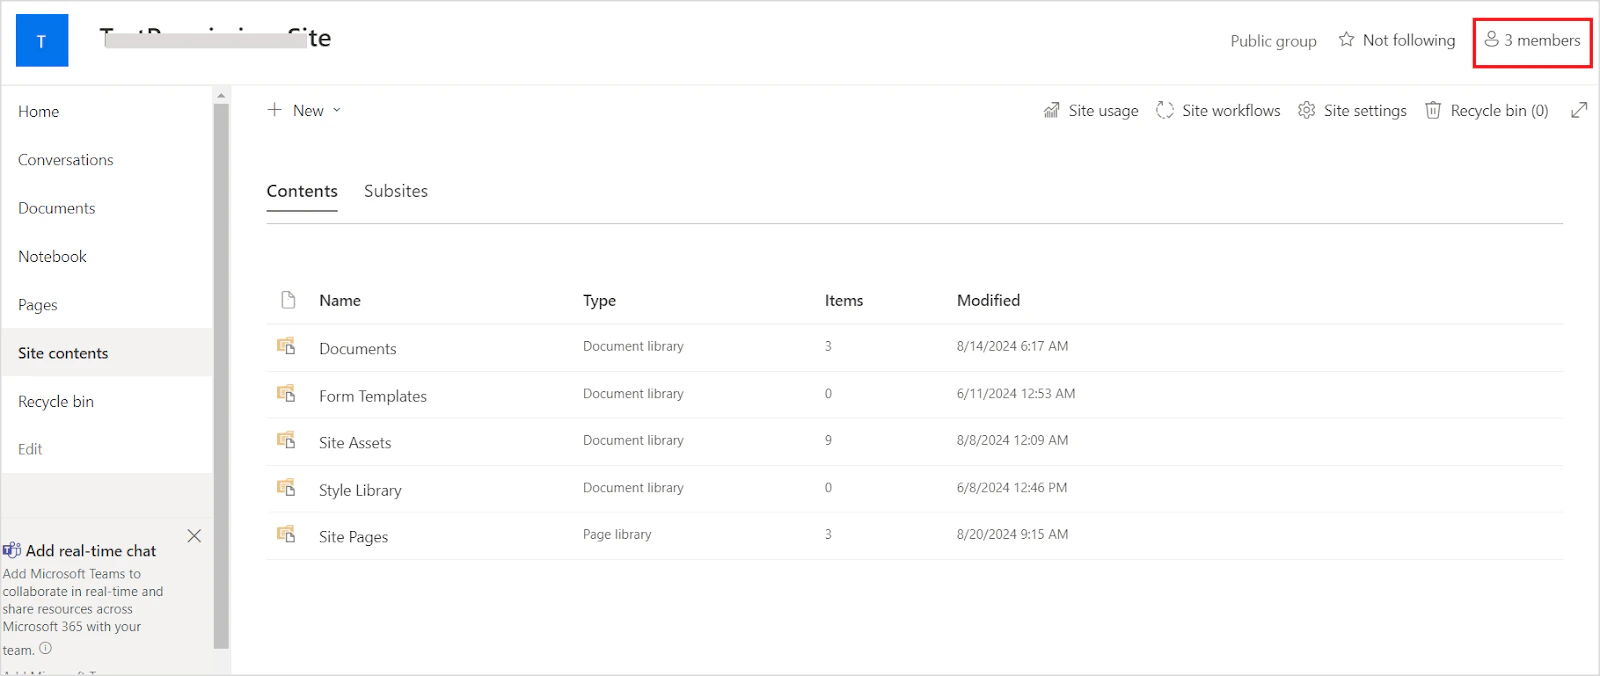 Click **Members** to view the list of members and their roles.
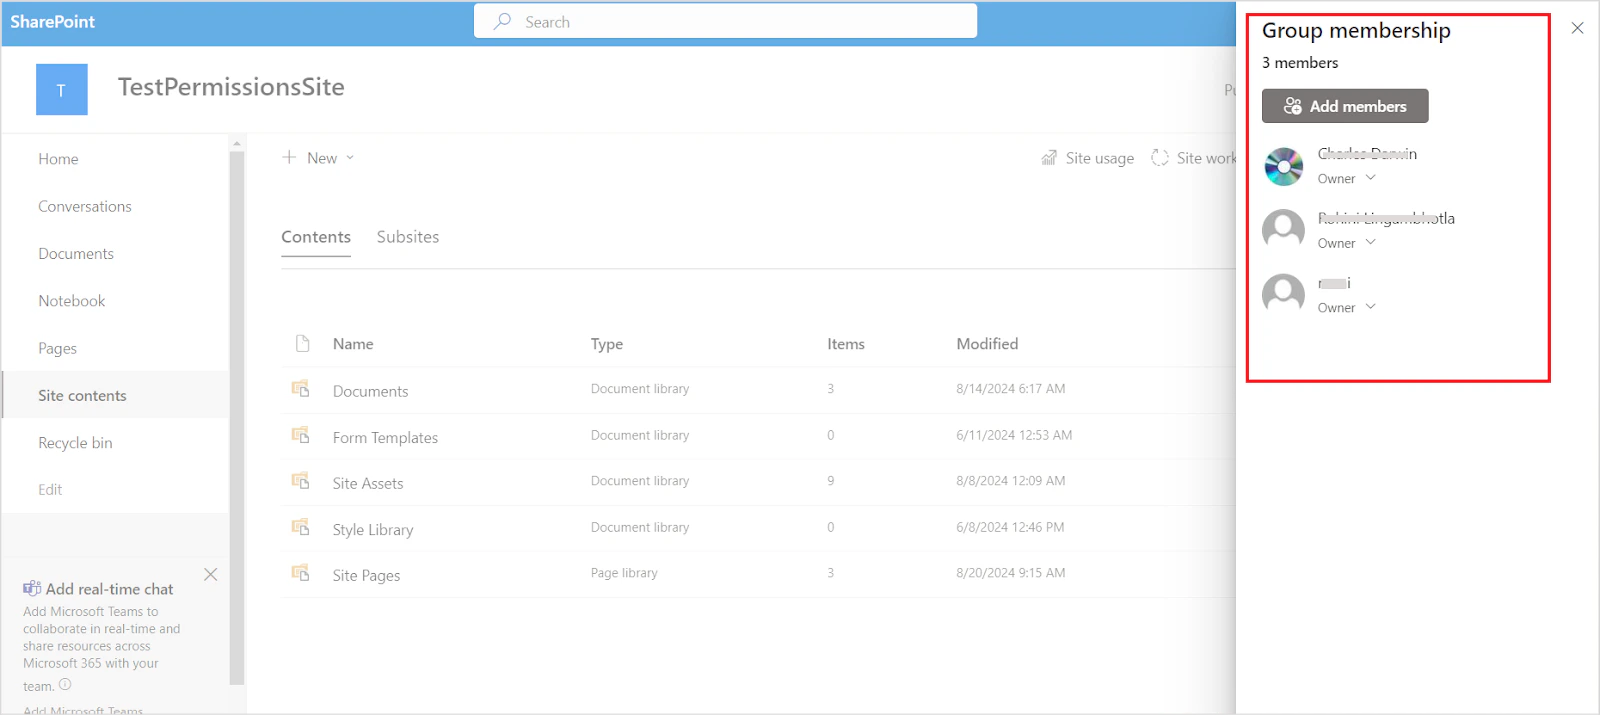 Go to **Settings > Site Permissions** to view SharePoint Security Groups.
 ### How Search AI Handles Site Permissions
* **Office 365 Group** — A Permission Entity is created in Search AI. All users directly added to this group are automatically added to the Permission Entity. Email groups added here must be resolved manually using the [Permission Entity APIs](/ai-for-service/apis/searchai/permission-entity-apis).
* **SharePoint Security Groups** — Three Permission Entities are created (one per default permission level). Users in these groups must be added manually to their corresponding Permission Entities using the [Permission Entity APIs](/ai-for-service/apis/searchai/permission-entity-apis).
The `sourceACL` field contains four Permission Entities corresponding to the site permissions.
### File-Level Permissions
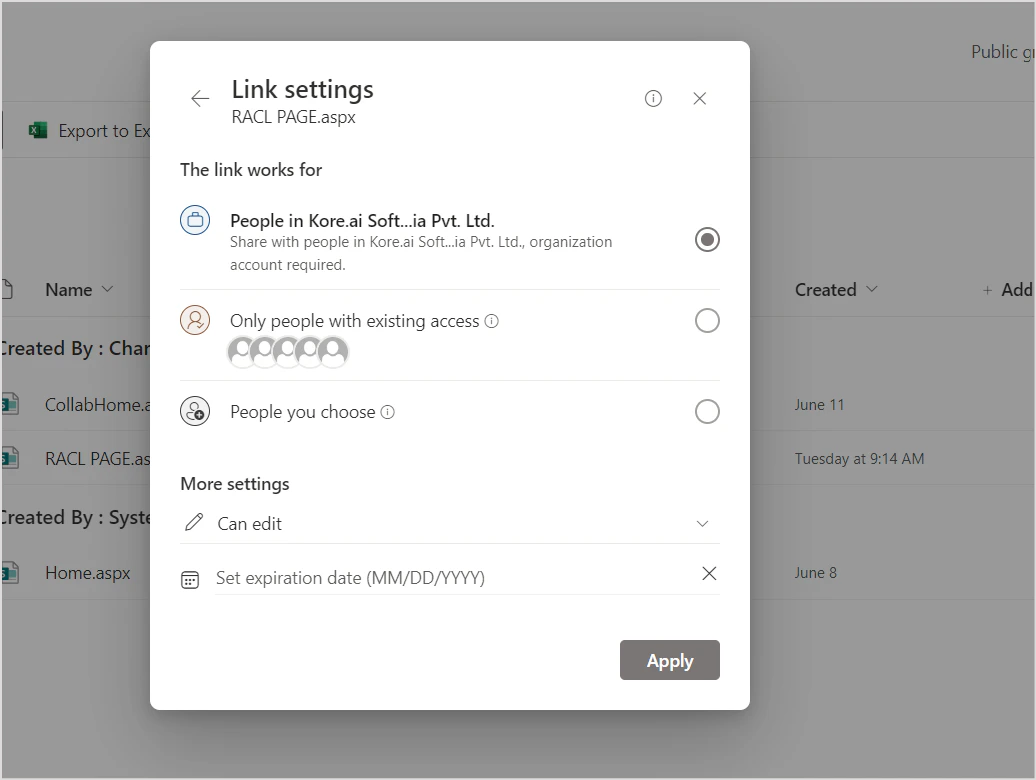
Site-level permissions apply to all files within that site. File owners can also share files with individual users, internally or externally, or with all domain or organization members.
### How Search AI Handles Site Permissions
* **Office 365 Group** — A Permission Entity is created in Search AI. All users directly added to this group are automatically added to the Permission Entity. Email groups added here must be resolved manually using the [Permission Entity APIs](/ai-for-service/apis/searchai/permission-entity-apis).
* **SharePoint Security Groups** — Three Permission Entities are created (one per default permission level). Users in these groups must be added manually to their corresponding Permission Entities using the [Permission Entity APIs](/ai-for-service/apis/searchai/permission-entity-apis).
The `sourceACL` field contains four Permission Entities corresponding to the site permissions.
### File-Level Permissions
Site-level permissions apply to all files within that site. File owners can also share files with individual users, internally or externally, or with all domain or organization members.

 ### How Search AI Handles File Permissions
* **Shared with a specific user** — The user is automatically added to the `sourceACL` field during ingestion.
* **Shared with a user group** — The group ID is used to create a Permission Entity that resolves individual users.
* **Shared with a specific domain** — The domain name is stored as a Permission Entity in `sourceACL`. Search AI compares user email domains during answer generation and grants access on a match.
## Related Topics
* [Access Control in Search AI](/ai-for-service/searchai/content-sources#role-based-access-control-racl)
* [Permission Entity APIs](/ai-for-service/apis/searchai/permission-entity-apis)
* [Content Sources](/ai-for-service/searchai/content-sources)
### How Search AI Handles File Permissions
* **Shared with a specific user** — The user is automatically added to the `sourceACL` field during ingestion.
* **Shared with a user group** — The group ID is used to create a Permission Entity that resolves individual users.
* **Shared with a specific domain** — The domain name is stored as a Permission Entity in `sourceACL`. Search AI compares user email domains during answer generation and grants access on a match.
## Related Topics
* [Access Control in Search AI](/ai-for-service/searchai/content-sources#role-based-access-control-racl)
* [Permission Entity APIs](/ai-for-service/apis/searchai/permission-entity-apis)
* [Content Sources](/ai-for-service/searchai/content-sources)