> ## Documentation Index
> Fetch the complete documentation index at: https://koreai.mintlify.site/llms.txt
> Use this file to discover all available pages before exploring further.
# User Management
Manage users, roles, groups, and enterprise directory for your AI for Work account.
***
Only administrators can access User Management settings.
## User Enrollment
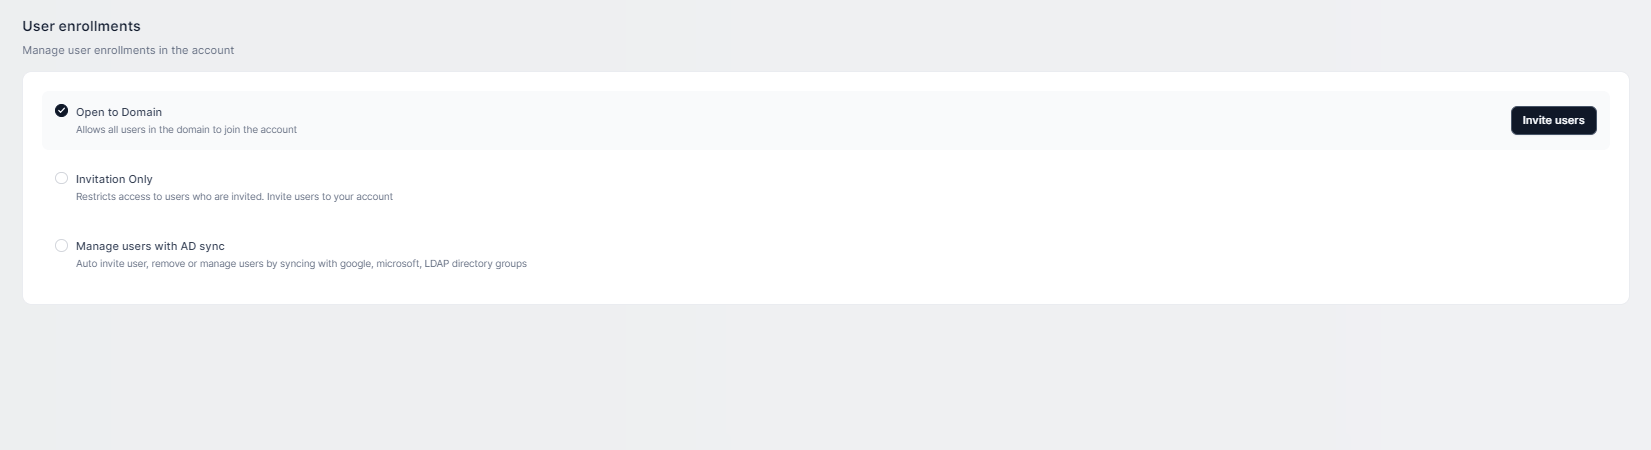
User enrollment controls how users join your account. To change the enrollment mode, go to **Admin Console > User Management > Users** and click **Change** in the top navigation.
| Enrollment Mode | Description |
| ----------------------------- | --------------------------------------------------------------------------------------------------------------------------------------------------------------------------- |
| **Open to Domain** | Any user in your configured domain(s) can log in automatically. |
| **Invite Only** | Only users who receive an explicit invitation can join. |
| **Manage users with AD Sync** | Users are automatically added, updated, or removed by syncing with Google, Microsoft, or LDAP directory groups. Manage service accounts in the **Service Account** section. |
 ### Configure AD Sync Enrollment
1. Click **Manage users with AD Sync**. A pop-up shows the current user count.
2. Click **Confirm** to proceed.
3. Select a distribution list (DL) from your service account and assign a role.
* All users enrolling through this DL receive the assigned role.
* If a user belongs to multiple DLs, the highest role applies: **Admin > Custom Admins > Members**.
4. Click **Sync now** to preview the account delta — users to be added, removed, or updated.
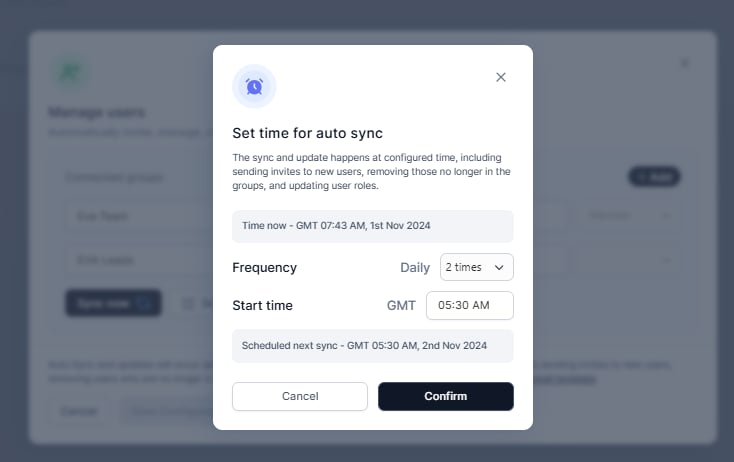
5. Click **Set Sync Now**, choose a sync frequency and start time, then click **Confirm**.
* Auto sync runs daily: it sends invites to new users, removes users no longer in the groups, and updates roles.
6. Click **Save Configuration** to apply all changes.
### Configure AD Sync Enrollment
1. Click **Manage users with AD Sync**. A pop-up shows the current user count.
2. Click **Confirm** to proceed.
3. Select a distribution list (DL) from your service account and assign a role.
* All users enrolling through this DL receive the assigned role.
* If a user belongs to multiple DLs, the highest role applies: **Admin > Custom Admins > Members**.
4. Click **Sync now** to preview the account delta — users to be added, removed, or updated.
5. Click **Set Sync Now**, choose a sync frequency and start time, then click **Confirm**.
* Auto sync runs daily: it sends invites to new users, removes users no longer in the groups, and updates roles.
6. Click **Save Configuration** to apply all changes.
 You cannot save the configuration if the admin making changes is not included in the admin DL.
**AD Sync behavior reference:**
| Behavior | Detail |
| ---------------------------- | ---------------------------------------------------------------------------------------------- |
| Suspend users | Admins can suspend users from the Users page even with AD Sync active. |
| Delete users or change roles | Not allowed while AD Sync is active. |
| Synced DLs | Created as user groups with the same name as the DL. Admins can rename or delete these groups. |
| Super Admins | Never removed from the account by sync. |
| Switching enrollment modes | Switching to **Invite Only** or **Open to Domain** retains all previously synced users. |
***
## Users
Navigate to **Admin Console > User Management > Users** to view and manage all users across your network accounts.
### User Statuses
| Status | Description |
| ------------- | -------------------------------------------------------------------------------------------------------------------------- |
| **Active** | User can log in and interact with other users. |
| **Invited** | User was invited but has not yet accepted. |
| **Suspended** | User cannot log in. An admin can reactivate at any time. |
| **Removed** | Soft-deleted by an admin. The user can be restored to **Active** within 60 days, after which they are permanently deleted. |
The Users table also displays: **USERS** (name + admin indicator), **DESIGNATION**, **ROLE**, and **USER GROUP**.
### View User Details
To open the user details page:
* Hover over a username and click **Open**, or
* Click **More** in the last column of the user's row.
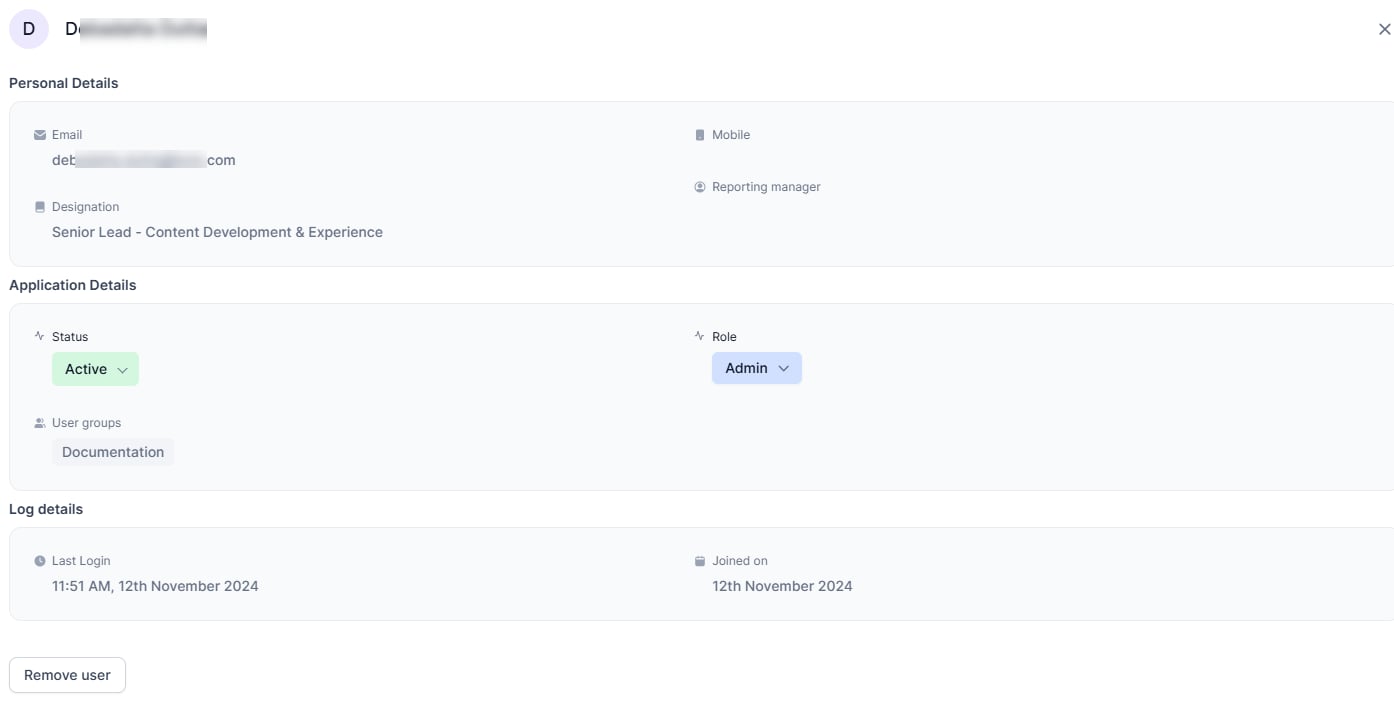
The user details page shows **Personal Details**, **Application Details**, and **Log Details**.
You cannot save the configuration if the admin making changes is not included in the admin DL.
**AD Sync behavior reference:**
| Behavior | Detail |
| ---------------------------- | ---------------------------------------------------------------------------------------------- |
| Suspend users | Admins can suspend users from the Users page even with AD Sync active. |
| Delete users or change roles | Not allowed while AD Sync is active. |
| Synced DLs | Created as user groups with the same name as the DL. Admins can rename or delete these groups. |
| Super Admins | Never removed from the account by sync. |
| Switching enrollment modes | Switching to **Invite Only** or **Open to Domain** retains all previously synced users. |
***
## Users
Navigate to **Admin Console > User Management > Users** to view and manage all users across your network accounts.
### User Statuses
| Status | Description |
| ------------- | -------------------------------------------------------------------------------------------------------------------------- |
| **Active** | User can log in and interact with other users. |
| **Invited** | User was invited but has not yet accepted. |
| **Suspended** | User cannot log in. An admin can reactivate at any time. |
| **Removed** | Soft-deleted by an admin. The user can be restored to **Active** within 60 days, after which they are permanently deleted. |
The Users table also displays: **USERS** (name + admin indicator), **DESIGNATION**, **ROLE**, and **USER GROUP**.
### View User Details
To open the user details page:
* Hover over a username and click **Open**, or
* Click **More** in the last column of the user's row.
The user details page shows **Personal Details**, **Application Details**, and **Log Details**.
 ### Invite Users
**By email:**
1. Click **Invite users** in the top navigation.
2. Select the **Add manual** radio button.
3. Enter one or more email addresses.
4. Click **Invite**.
**By file import:**
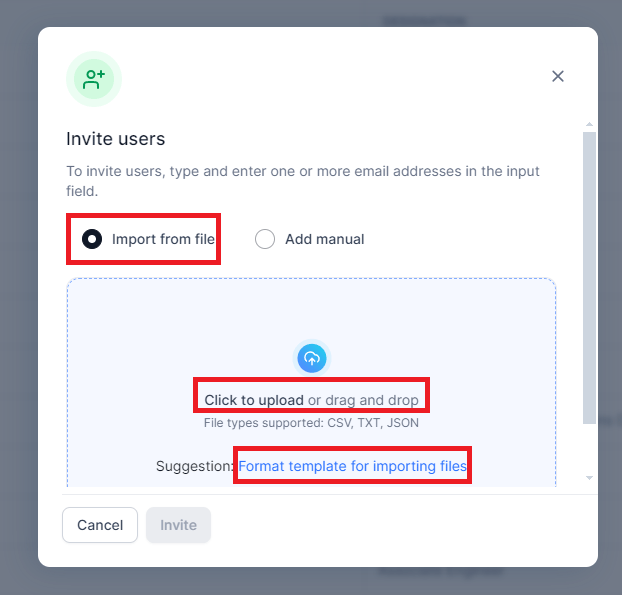
1. Click **Invite users** in the top navigation.
2. Click **Click to upload** or drag and drop your file into the upload area.
* See **Format template for importing files** for file preparation instructions.
3. Click **Invite**.
### Invite Users
**By email:**
1. Click **Invite users** in the top navigation.
2. Select the **Add manual** radio button.
3. Enter one or more email addresses.
4. Click **Invite**.
**By file import:**
1. Click **Invite users** in the top navigation.
2. Click **Click to upload** or drag and drop your file into the upload area.
* See **Format template for importing files** for file preparation instructions.
3. Click **Invite**.
 ### Search, Filter, Sort, and Group
| Tool | Purpose |
| ----------- | --------------------------------------------------------------------- |
| **Search** | Enter keywords to find specific users. Clear the field to view all. |
| **Filter** | Narrow the list by **Status** or **Role**. |
| **Sort By** | Order users by **First name**, **Last name**, or **Last login time**. |
| **Group** | Cluster users by shared attributes such as **Status** or **Role**. |
***
## Roles
Roles control what each user can see and do. Two default roles exist: **Admin** and **Member**.
### Modify an Existing Role
1. In the Users table, click the role displayed for the user you want to update.
2. Select the new role from the dropdown.
3. Confirm the change.
### Create a Custom Role
1. Click **Manage role** from the User Management interface.
2. Click **Add Role**.
3. Enter a **Role name** — use a clear, descriptive name that reflects the role's purpose.
### Search, Filter, Sort, and Group
| Tool | Purpose |
| ----------- | --------------------------------------------------------------------- |
| **Search** | Enter keywords to find specific users. Clear the field to view all. |
| **Filter** | Narrow the list by **Status** or **Role**. |
| **Sort By** | Order users by **First name**, **Last name**, or **Last login time**. |
| **Group** | Cluster users by shared attributes such as **Status** or **Role**. |
***
## Roles
Roles control what each user can see and do. Two default roles exist: **Admin** and **Member**.
### Modify an Existing Role
1. In the Users table, click the role displayed for the user you want to update.
2. Select the new role from the dropdown.
3. Confirm the change.
### Create a Custom Role
1. Click **Manage role** from the User Management interface.
2. Click **Add Role**.
3. Enter a **Role name** — use a clear, descriptive name that reflects the role's purpose.
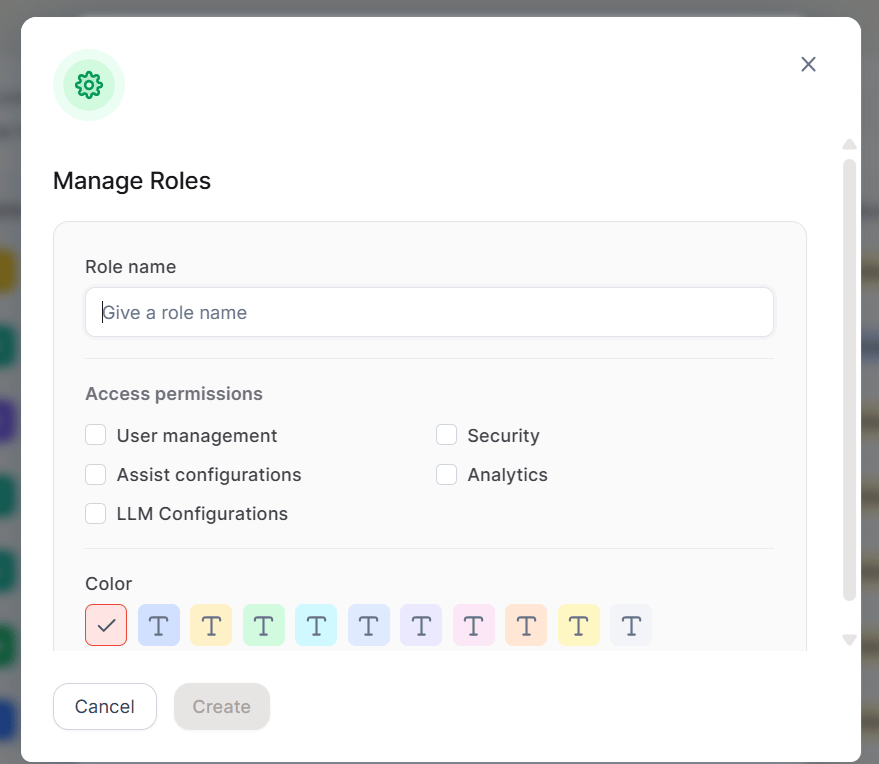 4. Select one or more **Access Permissions**:
| Permission | Description |
| -------------------- | ------------------------------------------- |
| User Management | Access to user and group management. |
| Assist configuration | Access to assistant configuration settings. |
| LLM Configuration | Access to LLM model settings. |
| Security | Access to security settings. |
| Analytics | Access to analytics and reporting. |
5. Choose a **Color** to visually distinguish the role throughout the system.
At least one Access Permission must be selected to create a role.
***
## User Groups
User groups let you organize users by department, location, or any shared attribute. Groups are for administrative use only and are not visible to end users.
Navigate to **Admin Console > User Management > User groups**.
| Column | Description |
| --------------- | ------------------------------------------------------ |
| **GROUP NAME** | Click to edit the group name, description, or members. |
| **DESCRIPTION** | Optional group description. |
| **CREATED BY** | User who created the group. |
| **CREATED ON** | Date and time the group was created. |
Use the **Search** field to find specific groups. Clear the field to view all.
### Create a Group
1. Click **Create group**.
2. Enter a **Group Name** and, optionally, a **Description**.
3. Add users using one of these methods:
| Method | Steps |
| --------------------------- | ----------------------------------------------------------------------------------------------------------------------------------------------------------------------------------------------------------------------- |
| Sync from distribution list | Search for a DL and click **Start Syncing**. |
| Import from file | Click **Click to upload**. Supported formats: XLS, CSV. |
| Add manually | Type the user's name and select from the results. |
| Enterprise Directory | Select users from the employee directory. Add one or more filters based on directory fields, combined using AND logic. Each filter supports one or more values. The user list updates dynamically as you apply filters. |
4. Click **Create group**.
4. Select one or more **Access Permissions**:
| Permission | Description |
| -------------------- | ------------------------------------------- |
| User Management | Access to user and group management. |
| Assist configuration | Access to assistant configuration settings. |
| LLM Configuration | Access to LLM model settings. |
| Security | Access to security settings. |
| Analytics | Access to analytics and reporting. |
5. Choose a **Color** to visually distinguish the role throughout the system.
At least one Access Permission must be selected to create a role.
***
## User Groups
User groups let you organize users by department, location, or any shared attribute. Groups are for administrative use only and are not visible to end users.
Navigate to **Admin Console > User Management > User groups**.
| Column | Description |
| --------------- | ------------------------------------------------------ |
| **GROUP NAME** | Click to edit the group name, description, or members. |
| **DESCRIPTION** | Optional group description. |
| **CREATED BY** | User who created the group. |
| **CREATED ON** | Date and time the group was created. |
Use the **Search** field to find specific groups. Clear the field to view all.
### Create a Group
1. Click **Create group**.
2. Enter a **Group Name** and, optionally, a **Description**.
3. Add users using one of these methods:
| Method | Steps |
| --------------------------- | ----------------------------------------------------------------------------------------------------------------------------------------------------------------------------------------------------------------------- |
| Sync from distribution list | Search for a DL and click **Start Syncing**. |
| Import from file | Click **Click to upload**. Supported formats: XLS, CSV. |
| Add manually | Type the user's name and select from the results. |
| Enterprise Directory | Select users from the employee directory. Add one or more filters based on directory fields, combined using AND logic. Each filter supports one or more values. The user list updates dynamically as you apply filters. |
4. Click **Create group**.
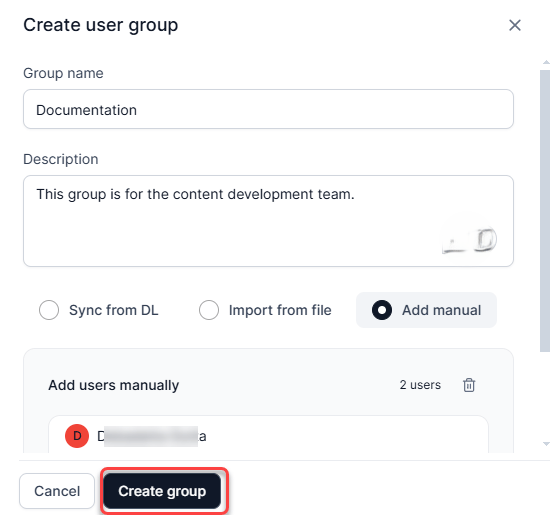 The Enterprise Directory option appears only if employee data is available. If the employee directory is not configured, the Enterprise Directory option disables the Save action.
**Enterprise Directory group behavior**
* You can edit an Enterprise Directory group at any time by updating the filters or modifying the group configuration.
* If filtered fields used in a group are later deleted from the directory, the group continues to exist but becomes empty because the filter values no longer match any records.
* If all employee data in the Enterprise Directory is removed, existing groups remain but become empty.
### Modify a Group
1. On the **User groups** page, click the group name.
2. Edit the description, add users, or hover over a username and click the delete icon to remove them.
3. Click **Back**. Changes are auto-saved.
### Delete a Group
1. On the **User groups** page, click the group name.
2. Click the delete icon.
3. In the confirmation dialog, click **Delete**.
Group deletion is permanent and cannot be undone.
***
## Enterprise Directory
Enterprise Directory delivers a centralized system for employee contact management, featuring intelligent search, flexible filters, and detailed contact profiles.
Access the Employees section from **Admin Hub > Employees**. The section contains two pages: **Directory Configuration** and **Lookup Settings**.
### Lookup Settings
Lookup Settings control how the assistant answers employee-related queries.
**Employee Lookup** is enabled by default. You can turn it on or off using the toggle.
When Employee Lookup is enabled, select one lookup source:
| Source | Availability | Behavior |
| ----------------------- | ------------------------------------------------------------------------------------------ | ----------------------------------------------------------------------------------------------------------------------------------------- |
| **Logged-in User Data** | Always available (default) | The assistant answers employee queries using data available from the logged-in user's account context only |
| **Employee Directory** | Enabled only if a published employee directory with data exists in Directory Configuration | The assistant answers employee queries using the configured directory data |
| **Service Account** | Enabled only if at least one service account is configured | Select a service account from the list. The assistant answers employee queries using data accessible through the selected service account |
**Logged-in User Data** is selected by default when you enable Employee Lookup for the first time or when no employee directory and no service accounts are configured.
If no employee directory is configured, the Employee Directory option is disabled and displays helper text indicating that directory configuration is required, with a link to navigate to Directory Configuration. If no service accounts are configured, the Service Account option is disabled and displays helper text indicating that a service account must be configured, with a link to navigate to Service Accounts.
A help text link in the corner reads "Enable Employee Lookup in Assistant?" Click it to see the steps for enabling this feature.
### Directory Configuration
Go to **Admin Hub > Employees > Directory Configuration**, then click **Add Directory Source** to launch the Configuration Wizard.
**Step 1: Source Configuration**
Select a data source for the directory:
| Source | Steps |
| -------------------------------------- | ---------------------------------------------------------------------------------------------------------------------------------------------------------------------------------------------------------------------------------------- |
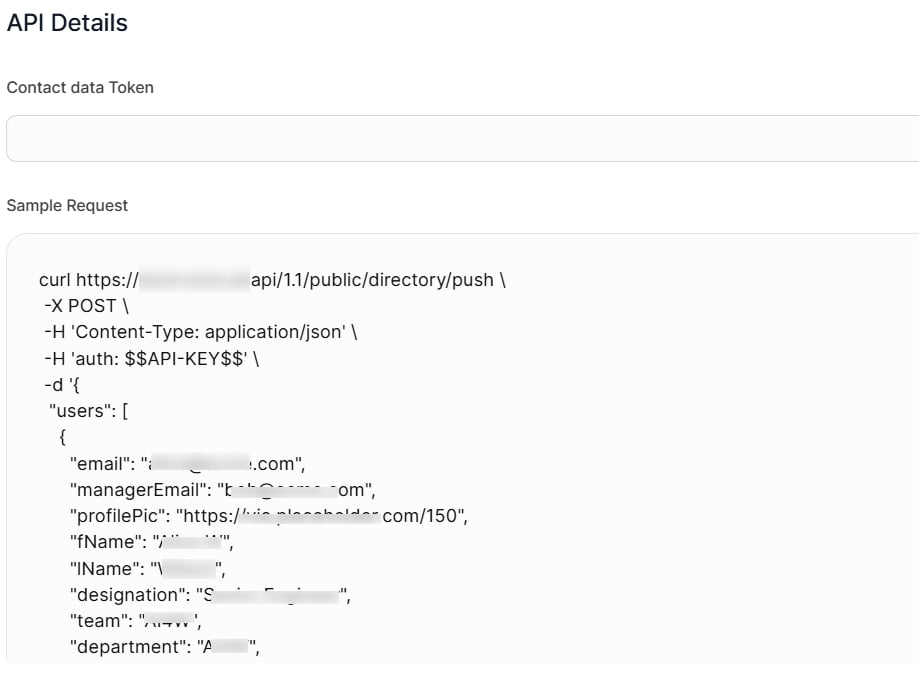
| **Push Data to Directory through API** | Click **Get API Details to Push Data** to retrieve the API endpoint URL, authentication credentials, required data format and schema, and a sample API request payload. Integrate the API in your system to begin pushing employee data. |
| **Service Account** | Select a configured service account (Google, Microsoft, or LDAP) to pull employee data from your organization's directory. |
The Enterprise Directory option appears only if employee data is available. If the employee directory is not configured, the Enterprise Directory option disables the Save action.
**Enterprise Directory group behavior**
* You can edit an Enterprise Directory group at any time by updating the filters or modifying the group configuration.
* If filtered fields used in a group are later deleted from the directory, the group continues to exist but becomes empty because the filter values no longer match any records.
* If all employee data in the Enterprise Directory is removed, existing groups remain but become empty.
### Modify a Group
1. On the **User groups** page, click the group name.
2. Edit the description, add users, or hover over a username and click the delete icon to remove them.
3. Click **Back**. Changes are auto-saved.
### Delete a Group
1. On the **User groups** page, click the group name.
2. Click the delete icon.
3. In the confirmation dialog, click **Delete**.
Group deletion is permanent and cannot be undone.
***
## Enterprise Directory
Enterprise Directory delivers a centralized system for employee contact management, featuring intelligent search, flexible filters, and detailed contact profiles.
Access the Employees section from **Admin Hub > Employees**. The section contains two pages: **Directory Configuration** and **Lookup Settings**.
### Lookup Settings
Lookup Settings control how the assistant answers employee-related queries.
**Employee Lookup** is enabled by default. You can turn it on or off using the toggle.
When Employee Lookup is enabled, select one lookup source:
| Source | Availability | Behavior |
| ----------------------- | ------------------------------------------------------------------------------------------ | ----------------------------------------------------------------------------------------------------------------------------------------- |
| **Logged-in User Data** | Always available (default) | The assistant answers employee queries using data available from the logged-in user's account context only |
| **Employee Directory** | Enabled only if a published employee directory with data exists in Directory Configuration | The assistant answers employee queries using the configured directory data |
| **Service Account** | Enabled only if at least one service account is configured | Select a service account from the list. The assistant answers employee queries using data accessible through the selected service account |
**Logged-in User Data** is selected by default when you enable Employee Lookup for the first time or when no employee directory and no service accounts are configured.
If no employee directory is configured, the Employee Directory option is disabled and displays helper text indicating that directory configuration is required, with a link to navigate to Directory Configuration. If no service accounts are configured, the Service Account option is disabled and displays helper text indicating that a service account must be configured, with a link to navigate to Service Accounts.
A help text link in the corner reads "Enable Employee Lookup in Assistant?" Click it to see the steps for enabling this feature.
### Directory Configuration
Go to **Admin Hub > Employees > Directory Configuration**, then click **Add Directory Source** to launch the Configuration Wizard.
**Step 1: Source Configuration**
Select a data source for the directory:
| Source | Steps |
| -------------------------------------- | ---------------------------------------------------------------------------------------------------------------------------------------------------------------------------------------------------------------------------------------- |
| **Push Data to Directory through API** | Click **Get API Details to Push Data** to retrieve the API endpoint URL, authentication credentials, required data format and schema, and a sample API request payload. Integrate the API in your system to begin pushing employee data. |
| **Service Account** | Select a configured service account (Google, Microsoft, or LDAP) to pull employee data from your organization's directory. |
 **Step 2: Field Configuration**
Configure the fields used to capture employee information.
| Field Type | Behavior |
| ------------------ | ---------------------------------------------------------- |
| **Default fields** | Name, Designation, Phone, Email — protected from deletion. |
| **Custom fields** | Add or remove at any time for organization-specific data. |
At minimum, configure the four mandatory fields: **Name, Designation, Phone, Email**.
**For Service Account sources**: All default fields appear prefilled with mapping keys. You can add new custom fields, modify key mappings, and delete custom fields. Default fields cannot be deleted. At least one mapped field is required to proceed.
**Step 3: Data Synchronization**
**For API sources**: The directory updates automatically each time your system pushes data via the API.
| Feature | Detail |
| ------------------ | ------------------------------------------------------------------------------------------------------------------------------------- |
| **API Token** | Access from **Get API Details to Push Data**. Include in the `auth` header of all API requests. Regenerate periodically for security. |
| **Last updated** | Timestamp of the most recent data push. |
| **Record summary** | Count of records added, updated, or deleted in the last push. |
| **Manual updates** | Call the Push API endpoint with updated employee data to trigger an immediate update. |
**For Service Account sources**: Click **Sync** to initiate a data sync. The page displays the last synced timestamp and the number of records added, updated, or deleted.
Configure a sync schedule:
| Setting | Options |
| ---------------------- | --------------------------------------------------------------- |
| **Frequency** | Daily, Weekly, Monthly, Never |
| **Day** | Specific day (for example, Monday, or 1 through 31 for monthly) |
| **Time and time zone** | Specific time in your preferred time zone |
The default frequency is **Never**. You must set a schedule to enable automatic syncing.
**Step 4: Display Settings**
**Hide conditions** — Control which contacts are visible to end users:
| Condition | Behavior |
| --------------------- | ------------------------------------------------------------------- |
| **Full string match** | Hides contacts where the field exactly matches the specified value. |
| **Starts with** | Hides contacts where the field begins with the specified prefix. |
**Detail card layout** — Customize field order and visibility:
1. Click **Edit Layout**.
2. Drag and drop fields to reorder them. Name, Designation, Phone, and Email are fixed at the top.
3. Hide non-essential fields. The four mandatory fields cannot be hidden.
4. Preview changes in real time.
**Filter settings** — Select single-select fields (for example, Department, Designation, Location) to expose as search filters for end users. Only fields with discrete values can be used as filters.
**Organization chart root user**: Control which employee appears at the top of the organization chart:
* **Auto-selection**: On the first sync, the platform automatically selects the user with the highest number of direct and indirect reportees as the root user. The selection persists across all subsequent syncs.
* **Manual override**: Select a different root user at any time from the list of users without an assigned manager. The manual selection persists across subsequent syncs.
* **Reassignment on manager assignment**: If the root user is assigned a reporting manager, that manager automatically becomes the new root user. If the new root user also has a manager, the platform traverses up the reporting chain until it finds the topmost user without a manager.
* **Reassignment on deletion**: If the root user is deleted, the platform automatically reassigns the root to the user with the next highest number of direct and indirect reportees.
* **Notification**: After any automatic reassignment, the platform notifies administrators so they can review or override the new root user.
Manually selected root users follow the same reassignment rules: deletion or manager assignment triggers automatic reassignment.
**Step 5: Publish the Directory**
Publishing requires at least one record in the directory. Only directories that are ready to publish (not in draft state or empty) can be published.
1. Push at least one contact record via the API or sync at least one record from a service account.
2. Choose a publishing scope:
* **Publish to all users**: Makes the directory immediately available to everyone in the account.
* **Keep unpublished**: Saves the configuration for later activation.
3. Click **Publish**.
After publishing, the admin view shows: publish status, last synced date (for service account sources) or last updated date (for API sources), record count summary, display settings overview, and a live preview of the directory.
**Hide individual contacts**: In the admin preview, hover over a contact card and click the hide icon. The contact remains in the directory data but is not visible to users.
***
## Partners
The **Partners** tab lets administrators manage external partner users from configured partner domains.
**Navigation**: Admin Console > User Management > Partners
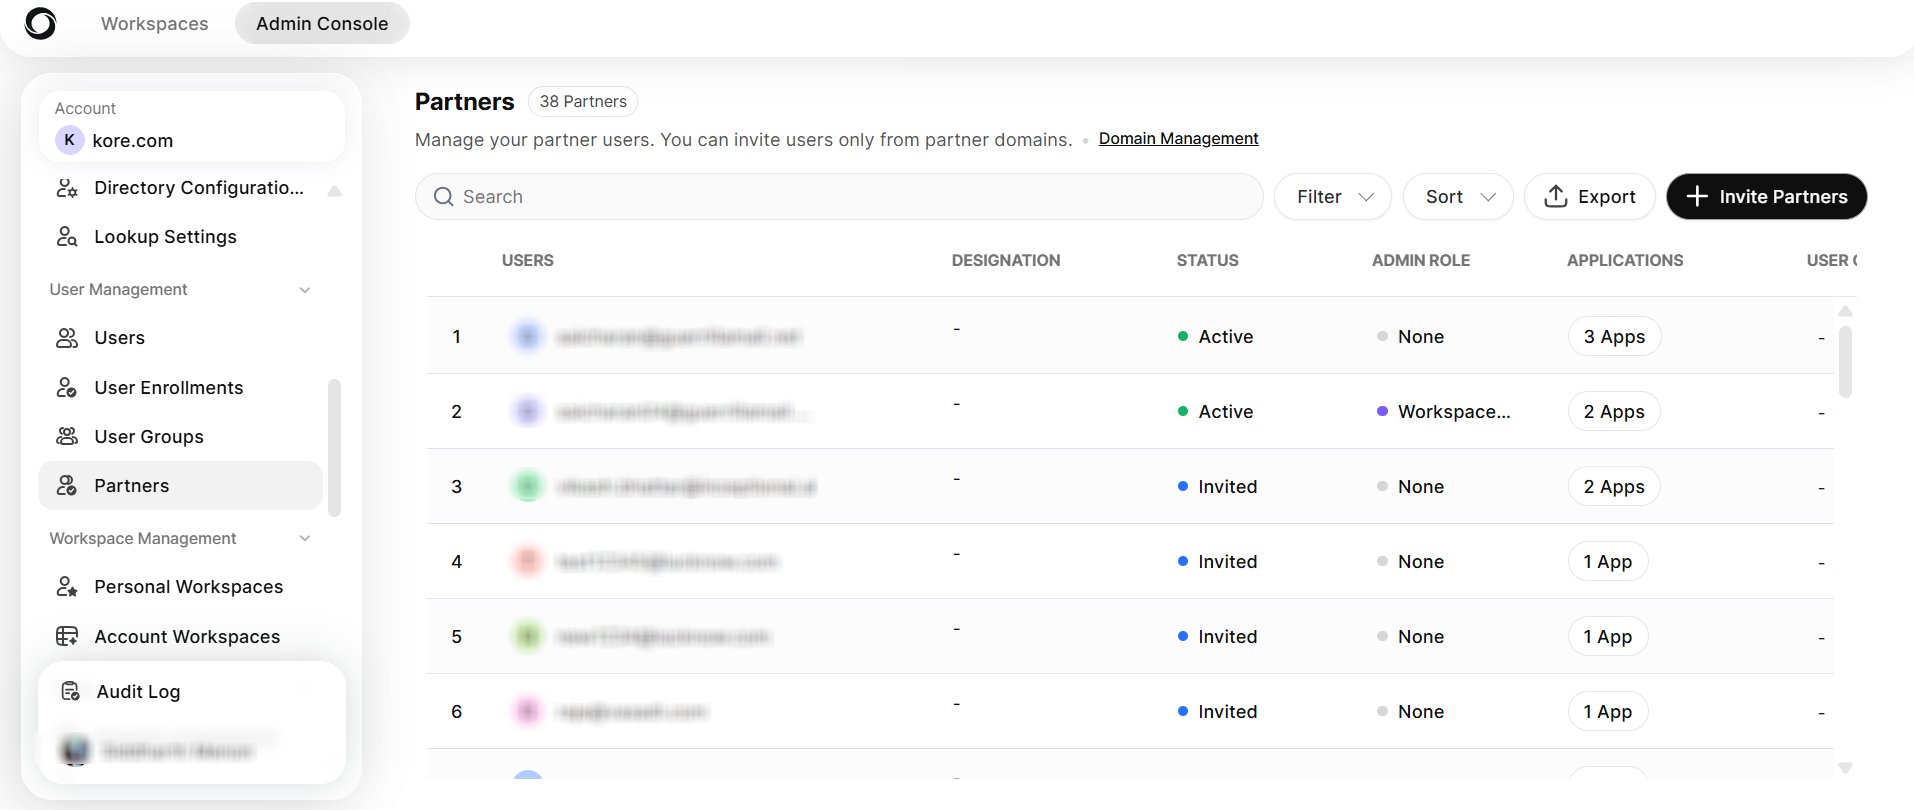
The partner list displays the following columns: **Users**, **Designation**, **Status**, **Admin Role**, **Applications**, and **User Groups**. Use the **Search** bar to find specific partners. Click **Filter**, **Sort**, or **Export** to manage the list. Exported files follow the naming format `Partner-list_YYYY-MMM-DD_HH-mm.csv`.
**Step 2: Field Configuration**
Configure the fields used to capture employee information.
| Field Type | Behavior |
| ------------------ | ---------------------------------------------------------- |
| **Default fields** | Name, Designation, Phone, Email — protected from deletion. |
| **Custom fields** | Add or remove at any time for organization-specific data. |
At minimum, configure the four mandatory fields: **Name, Designation, Phone, Email**.
**For Service Account sources**: All default fields appear prefilled with mapping keys. You can add new custom fields, modify key mappings, and delete custom fields. Default fields cannot be deleted. At least one mapped field is required to proceed.
**Step 3: Data Synchronization**
**For API sources**: The directory updates automatically each time your system pushes data via the API.
| Feature | Detail |
| ------------------ | ------------------------------------------------------------------------------------------------------------------------------------- |
| **API Token** | Access from **Get API Details to Push Data**. Include in the `auth` header of all API requests. Regenerate periodically for security. |
| **Last updated** | Timestamp of the most recent data push. |
| **Record summary** | Count of records added, updated, or deleted in the last push. |
| **Manual updates** | Call the Push API endpoint with updated employee data to trigger an immediate update. |
**For Service Account sources**: Click **Sync** to initiate a data sync. The page displays the last synced timestamp and the number of records added, updated, or deleted.
Configure a sync schedule:
| Setting | Options |
| ---------------------- | --------------------------------------------------------------- |
| **Frequency** | Daily, Weekly, Monthly, Never |
| **Day** | Specific day (for example, Monday, or 1 through 31 for monthly) |
| **Time and time zone** | Specific time in your preferred time zone |
The default frequency is **Never**. You must set a schedule to enable automatic syncing.
**Step 4: Display Settings**
**Hide conditions** — Control which contacts are visible to end users:
| Condition | Behavior |
| --------------------- | ------------------------------------------------------------------- |
| **Full string match** | Hides contacts where the field exactly matches the specified value. |
| **Starts with** | Hides contacts where the field begins with the specified prefix. |
**Detail card layout** — Customize field order and visibility:
1. Click **Edit Layout**.
2. Drag and drop fields to reorder them. Name, Designation, Phone, and Email are fixed at the top.
3. Hide non-essential fields. The four mandatory fields cannot be hidden.
4. Preview changes in real time.
**Filter settings** — Select single-select fields (for example, Department, Designation, Location) to expose as search filters for end users. Only fields with discrete values can be used as filters.
**Organization chart root user**: Control which employee appears at the top of the organization chart:
* **Auto-selection**: On the first sync, the platform automatically selects the user with the highest number of direct and indirect reportees as the root user. The selection persists across all subsequent syncs.
* **Manual override**: Select a different root user at any time from the list of users without an assigned manager. The manual selection persists across subsequent syncs.
* **Reassignment on manager assignment**: If the root user is assigned a reporting manager, that manager automatically becomes the new root user. If the new root user also has a manager, the platform traverses up the reporting chain until it finds the topmost user without a manager.
* **Reassignment on deletion**: If the root user is deleted, the platform automatically reassigns the root to the user with the next highest number of direct and indirect reportees.
* **Notification**: After any automatic reassignment, the platform notifies administrators so they can review or override the new root user.
Manually selected root users follow the same reassignment rules: deletion or manager assignment triggers automatic reassignment.
**Step 5: Publish the Directory**
Publishing requires at least one record in the directory. Only directories that are ready to publish (not in draft state or empty) can be published.
1. Push at least one contact record via the API or sync at least one record from a service account.
2. Choose a publishing scope:
* **Publish to all users**: Makes the directory immediately available to everyone in the account.
* **Keep unpublished**: Saves the configuration for later activation.
3. Click **Publish**.
After publishing, the admin view shows: publish status, last synced date (for service account sources) or last updated date (for API sources), record count summary, display settings overview, and a live preview of the directory.
**Hide individual contacts**: In the admin preview, hover over a contact card and click the hide icon. The contact remains in the directory data but is not visible to users.
***
## Partners
The **Partners** tab lets administrators manage external partner users from configured partner domains.
**Navigation**: Admin Console > User Management > Partners
The partner list displays the following columns: **Users**, **Designation**, **Status**, **Admin Role**, **Applications**, and **User Groups**. Use the **Search** bar to find specific partners. Click **Filter**, **Sort**, or **Export** to manage the list. Exported files follow the naming format `Partner-list_YYYY-MMM-DD_HH-mm.csv`.
 ### Invite Partners
1. Click **+ Invite Partners**.
2. In the **Invite Partners** popup, enter the partner's email address in the input field. You can invite users only from configured partner domains.
3. Select an **Admin Role** from the dropdown.
4. Set the number of **Applications** the partner can access.
5. Click **Add** to add the partner to the invite list.
6. Click **Invite** to send the invitation.
You can also click **Import from File** to invite multiple partners at once.
If you enter an email address that does not belong to a configured partner domain, an inline error displays: "Invalid domain."
If no partner domains exist in **Domain Management**, the Partners page shows an empty state that prompts you to add partner domains first, with a link to **Domain Management**. If you do not have access to Domain Management, hovering over the link shows a tooltip: "You don't have access."
Partner invitations are independent of the user enrollment setting.
### Manage Partner Users
Click the three-dot menu next to any partner to access these options:
| Action | Description |
| ---------------------- | ------------------------------------------------------ |
| **View details** | View the partner's profile and activity |
| **Change role** | Assign a different admin role to the partner |
| **Suspend** | Temporarily suspend the partner's access |
| **Delete** | Remove the partner from the account |
| **Permanently delete** | Permanently delete the partner and all associated data |
### Domain Management for Partners
When adding a partner domain in **Domain Management**, a message informs you that partners must be invited through the **Partners** page, with a link to navigate there. If you do not have access to the Partners page, hovering over the link shows a tooltip: "You don't have access to Partners page."
You cannot delete a partner domain if partner users from that domain exist in the account. A message displays: "You must remove all users from this domain before deleting it." Remove all associated partner users before deleting the domain.
***
### Invite Partners
1. Click **+ Invite Partners**.
2. In the **Invite Partners** popup, enter the partner's email address in the input field. You can invite users only from configured partner domains.
3. Select an **Admin Role** from the dropdown.
4. Set the number of **Applications** the partner can access.
5. Click **Add** to add the partner to the invite list.
6. Click **Invite** to send the invitation.
You can also click **Import from File** to invite multiple partners at once.
If you enter an email address that does not belong to a configured partner domain, an inline error displays: "Invalid domain."
If no partner domains exist in **Domain Management**, the Partners page shows an empty state that prompts you to add partner domains first, with a link to **Domain Management**. If you do not have access to Domain Management, hovering over the link shows a tooltip: "You don't have access."
Partner invitations are independent of the user enrollment setting.
### Manage Partner Users
Click the three-dot menu next to any partner to access these options:
| Action | Description |
| ---------------------- | ------------------------------------------------------ |
| **View details** | View the partner's profile and activity |
| **Change role** | Assign a different admin role to the partner |
| **Suspend** | Temporarily suspend the partner's access |
| **Delete** | Remove the partner from the account |
| **Permanently delete** | Permanently delete the partner and all associated data |
### Domain Management for Partners
When adding a partner domain in **Domain Management**, a message informs you that partners must be invited through the **Partners** page, with a link to navigate there. If you do not have access to the Partners page, hovering over the link shows a tooltip: "You don't have access to Partners page."
You cannot delete a partner domain if partner users from that domain exist in the account. A message displays: "You must remove all users from this domain before deleting it." Remove all associated partner users before deleting the domain.
***