> ## Documentation Index
> Fetch the complete documentation index at: https://koreai.mintlify.site/llms.txt
> Use this file to discover all available pages before exploring further.
# Channels
Deploy AI for Work directly inside your organization's collaboration platforms and host applications. This guide covers integration with **Microsoft Teams**, **Slack**, and the **Web/Mobile SDK**, including architecture, prerequisites, and step-by-step configuration.
***
## Microsoft Teams
AI for Work integrates with Microsoft Teams using Azure Bot Service, enabling users to access AI assistance, receive proactive notifications, and use Copilot features without leaving Teams.
### When to Use
| Scenario | Details |
| --------------------------- | ---------------------------------------------------------------------------------------------- |
| **Heavy Teams usage** | Organizations using Teams as the primary hub for communication, meetings, and file sharing |
| **Workflow integration** | Teams needing AI assistance during active chats, meetings, or collaborative document sessions |
| **Proactive notifications** | Businesses requiring AI-driven alerts, reminders, or time-sensitive updates delivered in Teams |
| **Copilot enhancement** | Companies extending standard Copilot with custom AI agents and specialized workflows |
### Architecture
The integration uses Azure Bot Service as the communication bridge:
```
[AI for Work Platform] ↔ [Azure Bot Service] ↔ [Microsoft Teams]
```
| Component | Role |
| -------------------------- | ---------------------------------------------- |
| **AI for Work Platform** | Processes user requests |
| **Azure Bot Service** | Routes messages between the platform and Teams |
| **Microsoft Teams** | User-facing interface |
| **Azure App Registration** | Manages authentication and permissions |
### Prerequisites
| Requirement | Details |
| ----------------------- | --------------------------------------------------------------------- |
| **Azure Subscription** | Active subscription with administrative privileges |
| **Teams Admin Access** | Permission to upload and manage custom apps in the Teams Admin Center |
| **AI for Work Account** | Active subscription with access to the Admin Console |
### Configuration
Follow these phases sequentially to ensure proper deployment and functionality.
**Phase 1: Initial Setup and Webhook Configuration**
**Objective:** Establish communication between AI for Work and Azure Bot Service.
1. Log in to the **Admin Console**.
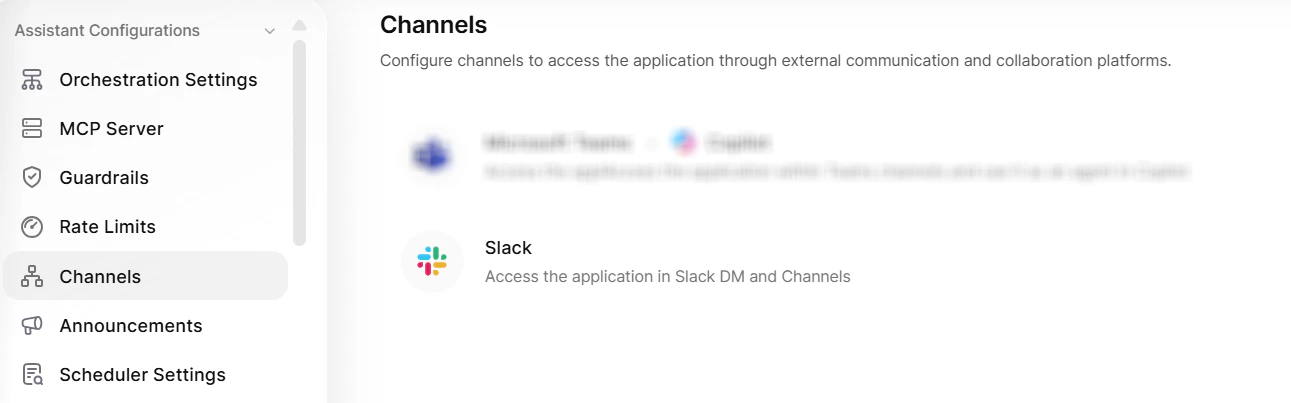
2. Navigate to **Channels** > **Microsoft Teams and Copilot**.
3. Copy and save the **Webhook URL**, to use in Azure Bot configuration later.
**Phase 2: Azure Bot Service Creation**
Create and configure the Azure Bot that serves as the communication bridge.
**Create Azure Bot Resource**
1. Sign in to the **Azure Portal**.
2. Click **+ Create a resource** → Search for **Azure Bot**.
3. Select **Azure Bot** and configure the following:
* **Bot Handle**: Choose a unique name.
* **Subscription**: Select your active subscription.
* **Resource Group**: Create or reuse an existing group.
* **Pricing Tier**: Select based on expected usage.
* **App Type**: Select **Multi-Tenant** or **Single-Tenant** based on organizational needs.
**Configure Bot Resource**
1. After deployment completes, click **Go to resource** and navigate to **Configuration** in the left sidebar.
2. Paste the webhook URL copied from the AI for Work platform into the **Messaging endpoint** field and click **Apply** to save the configuration.
**Phase 3: Authentication and Security Setup**
This phase varies based on your chosen App Type (MultiTenant vs SingleTenant).
**For MultiTenant Applications**
**Generate Client Secret**
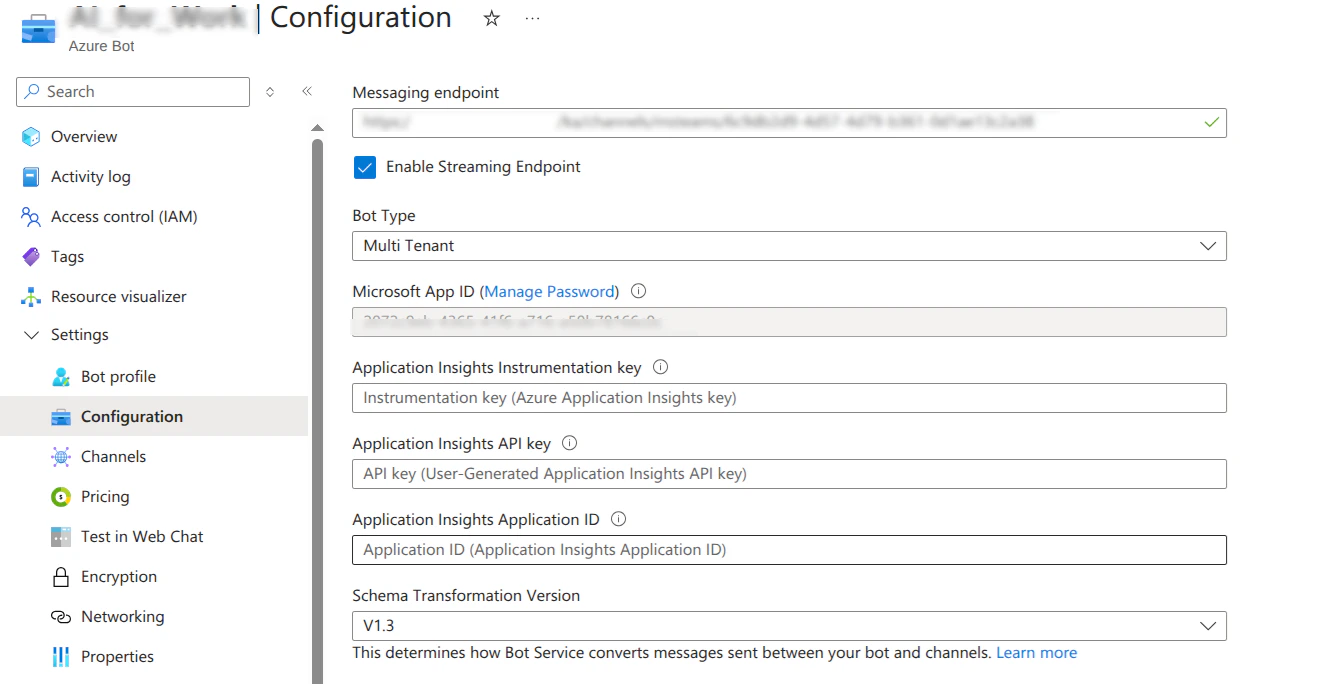
1. In **Configuration**, click **Manage Password** next to the Microsoft App ID.
2. Go to **Certificates & secrets** → **+ New client secret**.
3. Enter description and expiry → **Add**.
4. Copy the **Value** of the client secret (App Password).
5. Record the **Microsoft App ID** and **App Password** for the Platform configuration.
**For Single-Tenant Applications**
Follow the steps for Multi-Tenant setup. Also, note the Tenant ID for the Platform configuration.
**Phase 4: Enable Microsoft Teams Channel Integration**
Configure the bot to communicate with Microsoft Teams and enable Copilot integration.
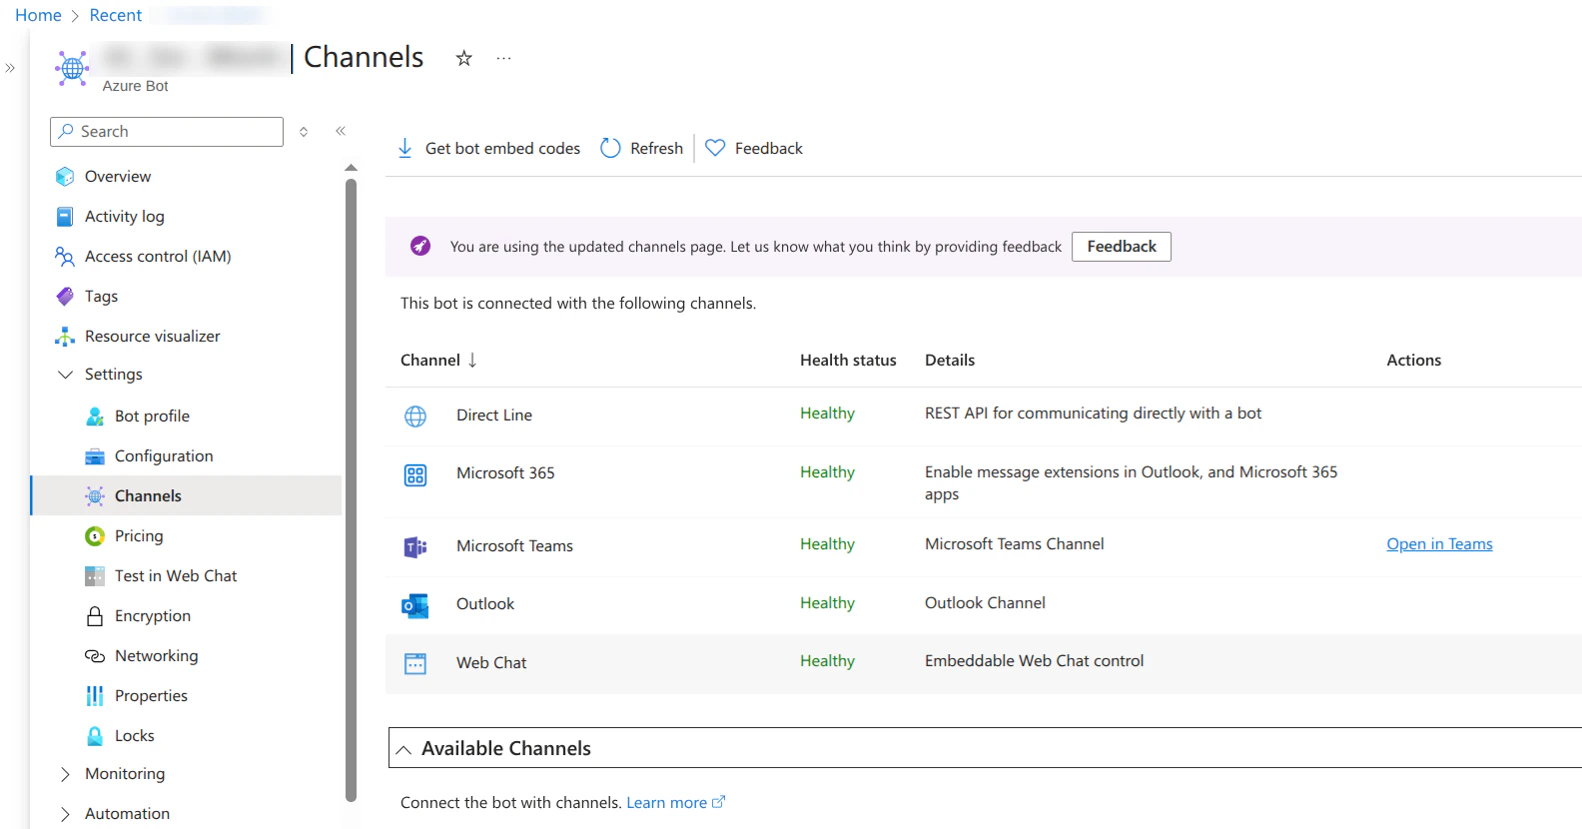
1. Navigate to **Channels** in the bot resource menu and locate the **Available Channels** section.
2. Select the **Microsoft Teams** channel and **M365 Extensions** channel (required for Copilot integration), review channel information, and select **Save**.
This integration doesn't support the Web Chat channel, so keep it disabled.
**Phase 5: Proactive Notifications Setup**
Enable the bot to send proactive notifications to users, which is essential for AI-driven interactions.
**Create App Registration for Notifications**
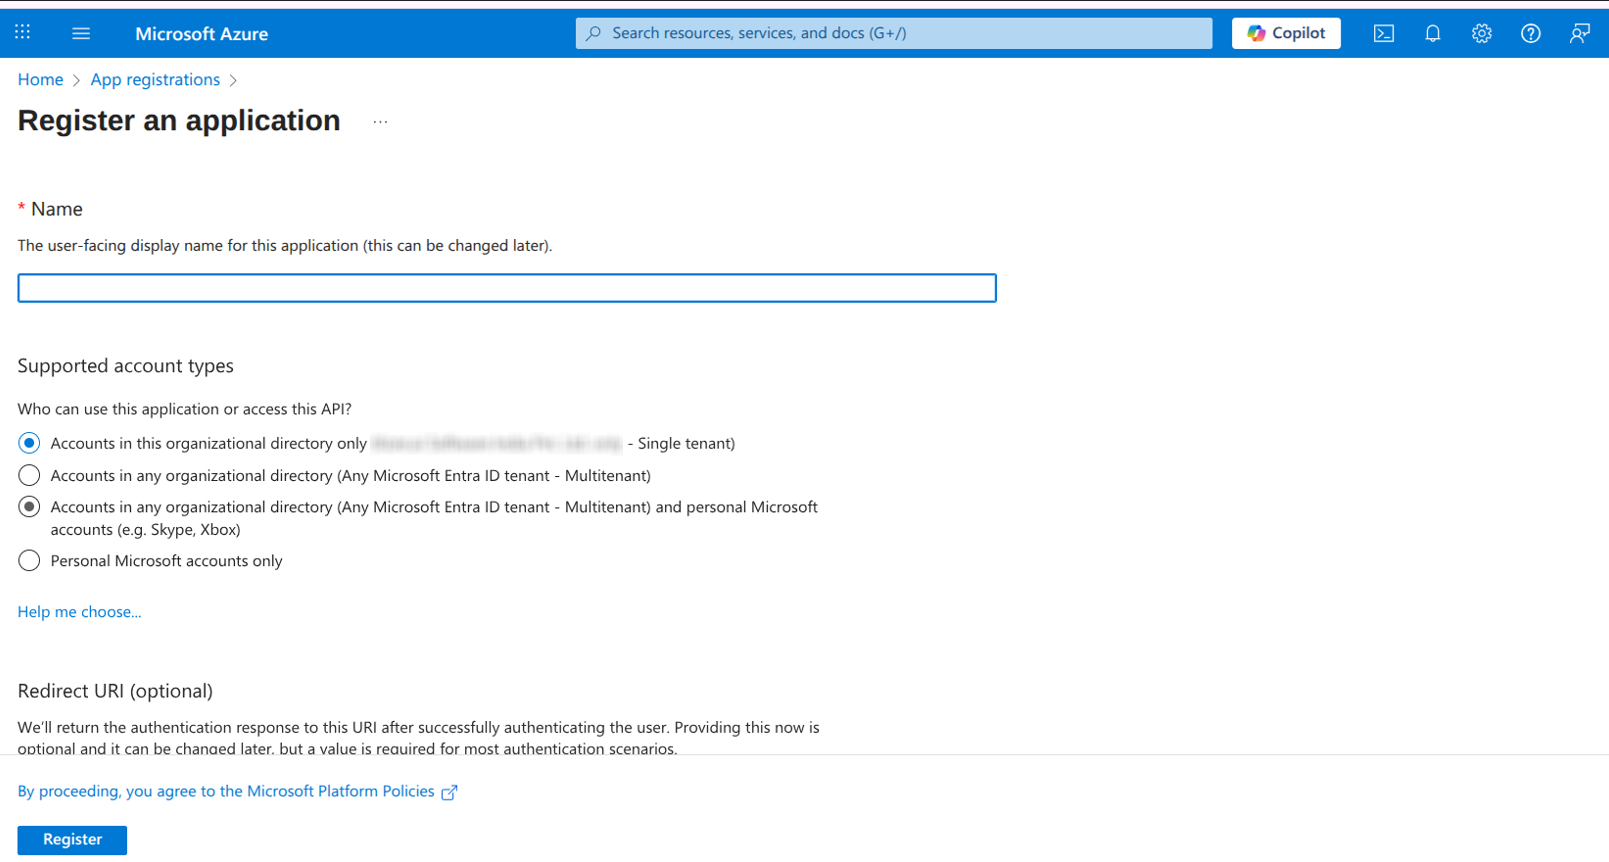
1. In the Azure Portal, navigate to **App registrations** and select **+ New registration**.
2. Register New Application:
* **Name**: Provide a descriptive name (for example, Platform-Microsoft Teams-Notifications).
* **Supported account types**: Choose based on organizational requirements.
* **Redirect URI**: Leave blank for this use case.
3. Select **Register.**
**Add Microsoft Graph Permissions**
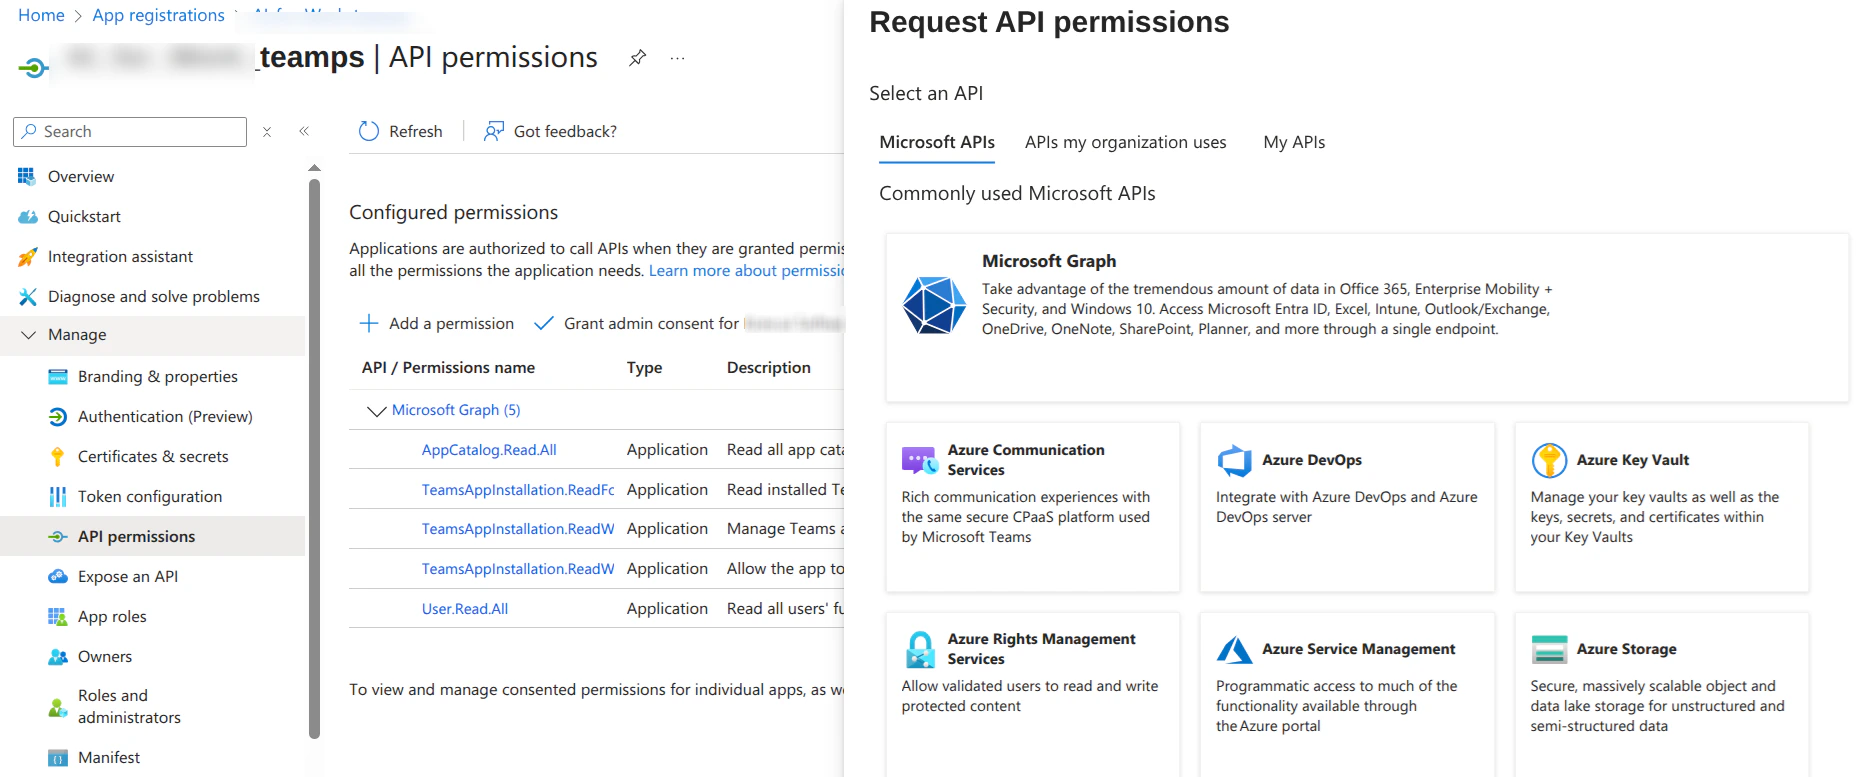
1. In the app registration, navigate to **API permissions** and select **Add a permission**.
2. Select **Microsoft Graph** → **Application permissions.**
**Required Permissions**: Add the following permissions for full functionality:
* `TeamsAppInstallation.ReadForUser.All`
* `TeamsAppInstallation.ReadWriteSelfForUser.All`
* `TeamsAppInstallation.ReadWriteForUser.All`
* `User.Read.All`
* `AppCatalog.Read.All`
3. Grant **Admin Consent.**
4. Generate a **Client Secret** and note down **App ID**, **Directory (Tenant) ID**.
5. Configure these values in AI for Work under **Microsoft Teams & Copilot Channel Settings**.
6. Generate a **JWT token** for secure communication.
**Phase 6: Configure AI for Work Platform**
Provide Azure Bot credentials to the Platform to establish secure communication.
1. Navigate to the Admin Console.
2. Locate **Channels** on the left pane.
3. Select **Microsoft Teams and Copilot**.
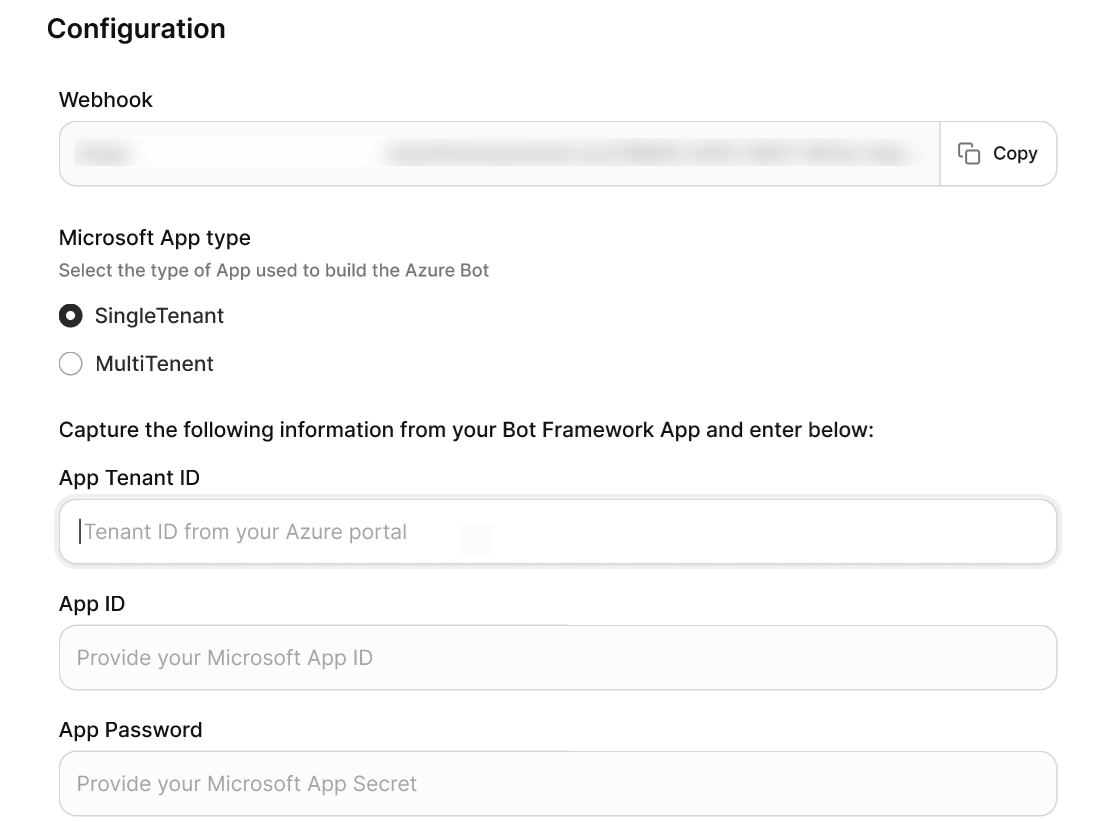
4. Enter the following credentials under **Configuration**:
* **Microsoft App Tenant ID**: (SingleTenant only) The tenant ID from the bot's app registration.
* **Microsoft App ID**: The App ID from your Azure Bot resource.
* **App Password**: The client secret from the bot's app registration.
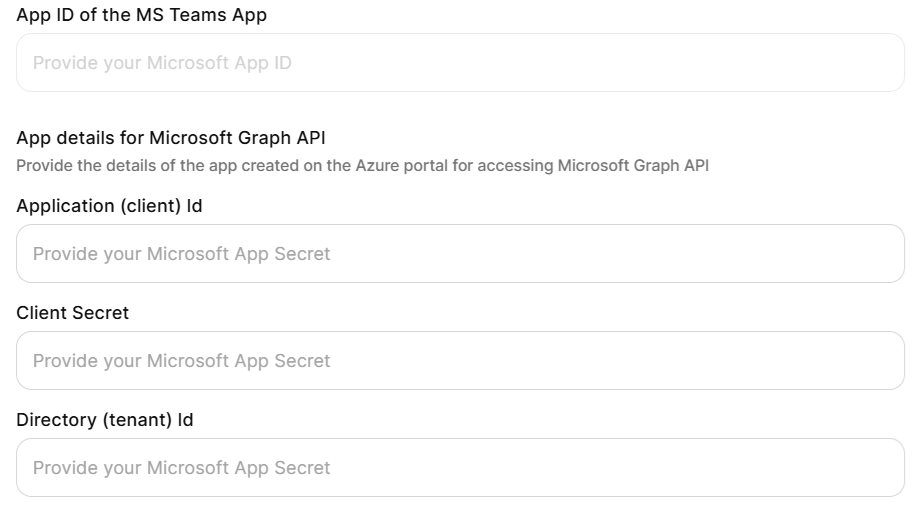
* **App ID of the Microsoft Teams App**: The additional app credentials for sending Proactive Notifications.
* **Application (Client) ID**: From the notifications app registration.
* **Client Secret**: From the notifications app registration.
* **Delivery (Tenant) ID**: From the notifications app registration.
**Customization Options**
By default, the Microsoft Teams app appears with the name **AI for Work**, the standard logo, and the default description. Administrators can customize the application before publishing to Microsoft Teams:
* **App Name** – Choose a custom display name for Microsoft Teams.
* **Logo** – Upload an organization-specific logo.
* **Description** – Provide a tailored description that reflects organizational context.
**Copilot Enablement**
During configuration, you are prompted to **Enable Copilot Integration**. We recommended you to enable this option so that Teams users can access the Platform features using Copilot.
**Phase 7: Upload Custom App to Teams Admin Center**
Upload the Platform app package to the Teams Admin Center so it's available within your organization.
**Generate Application Package**
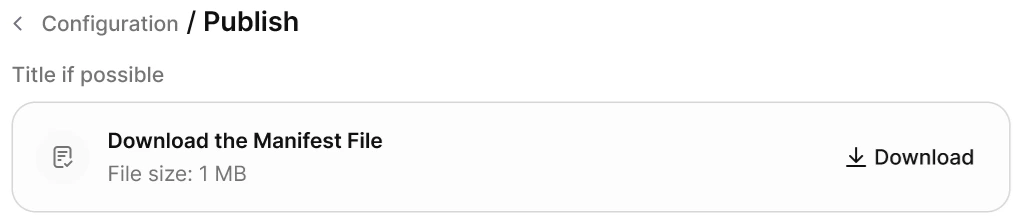
Upon configuring credentials in the Platform, generate and download the Teams application package (ZIP file). This package contains the app manifest and all required configurations for the integration.
**Upload to Teams Admin Center**
Ensure you have the necessary admin permissions in the Teams Admin Center. Verify organizational policies allow custom app uploads.
1. Sign in to [Microsoft Teams Admin Center](https://admin.teams.microsoft.com/).
2. Navigate to **Teams apps** → **Manage apps**.
3. Click **Upload new app** and select the downloaded application package. Wait for upload and verify to complete.
Once uploaded, the app appears as a custom app within your organization's Teams Admin Center. It isn't published to the public Teams App Store.
**Configure App Permissions and Policies**
Review the uploaded application details and configure app permission policies as needed. Set up app setup policies for automatic installation (optional).
**Phase 8: User Access Configuration**
You can decide how to distribute the custom app within your organization:
* **Add App for All Users** (Recommended) — Automatically installs the custom app for all employees in the organization. All users receive a notification in Microsoft Teams and a **welcome message** when the app is added.
Users must also be provisioned in the **Account Hub** of the Platform to access the app.
* **Let Users Add the App Themselves** — The custom app is available in the organization's app catalog within Teams. Users need to search for the app in the **Apps** section in Teams and add it manually. No automatic notifications or installations occur.
Users must be present in the **Account Hub** to use the app.
* **Add App for Selected Users or User Groups** — Uses app setup policies to assign the app only to specific users or security groups. Selected users are automatically notified in Microsoft Teams and receive the welcome message. Other users can find and install the app from the organization's app catalog if permitted by policy.
Selected users must also exist in the **Account Hub** for access.
### Troubleshooting
**Bot Not Responding in Microsoft Teams**
* Verify the webhook URL is correctly configured in Azure Bot.
* Check that the Microsoft Teams channel is enabled and saved.
* Validate client secrets haven't expired.
**Authentication Failures**
* Confirm admin consent is granted for all required API permissions.
* Verify client secrets are copied correctly (Value, not Secret ID).
* Check tenant ID matches between configurations.
**App Upload Failures**
* Ensure you have proper admin permissions in the Teams Admin Center.
* Verify the application package isn't corrupted during download.
* Check organizational policies allow custom app uploads.
**Proactive Notifications Not Working**
* Verify that admin consent is granted for all required Microsoft Graph permissions.
* Verify that the notification app registration client secret is valid.
* Ensure JWT token generation is working correctly.
***
## Slack
AI for Work integrates with Slack as a custom app, enabling users to perform work tasks, query enterprise knowledge, and interact with AI agents in direct messages and channels without leaving Slack.
### When to Use
| Scenario | Details |
| ---------------------------------- | -------------------------------------------------------------------------------------------------------------------------- |
| **Seamless workflow integration** | Teams that need AI assistance during active conversations, with persistent chat history and context retention |
| **Enterprise knowledge access** | Organizations that connect users to knowledge repositories, documents, LLMs, and data-driven answers within Slack channels |
| **Heavy Slack usage** | Remote or hybrid teams that treat Slack as their central hub for communication and project coordination |
| **Channel-level AI customization** | Organizations that require different agents, reply modes, or search sources for specific Slack channels |
### Architecture
The integration uses Slack's Developer Portal and OAuth authentication:
```
[AI for Work Platform] <> [Slack App Configuration] <> [Slack Workspace]
```
### Prerequisites
| Requirement | Details |
| --------------------------------- | ------------------------------------------------------ |
| **Slack Workspace** | Active workspace with administrative privileges |
| **Slack Developer Portal Access** | Permission to create and manage apps in your workspace |
| **AI for Work Account** | Active subscription with access to the Admin Console |
### Integration Lifecycle
| Phase | Steps |
| ------------------------------ | --------------------------------------------------------------------------------------------------------------------------------------------- |
| **Configuration and creation** | Customize app details in the Admin Console to generate an App Manifest, then use the manifest to create the app in the Slack Developer Portal |
| **Connection and security** | Exchange credentials to link the platforms, then authorize the required permissions |
| **Rollout** | Define the welcome experience, configure publish settings and channel governance, then grant user access to onboarded employees |
### Configuration
**Step 1: Configure App Display Settings**
* Log in to the **Admin Console**.
* Navigate to **Channels** > **Slack**.
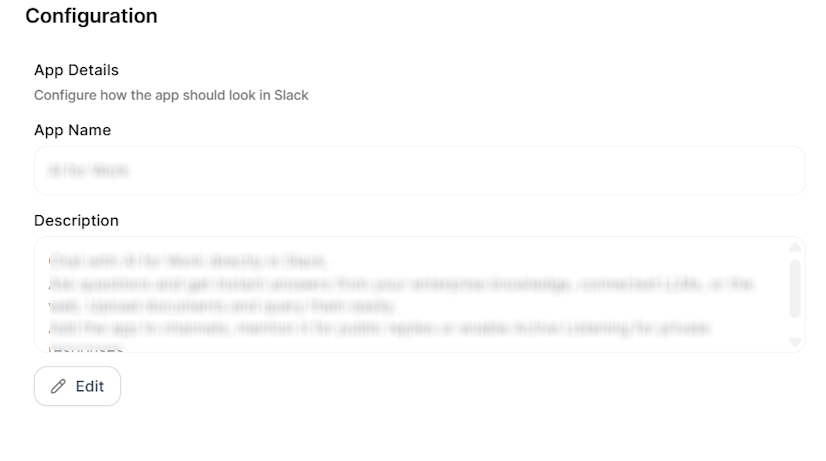
* Open the **Configuration** page and set the following:
| Setting | Description |
| ------------------- | ------------------------------------------------------------------------------ |
| **App Name** | Name that users see when they interact with the app in Slack |
| **App Description** | Text that explains the app capabilities; appears in the About section in Slack |
If you change the app name or description after deployment, generate a new manifest and update the Slack app in the Developer Portal.
**Step 2: Generate the App Manifest**
1. On the **Configuration** page, click **Get Manifest**.
2. Copy the entire manifest code.
The manifest contains all permissions, features, and settings that the Slack app requires.
Upload the app icon directly to the Slack Developer Portal after you create the app.
**Step 3: Create the App in the Slack Developer Portal**
**Access the portal**
1. Go to the [Slack Developer Portal](https://api.slack.com/apps/).
2. Sign in with your workspace credentials.
3. Click **Your Apps**.
**Create the app**
1. Click **Create New App** (or **Create an App** for first-time users).
2. Select **From a manifest**.
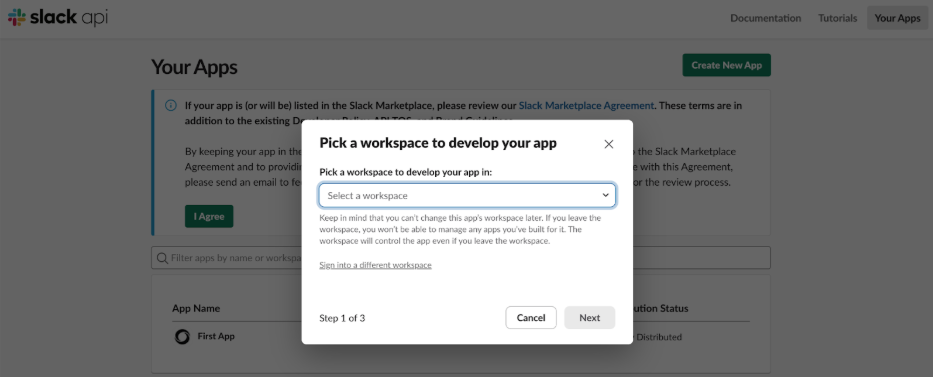
3. Select the target workspace from the **Slack Workspace** dropdown.
The app deploys to the selected workspace by default. To deploy to additional workspaces, activate public distribution after you publish the app (see Step 5).
**Paste the manifest**
1. Paste the manifest code you copied from the Platform.
2. Click **Next**, review the configuration and permissions, then click **Create**.
**Step 4: Customize the App Icon**
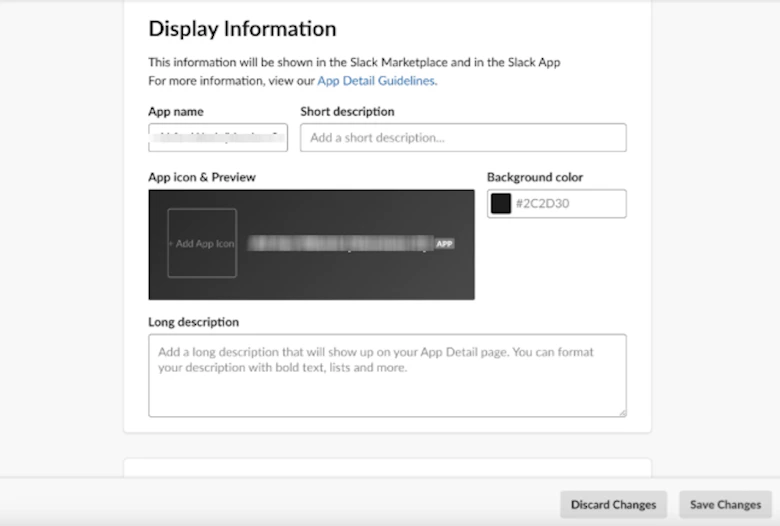
1. In the Slack Developer Portal, navigate to **Basic Information**.
2. Scroll to the **Display Information** section.
3. Configure the following settings:
* **App Icon**: Click **Upload** and select an image file that represents your organization.
* **Background Color**: Customize the background color for the app icon.
* **Short Description** and **Long Description**: Update as needed to refine how the app appears in listings.
4. Click **Save Changes**.
The app icon appears in all Slack interactions, including the app directory, direct messages, and channel mentions.
**Step 5: Activate Public Distribution (Optional)**
Enable public distribution if you manage multiple Slack workspaces and want to deploy the app across all of them.
1. In the Slack Developer Portal, navigate to **Settings** > **Manage Distribution**.
2. Review the distribution requirements on the screen.
3. Turn on **Public Distribution** for the app.
4. Click **Activate Public Distribution**.
After you activate public distribution, you can add the app to additional workspaces beyond the one you selected during app creation. Skip this step if you need the app in only one workspace.
**Step 6: Configure App Credentials**
**Retrieve credentials from Slack**
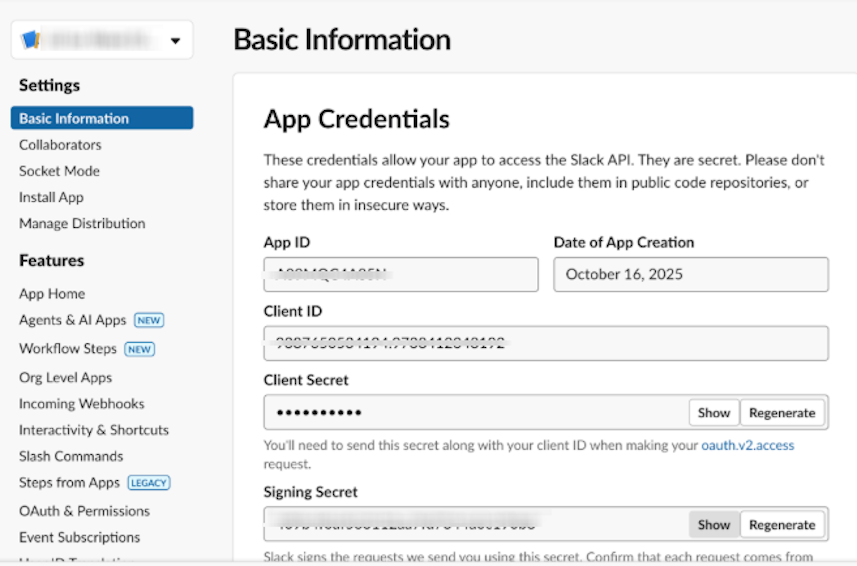
1. In the Slack Developer Portal, navigate to **Basic Information** in the left sidebar.
2. Scroll to **App Credentials** and copy the following values:
* **Client ID**
* **Client Secret**
* **Signing Secret**
**Enter credentials in AI for Work**
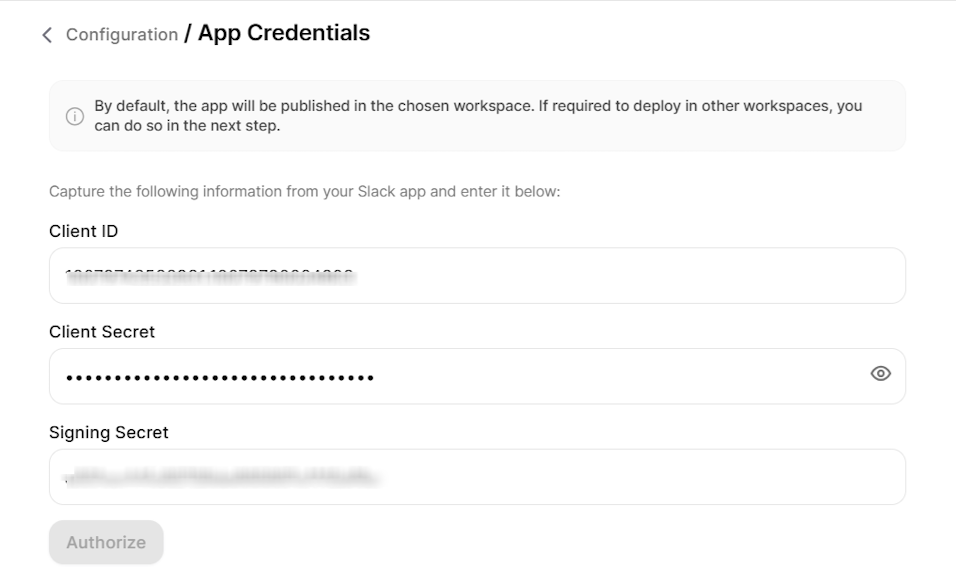
1. Return to the **Admin Console** > **App Credentials** page.
2. Paste the copied values into the corresponding fields.
3. Click **Authorize**.
**Complete authorization**
1. Review the permission request that Slack displays.
2. Click **Allow**.
After successful authorization, the app deploys to your Slack workspace and all onboarded users can see it.
**Step 7: Customize the Welcome Experience**
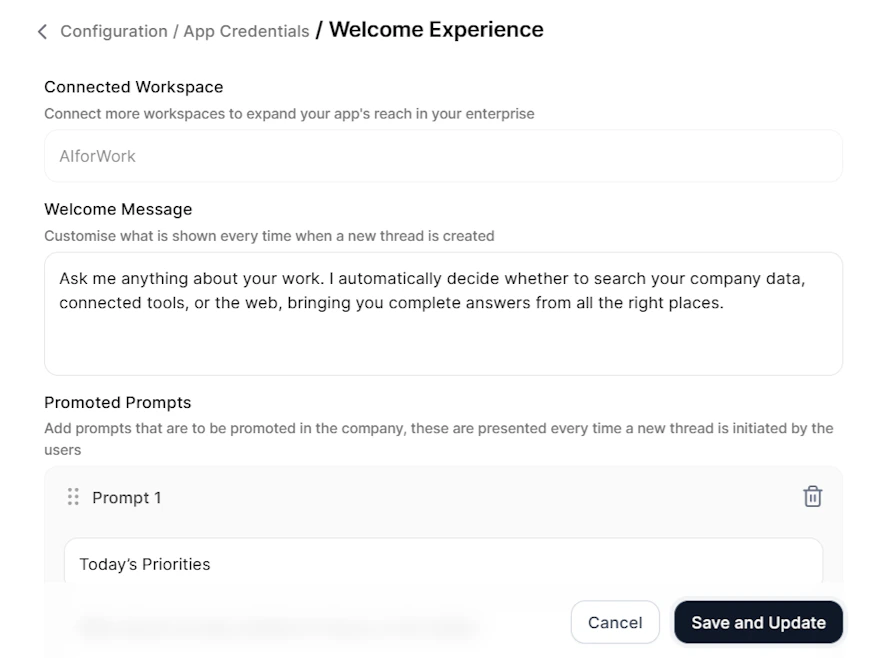
* In the Admin Console, navigate to the **Welcome Experience** page.
* Configure the following:
| Setting | Description |
| -------------------- | ----------------------------------------------------------------- |
| **Welcome Message** | Introductory message that users see when they first open the app |
| **Promoted Prompts** | Up to four clickable prompts that help users start a conversation |
* For each prompt, set:
* **Display Message**: Text that appears to users as the prompt button.
* **Actual Query**: The complete query the Platform receives when the user clicks the prompt.
* Click **Save and Update**. Changes take effect immediately for all users.
You can update the welcome experience at any time. Changes apply to all users immediately.
**Step 8: Configure Publish Settings**
Configure how the app behaves in different Slack contexts for each workspace. These settings determine which agents handle conversations and how users can customize channel behavior.
**Configure Direct Message Behavior**
1. In the **Publish Settings** page, select the workspace you want to configure.
2. Under **1:1 App Chat**, select the agent that the app uses in direct messages.
**Configure Channel Governance**
Define which users can customize the app behavior in Slack channels.
1. Under **Channel Governance**, select the users who can customize Slack channels.
2. These users can add specific agents to channels and configure how the app responds in those channels.
**Set Default Channel Behavior**
Choose whether the app replies publicly or privately when someone adds it to a channel.
* Under **Default Channel Behavior**, select one of the following options:
| Mode | Behavior |
| ----------------- | ----------------------------------------------------------------------------------------------------------------------------------------------------------------------------------------------------------------------------------------------------------- |
| **Private Reply** | Only the sender sees the response. A **Post to Thread** button lets the sender share the response with all channel members. The sender can continue asking follow-up questions in the same thread, and all follow-ups map to the same conversation context. |
| **Public Reply** | Everyone in the channel sees the response. Only the user who started the conversation can send follow-up messages in the thread. |
* Click **Save** to apply the default behavior to all channels.
Users with channel customization permissions can override this default for specific channels they manage.
**Agent Selection**
In both Publish Settings and Channel Customization, you can select any published agent you have access to. The agent doesn't need to have access granted to everyone in the account.
If the selected agent doesn't have access granted to everyone, a note appears below the customization section: *"Note: This agent isn't published or not accessible to everyone in the account."*
If a user who can't access the configured agent sends a query in that channel, that user sees the following message: *"The sources of this channel have been customized. You don't have access to this customization. Please contact @\"*
**User Access Verification**
The system displays an alert if some Slack members haven't onboarded to AI for Work. Add these users from **Admin Console** > **Account Hub** > **Users** before they interact with the app.
### Channel Customization
Users with channel governance permissions can customize how the app behaves in specific channels through the main web application.
**Access and Configure Channel Settings**
1. In the main web application, navigate to **Channel Settings** > **Slack**.
2. View all channels where the app runs.
3. Select a channel to customize.
4. Choose the **Reply Type** (Private Reply or Public Reply) for how the app responds in the channel.
5. Select an **Agent** for the channel. You can select any published agent you have access to.
* For **Private Reply**: Select from Search Agents and Autonomous Agents.
* For **Public Reply**: Select from Work Orchestrator, Autonomous Agents, and Search Agents.
6. For Search Agents, optionally scope the **Search Sources** that the agent uses in that channel.
7. Click **Save** to apply the customization to all users in that channel.
### Adding the App to Channels
All Slack users can add the app to any Slack channel, regardless of whether they have channel customization permissions.
1. Open the Slack channel where you want to add the app.
2. Click the channel name to open channel details.
3. Click **Integrations** > **Add an App**.
4. Search for your app and click **Add**.
When a user adds the app to a channel, all channel members see a confirmation message. The app follows the default behavior you configured in Publish Settings until someone with channel governance permissions customizes the channel.
### Channel Behavior by Agent and Reply Mode
The app behavior in channels depends on the agent type and reply mode you configure.
**Search Agent with Private Reply**
The user who triggers the query sees an interim processing message that only they can view. After processing completes, the full response appears (without streaming), visible only to that user, along with a **Post to Thread** button and **Search Results**. When the user clicks **Post to Thread**, the response posts publicly in the thread. The sender can continue asking follow-up questions in the same thread, and all follow-ups remain private and contextually linked to the original interaction.
**Autonomous Agent with Private Reply**
The user who triggers the query sees a private response that only they can view. The sender can continue asking follow-up questions in the same thread. All follow-ups remain private and map to the same conversation context.
Private Reply mode doesn't support follow-up queries from a different user in the same Slack thread. Only the original sender can continue the conversation.
**Search Agent with Public Reply**
| Characteristic | Behavior |
| ----------------------- | ------------------------------------------------------------------------------- |
| **Visibility** | Everyone in the channel can see the full response |
| **Streaming** | The app doesn't stream the response; only the final response appears |
| **Thoughts** | The app displays AI for Work thoughts |
| **Search Results** | All channel members can view search results |
| **Thread Continuation** | Only the user who started the query can continue the conversation in the thread |
**Autonomous Agent or Work Orchestrator with Public Reply**
| Characteristic | Behavior |
| ----------------------- | ------------------------------------------------------------------------------- |
| **Visibility** | Everyone in the channel can see the full response |
| **Streaming** | The app streams the response live in the thread reply |
| **Thoughts** | The app displays thoughts as it generates the answer |
| **Thread Continuation** | Only the user who started the query can continue the conversation in the thread |
### User Access Management
Only users who have onboarded to AI for Work can interact with the Slack app. Before you deploy, complete the following:
1. Invite all intended users to the Platform.
2. Onboard users with the appropriate access permissions.
3. Confirm that users exist in both the Platform and the target Slack workspace.
Users in the Slack workspace who haven't onboarded can see the app but receive an error when they try to send a message.
***
## Web/Mobile SDK
AI for Work integrates with your web or mobile application through the Web/Mobile SDK, enabling AI chat, agent interactions, and enterprise knowledge access directly inside your product. Each SDK app you create has its own credentials, allowed domains, and authentication settings, so you can deploy independent integrations for different applications or environments.
### When to Use
| Scenario | Details |
| ------------------------------- | ------------------------------------------------------------------------------------------------------------------------------------------- |
| **Embedded assistant** | Organizations that want to surface AI for Work inside their own web or mobile applications, instead of a separate channel |
| **Customer-facing experiences** | Products needing AI chat, agent interactions, and knowledge lookup available to end users within the host app |
| **Multi-app deployments** | Teams running several applications or environments (such as staging and production) that each require isolated credentials and domain rules |
| **Custom UI requirements** | Use cases where the assistant interface must match the host application's branding and user experience |
### Architecture
The integration uses signed credentials and JWT-based authentication between the host application and the Platform:
```
[Host Web/Mobile App] ↔ [Web/Mobile SDK] ↔ [AI for Work Platform]
```
| Component | Role |
| -------------------- | ------------------------------------------------------------------------------- |
| **Host Application** | The web or mobile app where the SDK is embedded |
| **Web/Mobile SDK** | Prebuilt library that renders the assistant interface and handles communication |
| **App Credentials** | Client ID, Client Secret, and JWT used to authenticate SDK requests |
| **Allowed Domains** | Allowlist that restricts which domains can load the SDK |
### Prerequisites
| Requirement | Details |
| ----------------------- | ----------------------------------------------------------------------------------- |
| **AI for Work Account** | Active subscription with access to the Admin Console |
| **Host Application** | A web or mobile application where you can embed the SDK code and prebuilt libraries |
| **Domain Access** | The domains where the SDK will run, ready to be added to the allowlist |
### Configuration
Each SDK app is created and managed independently from the **SDK Apps** page. You can create as many SDK apps as you need, each with its own credentials, allowed domains, and SDK setup.
**Step 1: Create an SDK App**
1. Log in to the **Admin Console**.
2. Navigate to **Channels** → **Web/Mobile SDK**.
3. On the **SDK Apps** page, click **+ Create New**.
The new app opens to the configuration view with three sections in the left pane: **App Credentials**, **Allowed Domains**, and **SDK Details**.
You can return to the **SDK Apps** page at any time to view, edit, or delete existing apps.
**Step 2: Configure App Credentials**
The **App Credentials** section provides the values your host application needs to authenticate with the Platform.
* Open the **App Credentials** section.
* Configure or copy the following values:
| Field | Description |
| ------------------ | --------------------------------------------------------------------------------------------------------------------- |
| **App Name** | Display name for the SDK app. Used to identify the app in the SDK Apps list. |
| **Client ID** | System-generated identifier for the SDK app. Use the copy icon to copy the value. |
| **Client Secret** | System-generated secret used to sign JWTs. Use the copy icon to copy the value, or the refresh icon to regenerate it. |
| **JWT Generation** | Sample JWT payload structure showing the mandatory and optional claims required by the SDK. |
* Click **Continue**.
Treat the Client Secret like a password. Regenerating the secret invalidates the previous value, and any host application using the old secret stops working until you update it.
**Step 3: Configure Allowed Domains**
The **Allowed Domains** section restricts which domains can load the SDK. The system blocks requests from any domain not on the list for security.
1. Open the **Allowed Domains** section.
2. Enter a domain in the **Enter domain** field (for example, `https://example.com`).
3. Click **+ Add Domain**.
4. Repeat to add additional domains.
5. To modify the list, edit any existing domain inline, or delete a domain to remove it.
6. Click **Continue**.
The system permits only configured domains to load the SDK. Add every domain where the SDK will be embedded, including staging and development environments.
**Step 4: Set Up the SDK**
The **SDK Details** section provides the embed code and links to the prebuilt SDK libraries.
1. Open the **SDK Details** section.
2. Use the following resources to set up the SDK in your host application:
* **Web SDK** — Click **Download SDK** to access the prebuilt Web SDK library and embed it in your web application.
* **Mobile SDK** — Click **Download SDK** to access the prebuilt Mobile SDK library and embed it in your mobile application.
3. Click **Save**.
**Auto-Save Behavior**
All changes across **App Credentials**, **Allowed Domains**, and **SDK Details** are saved automatically. You don't need to perform a manual save for each section — moving between sections preserves your changes.
### Managing SDK Apps
From the **SDK Apps** page, you can:
* **View** all SDK apps, including the creation date and the user who created them.
* **Edit** an existing app to update credentials, allowed domains, or SDK setup.
* **Delete** an app that's no longer needed using the actions menu.
Deleting an SDK app immediately revokes its credentials. Any host application using those credentials stops functioning.
### Web SDK Integration through CDN
After creating an SDK app in the Admin Console, integrate the Web SDK chatbot widget into your web application using the CDN approach. This method embeds the widget directly into your website without installing any npm packages.
**Integration Flow**
The end-to-end integration follows five stages:
1. Load the Web SDK through CDN.
2. Authenticate the user (through SSO).
3. Generate a JWT token.
4. Exchange the JWT for an access token.
5. Initialize the chatbot widget.
**Integration Prerequisites**
Before starting, gather the following from the SDK app you created in the Admin Console, along with details from your host application:
| Requirement | Source |
| ---------------------- | -------------------------------------------------------------------------------------------------- |
| **Client ID** | App Credentials section of the SDK app |
| **Client Secret** | App Credentials section of the SDK app |
| **Base URL** | Platform environment (for example, `https://work.kore.ai`) |
| **SSO Login Endpoint** | Platform URL constructed using the Client ID |
| **API URL** | Platform URL constructed using the Client ID |
| **Presence URL** | Platform base URL |
| **User Profile API** | Host application endpoint that returns the logged-in user's details (for example, `/api/users/me`) |
Never expose the Client Secret in production frontend code. In production, JWT generation must happen on the backend so that the secret stays server-side.
**Step 1: Add Required CSS and JS Files**
Add the following inside the `` section of your HTML page:
```html theme={null}
```
**Step 2: Define Configuration**
Declare the SDK configuration values in your script. Replace `YOUR_CLIENT_ID` and `YOUR_CLIENT_SECRET` with the values from your SDK app.
```javascript theme={null}
const CLIENT_ID = "YOUR_CLIENT_ID";
const CLIENT_SECRET = "YOUR_CLIENT_SECRET";
const USER_PROFILE_URL = "https://yoursite.example.com/api/users/me";
const SSO_LOGIN_URL = `https://work.kore.ai/api/1.1/sdk/${CLIENT_ID}/sso/login/`;
const API_URL = `https://work.kore.ai/api/1.1/sdk/${CLIENT_ID}/`;
const PRESENCE_URL = `https://work.kore.ai/`;
const JWT_EXPIRY = "5m";
```
**Step 3: Fetch the Logged-in User Profile**
The SDK requires user details to complete SSO. Call your host application's user profile API to retrieve them.
```javascript theme={null}
const fetchJson = async (url, options = {}) => {
const response = await fetch(url, options);
if (!response.ok) {
throw new Error(`Request failed: ${response.status}`);
}
return response.json();
};
const me = await fetchJson(USER_PROFILE_URL);
```
The response must include at least the user's email, first name, and last name:
```json theme={null}
{
"Email": "john@example.com",
"FirstName": "John",
"LastName": "Doe"
}
```
**Script Placement for Steps 4–6**
Place all code from **Step 4 through Step 6** inside a single `
```
**Step 4: Generate the SSO JWT Token**
Sign the JWT using the HS256 algorithm and the Client Secret.
```javascript theme={null}
const { SignJWT } = await import("https://cdn.jsdelivr.net/npm/jose@5/+esm");
const secret = new TextEncoder().encode(CLIENT_SECRET);
const id_token = await new SignJWT({
sub: me.Email,
firstName: me.FirstName,
lastName: me.LastName,
clientId: CLIENT_ID
})
.setProtectedHeader({ alg: "HS256", typ: "JWT" })
.setIssuedAt()
.setExpirationTime("5m")
.sign(secret);
```
In production, move JWT generation to your backend so that the Client Secret never reaches the browser.
**Step 5: Exchange the JWT for an Access Token**
Send the signed JWT to the SSO login endpoint and retrieve the access token and user ID.
```javascript theme={null}
const ssoResponse = await fetchJson(SSO_LOGIN_URL, {
method: "POST",
headers: { "Content-Type": "application/json" },
body: JSON.stringify({ id_token })
});
const accessToken = ssoResponse.authorization.accessToken;
const userId = ssoResponse.userInfo.id;
```
**Step 6: Initialize the Chatbot Widget**
Initialize the widget with the access token and user ID returned from the SSO exchange. Once initialized, the chatbot automatically appears on the page.
```javascript theme={null}
EvaSDK.chatBot.init({
accessToken,
api_url: API_URL,
presence_url: PRESENCE_URL,
userId,
title: "ChatBot",
showHistory: true
});
EvaSDK.chatInterface.configure({
disableAppAvatar: true
});
```
**Complete Bootstrap Example**
The following function combines all steps into a single bootstrap routine:
```javascript theme={null}
const bootstrapSdk = async () => {
try {
const me = await fetchJson(USER_PROFILE_URL);
const { SignJWT } = await import("https://cdn.jsdelivr.net/npm/jose@5/+esm");
const secret = new TextEncoder().encode(CLIENT_SECRET);
const id_token = await new SignJWT({
sub: me.Email,
firstName: me.FirstName,
lastName: me.LastName,
clientId: CLIENT_ID
})
.setProtectedHeader({ alg: "HS256", typ: "JWT" })
.setIssuedAt()
.setExpirationTime("5m")
.sign(secret);
const ssoResponse = await fetchJson(SSO_LOGIN_URL, {
method: "POST",
headers: { "Content-Type": "application/json" },
body: JSON.stringify({ id_token })
});
const accessToken = ssoResponse.authorization.accessToken;
const userId = ssoResponse.userInfo.id;
EvaSDK.chatBot.init({
accessToken,
api_url: API_URL,
presence_url: PRESENCE_URL,
userId,
title: "ChatBot",
showHistory: true
});
} catch (error) {
console.error("SDK bootstrap failed:", error);
}
};
bootstrapSdk();
```
### Testing Checklist
Before going live, verify the following:
* The user profile API returns the expected data.
* The JWT is generated correctly.
* The SSO endpoint returns an access token.
* The chatbot loads without console errors.
* Conversation history is preserved across sessions.
* The presence connection is successful.
Once all checks pass, the chatbot loads on the page, the user is auto-authenticated, chat history is preserved, and SSO authentication remains secure.
 2. Go to **Certificates & secrets** → **+ New client secret**.
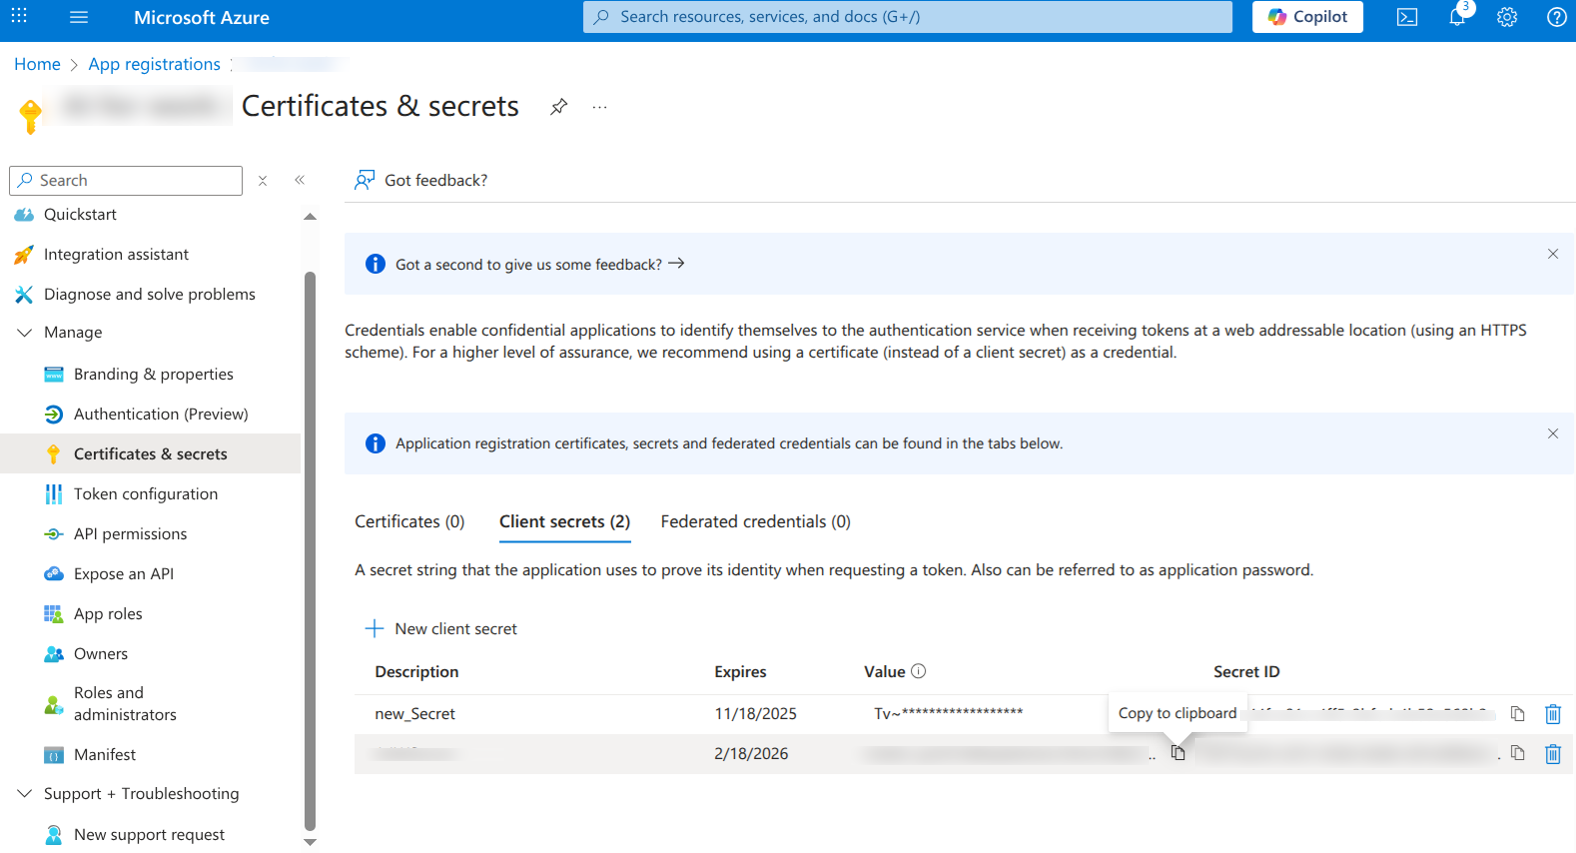 3. Enter description and expiry → **Add**.
4. Copy the **Value** of the client secret (App Password).
5. Record the **Microsoft App ID** and **App Password** for the Platform configuration.
**For Single-Tenant Applications**
Follow the steps for Multi-Tenant setup. Also, note the Tenant ID for the Platform configuration.
**Phase 4: Enable Microsoft Teams Channel Integration**
Configure the bot to communicate with Microsoft Teams and enable Copilot integration.
1. Navigate to **Channels** in the bot resource menu and locate the **Available Channels** section.
2. Select the **Microsoft Teams** channel and **M365 Extensions** channel (required for Copilot integration), review channel information, and select **Save**.
3. Enter description and expiry → **Add**.
4. Copy the **Value** of the client secret (App Password).
5. Record the **Microsoft App ID** and **App Password** for the Platform configuration.
**For Single-Tenant Applications**
Follow the steps for Multi-Tenant setup. Also, note the Tenant ID for the Platform configuration.
**Phase 4: Enable Microsoft Teams Channel Integration**
Configure the bot to communicate with Microsoft Teams and enable Copilot integration.
1. Navigate to **Channels** in the bot resource menu and locate the **Available Channels** section.
2. Select the **Microsoft Teams** channel and **M365 Extensions** channel (required for Copilot integration), review channel information, and select **Save**.
 **Add Microsoft Graph Permissions**
1. In the app registration, navigate to **API permissions** and select **Add a permission**.
**Add Microsoft Graph Permissions**
1. In the app registration, navigate to **API permissions** and select **Add a permission**.
 2. Select **Microsoft Graph** → **Application permissions.**
**Required Permissions**: Add the following permissions for full functionality:
* `TeamsAppInstallation.ReadForUser.All`
* `TeamsAppInstallation.ReadWriteSelfForUser.All`
* `TeamsAppInstallation.ReadWriteForUser.All`
* `User.Read.All`
* `AppCatalog.Read.All`
3. Grant **Admin Consent.**
4. Generate a **Client Secret** and note down **App ID**, **Directory (Tenant) ID**.
5. Configure these values in AI for Work under **Microsoft Teams & Copilot Channel Settings**.
6. Generate a **JWT token** for secure communication.
**Phase 6: Configure AI for Work Platform**
Provide Azure Bot credentials to the Platform to establish secure communication.
1. Navigate to the Admin Console.
2. Locate **Channels** on the left pane.
3. Select **Microsoft Teams and Copilot**.
4. Enter the following credentials under **Configuration**:
* **Microsoft App Tenant ID**: (SingleTenant only) The tenant ID from the bot's app registration.
* **Microsoft App ID**: The App ID from your Azure Bot resource.
* **App Password**: The client secret from the bot's app registration.
2. Select **Microsoft Graph** → **Application permissions.**
**Required Permissions**: Add the following permissions for full functionality:
* `TeamsAppInstallation.ReadForUser.All`
* `TeamsAppInstallation.ReadWriteSelfForUser.All`
* `TeamsAppInstallation.ReadWriteForUser.All`
* `User.Read.All`
* `AppCatalog.Read.All`
3. Grant **Admin Consent.**
4. Generate a **Client Secret** and note down **App ID**, **Directory (Tenant) ID**.
5. Configure these values in AI for Work under **Microsoft Teams & Copilot Channel Settings**.
6. Generate a **JWT token** for secure communication.
**Phase 6: Configure AI for Work Platform**
Provide Azure Bot credentials to the Platform to establish secure communication.
1. Navigate to the Admin Console.
2. Locate **Channels** on the left pane.
3. Select **Microsoft Teams and Copilot**.
4. Enter the following credentials under **Configuration**:
* **Microsoft App Tenant ID**: (SingleTenant only) The tenant ID from the bot's app registration.
* **Microsoft App ID**: The App ID from your Azure Bot resource.
* **App Password**: The client secret from the bot's app registration.
 * **App ID of the Microsoft Teams App**: The additional app credentials for sending Proactive Notifications.
* **Application (Client) ID**: From the notifications app registration.
* **Client Secret**: From the notifications app registration.
* **Delivery (Tenant) ID**: From the notifications app registration.
* **App ID of the Microsoft Teams App**: The additional app credentials for sending Proactive Notifications.
* **Application (Client) ID**: From the notifications app registration.
* **Client Secret**: From the notifications app registration.
* **Delivery (Tenant) ID**: From the notifications app registration.
 **Customization Options**
By default, the Microsoft Teams app appears with the name **AI for Work**, the standard logo, and the default description. Administrators can customize the application before publishing to Microsoft Teams:
* **App Name** – Choose a custom display name for Microsoft Teams.
* **Logo** – Upload an organization-specific logo.
* **Description** – Provide a tailored description that reflects organizational context.
**Copilot Enablement**
During configuration, you are prompted to **Enable Copilot Integration**. We recommended you to enable this option so that Teams users can access the Platform features using Copilot.
**Phase 7: Upload Custom App to Teams Admin Center**
Upload the Platform app package to the Teams Admin Center so it's available within your organization.
**Generate Application Package**
Upon configuring credentials in the Platform, generate and download the Teams application package (ZIP file). This package contains the app manifest and all required configurations for the integration.
**Customization Options**
By default, the Microsoft Teams app appears with the name **AI for Work**, the standard logo, and the default description. Administrators can customize the application before publishing to Microsoft Teams:
* **App Name** – Choose a custom display name for Microsoft Teams.
* **Logo** – Upload an organization-specific logo.
* **Description** – Provide a tailored description that reflects organizational context.
**Copilot Enablement**
During configuration, you are prompted to **Enable Copilot Integration**. We recommended you to enable this option so that Teams users can access the Platform features using Copilot.
**Phase 7: Upload Custom App to Teams Admin Center**
Upload the Platform app package to the Teams Admin Center so it's available within your organization.
**Generate Application Package**
Upon configuring credentials in the Platform, generate and download the Teams application package (ZIP file). This package contains the app manifest and all required configurations for the integration.
 **Upload to Teams Admin Center**
Ensure you have the necessary admin permissions in the Teams Admin Center. Verify organizational policies allow custom app uploads.
1. Sign in to [Microsoft Teams Admin Center](https://admin.teams.microsoft.com/).
2. Navigate to **Teams apps** → **Manage apps**.
3. Click **Upload new app** and select the downloaded application package. Wait for upload and verify to complete.
**Upload to Teams Admin Center**
Ensure you have the necessary admin permissions in the Teams Admin Center. Verify organizational policies allow custom app uploads.
1. Sign in to [Microsoft Teams Admin Center](https://admin.teams.microsoft.com/).
2. Navigate to **Teams apps** → **Manage apps**.
3. Click **Upload new app** and select the downloaded application package. Wait for upload and verify to complete.
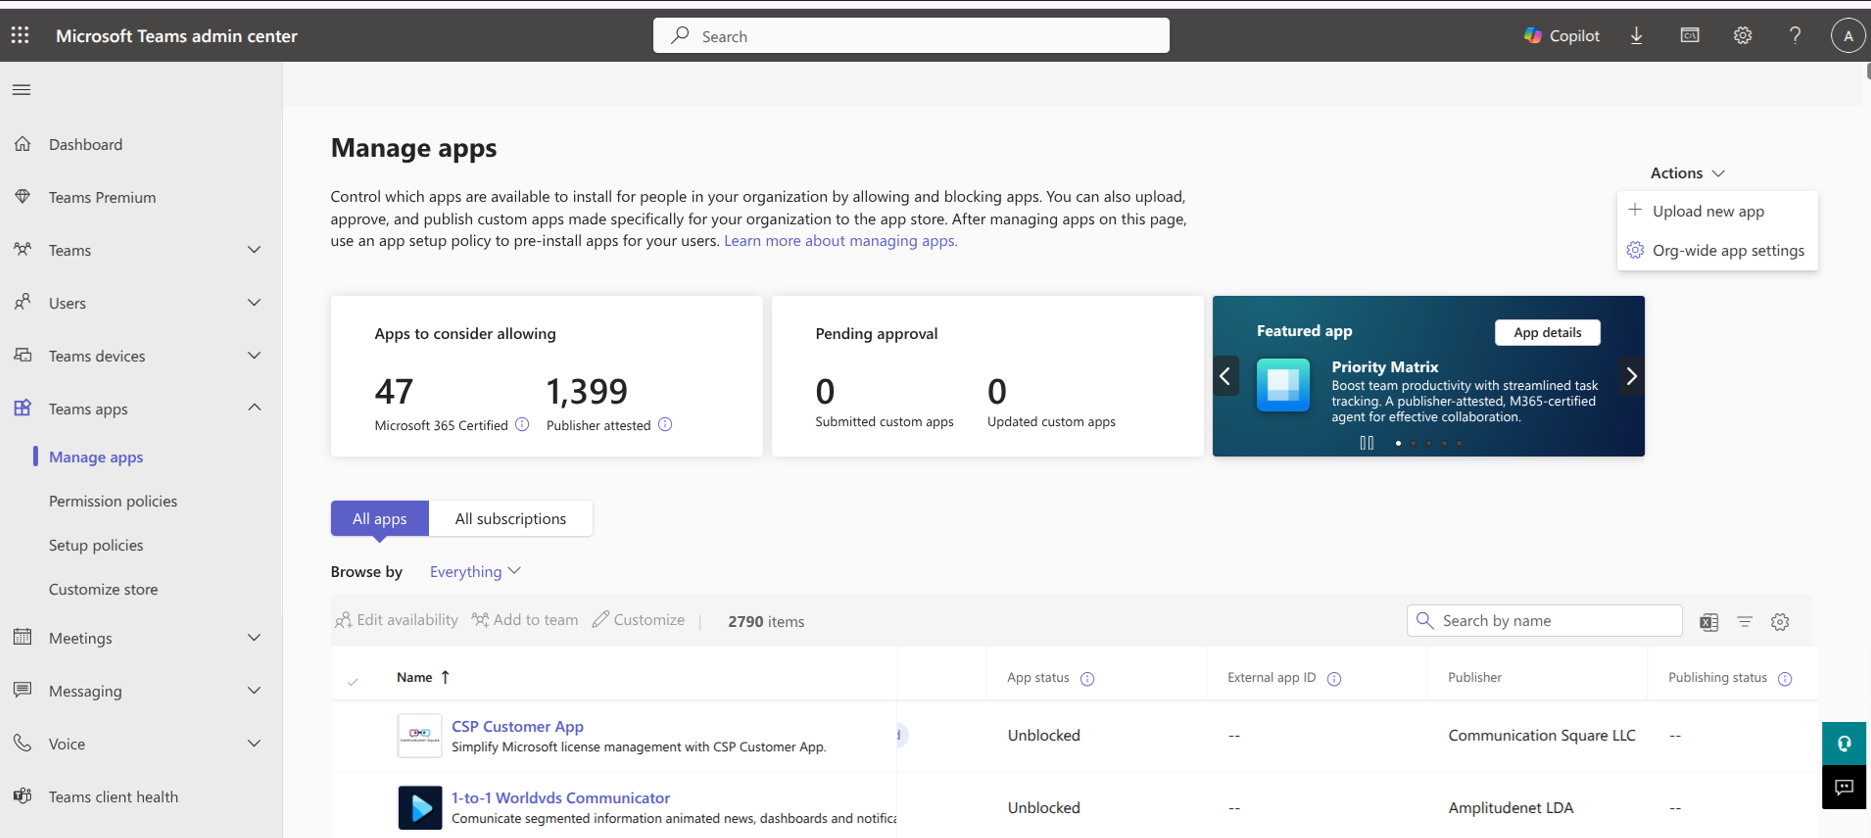 Once uploaded, the app appears as a custom app within your organization's Teams Admin Center. It isn't published to the public Teams App Store.
**Configure App Permissions and Policies**
Review the uploaded application details and configure app permission policies as needed. Set up app setup policies for automatic installation (optional).
**Phase 8: User Access Configuration**
You can decide how to distribute the custom app within your organization:
* **Add App for All Users** (Recommended) — Automatically installs the custom app for all employees in the organization. All users receive a notification in Microsoft Teams and a **welcome message** when the app is added.
Once uploaded, the app appears as a custom app within your organization's Teams Admin Center. It isn't published to the public Teams App Store.
**Configure App Permissions and Policies**
Review the uploaded application details and configure app permission policies as needed. Set up app setup policies for automatic installation (optional).
**Phase 8: User Access Configuration**
You can decide how to distribute the custom app within your organization:
* **Add App for All Users** (Recommended) — Automatically installs the custom app for all employees in the organization. All users receive a notification in Microsoft Teams and a **welcome message** when the app is added.
 ### When to Use
| Scenario | Details |
| ---------------------------------- | -------------------------------------------------------------------------------------------------------------------------- |
| **Seamless workflow integration** | Teams that need AI assistance during active conversations, with persistent chat history and context retention |
| **Enterprise knowledge access** | Organizations that connect users to knowledge repositories, documents, LLMs, and data-driven answers within Slack channels |
| **Heavy Slack usage** | Remote or hybrid teams that treat Slack as their central hub for communication and project coordination |
| **Channel-level AI customization** | Organizations that require different agents, reply modes, or search sources for specific Slack channels |
### Architecture
The integration uses Slack's Developer Portal and OAuth authentication:
```
[AI for Work Platform] <> [Slack App Configuration] <> [Slack Workspace]
```
### Prerequisites
| Requirement | Details |
| --------------------------------- | ------------------------------------------------------ |
| **Slack Workspace** | Active workspace with administrative privileges |
| **Slack Developer Portal Access** | Permission to create and manage apps in your workspace |
| **AI for Work Account** | Active subscription with access to the Admin Console |
### Integration Lifecycle
| Phase | Steps |
| ------------------------------ | --------------------------------------------------------------------------------------------------------------------------------------------- |
| **Configuration and creation** | Customize app details in the Admin Console to generate an App Manifest, then use the manifest to create the app in the Slack Developer Portal |
| **Connection and security** | Exchange credentials to link the platforms, then authorize the required permissions |
| **Rollout** | Define the welcome experience, configure publish settings and channel governance, then grant user access to onboarded employees |
### Configuration
**Step 1: Configure App Display Settings**
* Log in to the **Admin Console**.
* Navigate to **Channels** > **Slack**.
### When to Use
| Scenario | Details |
| ---------------------------------- | -------------------------------------------------------------------------------------------------------------------------- |
| **Seamless workflow integration** | Teams that need AI assistance during active conversations, with persistent chat history and context retention |
| **Enterprise knowledge access** | Organizations that connect users to knowledge repositories, documents, LLMs, and data-driven answers within Slack channels |
| **Heavy Slack usage** | Remote or hybrid teams that treat Slack as their central hub for communication and project coordination |
| **Channel-level AI customization** | Organizations that require different agents, reply modes, or search sources for specific Slack channels |
### Architecture
The integration uses Slack's Developer Portal and OAuth authentication:
```
[AI for Work Platform] <> [Slack App Configuration] <> [Slack Workspace]
```
### Prerequisites
| Requirement | Details |
| --------------------------------- | ------------------------------------------------------ |
| **Slack Workspace** | Active workspace with administrative privileges |
| **Slack Developer Portal Access** | Permission to create and manage apps in your workspace |
| **AI for Work Account** | Active subscription with access to the Admin Console |
### Integration Lifecycle
| Phase | Steps |
| ------------------------------ | --------------------------------------------------------------------------------------------------------------------------------------------- |
| **Configuration and creation** | Customize app details in the Admin Console to generate an App Manifest, then use the manifest to create the app in the Slack Developer Portal |
| **Connection and security** | Exchange credentials to link the platforms, then authorize the required permissions |
| **Rollout** | Define the welcome experience, configure publish settings and channel governance, then grant user access to onboarded employees |
### Configuration
**Step 1: Configure App Display Settings**
* Log in to the **Admin Console**.
* Navigate to **Channels** > **Slack**.
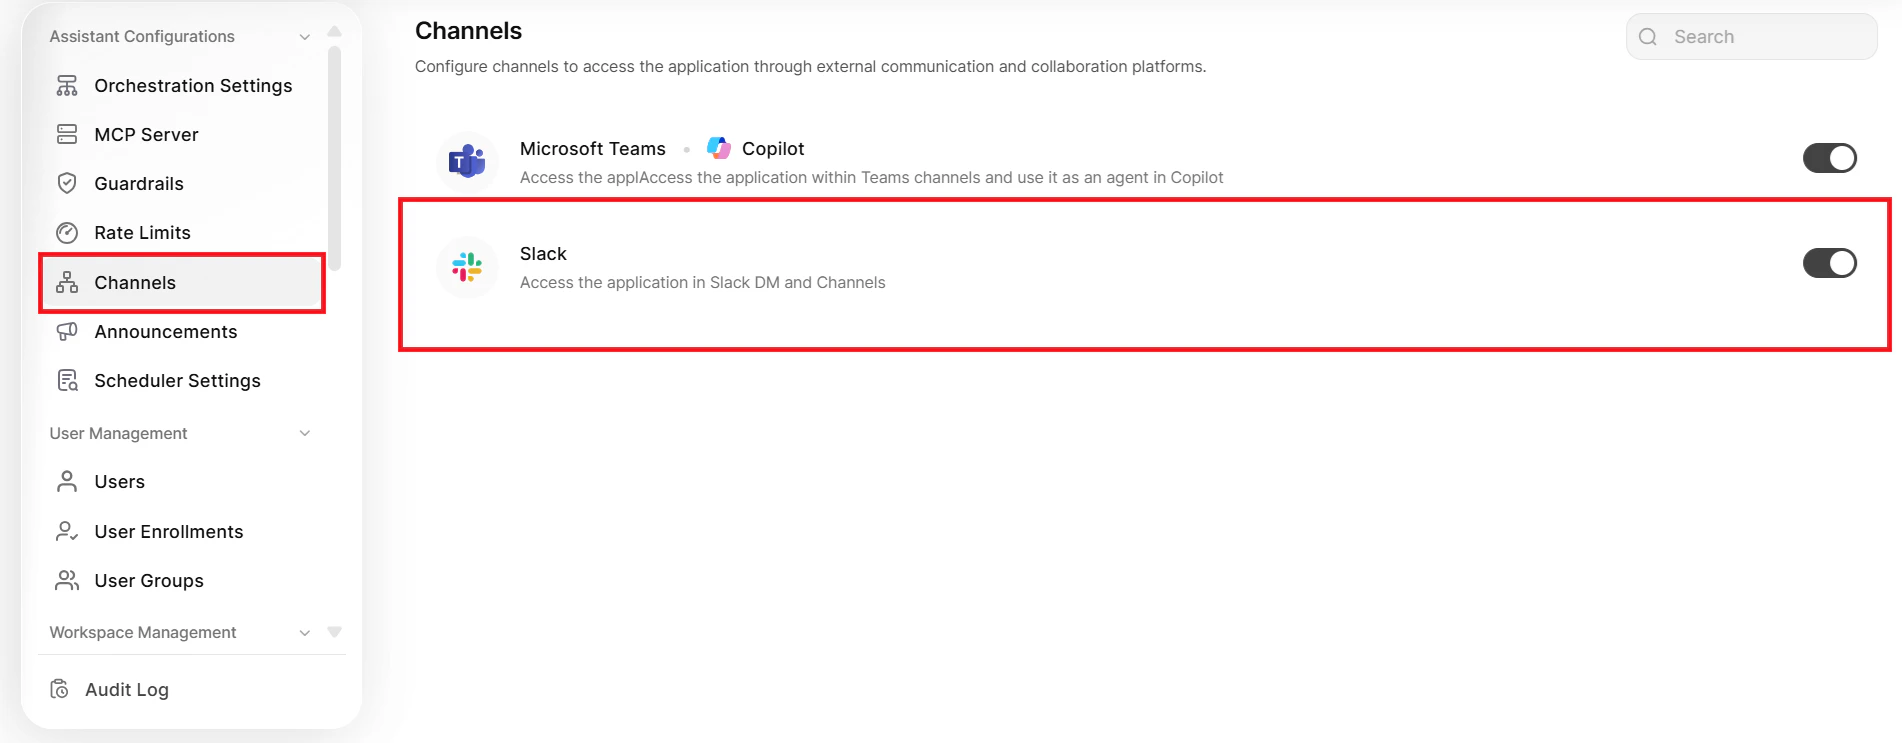 * Open the **Configuration** page and set the following:
| Setting | Description |
| ------------------- | ------------------------------------------------------------------------------ |
| **App Name** | Name that users see when they interact with the app in Slack |
| **App Description** | Text that explains the app capabilities; appears in the About section in Slack |
* Open the **Configuration** page and set the following:
| Setting | Description |
| ------------------- | ------------------------------------------------------------------------------ |
| **App Name** | Name that users see when they interact with the app in Slack |
| **App Description** | Text that explains the app capabilities; appears in the About section in Slack |
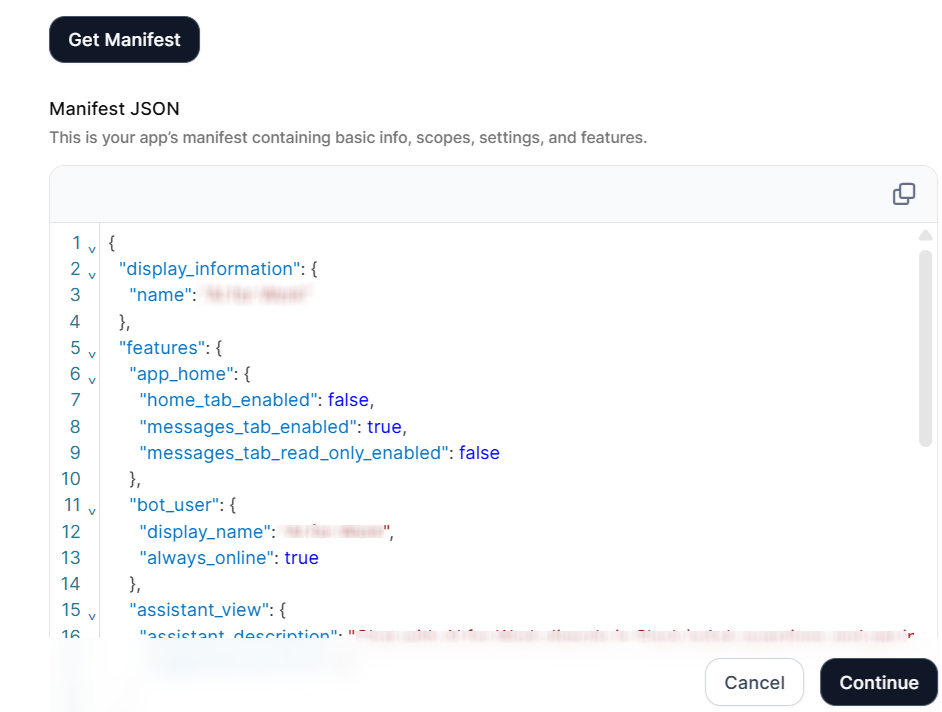 The manifest contains all permissions, features, and settings that the Slack app requires.
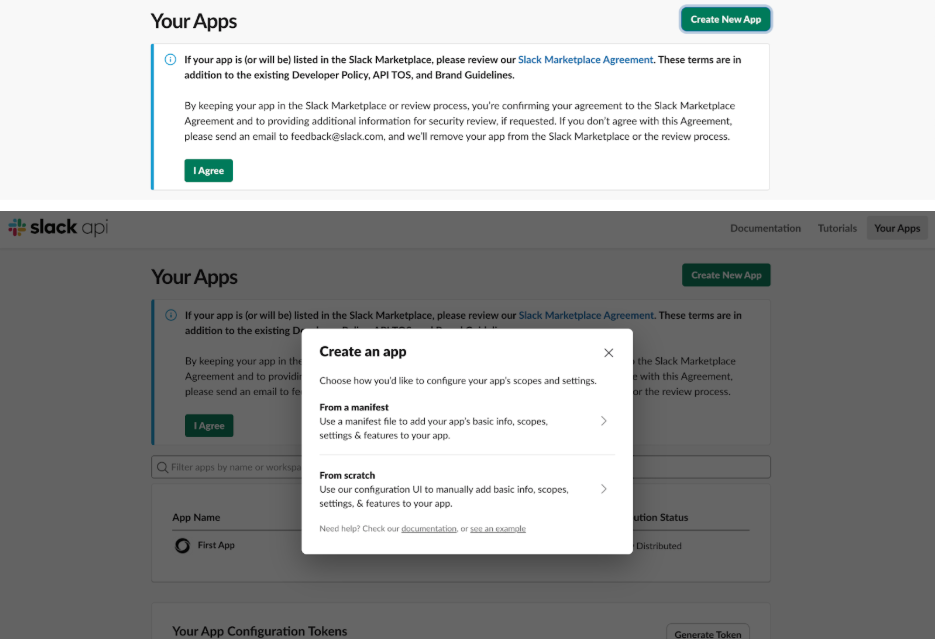 **Create the app**
1. Click **Create New App** (or **Create an App** for first-time users).
2. Select **From a manifest**.
3. Select the target workspace from the **Slack Workspace** dropdown.
**Create the app**
1. Click **Create New App** (or **Create an App** for first-time users).
2. Select **From a manifest**.
3. Select the target workspace from the **Slack Workspace** dropdown.
 The app icon appears in all Slack interactions, including the app directory, direct messages, and channel mentions.
**Step 5: Activate Public Distribution (Optional)**
Enable public distribution if you manage multiple Slack workspaces and want to deploy the app across all of them.
1. In the Slack Developer Portal, navigate to **Settings** > **Manage Distribution**.
2. Review the distribution requirements on the screen.
3. Turn on **Public Distribution** for the app.
4. Click **Activate Public Distribution**.
After you activate public distribution, you can add the app to additional workspaces beyond the one you selected during app creation. Skip this step if you need the app in only one workspace.
**Step 6: Configure App Credentials**
**Retrieve credentials from Slack**
1. In the Slack Developer Portal, navigate to **Basic Information** in the left sidebar.
2. Scroll to **App Credentials** and copy the following values:
* **Client ID**
* **Client Secret**
* **Signing Secret**
The app icon appears in all Slack interactions, including the app directory, direct messages, and channel mentions.
**Step 5: Activate Public Distribution (Optional)**
Enable public distribution if you manage multiple Slack workspaces and want to deploy the app across all of them.
1. In the Slack Developer Portal, navigate to **Settings** > **Manage Distribution**.
2. Review the distribution requirements on the screen.
3. Turn on **Public Distribution** for the app.
4. Click **Activate Public Distribution**.
After you activate public distribution, you can add the app to additional workspaces beyond the one you selected during app creation. Skip this step if you need the app in only one workspace.
**Step 6: Configure App Credentials**
**Retrieve credentials from Slack**
1. In the Slack Developer Portal, navigate to **Basic Information** in the left sidebar.
2. Scroll to **App Credentials** and copy the following values:
* **Client ID**
* **Client Secret**
* **Signing Secret**
 **Enter credentials in AI for Work**
1. Return to the **Admin Console** > **App Credentials** page.
2. Paste the copied values into the corresponding fields.
3. Click **Authorize**.
**Enter credentials in AI for Work**
1. Return to the **Admin Console** > **App Credentials** page.
2. Paste the copied values into the corresponding fields.
3. Click **Authorize**.
 **Complete authorization**
1. Review the permission request that Slack displays.
2. Click **Allow**.
After successful authorization, the app deploys to your Slack workspace and all onboarded users can see it.
**Step 7: Customize the Welcome Experience**
* In the Admin Console, navigate to the **Welcome Experience** page.
**Complete authorization**
1. Review the permission request that Slack displays.
2. Click **Allow**.
After successful authorization, the app deploys to your Slack workspace and all onboarded users can see it.
**Step 7: Customize the Welcome Experience**
* In the Admin Console, navigate to the **Welcome Experience** page.
 * Configure the following:
| Setting | Description |
| -------------------- | ----------------------------------------------------------------- |
| **Welcome Message** | Introductory message that users see when they first open the app |
| **Promoted Prompts** | Up to four clickable prompts that help users start a conversation |
* For each prompt, set:
* **Display Message**: Text that appears to users as the prompt button.
* **Actual Query**: The complete query the Platform receives when the user clicks the prompt.
* Click **Save and Update**. Changes take effect immediately for all users.
* Configure the following:
| Setting | Description |
| -------------------- | ----------------------------------------------------------------- |
| **Welcome Message** | Introductory message that users see when they first open the app |
| **Promoted Prompts** | Up to four clickable prompts that help users start a conversation |
* For each prompt, set:
* **Display Message**: Text that appears to users as the prompt button.
* **Actual Query**: The complete query the Platform receives when the user clicks the prompt.
* Click **Save and Update**. Changes take effect immediately for all users.