> ## Documentation Index
> Fetch the complete documentation index at: https://koreai.mintlify.site/llms.txt
> Use this file to discover all available pages before exploring further.
# Agent Management
This guide covers the complete lifecycle of a custom agent: from initial creation and testing, through version control and publishing, to ongoing management and advanced integration features.
| Feature | Description |
| --------------------------------------------- | -------------------------------------------------------------------------------------- |
| [Testing an Agent](#testing-an-agent) | Validate and refine agent behavior in a controlled environment before deployment. |
| [Version Control](#version-control) | Manage draft and published agent versions to keep production stable while iterating. |
| [Agent Options](#agent-options) | Export, delete, share, and modify agents after publication. |
| [Schedulers](#schedulers) | Create, manage, and monitor automated schedules for agents, flows, and platform modes. |
| [Schedule Trigger](#schedule-trigger) | Automate agent execution at predefined intervals without manual intervention. |
| [Handling Alert Tasks](#handling-alert-tasks) | Pause and resume conversations using hold templates and correlation IDs. |
| [Notify API](#notify-api) | Send interactive notifications with action buttons to users via API. |
## Testing an Agent
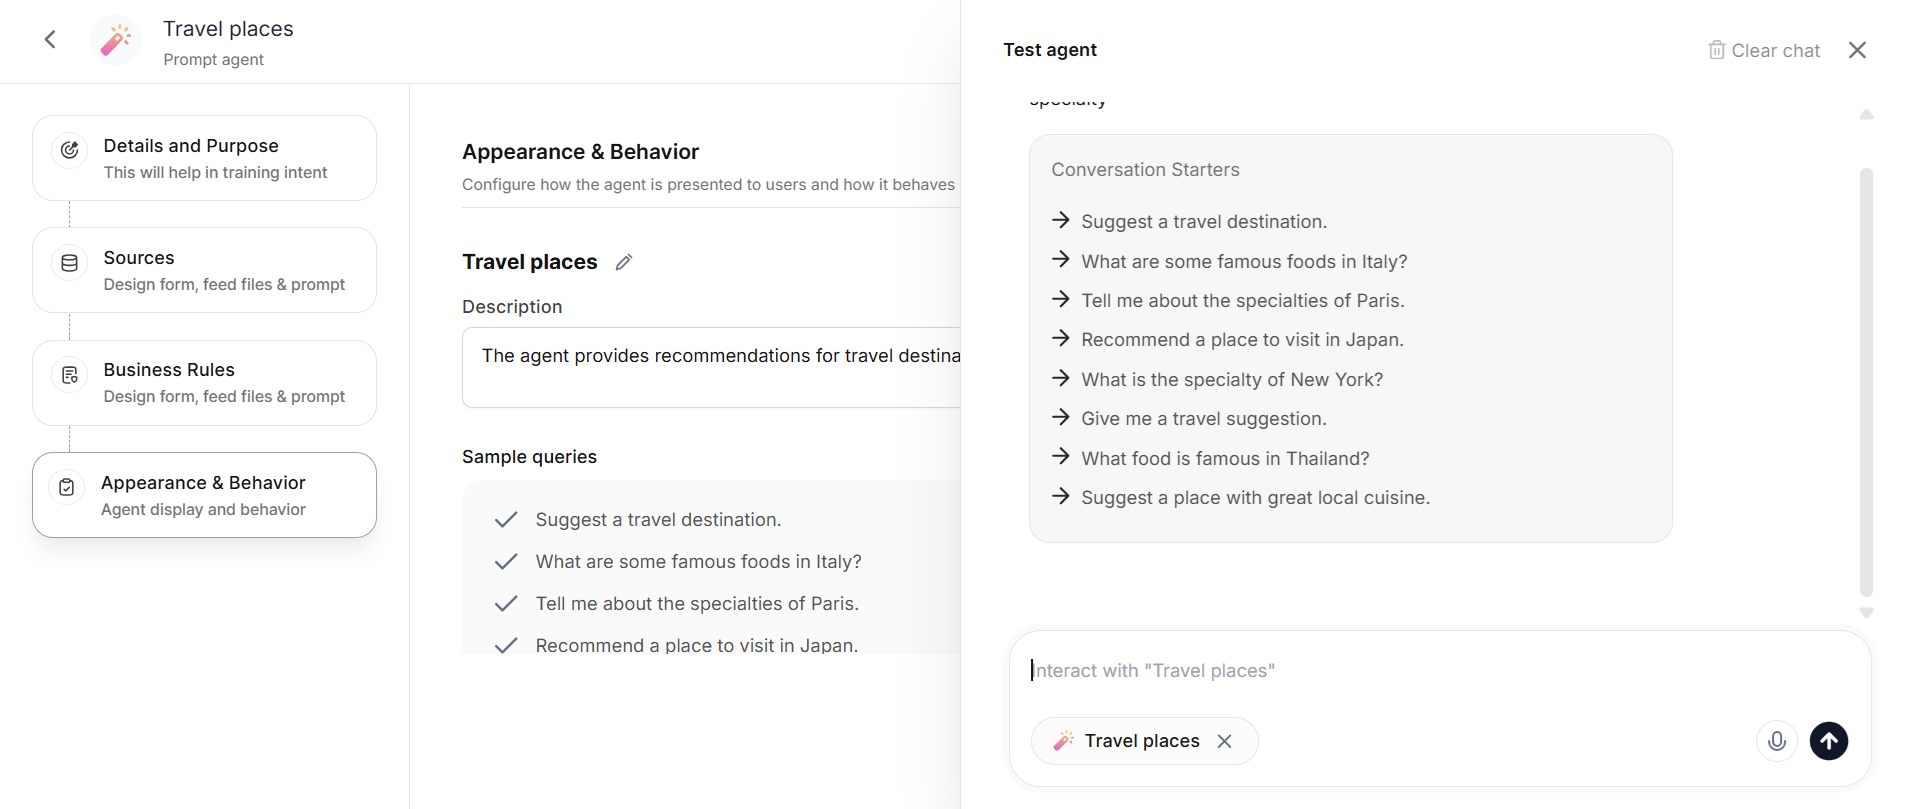
The Agent Testing feature provides a controlled environment for testing and refining agents before deployment, ensuring optimal performance in production environments.
 ### Accessing the Testing Panel
The **Test** button becomes active after administrators complete the agent basic details step. Clicking it opens the Agent Testing Panel with a compose bar scoped strictly to the selected agent. Administrators cannot change agents or add attachments within this testing mode.
### Accessing the Testing Panel
The **Test** button becomes active after administrators complete the agent basic details step. Clicking it opens the Agent Testing Panel with a compose bar scoped strictly to the selected agent. Administrators cannot change agents or add attachments within this testing mode.
 ### Testing Capabilities
* The panel provides default sample queries for one-click execution.
* Users can manually enter custom queries.
* Responses for both query types are displayed within the panel for comprehensive testing.
* Administrators can submit multiple queries per session to thoroughly evaluate agent performance.
* **Clear Chat** resets the chat history and input field for a new session.
### Agent Improvement Workflow
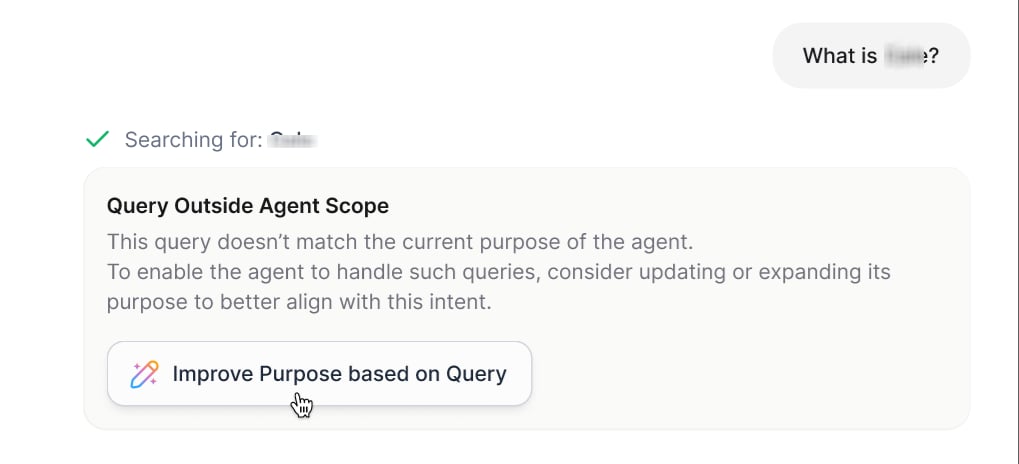
Out-of-scope queries trigger an **Improve Purpose based on Query** button that opens a modal displaying the current agent purpose alongside the problematic query. Administrators can generate a revised purpose based on the query and save the updated configuration directly to the agent.
### Testing Capabilities
* The panel provides default sample queries for one-click execution.
* Users can manually enter custom queries.
* Responses for both query types are displayed within the panel for comprehensive testing.
* Administrators can submit multiple queries per session to thoroughly evaluate agent performance.
* **Clear Chat** resets the chat history and input field for a new session.
### Agent Improvement Workflow
Out-of-scope queries trigger an **Improve Purpose based on Query** button that opens a modal displaying the current agent purpose alongside the problematic query. Administrators can generate a revised purpose based on the query and save the updated configuration directly to the agent.
 Agent responses with submission actions show disabled execution buttons in testing mode to prevent unintended actions.
### Response Management
The panel includes utility features for response management, including copy functionality for agent responses, export options for test results, and configurable follow-up capabilities that administrators can disable as needed during testing scenarios.
***
## Version Control
The Agent Version Control system allows you to safely develop and test agent configurations without affecting your live, published agents. Each agent maintains a complete version history, so you can publish named versions, preview earlier configurations, and restore any version as a new draft.
Agent responses with submission actions show disabled execution buttons in testing mode to prevent unintended actions.
### Response Management
The panel includes utility features for response management, including copy functionality for agent responses, export options for test results, and configurable follow-up capabilities that administrators can disable as needed during testing scenarios.
***
## Version Control
The Agent Version Control system allows you to safely develop and test agent configurations without affecting your live, published agents. Each agent maintains a complete version history, so you can publish named versions, preview earlier configurations, and restore any version as a new draft.
 ### Version Types
Every agent maintains one draft version and one published version at a time, along with a history of earlier versions:
| Version | Description |
| --------------------- | ----------------------------------------------------------------------------------------- |
| **Draft Version** | Contains your latest edits and modifications. Only one draft version can exist at a time. |
| **Published Version** | The live version accessible to end users. |
| **Earlier Versions** | Previously published versions preserved in Version History. |
This separation ensures that experimental changes do not impact the production environment until you are ready to deploy them. An agent can contain a maximum of 50 versions, including the draft and published versions.
### Making Changes
When you edit a published agent:
1. Your changes are automatically saved to the **Draft Version**.
2. The **Published Version** remains unchanged.
3. An **Unpublished Changes** banner appears at the top of your screen.
### Unpublished Changes Banner
The banner displays: *You have unpublished changes that haven't been applied to the published agent.*
**Available actions:**
* **Discard Changes** — Remove all draft modifications.
* **Publish** — Deploy your changes to the live version.
### Discarding Changes
To abandon draft modifications:
1. Click **Discard Changes** in the banner.
2. A confirmation pop-up appears with the following options:
* **Confirm** — Permanently discard all changes and revert to the published version.
* **Cancel** — Keep your changes and dismiss the popup.
### Publishing Changes
To deploy your draft modifications:
1. Click **Publish** in the banner. You are redirected to the **Publish** screen. The button label depends on your changes:
* **Publish**: Appears when you change the agent configuration. Clicking it opens a popup that requests version details.
* **Update**: Appears when you change only the members or publish list. Clicking it updates the publish list without creating a new version or showing the version popup.
2. In the version popup, review the version details:
* **Version Name**: Auto-filled as "Version 'number'". You can edit the name.
* **Description**: Optional.
3. Click **Publish** to create the new version and deploy it to end users.
### Version Types
Every agent maintains one draft version and one published version at a time, along with a history of earlier versions:
| Version | Description |
| --------------------- | ----------------------------------------------------------------------------------------- |
| **Draft Version** | Contains your latest edits and modifications. Only one draft version can exist at a time. |
| **Published Version** | The live version accessible to end users. |
| **Earlier Versions** | Previously published versions preserved in Version History. |
This separation ensures that experimental changes do not impact the production environment until you are ready to deploy them. An agent can contain a maximum of 50 versions, including the draft and published versions.
### Making Changes
When you edit a published agent:
1. Your changes are automatically saved to the **Draft Version**.
2. The **Published Version** remains unchanged.
3. An **Unpublished Changes** banner appears at the top of your screen.
### Unpublished Changes Banner
The banner displays: *You have unpublished changes that haven't been applied to the published agent.*
**Available actions:**
* **Discard Changes** — Remove all draft modifications.
* **Publish** — Deploy your changes to the live version.
### Discarding Changes
To abandon draft modifications:
1. Click **Discard Changes** in the banner.
2. A confirmation pop-up appears with the following options:
* **Confirm** — Permanently discard all changes and revert to the published version.
* **Cancel** — Keep your changes and dismiss the popup.
### Publishing Changes
To deploy your draft modifications:
1. Click **Publish** in the banner. You are redirected to the **Publish** screen. The button label depends on your changes:
* **Publish**: Appears when you change the agent configuration. Clicking it opens a popup that requests version details.
* **Update**: Appears when you change only the members or publish list. Clicking it updates the publish list without creating a new version or showing the version popup.
2. In the version popup, review the version details:
* **Version Name**: Auto-filled as "Version 'number'". You can edit the name.
* **Description**: Optional.
3. Click **Publish** to create the new version and deploy it to end users.
 ### Version History
Version History lists every version of an agent so you can review, restore, or preview earlier configurations.
To open Version History:
1. Open the agent options menu.
2. Select **Version History**.
Each version card displays the version name, description, the user who created it, and the creation time. The published version carries a **Published** tag, and the draft version carries a **Draft** tag.
Any change you make on top of the published version is autosaved as a draft. The platform names the auto-created draft "Draft" with no description.
### Version Actions
Every version supports the following actions:
| Action | Description | Exceptions |
| ----------- | ---------------------------------------- | ------------------------------------------------------------ |
| **Edit** | Modify the version name and description. | None |
| **Delete** | Remove the version from Version History. | The published version cannot be deleted. |
| **Restore** | Recreate the version as a new draft. | Draft and published versions do not show the Restore option. |
### Restoring a Version
Restoring a version creates a new draft from that version's configuration:
* The platform names the restored draft "Copy 'restored version name'". If the restored version is itself a copy, the name chains. For example, restoring "Copy Version 3" creates "Copy Copy Version 3".
* The draft description reads "This is a copy of 'restored version name'", followed by the original version's description.
* If a draft already exists, a confirmation popup warns that the restore overrides the existing draft. If no draft exists, a standard confirmation popup appears before the restore.
* A restored version remains a draft. You must publish it explicitly to make it the published version.
### Version Limit
An agent can contain a maximum of 50 versions, including the published and draft versions. When an agent reaches the limit, publishing or restoring a version displays a popup stating that you must delete an existing version before the action can proceed. Delete at least one version, then retry the action. The published version cannot be deleted.
### Previewing a Version
Clicking **Version History** opens the agent in preview mode. A visual indicator confirms that you are previewing and not editing.
* The agent loads in a read-only state. You cannot edit the configuration while previewing a version.
* Click any version in the panel to load that version's configuration into the left panel.
* You can navigate to any page within the agent, and each page loads the selected version's configuration.
* While you preview a version that is neither the draft nor the published version, a **Restore** button appears at the top. Clicking **Restore** restores the previewed version as a draft and follows the same confirmation rules.
* Exiting preview mode without taking an action returns you to the normal editing view in your current draft state, or the published state if no draft exists. Preview mode is non-destructive; nothing changes unless you explicitly restore a version.
***
## Agent Options
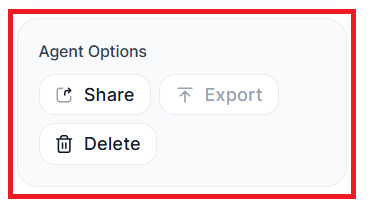
Manage your agent's deployment, data, and availability post-publication. Agent options are enabled after publishing your agent.
### Version History
Version History lists every version of an agent so you can review, restore, or preview earlier configurations.
To open Version History:
1. Open the agent options menu.
2. Select **Version History**.
Each version card displays the version name, description, the user who created it, and the creation time. The published version carries a **Published** tag, and the draft version carries a **Draft** tag.
Any change you make on top of the published version is autosaved as a draft. The platform names the auto-created draft "Draft" with no description.
### Version Actions
Every version supports the following actions:
| Action | Description | Exceptions |
| ----------- | ---------------------------------------- | ------------------------------------------------------------ |
| **Edit** | Modify the version name and description. | None |
| **Delete** | Remove the version from Version History. | The published version cannot be deleted. |
| **Restore** | Recreate the version as a new draft. | Draft and published versions do not show the Restore option. |
### Restoring a Version
Restoring a version creates a new draft from that version's configuration:
* The platform names the restored draft "Copy 'restored version name'". If the restored version is itself a copy, the name chains. For example, restoring "Copy Version 3" creates "Copy Copy Version 3".
* The draft description reads "This is a copy of 'restored version name'", followed by the original version's description.
* If a draft already exists, a confirmation popup warns that the restore overrides the existing draft. If no draft exists, a standard confirmation popup appears before the restore.
* A restored version remains a draft. You must publish it explicitly to make it the published version.
### Version Limit
An agent can contain a maximum of 50 versions, including the published and draft versions. When an agent reaches the limit, publishing or restoring a version displays a popup stating that you must delete an existing version before the action can proceed. Delete at least one version, then retry the action. The published version cannot be deleted.
### Previewing a Version
Clicking **Version History** opens the agent in preview mode. A visual indicator confirms that you are previewing and not editing.
* The agent loads in a read-only state. You cannot edit the configuration while previewing a version.
* Click any version in the panel to load that version's configuration into the left panel.
* You can navigate to any page within the agent, and each page loads the selected version's configuration.
* While you preview a version that is neither the draft nor the published version, a **Restore** button appears at the top. Clicking **Restore** restores the previewed version as a draft and follows the same confirmation rules.
* Exiting preview mode without taking an action returns you to the normal editing view in your current draft state, or the published state if no draft exists. Preview mode is non-destructive; nothing changes unless you explicitly restore a version.
***
## Agent Options
Manage your agent's deployment, data, and availability post-publication. Agent options are enabled after publishing your agent.
 ### Available Actions
| Action | Description |
| ------------------- | ---------------------------------------------------------------------- |
| **Export Agent** | Download agent configuration and associated data. |
| **Version History** | View, preview, and restore earlier versions of the agent. |
| **Delete Agent** | Permanently remove the application. |
| **Share** | Grant workspace members access to collaborate on and manage the agent. |
### Modifying an Agent
To edit an existing agent:
1. Navigate to the desired agent list page and locate the agent you wish to modify.
### Available Actions
| Action | Description |
| ------------------- | ---------------------------------------------------------------------- |
| **Export Agent** | Download agent configuration and associated data. |
| **Version History** | View, preview, and restore earlier versions of the agent. |
| **Delete Agent** | Permanently remove the application. |
| **Share** | Grant workspace members access to collaborate on and manage the agent. |
### Modifying an Agent
To edit an existing agent:
1. Navigate to the desired agent list page and locate the agent you wish to modify.
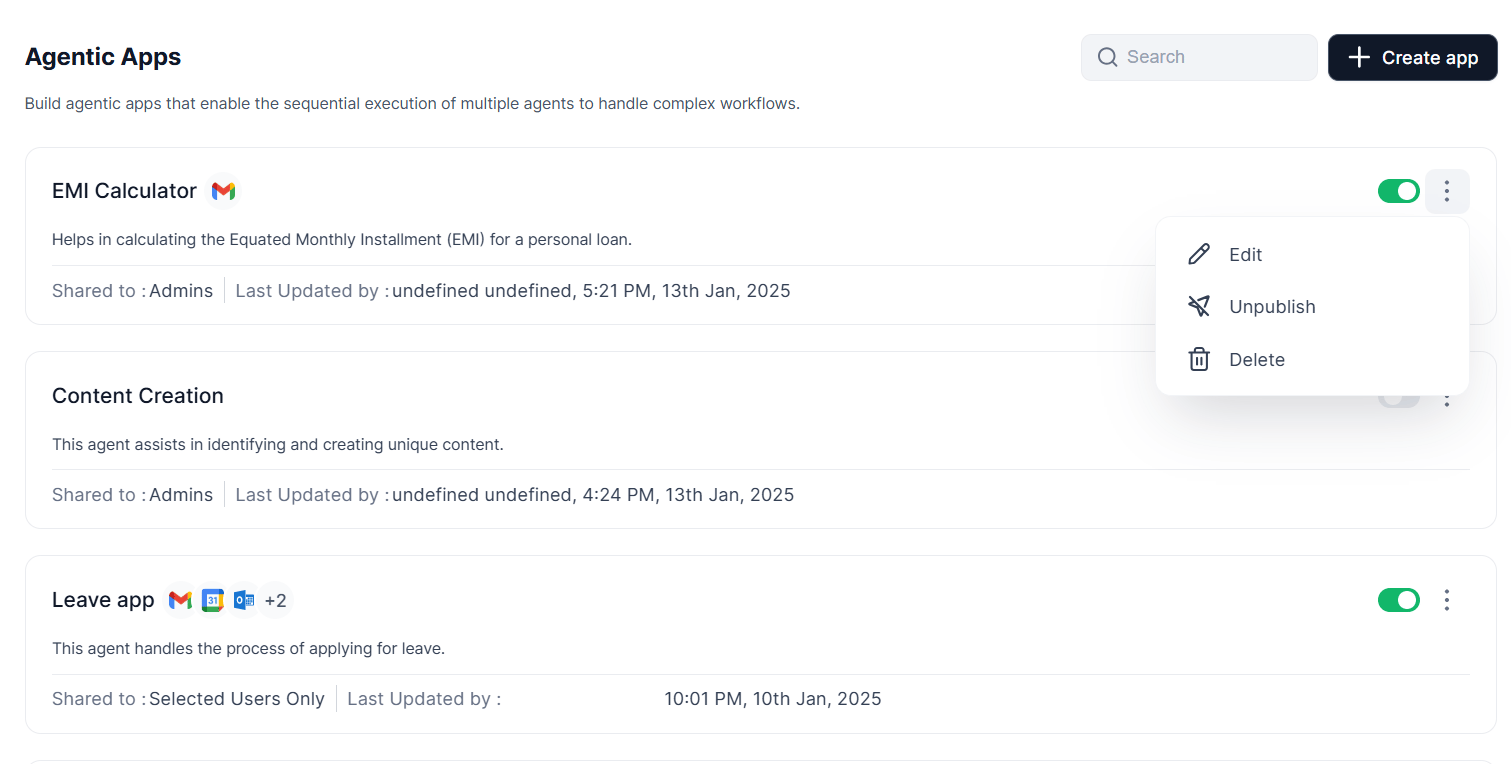 2. Click the three-dot icon next to the agent's name. A menu appears with the following options:
* **Edit** — Open and modify the agent's details.
* **Publish/Unpublish** — Change the agent's status.
* **Delete** — Permanently remove the agent.
3. Select the required option and complete the modifications as needed.
### Sharing an Agent
Agent Sharing lets workspace members collaborate on and manage agents through granular access controls, flexible sharing, and clear ownership.
Click **Share** to access and manage agent sharing settings.
2. Click the three-dot icon next to the agent's name. A menu appears with the following options:
* **Edit** — Open and modify the agent's details.
* **Publish/Unpublish** — Change the agent's status.
* **Delete** — Permanently remove the agent.
3. Select the required option and complete the modifications as needed.
### Sharing an Agent
Agent Sharing lets workspace members collaborate on and manage agents through granular access controls, flexible sharing, and clear ownership.
Click **Share** to access and manage agent sharing settings.
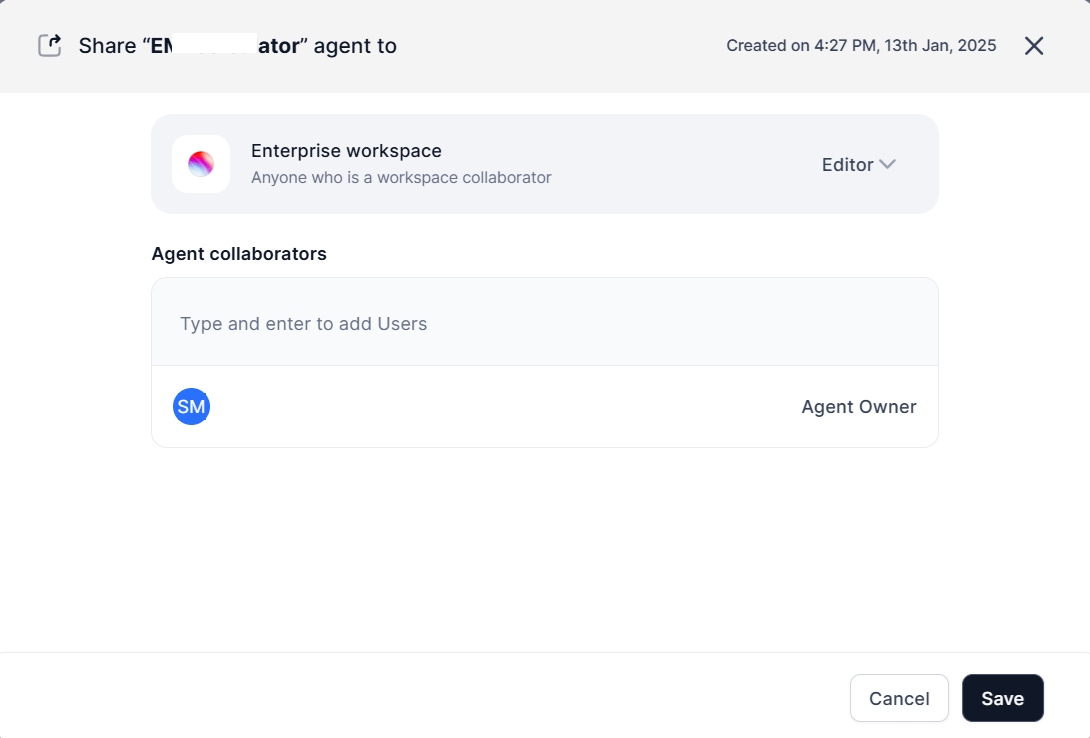 **Default visibility:** All agents are visible to workspace collaborators. The creator has full edit access; others have view-only access.
**Access levels:**
| Level | Permissions |
| ----------------- | ---------------------------------------------------------- |
| **Viewer** | Can view but not change configurations. |
| **Editor** | Full control over settings and can add collaborators. |
| **Remove Access** | Confirms the agent exists but prevents viewing or editing. |
**Collaboration rules:**
* Creators and editors can assign **Editor** or **Viewer** access at the individual or workspace level.
* Only workspace members can be invited to collaborate.
***
## Schedulers
Schedulers offer a unified hub to design, oversee, and track automated schedules across agents, flows, and platform modes.
### Admin-Enforced Schedulers
Administrators can create and assign schedulers that appear automatically in your Schedulers tab. Admins configure this from the Admin Console under **Assist Configuration > Scheduler Settings**, where they can:
* Enable the Scheduler feature for the workspace.
* Set a scheduling limit per user (5, 10, 20, or 30 schedulers).
* Enable **Workspace Owner Scheduler Permissions** to allow workspace owners to publish agents with pre-configured schedules that run automatically for end users.
When Workspace Owner Scheduler Permissions are enabled, workspace owners can add schedulers during agent creation and publish agents with active schedules.
Admin-enforced schedulers follow these rules:
* If you have available capacity, they are enabled by default. If you have reached your limit, they appear disabled.
* You can enable or disable them.
* You cannot edit their configuration — they appear in view-only mode.
* You cannot delete them.
***
## Schedule Trigger
The Schedule Trigger feature enables automated execution of agentic flows at predefined intervals. By configuring a schedule, you can automate routine tasks without manual intervention, allowing the agent to run autonomously based on your specified timing and frequency.
The Schedule Trigger is optional and disabled by default. When enabled, it provides end users with the ability to configure and manage automated executions.
**Default visibility:** All agents are visible to workspace collaborators. The creator has full edit access; others have view-only access.
**Access levels:**
| Level | Permissions |
| ----------------- | ---------------------------------------------------------- |
| **Viewer** | Can view but not change configurations. |
| **Editor** | Full control over settings and can add collaborators. |
| **Remove Access** | Confirms the agent exists but prevents viewing or editing. |
**Collaboration rules:**
* Creators and editors can assign **Editor** or **Viewer** access at the individual or workspace level.
* Only workspace members can be invited to collaborate.
***
## Schedulers
Schedulers offer a unified hub to design, oversee, and track automated schedules across agents, flows, and platform modes.
### Admin-Enforced Schedulers
Administrators can create and assign schedulers that appear automatically in your Schedulers tab. Admins configure this from the Admin Console under **Assist Configuration > Scheduler Settings**, where they can:
* Enable the Scheduler feature for the workspace.
* Set a scheduling limit per user (5, 10, 20, or 30 schedulers).
* Enable **Workspace Owner Scheduler Permissions** to allow workspace owners to publish agents with pre-configured schedules that run automatically for end users.
When Workspace Owner Scheduler Permissions are enabled, workspace owners can add schedulers during agent creation and publish agents with active schedules.
Admin-enforced schedulers follow these rules:
* If you have available capacity, they are enabled by default. If you have reached your limit, they appear disabled.
* You can enable or disable them.
* You cannot edit their configuration — they appear in view-only mode.
* You cannot delete them.
***
## Schedule Trigger
The Schedule Trigger feature enables automated execution of agentic flows at predefined intervals. By configuring a schedule, you can automate routine tasks without manual intervention, allowing the agent to run autonomously based on your specified timing and frequency.
The Schedule Trigger is optional and disabled by default. When enabled, it provides end users with the ability to configure and manage automated executions.
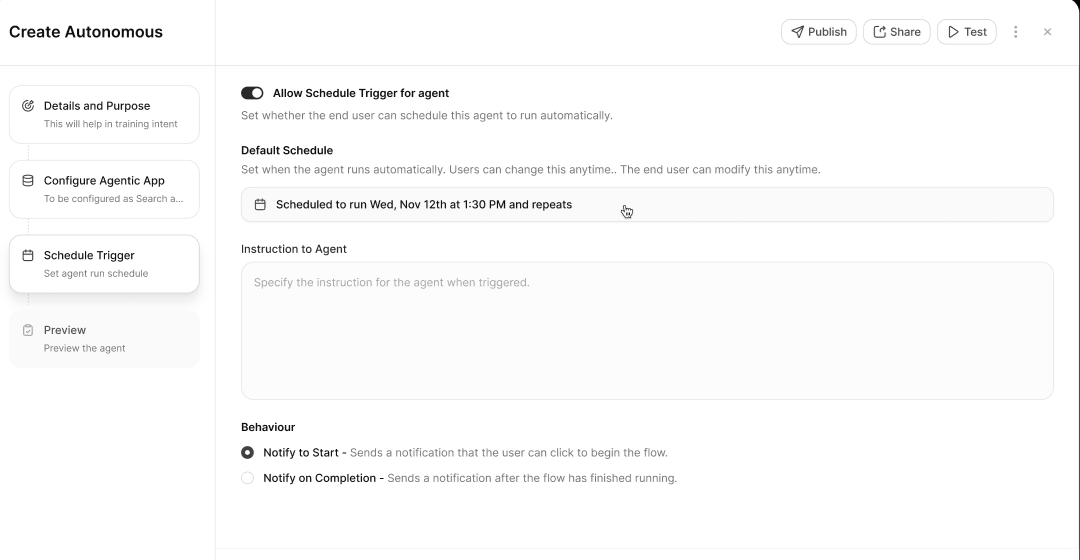 ### Configuring a Schedule Trigger
**Step 1 — Allow Schedule Trigger for Agent**
Toggle the **Allow Schedule Trigger for Agent** option to enable scheduling. When enabled, end users can see, set up, and activate schedules. Disabling it hides all scheduling options from them.
**Step 2 — Set Default Schedule**
Click **Default Schedule** to set the initial automation schedule. Available schedule types:
| Type | Description |
| ----------- | ------------------------------------------------ |
| **Once** | Runs a single time at a specified date and time. |
| **Hourly** | Repeats every hour. |
| **Daily** | Repeats each day at a set time. |
| **Weekly** | Repeats on selected days of the week. |
| **Monthly** | Repeats on a specified day each month. |
| **Custom** | User-defined recurrence. |
| **Cron** | Precise schedule using cron expression syntax. |
After selecting a type, specify the start and end dates and times, then select a timezone. You can choose a standard timezone or set it to **End User Specific**, which bases the trigger on each user's geolocation. For **Weekly** schedules, you must also select the specific days when the automation should run.
If you enable the schedule trigger without specific configuration, the system defaults to a daily run at 8:00 AM.
**Step 3 — Instructions to Agent**
Enter clear instructions describing what the agent should accomplish during its scheduled execution. Well-defined instructions help ensure the agent performs the intended tasks accurately.
**Step 4 — Configure Behavior Settings**
Configure notification preferences to control how the system communicates with users about scheduled executions.
| Setting | Mode | Behavior |
| ------------------------ | -------------- | -------------------------------------------------------------------------------------------------------------------------- |
| **Notify on Start** | User-Triggered | Sends a notification when the agent is ready to begin execution. The agent waits for user confirmation before running. |
| **Notify on Completion** | Auto-Triggered | Sends a notification once the agent has finished executing. The agent runs automatically and informs users of the results. |
Schedule Trigger configuration becomes available only when scheduling is enabled by an administrator. To understand the required admin-level controls, see [Scheduler Settings](/ai-for-work/assistant-configurations#scheduler-settings).
***
## Handling Alert Tasks
The Bot, Workflow, and Autonomous Agents module allows developers to integrate conversation hold and resume functionality within AI for Service Bots. This section describes how the system handles brief pauses (holds) and subsequent resumption of conversations.
### Core Concepts
**Conversation Hold**
A conversation hold represents a temporary pause in the dialogue flow, typically initiated when waiting for an external alert or event. The system maintains conversation context throughout the pause using a unique identifier: `conversation_reference_id`.
**Hold Template**
A hold template is a structured message displayed to users during a conversation pause. It contains a title and description explaining the reason for the interruption.
Customizable fields include:
* **Title** — A concise title describing the reason for the pause.
* **Description** — A more detailed explanation of the pause and potential next steps.
### Prerequisites
Before implementing conversation hold and resume:
* **Hold Trigger Mechanism** — Implement a mechanism to send a predefined `hold template` message to the user when a conversation needs to be paused.
* **Resume Mechanism** — Define how alerts or messages triggers the resumption of the paused conversation using the `conversation_reference_id`.
* **Correlation ID** — Ensure both the hold template and the resuming alert include the same `conversation_reference_id` for proper matching.
### Triggering a Conversation Hold
When the bot encounters a situation requiring a pause (for example, awaiting an alert), send a `hold template` message to the user.
**Required parameters:**
| Parameter | Type | Required/Optional | Description |
| --------------------------- | ------ | ----------------- | ----------------------------------------------------- |
| type | string | Required | Action type (e.g., `"hold_conversation"`) |
| title | string | Required | Title of the hold message. |
| description | string | Required | Description of the hold message. |
| conversation\_reference\_id | string | Required | The unique identifier for this specific conversation. |
**Example hold template:**
```js theme={null}
let sessionId = context.'uniqConversationId';
let response = {
"type": "template",
"payload": {
"template_type": "hold_conversation",
"title": "Request is being processed...",
"description": "You will be notified as soon as it is ready!",
"conversation_reference_id": sessionId // e.g., "abc123"
}
};
response = JSON.stringify(response);
print(response);
```
Upon receiving the hold template, the user interface:
* Pauses the ongoing conversation.
* Displays the hold template to the user, including the customized title and description.
You must first activate the alert service before displaying the hold template.
### Resuming a Conversation
The resume response removes the hold template and continues the conversation with the alert or message content.
**Required parameters:**
| Parameter | Type | Required/Optional | Description |
| --------------------------- | ------ | ----------------- | ------------------------------------------------- |
| conversation\_reference\_id | string | Required | The unique identifier of the paused conversation. |
| text | string | Required | Response content to display upon resumption. |
**Example resume response:**
```js theme={null}
let response = {
"conversation_reference_id": id, // e.g., "abc123"
"text": result
};
response = JSON.stringify(response);
print(response);
```
Once the resume response is received:
* The hold template is removed from the user interface.
* The new alert or message is displayed to the user.
The `conversation_reference_id` ensures that the response is correctly associated with the paused conversation. Any text or template that includes `conversation_reference_id` can be used as an alert response or message to start a new conversation.
### Key Points
* **Customization** — Leverage the flexibility of the hold template to provide contextually relevant messages to users.
* **Mandatory Correlation ID** — The `conversation_reference_id` is critical for ensuring seamless conversation flow during pauses and resumes.
* **Alert/Message Flexibility** — Support various response formats, including plain text and custom bot templates, for optimal user experience.
***
## Notify API
The Notify API enables developers to send interactive notifications to users. These notifications can include customizable response options and action buttons.
Applicable only for Bot, Autonomous, and Workflow Agents.
### Endpoint Reference
| Property | Value |
| ----------------- | -------------------------------------------------------------------------------------- |
| **Method** | POST |
| **Endpoint** | `https://{{host}}/api/public/agents/{agentId}/notify` |
| **Content-Type** | `application/json` |
| **Authorization** | `authorization: (authToken)` — The access token obtained from the agent settings page. |
| **API Scope** | Notification |
### Path Parameters
| Parameter | Required/Optional | Description |
| --------- | ----------------- | ------------------------------------------------------------------------------------------------------------------------------------------------------ |
| host | Required | Environment URL, for example `https://work.example.ai` |
| agentId | Required | The unique identifier of the agent. Replace `{agentId}` in the URL with the actual agent ID, obtained from the Post URL field while creating an agent. |
### Sample Request
```bash theme={null}
curl --location --request POST 'https://work.example.ai/api/1.1/public/agents/ag-xxxxxxxx-xxxx-xxxx-xxxx-xxxxxxxxxxxx/notify' \
--header 'authorization: (YOUR_AUTH_TOKEN)' \
--header 'Content-Type: application/json' \
--data-raw '{
"to": "john.doe@example.com",
"message": {
"title": "Agent Update",
"body": "Notification description"
},
"category": "agent",
"actions": [
{
"title": "LaptopRequest",
"type": "postback",
"utterance": "submit action 1",
"payload": {
"transactionId": "tx-qwe2cd11",
"sessionId": "s-hr3wx21rt",
"event": "laptopRequest"
}
}
]
}'
```
### Request Body Parameters
| Parameter | Type | Required/Optional | Description |
| -------------------- | ------ | ----------------- | --------------------------------------------------------- |
| to | string | Required | Email address of the application user (single recipient). |
| message | object | Required | Contains notification title and body text. |
| message.title | string | Required | Notification title. |
| message.body | string | Required | Notification message body. |
| category | string | Required | Category of the notification (e.g., `"agent"`). |
| actions | array | Required | Array of interactive response buttons. |
| actions\[].title | string | Required | Button label text. |
| actions\[].type | string | Required | Action type (e.g., `"postback"`). |
| actions\[].utterance | string | Required | Text sent when the button is clicked. |
| actions\[].payload | object | Required | Custom data passed with the action. |
### Sample Response
```json theme={null}
{
"notify": "success"
}
```
### Key Points
* The `to` email address must belong to a valid application user.
* Use custom payload data for tracking and response handling.
* The `to` key accepts a single email address in the initial implementation.
* Include `actions` in the request payload to present users with interactive buttons.
***
### Configuring a Schedule Trigger
**Step 1 — Allow Schedule Trigger for Agent**
Toggle the **Allow Schedule Trigger for Agent** option to enable scheduling. When enabled, end users can see, set up, and activate schedules. Disabling it hides all scheduling options from them.
**Step 2 — Set Default Schedule**
Click **Default Schedule** to set the initial automation schedule. Available schedule types:
| Type | Description |
| ----------- | ------------------------------------------------ |
| **Once** | Runs a single time at a specified date and time. |
| **Hourly** | Repeats every hour. |
| **Daily** | Repeats each day at a set time. |
| **Weekly** | Repeats on selected days of the week. |
| **Monthly** | Repeats on a specified day each month. |
| **Custom** | User-defined recurrence. |
| **Cron** | Precise schedule using cron expression syntax. |
After selecting a type, specify the start and end dates and times, then select a timezone. You can choose a standard timezone or set it to **End User Specific**, which bases the trigger on each user's geolocation. For **Weekly** schedules, you must also select the specific days when the automation should run.
If you enable the schedule trigger without specific configuration, the system defaults to a daily run at 8:00 AM.
**Step 3 — Instructions to Agent**
Enter clear instructions describing what the agent should accomplish during its scheduled execution. Well-defined instructions help ensure the agent performs the intended tasks accurately.
**Step 4 — Configure Behavior Settings**
Configure notification preferences to control how the system communicates with users about scheduled executions.
| Setting | Mode | Behavior |
| ------------------------ | -------------- | -------------------------------------------------------------------------------------------------------------------------- |
| **Notify on Start** | User-Triggered | Sends a notification when the agent is ready to begin execution. The agent waits for user confirmation before running. |
| **Notify on Completion** | Auto-Triggered | Sends a notification once the agent has finished executing. The agent runs automatically and informs users of the results. |
Schedule Trigger configuration becomes available only when scheduling is enabled by an administrator. To understand the required admin-level controls, see [Scheduler Settings](/ai-for-work/assistant-configurations#scheduler-settings).
***
## Handling Alert Tasks
The Bot, Workflow, and Autonomous Agents module allows developers to integrate conversation hold and resume functionality within AI for Service Bots. This section describes how the system handles brief pauses (holds) and subsequent resumption of conversations.
### Core Concepts
**Conversation Hold**
A conversation hold represents a temporary pause in the dialogue flow, typically initiated when waiting for an external alert or event. The system maintains conversation context throughout the pause using a unique identifier: `conversation_reference_id`.
**Hold Template**
A hold template is a structured message displayed to users during a conversation pause. It contains a title and description explaining the reason for the interruption.
Customizable fields include:
* **Title** — A concise title describing the reason for the pause.
* **Description** — A more detailed explanation of the pause and potential next steps.
### Prerequisites
Before implementing conversation hold and resume:
* **Hold Trigger Mechanism** — Implement a mechanism to send a predefined `hold template` message to the user when a conversation needs to be paused.
* **Resume Mechanism** — Define how alerts or messages triggers the resumption of the paused conversation using the `conversation_reference_id`.
* **Correlation ID** — Ensure both the hold template and the resuming alert include the same `conversation_reference_id` for proper matching.
### Triggering a Conversation Hold
When the bot encounters a situation requiring a pause (for example, awaiting an alert), send a `hold template` message to the user.
**Required parameters:**
| Parameter | Type | Required/Optional | Description |
| --------------------------- | ------ | ----------------- | ----------------------------------------------------- |
| type | string | Required | Action type (e.g., `"hold_conversation"`) |
| title | string | Required | Title of the hold message. |
| description | string | Required | Description of the hold message. |
| conversation\_reference\_id | string | Required | The unique identifier for this specific conversation. |
**Example hold template:**
```js theme={null}
let sessionId = context.'uniqConversationId';
let response = {
"type": "template",
"payload": {
"template_type": "hold_conversation",
"title": "Request is being processed...",
"description": "You will be notified as soon as it is ready!",
"conversation_reference_id": sessionId // e.g., "abc123"
}
};
response = JSON.stringify(response);
print(response);
```
Upon receiving the hold template, the user interface:
* Pauses the ongoing conversation.
* Displays the hold template to the user, including the customized title and description.
You must first activate the alert service before displaying the hold template.
### Resuming a Conversation
The resume response removes the hold template and continues the conversation with the alert or message content.
**Required parameters:**
| Parameter | Type | Required/Optional | Description |
| --------------------------- | ------ | ----------------- | ------------------------------------------------- |
| conversation\_reference\_id | string | Required | The unique identifier of the paused conversation. |
| text | string | Required | Response content to display upon resumption. |
**Example resume response:**
```js theme={null}
let response = {
"conversation_reference_id": id, // e.g., "abc123"
"text": result
};
response = JSON.stringify(response);
print(response);
```
Once the resume response is received:
* The hold template is removed from the user interface.
* The new alert or message is displayed to the user.
The `conversation_reference_id` ensures that the response is correctly associated with the paused conversation. Any text or template that includes `conversation_reference_id` can be used as an alert response or message to start a new conversation.
### Key Points
* **Customization** — Leverage the flexibility of the hold template to provide contextually relevant messages to users.
* **Mandatory Correlation ID** — The `conversation_reference_id` is critical for ensuring seamless conversation flow during pauses and resumes.
* **Alert/Message Flexibility** — Support various response formats, including plain text and custom bot templates, for optimal user experience.
***
## Notify API
The Notify API enables developers to send interactive notifications to users. These notifications can include customizable response options and action buttons.
Applicable only for Bot, Autonomous, and Workflow Agents.
### Endpoint Reference
| Property | Value |
| ----------------- | -------------------------------------------------------------------------------------- |
| **Method** | POST |
| **Endpoint** | `https://{{host}}/api/public/agents/{agentId}/notify` |
| **Content-Type** | `application/json` |
| **Authorization** | `authorization: (authToken)` — The access token obtained from the agent settings page. |
| **API Scope** | Notification |
### Path Parameters
| Parameter | Required/Optional | Description |
| --------- | ----------------- | ------------------------------------------------------------------------------------------------------------------------------------------------------ |
| host | Required | Environment URL, for example `https://work.example.ai` |
| agentId | Required | The unique identifier of the agent. Replace `{agentId}` in the URL with the actual agent ID, obtained from the Post URL field while creating an agent. |
### Sample Request
```bash theme={null}
curl --location --request POST 'https://work.example.ai/api/1.1/public/agents/ag-xxxxxxxx-xxxx-xxxx-xxxx-xxxxxxxxxxxx/notify' \
--header 'authorization: (YOUR_AUTH_TOKEN)' \
--header 'Content-Type: application/json' \
--data-raw '{
"to": "john.doe@example.com",
"message": {
"title": "Agent Update",
"body": "Notification description"
},
"category": "agent",
"actions": [
{
"title": "LaptopRequest",
"type": "postback",
"utterance": "submit action 1",
"payload": {
"transactionId": "tx-qwe2cd11",
"sessionId": "s-hr3wx21rt",
"event": "laptopRequest"
}
}
]
}'
```
### Request Body Parameters
| Parameter | Type | Required/Optional | Description |
| -------------------- | ------ | ----------------- | --------------------------------------------------------- |
| to | string | Required | Email address of the application user (single recipient). |
| message | object | Required | Contains notification title and body text. |
| message.title | string | Required | Notification title. |
| message.body | string | Required | Notification message body. |
| category | string | Required | Category of the notification (e.g., `"agent"`). |
| actions | array | Required | Array of interactive response buttons. |
| actions\[].title | string | Required | Button label text. |
| actions\[].type | string | Required | Action type (e.g., `"postback"`). |
| actions\[].utterance | string | Required | Text sent when the button is clicked. |
| actions\[].payload | object | Required | Custom data passed with the action. |
### Sample Response
```json theme={null}
{
"notify": "success"
}
```
### Key Points
* The `to` email address must belong to a valid application user.
* Use custom payload data for tracking and response handling.
* The `to` key accepts a single email address in the initial implementation.
* Include `actions` in the request payload to present users with interactive buttons.
***