> ## Documentation Index
> Fetch the complete documentation index at: https://koreai.mintlify.site/llms.txt
> Use this file to discover all available pages before exploring further.
# Pre-built Agents
Deploy pre-configured, customizable AI agents that integrate into your workflows to streamline operations and enhance productivity.
Currently, the following prebuilt agents are available:
## Pre-Built API Agents
* **Zendesk** - Fetches Zendesk tickets based on the entities.
* **Slack** - Sends responses to Slack channels and threads.
* **Microsoft 365 Calendar** - Creates calendar events, fetches events based on filters, checks colleague's availability, and sends quick messages when you delay in joining a meeting.
* **Microsoft 365 Email** - Retrieves emails based on user queries and entities, sends responses as emails, sets individual emails as context, and supports follow-up questions.
* **Microsoft OneDrive** - Fetches files based on user queries and filters, sets individual files as context, and supports follow-up questions.
* **Microsoft Teams** - Fetches files based on user queries and filters, sets individual files as context, and supports follow-up questions.
* **Jira** - Retrieves issues based on user queries using entity filters and creates Jira issues using AI intelligence derived from action items.
* **HubSpot** - Pulls deals based on user queries.
* **Google Calendar** - Creates calendar events, fetches events based on filters, checks colleagues' availability, and sends quick messages when you delay in joining meetings.
* **Google Mail** - Retrieves emails based on user queries and entities, sends responses as emails, sets individual emails as context, and supports follow-up questions.
* **Google Drive** - Fetches files based on user queries and filters, sets individual files as context, and supports follow-up questions.
## Publish a Pre-Built Agent
Administrators can publish selected pre-built agents to make them available to users through the Agent Store.
Steps to publish a pre-built agent:
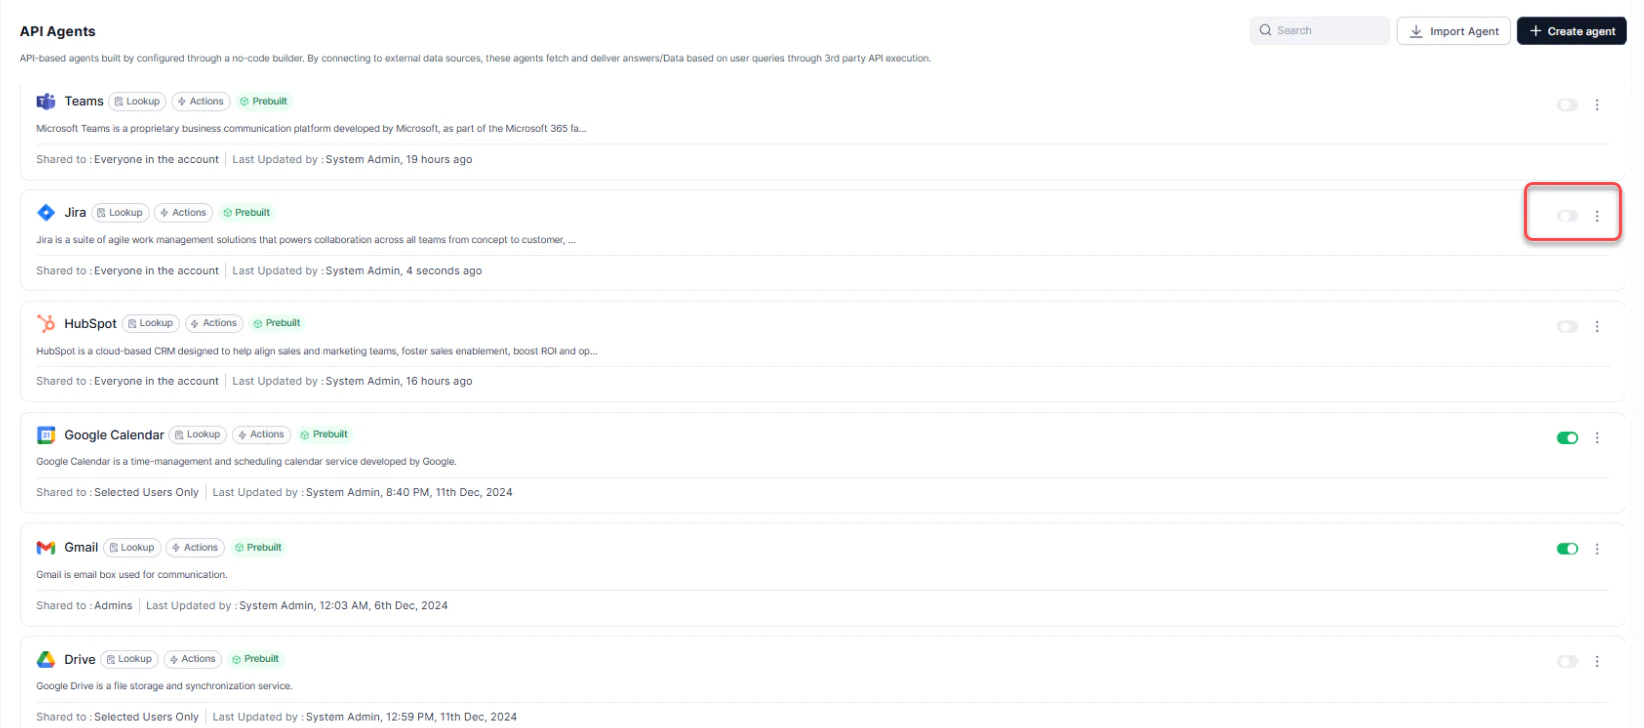
1. Navigate to **User Profile** > **Admin Console** > **Workspaces** > **API Agents** or **Prompt Agents**. You'll see a list of Pre-Built Agents, each marked with a "Prebuilt" label.
2. Toggle the switch **ON** next to the specific agent, or click the **ellipsis (⋮)** icon. A pop-up window appears.
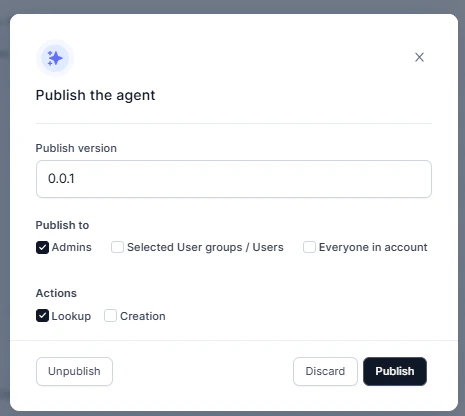
 3. Provide the following details:
* **Published Version**: Select the version of the agent you want to publish.
* **Publish to**: Choose who has access to the agent:
* **Admins**: Restricts the agent to Admin users only.
* **Selected User Groups/Users**: Allows you to specify individual users or groups.
* **Everyone in the Account**: Makes the agent available to all users.
* **Actions**: Choose what users can do with this agent:
* **Lookup**: Users can search for existing items.
* **Creation**: Users can create new items.
For example, for a Jira agent, you can allow users to look up issues or also let them create new issues.
3. Provide the following details:
* **Published Version**: Select the version of the agent you want to publish.
* **Publish to**: Choose who has access to the agent:
* **Admins**: Restricts the agent to Admin users only.
* **Selected User Groups/Users**: Allows you to specify individual users or groups.
* **Everyone in the Account**: Makes the agent available to all users.
* **Actions**: Choose what users can do with this agent:
* **Lookup**: Users can search for existing items.
* **Creation**: Users can create new items.
For example, for a Jira agent, you can allow users to look up issues or also let them create new issues.
 4. Click **Publish**. The system displays the **Auth Settings** screen before completing the publishing process. See the section below for details.
## Configure Authentication Settings
When you click **Publish** for a pre-built agent, the platform presents the Auth Settings screen. You must configure authentication before the agent is available to users.
**Authorization Method**
The Auth Settings screen displays the type of authorization that the agent supports. This field is read-only and shows one of the following methods:
* **OAuth**: Most pre-built agents use this method (Jira, HubSpot, Microsoft 365 Calendar, Microsoft 365 Email, Microsoft OneDrive, Microsoft Teams, Google Calendar, Google Mail, Google Drive, Slack).
* **Basic Auth**: The Zendesk agent uses this method.
### OAuth Application Configuration
For agents that use OAuth, the Auth Settings screen presents two options:
**Use Product Registered OAuth Application**: Select this option to route the OAuth credentials of the user's account to the product-registered application. The platform stores and manages the credentials automatically.
**Use Your Own OAuth Application**: Select this option to use your organization's own OAuth application credentials. When you select this option, the following fields appear:
* **Client ID** (editable): Enter the Client ID from your OAuth application.
* **Client Secret** (editable): Enter the Client Secret from your OAuth application.
* **Redirect URL** (read-only): Displays the redirect URL that you must register in your OAuth application. Use the copy icon to copy this value.
* **Scopes** (read-only): Displays the required OAuth scopes. Use the copy icon to copy these values.
The **Save** button enables after you enter valid values for Client ID and Client Secret.
**Google Agents Restriction**
For Google agents (Google Calendar, Google Mail, and Google Drive), the platform displays only the **Your Own OAuth Application** option. You must provide your own OAuth application credentials to use these agents.
**Zendesk Authentication**
The Zendesk agent uses **Basic Auth** instead of OAuth. When you publish the Zendesk agent, the Auth Settings screen prompts you to enter Basic Auth credentials (username and password or API token) rather than OAuth details.
### Setting Up Your Own OAuth Application
Each third-party system requires you to register an OAuth application before you can use the "Your Own OAuth Application" option. The Auth Settings screen includes a **Find More Details** link for each system. Use the following resources to set up your OAuth application:
* **Jira**: Refer to the [Atlassian guide](https://developer.atlassian.com/cloud/oauth/getting-started/enabling-oauth-3lo/) on enabling OAuth 2.0 (3LO) in the Atlassian Developer portal.
Required scopes: `offline_access`, `read:jira-user`, `read:jira-work`, `write:jira-work`, `manage:jira-project`, `manage:jira-configuration`, `manage:jira-data-provider`, `manage:jira-webhook`, `read:me`
* **HubSpot**: Refer to the [HubSpot OAuth Quickstart Guide](https://developers.hubspot.com/docs/apps/legacy-apps/authentication/oauth-quickstart-guide) in the HubSpot Developer docs.
Required scopes: `sales-email-read`, `crm.objects.deals.read`, `crm.objects.deals.write`, `crm.objects.contacts.read`, `crm.objects.contacts.write`, `crm.objects.companies.read`, `crm.objects.companies.write`, `crm.objects.owners.read`
* **Microsoft 365 (Calendar, Email, OneDrive, Teams)**: Refer to the [Microsoft Graph documentation](https://learn.microsoft.com/en-us/graph/auth-register-app-v2) on registering an application with the Microsoft identity platform.
* **Google (Gmail, Calendar, Drive)**: Refer to the [Google Cloud documentation](https://docs.cloud.google.com/application-integration/docs/configure-authentication-profiles) on configuring authentication profiles in Application Integration.
* **Slack**: Visit the Slack API Apps page.
Required scopes: `mpim:read`, `users:read`, `chat:write`, `team:read`, `channels:read`, `files:write`, `groups:read`, `remote_files:share`
* **Zendesk**: Refer to the [Zendesk Support article](https://support.zendesk.com/hc/en-us/articles/4408845965210-Using-OAuth-authentication-with-your-application) on using OAuth authentication with your application.
After you configure and save the authentication settings, the platform redirects you to the **Publishing** screen to complete the agent publishing process.
**Access Auth Settings After Publishing**
You can access the Auth Settings at any time after publishing through two entry points:
* **OAuth Settings Banner**: The Publishing screen displays an OAuth Settings banner. Click the banner to navigate back to the Auth Settings screen.
* **Three-Dot Menu**: Click the ellipsis (⋮) menu on the Publishing screen and select **Auth Settings** to open the Auth Settings screen.
## Using a Published Agent
After the administrator publishes an agent and configures authentication, users can access it through the Agent Store. Users open the Agent Store, click **Connect** for the desired agent, and follow the on-screen instructions to **Add Connection**. After the user successfully adds the connection, the agent responds to user questions and queries through the Ask or Search Anything box on the homepage.
***
4. Click **Publish**. The system displays the **Auth Settings** screen before completing the publishing process. See the section below for details.
## Configure Authentication Settings
When you click **Publish** for a pre-built agent, the platform presents the Auth Settings screen. You must configure authentication before the agent is available to users.
**Authorization Method**
The Auth Settings screen displays the type of authorization that the agent supports. This field is read-only and shows one of the following methods:
* **OAuth**: Most pre-built agents use this method (Jira, HubSpot, Microsoft 365 Calendar, Microsoft 365 Email, Microsoft OneDrive, Microsoft Teams, Google Calendar, Google Mail, Google Drive, Slack).
* **Basic Auth**: The Zendesk agent uses this method.
### OAuth Application Configuration
For agents that use OAuth, the Auth Settings screen presents two options:
**Use Product Registered OAuth Application**: Select this option to route the OAuth credentials of the user's account to the product-registered application. The platform stores and manages the credentials automatically.
**Use Your Own OAuth Application**: Select this option to use your organization's own OAuth application credentials. When you select this option, the following fields appear:
* **Client ID** (editable): Enter the Client ID from your OAuth application.
* **Client Secret** (editable): Enter the Client Secret from your OAuth application.
* **Redirect URL** (read-only): Displays the redirect URL that you must register in your OAuth application. Use the copy icon to copy this value.
* **Scopes** (read-only): Displays the required OAuth scopes. Use the copy icon to copy these values.
The **Save** button enables after you enter valid values for Client ID and Client Secret.
**Google Agents Restriction**
For Google agents (Google Calendar, Google Mail, and Google Drive), the platform displays only the **Your Own OAuth Application** option. You must provide your own OAuth application credentials to use these agents.
**Zendesk Authentication**
The Zendesk agent uses **Basic Auth** instead of OAuth. When you publish the Zendesk agent, the Auth Settings screen prompts you to enter Basic Auth credentials (username and password or API token) rather than OAuth details.
### Setting Up Your Own OAuth Application
Each third-party system requires you to register an OAuth application before you can use the "Your Own OAuth Application" option. The Auth Settings screen includes a **Find More Details** link for each system. Use the following resources to set up your OAuth application:
* **Jira**: Refer to the [Atlassian guide](https://developer.atlassian.com/cloud/oauth/getting-started/enabling-oauth-3lo/) on enabling OAuth 2.0 (3LO) in the Atlassian Developer portal.
Required scopes: `offline_access`, `read:jira-user`, `read:jira-work`, `write:jira-work`, `manage:jira-project`, `manage:jira-configuration`, `manage:jira-data-provider`, `manage:jira-webhook`, `read:me`
* **HubSpot**: Refer to the [HubSpot OAuth Quickstart Guide](https://developers.hubspot.com/docs/apps/legacy-apps/authentication/oauth-quickstart-guide) in the HubSpot Developer docs.
Required scopes: `sales-email-read`, `crm.objects.deals.read`, `crm.objects.deals.write`, `crm.objects.contacts.read`, `crm.objects.contacts.write`, `crm.objects.companies.read`, `crm.objects.companies.write`, `crm.objects.owners.read`
* **Microsoft 365 (Calendar, Email, OneDrive, Teams)**: Refer to the [Microsoft Graph documentation](https://learn.microsoft.com/en-us/graph/auth-register-app-v2) on registering an application with the Microsoft identity platform.
* **Google (Gmail, Calendar, Drive)**: Refer to the [Google Cloud documentation](https://docs.cloud.google.com/application-integration/docs/configure-authentication-profiles) on configuring authentication profiles in Application Integration.
* **Slack**: Visit the Slack API Apps page.
Required scopes: `mpim:read`, `users:read`, `chat:write`, `team:read`, `channels:read`, `files:write`, `groups:read`, `remote_files:share`
* **Zendesk**: Refer to the [Zendesk Support article](https://support.zendesk.com/hc/en-us/articles/4408845965210-Using-OAuth-authentication-with-your-application) on using OAuth authentication with your application.
After you configure and save the authentication settings, the platform redirects you to the **Publishing** screen to complete the agent publishing process.
**Access Auth Settings After Publishing**
You can access the Auth Settings at any time after publishing through two entry points:
* **OAuth Settings Banner**: The Publishing screen displays an OAuth Settings banner. Click the banner to navigate back to the Auth Settings screen.
* **Three-Dot Menu**: Click the ellipsis (⋮) menu on the Publishing screen and select **Auth Settings** to open the Auth Settings screen.
## Using a Published Agent
After the administrator publishes an agent and configures authentication, users can access it through the Agent Store. Users open the Agent Store, click **Connect** for the desired agent, and follow the on-screen instructions to **Add Connection**. After the user successfully adds the connection, the agent responds to user questions and queries through the Ask or Search Anything box on the homepage.
***