
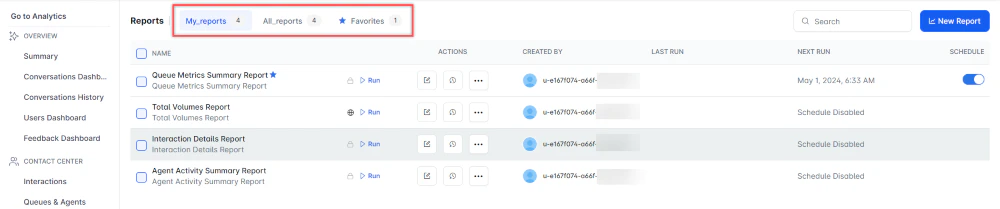
Back to Reports List Contact Center AI reports enable supervisors to assess performance across agents, queues, and calls, with metrics such as Average Handle Time (AHT), Average Speed of Answer (ASA), and Customer Satisfaction (CSAT). To access reports, go to Contact Center AI > Analytics > CONTACT CENTER > Reports. You can filter the reports list using the following tabs:Documentation Index
Fetch the complete documentation index at: https://koreai.mintlify.app/llms.txt
Use this file to discover all available pages before exploring further.
- My Reports: Shows only reports created by the current user.
- All Reports: Shows all reports.
- Favorites: Shows reports marked as favorites by the current user.
Creating a New Report
- On the Reports page, select New Report.
- In the list of reports, select a report type to generate. For example, Interaction Details Report.
- Enter the Report Name and Report Description.
- Select a Time.
- Select Data Filters.
- Select Report Generation and choose Run On Demand or Schedule, where you can create up to six schedules (only one for the Hourly option).
- Select the desired Format.
- Enter a Send To address (single email address or mailing list).
- Select Create to generate the report.
- Select the Run option to generate the report. Run On Demand generates the report immediately, while Schedule configures automatic generation at the specified date and time without manual execution. Use the toggle to enable or disable the schedule (applies only to scheduled reports).
- Select the option to download the report.
Manage Reports
Contact Center AI supports filters, scheduled report runs, on-demand runs, format and filter modifications, and bulk actions on reports.The red dot beside the report indicates it was generated within the last 24 hours. You can download, save, and view the report in PDF/CSV format.
Availability
You can restrict report visibility using one of two permissions:- Public (default)-visible to all users.
- Private-visible only to the creator.
- Select ⋮ under ACTIONS for the report.
- Select Switch to Private to restrict access, or Switch to Public to make it available to everyone.
A private report is not visible to other users on the REPORTS page.
Bulk Actions
Bulk actions let you run or delete multiple reports at once. Select Run Now or Delete and then follow the on-screen instructions.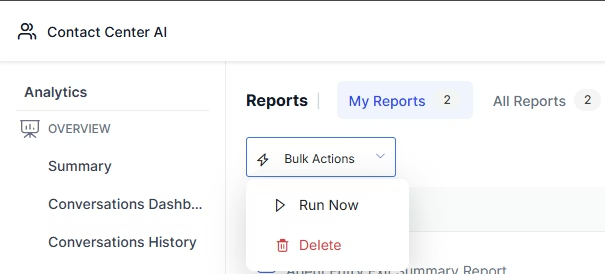
Actions
The following actions are available for each report:| Action | Icon | Steps |
|---|---|---|
| Edit |  | 1. Select Edit on the report. 2. In the pop-up, make your changes and select Save. |
| View History |  | 1. Select View History to see the last 5 runs. 2. Select the PDF icon to download a run. |
| Clone | 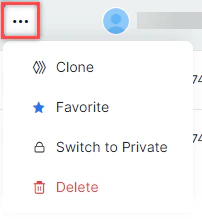 | 1. Select ⋮ > Clone. 2. In the pop-up, select Save. |
| Favorite / Unfavorite | | 1. Select ⋮ > Favorite or Unfavorite. 2. Confirm in the pop-up. |
| Delete | | 1. Select ⋮ > Delete. 2. In the confirmation pop-up, select Yes, Delete. |