

Standard Responses
Standard responses are pre-defined NLP interpreter messages the AI Agent displays based on events, user inputs, or system conditions. All defaults can be customized, and channel-specific overrides can be added. Go to Automation AI > Conversation Intelligence > Conversation Management > Standard Responses. For each category, the trigger condition is listed alongside the default response(s). The NLP interpreter randomly selects from multiple responses at runtime.Response Categories
Statements
Responses triggered by actions from the AI Agent or user.Use the toggle to enable or disable Statements. By default, all are enabled. Disabling a Statement excludes it from runtime processing, while other Standard Response categories continue to function normally. Use the filter to toggle all options at once. Disable the standard response for each language separately.
Queries
Questions the AI Agent asks users for more information.Errors & Warnings
Messages displayed when errors or validation issues occur.Questions
General questions the AI Agent poses to users.Choices
Yes/No prompts used during alert and task setup.Add and Edit Responses
To add a new standard response:- Select a category tab and hover over the target situation.
- Click Add Response.
-
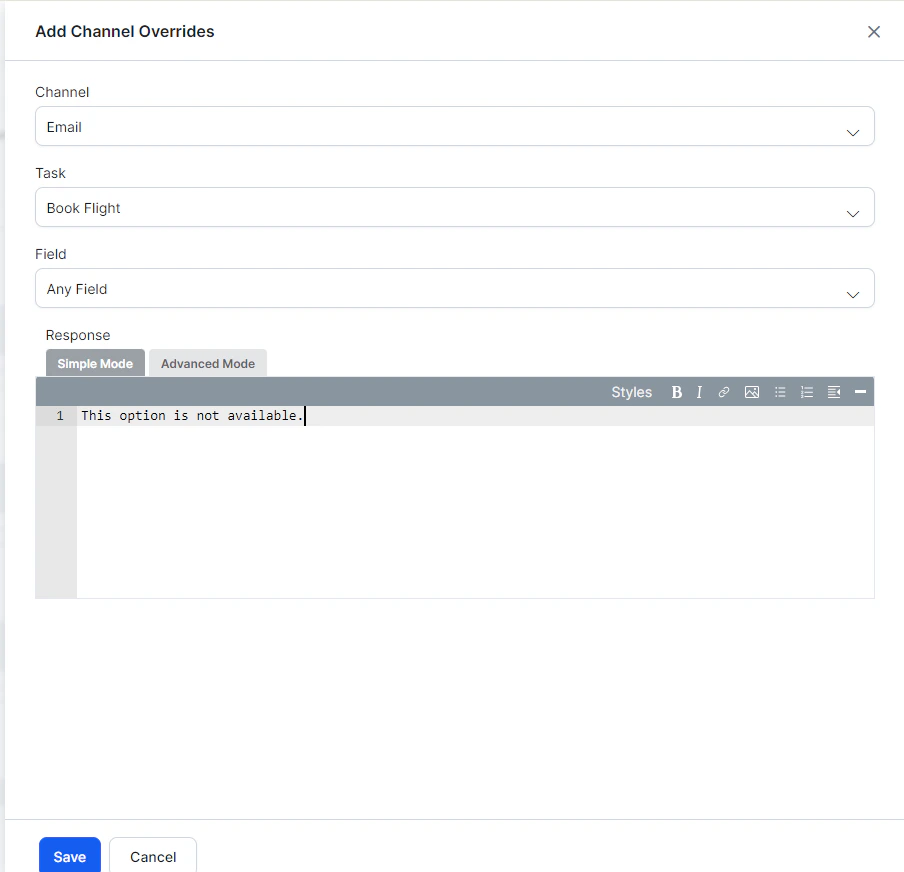
In the Add Channel Overrides dialog:
- Select a channel (or Any Channel for all channels).
- For channel-specific responses, select a task and optionally a field.
-
In the Response editor, choose a mode:
- Simple Mode — Plain text with optional formatting (bold, italics, hyperlinks, lists).
- Advanced Mode — JavaScript for custom channel-specific messages. Use
response.messagefor the default message string andresponse.choicesfor the options array.
- Click Save.
Channel Override Examples
Slack:Customizing Ambiguity Display with getChoices()
Use getChoices() to retrieve ambiguous intent choices and render them in a custom format (for example, as buttons):
Manage Interruptions
Users rarely follow a linear conversation path — they may switch topics, ask unrelated questions, or provide a new intent mid-task. Manage Interruptions gives you granular control over how the AI Agent handles these situations. Go to Automation AI > Conversation Intelligence > Conversation Management > Manage Interruptions.Interruptions Hierarchy
Settings at more specific levels override broader defaults.If no node or task-level settings exist, the app-level settings apply.
When a user provides input after 15+ minutes of inactivity and the input is within the previous session context, it’s treated as an interruption. If the user starts a new utterance, the old context is discarded.
Allow Interruptions
Do Not Allow Interruptions
Disables interruptions at the app level. Can still be overridden at the task or node level.Allow the End User to Select the Behavior
Prompts the user to confirm whether to switch tasks. Customize the confirmation message via Manage Response. Requires a Resume Option.Resume Options
Defines what happens to the on-hold task after the interrupting task completes.
Example — Get confirmation before resuming:
On-Hold Quantity
Set the maximum number of tasks that can be held at once. Default: 1. Range: 1-N. When the limit is reached, new tasks are ignored regardless of interruption settings.Tasks resume in reverse chronological order (most recent first). Limit on-hold tasks to 1-2 to avoid confusion.
Node-Level Customization
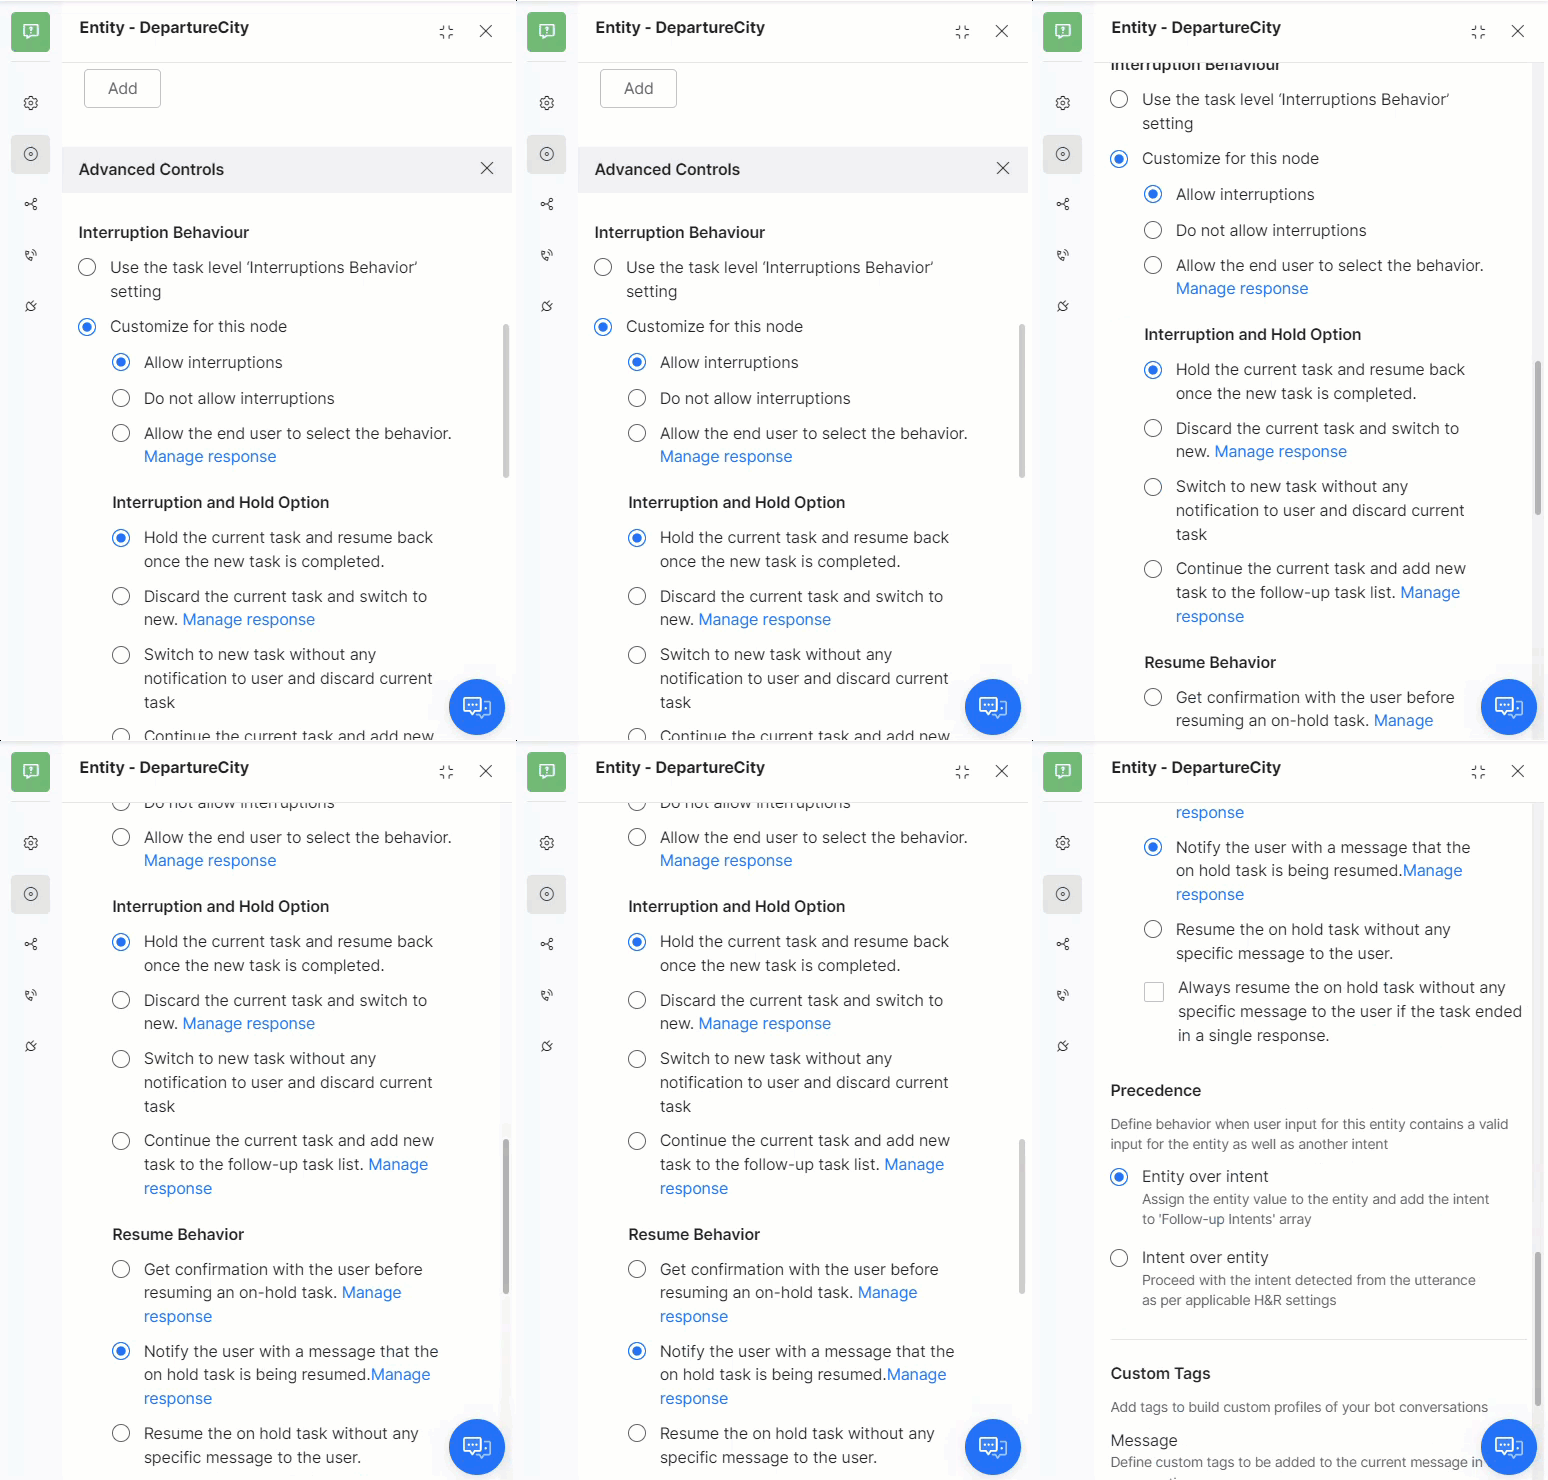
- Open the dialog task and select the node.
- Go to the Instance tab > Advanced Controls.
- Under Interruptions Behavior, select Customize for this node and configure settings.
Dialog-Level Customization
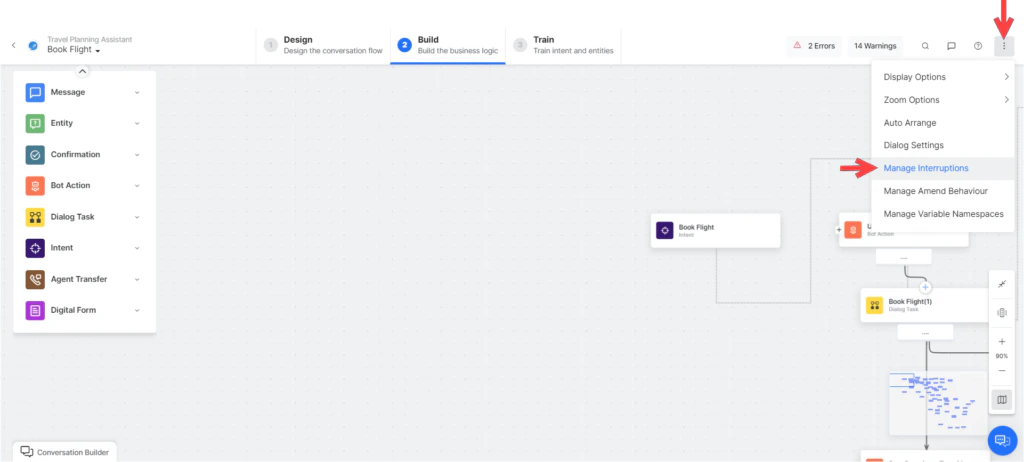
- Open the dialog task.
- Click the more options icon (top-right of Dialog Builder) > Manage Interruptions.
- Under Interruptions Behavior, select Customize for this task and configure settings.
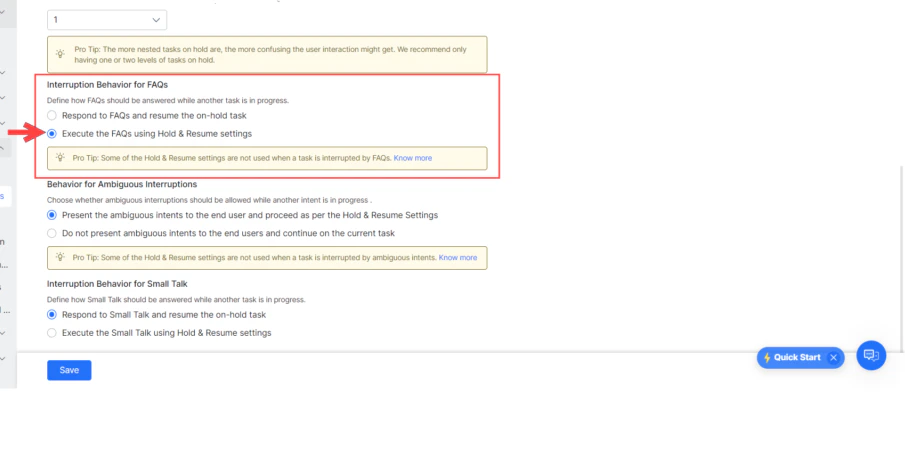
Behavior for FAQs
Behavior for Ambiguous Intents

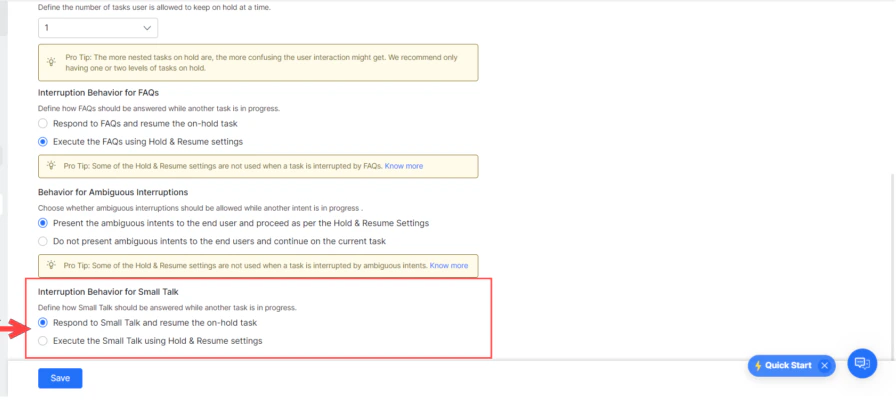
Behavior for Small Talk
Behavior for Search AI
This behavior applies only to NLP-based apps.
Behavior for User Authorization
When a user provides unexpected input at an authorization prompt:- If Small Talk is detected: Small Talk response is shown, and the authorization prompt is repeated.
- The Platform checks for intents regardless of interruption settings:
- Single intent detected — Asks the user to confirm discarding the current task and triggering the new one.
- Multiple intents detected — Shows an ambiguity dialog with an option to ignore and continue the current task.
- If no intent is found — User is re-prompted with the authorization link.
Small Talk
Small Talk enables the AI Agent to engage users in casual conversation. AI Agents that respond to social inputs like How are you? create a positive impression and improve engagement. Go to Automation AI > Use Cases > Small Talk.Intents and FAQs take precedence over Small Talk. If both are detected, the intent or FAQ is handled first. Small talk is language-specific — configure it separately for each enabled language.
Features
Default Small Talk (Greetings Group)
When you create an app, a Greetings group is generated automatically. The following messages are included:When you open Small Talk in an existing app, you are prompted to migrate Standard Response greetings to Small Talk. This migration is permanent — greetings are removed from Standard Responses and can’t be retrieved if you proceed.
Set Up Small Talk
Step 1: Add a Group
- Go to Automation AI > Use Cases > Small Talk.
- Click New Group.
- Enter a Group Name and click Proceed.
Step 2: Add Query-Response Pairs
- In the Small Talk editor, enter the User Query and Bot Response.
- Press Enter or click Add to save the pair.
- Alternate questions — Additional phrasings for the same query. These are pattern-based.
- Alternate responses — Multiple responses; the Platform picks one at random at runtime.
- Child queries — Follow-up questions available only after the parent is answered. Up to 3 levels of nesting are supported.
Step 3: Configure Channel-Specific Responses (Optional)
- Hover over a response and click the Settings (gear) icon.
- In the Manage Response window:
- Add a default message for all channels.
- Click + Add Response > New Prompt Message for channel-specific responses.
- Select a Channel, then enter a response in Simple or Advanced (JavaScript) mode.
- Click Save.
Import Small Talk
To import an existing Small Talk dataset:- Click the more (ellipsis) icon in the Small Talk view.
- Select Import.
- Download the sample file if needed to verify formatting (JSON or TSV).
- Select your file and click Next.
Small Talk Context
Mark sections of user input patterns with_ to capture contextual data. This data is stored in context.smallTalk.matchData and can be used to personalize responses.
Example pattern: I am from _~location Where are you from?
_0, _1, _2, etc.) and may not be contiguous if an optional token is absent.
Example pattern with optional token: how is the _[ climate temperature ] { at _~location } ~time
- User says “how is the temperature in London today” →
_0: temperature,_1: London,_2: today - User says “how is the climate today” →
_0: climate,_2: today(_1is absent)
- The session ends.
- A new primary Small Talk intent is detected.
- Any non-Small Talk intent is triggered.
Training
After making changes to Small Talk, click Train in the Small Talk editor to retrain the assistant.Importing a Small Talk file triggers training automatically.
- Only 3 levels of child nodes are allowed.
- Duplicate top-level questions across groups aren’t allowed.
- Questions are evaluated in the order added within a group; groups are evaluated in the order created.
Alert Tasks
Alert Tasks proactively deliver information to users by polling a service on a real-time or scheduled basis. Users can configure alerts to trigger at specific times or when defined conditions are met. Go to Automation AI > Use Cases > Alert Tasks.Example Use Cases
- Time- or location-based promotional offers
- Scheduled delivery updates
- Inventory level changes
- Critical issue notifications
- Weather alerts
- Cross-system status changes
Create an Alert Task
- Open the AI Agent.
- Navigate to Automation > Use Cases > Alert Tasks.
- Click Create Alert Task.
- Configure the General Settings:
Advanced Settings
Authorization
Define how end-users are authenticated to receive alert notifications. Not required for Webhook connection types.- On the API Request tab, expand the Authorization section.
- Select an existing Authorization Provider or click Create New.
- Select an Authorization Type:
API Requests
Configure the API request that fetches data for the alert. The configuration depends on the Connection Type:
You can define API Parameters, an optional API task Initializer, API Request pre/post-processors, and expected Response Samples.
Bot Responses
After configuring the API request, define how alert results are displayed to the user.Alert Settings
Define when and how the alert fires. Not applicable to Webhook tasks.Version Namespaces
Associate Variable Namespaces to scope which variables are used during task execution. This option is only available when Namespaces are enabled.View Logs
View logged events for published alert tasks to troubleshoot request/response behavior.- In Alert Tasks, click the Settings (gear) icon for the task.
- Click View Logs.