

Flows Live Board
Navigate to Automation AI / Contact Center AI / Agent AI > Flows & Channels > FLOWS to access all flows.
Search — Enter keywords to filter flows.
Sort — Click the Flow column header to toggle alphabetical sort (↑ ascending / ↓ descending).
Flow Types
Default Welcome Flows
Default flows ship with every new account and act as fallbacks when no intent is matched.
Use these flows to validate fallback behavior and verify channel-specific configurations.
Create a Start Flow
- Go to Flows & Channels > FLOWS.
- Click + New Start Flow.
- Enter a Start Flow Name and Description.
- Select a channel under Attach a Channel — see channel-specific settings below.
- Click Update & Continue to Flow Design to open the Flow Designer.

Voice Channel
Phone Number
Select an existing phone number from your account, or click Purchase a phone number to acquire one.- Click Get New Phone Number, then select: Country, Local or Toll-Free, State, and Area Code. Monthly fee and per-minute charge are displayed before confirmation.
- After purchase, set the number for Inbound, Outbound, or both calls, then click Done.
Phone number purchase requires a Twilio account. Not supported for SIP trunk setups.
ASR and TTS
Show Advanced Settings — Configure Primary and Fallback TTS independently. Learn more.
Bot No Input
Prevents dead air when the bot doesn’t respond due to backend delays or failures. When disabled, the call disconnects after a 30-second default give-up timeout.
Example configuration:
Behavior: The bot plays the message every 10 seconds. After 120 seconds (or 15 retries), it speaks the end-call message and disconnects.
Answering Machine Detection (AMD)
Detects whether a human or answering machine answered the call. The result is stored incontext.session.UserSession. Enable Disconnect the call after detecting a machine to auto-terminate on detection.
When AMD triggers a disconnection, the interaction is recorded as follows:
Applicable to voice flows only.
TTS Streaming
Streams the TTS response, reducing TTS connection latency by ~200 ms. Supported only for Deepgram and ElevenLabs.Continuous Gather
Available when TTS Streaming is enabled. Captures user responses concurrently to further reduce latency. Use only for Agentic App use cases.Optional Flow Attachments (Voice)
Only published flows appear in these dropdowns.
Chat Channel
Click Update & Continue to Flow Design to open the Flow Designer.
SMS Channel
- Select a configured phone number.
- Optionally attach a No Agents Available Flow and/or Out-of-Hours Flow.
- Click Update & Continue to Flow Design.
Create an Exit Flow
- Go to Flows & Channels > FLOWS.
- Click + New Exit Flow.
- Enter an Exit Flow Name and Description.
- Under Attach a Channel, select Voice or Chat.
- Click Update & Continue to Flow Design.
Navigate the Flow Designer
Once you enter the Flow Designer, the default Start node is already on the canvas.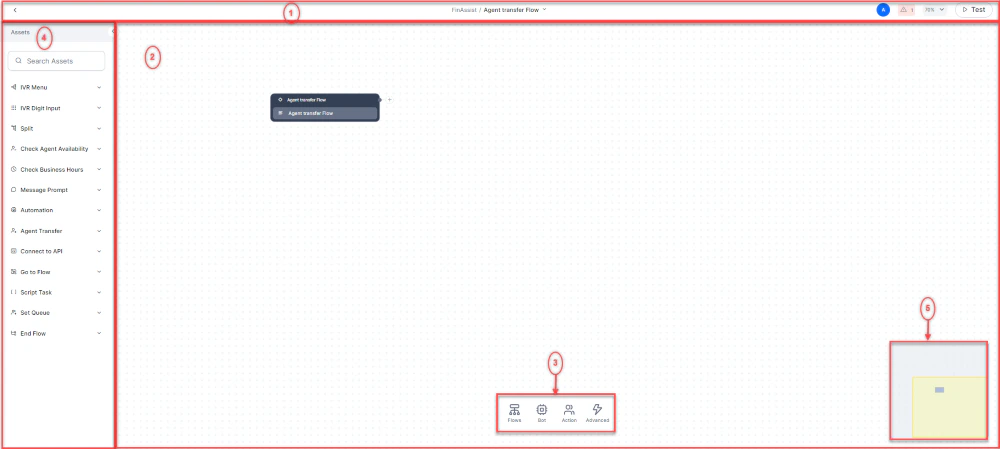
All changes are auto-saved.
Toolbar Details
Manage Flows
Edit a Start Flow
- On the Flows Live Board, click ⋮ next to the flow.
- Click Update, edit the fields (Name, Description, Channel), and click Update.
The Channel field of default Start Flows can’t be edited.
Delete a Start Flow
- Click ⋮ next to the flow and click Delete.
- Confirm deletion.
- Deleted flows can’t be restored.
- Default start flows can’t be deleted.
- A flow linked to an active campaign must be removed from that campaign before it can be deleted.
Edit an Exit Flow
- Click ⋮ next to the exit flow and click Update.
- Make changes and click Update.
Delete an Exit Flow
- Click ⋮ next to the exit flow and click Delete.
- Confirm deletion.
Publish a Flow
Publishing makes the flow available to end users. See Publishing Components.Flow Nodes and Node Types
Nodes are the building blocks of a flow. Drag them onto the canvas and connect them to define the customer journey.Node Reference
Working with Nodes
Add a Node
- Method 1: Click + on the canvas → select a node from the pop-up → click + New Node.
- Method 2: Drag a node from the Nodes Panel onto the canvas.
Configure a Node
Click any node on the canvas to open its configuration panel, then fill in the required fields.Rearrange Nodes
Drag and drop nodes to new positions. Connected nodes stay in place regardless of drag direction.Connect Nodes
- Click + on the source node.
- Drag to the target node. An arrowed line appears indicating the connection direction.
Edit or Delete a Node Connection
Click the connector line between two nodes to reveal options:
After deleting a connector, reconnect the nodes or remove the orphaned node to keep the flow valid.
Edit or Delete a Node
Right-click a node to access:- Deleted nodes can’t be restored unless a previously saved version contains them. Restoring a version may overwrite other changes — proceed with caution. See Restore Versions.
- The Start node can’t be deleted.
Automation Routing
Path: Flows & Channels > Automation Routing > Routing Modes The Routing Modes page lists all Chat and Voice flows with their automation routing configuration. Use it to manage automation app connections and routing behavior. The integrated search bar filters results across all displayed fields.
Click ⋮ next to any welcome flow to access the following options: