

Only administrators can access User Management settings.
User Enrollment
User enrollment controls how users join your account. To change the enrollment mode, go to Admin Console > User Management > Users and click Change in the top navigation.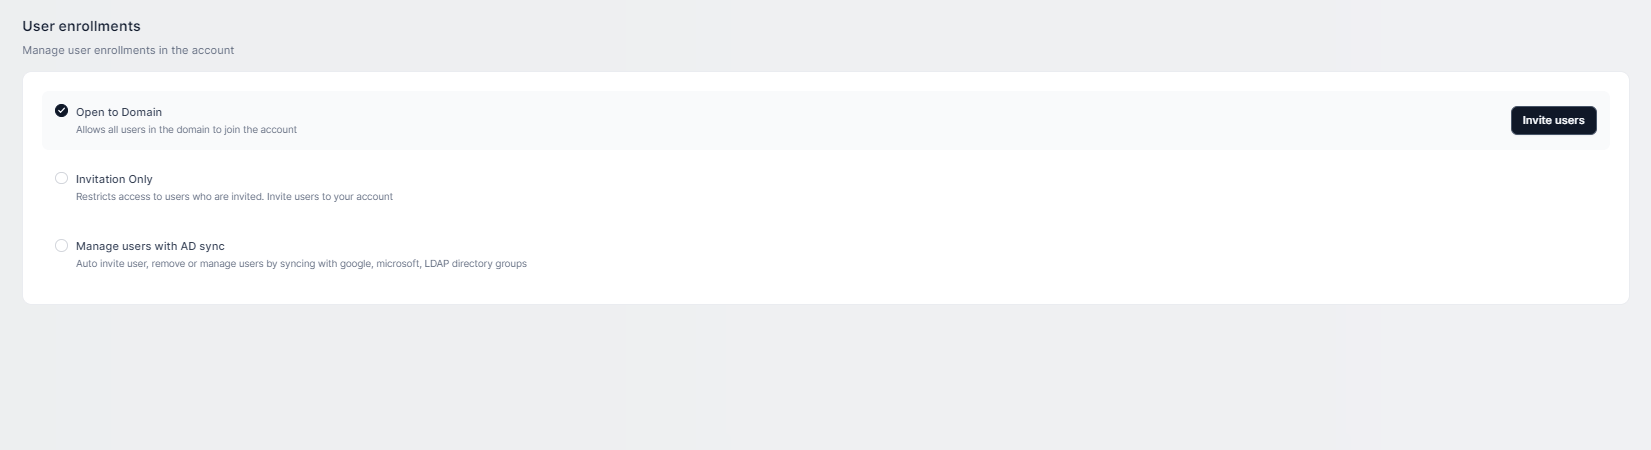
Configure AD Sync Enrollment
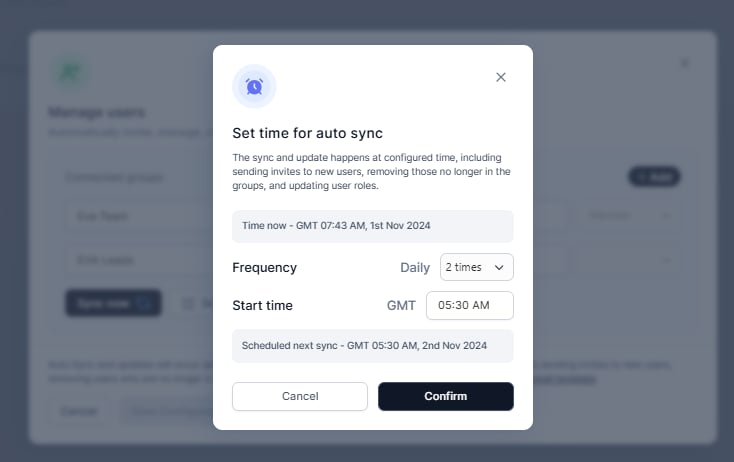
- Click Manage users with AD Sync. A pop-up shows the current user count.
- Click Confirm to proceed.
-
Select a distribution list (DL) from your service account and assign a role.
- All users enrolling through this DL receive the assigned role.
- If a user belongs to multiple DLs, the highest role applies: Admin > Custom Admins > Members.
- Click Sync now to preview the account delta — users to be added, removed, or updated.
-
Click Set Sync Now, choose a sync frequency and start time, then click Confirm.
- Auto sync runs daily: it sends invites to new users, removes users no longer in the groups, and updates roles.
-
Click Save Configuration to apply all changes.
You cannot save the configuration if the admin making changes is not included in the admin DL.
Users
Navigate to Admin Console > User Management > Users to view and manage all users across your network accounts.User Statuses
The Users table also displays: USERS (name + admin indicator), DESIGNATION, ROLE, and USER GROUP.
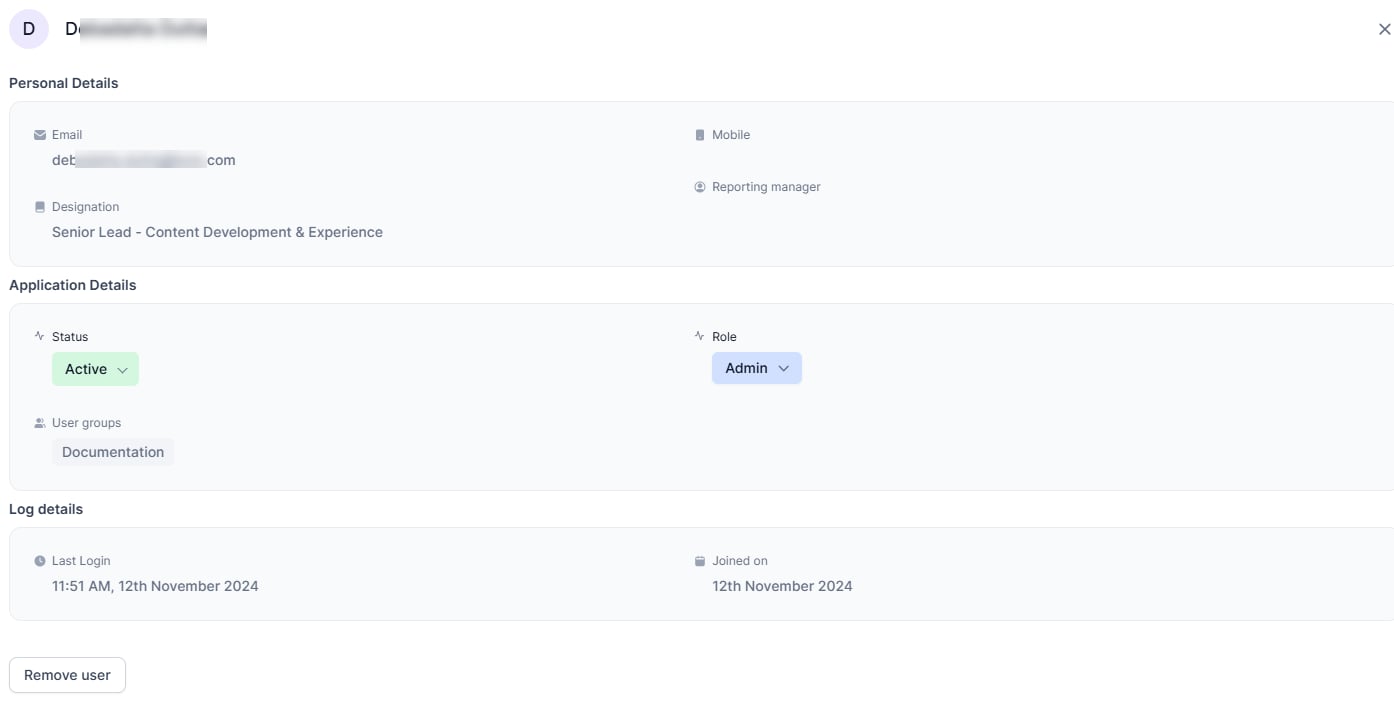
View User Details
To open the user details page:- Hover over a username and click Open, or
- Click More in the last column of the user’s row.
Invite Users
By email:- Click Invite users in the top navigation.
- Select the Add manual radio button.
- Enter one or more email addresses.
- Click Invite.
- Click Invite users in the top navigation.
-
Click Click to upload or drag and drop your file into the upload area.
- See Format template for importing files for file preparation instructions.
-
Click Invite.

Search, Filter, Sort, and Group
Roles
Roles control what each user can see and do. Two default roles exist: Admin and Member.Modify an Existing Role
- In the Users table, click the role displayed for the user you want to update.
- Select the new role from the dropdown.
- Confirm the change.
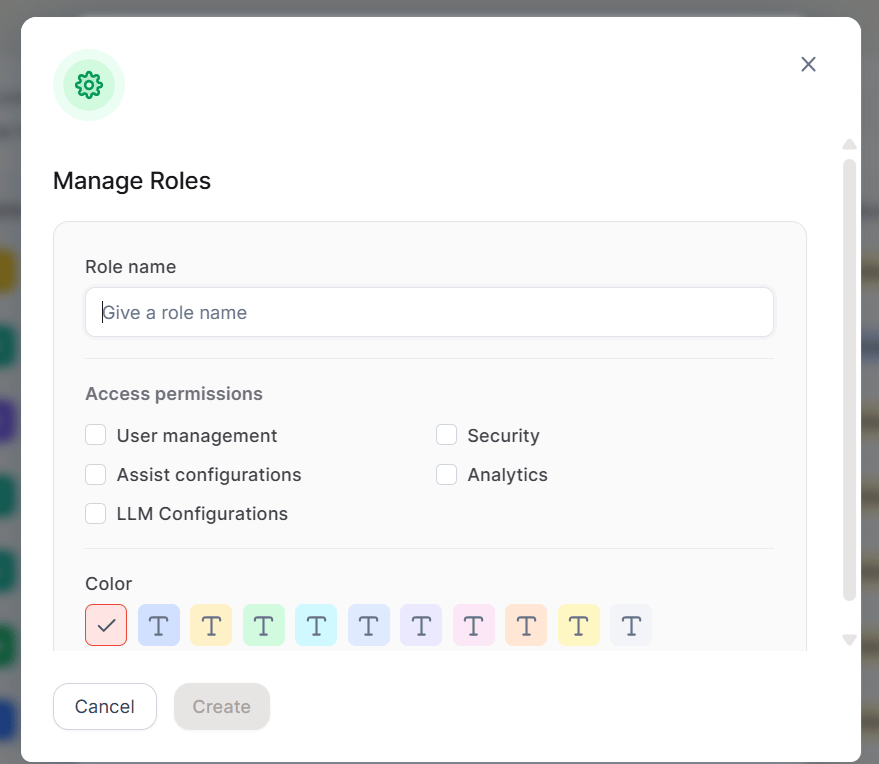
Create a Custom Role
- Click Manage role from the User Management interface.
- Click Add Role.
-
Enter a Role name — use a clear, descriptive name that reflects the role’s purpose.
-
Select one or more Access Permissions:
- Choose a Color to visually distinguish the role throughout the system.
At least one Access Permission must be selected to create a role.
User Groups
User groups let you organize users by department, location, or any shared attribute. Groups are for administrative use only and are not visible to end users. Navigate to Admin Console > User Management > User groups.
Use the Search field to find specific groups. Clear the field to view all.
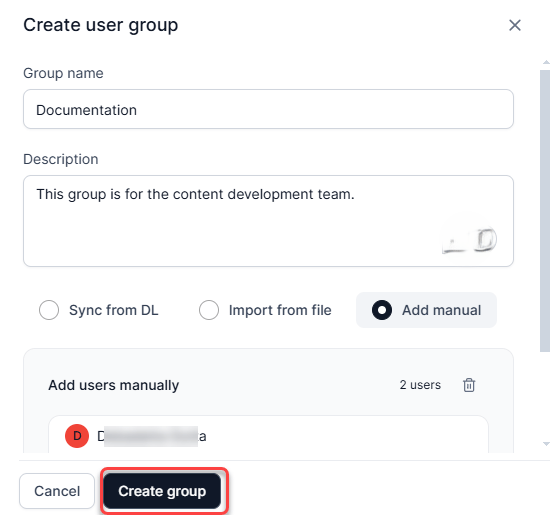
Create a Group
- Click Create group.
- Enter a Group Name and, optionally, a Description.
-
Add users using one of these methods:
-
Click Create group.
The Enterprise Directory option appears only if employee data is available. If the employee directory is not configured, the Enterprise Directory option disables the Save action.
- You can edit an Enterprise Directory group at any time by updating the filters or modifying the group configuration.
- If filtered fields used in a group are later deleted from the directory, the group continues to exist but becomes empty because the filter values no longer match any records.
- If all employee data in the Enterprise Directory is removed, existing groups remain but become empty.
Modify a Group
- On the User groups page, click the group name.
- Edit the description, add users, or hover over a username and click the delete icon to remove them.
- Click Back. Changes are auto-saved.
Delete a Group
- On the User groups page, click the group name.
- Click the delete icon.
- In the confirmation dialog, click Delete.
Group deletion is permanent and cannot be undone.
Enterprise Directory
Enterprise Directory delivers a centralized system for employee contact management, featuring intelligent search, flexible filters, and detailed contact profiles. Access the Employees section from Admin Hub > Employees. The section contains two pages: Directory Configuration and Lookup Settings.Lookup Settings
Lookup Settings control how the assistant answers employee-related queries. Employee Lookup is enabled by default. You can turn it on or off using the toggle. When Employee Lookup is enabled, select one lookup source:
Logged-in User Data is selected by default when you enable Employee Lookup for the first time or when no employee directory and no service accounts are configured.
If no employee directory is configured, the Employee Directory option is disabled and displays helper text indicating that directory configuration is required, with a link to navigate to Directory Configuration. If no service accounts are configured, the Service Account option is disabled and displays helper text indicating that a service account must be configured, with a link to navigate to Service Accounts.
A help text link in the corner reads “Enable Employee Lookup in Assistant?” Click it to see the steps for enabling this feature.
Directory Configuration
Go to Admin Hub > Employees > Directory Configuration, then click Add Directory Source to launch the Configuration Wizard. Step 1: Source Configuration Select a data source for the directory: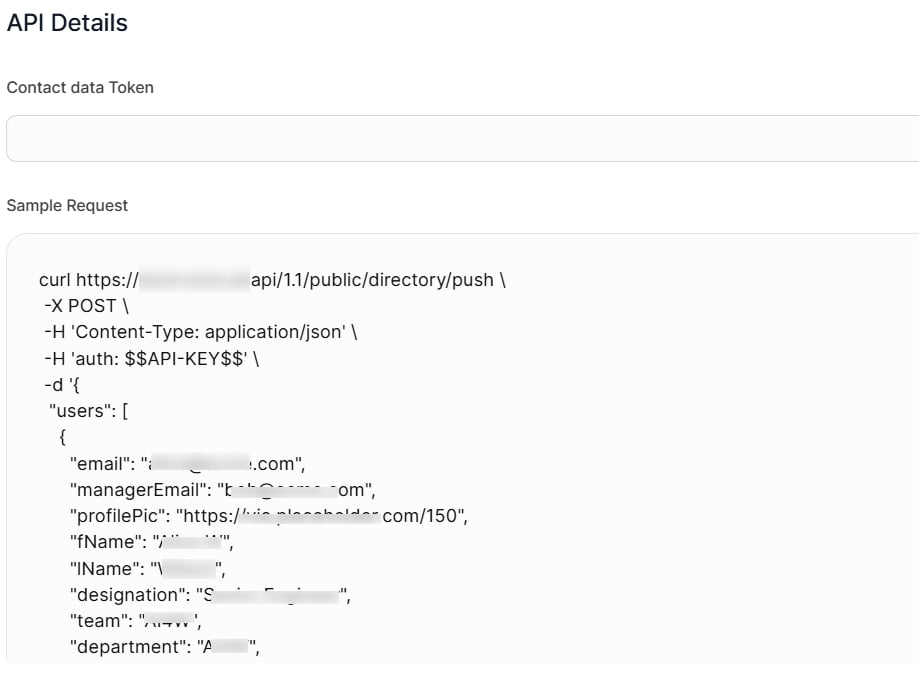
At minimum, configure the four mandatory fields: Name, Designation, Phone, Email.
For Service Account sources: All default fields appear prefilled with mapping keys. You can add new custom fields, modify key mappings, and delete custom fields. Default fields cannot be deleted. At least one mapped field is required to proceed.
Step 3: Data Synchronization
For API sources: The directory updates automatically each time your system pushes data via the API.
For Service Account sources: Click Sync to initiate a data sync. The page displays the last synced timestamp and the number of records added, updated, or deleted.
Configure a sync schedule:
The default frequency is Never. You must set a schedule to enable automatic syncing.
Step 4: Display Settings
Hide conditions — Control which contacts are visible to end users:
Detail card layout — Customize field order and visibility:
- Click Edit Layout.
- Drag and drop fields to reorder them. Name, Designation, Phone, and Email are fixed at the top.
- Hide non-essential fields. The four mandatory fields cannot be hidden.
- Preview changes in real time.
- Auto-selection: On the first sync, the platform automatically selects the user with the highest number of direct and indirect reportees as the root user. The selection persists across all subsequent syncs.
- Manual override: Select a different root user at any time from the list of users without an assigned manager. The manual selection persists across subsequent syncs.
- Reassignment on manager assignment: If the root user is assigned a reporting manager, that manager automatically becomes the new root user. If the new root user also has a manager, the platform traverses up the reporting chain until it finds the topmost user without a manager.
- Reassignment on deletion: If the root user is deleted, the platform automatically reassigns the root to the user with the next highest number of direct and indirect reportees.
- Notification: After any automatic reassignment, the platform notifies administrators so they can review or override the new root user.
- Push at least one contact record via the API or sync at least one record from a service account.
- Choose a publishing scope:
- Publish to all users: Makes the directory immediately available to everyone in the account.
- Keep unpublished: Saves the configuration for later activation.
- Click Publish.
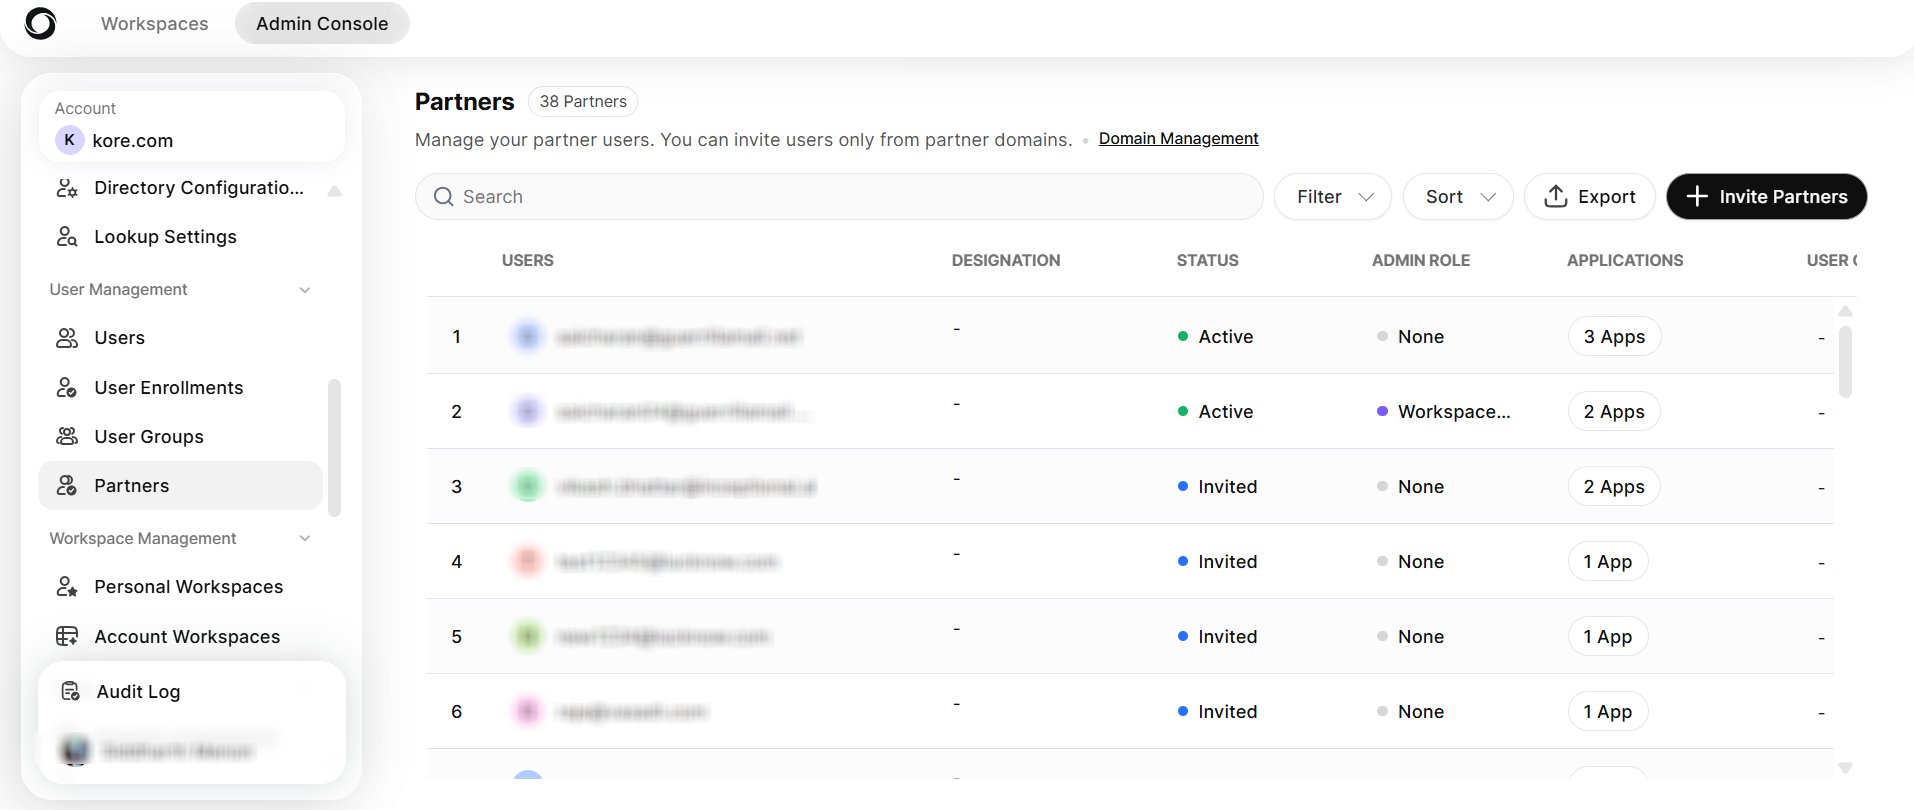
Partners
The Partners tab lets administrators manage external partner users from configured partner domains. Navigation: Admin Console > User Management > Partners The partner list displays the following columns: Users, Designation, Status, Admin Role, Applications, and User Groups. Use the Search bar to find specific partners. Click Filter, Sort, or Export to manage the list. Exported files follow the naming formatPartner-list_YYYY-MMM-DD_HH-mm.csv.
Invite Partners
- Click + Invite Partners.
- In the Invite Partners popup, enter the partner’s email address in the input field. You can invite users only from configured partner domains.
- Select an Admin Role from the dropdown.
- Set the number of Applications the partner can access.
- Click Add to add the partner to the invite list.
- Click Invite to send the invitation.
Partner invitations are independent of the user enrollment setting.