
Back to Available Channels Users can select any of the following messaging partners to enable WhatsApp Business messaging:Documentation Index
Fetch the complete documentation index at: https://koreai.mintlify.app/llms.txt
Use this file to discover all available pages before exploring further.
Adding the WhatsApp Channel using Infobip Application
To complete this procedure, you must have an Infobip account. This is one of the messaging providers for enabling WhatsApp Business Messaging on the Platform. Steps to configure Infobip:- Login to the Infobip developer portal.
-
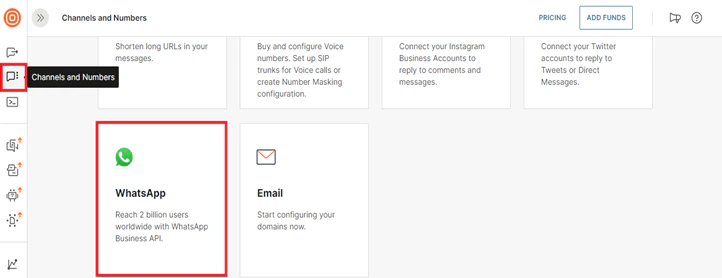
On the left navigation menu, click the Channels and Numbers option and select the WhatsApp channel on the Channel Essentials panel.
-
To configure a new number for the Infobip and WhatsApp messaging platforms’ integration, follow one of the steps given below:
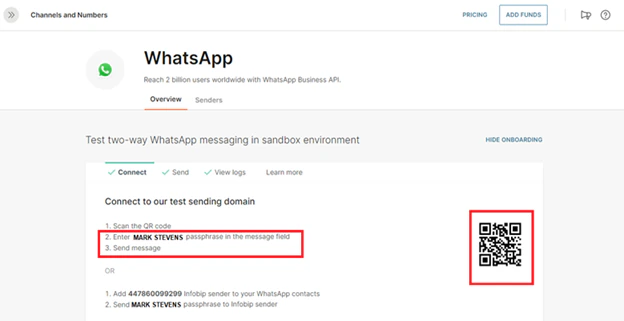
- Scan the QR code under Overview > Connect on the WhatsApp page on the Infobip portal using the camera or QR scanner on your mobile device.
-
Follow the instructions for steps 2 and 3 shown in the image below.
-
Alternatively, add the number shown on the screen of the Infobip sender to your WhatsApp contacts.
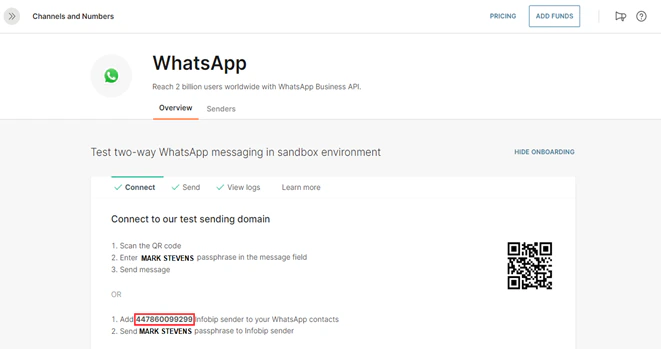
The mobile number must have the country code preceded by a plus (+) sign to activate the Infobip and WhatsApp connections. -
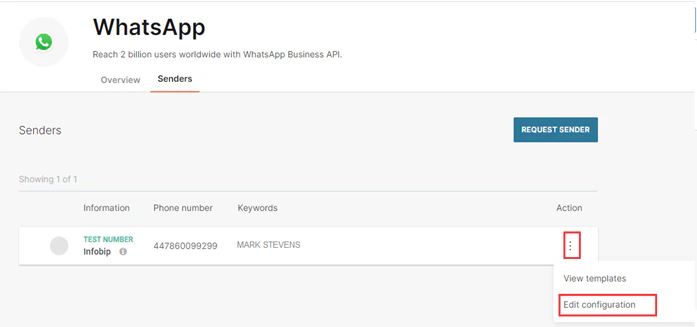
After associating the number, select the Senders tab to view or edit the numbers for WhatsApp messaging.

-
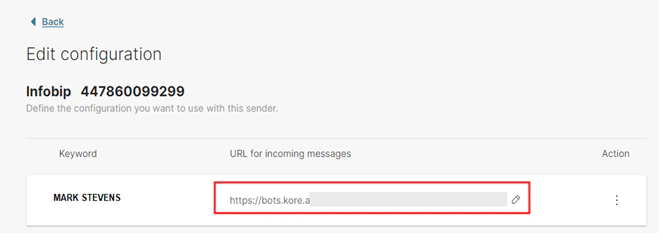
Click the ellipses icon under Action and select Edit Configuration.
-
On the Edit Configuration page, click the edit icon, add the URL for incoming messages (copy the Webhook URL from the Platform under Channels and Flows > Channels > Digital > All > WhatsApp Business Messaging > Configurations tab) and click Back.
-
Next, to add Infobip’s Base URL, follow these steps:
- On the Platform, go to Channels and Flows > Channels > Digital > All and click WhatsApp Business Messaging.
-
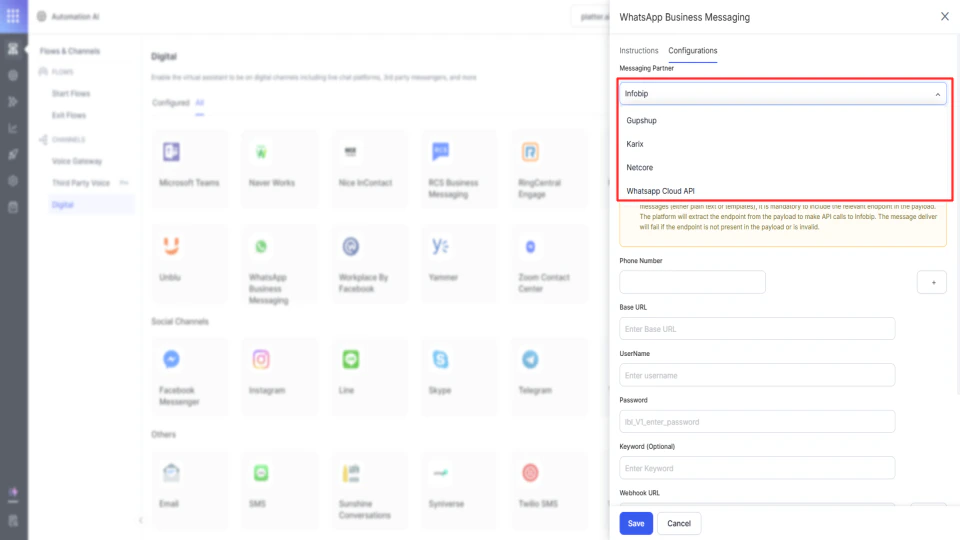
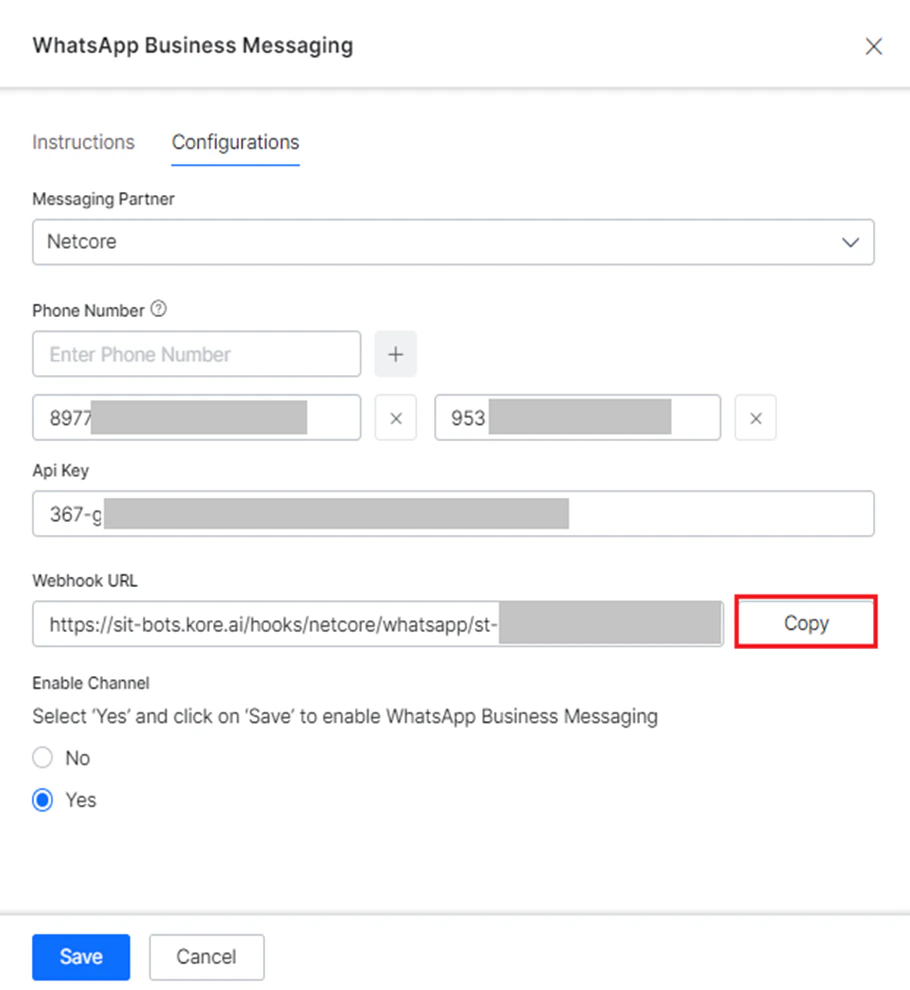
On the WhatsApp Business Messaging panel, select the Configurations tab and provide inputs for the following fields:
- Messaging Partner: Select Infobip from the dropdown list.
- Infobip API: Select the type of Infobip API used for communication purposes. Available options include WhatsApp Outbound API and Omni Failover API.
- Channel-based Sessions: Enable this toggle to treat each inbound number as an independent channel. Conversations from the same number continue in the existing session, while those from a different number start a new session. Available only for Infobip. Enabling this for existing apps may disrupt ongoing sessions if inbound numbers are already linked to experience flows.
- Webhook URL: Copy the webhook URL provided in the configuration tab and update the same on the Infobip developer portal for Infobip to send the received messages from the subscriber (WhatsApp Business Messaging).
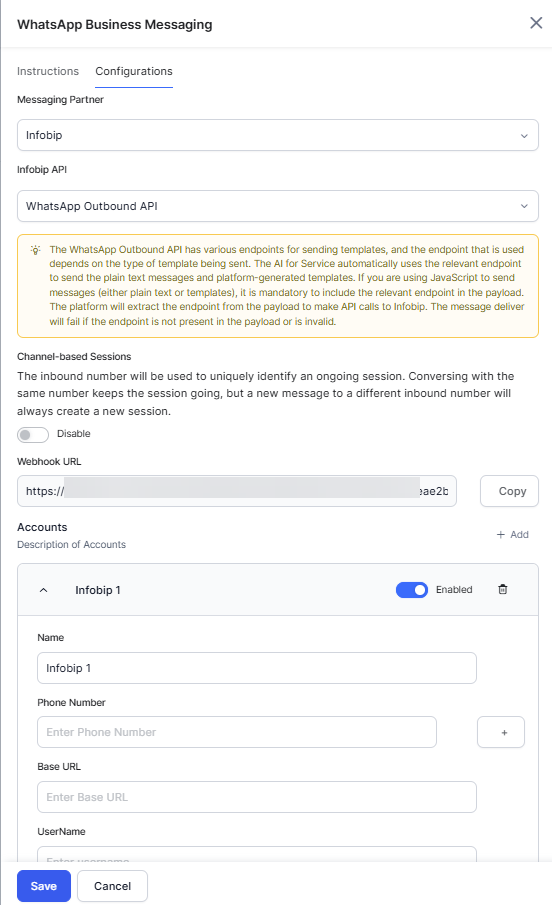
- Within the Accounts section, enable and configure Infobip account details (the platform supports the addition of up to 10 Infobip accounts) as follows:
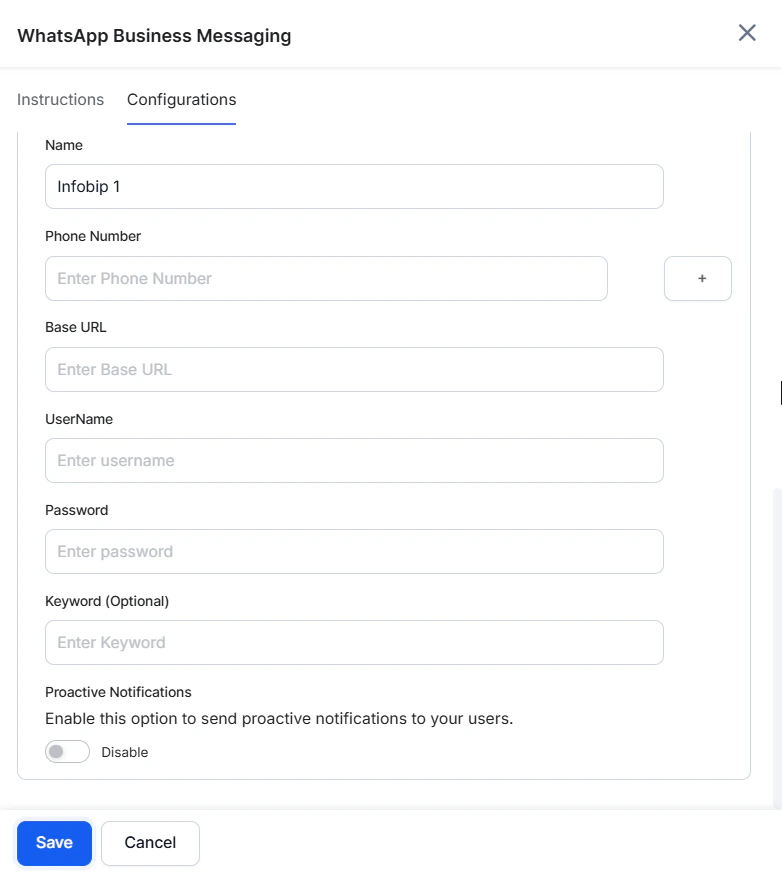
- Name: The name of the Infobip account.
- Phone Number: Copy and paste the number displayed on the Infobip portal for your account under the Connect section (please refer to step 3). The Platform now supports adding multiple phone numbers on the WhatsApp Messaging Channel for the same AI Agent. The AI Agent responds to only the source number from which it receives the message rather than a common phone number. Learn more.
-
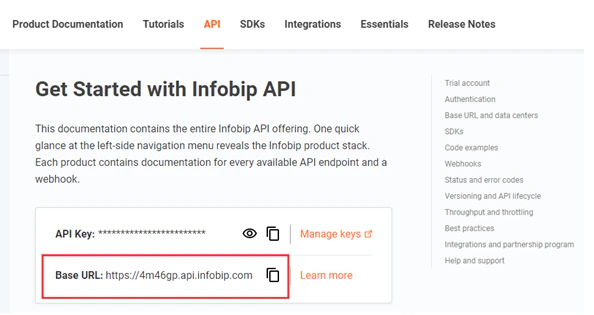
Base URL: Copy the Base URL from this page. Use this URL sends messages when the WhatsApp Business Messaging channel is enabled.
- Username and Password: The username and password of the Infobip account holder. Infobip’s API requires authentication and uses the basic authorization for sending and receiving messages over the API with these values.
- Enable Proactive Notifications to send relevant updates to the users without requiring them to initiate interaction with the app first.
-
Select Save to complete the integration setup. To add another account, select + Add and follow the same steps again. Each account can have multiple inbound numbers. You can disable or delete any account using the icons next to it. If you disable an account and its inbound numbers are being used in active experience flows, it may affect ongoing sessions.
If you’re using the development sandbox on Infobip, once the channel is enabled and published, you will need to send messages in the format ‘[Keyword on infobip][User input]’ For example, “Platform Hi”.
Viewing WhatsApp Message Logs on Infobip
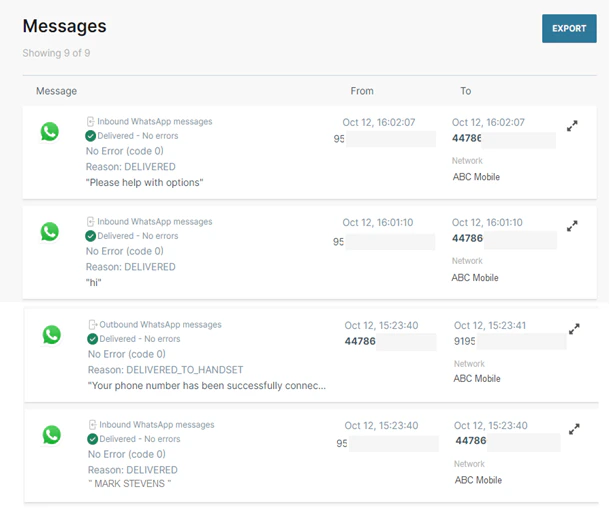
Once you’ve sent a message to Infobip using the WhatsApp Business Messaging channel, you can track the text, AI Agent responses, delivery status, and errors (if any) on your Infobip account under Channels and Numbers > Channel Essentials > WhatsApp > Overview > View Logs.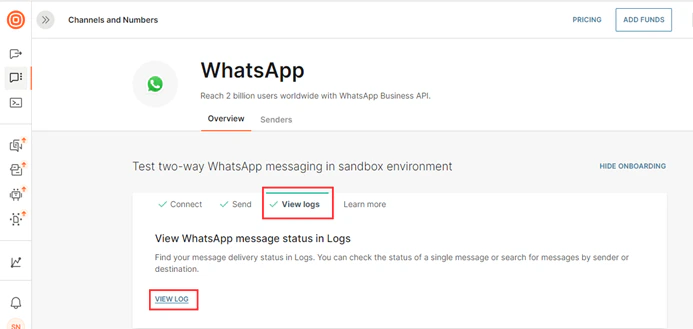
Messaging Templates
WhatsApp for business communications supports the following messaging types for the Infobip channel:- Templates: Formatted, non-editable, and pre-registered messages approved by WhatsApp.
- Free-Form texts: Free-flowing text messages.
- String: The Platform uses a free-form text message template when the JS result is a string.
- Object: The Platform uses a message template when the JS result is an object.
- To learn more about creating and managing templates, please refer to this link.
- To know more about various message types and the structure of templates, please refer to this link.
- To learn more about sending template messages, please refer to this link.
Adding the WhatsApp Channel Using GupShup Application
The Platform supports integration with GupShup to enable WhatsApp business as a channel. In this integration, the Platform provides a Webhook URL that GupShup calls during a conversation to enable events and exchange messages. To enable WhatsApp Messaging on this channel, you must have a GupShup enterprise account.
Step 1: Create a GupShup Application
The first step in the WhatsApp Messaging Channel integration is to create a GupShup application, To create an app, follow the steps below:-
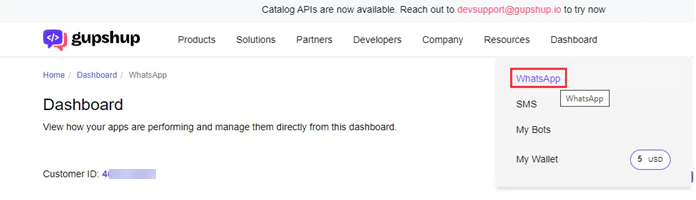
Log in to the GupShup portal and navigate to the Dashboard → WhatsApp section.
-
Click the + Create App button.

-
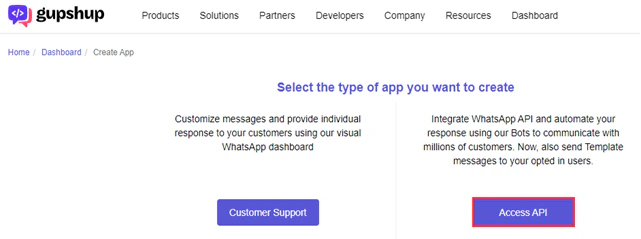
On the Create App screen, click Access API to select the app type.
-
Provide a unique name for the application and click Submit.

-
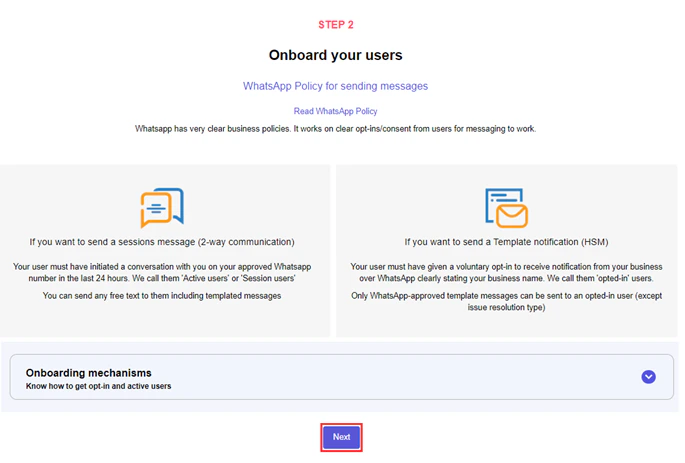
For Step 2: Onboard your Users, click Next.
Step 2: Configure the Channel Enablement
To send messages to your GupShup users on the WhatsApp Business Messaging Channel, follow the steps below:Step 2a: Create a new WhatsApp Business Account
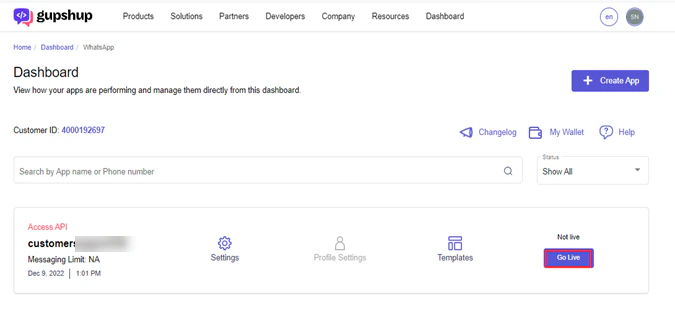
Once you have created a GupShup app, you need to create a WABA to set up the integration with a number. To create a WABA, follow the steps below:- Navigate to the WhatsApp Dashboard on your GupShup Developer Console.
-
Click the Go Live button of the desired app in the list.
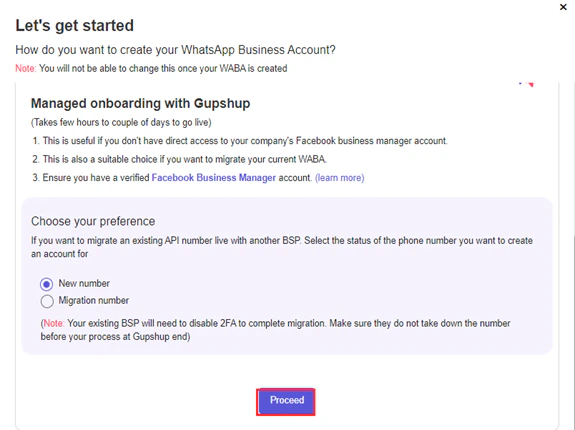
- On the Let’s Get Started window, select the New Number option under Managed onboarding with Gupshup.
-
Click Proceed.
- Enter your details to set up your WhatsApp Business account and click Next.
- Follow all the instructions on the screen to Setup the WhatsApp Account, Get WhatsApp Approvals, and Complete Verification.
- Once the platform verfies the account with your Facebook Business ID, it displays WABA ID, Mobile number, and Password.
Step 2b: Set up the WABA Parameters on the Platform
To integrate your GupShup service using the WBM channel to the Platform, follow the steps below:- Copy the Mobile number, WABA ID, and the Password from the GupShup WhatsApp Dashboard.
- On the App Builder, navigate to Channels and Flows > Channels > Digital > All > WhatsApp Business Messaging.
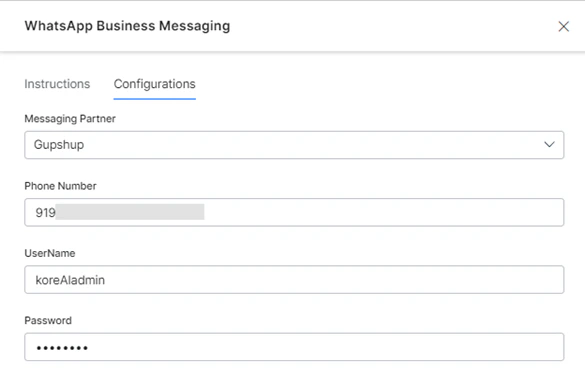
- Click the Configurations tab on the WhatsApp Business Messaging window.
- Select GupShup from the dropdown list for Messaging Partner.
- Paste the copied values for Mobile number, WABA ID, and Password in the respective input fields.
Step 2c: Configure the Callback URL/Webhook URL
To link to your app on the Platform to receive inbound messages/events, you must configure the Callback/Webhook URL on your GupShup WhatsApp Dashboard. To set up the Callback URL, follow the steps below:- On the App Builder, navigate to Channels and Flows > Channels > Digital > All > WhatsApp Business Messaging.
- Click the Configurations tab on the WhatsApp Business Messaging window.
-
Ensure you have selected GupShup for the Messaging Partner field. Click Copy to copy the Webhook URL.

- Navigate to your GupShup WhatsApp Dashboard.
-
Click the Settings icon for your app of type Access API.

- On the Settings page, scroll down to the Test Access API and set callback URL section.
- Click the Callback URL / Link your Bot tab.
-
Turn on the toggle switch and paste the Webhook URL you copied from the App Builder in the Enter your Callback URL input field.
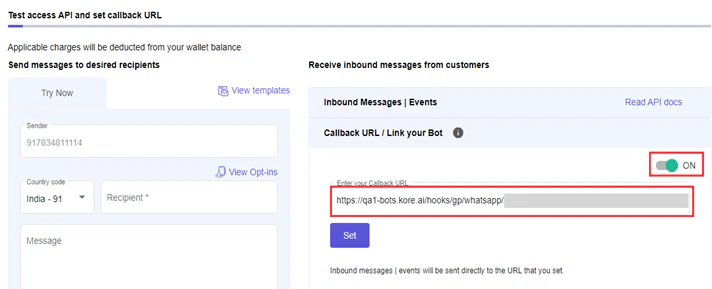
-
Click Set.
Refer to this link for more information on setting up the Callback/Webhook URL on the Gupshup Dashboard.
Contact the Gupshup customer support team to help configure the webhook URL on GupShup and enable inbound messages to the app.
-
Once you set the callback successfully in the Platform WhatsApp Business Messaging window, follow the steps below:
- (Optional) Enable the Associate an App option, if required, and follow the configuration steps.
- Enable Proactive Notifications to send relevant updates to the users without requiring them to initiate interaction with the app first.
- Select YES for the Enable Channel option.
- Click Save.
Step 3: Secure the Integration
The Webhook URL used on the WhatsApp Business Messaging Channel for GupShup is a public URL that may cause security vulnerabilities. The Platform enforces an authentication mechanism by securing the webhook URL and associating it with a App. The Associate an App feature serves this purpose. This feature is available under Channels and Flows > Channels > Digital > All > WhatsApp Business Messaging > Configurations.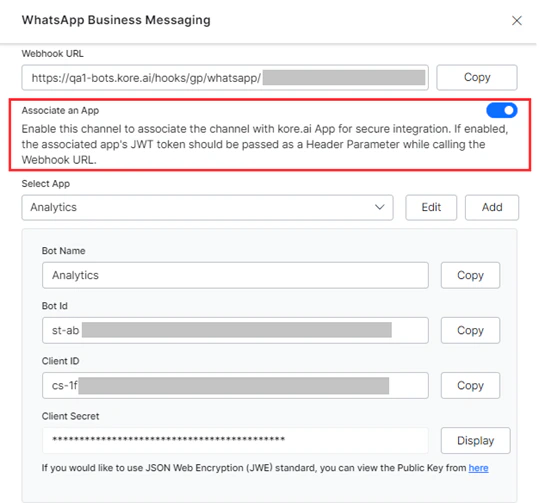
- The GupShup (the Callback URL you configure under Settings) calls the URL where the channel passes the authorization token as the header information.
- The Platform checks for the JWT Token of the associated app in the Header and accepts the Webhook API call(s).
- However, if the Token is missing, the Platform rejects the incoming API call(s) and responds with an error code.
This channel configuration is not a part of the Import/Export feature. The user should manually enable the channel for the target App. The integration flow remains the same even with the App Association feature.
Messaging Templates
As part of the GupShup WhatsApp channel integration, the Platform supports the following Gupshup outbound message types to provide an engaging, interactive end-user experience:- Templates: WhatsApp-approved, pre-formatted messages that aren’t editable.
- Free-flowing: Messages that support all media types as “free-form
Support for WhatsApp Pay
The Platform supports WhatsApp Pay, a digital payment service that enables instant money transfers between banks through mobile devices using the Unified Payments Interface (UPI) system for the GupShup channel. GupShup, as a WhatsApp Business integration provider, supports outbound message types Order Details [Text] and Order Status templates, which are also supported on the Platform via APIs. How it Works:- When the end user completes the transaction using the WhatsApp Pay template rendered on the WhatsApp channel, the Platform receives an inbound message.
- The Inbound message is in the form of a JSON Object containing payment details and their respective status.
- The Platform automatically decides the payload to send to the channels after parsing Advanced Messages (JS) that include one of the following:
- String: Use a free-form text message template when the JS result returns a string.
- Object: Use message template if the JS result is an object.
- The Platform accepts this JSON object format as the Composite entity type and stores it in the context object under the respective entity.
Error Response Codes
The table below outlines the various error status codes that may occur when receiving incoming requests through the Gupshup Whatsapp channel:| Scenario | Status Code | Message |
|---|---|---|
| Authorization header is missing | 401 | Access token not found |
| Authorization header is incorrect | 401 | Invalid access |
| JSON request body is missing | 500 | Internal Server Error |
| Invalid “streamId” in the request URL | 500 | Internal Server Error |
| Missing “mobile” field in the request body | 500 | Internal Server Error |
Adding the WhatsApp Channel Using Karix Application
To integrate Karix to your WhatsApp Business Messaging channel and enable it for an app, you’ll need to perform the following setup under the Configuration tab.To complete this procedure, you must already have a Karix account. This is one of the messaging provider for enabling WhatsApp Business Messaging.
Prerequisites
- Gather the following details from the Karix support team.
- Vendor
- Account Key
- From
- Copy the Webhook URL from the Platform and share it with the Karix support team. The Karix support team will need to configure this URL on their platform for a successful handshake between Platform and Karix.
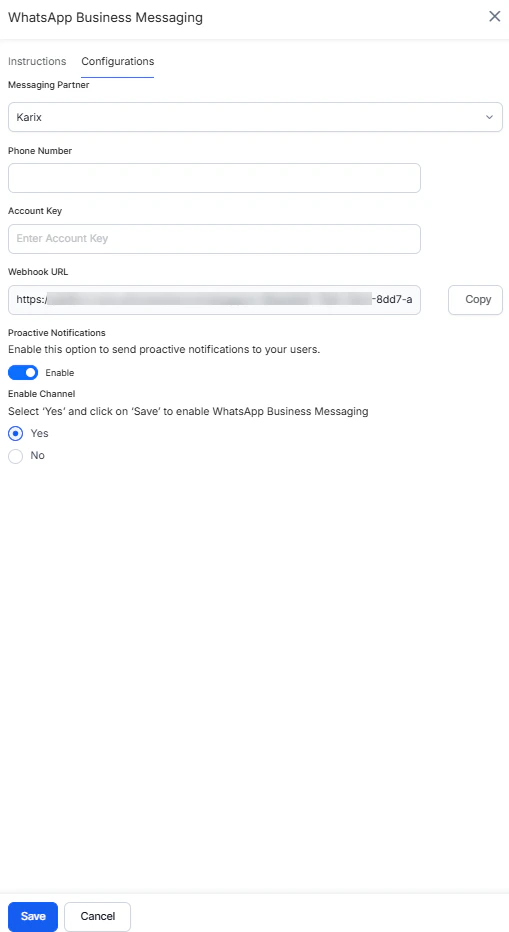
Configuration Steps
On the WhatsApp Business Messaging platform, follow the below steps:- Select Karix from the list for Messaging Partner.
- Enter the Phone Number to map to the WhatsApp Business Messaging channel.
- Provide the Account Key you’ve received from the Karix support team.
- Provide the Webhook URL shared with the Karix support team.
- Enable Proactive Notifications to send relevant updates to the users without requiring them to initiate interaction with the app first.
- Select Yes for Enable Channel.
- Click Save.
Adding the WhatsApp Channel using Netcore Application
Netcore CE uses API endpoints from CPaaS to connect with WhatsApp. To enable, WhatsApp through Netcore on the Platform, you must provide the WhatsApp phone number and API key in the Channel Configurations section and the Platform’s Webhook URL for the API callback in the CPaaS portal.Prerequisites
- An active WhatsApp Business account for your enterprise.
- An active CPaSS account with WhatsApp enabled.
- Selecting Opt-in is compulsory for WhatsApp communication, although there is a provision for bypassing Opt-in if necessary. Learn more .
Configuration Steps
To configure and enable WhatsApp using Netcore, follow the steps below:Step 1: Get the API Key
To begin WhatsApp integration via Netcore, copy the API Key from Netcore to the channel’s configuration page on the platform by following the steps below:- Login to your Netcore account using CPaaS.
- On the left navigation menu, click Settings > General Settings.
- Scroll down to the Integrate API section.
- On the Integrations page, click on the API tab.
- The system hides the API Key for security purposes. Click Show. The system will prompt you to enter your account password. Once you enter the password, the API key is accessible.

Step 2: Add Incoming Webhook URL
Next, set up the Webhook URL on Netcore for callback from the channel by following the steps below:- Login to the Platform.
- From the home page, select the App you wish to integrate.
- From the left navigation pane, select the Flow and Channels > Digital > All > WhatsApp Business messaging.
-
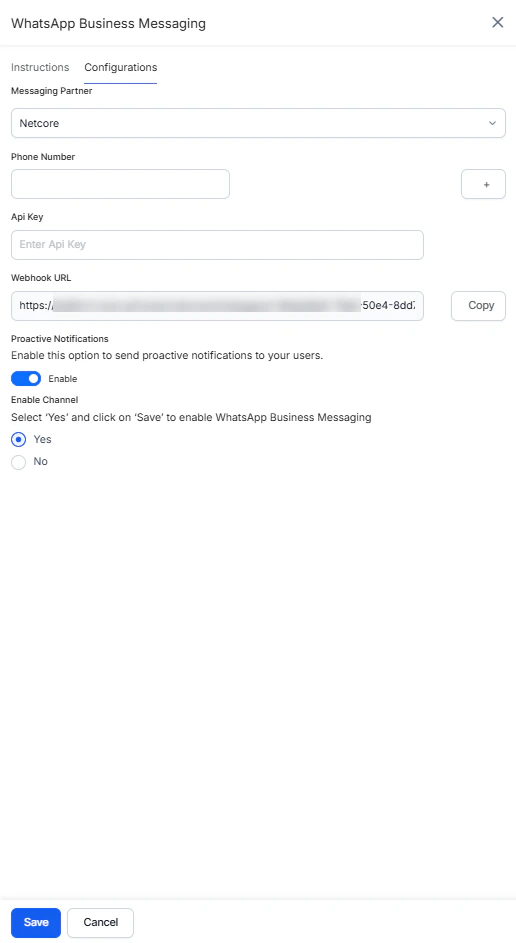
From the pop-up, under the Configurations, select the Netcore from the Messaging Partner drop-down.
-
Copy the Webhook URL.
- Login to your Netcore account using CPaaS.
- On the left navigation menu, click Settings.
- Scroll down to the Webhook Integration section.
- Under Incoming webhook, paste the webhook URL copied from the Platform.
-
Turn on the Status switch to enable the webhook.

Step 3: Enable the Channel
Finally, enable the channel on the Platform to start receiving WhatsApp messages by following the steps below:- Navigate to Deploy > Channels > WhatsApp Business Messaging > Configurations page.
- Select Netcore for Messaging Partner.
- Add the registered WhatsApp Business Messaging phone number(s). The platform allows a maximum of 20 numbers.
- Paste the API Key copied in step 6 here .
- Enable Proactive Notifications to send relevant updates to the users without requiring them to initiate interaction with the app first.
- Select “Yes” for Enable Channel.
-
Click Save.
Adding the WhatsApp Channel Using Meta Cloud API
This integration uses Meta’s Cloud API for WhatsApp Business messaging that eliminates the need for third-party Business Solution Providers (BSPs) and enables businesses to access WhatsApp features directly through their account. To enable WhatsApp integration on the Platform, you must provide the WhatsApp phone number and API key in the Channel Configurations section and the Platform’s Webhook URL for the API callback in the CPaaS portal. Key features:- Seamless management of templates, catalogs, conversational flows, and payments.
- Simplified account linking and configuration through Meta’s developer platform.
- Enhanced operational efficiency and customer satisfaction.
Configuration Steps
To configure and enable WhatsApp Native integration via Cloud API, pursue the following steps:Step 1: Create your app
-
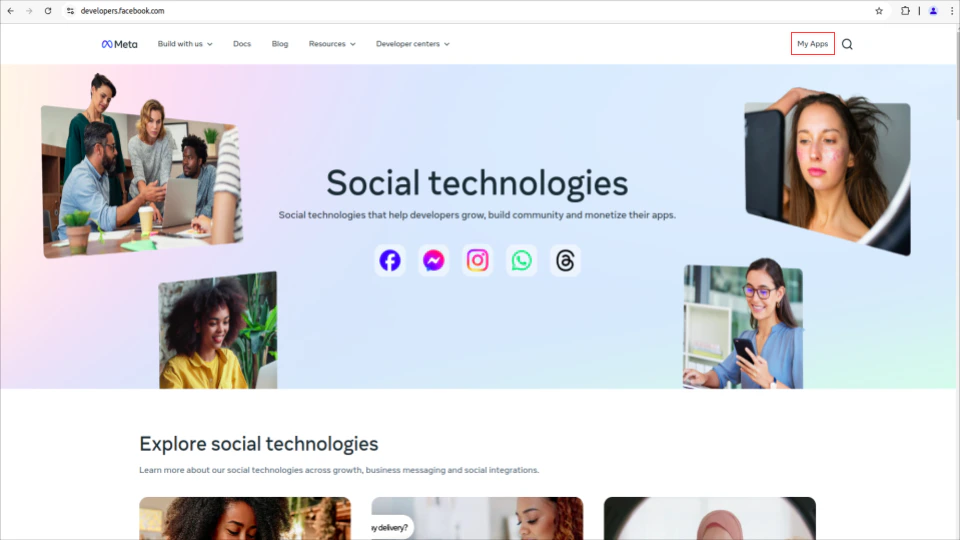
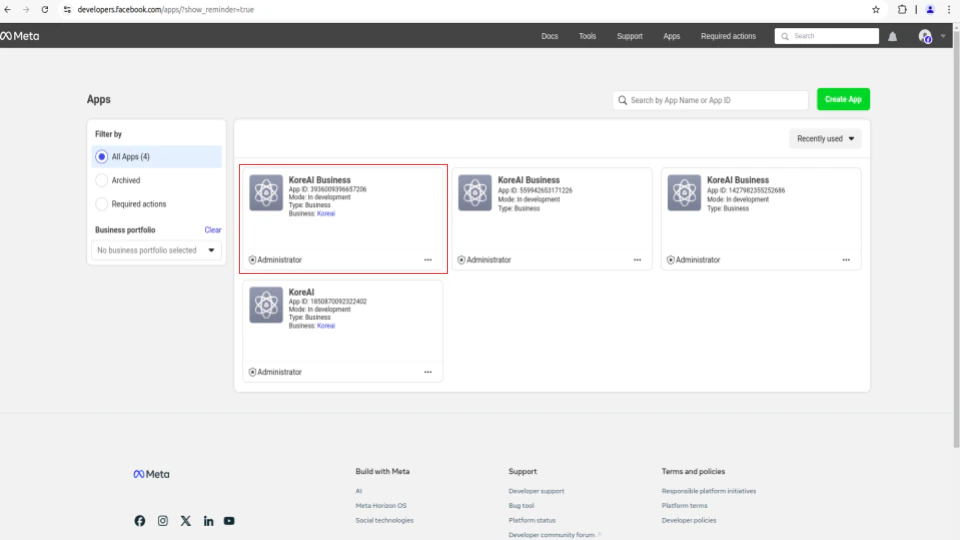
Log in to the Meta Developer Portal and click the Apps button.
-
Now, click Create App to create a new app or select an existing app.
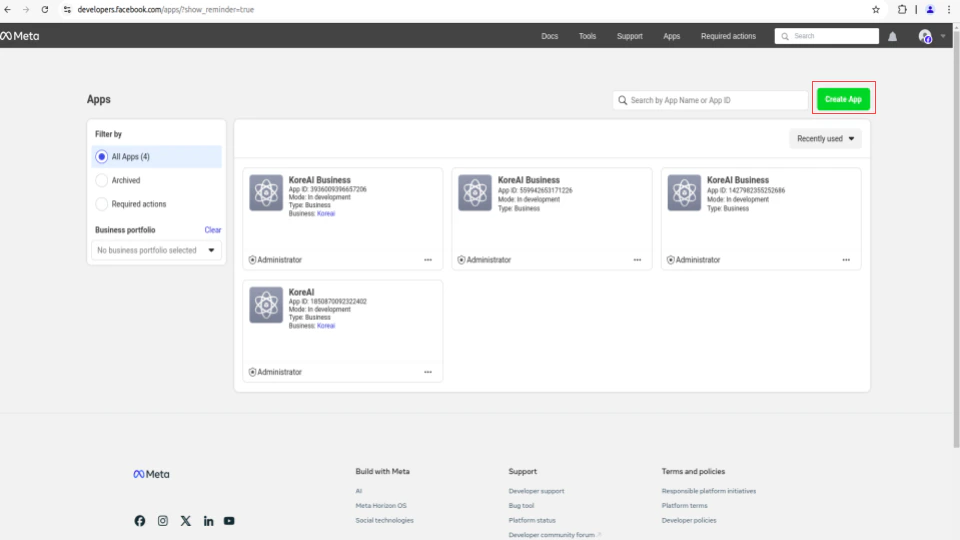
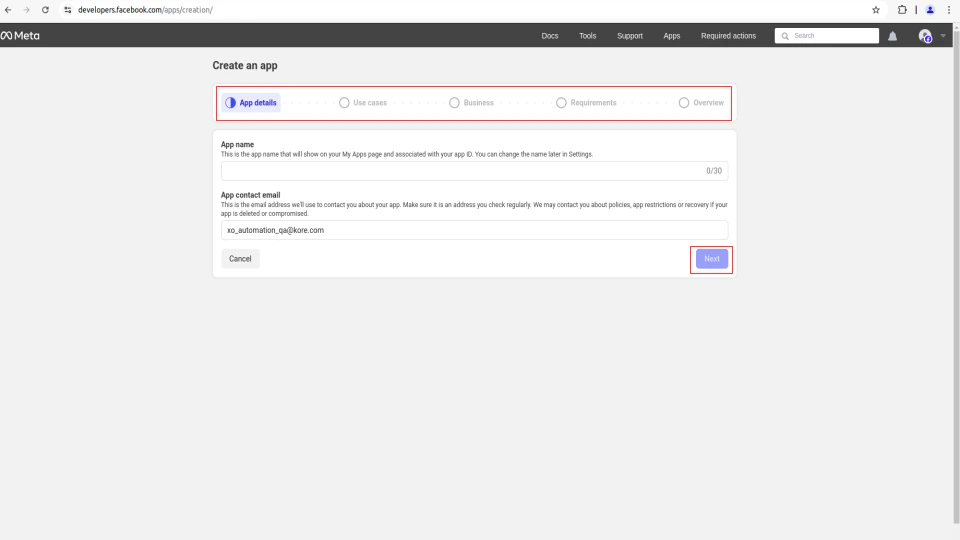
-
Enter the details in the following tabs as per your business needs and click Next to create a WhatsApp Business Account (WABA):
- App details
- Use cases
- Business
- Requirements
- Overview
-
On the app in the app dashboard, Click on your created app.
Step 2: Get Permanent Token, App ID, and App Secret
If you are opting for Permanent Authorization, get a Permanent Token. Refer Creating a Permanent Access Token.- Go to Business Settings.
- Select the business account that associates with your app.
- Below Users, click System Users.
- Click Add.
- Name the system user, choose Admin as the user role, and click Create System User.
- Select the WhatsApp Business Messaging permission.
- Click Generate New Token.
- Copy and save your token.
- Go to your App Dashboard.
- Click the App Settings tab.
- Under App Settings, select Basic.
-
Find and Copy the App ID and App Secret ID and paste it as required in the Step 4
Ensure that you enter details in all required columns. Without all the required fields, your app will not be approved by Meta.

Step 3: Configure the Callback URL
-
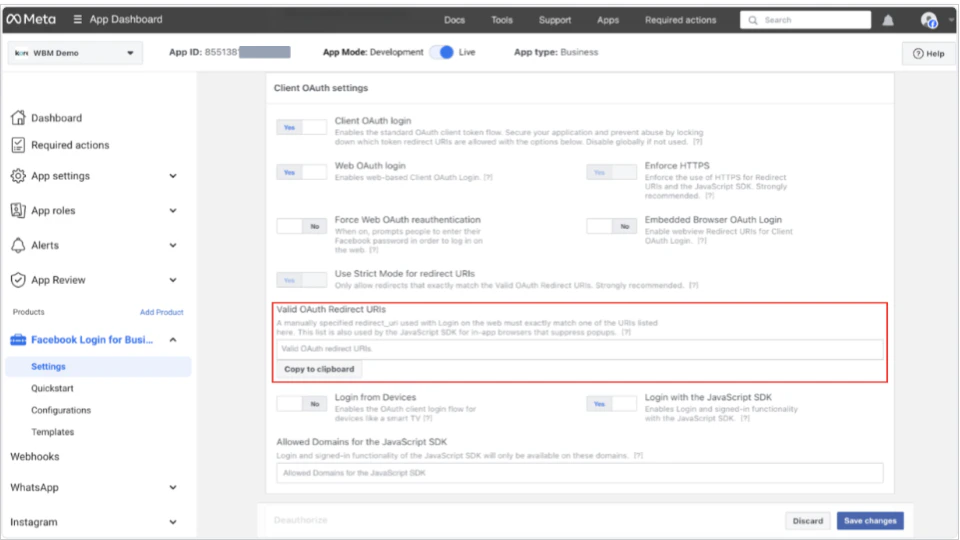
Click Add product under the Products section on the left navigation bar.
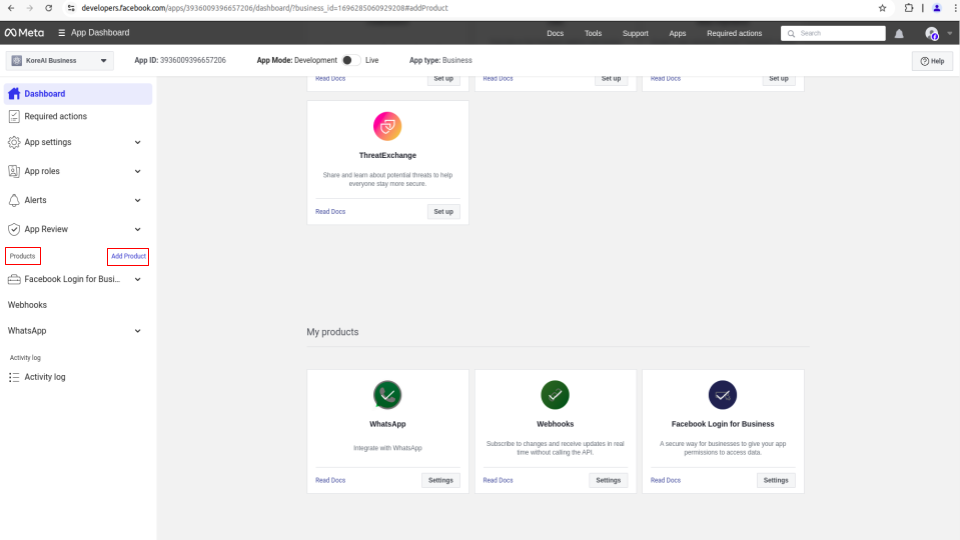The Facebook Login for Business is not available as default. Therefore, we recommends that you search for it to add under the My products section. Ignore, if it is already available.
-
Now, click the Settings tab of Facebook Login for Business.
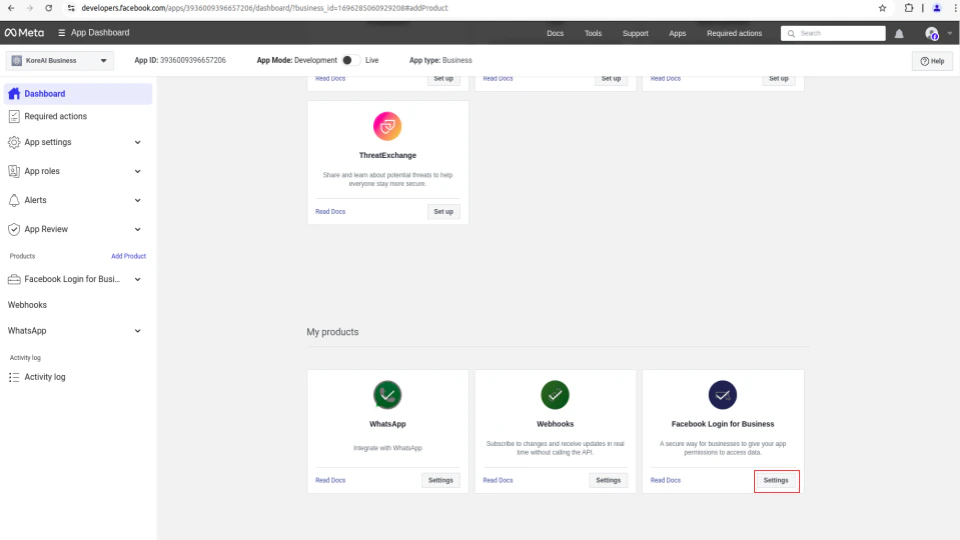
-
On the Settings page, enter the Valid OAuth Redirect URLs from the Platform Configuration Page as follows:
a. Login to the Platform.
b. From the home page, select the App you wish to integrate.
c. In the left navigation, select the Flow and Channels and then click Digital > All > WhatsApp Business Messaging.
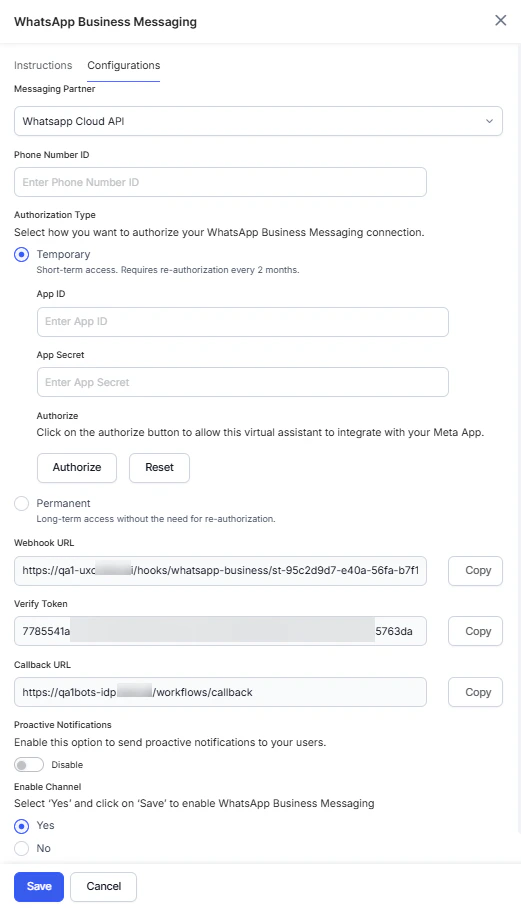
d. On the Configurations tab, select the WhatsApp Cloud API from the Messaging Partner list.
Step 4: Select Authorization Type
Enter the Phone Number ID and select the connection Authorization Type.-
If you select Temporary Authorization, enter the App ID and App Secret ID from step 2, and Authorize the channel. Temporary tokens expire every two months and require reauthorization to keep the channel active.
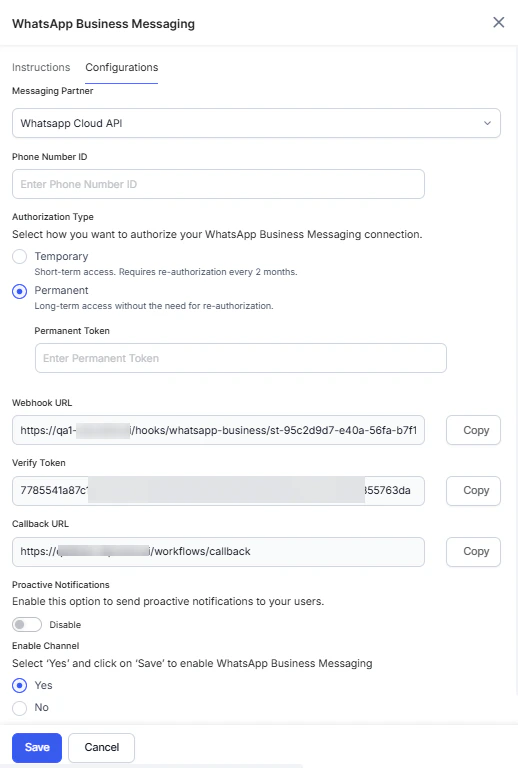
-
If you select the Permanent Authorization, enter the Permanent Token from step 2 provided by the Meta. Refer Creating a Permanent Access Token.
Step 5: Verify the Webhook URL and Token
-
From the Platform App builder Configuration Page, copy the URL and Token.
We recommends you verify the Token and Callback URL by publishing your application. This ensures your token and URL is valid.
-
Paste them in the Callback URL and Verify token respectively of the Configuration section under the WhatsApp section in the left navigation bar.
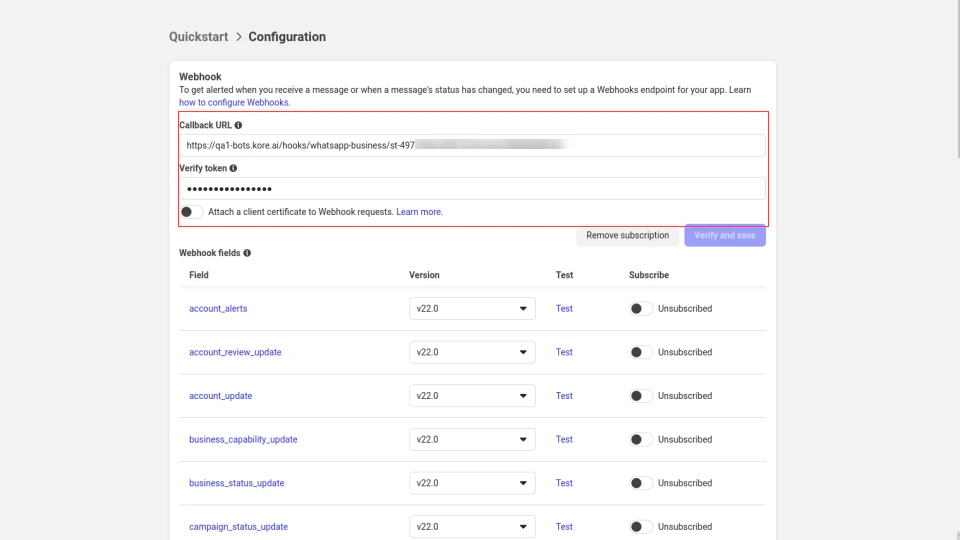
- Click Verify and save.
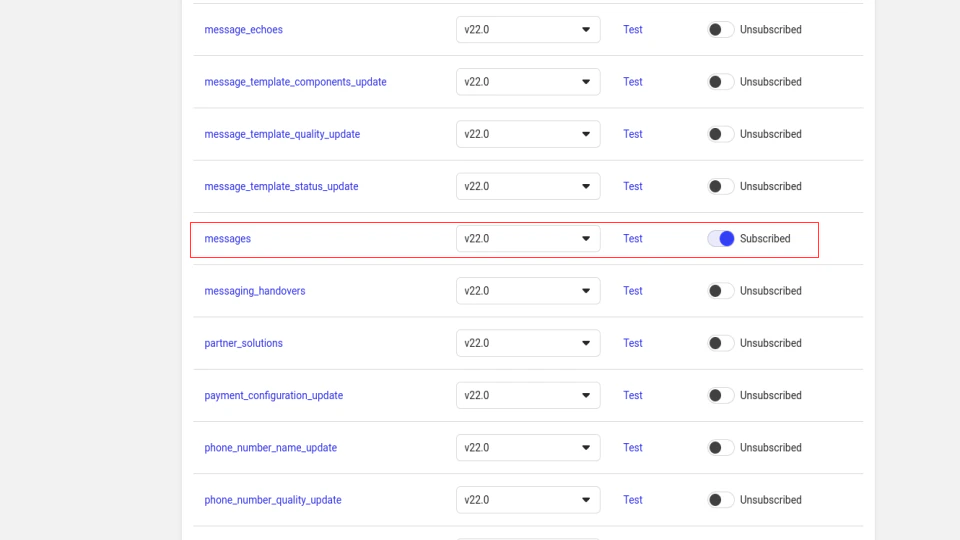
- Now, from the Webhook fields, subscribe to the messages by enabling the toggle.
We recommends you to select the latest version of the messaging app while subscribing
Step 6: Enable the Channel
Finally, enable the channel on the Platform to start receiving WhatsApp messages by following the steps below:- Enable Proactive Notifications to send relevant updates to the users without requiring them to initiate interaction with the app first.
- Select “Yes” for Enable Channel.
- Click Save.