

- App: The AI Agent that the user interacts with.
- Users: Customers using the AI Agent.
- Agent: Human agents using the Unblu chat interface.
Prerequisites
- A fully functional AI Agent
- An Unblu account
- BotKit SDK from Kore’s GitHub
- Node.js v12.0 or above
- Ngrok to simulate the callback server
Configuration
Platform Setup
- Log in to the Agent Platform.
- Select the Build tab from the top menu.
- Go to Integrations and select Agent Transfer.
- Next to App Name, click Add (or select an existing app from the drop-down).
- Enter an app name in the Name field.
- Optionally enforce JTI or JWE encryption.
- Click Next > Done.
- In the Callback URL field, enter the BotKit URL endpoint (for example,
https://<domainname>/unblu). - Click Save.
Unblu Account Setup
- Log in to your Unblu account.
- Click your profile (top-right) and under Administration, select Manage Account.
- On the left pane, under Site Integration, select Domains.
- Click New Domain (top-right).
-
Enter the Callback URL (from Step 8 above) in the Domain URL field.
If using a non-static or Ngrok IP, update this URL whenever it changes.
- Set Protocol to Both.
- Click Save.
BotKit Configuration
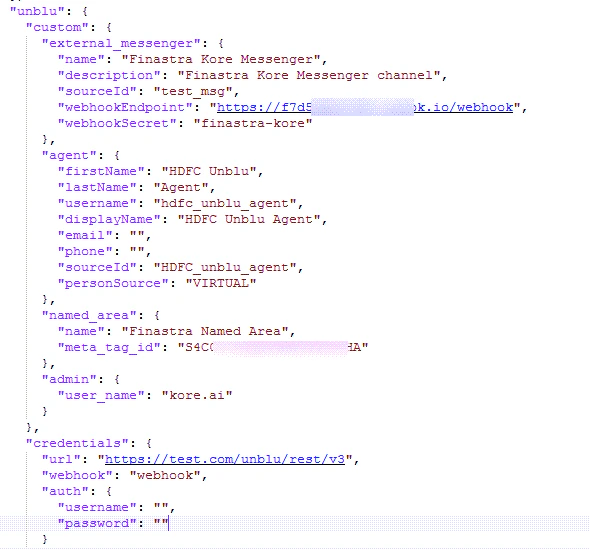
Edit theconfig.json file using the values from sample_config_file.txt as reference.
-
Under the app section, paste the Ngrok or publicly accessible URL.

-
Under the credentials section, paste your Kore app details:
- API Key (client secret)
- App ID (client id)
- Bot Name

- Log in to the Kore apps platform.
- Select the Build tab.
- Go to Integrations > BotKit.
-
Under the Unblu section, configure:
- Unblu credentials: Paste Unblu account credentials.
-
external_messenger: Enter the name, description, and other display details for the chat.
To access external messenger details:
- Log in to the Unblu desktop app.
- Under External Integration, select External Messengers.
- Select the relevant messenger to find its details.
- agent: Enter the agent details.
-
named_area: Enter a Name and Meta Tag ID.
To create a named area:
- Log in to the Unblu app.
- Under Site Integration, select Named Areas.
- Click New Named Area (top-right).
- Select a domain from the Domain Name drop-down and enter a name. You can also register a new domain.
- Click Save.
- admin: Enter the Unblu username.
-
Install dependencies:
-
Start the integration:
The webhook URL must be the same in API Extensions,
config.json, and the Unblu external messenger Endpoint URL (that’s, the BotKit URL in API Extensions,app.url, andunblu.custom.external_messenger). - Open the dialog task and the agent transfer node to verify the configuration is saved.
Additional Notes
- Multiple named areas can be mapped to a single AI Agent, allowing it to accept Unblu dialog offer requests from different origins (SDKs or named areas).
- Named area mapping is optional when enabling Unblu for a single assistant.
- Add an agent transfer node in the dialog flow to redirect conversations to agents. No separate BotKit or Agent Transfer enablement is required.
- User information from Unblu is available in
usercontext.customData(includesdeviceInfo,authInfo,joinedTime). See Context Object.