Back to Web SDK Overview This tutorial walks through setting up the Kore.ai Web SDK in a React application with a local JWT server. By the end, you will have a working chat window on your localhost connected to a Platform bot.

Overview

Steps:
  1. Create a bot on the Platform.
  2. Configure the Web/Mobile Client channel and create a Client JWT App.
  3. Publish the bot.
  4. Install Node.js and set up the JWT generation service.
  5. Create a React application and install the Web SDK.
  6. Configure and launch the SDK.

Step 1 — Create and Configure the Bot

  1. Log into the Platform and click New App to create a bot.
  2. Go to Flows & Channels > Digital > Web/Mobile Client. See Web/Mobile Client channel setup for full details.
  3. Click JWT App Details > Add. The Create New Client JWT App dialog opens.
  4. Enter a name (for example, My SDK Client App) and select HS256 as the JWT signing algorithm. Click Create.
  5. Select the newly created app in the Select JWT App dropdown and click Save.
    By default, the bot’s Target Audience is Enterprise Users. You can change this to General Public before publishing — it cannot be changed after.
  6. Return to Web/Mobile Client > JWT App Details and note:
    • Bot Name
    • Bot ID
    • Client ID
    • Client Secret

Step 2 — Publish the Bot

  1. Go to Deploy > Deploy Management > Publish.
  2. Select all tasks, click Proceed, enter a comment, and Confirm.
  3. If your deployment is managed by an Enterprise Admin, ask them to approve the request in the Admin Console under Apps Management > Deployment requests.

Step 3 — Set Up the JWT Server

  1. Install Node.js and verify:
    node -v
    
  2. Download and extract the SDKApp JWT server.
  3. In routes/users.js, configure the Client ID and Client Secret from the Web/Mobile Client channel:
    router.post('/', function(req, res, next) {
      let identity     = req.body.identity;
      let clientId     = process.env.CLIENT_ID;
      let clientSecret = process.env.CLIENT_SECRET;
      let isAnonymous  = req.body.isAnonymous || false;
      let aud          = req.body.aud || "https://idproxy.kore.com/authorize";
      let options = {
        "iat": new Date().getTime(),
        "exp": new Date(new Date().getTime() + 24 * 60 * 60 * 1000).getTime(),
        "aud": aud,
        "iss": clientId,
        "sub": identity,
        "isAnonymous": isAnonymous
      };
      let token = jwt.sign(options, clientSecret);
      res.send({"jwt": token});
    });
    
  4. Start the JWT server:
    node startServer
    

Step 4 — Integrate the Web SDK in React

  1. Create a React app following the Official React Docs.
  2. Install the Kore Web SDK from npm:
    npm i kore-web-sdk
    
  3. In App.js or page.tsx, import and configure the SDK:
    import { chatConfig, chatWindow } from "kore-web-sdk";
    
    let chatWindowInstance = new chatWindow();
    let botOptions = chatConfig.botOptions;
    
    botOptions.koreAPIUrl   = "https://platform.kore.ai/api/";
    botOptions.userIdentity = "user@example.com";  // unique identifier
    botOptions.botInfo      = { name: "Sample App Name", "_id": "st-xxxxx-xxx-xxxx-xxxx-xxxxxxxxx" };
    
  4. Set up the JWT assertion function:
    chatConfig.JWTAsertion = function(commitJWT) {
      let payload = { "identity": "user@example.com" };
      fetch('http://localhost:7000/api/users/sts/', {
        headers: { "content-type": "application/json" },
        body: JSON.stringify(payload),
        method: "POST"
      })
      .then(res => res.ok ? res.json() : Promise.reject(new Error('JWT request failed')))
      .then(res => {
        chatWindowInstance.setJWT(res.jwt);  // JWT from your server
        commitJWT();                          // Required callback
      })
      .catch(err => console.log(err));
    };
    
    The URL above points to your local JWT server. In production, replace it with your server’s API endpoint.
  5. Configure optional SDK settings:
    chatConfig.history.recent.batchSize = 15;
    
  6. Launch the chat window:
    chatWindowInstance.show(chatConfig);
    
  7. Start the React app:
    npm start
    
  8. Open http://localhost:3000 in a browser. The Web SDK chat window loads.

Passing Custom Data

Pass additional user data (phone number, address, etc.) via customData:
botOptions.botInfo.customData = {
  "name": "John",
  "age": 30,
  "cars": { "car1": "Ford", "car2": "BMW", "car3": "Fiat" }
};
Custom Data 
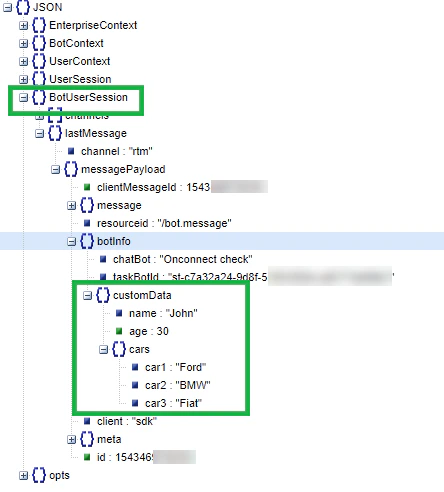
customData is accessible in the dialog context at lastMessage under BotUserSession. It persists for the user session.

Passing Mapped Identities

Use identityToMerge in the JWT payload when a user transitions from anonymous to known (for example, after logging in). The Platform merges conversation history under the new identity.
{
  "iat": 1611810186883,
  "exp": 1611813786.883,
  "aud": "https://idproxy.kore.com/authorize",
  "iss": "cs-d3042d3e-7da4-55da-a94d-78334927xxxx",
  "sub": "john.doe@example.com",
  "isAnonymous": "false",
  "identityToMerge": "john.doe@example.com"
}
Identity merge behavior:
ScenarioResult
Neither identity existsNew identity created; new conversation started
New identity exists, merged does notConversation started/continued with new identity
Merged identity exists, new does notNew identity created; conversation continues; merged identity removed
Both exist, new has no active sessionConversation continues with new identity; merged identity removed
Both exist, both have active sessionsMerged identity’s conversation continues under new identity; new identity’s active session closed as “Drop-off”
Side effects of merging:
  • Analytics and chat history are updated to associate merged identity sessions with the new identity.
  • Billing session tracking updates to the new identity.

Custom Meta Tags

Add session, user, and message-level meta tags from the Web SDK (available since v8.0):
botOptions.botInfo = {
  name: "<bot_name>",
  "_id": "<bot_id>",
  customData: { "name": "John" },
  "metaTags": {
    "messageLevelTags": [{ "name": "tag1", "value": "message" }],
    "sessionLevelTags": [{ "name": "tag2", "value": "session"  }],
    "userLevelTags":    [{ "name": "tag3", "value": "user"     }]
  }
};

Troubleshooting

  • Verify that the Client ID and Client Secret in the JWT server match the values from the Web/Mobile Client channel.
  • Ensure all required JWT payload fields are included when generating the token.

Next Steps

For full configuration options, customizations, standard templates and plugins, and alternative integration methods (CDN, SharePoint, ServiceNow), see the Kore Web SDK GitHub repo and npm package.