Back to Available Channels Webhook channel provides a generic integration framework to connect your AI Agent with any external communication systems. Kore.ai Platform provides standard request and response APIs to send and receive messages in text format. The end user’s input through a voice, keypad, or any other means must be converted to plain text before sending to the Kore.ai XO Platform using the Request API. The Webhook Channel will continue to be available under the ‘Available Channels’ list, and you can choose to create additional instances. Each Webhook channel instances is presented as an independent channel to define messages, prompts, filters, etc., across the application.

Webhook Versions

The platform supports two versions of the Webhook channel i.e., V1.0 and V2.0.
V2.0 is the recommended version as it provides a scalable request and response format.
Here are the key differences:
FEATUREWEBHOOK V1.0WEBHOOK V2.0
EventsNot supportedSupports ‘on connect’ event
Poll MechanismNot supportedSupported in Synchronous Mode
File Upload in ChunksNot supportedSupported

Integration Mode

The platform supports Synchronous and Asynchronous modes of integrations for the Webhook channel. Here are the key differences:
  • Synchronous Mode: The app responses are directly delivered as a response to the incoming requests. The app will execute the flow, identify the response or responses to be delivered, and provide them as the response to the incoming request. Some platform functionalities like Alert Tasks, Agent Transfer, and Proactive Session Closure messages are not supported in the Synchronous mode. You may consider using the onAlert event through BotKit, Learn more.
Synchronous Webhook channel requests timeout after 15 seconds. We recommend using the Asynchronous Webhook Channel if you expect the requests to take beyond 15 seconds.
  • Asynchronous Mode: Asynchronous mode is useful if you want to deliver the app responses to a URL other than the incoming request’s URL. You have to configure the POST_URL of your external system to enable the Async mode. The app responses are asynchronously delivered to this POST_URL. Do note the that Kore.ai XO Platform does not provide the service to host the POST URL. You need to host a custom service or use a third-party service for this.

Step 1: Associate an App

To associate an App, follow the below steps:
  1. In the XO Platform, select the assistant to which you want to add the channel.
  2. Go to Channels & Flows > Channels > Digital > All > Webhook.
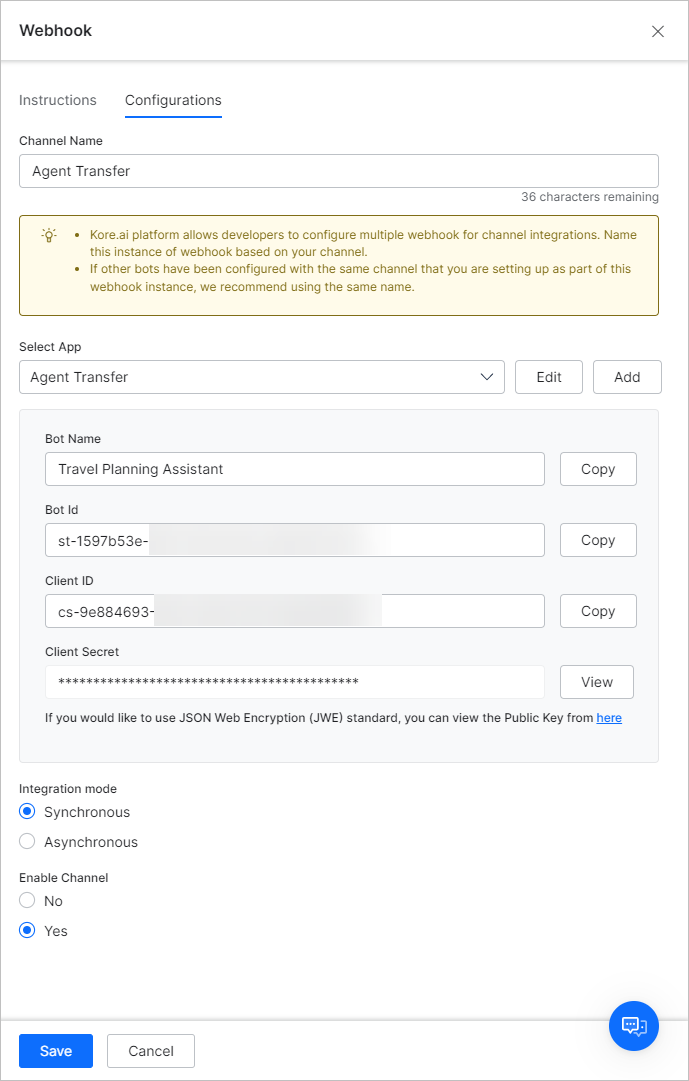
  3. Go to the Configurations tab of this page and associate this channel with an app.
  4. Enter a Name for the channel.
    1. Select one of these scopes for the app:
      1. Allow anonymous users to chat with the assistant: enables anonymous users to interact with the assistant.
      2. Auto register new users on Kore.ai XO Platform: Select to control the auto-user registration in Kore.ai if the user assertion is unknown.
    2. In the JWT Signing Algorithms Used For Client App Authentication drop-down list, select one of the following security algorithms:
      1. RS256/RS512: Select to enable the Public Key. The Private key, used for encryption, is provided by the user, and the Public key, used for decryption, is provided by the Platform. Both the keys have to be used for generating the token. The Public Key is used by the XO Platform to authenticate the client application.
      2. HS256/HS512: Select to generate a Secret Key and a Client ID. The Client ID is required for app initialization, and the Secret Key is used by the XO Platform to authenticate the client application
    3. Click Create. The app is created, and Client ID and Client Secret are generated. Copy the Client ID and Client Secret details
  5. If you want to use the JSON Web Encryption (JWE) standard, you can view the Public Key by clicking the link provided below the Client Secret field.
  6. The Webhook channel supports both synchronous and asynchronous modes. Depending on your business needs, you can enable one of these modes in the Configurations tab.
  7. (Only for Webhook v2.0) In the Synchronous mode, by default, the Enable the Polling for Webhook v2 option is selected. webhook channel
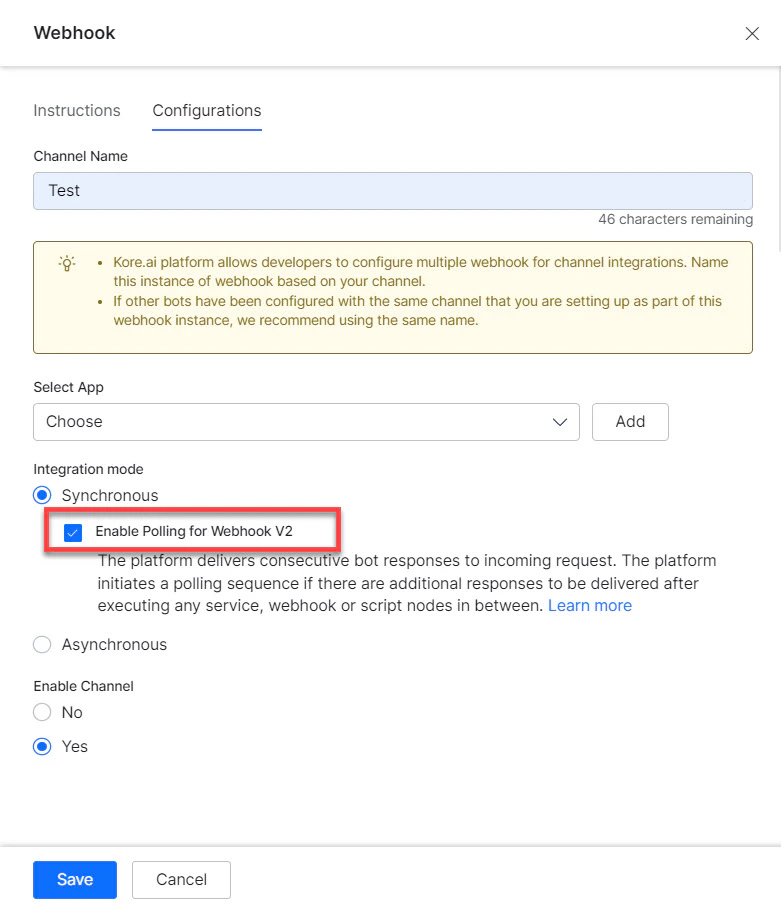
  8. Deselect the Enable the Polling in Webhook V2 option to retrieve the complete response, all at once, without the need for polling.
    This option is available only in Webhook v2.0. Learn more.
  9. In the ASynchronous mode, enable Proactive Notifications to send relevant updates to the users without requiring them to initiate interaction with the app first. webhook channel
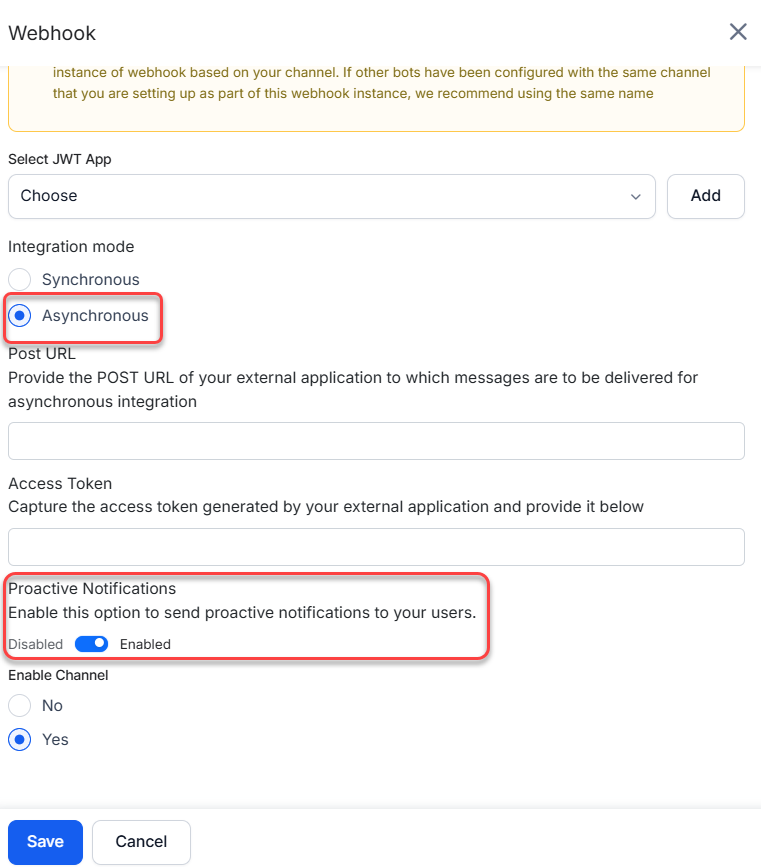
  10. Select Yes to Enable Channel.
  11. Save the configuration. The Webhook URL in this channel instance is created dynamically. enable webhook channel

Step 2: Select the Integration Mode

Use the Webhook URL to establish integration with external communication systems. This URL is available only after enabling the channel. add webhook URL

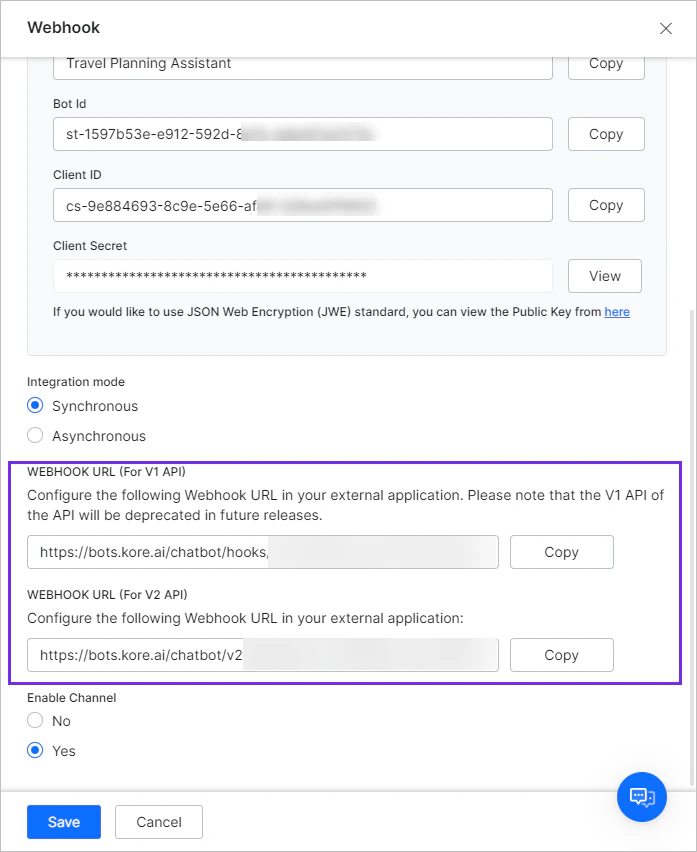
Step 3: Deploy the Client SDK (Optional)

You may skip this step if you already have a messaging application to integrate with the Webhook channel. Optionally, you can use the Kore.ai Platform’s Web/Mobile SDK libraries to integrate with the Webhook channel. Use V2 of the Webhook APIs with synchronous mode for integrating with the client libraries. You can select the API version by going to the Instructions tab of the Webhook channel and scrolling down to Step 4. After completing these steps, a success message appears on the screen, and a channel request is sent to your Administrator for approval.
  • The channel will be enabled for the end users only after the channel configurations are published. The publish request must be auto-approved or approved by the account admin.
  • Webhook channel instances are included in the app export copy, and are imported when the definition is imported into another app. The channel instances are imported as placeholders, and you need to associate them with a valid app from the target AI Agent.

Step 4: Review Payload Formats

To select the API Version for your integration, go to the Instructions tab of the Webhook channel you are working with. You can use the following code snippets of the payload formats to verify the integration. The Webhook API V2 is the latest version and includes a more standardized request and response payload.

Webhook Endpoints

The structure of the Webhook URL of the first instance varies from any additional instances enabled for the app.
  • In case you have either – only one webhook channel. Or for the first webhook channel in case you have multiple webhook channels configured:
    POST {{host_url}}*/chatbot/hooks/{{bot* id}}
  • in case of multi-webhook configuration for the second instance onwards In case you have multiple webhook channels configured, this applies to the second instance onwards:
    POST {{host_url}}/chatbot/hooks/{{bot* id}}/hookInstance/{{webHookId}} (This is auto-generated)*
Query Parameters
ParameterDescription
host_urlYour XO Platform URL.
app idThe ID of the app to which you want to post messages. You can access it from the App Settings page of the app.

Webhook V1.0

Webhook version 1.0 supports simple request and response interfaces for enabling the communication between your custom channel interface and the platform. It is recommended to use the Webhook V2.0 as it supports standardized and modular payloads for exchanging messages and events.

Interaction Flow

SCENARIOSYNCHRONOUS MODEASYNCHRONOUS MODE
Single ResponseAI Agent responses are sent as a response to the incoming request.AI Agent response is sent to the Post_URL configured as part of the channel configurations.
Multiple consecutive response nodesAI Agent responses are sent as an array to the incoming request.Each of the app response is sent to the Post_URL configured as part of the channel configurations
Multiple response nodes with service / webhook nodes in betweenThe platform completes the service / webhook execution and sends the app responses as an array to the incoming request.Each of the app response is sent to the Post_URL after processing the relevant service / webhook nodes.

Authorization

Invoke the API with JWT in the header with the following syntax:
Authorization: bearer {{JWT}}
Generate JWT using the following header and payload from this page.

Response content type

application/json

Request Parameters

The following are the parameters required/supported in the v1.0 of the Webhook channel
PARAMETER NAMEDESCRIPTIONDATA TYPEREQUIRED/OPTIONALPOSSIBLE VALUES
sessionDetails of how the conversation session should be handled.ObjectsOptionalN/A
newParameter to define whether to start a new conversion or continue with the existing.BooleanOptionaltrue false
messageIncludes the contents of the incoming request to the app.ObjectRequiredN/A
textThe message text to be sent to the app.StringRequiredN/A
attachmentsThe list of attachments to be passed to the app.Array of ObjectsOptional{"url":"https://- - "}
fromDetails of the request origin. It usually includes user information.ObjectRequiredN/A
idThe unique identity of the user interacting with the app.StringRequiredUsually a random string, alphanumeric number, email id etc.,
userInfoThe user profile information.ObjectOptionalN/A
firstNameThe first name of the user.StringOptionalN/A
lastNameThe last name of the user.StringOptionalN/A
emailThe email address of the user.StringOptionalN/A
userLevelTagsArray of user level meta tags to be added to the current user.Array of ObjectsOptionalEvery tag to be added using “name” and “value” keys.
sessionLevelTagsArray of session level meta tags to be added to the current conversion session.Array of ObjectsOptionalEvery tag to be added using “name” and “value” keys.
messageLevelTagsArray of message level tags to be added to the current message.Array of ObjectsOptionalEvery tag to be added using “name” and “value’ keys.
mergeIdentityTo merge the current conversation with any other conversation in progress.StringOptionaltrue false The ‘text’ field can contain a string, object or an array of strings or objects.

Sample Response for Asynchronous Mode

{
"to": "john.doe@example.com",
"from": "st-b3a3dc49-bd57-5c5d-b12c-8e377619xxxx",
"text": "Your available account balance is $31,439.",
}
For Asynchronous integration mode, the platform sends an acknowledgement response to the incoming request with Status Code as 200. The app response to be delivered to the user is sent to the Post_URL configured for the channel.
  • The text field can contain a string, object or an array of strings or objects.
  • Separate messages are sent for every app response to be delivered to the user.
  • The conversation flow related fields like “endOfTask“, “endReason“, “completedTaskId” and “completedTaskName“: “show balance” are delivered as a separate message.

Webhook V2.0

The Webhook V2 API provides a more standardized and modular payload format and additional conversation management capabilities.

Interaction Flow

SCENARIOSYNCHRONOUS MODEASYNCHRONOUS MODE
Single ResponseAI Agent response is sent as a response to the incoming request.AI Agent response is sent to the Post_URL configured as part of the channel configurations.
Multiple consecutive response nodesAI Agent responses are sent as an array to the incoming request.Each of the app response is sent to the Post_URL configured as part of the channel configurations
Multiple response nodes with service / webhook nodes in betweenThe consecutive messages are delivered to the request along with a ‘pollid’. The platform initiates the execution of service / webhook nodes. The client should poll the platform using the ‘pollid’ at short intervals. The platform responds to the poll request with the status of the execution. If the execution is complete, then the response will include the next set of consecutive messages.Each of the AI Agent response is sent to the Post_URL after processing the relevant service / webhook nodes.

Authorization

User Identity

The Webhook V2.0 allows you to authenticate the API call with JWT token user identity. If the user identity (‘from’ field) exists in both the request the payload and JWT token, then the Webhook v2 validates the user identity. Use the following payload for authentication with user identity:

JWT Payload

{
  "appId": "{{clientId of the bot}}",
  "sub" : "{{random number}}"
  "userIdentity": "{{unique user identity}}",
  "iat" : 161639822
  }

  • If the userIdentity is not present in JWT, you can validate the userIdentity authentication using the appId and the from value will be used to generate the userId in the Kore platform..
  • If the userIdentity is present in JWT as well as from but both are NOT same, then authentication will be failed and throws an error saying that Invalid access token.
  • The userIdentity is present in JWT, and from is present in the webhook payload, and both userIdentity and from are the same, then it will check against the authentication against the appId and proceed further.

Request Parameters

The following are the parameters required/supported in the v2.0 of the Webhook channel.
PARAMETER NAMEDESCRIPTIONDATA TYPEREQUIRED/OPTIONALPOSSIBLE VALUES
sessionDetails of how the conversation session should be handled.Objects.OptionalN/A
newParameter to define whether to start a new conversion or continue with the existing.BooleanOptionaltrue false
messageIncludes the contents of the incoming request to the app.ObjectRequiredN/A
typeThe type of incoming message to the platform.StringRequiredtext template event formData
valThe value for the incoming message type.String or ObjectRequiredIf the type = “text” then the *val *will be String. If the type = “template” or “formData” then the val will be Object. If the type = “event” then the val must be “ON_CONNECT”. if type=”event” then the val must be SESSION_CLOSURE to close an active session.
attachmentsThe list of attachments to be passed to the AI Agent. Note: If attachment is used, set **type **as *text *and the **val **parameter cannot be blank and it has to contain some user utterance.Array of ObjectsOptional{"url":"https://- - "}, { "fileName": "Kore_ai_Logo.png", "fileType":"image", "fileId": "6163e17bf60e0xxxxxxxx" }
fromDetails of the request origin. It usually includes user information.ObjectRequiredN/A
idThe unique identity of the user interacting with the AI Agent.StringRequiredUsually a random string, alphanumeric number, email id etc.,
InteractiveLanguageThe interaction language of the AI Agent.StringOptionalAny language that is configured for the AI Agent. For the list of Supported App Languages, read Getting Started with Multilingual AI Agent article.
userInfoThe user profile information.ObjectOptionalN/A
firstNameThe first name of the user.StringOptionalN/A
lastNameThe last name of the user.StringOptionalN/A
emailThe email address of the user.StringOptionalN/A
metaTagsRefers to the meta tags to be added.StringOptionalN/A
userLevelTagsArray of user level meta tags to be added to the current user.Array of ObjectsOptionalEvery tag to be added using “name” and “value’ keys.
sessionLevelTagsArray of session level meta tags to be added to the current conversion session.Array of ObjectsOptionalEvery tag to be added using “name” and “value’ keys.
messageLevelTagsArray of message level tags to be added to the current message.Array of ObjectsOptionalEvery tag to be added using “name” and “value’ keys.
mergeIdentityTo merge the current conversation with any other conversation in progress.StringOptionaltrue false
For parameter descriptions, refer to the request parameters table.

Option 2: Upload Files to Kore.ai XO Platform

You can upload files directly to the Platform, capture the ‘file id’ provided by the platform, and share it with the app during the conversation. This option is supported only when the Webhook v2.0 is used. Use the following API to upload your file to the platform. These APIs do not require any scopes and are accessible using any of the valid apps present in the app/account.
Request
URL: https://{{host}}/api/public/uploadfile
   Method: POST
   Body:
     {
        File:,
        fileContext :,
        fileExtension : ,
        Filename:
   }
Response
          Response: {
                        fileId:
                        hash:
  }
You can use the following API to upload file in chunks Token API
URL: /api/attachments/:streamId/:channelType/token
     Method: POST
     Headers: {
                 authorization:bearer jwttoken
          }
     Body:{
    }
Chunk Upload API
URL: /api/attachments/:streamId/:channelType/token/:token/chunk
Method: POST
Headers: {
          authorization:bearer jwttoken
       }
      Body:{
              chunk:"",
              chunkNo:2
     }
Commit API
URL: /api/attachments/:streamId/:channelType/token/:token/chunk
Method: PUT
Headers: {
            authorization:bearer jwttoken
        }
     Body:{
             fileContext:"",
             filename:"",
             totalChunks:"",
             fileExtension:""
       }
You can also use the filename or fileID to upload a file. For example, use this syntax to upload a file with name and ID: { "fileName": "Kore_ai_Logo%405x.png", "fileType":"image", "fileId": "6163e17bf60e0a7e4799f423" }.

Handle Digital Forms

If your app has a form that needs user input, the synchronous WebHook channel gets the complete form definition in the response, and you need to send the formData in the request when interacting with the app.

Sample Request

You can get the Webhook API URL on the WebHook channel Configurations tab. Learn more.
This URL is available only after enabling the channel.
 "session": {
       "new": false
   },
   "message": {
       "val": {
           "formId": "{{formId}}",
           "data": [
               {
                   "componentId": "{{ComponentId}}",
                   "input": "{{user input1}}"
               },
               {
                   "componentId": "{{ComponentId}}",
                   "input": "{{user input2}"
               },
               {
                   "componentId": "{{ComponentId}}",
                   "input": "Submit"
               }
           ],
           "meta": {}
       },
       "type": "formData"
   },
   "from": {
       "id": "",
       "userInfo": {
           "firstName": "",
           "lastName": "",
           "email": ""
       }
   },
   "to": {
       "id": "",
       "groupInfo": {
           "id": "",
           "name": ""
       }
   },
Others if any
}

Sample Response

{
    "text": [],
    "form": {
        "formDef": { Formdef },
        "formInitialization": { FormInitialization } //if any
    }
    ..other params if any
}
FormDef (This is the complete Form definition which is used to render the Form)
{
  "_id": "",
  "refId": "",
  "streamId": "st-####a#d-##fd-#b##-acab-b#f#f######",
  "branding": {
     "properties": []
    },
  "components": [
    {
     "_id": "fct-#f#e###d-d#b#-###a-#a##-######f###b",
     "refId": "#####f##-###c-###b-##a#-da########1d",
     "metaData": {
         "type": "textField",
         "key": "textField",
         "displayName": "Text Field",
         "name": "TextField0",
         "placeholder": "Provide your input",
         "toolTip": "",
         "isVisible": true,
         "required": false,
         "validations": {
            "validationType": "simple"
            },
         "validateOn": "onBlur"
      },
     "name": "TextField0",
     "type": "textField"
  },
  {
    "_id": "fct-#f#e###d-d#b#-###a-#a##-######f###b",
    "refId": "#####f##-###c-###b-##a#-da########1d",
    "metaData": {
       "type": "textField",
       "key": "textField",
       "displayName": "Text Field",
       "name": "TextField1",
       "placeholder": "Provide your input",
       "toolTip": "",
       "isVisible": true,
       "required": false,
       "validations": {
          "validationType": "simple"
         },
       "validateOn": "onBlur"
      },
      "name": "TextField1",
      "type": "textField"
    },
   {
     "_id": "fct-#f#e###d-d#b#-###a-#a##-######f###b",
     "refId": "#####f##-###c-###b-##a#-da########1d",
     "metaData": {
        "key": "button",
        "type": "button",
        "displayName": "Submit",
        "name": "Submit",
        "buttonAction": "submit",
        "isVisible": true,
        "buttonStyle": "primary",
        "sourceUrl": ""
       },
     "name": "Submit",
     "type": "button"
     }
    ],
   "description": "regular",
   "displayName": "Form 1",
   "name": "firstForm",
   "type": "regular",
   (... few other fields)
}
FormInitialization (This must be used for pre-filling Forms)
{
       "valueMap": {
       "TextField0": "input1",
       "TextField1": "input2"
      }
}

Error Scenarios in Webhook v2 Responses

The following is the failure response for 401 Error:
{
  "errors": [
    {
      "msg": "Invalid Access token",
      "code": 401
    }
  ],
  "_v": "v2", //versionId
  "_t": "RTM-TRACE-9JOHE3ALB" //traceId
}
The following is the failure response for 429 Error (Rate Limit)
{
  "errors": [
    {
      "msg": "Too Many requests",
      "code": 429
    }
  ],
  "_v": "v2", //versionId
  "_t": "RTM-TRACE-9JOHE3ALB" //traceId
}
The following is the failure response for 504 Error:
{
  "errors": [
    {
      "msg": "The request has been timed-out",
      "code": 504
    }
  ],
  "_v": "v2", //versionId
  "_t": "RTM-TRACE-9JOHE3ALB" //traceId
}
The following is the failure response for 400 Error:
{
  "errors": [
    {
      "msg": "Invalid Request Payload",
      "code": 400
    }
  ],
  "_v": "v2", //versionId
  "_t": "RTM-TRACE-9JOHE3ALB" //traceId
},