

Prerequisites
Install and Run ngrok
- Download from ngrok.com/download.
-
Start ngrok on port 8003 using
ngrok http 8003command.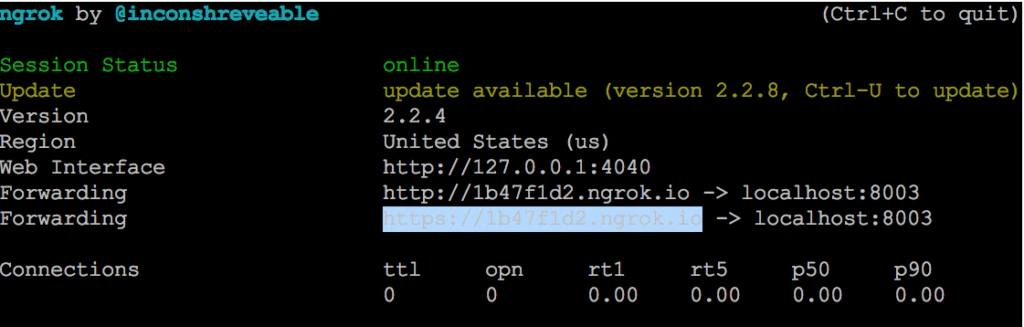
-
Copy the HTTPS Forwarding URL (for example,
https://1b47f1d2.ngrok.io). Leave ngrok running.
Install Node.js
- Download from nodejs.org/en/download.
- Verify the installation, by checking the version number using
node -vcommand.
Configure the Assistant
Install the Flight Search Assistant
- Log into XO Platform and click New Bot > Start from the Store.
- Find Flight Search and install it.
Register Your App and Generate Credentials
- Go to Deploy > Integrations > BotKit, click Add next to the App name dropdown.
- Enter a name and click Next. Copy the Client ID and Client Secret. Click Done.
-
In Callback URL, paste the ngrok Forwarding URL.
Each ngrok session generates a new URL. Update the Callback URL whenever you restart ngrok.
- In Events, select OnHookNode — triggered when a Webhook node is reached in the dialog.
- Click Save.
Publish the Assistant
You must publish the assistant to share with other users. See Publishing your App. To just test, skip to Configure the BotKit SDK. After publishing, deploy in the Admin Console:- Enterprise Users — Go to Bots Management > Enterprise Bots, click Ellipses > Manage bot tasks, select all tasks, and assign via Bot & task assignments.
- General Public — Go to Bots Management > Consumer Bots, click Ellipses > Manage bot tasks, and select all tasks.
Configure the BotKit SDK
- Download and extract the BotKit SDK from github.com/Koredotcom/BotKit.
-
Edit
config.json: -
In
FindAFlight.jsfile, update the following variables with your assistant’s Bot Name and Bot ID (found in Settings > Config Settings > General Settings):
Start and Test
-
On a command terminal, navigate to your BotKit SDK folder and execute
node app.jscommand. Expected output:app listening at https://:::8003 -
Testing checklist:
- ngrok running:
ngrok http 8003 - Node.js running:
node app.js - Platform: click Talk to Bot (bottom-right corner of any page)
- ngrok running:
- After the Flight Search dialog starts, webhook messages are exchanged between the third-party web service and the BotKit SDK.